ARouter is an open source project on github by Ali. The address is: ARouter This article does not focus on sharing the use of ARouter, but on sharing how ARouter is decomposed.For detailed use, you can see the documentation and ask questions in groups.On how to write a route for componentization, I recommend reading an article from my colleague that teaches you how to write an introductory Router framework
Advantages of Componentization
Decoupling enables each business module to focus on its own business implementation, regardless of other module business.
Easy to develop, you can develop your own specific modules when many people develop them, in addition to the underlying modules
Configurable and reusable, different modules can be used for different App s without much change.
Each module can run independently to facilitate development and debugging.
Everyone adds
Implementation of Componentized Development
! [Picture uploading...]
The project structure is:
To configure
Everyone configures something according to ARouter's documentation. It is important to note that each module must introduce compile sdk. Processing API SDk can be introduced in Base sdk.
Annotation sdk doesn't need us to introduce it, he will automatically rely on it
At development time, each module must be grouped differently or there will be a class duplicate error.Grouping is between the first'/'and the second'/' of the path.
thinking
We need to split components, different modules are responsible for their own business implementation, and there is no dependency on other modules.If this module needs to start another Activity or call another module method, we will do so through the method provided by ARouter.
The module diagram is as follows:
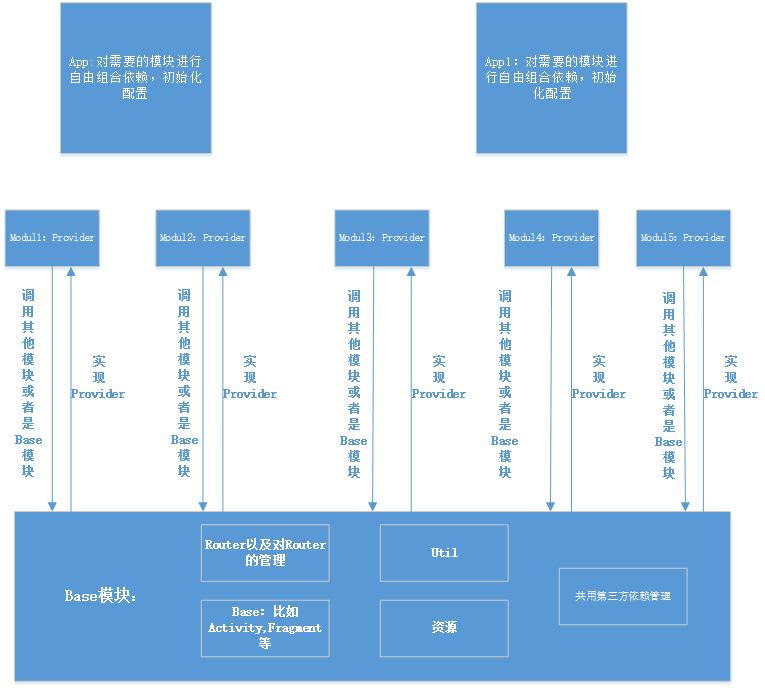
App module App module is our Apk module, which is our final product.He can configure the modules he needs and do some initialization work as needed.
Module module module is our business implementation module. It is responsible for this module's business and not for other business. It is through the methods and interfaces provided by ARouter to invoke external data and provide methods to external calls, that is, the Provider in the diagram.
Base module about the base module, you can continue to split some fine modules, such as processing router independently, but it is not recommended to split too much, because the base module will change a lot, that is, in the iteration process of versions, constantly changing, it is not very convenient to develop if there are more splits.Because there is a dependency on delivery, such as base depending on more modules of this project, when the design is modified by more modules at the bottom, it needs to be passed one level at a time.The base module should be a business-independent module. In this example, the base module is responsible for managing routers, and provides some basic things, such as BaseActivit y, Util resources, and so on.If we have our own sdk, network library dependency, etc., the recommendation is to introduce in base.
practice
Manage Router
We use a ModuleManager to provide a Map that uses the path of the Provider corresponding to the module as the key and value.And related data structures, which are used to encapsulate and manage ARouter's secondary modules.Approximately as follows:
public class ModuleManager {
    private ModuleOptions options;
    private ModuleManager() {
    }
    private static class ModuleManagerHolder {
        private static final ModuleManager instance = new ModuleManager();
    }
    public static ModuleManager getInstance() {
        return ModuleManagerHolder.instance;
    }
    public void init(ModuleOptions options) {
        if (this.options == null && options != null) {
            this.options = options;
        }
    }
    public ModuleOptions getOptions() {
        return options;
    }
    public boolean hasModule(String key) {
        return options.hasModule(key);
    }
}
ModuleOptions specifically manage configurations that contain those modules.This class is initialized when App or test module runs independently (mentioned later).For example:
public class CustomApplication extends BaseApplication {
    @Override
    public void onCreate() {
        super.onCreate();
        initARouter();
    }
    private void initARouter() {
        if (LG.isDebug) {
            ARouter.openLog();
            ARouter.openDebug();
            ARouter.printStackTrace();
        }
        ARouter.init(this);
        ModuleOptions.ModuleBuilder builder = new ModuleOptions.ModuleBuilder(this)
                .addModule(IHomeProvider.HOME_MAIN_SERVICE, IHomeProvider.HOME_MAIN_SERVICE)
                .addModule(IModule1Provider.MODULE1_MAIN_SERVICE, IModule1Provider.MODULE1_MAIN_SERVICE)
                .addModule(IModule2Provider.MODULE2_MAIN_SERVICE, IModule2Provider.MODULE2_MAIN_SERVICE)
                .addModule(IModule4Provider.MODULE4_MAIN_SERVICE, IModule4Provider.MODULE4_MAIN_SERVICE)
                .addModule(IModule5Provider.MODULE5_MAIN_SERVICE, IModule5Provider.MODULE5_MAIN_SERVICE);
        ModuleManager.getInstance().init(builder.build());
    }
}
This completes the management of changes to App or module s.
management service
We use a ServiceManager to get services for different modules, namely Providers.Installing ARouter's documentation, we implement the Provider in the corresponding module by inheriting IProvider, writing an interface for the corresponding module, providing an interface method.The Provider is then managed and captured in ServiceManager.For example, the home module implements an IHomeProvider, and the implementation class is the HomeProvider.
//Interface
public interface IHomeProvider extends IBaseProvider {
    //Service
    String HOME_MAIN_SERVICE = "/home/main/service";
    //Open Screen
    String HOME_ACT_SPLASH = "/home/act/splash";
    //Home home page
    String HOME_ACT_HOME = "/home/act/home";
    String HOME_TABTYPE = "home_tab_type";
    void toast(String msg);
    void selectedTab(Activity activity,int position);
}
//Implementation Class
@Route(path = IHomeProvider.HOME_MAIN_SERVICE)
public class HomeProvider implements IHomeProvider {
    private Context context;
    @Override
    public void init(Context context) {
        this.context = context;
    }
    @Override
    public void toast(String msg) {
        Toast.makeText(context, msg, Toast.LENGTH_SHORT).show();
    }
    @Override
    public void selectedTab(Activity activity,int position) {
        if (activity instanceof HomeActivity) {
            ((HomeActivity) activity).selectedTab(position);
        }
    }
}
Then in ServiceManager,
    //You can also use automatic injection, which is manually discovered and invoked here
  public IModule1Provider getModule1Provider() {
        return module1Provider != null ? module1Provider : (module1Provider = ((IModule1Provider) MyRouter.newInstance(IModule1Provider.MODULE1_MAIN_SERVICE).navigation()));
    }
We manage all services for this Project.Then, within the base, different services are provided to invoke the Provider, and an Intent method is provided to start the activities of different modules, such as:
//Manage services that call a specific module of Provider
public class HomeService {
    private static boolean hasModule() {
        return ModuleManager.getInstance().hasModule(IHomeProvider.HOME_MAIN_SERVICE);
    }
    public static void selectedTab(Activity activity, int position) {
        if (!hasModule()) return;
        ServiceManager.getInstance().getHomeProvider().selectedTab(activity, position);
    }
}
//Manage Activity jumps for this module
public class HomeIntent {
    private static boolean hasModule() {
        return ModuleManager.getInstance().hasModule(IHomeProvider.HOME_MAIN_SERVICE);
    }
    public static void launchHome(int tabType) {
        //HomeActivity
        MyBundle bundle = new MyBundle();
        bundle.put(IHomeProvider.HOME_TABTYPE, tabType);
        MyRouter.newInstance(IHomeProvider.HOME_ACT_HOME)
                .withBundle(bundle)
                .navigation();
    }
}
Module can run configurations independently
After these two steps, we have basically completed the project componentization.However, for componentization, we also have the feature that each module can run independently, making it easy to develop and debug.So, what should we do?
We provide two environments, one is debug, the other is release, debug when we are independent modules that can run, and release when we are library.
-
When debug, we need to provide some test code and a set of initializations.For example: we need module1 to run independently, in this demo, it is a Fragment that is added as the main entry by other modules, so we need to add an Activity, a set of checklists, some resources in debug.We use config.gradle to manage some of our external dependencies arr and some of our compiled version numbers, sdk version numbers, and so on, as follows:
ext {
   //...version number and arr management
//Is home a module, true when it is, false when it can run independently, ps name is a bit wrong, do you want to change the ORZ?
isMouleDebugHome = true;
//Is module 1 a module, true a module, false a module?
isModule1Debug = true;
}
Then, apply goes in the first line with build.gradle.
apply from: "config.gradle"
Then, use sourceSets to manage the code, configure debug and release code, and module1 is structured as follows
! [Picture uploading...]
His gradle configuration is as follows:
if (rootProject.ext.isModule1Debug) {
    apply plugin: 'com.android.library'
} else {
    apply plugin: 'com.android.application'
}
android {
    compileSdkVersion rootProject.ext.android.compileSdkVersion
    buildToolsVersion rootProject.ext.android.buildToolsVersion
    defaultConfig {
        minSdkVersion rootProject.ext.android.minSdkVersion
        targetSdkVersion rootProject.ext.android.targetSdkVersion
        versionCode 101
        versionName "1.0.1"
        if (!rootProject.ext.isModule1Debug) {
            applicationId "com.github.io.liweijie.lib1"
        }
        javaCompileOptions {
            annotationProcessorOptions {
                arguments = [moduleName: project.getName()]
            }
        }
    }
    compileOptions {
        sourceCompatibility JavaVersion.VERSION_1_7
        targetCompatibility JavaVersion.VERSION_1_7
    }
    buildTypes {
        release {
            minifyEnabled false
            proguardFiles getDefaultProguardFile('proguard-android.txt'), 'proguard-rules.pro'
        }
    }
    sourceSets {
        main {
            if (!rootProject.ext.isModule1Debug) {
                manifest.srcFile 'src/debug/AndroidManifest.xml'
                java.srcDir 'src/debug/java/'
                res.srcDirs=['src/debug/res']
            } else {
                manifest.srcFile 'src/release/AndroidManifest.xml'
                java.srcDir 'src/release/java/'
            }
        }
    }
}
dependencies {
    compile fileTree(dir: 'libs', include: ['*.jar'])
    androidTestCompile('com.android.support.test.espresso:espresso-core:2.2.2', {
        exclude group: 'com.android.support', module: 'support-annotations'
    })
    compile project(':base')
    testCompile 'junit:junit:4.12'
    annotationProcessor rootProject.ext.dependencies["aroutercompiler"]
}
The important thing to note here is that the lists for debug and relase need to declare the required activity and other components.Application should also be configured in debug to initialize ARouter.In this way, each of our modules can be run independently.Generally speaking, release is nothing, because what release needs is the business logic implementation code that our module needs, which he uses as a library to see if relase needs to be configured for his project.In this project, modifying the values in the corresponding config.gradle allows module1 and home to run independently or as libs.The final result is as follows:

App runs independently:
! [Picture uploading...]
App2 runs independently: 
home runs independently:
module1 runs independently:

Recommendations for Component Development
After each of our module documents, we should use arr to introduce dependencies, upload our maven libraries, compile them, and comment out the settings.gradle configuration to help speed up compilation.
Delete the test code for each module, that is, the test in the src directory, because those contain some task s that are executed at synchronization or compilation time, slowing down compilation.
The four components should be declared within their respective module s.
Provide a BaseApplication in Base.
Componentized Process Practice for Old Projects
Recently, when I was working in App for my company, I worked with my colleagues to make the responsible App component. In the process, there are some pits to share with you to avoid you stepping on it.
Don't go too far in componentization. It's recommended that you first break up the easier components, make them into modules, and then iterate through your business without delay unless you have enough time to componentize.
For resource splitting, some style s, some common string s, some shared pictures, drawable s and other resources, it is recommended that they be stored in the base module and can be shared.For resources belonging to different modules, it is not recommended to store them in the base. Maybe it is better to put all the resources in the base directly at the beginning. For example, you don't need to worry about compilation errors, resources can't be found, and a replication problem is needed. However, you store them in the base, and the base module, which changes frequently during the development process, is him.They are often compiled, which creates a compilation speed problem, so each module should store its own resources.
With regard to Base's dependency library issues, such as our own sdk, third-party dependencies, etc., which are independent of business logic, it is recommended to use a separate project for secondary encapsulation, after encapsulation is complete, package arr dependencies, upload from our maven library, base through compile, or specific modules. It is not recommended to create new modules directly in the app.For example, if we want to introduce volley, we should use a new project to re-encapsulate the volley and then, after stabilization, introduce the base or other modules through compile arr.In this way, these unrelated to business logic are also convenient for other projects of the company.
For a module split from an old project, debug may not be written for the time being, that is, it may not be necessary to make the old project run independently because it may involve more initialization logic and not enough time to run tests directly on the app's dependency.For the new module, debug can be written to make the new module run independently for debugging purposes.
Componentization issues
Because of the pricing of the project, it may be necessary to separate each business, which will result in more modules.In the end, it may be difficult to develop a module with an activity and a fragment as a component, so we need to divide the modules according to our actual project, not too detailed.At the same time, in the process of Componentization of old projects, because each module is not mature and stable, there will be more modules to compile, and the speed is also slower, so the split of old projects also needs to follow certain steps to split slowly.At the same time, it is recommended to use Activity+Fragment for componentization so that it can be easily used by other components. Activity does not involve general logic.
Sometimes modifying the base library can be a hassle when you need to modify the dependencies.
Sometimes there is a resource conflict problem, so we add a prefix to the module resource in gradle to resolve it