1, Controllers
Official website: https://kubernetes.io/docs/concepts/workloads/controllers/replicaset/
I mentioned pods earlier, but if you want to change from one to multiple pods, how to ensure that there are multiple pods all the time? At this time, the maintenance of pods is particularly important. At this time, according to the knowledge in the first article, the role of Controllers comes out. The official website is posted on it. You can read it yourself. We talked about the creation of pod. The yml file is as follows. Now, if I want to run multiple pods, I can't make multiple files below and call different names. So the first thing we want to think about is whether we can find a one click creation and maintenance method.
apiVersion: v1
kind: Pod
metadata:
  name: nginx-pod
  labels:
    app: nginx
spec:
  containers:
  - name: nginx-container
    image: nginx
    ports:
    - containerPort: 80
(1) The optimized file is as follows: create a file named nginx_replication.yaml
apiVersion: v1
kind: ReplicationController
metadata:
  name: nginx
spec:
  replicas: 3
  selector:
    app: nginx
  template:
    metadata:
      name: nginx
      labels:
        app: nginx
    spec:
      containers:
      - name: nginx
        image: nginx
        ports:
        - containerPort: 80
- kind: indicates the type of object to create
- spec.selector: indicates the label of the Pod to be managed. Here, it means that the Pod including the label of app: nginx will be managed by the RC
- spec.replicas: indicates the number of replicas that the Pod managed by this RC needs to run
- spec.template: refers to the template used to define Pod, such as Pod name, owned label and applications running in Pod
- The upgrade function of Pod can be realized by changing the image version in the Pod template in RC
- kubectl apply -f nginx-pod.yaml, at this time k8s, three pods will be created on all available nodes, and each Pod has a label of app: nginx, and an nginx container is running in each Pod.
- If a Pod has a problem, the Controller Manager can find it in time, and then create a new Pod according to the definition of RC
- Expansion and contraction capacity: kubectl scale rc nginx --replicas=5
(2) According to nginx_replication.yaml create pod
kubectl apply -f nginx_replication.yaml
(3) View pod
kubectl get pods -o wide
   NAME      READY     STATUS
nginx-hksg8   1/1     Running   0          44s   192.168.0.107   w2
nginx-q7bw5   1/1     Running   0          44s   192.168.0.106   w1
nginx-zzwzl   1/1     Running   0          44s   192.168.0.108   w1
(4) View creation number
kubectl get rc
(5) Try to delete a pod (after you delete one, the system will automatically create another)
kubectl delete pods nginx-zzwzl
kubectl get pods
(6) Expansion and contraction of pod
kubectl scale rc nginx --replicas=5
kubectl get pods
nginx-8fctt   0/1     ContainerCreating   0          2s
nginx-9pgwk   0/1     ContainerCreating   0          2s
nginx-hksg8   1/1     Running             0          6m50s
nginx-q7bw5   1/1     Running             0          6m50s
nginx-wzqkf   1/1     Running             0          99s
(7) Delete pod (delete all by deleting yaml)
kubectl delete -f nginx_replication.yaml
2, ReplicaSet(RS)
Official website address: https://kubernetes.io/docs/concepts/workloads/controllers/replicaset/
The above has introduced a method of managing pod. Next, I will talk about the second method. In fact, as long as I understand the first article, this article is very easy to understand. In general, we rarely use Replica Set alone. It is mainly used by Deployment, a higher resource object, to form a complete set of choreography mechanism for pod creation, deletion and update. When we use Deployment, we don't need to care about how it creates and maintains replica sets. All this happens automatically. At the same time, there is no need to worry about incompatibility with other mechanisms (for example, ReplicaSet does not support rolling update, but Deployment does). In kubernetes v1 At 2:00, RC was upgraded to another concept: Replica Set, officially interpreted as "next generation RC"; There is no essential difference between ReplicaSet and RC. Most commands used for RC in kubectl are also applicable to rs. the only difference between RS and RC is that RS supports set based Label Selector, while RC only supports equality based Label Selector, which makes Replica Set more powerful
3, Deployment
Official website: https://kubernetes.io/docs/concepts/workloads/controllers/deployment/
The biggest upgrade of Deployment relative to RC is that we can know the progress of current Pod "Deployment" at any time. Next, create a Deployment object to generate the corresponding Replica Set, complete the creation process of Pod replica, and check the status of Deploymnet to see whether the Deployment action is completed (whether the number of Pod replicas reaches the expected value)
(1) Create nginx_deployment.yaml file
apiVersion: apps/v1
kind: Deployment
metadata:
  name: nginx-deployment
  labels:
    app: nginx
spec:
  replicas: 3
  selector:
    matchLabels:
      app: nginx
  template:
    metadata:
      labels:
        app: nginx
    spec:
      containers:
      - name: nginx
        image: nginx:1.7.9
        ports:
        - containerPort: 80
(2) According to nginx_ deployment. Create pod from yaml file
kubectl apply -f nginx_deployment.yaml
(3) View pod
kubectl get pods -o wide
kubectl get deployment
kubectl get rs
kubectl get deployment -o wide
(4) Current version of nginx
kubectl get deployment -o wide
NAME    READY   UP-TO-DATE   AVAILABLE   AGE     CONTAINERS   IMAGES      SELECTOR
nginx-deployment   3/3         3     3  3m27s      nginx    nginx:1.7.9   app=nginx
(5) Update the image version of nginx
kubectl set image deployment nginx-deployment nginx=nginx:1.9.1
4, Labels and Selectors
Official website: https://kubernetes.io/docs/concepts/overview/working-with-objects/labels/
In the previous yaml file, you can see a lot of labels. As the name suggests, they label some resources. Use an example to illustrate
apiVersion: v1
kind: Pod
metadata:
  name: nginx-pod
  labels:
    app: nginx
The above example shows a pod named nginx pod with a label, a key of app and a value of nginx. We can leave the pod with the same label to the selector to manage, and then look at the following
apiVersion: apps/v1
kind: Deployment
metadata:
  name: nginx-deployment
  labels:
    app: nginx
spec:
  replicas: 3
  selector:             # Match pod tags with the same label attribute
    matchLabels:
      app: nginx
  template:             # Define the template of pod
    metadata:
      labels:
        app: nginx      # Define the label attribute of the current pod. app is key and value is nginx
    spec:
      containers:
      - name: nginx
        image: nginx:1.7.9
        ports:
        - containerPort: 80
5, Namespace
Check the current namespace
kubectl get namespaces/ns
NAME              STATUS   AGE
default           Active   27m  #default
kube-node-lease   Active   27m
kube-public       Active   27m
kube-system       Active   27m
View system
kubectl get pods -n kube-system
In fact, to put it bluntly, namespaces are used to isolate different resources, such as Pod, Service, Deployment, etc. You can specify the namespace ` - n 'when entering a command. If it is not specified, the default namespace is used: default.
(1) Create namespace myns namespace yaml
apiVersion: v1
kind: Namespace
metadata:
  name: myns
(2) Execute command creation
kubectl apply -f myns-namespace.yaml
(3) Check
kubectl get namespaces/ns
NAME              STATUS   AGE
default           Active   38m
kube-node-lease   Active   38m
kube-public       Active   38m
kube-system       Active   38m
myns              Active   6s
(4) Specify the resources under the namespace
For example, create a pod that belongs to the myns namespace
vi nginx-pod.yaml
apiVersion: v1
kind: Pod
metadata:
  name: nginx-pod
  namespace: myns
spec:
  containers:
  - name: nginx-container
    image: nginx
    ports:
    - containerPort: 80
(5) Execute command creation
kubectl apply -f nginx-pod.yaml
(6) View Pod and resources under myns namespace
kubectl get pods
kubectl get pods -n myns
kubectl get all -n myns
kubectl get pods --all-namespaces    #Find pod s under all namespaces
6, Network
6.1 container communication in the same Pod
Next, we will talk about the contents related to Kubernetes network communication. We all know that the smallest operating unit of K8S is pod. First, consider that multiple containers in the same pod need to communicate. From the words on the official website, it can be seen that the containers in the same pod share the network ip address and port number. Obviously, there is no problem in communication
Each Pod is assigned a unique IP address. Every container in a Pod shares the network namespace, including the IP address and network ports.
What if you communicate through the name of the container? You need to add all the containers in the pod to the network of the same container. We call this container the pause container in the pod.
6.2 communication between pods in the cluster
Next, let's talk about the smallest operation unit of K8S and the communication between pods. We all know that pods will have an independent IP address. This IP address is shared by all containers in the pod. Can the communication between multiple pods pass through this IP address? This problem needs to be divided into two dimensions: one is the pod in the same machine in the cluster, and the other is the pod in different machines in the cluster; To solve this problem, prepare two pods, one is nginx and the other is busybox
nginx_pod.yaml
apiVersion: v1
kind: Pod
metadata:
  name: nginx-pod
  labels:
    app: nginx
spec:
  containers:
   - name: nginx-container
     image: nginx
     ports:
       - containerPort: 80
busybox_pod.yaml
apiVersion: v1
kind: Pod
metadata:
  name: busybox
  labels:
    app: busybox
spec:
  containers:
  - name: busybox
    image: busybox
    command: ['sh', '-c', 'echo The app is running! && sleep 3600']
(1) Run the two pod s and check the operation
 kubectl apply -f nginx_pod.yaml
 kubectl apply -f busy_pod.yaml
kubectl get pods -o wide
> NAME      READY  STATUS    RESTARTS   AGE         IP                NODE
> busybox    1/1   Running      0       49s    192.168.221.70   worker02-kubeadm-k8s
> nginx-pod  1/1   Running      0      7m46s   192.168.14.1     worker01-kubeadm-k8s
It is found that the ip of nginx pod is 192.168.14.1 and that of busybox pod is 192.168.221.70
(2) Same machine in the same cluster
Go to worker01: ping 192.168.14.1
PING 192.168.14.1 (192.168.14.1) 56(84) bytes of data.
64 bytes from 192.168.14.1: icmp_seq=1 ttl=64 time=0.063 ms
64 bytes from 192.168.14.1: icmp_seq=2 ttl=64 time=0.048 ms
Go to worker01: curl 192.168.14.1
<!DOCTYPE html>
<html>
<head>
<title>Welcome to nginx!</title>
<style>
    body {
        width: 35em;
        margin: 0 auto;
        font-family: Tahoma, Verdana, Arial, sans-serif;
    }
</style>
(3) Different machines in the same cluster
Go to worker02: ping 192.168.14.1
[root@worker02-kubeadm-k8s ~]# ping 192.168.14.1
PING 192.168.14.1 (192.168.14.1) 56(84) bytes of data.
64 bytes from 192.168.14.1: icmp_seq=1 ttl=63 time=0.680 ms
64 bytes from 192.168.14.1: icmp_seq=2 ttl=63 time=0.306 ms
64 bytes from 192.168.14.1: icmp_seq=3 ttl=63 time=0.688 ms
Go to worker02: curl 192.168.14.1, and you can also access nginx;
To the master:
ping/curl 192.168.14.1          Visited worker01 Upper nginx-pod
ping          192.168.221.70     Visited worker02 Upper busybox-pod
When you come to worker01: ping 192.168.221.70, you can access busybox pod on worker02
6.3. Service cluster IP in the cluster
Official website: https://kubernetes.io/docs/concepts/services-networking/service/
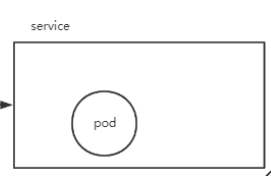
For the above pods, although the internal communication of the cluster is realized, the Pod is unstable. For example, the Pod may be expanded or reduced at any time through the Deployment management of the Pod. At this time, the IP address of the Pod changes. It can have a fixed IP so that it can be accessed in the cluster. That is, as mentioned earlier in the architecture description, the same or associated Pod can be labeled to form a Service. The Service has a fixed IP. No matter how the Pod is created or destroyed, it can be accessed through the Service IP
(1) Create whoamI deployment Yaml file
apiVersion: apps/v1
kind: Deployment
metadata:
  name: whoami-deployment
  labels:
    app: whoami
spec:
  replicas: 3
  selector:
    matchLabels:
      app: whoami
  template:
    metadata:
      labels:
        app: whoami
    spec:
      containers:
      - name: whoami
        image: jwilder/whoami
        ports:
        - containerPort: 8000
apply
kubectl apply -f whoami-deployment.yaml
(2) View pod and service
kubectl get pods
give the result as follows
whoami-deployment-5dd9ff5fd8-22k9n   192.168.221.80   worker02-kubeadm-k8s
whoami-deployment-5dd9ff5fd8-vbwzp   192.168.14.6     worker01-kubeadm-k8s
whoami-deployment-5dd9ff5fd8-zzf4d   192.168.14.7     worker01-kubeadm-k8s
(3) normal access in the cluster
curl 192.168.221.80:8000/192.168.14.6:8000/192.168.14.7:8000
(4) by checking the service, you can find that there is no service about whoami at present
kubect get svc
NAME         TYPE        CLUSTER-IP   EXTERNAL-IP   PORT(S)   AGE
kubernetes   ClusterIP   10.96.0.1    <none>        443/TCP   19h
(5) create whoami service (this address can only be accessed inside the cluster)
kubectl expose deployment whoami-deployment
Then view; You can find a service of Cluster IP type, whose name is whoamI deployment and IP address is 10.105.147.59
kubectl get svc
[root@master-kubeadm-k8s ~]# kubectl get svc
NAME                TYPE        CLUSTER-IP       EXTERNAL-IP   PORT(S)    AGE
kubernetes          ClusterIP   10.96.0.1        <none>        443/TCP    19h
whoami-deployment   ClusterIP   10.105.147.59   <none>        8000/TCP   23s
Delete svc} command
kubectl delete service whoami-deployment
(6) Access through Cluster IP of Service
[root@master-kubeadm-k8s ~]# curl 10.105.147.59:8000
I'm whoami-deployment-678b64444d-b2695
[root@master-kubeadm-k8s ~]# curl 10.105.147.59:8000
I'm whoami-deployment-678b64444d-hgdrk
[root@master-kubeadm-k8s ~]# curl 10.105.147.59:8000
I'm whoami-deployment-678b64444d-65t88
(7) Check the details of whoamI deployment and find that one endpoint is connected to three pods
[root@master-kubeadm-k8s ~]# kubectl describe svc whoami-deployment
Name:              whoami-deployment
Namespace:         default
Labels:            app=whoami
Annotations:       <none>
Selector:          app=whoami
Type:              ClusterIP
IP:                10.105.147.59
Port:              <unset>  8000/TCP
TargetPort:        8000/TCP
Endpoints:         192.168.14.8:8000,192.168.221.81:8000,192.168.221.82:8000
Session Affinity:  None
Events:            <none>
(8) We might as well expand whoami to 5
kubectl scale deployment whoami-deployment --replicas=5
(9) Visit again: curl 10.105.147.59:8000
(10) Check the service details again: kubectl describe SVC whoamI deployment
(11) In fact, for Service creation, you can not only use kubectl expose, but also define a yaml file
apiVersion: v1
kind: Service
metadata:
  name: my-service
spec:
  selector:
    app: MyApp
  ports:
    - protocol: TCP
      port: 80
      targetPort: 9376
  type: Cluster
conclusion: in fact, the meaning of Service is for the instability of Pod, and the above discussion is about a type of Service Cluster IP, which can only be accessed in the Cluster
6.4 Pod access to external services
It's relatively simple. There's not much to say. Just visit it directly
6.5 external service accessing Pod in cluster
Service-NodePort
It is also a type of Service, which can be through NodePort; To put it bluntly, because the external can access the physical machine IP of the cluster, the same IP is exposed on each physical machine in the cluster, such as 32008
(1) According to whoamI deployment Yaml create pod
apiVersion: apps/v1
kind: Deployment
metadata:
  name: whoami-deployment
  labels:
    app: whoami
spec:
  replicas: 3
  selector:
    matchLabels:
      app: whoami
  template:
    metadata:
      labels:
        app: whoami
    spec:
      containers:
      - name: whoami
        image: jwilder/whoami
        ports:
        - containerPort: 8000
Create it
kubectl apply -f whoami-deployment.yaml
(2) Create a service of NodePort type with the name whoamI deployment, and delete the previously created service before creating it
kubectl delete svc whoami-deployment
kubectl expose deployment whoami-deployment --type=NodePort
[root@master-kubeadm-k8s ~]# kubectl get svc
NAME                TYPE        CLUSTER-IP     EXTERNAL-IP   PORT(S)          AGE
kubernetes          ClusterIP   10.96.0.1      <none>        443/TCP          21h
whoami-deployment   NodePort    10.99.108.82   <none>        8000:32041/TCP   7s
(3) Note that the above port 32041 is actually the port exposed on the physical machine in the cluster
lsof -i tcp:32041
netstat -ntlp|grep 32041
(4) The browser is accessed through the IP of the physical machine
http://192.168.0.51:32041
curl 192.168.0.61:32041
Although NodePort can meet the requirements of external access to Pod, is it really good? In fact, it is not good. It occupies the ports on each physical host
Service-LoadBalance
It usually needs the support of third-party cloud providers, which is binding
Ingress
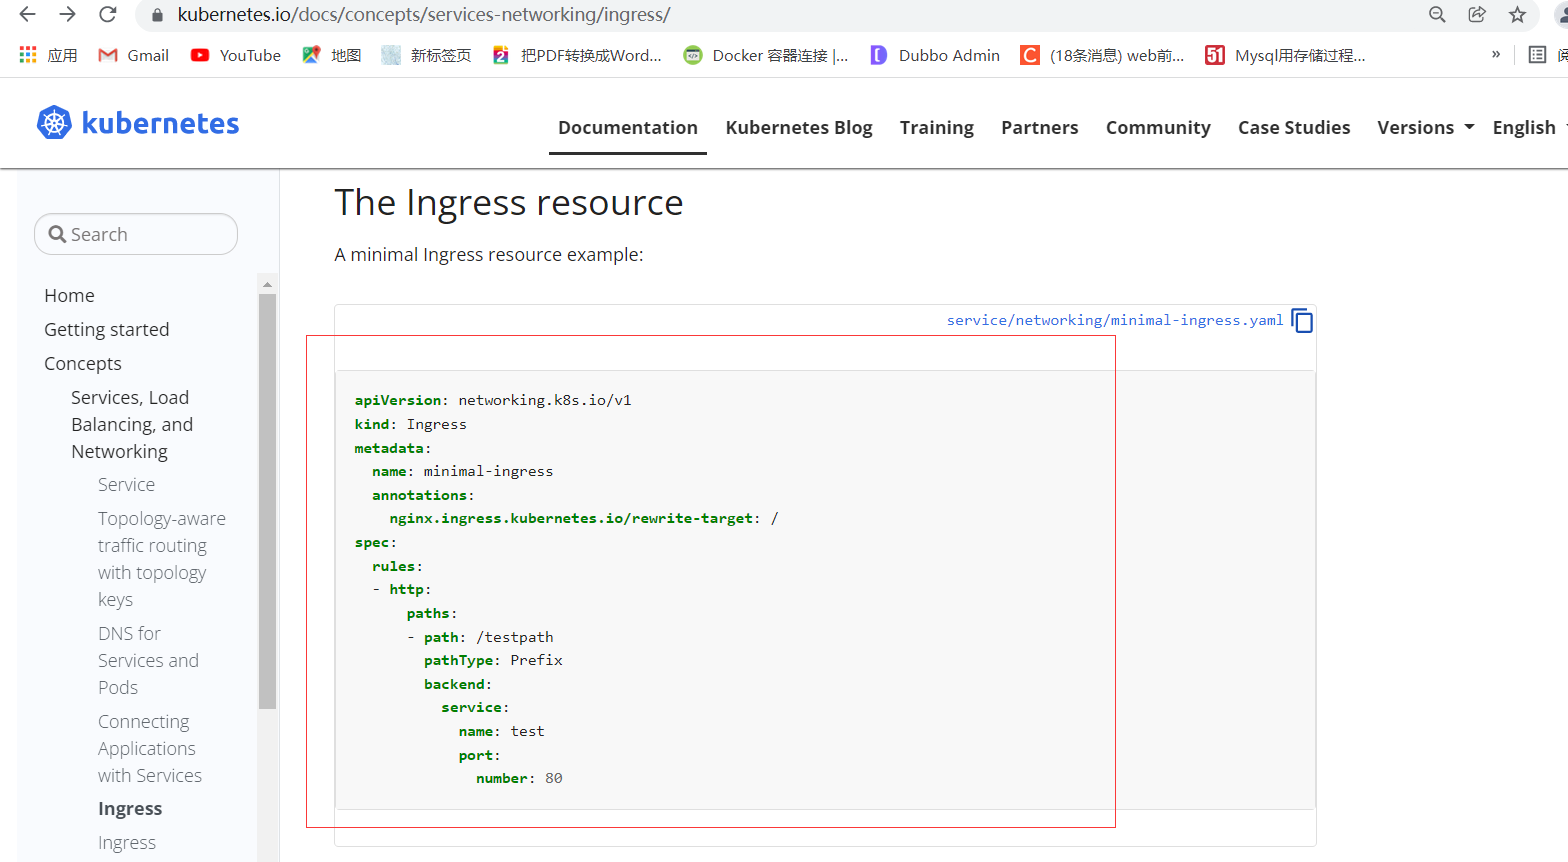
Official website: https://kubernetes.io/docs/concepts/services-networking/ingress/
Through the official website, we can find that Ingress helps us access the services in the cluster. But before we look at progress, let's start with a case. Very simply, deploy {Tomcat in the middle of K8S cluster; If the browser wants to access this} tomcat, that is, if the external wants to access the tomcat, it can use the previous service nodeport. For example, if a 32008 port is exposed, it only needs to access 192.168.0.61:32008. However, it is obvious that the service nodeport production environment is not recommended. Then, based on the above requirements, use Ingress to meet the requirements of accessing Tomcat.
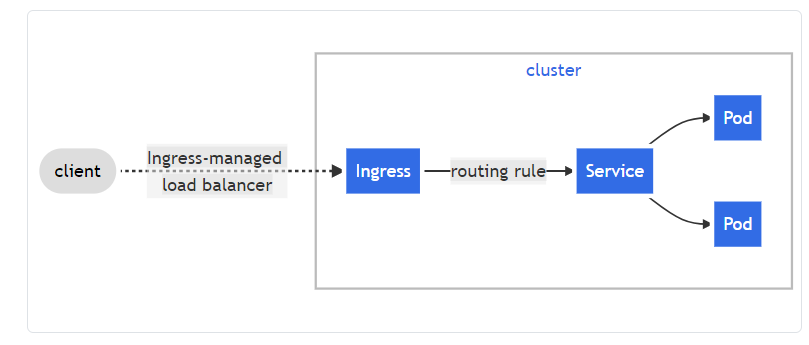
What is progress? In fact, the official website document is very detailed. I don't want to copy it. For this document, you should read it carefully
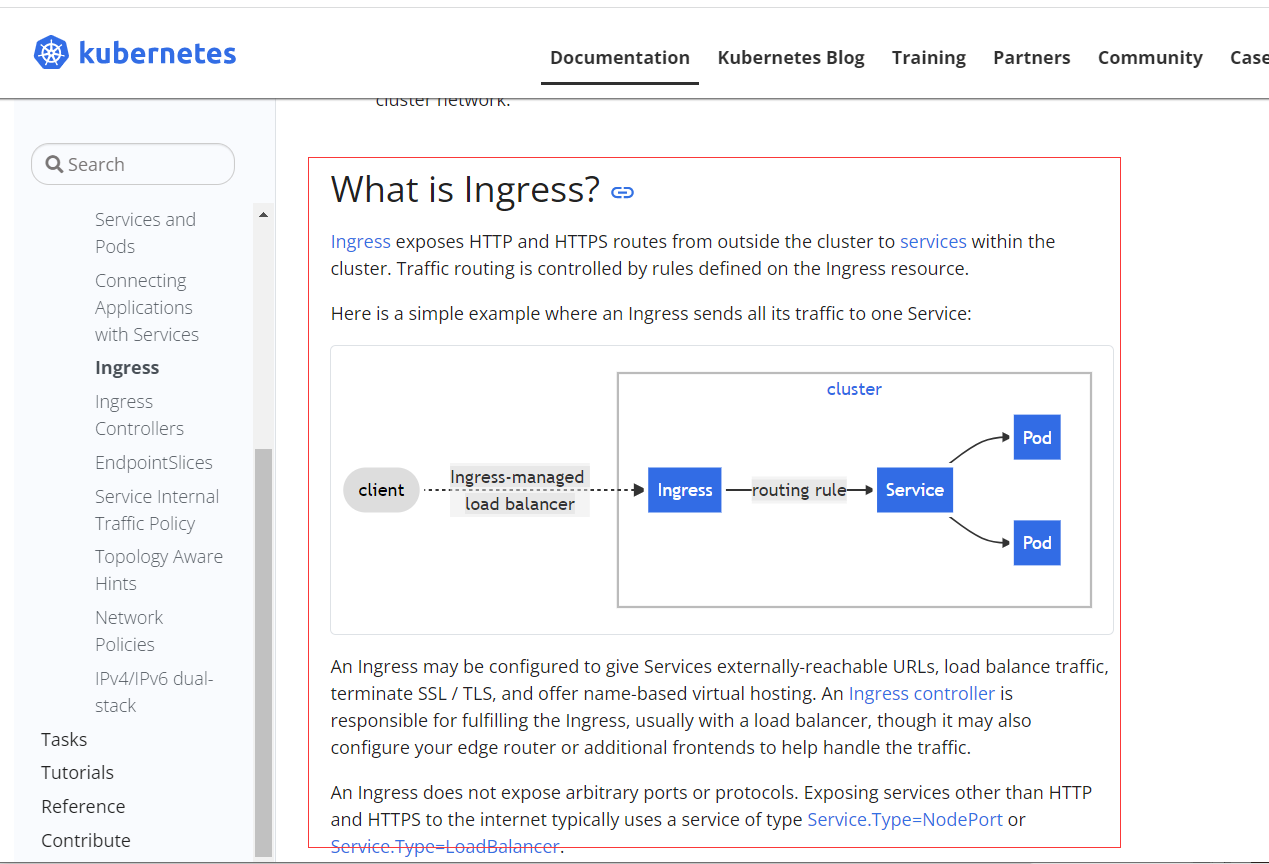
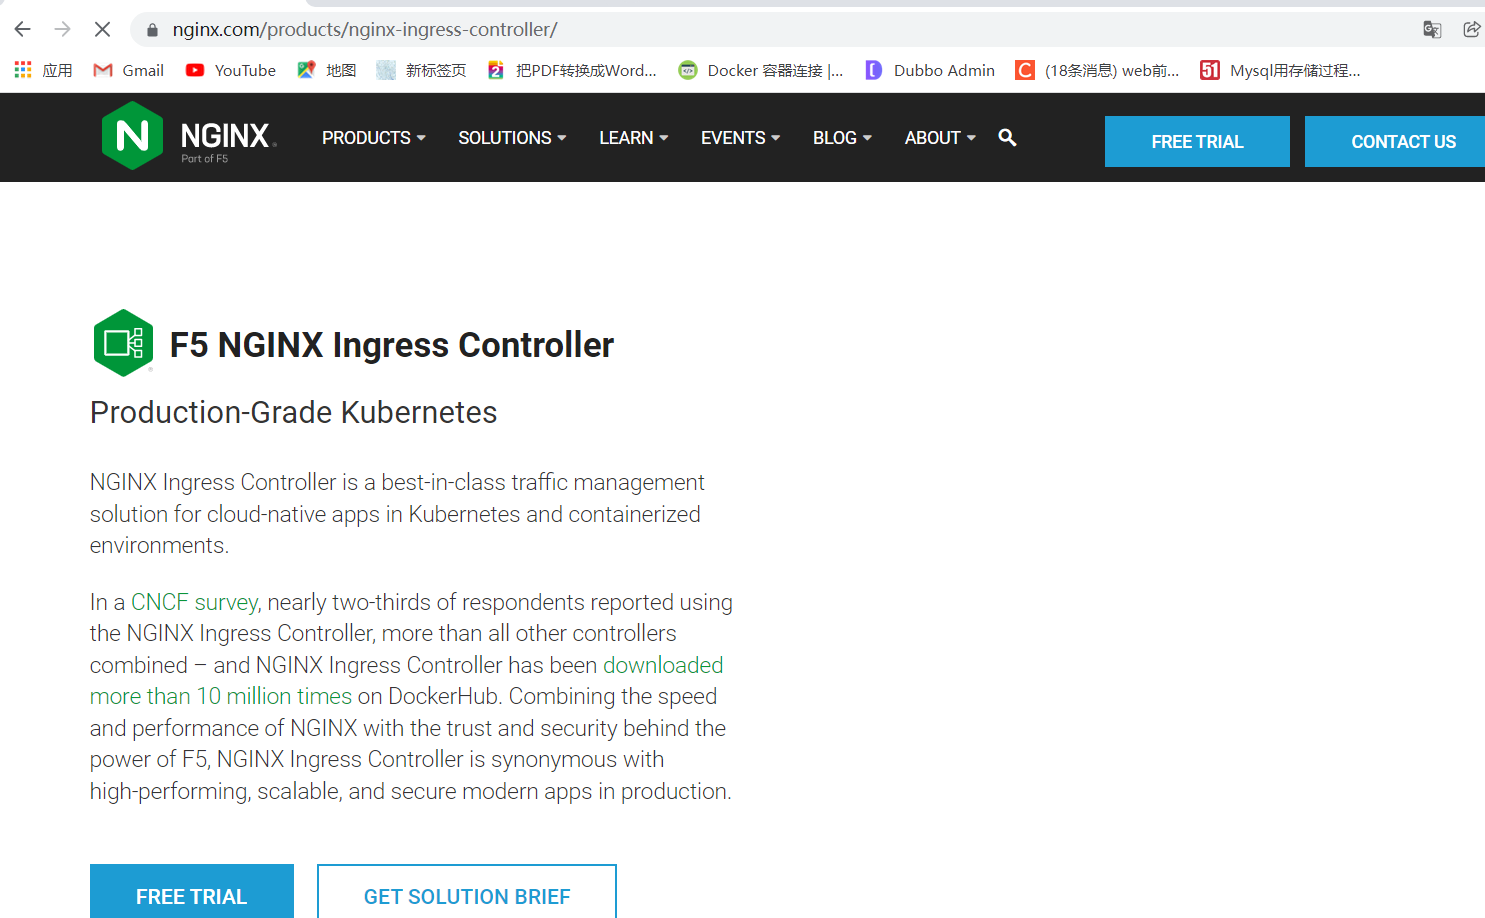
Use the official website below Ingress controller Feel the example
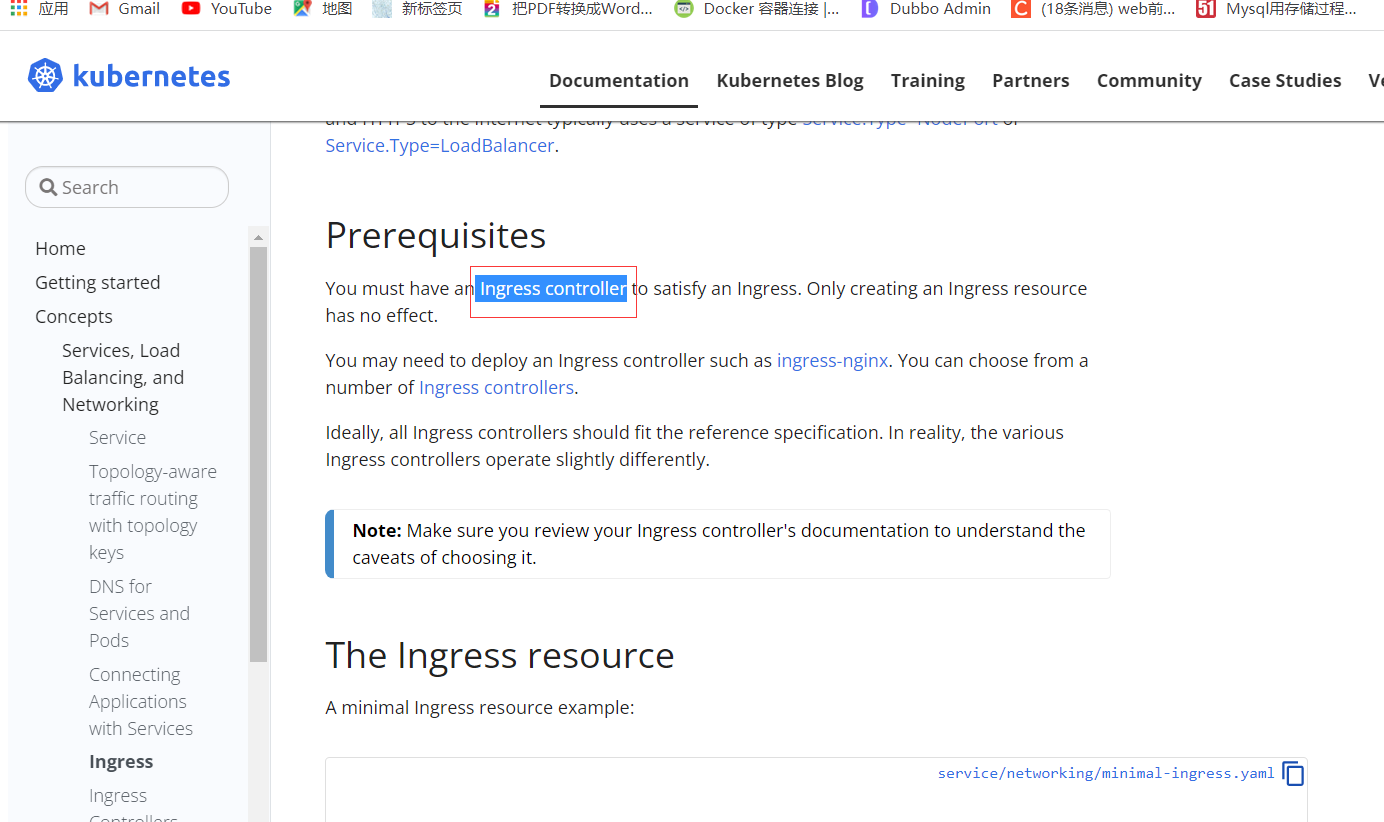
After opening a new web address, select NGINX Ingress Controller Feel
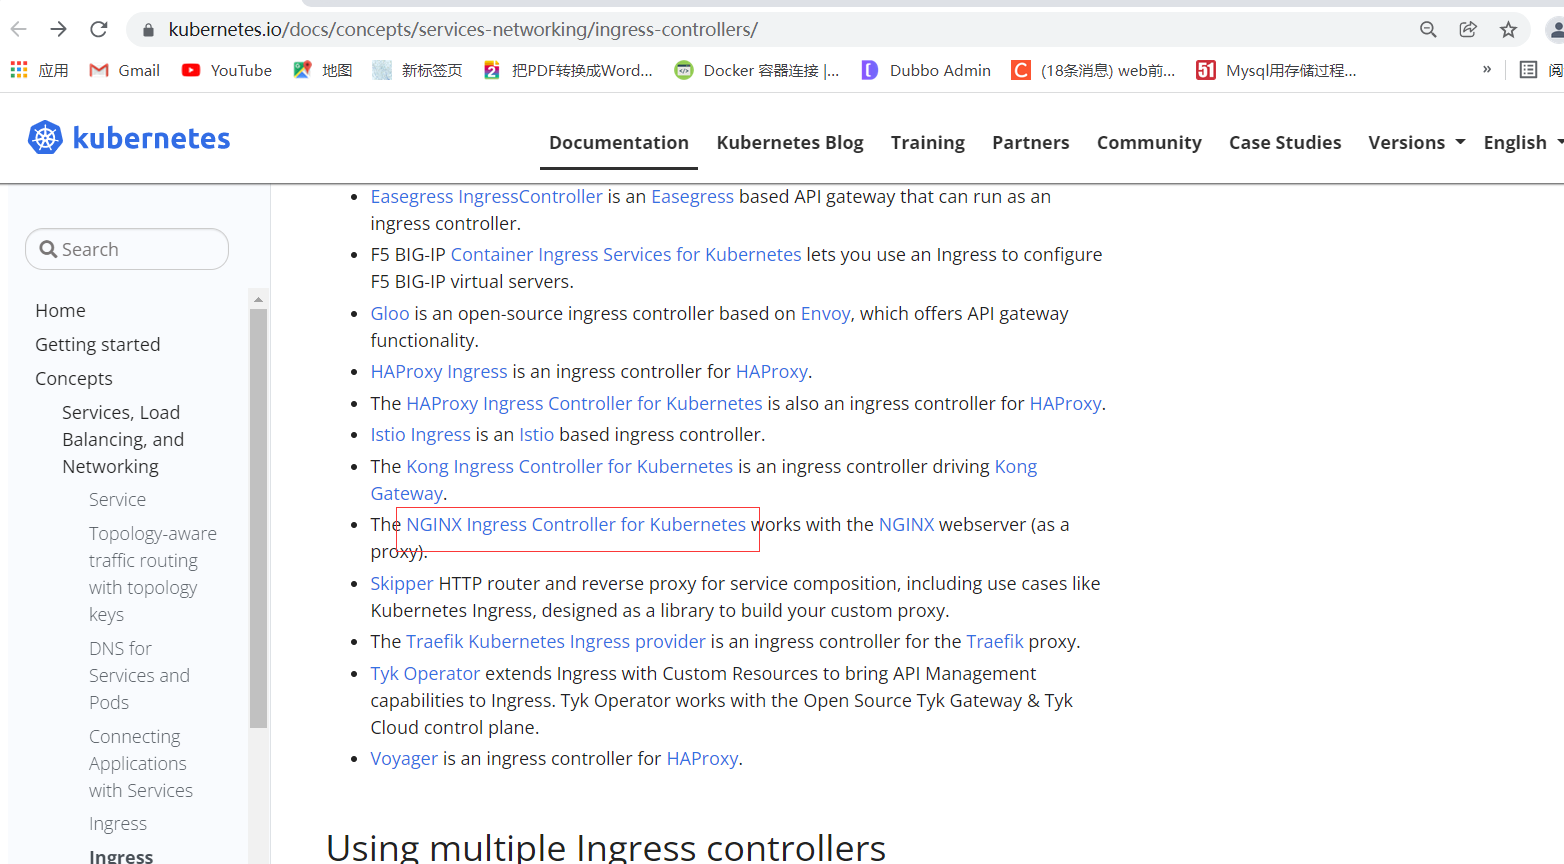
The following is the official website
Of course, you can also learn the specific description of the progress controller from its github. The reason why you look at github is that some parts of the official website still look troublesome; github's website is: https://github.com/kubernetes/ingress-nginx ; There are some instructions and online documents
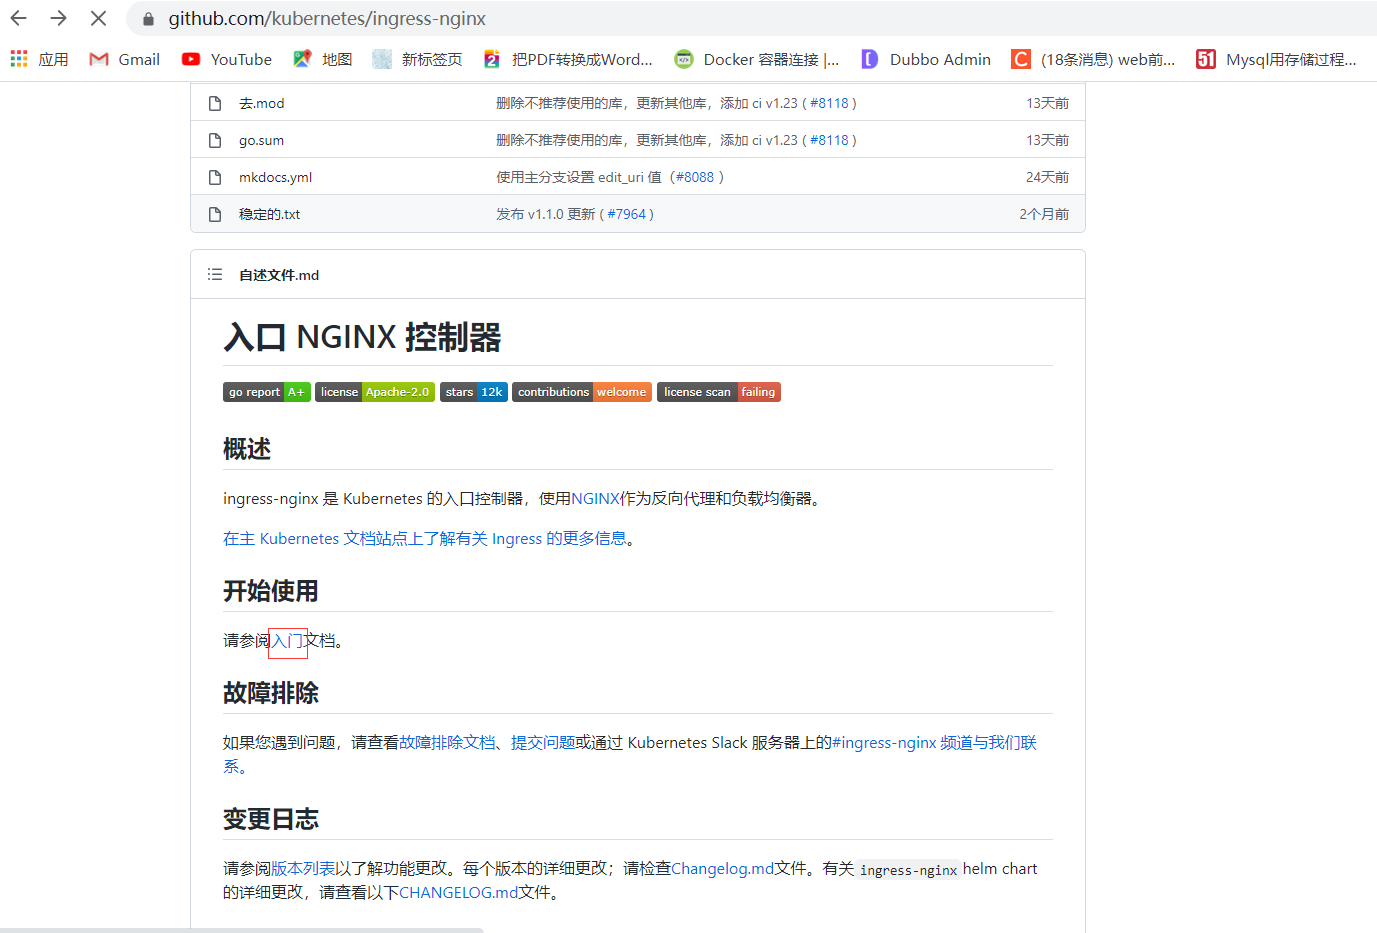
Enter document view: https://kubernetes.github.io/ingress-nginx/deploy/

It explains the method of deploying with yml file. You need to execute the following command to download the file

This deployment I downloaded the yaml file in advance. Let's take a look at the downloaded content
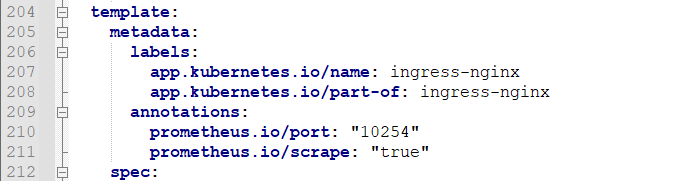
apiVersion: v1
kind: Namespace
metadata:
  name: ingress-nginx
  labels:
    app.kubernetes.io/name: ingress-nginx
    app.kubernetes.io/part-of: ingress-nginx

---

kind: ConfigMap
apiVersion: v1
metadata:
  name: nginx-configuration
  namespace: ingress-nginx
  labels:
    app.kubernetes.io/name: ingress-nginx
    app.kubernetes.io/part-of: ingress-nginx

---
kind: ConfigMap
apiVersion: v1
metadata:
  name: tcp-services
  namespace: ingress-nginx
  labels:
    app.kubernetes.io/name: ingress-nginx
    app.kubernetes.io/part-of: ingress-nginx

---
kind: ConfigMap
apiVersion: v1
metadata:
  name: udp-services
  namespace: ingress-nginx
  labels:
    app.kubernetes.io/name: ingress-nginx
    app.kubernetes.io/part-of: ingress-nginx

---
apiVersion: v1
kind: ServiceAccount
metadata:
  name: nginx-ingress-serviceaccount
  namespace: ingress-nginx
  labels:
    app.kubernetes.io/name: ingress-nginx
    app.kubernetes.io/part-of: ingress-nginx

---
apiVersion: rbac.authorization.k8s.io/v1beta1
kind: ClusterRole
metadata:
  name: nginx-ingress-clusterrole
  labels:
    app.kubernetes.io/name: ingress-nginx
    app.kubernetes.io/part-of: ingress-nginx
rules:
  - apiGroups:
      - ""
    resources:
      - configmaps
      - endpoints
      - nodes
      - pods
      - secrets
    verbs:
      - list
      - watch
  - apiGroups:
      - ""
    resources:
      - nodes
    verbs:
      - get
  - apiGroups:
      - ""
    resources:
      - services
    verbs:
      - get
      - list
      - watch
  - apiGroups:
      - ""
    resources:
      - events
    verbs:
      - create
      - patch
  - apiGroups:
      - "extensions"
      - "networking.k8s.io"
    resources:
      - ingresses
    verbs:
      - get
      - list
      - watch
  - apiGroups:
      - "extensions"
      - "networking.k8s.io"
    resources:
      - ingresses/status
    verbs:
      - update

---
apiVersion: rbac.authorization.k8s.io/v1beta1
kind: Role
metadata:
  name: nginx-ingress-role
  namespace: ingress-nginx
  labels:
    app.kubernetes.io/name: ingress-nginx
    app.kubernetes.io/part-of: ingress-nginx
rules:
  - apiGroups:
      - ""
    resources:
      - configmaps
      - pods
      - secrets
      - namespaces
    verbs:
      - get
  - apiGroups:
      - ""
    resources:
      - configmaps
    resourceNames:
      # Defaults to "<election-id>-<ingress-class>"
      # Here: "<ingress-controller-leader>-<nginx>"
      # This has to be adapted if you change either parameter
      # when launching the nginx-ingress-controller.
      - "ingress-controller-leader-nginx"
    verbs:
      - get
      - update
  - apiGroups:
      - ""
    resources:
      - configmaps
    verbs:
      - create
  - apiGroups:
      - ""
    resources:
      - endpoints
    verbs:
      - get

---
apiVersion: rbac.authorization.k8s.io/v1beta1
kind: RoleBinding
metadata:
  name: nginx-ingress-role-nisa-binding
  namespace: ingress-nginx
  labels:
    app.kubernetes.io/name: ingress-nginx
    app.kubernetes.io/part-of: ingress-nginx
roleRef:
  apiGroup: rbac.authorization.k8s.io
  kind: Role
  name: nginx-ingress-role
subjects:
  - kind: ServiceAccount
    name: nginx-ingress-serviceaccount
    namespace: ingress-nginx

---
apiVersion: rbac.authorization.k8s.io/v1beta1
kind: ClusterRoleBinding
metadata:
  name: nginx-ingress-clusterrole-nisa-binding
  labels:
    app.kubernetes.io/name: ingress-nginx
    app.kubernetes.io/part-of: ingress-nginx
roleRef:
  apiGroup: rbac.authorization.k8s.io
  kind: ClusterRole
  name: nginx-ingress-clusterrole
subjects:
  - kind: ServiceAccount
    name: nginx-ingress-serviceaccount
    namespace: ingress-nginx

---

apiVersion: apps/v1
kind: Deployment
metadata:
  name: nginx-ingress-controller
  namespace: ingress-nginx
  labels:
    app.kubernetes.io/name: ingress-nginx
    app.kubernetes.io/part-of: ingress-nginx
spec:
  replicas: 1
  selector:
    matchLabels:
      app.kubernetes.io/name: ingress-nginx
      app.kubernetes.io/part-of: ingress-nginx
  template:
    metadata:
      labels:
        app.kubernetes.io/name: ingress-nginx
        app.kubernetes.io/part-of: ingress-nginx
      annotations:
        prometheus.io/port: "10254"
        prometheus.io/scrape: "true"
    spec:
      # wait up to five minutes for the drain of connections
      terminationGracePeriodSeconds: 300
      serviceAccountName: nginx-ingress-serviceaccount
      hostNetwork: true
      nodeSelector:
        name: ingress
        kubernetes.io/os: linux
      containers:
        - name: nginx-ingress-controller
          image: quay.io/kubernetes-ingress-controller/nginx-ingress-controller:0.26.1
          args:
            - /nginx-ingress-controller
            - --configmap=$(POD_NAMESPACE)/nginx-configuration
            - --tcp-services-configmap=$(POD_NAMESPACE)/tcp-services
            - --udp-services-configmap=$(POD_NAMESPACE)/udp-services
            - --publish-service=$(POD_NAMESPACE)/ingress-nginx
            - --annotations-prefix=nginx.ingress.kubernetes.io
          securityContext:
            allowPrivilegeEscalation: true
            capabilities:
              drop:
                - ALL
              add:
                - NET_BIND_SERVICE
            # www-data -> 33
            runAsUser: 33
          env:
            - name: POD_NAME
              valueFrom:
                fieldRef:
                  fieldPath: metadata.name
            - name: POD_NAMESPACE
              valueFrom:
                fieldRef:
                  fieldPath: metadata.namespace
          ports:
            - name: http
              containerPort: 80
            - name: https
              containerPort: 443
          livenessProbe:
            failureThreshold: 3
            httpGet:
              path: /healthz
              port: 10254
              scheme: HTTP
            initialDelaySeconds: 10
            periodSeconds: 10
            successThreshold: 1
            timeoutSeconds: 10
          readinessProbe:
            failureThreshold: 3
            httpGet:
              path: /healthz
              port: 10254
              scheme: HTTP
            periodSeconds: 10
            successThreshold: 1
            timeoutSeconds: 10
          lifecycle:
            preStop:
              exec:
                command:
                  - /wait-shutdown
After the above method, you can get an} progress control. Then, you can define a configuration rule for the control configuration through progress. After the rule is defined, the progress control can read the rule and form a forwarding of the corresponding resource rule.
Now draw a picture for everyone to understand
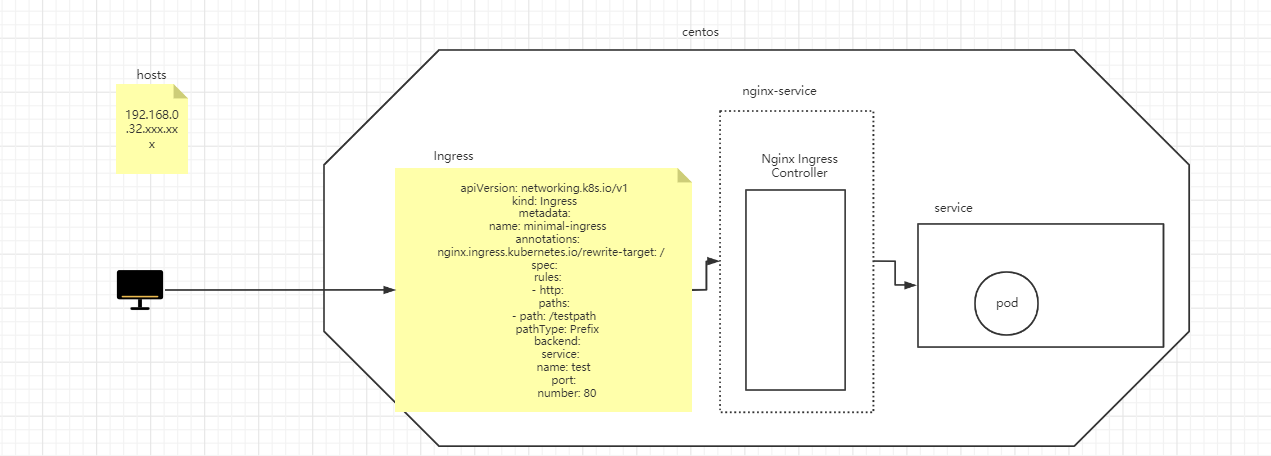
With the above thought map, you can clearly know the process of the whole link of web access to pod. The above has said so much. The following thing is to carry out practical verification and comparison according to the previous theory, and realize the requirement of using Ingress to access tomcat step by step
Take tomcat as an example to complete the link
1) Define my Tomcat of pod Yaml file, and then manage and map the Internet through service
With command
vi my-tomcat.yaml
Copy the following file
apiVersion: apps/v1
kind: Deployment
metadata:
  name: tomcat-deployment
  labels:
    app: tomcat
spec:
  replicas: 1
  selector:
    matchLabels:
      app: tomcat
  template:
    metadata:
      labels:
        app: tomcat
    spec:
      containers:
      - name: tomcat
        image: tomcat
        ports:
        - containerPort: 8080
---
apiVersion: v1
kind: Service
metadata:
  name: tomcat-service
spec:
  ports:
  - port: 80
    protocol: TCP
    targetPort: 8080
  selector:
    app: tomcat
2) Create with command
kubectl apply -f my-tomcat.yaml
3) View resources
kubectl get pods
4) After the creation is completed, you can use the following command to view the details
kubectl get pods -o wide
5) You can find that he created a Tomcat service with the following command
kubectl get svc
tomcat-service NodePort 10.105.51.97 <none> 80:31032/TCP 37s
After the above operation, the last part of the sequence diagram I drew is completed, which is the following figure
Normally, if I want to provide access to the outside world, I can only change this service to NodePort mode, but as mentioned earlier, this is not recommended in the production environment. If I play according to the production requirements, the next step is to complete the penultimate step of the sequence diagram and deploy nginx Ingress Controller; As mentioned earlier, download a long mandatory through the official website command Yaml file, but the file is downloaded without the label shown in the figure below
If we deploy it directly, nginx ingress controller will be randomly assigned to any machine in the cluster. If we want to solve this problem, we need to use the label selector to specify that it is in a fixed node, and then the next step is to complete the specified operation;
6) Ensure that nginx controller runs on the w1 node (label the w1 node, and execute on the master node);
kubectl label node w1 name=ingress
After having a tag, the next step is to let ingress nginx run on this node. What to do is nodeSelector. The node selector selects the node name: ingress. The purpose of this is to let it run on the fixed node w1;
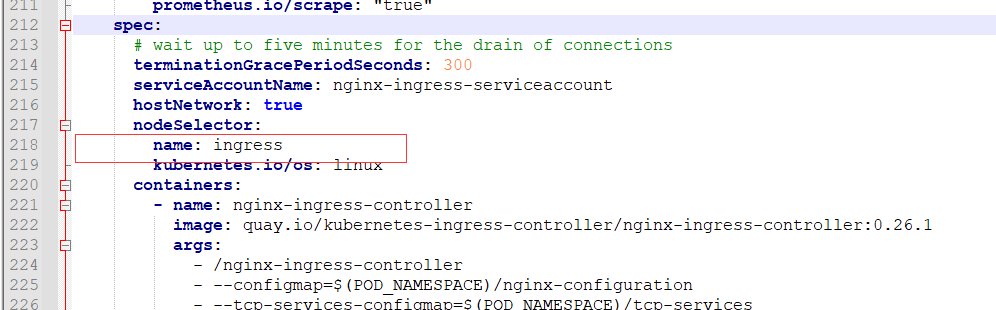
7) To run in HostPort mode, you need to add configuration; Let him expose the port for external access; Add the following configuration in the downloaded configuration file
hostNetwork: true
I will download the improved mandatory from the official website Yaml shows it again
apiVersion: v1
kind: Namespace
metadata:
  name: ingress-nginx
  labels:
    app.kubernetes.io/name: ingress-nginx
    app.kubernetes.io/part-of: ingress-nginx

---

kind: ConfigMap
apiVersion: v1
metadata:
  name: nginx-configuration
  namespace: ingress-nginx
  labels:
    app.kubernetes.io/name: ingress-nginx
    app.kubernetes.io/part-of: ingress-nginx

---
kind: ConfigMap
apiVersion: v1
metadata:
  name: tcp-services
  namespace: ingress-nginx
  labels:
    app.kubernetes.io/name: ingress-nginx
    app.kubernetes.io/part-of: ingress-nginx

---
kind: ConfigMap
apiVersion: v1
metadata:
  name: udp-services
  namespace: ingress-nginx
  labels:
    app.kubernetes.io/name: ingress-nginx
    app.kubernetes.io/part-of: ingress-nginx

---
apiVersion: v1
kind: ServiceAccount
metadata:
  name: nginx-ingress-serviceaccount
  namespace: ingress-nginx
  labels:
    app.kubernetes.io/name: ingress-nginx
    app.kubernetes.io/part-of: ingress-nginx

---
apiVersion: rbac.authorization.k8s.io/v1beta1
kind: ClusterRole
metadata:
  name: nginx-ingress-clusterrole
  labels:
    app.kubernetes.io/name: ingress-nginx
    app.kubernetes.io/part-of: ingress-nginx
rules:
  - apiGroups:
      - ""
    resources:
      - configmaps
      - endpoints
      - nodes
      - pods
      - secrets
    verbs:
      - list
      - watch
  - apiGroups:
      - ""
    resources:
      - nodes
    verbs:
      - get
  - apiGroups:
      - ""
    resources:
      - services
    verbs:
      - get
      - list
      - watch
  - apiGroups:
      - ""
    resources:
      - events
    verbs:
      - create
      - patch
  - apiGroups:
      - "extensions"
      - "networking.k8s.io"
    resources:
      - ingresses
    verbs:
      - get
      - list
      - watch
  - apiGroups:
      - "extensions"
      - "networking.k8s.io"
    resources:
      - ingresses/status
    verbs:
      - update

---
apiVersion: rbac.authorization.k8s.io/v1beta1
kind: Role
metadata:
  name: nginx-ingress-role
  namespace: ingress-nginx
  labels:
    app.kubernetes.io/name: ingress-nginx
    app.kubernetes.io/part-of: ingress-nginx
rules:
  - apiGroups:
      - ""
    resources:
      - configmaps
      - pods
      - secrets
      - namespaces
    verbs:
      - get
  - apiGroups:
      - ""
    resources:
      - configmaps
    resourceNames:
      # Defaults to "<election-id>-<ingress-class>"
      # Here: "<ingress-controller-leader>-<nginx>"
      # This has to be adapted if you change either parameter
      # when launching the nginx-ingress-controller.
      - "ingress-controller-leader-nginx"
    verbs:
      - get
      - update
  - apiGroups:
      - ""
    resources:
      - configmaps
    verbs:
      - create
  - apiGroups:
      - ""
    resources:
      - endpoints
    verbs:
      - get

---
apiVersion: rbac.authorization.k8s.io/v1beta1
kind: RoleBinding
metadata:
  name: nginx-ingress-role-nisa-binding
  namespace: ingress-nginx
  labels:
    app.kubernetes.io/name: ingress-nginx
    app.kubernetes.io/part-of: ingress-nginx
roleRef:
  apiGroup: rbac.authorization.k8s.io
  kind: Role
  name: nginx-ingress-role
subjects:
  - kind: ServiceAccount
    name: nginx-ingress-serviceaccount
    namespace: ingress-nginx

---
apiVersion: rbac.authorization.k8s.io/v1beta1
kind: ClusterRoleBinding
metadata:
  name: nginx-ingress-clusterrole-nisa-binding
  labels:
    app.kubernetes.io/name: ingress-nginx
    app.kubernetes.io/part-of: ingress-nginx
roleRef:
  apiGroup: rbac.authorization.k8s.io
  kind: ClusterRole
  name: nginx-ingress-clusterrole
subjects:
  - kind: ServiceAccount
    name: nginx-ingress-serviceaccount
    namespace: ingress-nginx

---

apiVersion: apps/v1
kind: Deployment
metadata:
  name: nginx-ingress-controller
  namespace: ingress-nginx
  labels:
    app.kubernetes.io/name: ingress-nginx
    app.kubernetes.io/part-of: ingress-nginx
spec:
  replicas: 1
  selector:
    matchLabels:
      app.kubernetes.io/name: ingress-nginx
      app.kubernetes.io/part-of: ingress-nginx
  template:
    metadata:
      labels:
        app.kubernetes.io/name: ingress-nginx
        app.kubernetes.io/part-of: ingress-nginx
      annotations:
        prometheus.io/port: "10254"
        prometheus.io/scrape: "true"
    spec:
      # wait up to five minutes for the drain of connections
      terminationGracePeriodSeconds: 300
      serviceAccountName: nginx-ingress-serviceaccount
      hostNetwork: true
      nodeSelector:
        name: ingress
        kubernetes.io/os: linux
      containers:
        - name: nginx-ingress-controller
          image: quay.io/kubernetes-ingress-controller/nginx-ingress-controller:0.26.1
          args:
            - /nginx-ingress-controller
            - --configmap=$(POD_NAMESPACE)/nginx-configuration
            - --tcp-services-configmap=$(POD_NAMESPACE)/tcp-services
            - --udp-services-configmap=$(POD_NAMESPACE)/udp-services
            - --publish-service=$(POD_NAMESPACE)/ingress-nginx
            - --annotations-prefix=nginx.ingress.kubernetes.io
          securityContext:
            allowPrivilegeEscalation: true
            capabilities:
              drop:
                - ALL
              add:
                - NET_BIND_SERVICE
            # www-data -> 33
            runAsUser: 33
          env:
            - name: POD_NAME
              valueFrom:
                fieldRef:
                  fieldPath: metadata.name
            - name: POD_NAMESPACE
              valueFrom:
                fieldRef:
                  fieldPath: metadata.namespace
          ports:
            - name: http
              containerPort: 80
            - name: https
              containerPort: 443
          livenessProbe:
            failureThreshold: 3
            httpGet:
              path: /healthz
              port: 10254
              scheme: HTTP
            initialDelaySeconds: 10
            periodSeconds: 10
            successThreshold: 1
            timeoutSeconds: 10
          readinessProbe:
            failureThreshold: 3
            httpGet:
              path: /healthz
              port: 10254
              scheme: HTTP
            periodSeconds: 10
            successThreshold: 1
            timeoutSeconds: 10
          lifecycle:
            preStop:
              exec:
                command:
                  - /wait-shutdown
Upload the improved file to the master server, and then execute the command to create it (ensure that ports 80 and 443 on the w1 node are not occupied)
kubectl apply -f mandatory.yaml
Looking at the creation of the namespace ingress nginx, you will find that it takes a long time to pull the image
kubectl get pods -n ingress-nginx
After pulling, check with the following command and you will find that it must be running on the w1 node
kubectl get pods -n ingress-nginx -o wide
After the image is pulled, check whether there is a problem with the creation (if you are confident that the following steps can be omitted)
View which images are required for the configuration file of the current machine
cat mandatory.yaml |grep image
You will see that the image to be pulled is displayed. Pull it with docker pull. If it can be pulled normally, it means that the created pods are OK
8) View all resources under the current namespace and check whether the creation of resources is completed (be sure to wait until the creation is completed)
kubectl get all -n ingress-nginx
After these operations are completed, the operations in the following figure are completed

After the progress controller is deployed, you can view w1 and find that ports 80 and 443 will be opened (I didn't use the official website NodePort to expose the ports, because if the official website is used, each node will have such a port. In this case, it's inconvenient to have too many ports, so I used the hostPort method)
lsof -i tcp:80
lsof -i tcp:443
9) Next, write the rule of Ingress and create nginx - Ingress with the command Yaml file
#ingress
apiVersion: extensions/v1beta1
kind: Ingress
metadata:
  name: nginx-ingress
spec:
  rules:
  - host: tomcat.ghy.com
    http:
      paths:
      - path: /
        backend:
          serviceName: tomcat-service
          servicePort: 80
Create with command
kubectl apply -f nginx-ingress.yaml
Check whether the yaml file is created successfully
kubectl get ingress
I don't have the domain name of the host in the above configuration file, so I need to configure dns and modify dns and add the following domain name
192.168.8.61 tomcat.ghy.com
10) Open the browser and visit Tomcat ghy. Com can be accessed successfully
Summary:
If you want to use the ingress network in the future, you just need to define ingress, service and pod. The premise is to ensure that the nginx ingress controller has been configured