01 overview
NB-IoT
NB IOT (Narrow Band Internet of Things) is a narrowband Internet of things technology based on cell, which supports low-power devices to connect cellular data in low-power wide area Internet of things (LPWAN).

LWM2M protocol
The full name of LwM2M is lightweight machine to machine. It is a lightweight protocol formulated by OMA (Open Mobile Alliance). It is mainly aimed at the Internet of things applications in the scenario of cellular narrowband Internet of things (NB IOT).
- Basic architecture and interfaces
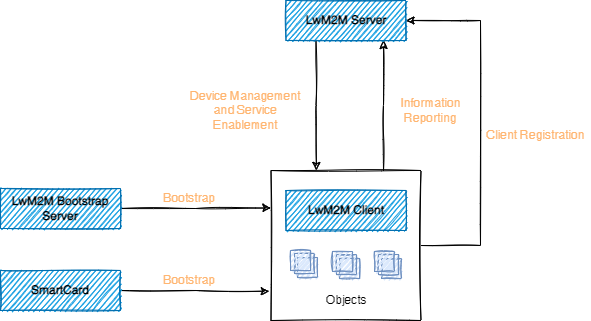
1.1 logical entity
- LWM2M Server: platform server interface;
- LWM2M client: responsible for executing the commands of the server and reporting the execution results;
- Bootstrap server: responsible for configuring LWM2M client.
1.2 logic interface - Bootstrap (boot interface): provide the LwM2M client with the necessary information to register with the LwM2M server;
- Client Registration: connect LwM2M client with LwM2M server, and store relevant information of LwM2M client on LwM2M server;
- Device Management and Service Enablement (device management and service implementation interface): the main controller is the LwM2M server. The server sends instructions to the client, and the client responds to the instructions and sends the response message to the server;
- Information Reporting interface: the LwM2M server is allowed to subscribe resource information to the client. After receiving the subscription, the client reports its resource changes to the server according to the agreed mode.
- characteristic
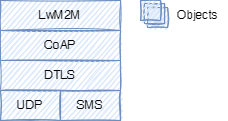
- REST based architecture;
- Message passing is realized through CoAP protocol;
- A compact, efficient and scalable data model is defined.
- Objects and resources
The LwM2M protocol defines a model with resources as the basic unit. Each Resource can carry a value and point to an address to represent each available information in the LwM2M client. Resources exist in Object instances, that is, the instantiation of objects.
LwM2M protocol predefines eight kinds of objects to meet the basic requirements, namely:
| Object | Object ID |
|---|---|
| Security object | 0 |
| Server (server object) | 1 |
| Access Control object | 2 |
| Device (device object) | 3 |
| Connectivity Monitoring (Connectivity Monitoring object) | 4 |
| Firmware (firmware object) | 5 |
| Location (location object) | 6 |
| Connectivity Statistics (connectivity statistics object) | 7 |
In the stage of the client registering with the platform, the LwM2M client passes the object instance carrying the resource information to the LwM2M server to inform the server of the capabilities of its own equipment.
OneNET platform
OneNET is the IoT Internet of things platform of China Mobile, which provides a variety of protocol access and applications. Among them, Nb IoT of mobile OneNET platform adopts LWM2M protocol and CoAP protocol based on the above NB-IOT to realize the communication between UE(User Equipment) and the platform. LWM2M protocol is application layer protocol and CoAP protocol is transport layer protocol.
- OneNET LwM2M objects and resources
OneNET provides rich objects and resource s for LwM2M protocol. The definitions of objects and attributes are partially modified based on OMA specification, which can be viewed for details OneNET LwM2M objects and properties.
-
Digital Input object
object: 3200
resource:id name type 5500 Digital Input State boolean 5501 Digital Input Counter integer 5502 Digital Input Polarity boolean 5503 Digital Input Debounce integer 5504 Digital Input Edge Selection integer 5750 Application Type string 5751 Sensor Type string -
Analog Input object
object: 3202
resource:id name type 5600 Analog Input Current Value float 5601 Min Measured Value float 5602 Max Measured Value float 5603 Min Range Value float 5604 Max Range Value float 5750 Application Type string 5751 Sensor Type string
The above are some of the listed objects and resources. Attention should be paid to the read-write properties of resources during operation.
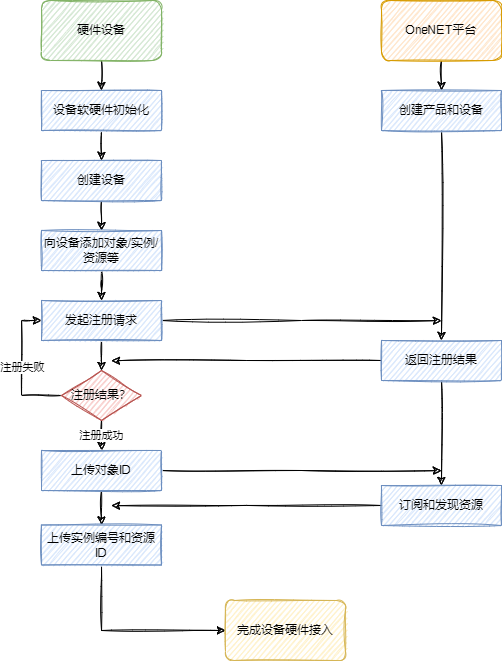
2. Equipment access process
2.1 preparation
- Internet of things SIM card
If the operator of IOT network card we choose is China Mobile, it can be seamlessly connected with OneNET platform. If it is China Unicom or telecom, corresponding restrictions need to be opened. - MCU of OneNET corresponding interface firmware is implemented
- Transplant NB communication module of OneNET Platform SDK
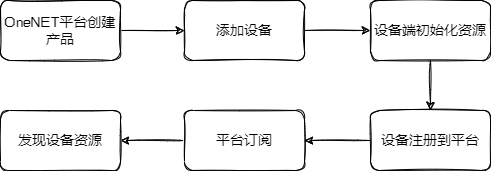
2.2 equipment access steps - Create products and devices on OneNET platform
- Device hardware and software initialization
- Create devices and resources
- Register to OneNET platform
- The platform completes the subscription and discovery of device resources
02 implementation
hardware design
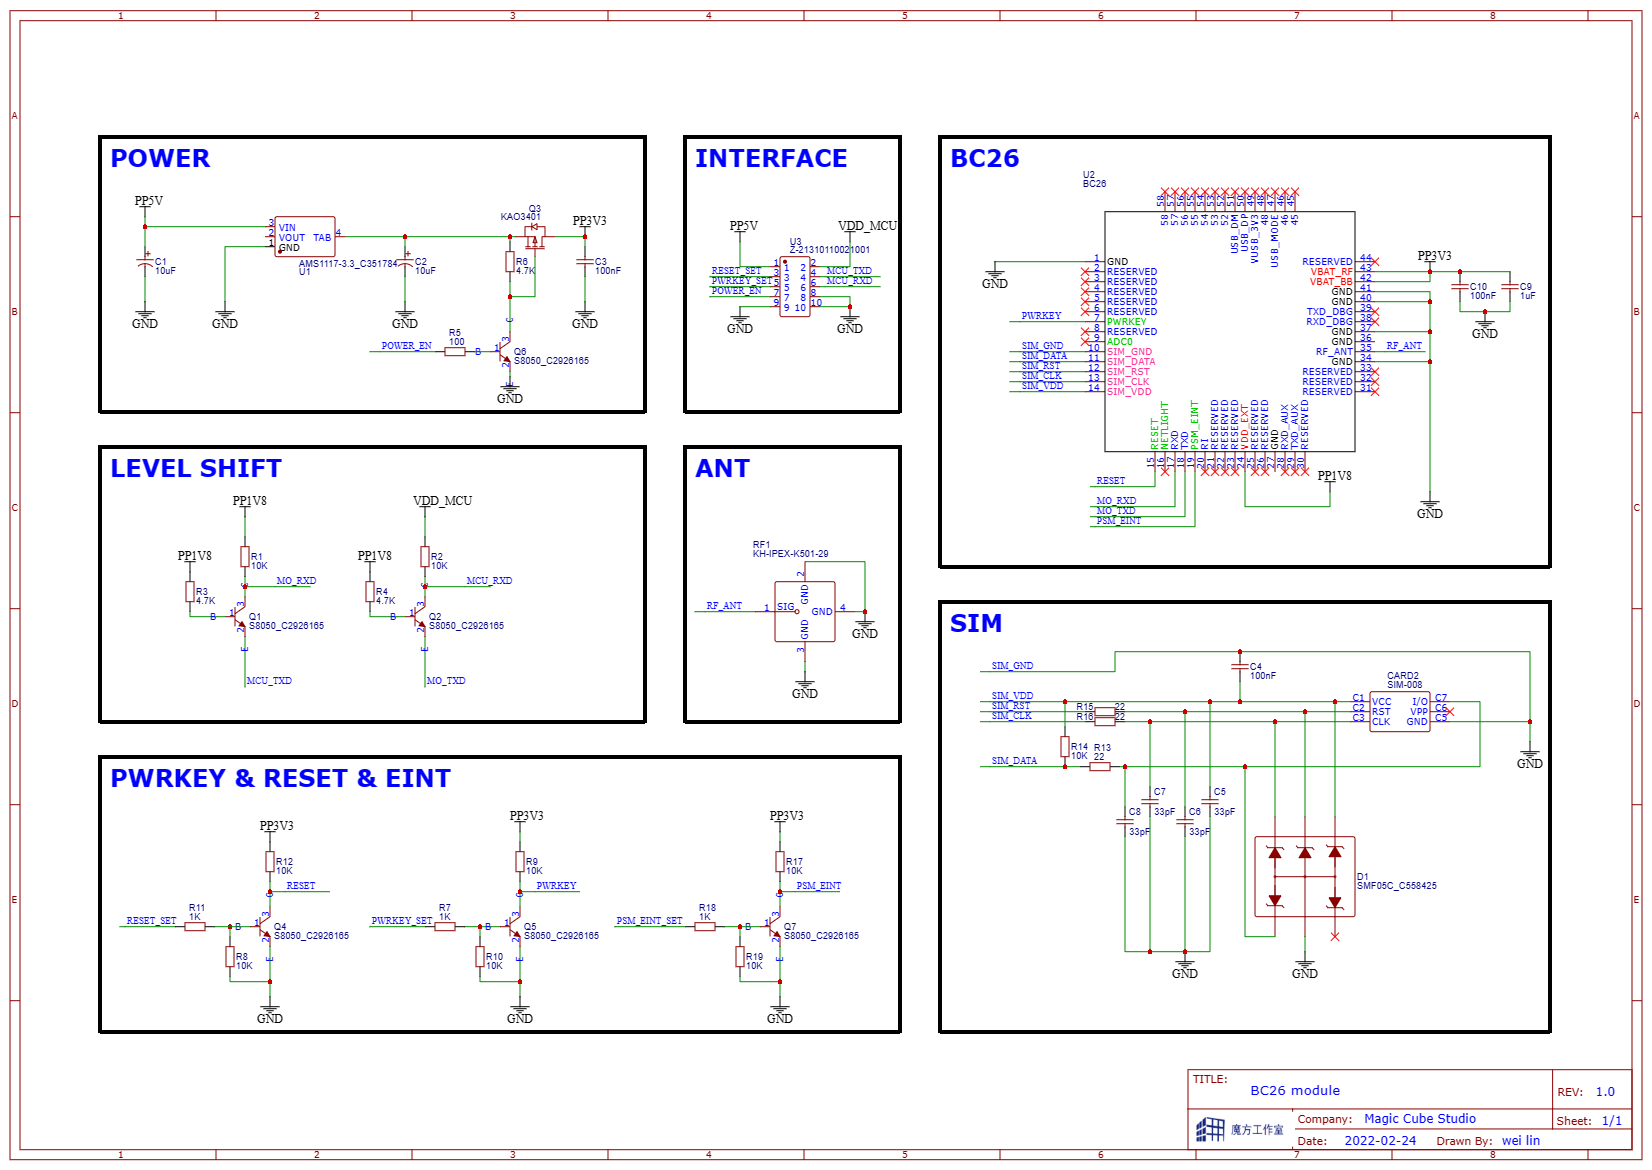
- BC26 module design
For this, you can refer to the official hardware design manual. The following lists the general application circuits.
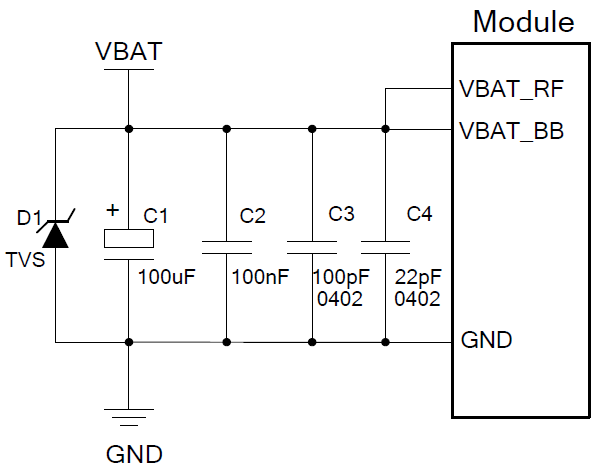
- Power supply circuit
A TVS tube is added near the VBAT input to improve the surge voltage withstand capacity of the module.
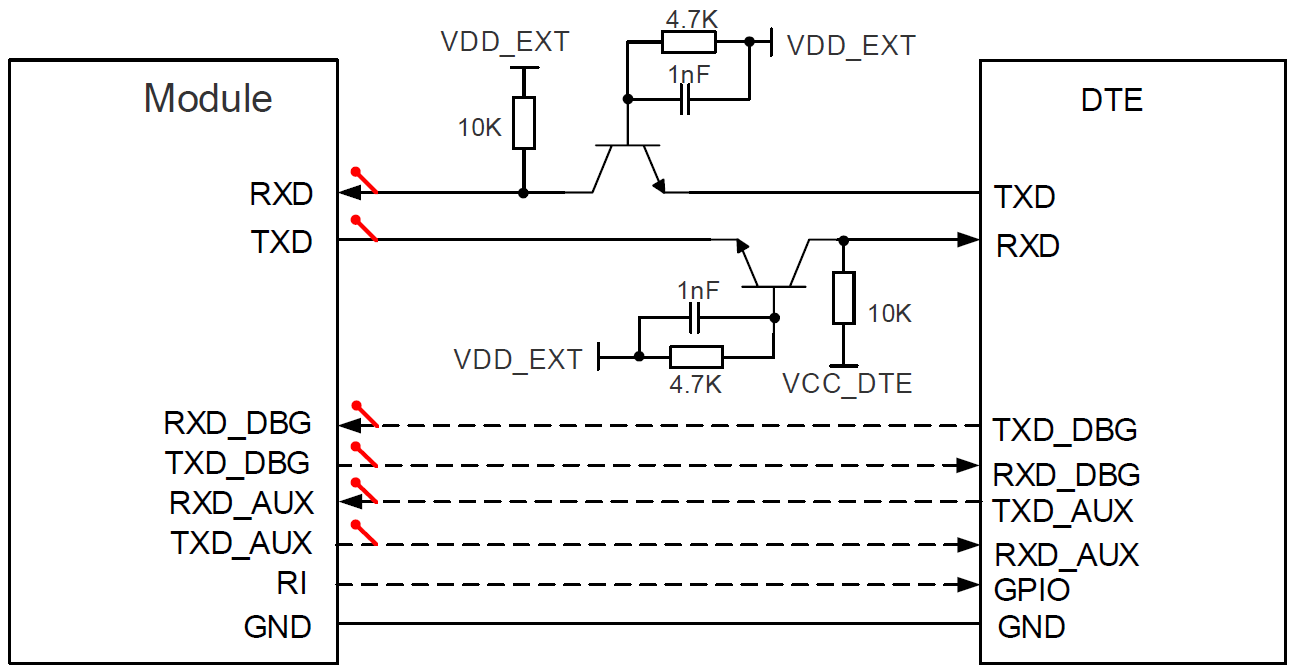
- Serial communication circuit
Because the serial port voltage domain of the module is 1.8V, it needs level conversion when applied to non-1.8v systems. You can use a special level conversion chip or build your own conversion circuit.
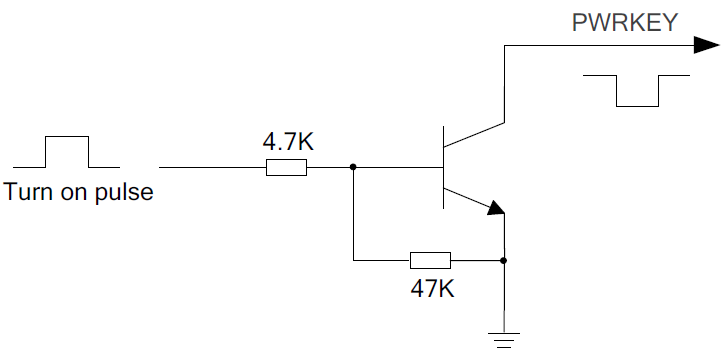
- Power on circuit
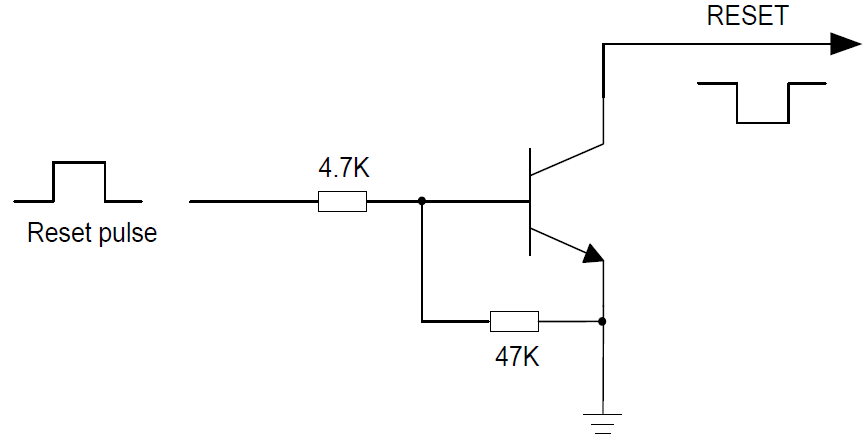
- Reset circuit
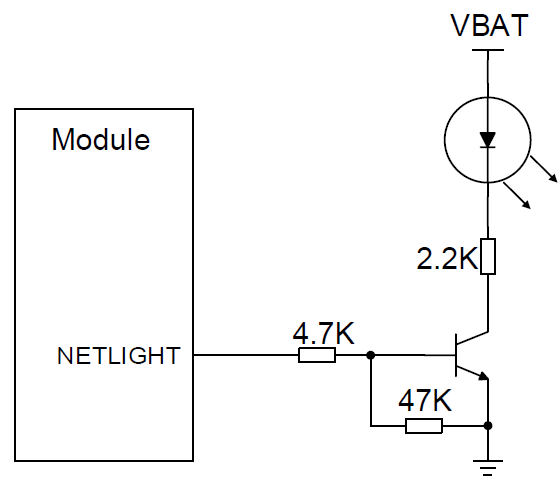
- Network status indication circuit
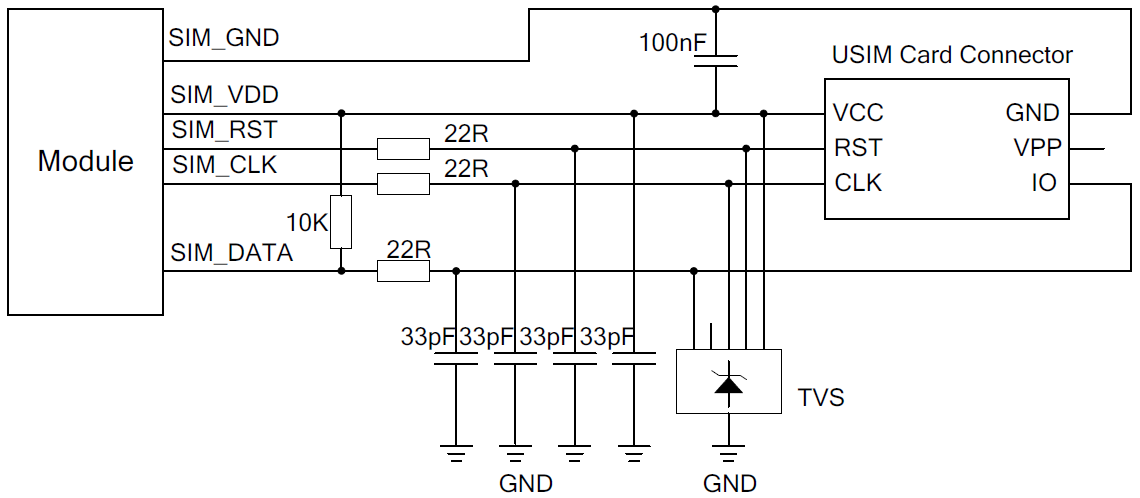
- USIM card circuit
TVS tube is added to the pin of external USIM card base to ensure good ESD protection performance.
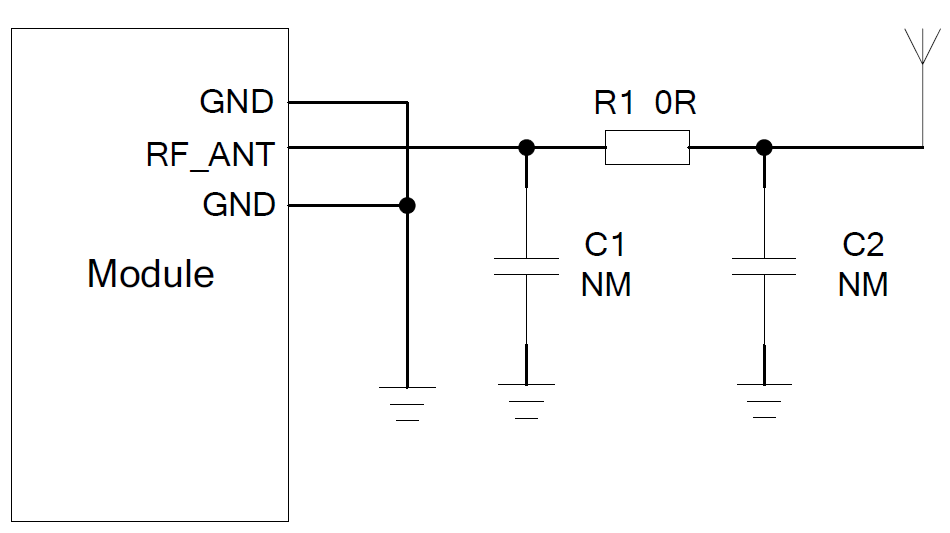
- Antenna circuit
By default, C1 and C2 are not pasted, and only 0 ohm resistance is pasted on R1.
2. Overall hardware design
After power supply, connect UART and power of MCU_ The control signals of en, PWRKEY, RESET and PSM EINT can control the module.
Firmware design
BC26 module configuration
- AT command transceiver
/** Enumerate the instruction table according to the AT instruction manual*/
typedef enum
{
    /** product info*/
    AT_CMD,
    ATI_CMD,
    AT_CGMI_CMD,
    AT_CGMM_CMD,
    AT_CGMR_CMD,
    AT_CGSN_Q_CMD,
    AT_CCLK_Q_CMD,

    /** ...*/

    /** oneNET*/
    AT_MIPLCONFIG_CMD,
    AT_MIPLCREATE_CMD,
    AT_MIPLDELETE_CMD,
    AT_MIPLVER_CMD,
    AT_MIPLADDOBJ_CMD,
    AT_MIPLDELOBJ_CMD,
    AT_MIPLRD_CMD,
    AT_MIPLOPEN_CMD,
    AT_MIPLCLOSE_CMD,
    AT_MIPLDISCOVERRSP_CMD,
    AT_MIPLOBSERVERSP_CMD,
    AT_MIPLREADRSP_CMD,
    AT_MIPLREAD_CMD,
    AT_MIPLWRITERSP_CMD,
    AT_MIPLWRITE_CMD,
    AT_MIPLEXECUTERSP_CMD,
    AT_MIPLPAPAMETERRSP_CMD,
    AT_MIPLNOTIFY_CMD,
    AT_MIPLUPDATE_CMD,
} AT_CMT_T;
/** AT Instruction sending*/
/*!
 * @brief       Send AT command
 *
 * @param       cmdType
 *
 * @param       cmdBuffer
 *
 * @retval      error
 *
 */
int BC26_ATCmdSend(uint8_t cmdType, AT_CMD_BUF_T cmdBuffer)
{
    char cmdStr[100];

    char lineEnd[] = "\r\n";

    switch(cmdType)
    {
        case AT_CMD:
            sprintf(cmdStr, "AT%s", lineEnd);
            break;

        case ATI_CMD:
            sprintf(cmdStr, "ATI%s", lineEnd);
            break;

        case AT_CIMI_CMD:
            sprintf(cmdStr, "AT+CIMI%s", lineEnd);
            break;

        case AT_CGSN_Q_CMD:
            sprintf(cmdStr, "AT+CGSN=%d%s", cmdBuffer.Int[0], lineEnd);
            break;

        /** ...*/

        case AT_MIPLWRITERSP_CMD:
            sprintf(cmdStr, "AT+MIPLWRITERSP=%d,%d,%d%s",cmdBuffer.Int[0],cmdBuffer.Int[1],cmdBuffer.Int[2],lineEnd);
            printf(">> %s\r\n",cmdStr);
            break;

        default:
            return 1;
    }

    LPUART1_SendStr(cmdStr);

    return 0;
}
/** AT Instruction reception*/
/*!
 * @brief       Get AT ack
 *
 * @param       cmdType
 *
 * @param       timeout
 *
 * @param       waitTime
 *
 * @retval      None
 *
 */
void BC26_ATAckGet(uint8_t cmdType, uint16_t timeout, uint16_t waitTime)
{
    char *atAckStr;
    char atAckStr1[100];
    char atAckStr2[20];

    int atAckNum[11];
    float atAckFltNum[10];
    uint8_t timeoutFlag = 0;

    switch(cmdType)
    {
        case AT_CMD:
            Delay_ms(waitTime);
            while(timeout)
            {
                atAckStr = strstr((const char*)rxBufLPUART1, (const char*)"OK");
                if(atAckStr == NULL)
                {
                    Delay_ms(1);
                    timeout--;
                    if(timeout == 0)
                    {
                        timeoutFlag = 1;
                    }
                }
                else
                {
                    printf("<< %s",atAckStr);
                    break;
                }
            }
            break;

        case ATI_CMD:
            Delay_ms(waitTime);
            while(timeout)
            {
                atAckStr = strstr((const char*)rxBufLPUART1, (const char*)"Quectel_Ltd");
                sscanf(atAckStr, "%*[^\n]\n%[^\r]%*[^:]:%[^\r]", atAckStr1,atAckStr2);
                if(atAckStr == NULL)
                {
                    Delay_ms(1);
                    timeout--;
                    if(timeout == 0)
                    {
                        timeoutFlag = 1;
                    }
                }
                else
                {
                    printf("<< ET:%s\r\n",atAckStr1);
                    printf("<< Rev:%s\r\n",atAckStr2);
                    break;
                }
            }
            break;

        /** ...*/

        case AT_MIPLWRITERSP_CMD:
            Delay_ms(waitTime);
            while(timeout)
            {
                atAckStr = strstr((const char*)rxBufLPUART1, (const char*)"OK");
                if(atAckStr == NULL)
                {
                    Delay_ms(1);
                    timeout--;
                    if(timeout == 0)
                    {
                        timeoutFlag = 1;
                    }
                }
                else
                {
                    printf("<< %s",atAckStr);
                    break;
                }
            }
            break;

        default:
            break;
    }

    if(timeoutFlag)
    {
        g_errorFlag = ERR_TIMEOUT;
    }

    memset(rxBufLPUART1,0,LPUART1_REV_LEN);
    rxStaLPUART1.USART_RX_STA_B.VALID_LENGHT = 0;
    timeoutFlag = 0;
}
- BC26 module initialization
/*!
 * @brief       Init BC26 module
 *
 * @param       None
 *
 * @retval      error
 *
 */
int BC26_Init(void)
{
    AT_CMD_BUF_T cmdBuffer;

    /** Automatic matching baud rate*/
    printf("Auto match boudrate\r\n");
    Delay_ms(200);

    cmdBuffer.Int[0] = 0;
    BC26_ATCmdSend(AT_CMD,cmdBuffer);
    BC26_ATAckGet(AT_CMD,100,100);

    BC26_ATCmdSend(AT_CMD,cmdBuffer);
    BC26_ATAckGet(AT_CMD,100,100);

    BC26_ATCmdSend(AT_CMD,cmdBuffer);
    BC26_ATAckGet(AT_CMD,100,100);

    if(BC26_ErrorHandler())
    {
        return 1;
    }

    BC26_ATCmdSend(ATI_CMD,cmdBuffer);
    BC26_ATAckGet(ATI_CMD,500,500);

    BC26_ATCmdSend(AT_CIMI_CMD,cmdBuffer);
    BC26_ATAckGet(AT_CIMI_CMD,200,500);

    cmdBuffer.Int[0] = CGSN_IMEI;
    BC26_ATCmdSend(AT_CGSN_Q_CMD,cmdBuffer);
    BC26_ATAckGet(AT_CGSN_Q_CMD,200,500);

    BC26_ATCmdSend(AT_CGATT_CMD,cmdBuffer);
    BC26_ATAckGet(AT_CGATT_CMD,200,500);

    BC26_ATCmdSend(AT_QBAND_CMD,cmdBuffer);
    BC26_ATAckGet(AT_QBAND_CMD,200,500);

    BC26_ATCmdSend(AT_CSQ_CMD,cmdBuffer);
    BC26_ATAckGet(AT_CSQ_CMD,200,500);

    BC26_ATCmdSend(AT_CEREG_Q_CMD,cmdBuffer);
    BC26_ATAckGet(AT_CEREG_Q_CMD,200,500);

    cmdBuffer.Int[0] = 1;
    BC26_ATCmdSend(AT_CGPADDR_S_CMD,cmdBuffer);
    BC26_ATAckGet(AT_CGPADDR_S_CMD,200,500);

    if(BC26_ErrorHandler())
    {
        return 1;
    }

    return 0;
}
OneNET platform interface design
OneNET platform supports resource models defined by LWM2M and IPSO. Users need to select the appropriate resource model from these two standards according to the sensor type. The resource model is a three-tier structure of Object / Instance / Resource.
- Object: indicates a type of sensor.
- Instance: the number of sensors of the same type.
- Resource: description of some characteristics of the sensor.
After the device creates a device (dev) in the application, you also need to create an object and the corresponding instance and resource.
- Create objects and resources
The resource items of the original AI and DI objects can be used for the resources of their own projects.
/*!
 * @brief oneNET Comparison table of platform object attributes and gas meter data
 *        Object property name property type operation type gas meter data
 *     AI(3202)   AICV(5600)     float          R            standardConditionFlow
 *     AI(3202)   MinMV(5601)    float          R                   NONE
 *     AI(3202)   MamMV(5602)    float          R                   NONE
 *     AI(3202)   MinRV(5603)    float          R                   NONE
 *     AI(3202)   MaxRV(5604)    float          R                   NONE
 *     AI(3202)   AT(5750)       string        W/R              gasUnitPrice
 *     AI(3202)   ST(5751)       string         R                   NONE
 *
 *     DI(3200)   State(5500)    bool           R                   NONE
 *     DI(3200)   Counter(5501)  int            R                gasMeterStatus
 *     DI(3200)   Polarity(5502) bool          W/R               airValCTRL
 *     DI(3200)   Debounce(5503) int           W/R               gasSerialNum
 *     DI(3200)   ES(5504)       int           W/R               gasProductID
 *     DI(3200)   AT(5750)       string        W/R               gasMoney
 *     DI(3200)   ST(5751)       string         R                   NONE
 */
- Platform registration operation
The following is the communication process from device registration to deregistration.
AT+MIPLCREATE
+MIPLCREATE: 0                     //Successfully created communication suite instance.
OK
AT+MIPLADDOBJ=0,3200,"1",1,7,0    //Add LwM2M object.
OK                                //The object was successfully added and the instance with ID 0 will be registered.
AT+MIPLOPEN=0,100                 //Send a registration request to OneNET.
OK
+MIPLEVENT: 0,1 //Start connecting to the Bootstrap server.
+MIPLEVENT: 0,2 //Successfully connected to Bootstrap server.
+MIPLEVENT: 0,4 //Successfully connected to OneNET platform.
+MIPLEVENT: 0,6 //Successfully registered to OneNET platform.
+MIPLOBSERVE: 0,69234,1,3200,0,-1 //Received subscription request (3311 / 0).
AT+MIPLOBSERVERSP=0,69234,1 //Respond to the subscription request, and the result code is 1.
OK
+MIPLDISCOVER: 0,26384,3200 //Resource discovery request received.
AT+MIPLDISCOVERRSP=0,26384,1,34,"5500;5501;5502;5503;5504;5750;5751"  //Use the resource ID list to respond to resource discovery requests.
OK
AT+MIPLDELOBJ=0,3200 //Delete the LwM2M object.
OK
AT+MIPLCLOSE=0 //Send a logout request to the OneNET platform.
OK
+MIPLEVENT: 0,15 //Successfully logged off.
AT+MIPLDELETE=0
OK //Successfully deleted communication suite instance.
- Data reporting
Note that the MsgID number should be consistent with that issued during registration.
AT+MIPLNOTIFY=0,69234,3200,0,5501,3,4,29416122,0,0 //Report resource data.
OK
- Read resource response
+MIPLREAD: 0,3123,3200,0,5501 //Read resource request received.
AT+MIPLREADRSP=0,3123,1,3299,0,5501,3,4,29416122,0,0 /Respond to read requests.
OK //Successfully sent data 29416122 to the application server.
- Write resource response
+MIPLWRITE: 0,38017,3200,0,5750,2,5,3132333435,0,0 //After receiving the write resource request, write 12345.
AT+MIPLWRITERSP=0,38017,2 //In response to the write request, the result code is 2.
OK
OneNET platform configuration
The device created on the platform side is the mapping of the real device on the platform side. Users can query information, issue commands, manage data flow, add triggers and other operations on the real device through the "virtual device" on the platform side.
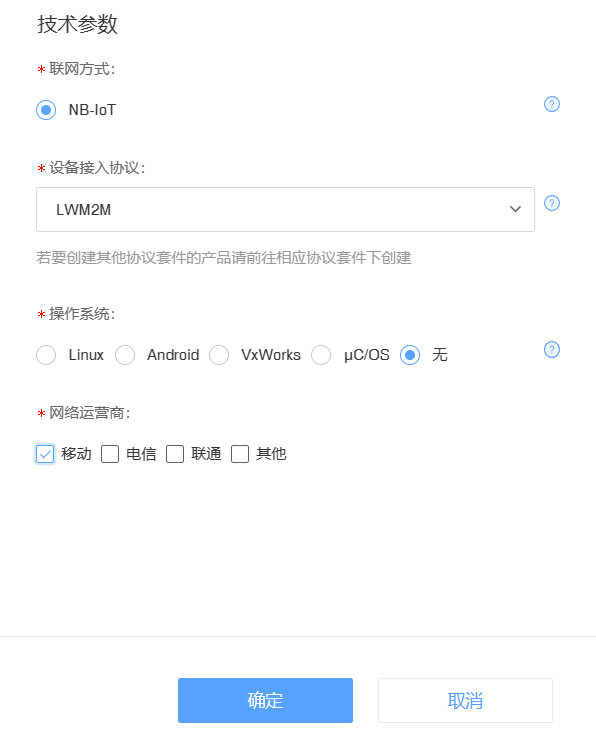
- Create product
After entering the OneNET platform console, click the "add product" button. Fill in the basic information of the product according to the prompts in the pop-up page to create the product.
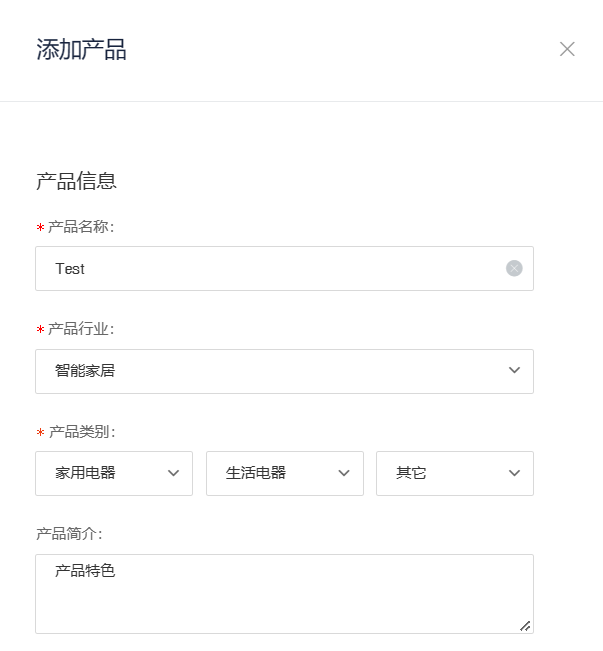
Networking mode: NB IOT;
Equipment access protocol selection: LWM2M;
Operating system selection: none;
Network operator choice: mobile.
Here, take the mobile Internet of things sim card as an example. Finally, click OK to complete the creation of the product.
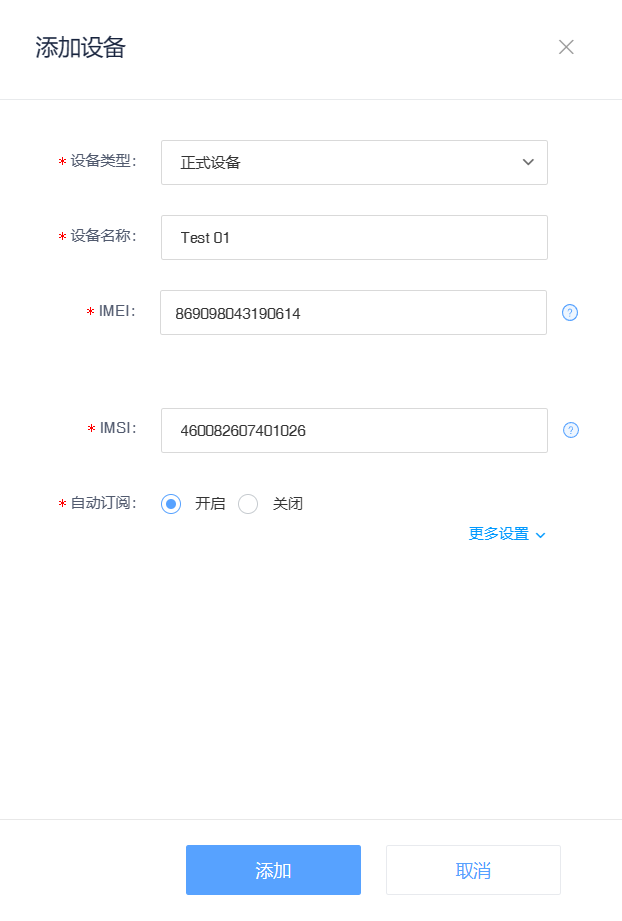
- Add device
After creating the product, click "equipment list" and then select "add equipment". Fill in IMEI, IMSI and other information, and turn on "automatic subscription". If the automatic subscription function is enabled, the platform will issue instructions to obtain the resource information of the device after the device is successfully registered.
-
Device hardware initialization
After the equipment is powered on, the software and hardware initialization of the equipment needs to be completed. Hardware initialization includes power on of each hardware module, register initialization of processor, working mode initialization, etc. Software initialization includes basic communication suite initialization, application interface initialization, application program initialization, etc. -
Creation of device objects and resources
As above Create objects and resources Described. -
Device registration to platform
After the initialization of the basic communication suite of the device and the creation of device resources, the registration code of the registration request can be reported to the OneNET platform. After receiving the registration code of the login request, the server will verify the parameters in the registration code and return the registration result. If the device is registered successfully, the "online status" of the product will change to the "online" identification.

- Platform subscription
After the "automatic subscription" function is enabled, the OneNET platform will send an Observer message to the device after the device is registered with the platform. After receiving this message, the device needs a corresponding response platform.

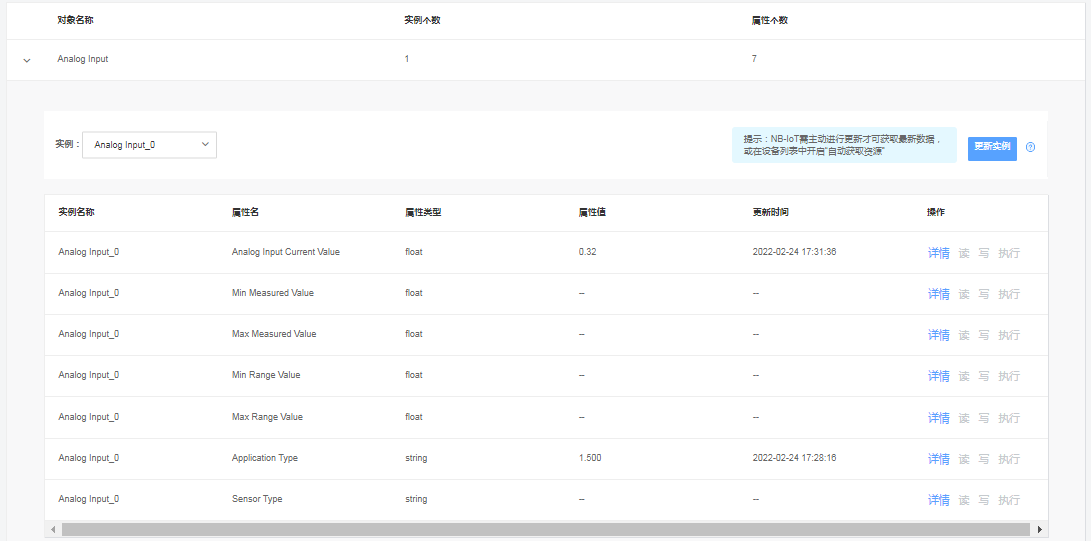
- Discover device resources
Automatic discovery of device resources is not enabled by default on the platform side, and users need to "update instances" manually. After clicking update, the platform and device will send a Discover message. After receiving this message, the device needs a corresponding response platform.
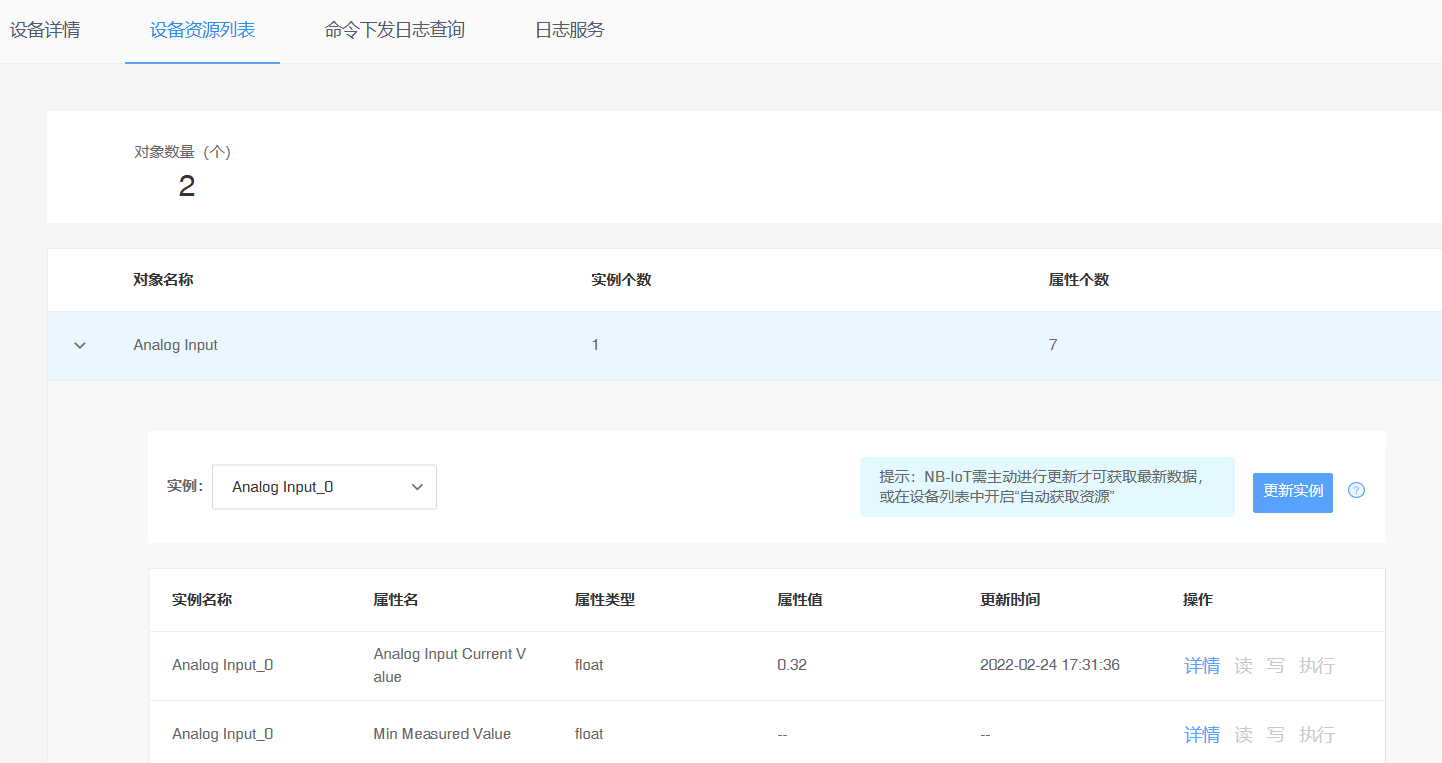
If you want the platform to automatically discover resources, you need to turn on the "automatically discover resources" option in the "device list".

The following figure shows the equipment with updated resources.
03 application
Applet application design
Platform data push
The platform pushes data to the registered address of the third-party application platform in the form of HTTPS POST request, and the relevant information of the pushed data is placed in the body part of the HTTPS request in the form of JSON string.
- news
There are two types of messages: data point messages and equipment online and offline messages. The data point message is divided into single data point message and data point message batch form. Different data points in the batch form of data point message are distinguished by different timestamps.
//Data point message
{
	"errno": 0,
	"data": {
		"update_at": "2022-01-27 12:35:43",
		"id": "3200_0_5504",
		"create_time": "2022-01-17 14:11:24",
		"current_value": 102304069
	},
	"error": "succ"
}
//Data flow message
{
    "errno":0,
    "data":{
        "cursor":"25971_564280_1448961152173",
        "count":5,
        "datastreams":[
            {
                "datapoints":[
                    {
                        "at":"2022-03-01 17:10:24.981",
                        "value":"35"
                    },
                    {
                        "at":"2022-03-01 17:10:53.406",
                        "value":"38"
                    },
                    ...
                ],
                "id":"3200_0_5501"
            },
            ...
        ]
    },
    "error":"succ"
}
- Description of message related fields
Related fields can be queried OneNET platform documentation , I won't repeat it here.
API interface
Here are only the APIs related to reading and writing resources. For a detailed introduction to the API, you can view the official documents.
- Platform related API
-
Query equipment information
project describe HTTP method GET URL https://api.heclouds.com/devices/<device_id> HTTP header API Key: XXXX ffff zzz, which must be the Key to view the device
Content-Type:application/jsonRequest return {
"errno": 0,
"data": {
"area": "3",
"private": false,
"create_time": "2022-01-09 17:40:53",
"act_time": "2022-01-09 17:42:52",
"obsv": true,
"auth_info": {
"863409058100099": "460044813808442"
},
"last_ct": "2022-01-10 21:57:58",
"imsi": "460044813808442",
"title": "GeehyGasMeter02",
"tags": [],
"manufacturer": "mobile communication",
"obsv_st": false,
"protocol": "LWM2M",
"rg_id": "863409058100099",
"imsi_old": [
"460044813808442"
],
"online": false,
"location": {
"lat": 0,
"lon": 0
},
"id": "878229973",
"datastreams": [
{
"create_time": "2022-01-09 17:43:40",
"uuid": "5cad4abc-c25a-46bd-b0e7-7f0fe7c843dd",
"id": "3303_0_5700"
},
{
"create_time": "2022-01-09 20:21:40",
"uuid": "b8a891af-c714-415e-ac83-0d8b83c06f82",
"id": "3200_0_5501"
},
{
"create_time": "2022-01-09 20:23:11",
"uuid": "4d2d2f9a-07fb-4555-b609-ef04258e3396",
"id": "3200_0_5500"
},
{
"create_time": "2022-01-09 20:45:05",
"uuid": "c26488b6-c394-4507-8fb9-23e207c7f94b",
"id": "3202_0_5600"
},
{
"create_time": "2022-01-09 20:45:14",
"uuid": "85d877f4-40b0-48a4-9bb2-77f40d6016ad",
"id": "3202_0_5601"
},
{
"create_time": "2022-01-09 20:45:18",
"uuid": "b419c823-d7ad-4426-9b43-19eebf45dcd8",
"id": "3202_0_5602"
},
{
"create_time": "2022-01-09 20:45:21",
"uuid": "0f0785c8-658c-4d58-90b4-7806606e1b41",
"id": "3202_0_5603"
},
{
"create_time": "2022-01-09 20:45:23",
"uuid": "28c67b22-f680-48e6-b6b3-0f570f48fa69",
"id": "3202_0_5604"
}
],
"desc": ""
},
"error": "succ"
} -
Read data point
project describe HTTP method GET URL https://api.heclouds.com/devices/<device_id>/datastreams/ HTTP header API key: XXXX ffff zzz / / must be a MasterKey HTTP parameters “resource_id”:3200_ 0_ 5504, / / resource ID number, required HTTP response message content {
"errno": 0,
"data": {
"update_at": "2022-01-27 12:35:43",
"id": "3200_0_5504",
"create_time": "2022-01-17 14:11:24",
"current_value": 102304069
},
"error": "succ"
}explain 1. In the response message, errno indicates the error code and error indicates the error reason. -
Write data point
project describe HTTP method POST URL https://api.heclouds.com/devices/<device_id>/datapoints HTTP header API key: XXXX ffff zzz / / must be a MasterKey HTTP parameters {
"datastreams": [{
"id": "3200_0_5502",
"datapoints": [{
"at": "2022-01-28T00:32:43",
"value": 1
}
]
}
]
}HTTP response message content {
"errno": 0,
"error": "succ"
}explain 1. In the response message, errno indicates the error code and error indicates the error reason.
- Equipment related API
-
Immediate command - read device data point
project describe HTTP method GET URL https://api.heclouds.com/nbiot HTTP header API key: XXXX ffff zzz / / must be a MasterKey HTTP parameters "imei": 121, / / ID code of nbiot device, required
"Object_id": 1212, / / the object ID of the device corresponds to the data flow ID in the platform model, which is required
"Obj_inst_id": 1212, / / the ID of a specific instance under the nbiot device object, which corresponds to a part of the key value of the data point in the platform model. Optional
"Res_id": 2122, / / resource ID of nbiot device, optionalHTTP response message content {
"errno": 0,
"error": "succ",
"data": [{
"obj_inst_id":123,
"res":[
{
"res_id":1234,
"val": Object / / can be boolean, string, long, double type data
},
.........
]
},
.........
]
}explain 1. In the response message, errno indicates the error code and error indicates the error reason. -
Immediate command - write device data point
project describe HTTP method POST URL https://api.heclouds.com/nbiot HTTP header API key: XXXX ffff zzz / / must be a MasterKey HTTP parameters "imei": 121, / / ID code of nbiot device, required
"Object_id": 1212, / / the object ID of the device corresponds to the data flow ID in the platform model, which is required
"Obj_inst_id": 1212, / / the ID of a specific instance under the nbiot device object, which corresponds to a part of the key value of the data point in the platform model. Optional
"mode": 1HTTP response message content {
"errno": 0,
"error": "succ"
}explain 1. In the response message, errno indicates the error code and error indicates the error reason. -
Cache command - read device data point
project describe HTTP method GET URL http://api.heclouds.com /nbiot/offline HTTP header API key: XXXX ffff zzz / / must be a MasterKey HTTP parameters "imei": 121, / / ID code of nbiot device, required
"Object_id": 1212, / / the object ID of the device corresponds to the data flow ID in the platform model, which is required
"Obj_inst_id": 1212, / / the ID of a specific instance under the nbiot device object, which corresponds to a part of the key value of the data point in the platform model. Optional
"Res_id": 2122, / / resource ID of nbiot device, optional
"valid_time": "2022-03-01T17:30:00"
"expired_time": "2022-03-02T17:30:00"_ time
"retry": between 3 / / [3-10], indicating the number of failed retries (waiting for the next device update or online), requiredHTTP response message content {
"errno": 0,
"error": "succ",
"data": {
"uuid": "f195c6d1-7035-5747-a4ce-b6f6b09a2d73"
}
}explain 1. In the response message, errno indicates the error code and error indicates the error reason. -
Cache command - write device data point
project describe HTTP method POST URL https://api.heclouds.com /nbiot/offline HTTP header API key: XXXX ffff zzz, / / must be a MasterKey
Content-Type:application/jsonHTTP parameters "imei": 121, / / ID code of nbiot device, required
"Object_id": 1212, / / the object id of the device, which corresponds to the data flow ID in the platform model. It is required
"Object_inst_id": 1212, / / the ID of a specific instance under the nbiot device object, which corresponds to the platform model
Part of the key value of the data point in. Required
"mode": 1
"valid_time": "2022-03-01T17:30:00"
"expired_time": "2022-03-02T17:30:00"_ time
"retry": between 3 / / [3-10], indicating the number of failed retries (waiting for the next device update or online). RequiredHTTP content {
"data": [{
"res_id":123,
"type": 1, / / optional. At present, only 1 is supported. At this time, the data is a hexadecimal string
"val":Object / / can be boolean, string, long, double
},
{...},
...
]
}HTTP response message content {
"errno": 0,
"error": "succ",
"data": {
"uuid": "432a877d-53ab-5dbb-8c51-4853f65d94fb"
}
}explain 1. In the response message, errno indicates the error code and error indicates the error reason.
API testing tools
Before starting applet application design, we need to use some API testing tools to verify whether the relevant API interfaces are correct. Generally, we will use "Fiddler" or "ApiPost".

-
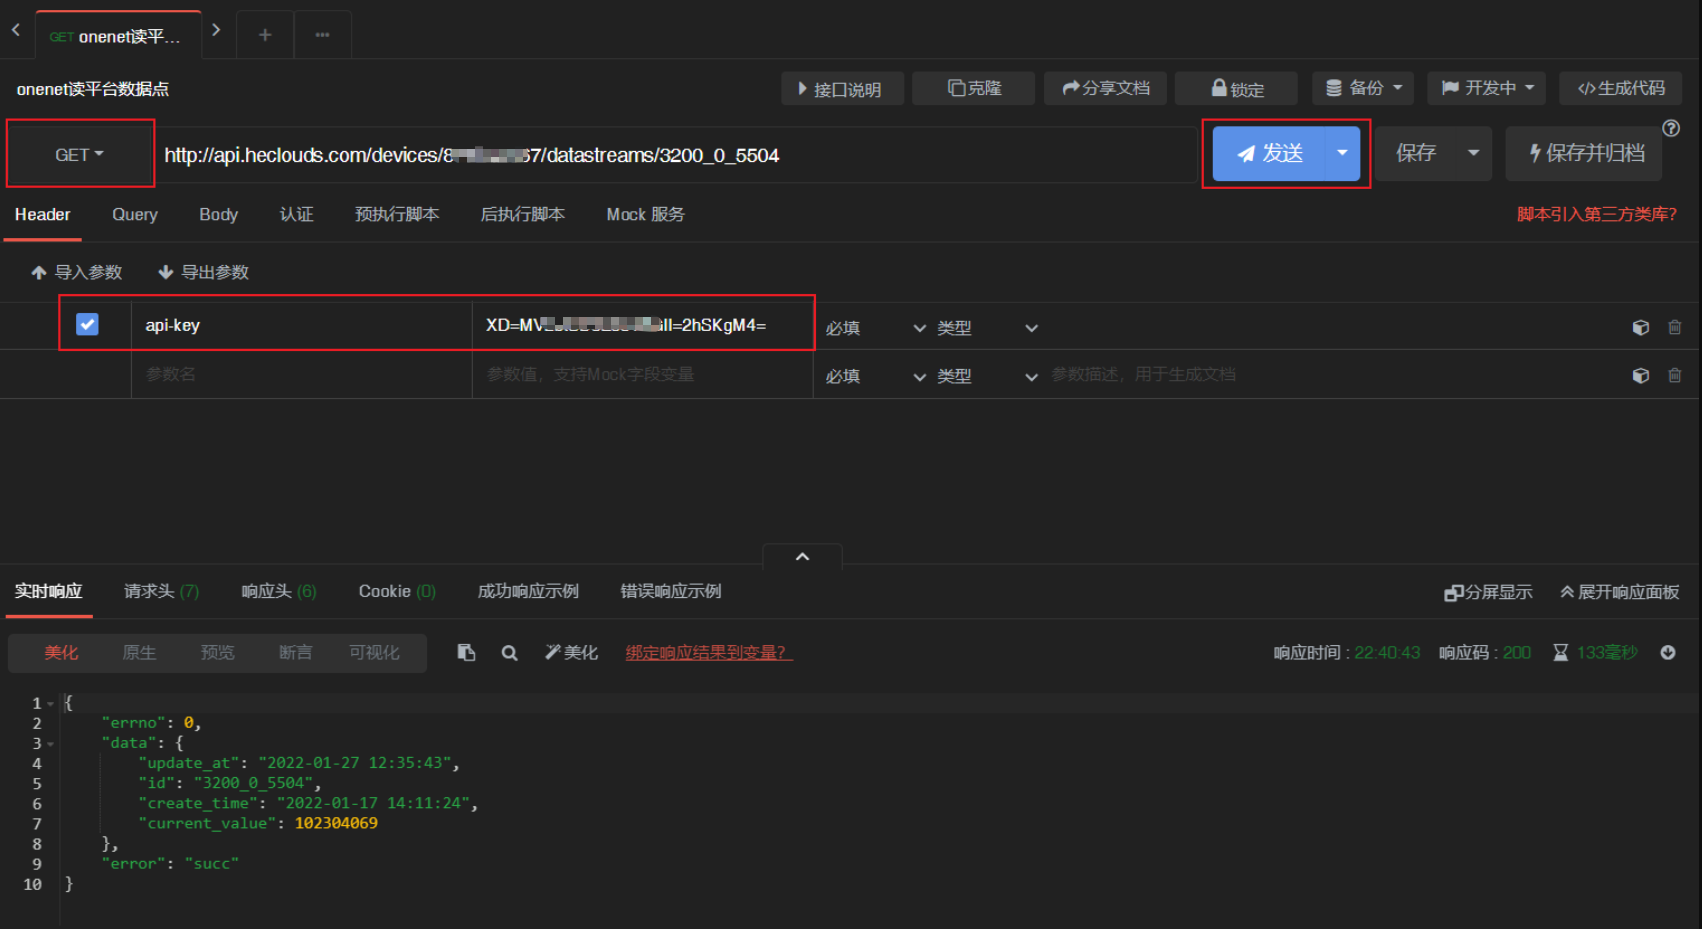
ApiPost usage
Take reading platform data points as an example. Create a new API interface, select HTTP method as GET, and fill in the URL of the platform data point. Then fill in the API key in the HTTP header, and finally click the "send" button to obtain the real-time response of the platform.
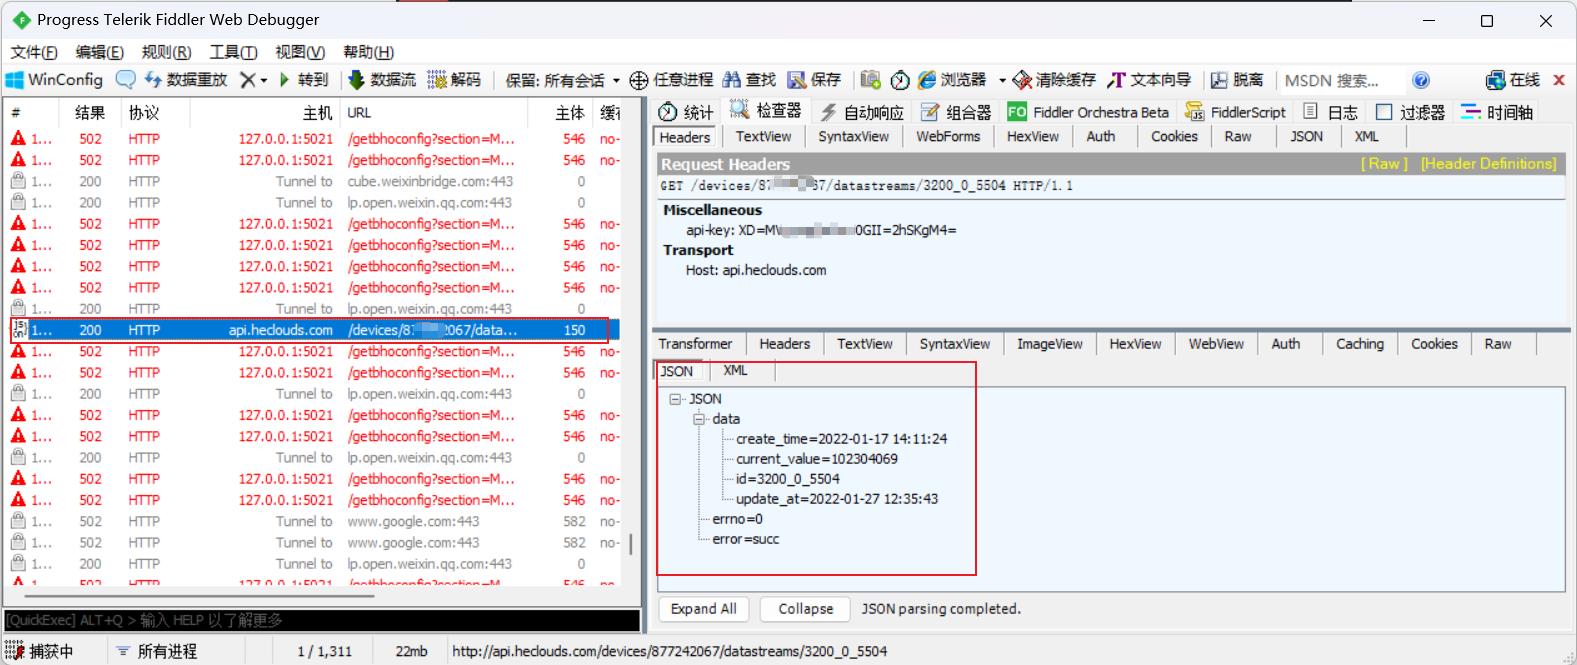
- Fiddler usage
Take reading platform data points as an example. In the "combiner" tab, select the HTTP method as GET, and fill in the URL of the data point of the reading platform. Then fill in the API key in the HTTP header, and finally click the "execute" button.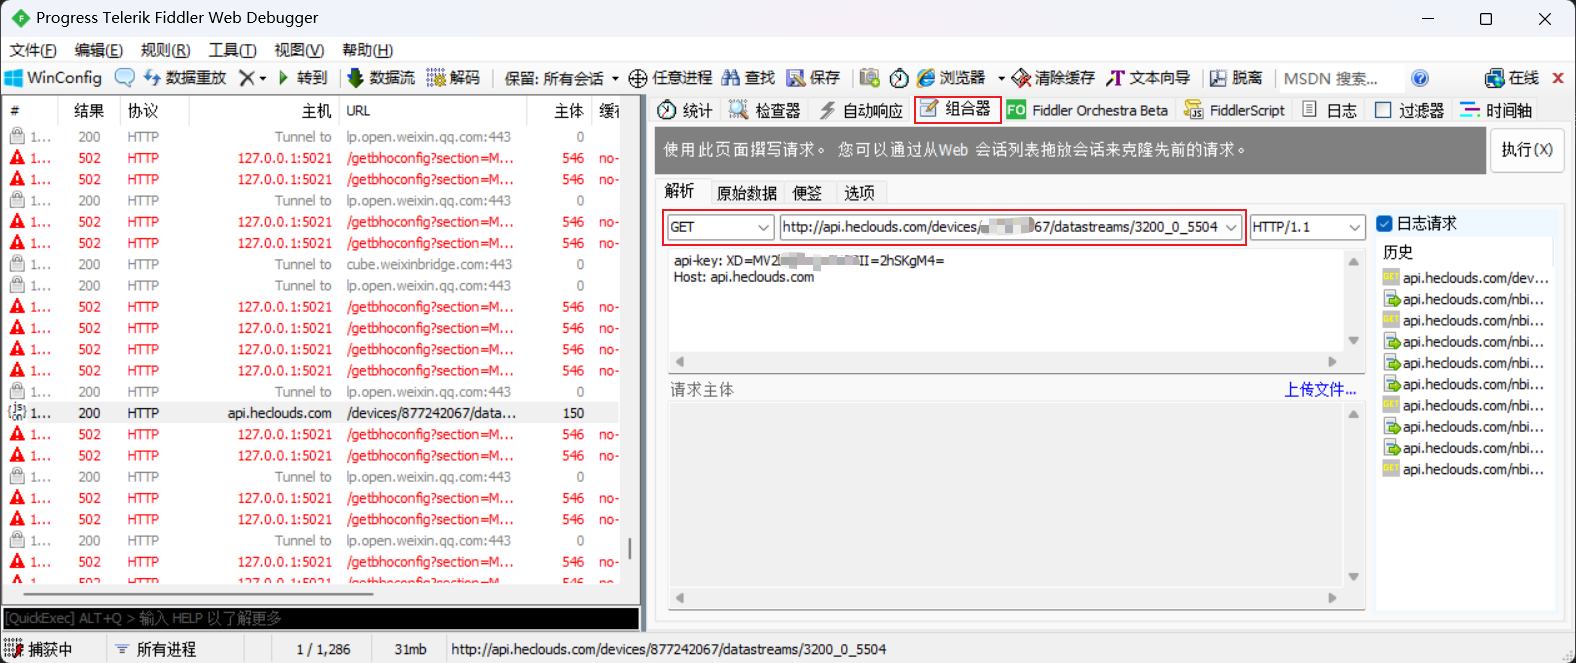
Wait for a moment to see the response in the viewer on the left. After double clicking the response, you can view the JSON string and other details.
UI design of applet
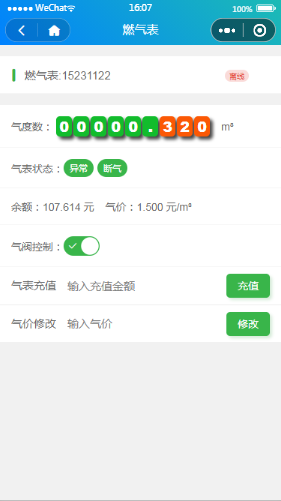
Only some UI are listed here, taking the gas degree as an example.
- Yes js page file to define and initialize data variables.
Page({

    /**
     * Initial data of the page
     */
    data: {
        device_info:{
            flowQty:0,
            serialNum:0,
            productID:0,
            stdFlow:0.0,
            gasMoney:0.0,
            gasUnitPrice:0.0,
            gasMeterStatus:0,
            gasOnlineStatus:0,
            airValSta:false,
            //Bearing number
            stdFlowArr: [0,0,0,0,0,0,0,0],
            deviceName:"str",
            apiKey:"str",
            deviceID:0,
            deviceIMEI:0,
            deviceIMSI:0,
            deviceConnectStatus:false
        },
    },
}
- Design the UI and bind the page data.
<view class="bg-white margin-top">
    <view class="flex flex-wrap solid-bottom padding-top padding-bottom align-center">
        <view class="basis-xs padding-left">
            <text class="text-cut">Bearing number:</text>
        </view>
        <view class="basis-lo justify-start text-center">
            <view class="grid col-10 align-center">
                <view class="bg-green-gs number-gs-f">
                    <text class="text-white">{{gas_meter_info.stdFlowArr[0]}}</text>
                </view>
                <view class="bg-green-gs number-gs">
                    <text class="text-white">{{gas_meter_info.stdFlowArr[1]}}</text>
                </view>
                <view class="bg-green-gs number-gs">
                    <text class="text-white">{{gas_meter_info.stdFlowArr[2]}}</text>
                </view>
                <view class="bg-green-gs number-gs">
                    <text class="text-white">{{gas_meter_info.stdFlowArr[3]}}</text>
                </view>
                <view class="bg-green-gs number-gs">
                    <text class="text-white">{{gas_meter_info.stdFlowArr[4]}}</text>
                </view>
                <view class="bg-green-gs number-gs">
                    <text class="text-white">.</text>
                </view>
                <view class="bg-orange-gs number-gs">
                    <text class="text-white">{{gas_meter_info.stdFlowArr[5]}}</text>
                </view>
                <view class="bg-orange-gs number-gs">
                    <text class="text-white">{{gas_meter_info.stdFlowArr[6]}}</text>
                </view>
                <view class="bg-orange-gs number-gs">
                    <text class="text-white">{{gas_meter_info.stdFlowArr[7]}}</text>
                </view>
                <view class="padding-left">
                    <text>m³</text>
                </view>
            </view>
        </view>
    </view>
</view>
API request implementation of applet
- Basic information definition
Define platform API, device name, interface and other information.
//onenet device info
var Test01 = {
    deviceName:"Test 01",
    apiKey:"XD=MV2btSD8Es022II=2hSKgM4=",
    deviceID:897824175,
    deviceIMEI:0,
    deviceIMSI:0,
    deviceConnectStatus:false,
}

const Host = "api.heclouds.com"
//get/post datapoints
const datapointsInfoURL = "https://api.heclouds.com/devices/"
const deviceInfoURL = "https://api.heclouds.com/devices/"
//get/post device resource cmd
const devResourceURL = "https://api.heclouds.com/nbiot?imei = "/ / Online
const devResOfflineURL = "http://api.heclouds.com/nbiot/offline?imei = "/ / offline

const stdFlowID = "3202_0_5600"        //Standard condition quantity
const moneyID = "3200_0_5750"          //balance
- Get device information
getDeviceInfo:function(e) {
    var that = this

    wx.request({
      url: deviceInfoURL + Test01.deviceID,
      header: {
        "api-key": Test01.apiKey
      },
      data: {

      },
      method:"GET",
      success(res) {
        console.log("**********getDeviceInfo start***********")
        console.log(res)
        Test01.deviceIMEI = res.data.data.rg_id
        Test01.deviceIMSI = res.data.data.imsi

        if (res.data.data.online) {
          Test01.deviceConnectStatus = true
          that.setData({
              "device_info[1].devOnlineStatus":1
          })
          console.log("online:%s",that.data.onlineStatus[that.data.device_info[1].gasOnlineStatus])
        } else {
          Test01.deviceConnectStatus = false
          that.setData({
              "device_info[1].gasOnlineStatus":0
          })
          console.log("offline:%s",that.data.onlineStatus[that.data.device_info[1].gasOnlineStatus])
        }
        that.data.device_info[1].deviceName = Test01.deviceName
        that.data.device_info[1].apiKey = Test01.apiKey
        that.data.device_info[1].deviceID = Test01.deviceID
        that.data.device_info[1].deviceIMEI = Test01.deviceIMEI
        that.data.device_info[1].deviceIMSI = Test01.deviceIMSI
        that.data.device_info[1].deviceConnectStatus = Test01.deviceConnectStatus
      },
      fail(res) {
        console.log("getDeviceInfo request was aborted")
        app.showToast("Request data failed")
        Test01.deviceConnectStatus = false
        that.data.device_info[1].deviceConnectStatus = false
      },
      complete() {
          console.log("**********getDeviceInfo end***********")
      }
    })
  }
- Reading and writing platform data
- Read platform data points
getPlatfromDatapoint:function(apiKey, deviceID, objID, objInsID, resID) {
    var that = this
    var getUrl = datapointsInfoURL + deviceID + "/datastreams/" +  objID +'_' + objInsID + '_' + resID
    return new Promise(function (resolve, reject) {
        wx.request({
            url: getUrl,
            header: {
                "Host":Host,
                "api-key":apiKey
            },
            data: {

            },
            method:'GET',
            success(res) {
                //Return the requested data through resolve
                resolve(res)
            },
            fail(res) {
                console.log("getPlatfromDatapoint request was aborted")
            },
            complete() {
            }
            })
    })
}
- Write platform data point
//Get json timestamp
formatTimeStamp:function() {
    var timeStamp = new Date()
    var year = timeStamp.getFullYear()
    var month = (timeStamp.getMonth() + 1).toString()
    var day = timeStamp.getDate().toString()
    var hour = timeStamp.getHours().toString()
    var minute = timeStamp.getMinutes().toString()
    var second = timeStamp.getSeconds().toString()

    month = month.length < 2 ? '0' + month : month
    day = day.length < 2 ? '0' + day : day
    hour = hour.length < 2 ? '0' + hour : hour
    minute = minute.length < 2 ? '0' + minute : minute
    second = second.length < 2 ? '0' + second : second

    timeStampJSON = year + '-' + month + '-' + day + 'T' + hour + ':' + minute + ':' + second
}
//Write platform data point
setPlatfromDatapoint:function(apiKey, deviceID, objID, objInsID, resID, value) {
    var that = this
    var datastreamsID = objID + '_' + objInsID + '_' + resID
    var postUrl = datapointsInfoURL + deviceID + "/datapoints"

    that.formatTimeStamp()
    let data ={
        "datastreams": [{
            "id": datastreamsID,
            "datapoints": [{
                    "at": timeStampJSON,
                    "value": value
                }
            ]
        }
    ]
    }
    return new Promise(function (resolve, reject) {
        wx.request({
            url: postUrl,
            method:'POST',
            header: {
                "Host":Host,
                "api-key":apiKey,
                "content-type": 'application/json',
            },
            data: JSON.stringify(data),
            success(res) {
                //Return the requested data through resolve
                resolve(res)
            },
            fail(res) {
                console.log("setPlatfromDatapoint request was aborted")
            },
            complete() {
            }
        })
    })
}
- Read and write device data (CACHE command)
When the device is offline, we can call the cache command to operate the device. The principle is that the user sets the effective time of the command and the expiration time of the command. During this time period, the OneNET platform caches the cached command. When the terminal device is online, the platform sends the cached command to the terminal device. If this valid period is exceeded, the platform will clear the cache command cache.
The difference from the "instant" read-write device is that the offline and expired of the cache command read-write device data are removed from the API_ Time field. If you are interested, you can refer to the official API implementation manual.
- Offline data acquisition device
//Composite command expiration time
expiredTimeStamp:function() {
    var timeStamp = new Date()
    var year = timeStamp.getFullYear()
    var month = (timeStamp.getMonth() + 1).toString()
    var day = (timeStamp.getDate() + 1).toString()
    var hour = timeStamp.getHours().toString()
    var minute = timeStamp.getMinutes().toString()
    var second = timeStamp.getSeconds().toString()

    month = month.length < 2 ? '0' + month : month
    day = day.length < 2 ? '0' + day : day
    hour = hour.length < 2 ? '0' + hour : hour
    minute = minute.length < 2 ? '0' + minute : minute
    second = second.length < 2 ? '0' + second : second

    expiredTimeStamp = year + '-' + month + '-' + day + 'T' + hour + ':' + minute + ':' + second
},
//Offline acquisition of equipment data points
getDeviceDatapointOffline:function(apiKey, deviceID, objID, objInsID, resID) {
    var that = this
    var retry = 3
    that.expiredTimeStamp()

    var getUrl = devResOfflineURL + that.data.gas_meter_info.deviceIMEI + "&obj_id=" + objID + "&obj_inst_id=" + objInsID + "&res_id=" + resID + '&expired_time=' + expiredTimeStamp + '&retry' + retry

    return new Promise(function (resolve, reject) {
        wx.request({
          url: getUrl,
          header: {
              "Host":Host,
              "api-key":apiKey,
          },
          data: {

          },
          method:'GET',
          success(res) {
              resolve(res)
          },
          fail(res) {
              console.log("getDeviceDatapointOffline request was aborted")
          },
          complete() {

          }
        })
    })
},
- Offline write device data point
//Offline write device data point
setDeviceDatapointOffline:function(apiKey, deviceID, objID, objInsID, resID, value) {
    var that = this
    var retry = 3
    var mode = 2
    let data ={
        "data":[
            {
                "res_id":resID,
                "val":value
            }
        ]
    }
    that.expiredTimeStamp()

    var postUrl = devResOfflineURL + that.data.gas_meter_info.deviceIMEI + "&obj_id=" + objID + "&obj_inst_id=" + objInsID + '&expired_time=' + expiredTimeStamp + '&retry' + retry + '&mode=' + mode

    return new Promise(function (resolve, reject) {
        wx.request({
            url: postUrl,
            method:'POST',
            header: {
                "Host":Host,
                "api-key":apiKey,
                "content-type": 'application/json',
            },
            data: JSON.stringify(data),
            success(res) {
                resolve(res)
            },
            fail(res) {
                console.log("setDeviceDatapointOffline request was aborted")
            },
            complete() {

            }
        })
    })
}