vscode is a text editor, similar to editplus. There are many plug-ins on it. It is a common alternative to C++ development when you can't use the legitimate visual studio. But please note that it can't be equated with IDE.
- Install vscode
Download the installation package under windows and install it in the way of general software
Download address:
https://code.visualstudio.com...
Under linux, you can install it directly with commands or download the. deb package.
sudo apt-get update
sudo apt-get install ubuntu-make

sudo umake ide visual-studio-code
2. Install cpptools plug-ins
Normally, whether in windows or linux, clicking on the extension label under vscode and typing cpptools will automatically help you find the plug-in.
But my linux can't connect to extension marketplace. It's still impossible to configure proxy in vscode. You can try this command.
code --install-extension ms-vscode.cpptools
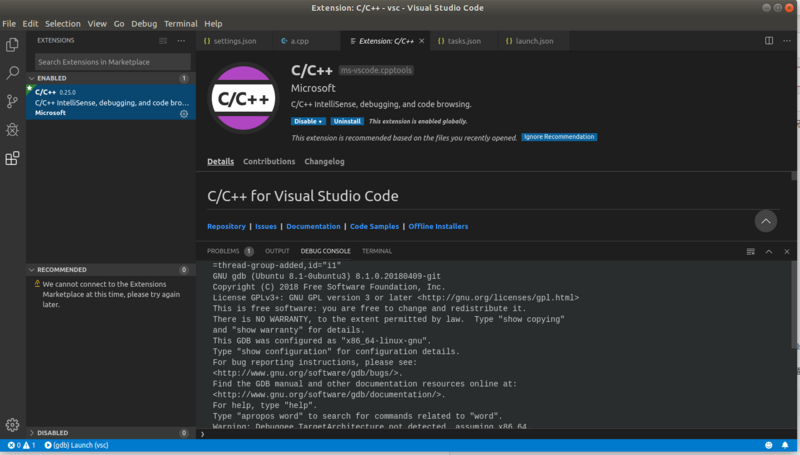
After installation, as shown in the figure, there is a c/c++ plug-in in extensions

3. Install C++ compiler/library
You need to install something called mingw under windows
Download address:
https://sourceforge.net/proje...
Let you download something called minw-get-setup.exe
Suppose you install MingGW in the C root directory.
After installation, you need to add C:MinGWbin to the Path of the environment variable
Only commands need to be executed under ubuntu
sudo apt install gcc
Run gcc-v on the windows command line or linux terminal window to confirm that the installation was successful
4. Adding Configuration
Create a folder and add a test.cpp file for testing
#include <iostream>
using namespace std;

int main() {
    cout << "!!!Hello World!!!" << endl; // prints !!!Hello World!!!
    getchar();
    return 0;
}
At this point, if you refer to the online tutorials, you may feel a little weird, because when we used IDE, we could run directly by finding two buttons or menus, compiling, running/debugging, but that was IDE.
Vscode is just a text editor. In vscode, plug-ins are needed to complete the compilation and running process.
So you need to add two additional profiles to do this. These two profiles are placed under a directory called. vscode, which you can create under your workspace directory.
You can select Terminal - > Configure Tasks from the menu bar, which will automatically generate this. vscode directory for you.
Add a file launch.json under the. vscode directory
launch.json (linux)
{
    "version": "0.2.0",
    "configurations": [
        {
            "name": "(gdb) Launch",
            "type": "cppdbg",
            "request": "launch",
            "program": "${workspaceFolder}/${fileBasenameNoExtension}.out",
            "args": [],
            "stopAtEntry": false,
            "cwd": "${workspaceFolder}",
            "environment": [],
            "externalConsole": true,
            "MIMode": "gdb",
            "preLaunchTask":"build",
            "setupCommands": [
                {
                    "description": "Enable pretty-printing for gdb",
                    "text": "-enable-pretty-printing",
                    "ignoreFailures": true
                }
            ]
        }
    ]
}
There are many differences under windows. Note the format of the file directory below. Here's what you should pay attention to is that the miDebuggerPath entry is the same as the mingw installation directory you used in the previous step.
launch.json (windows)
{
    "version": "0.2.0",
    "configurations": [
        {
            "name": "(gdb) Launch",
            "type": "cppdbg",
            "request": "launch",
            "program": "${workspaceFolder}/${fileBasenameNoExtension}.exe",
            "args": [],
            "stopAtEntry": false,
            "cwd": "${workspaceFolder}",
            "environment": [],
            "externalConsole": true,
            "MIMode": "gdb",
            "miDebuggerPath":"C:\\MinGW\\bin\\gdb.exe",
            "preLaunchTask":"build",
            "setupCommands": [
                {
                    "description": "Enable pretty-printing for gdb",
                    "text": "-enable-pretty-printing",
                    "ignoreFailures": true
                }
            ]
        }
    ]
}
This launch.json tells vscode what you need to do when you run point. Here we call the previous cpptools plug-in. Under linux, he will execute the test.out file, and under windows, a CMD window will run a test.exe file.
Which file to run here is the decision of program, how does this file come from? Of course, it has to be compiled first, so here we need another configuration file tasks.json.
preLaunchTask is configured as label for task
tasks.json (linux)
{
    "tasks": [
        {
            "label": "build",
            "type": "shell",
            "command": "g++",
            "args": ["-g", "${file}", "-std=c++11", "-o", "${fileBasenameNoExtension}.out"]
        }
     ]
}
tasks.json(windows)
{
    "tasks": [
        {
            "label": "build",
            "version": "0.1.0",
            "command": "g++",
            "args": ["-g","-std=c++11","${file}","-o","${fileDirname}\\${fileBasenameNoExtension}.exe"],
            "problemMatcher": {
                "owner": "cpp",
                "fileLocation": ["relative", "${workspaceRoot}"],
                "pattern": {
                    "regexp": "^(.*):(\\d+):(\\d+):\\s+(warning|error):\\s+(.*)$",
                "file": 1,
                "line": 2,
                "column": 3,
                "severity": 4,
                "message": 5
                }
            }
        }
     ]
}
The file directory is shown in the following figure
5 Implementation
Press F5 at this time, and you will see that vscode will help us compile this cpp file and generate. out(linux)/.exe(windows) files in the current directory.
This is essentially a call to G C C-G test.cpp-std=c++ 11-o test.out, which is configured in tasks.
If the compilation fails and the corresponding out/exe file is not generated, a window pops up saying that the file cannot be found.
