1. Introduction by Sonar
Sonar is an open source tool for managing code quality. It can analyze bug s and vulnerabilities in code and Code Smells. It supports the detection of more than 20 programming languages, such as java, c/c++, python, php and so on. Currently, more than 85,000 organizations use sonar. Sonar can be fully integrated with DevOps toolchain, can be built-in integrated with most building tools, and can easily integrate with Jenkins, TFS / VSTS, Team City, Bamboo and other continuous integration engines, supporting many source code management configuration tools, such as git, svn, cvs, etc.
Official address: https://www.sonarqube.org/
As early as 2007, when the first line of code was created, Sonar's founders dreamed of one day being able to provide each developer with the ability to measure the quality of their project code. His motto: "Continuous testing must become the mainstream of continuous integration".
The purpose of this article is to install a sonar and integrate it into Jenkins to achieve a continuous quality monitoring of the code.
2.Sonar Installation
2.1. Introduction to Installation Environment
Note: The sonar server requires at least 2G B of memory to run effectively, while the operating system requires 1GB of available memory.
- Centos 7.2
- Install JDK 1.8
- Install Jenkins 2.89
- Install maven 3.5.2 (not required for compiling some plug-ins)
- mysql 5.6 database (required version, no less than 5.6)
After installing mysql, create sonar database and account as follows:
CREATE DATABASE sonar CHARACTER SET utf8 COLLATE utf8_general_ci;
GRANT ALL PRIVILEGES ON sonar.* TO 'sonar'@'localhost' IDENTIFIED BY '123456' WITH GRANT OPTION;
FLUSH PRIVILEGES;
2.2.SonarQube installation
cd /data/package/
wget https://sonarsource.bintray.com/Distribution/sonarqube/sonarqube-6.6.zip
mkdir /data/service/sonar/
unzip sonarqube-6.6.zip -d /data/service/sonar/
Configure the startup script:
[root@c7-node1 ~]# cat /etc/init.d/sonar
#!/bin/sh
#
# rc file for SonarQube
#
# chkconfig: 345 96 10
# description: SonarQube system (www.sonarsource.org)
#
### BEGIN INIT INFO
# Provides: sonar
# Required-Start: $network
# Required-Stop: $network
# Default-Start: 3 4 5
# Default-Stop: 0 1 2 6
# Short-Description: SonarQube system (www.sonarsource.org)
# Description: SonarQube system (www.sonarsource.org)
### END INIT INFO
/usr/bin/sonar $*
Authorize startup script execution privileges and configure paths
chmod +x /etc/init.d/sonar
ln -s /data/service/sonar/sonarqube-6.6/bin/linux-x86-64/sonar.sh /usr/bin/sonar
chkconfig sonar on
Modify configuration files
[root@c7-node1 ~]# cd /data/service/sonar/sonarqube-6.6/conf/
[root@c7-node1 conf]# cp sonar.properties{,.bak}
sonar.jdbc.username=sonar
sonar.jdbc.password=123456
sonar.jdbc.url=jdbc:mysql://localhost:3306/sonar?useUnicode=true&characterEncoding=utf8&rewriteBatchedStatements=true&useConfigs=maxPerformance&useSSL=false
2.3.sonarQube Scanner installation
cd /data/package/
wget https://sonarsource.bintray.com/Distribution/sonar-scanner-cli/sonar-scanner-2.8.zip
unzip sonar-scanner-2.8.zip -d /data/service/sonar/
ln -s /data/service/sonar/sonar-scanner-2.8/bin/sonar-scanner /usr/bin/sonar-scanner
Modify configuration files
[root@c7-node1 ~]# cd /data/service/sonar/sonar-scanner-2.8/conf/
[root@c7-node1 conf]# cp sonar-scanner.properties{,.bak}
[root@c7-node1 conf]# vim sonar-scanner.properties
sonar.jdbc.username=sonar
sonar.jdbc.password=123456
sonar.jdbc.url=jdbc:mysql://localhost:3306/sonar?useUnicode=true&characterEncoding=utf8
2.4.sonarQube runner installation
cd /data/service/
wget http://repo1.maven.org/maven2/org/codehaus/sonar/runner/sonar-runner-dist/2.4/sonar-runner-dist-2.4.zip
unzip sonar-runner-dist-2.4.zip -d /data/service/sonar/
ln -s /data/service/sonar/sonar-runner-2.4/bin/sonar-runner /usr/bin/sonar-runner
Modify configuration files
[root@c7-node1 ~]# cd /data/service/sonar/sonar-runner-2.4/conf/
[root@c7-node1 conf]# cp sonar-runner.properties{,.bak}
[root@c7-node1 conf]# vim sonar-runner.properties
sonar.jdbc.url=jdbc:mysql://localhost:3306/sonar?useUnicode=true&characterEncoding=utf8
sonar.jdbc.username=sonar
sonar.jdbc.password=123456
Adding environment variables
[root@c7-node1 ~]# vim /etc/profile.d/sonar.sh
export SONAR_HOME=/data/service/sonar/sonarqube-6.6
export SONAR_RUNNER_HOME=/data/service/sonar/sonar-runner-2.4
export PATH=$SONAR_RUNNER_HOME/bin:$PATH
[root@c7-node1 ~]# source /etc/profile.d/sonar.sh
2.5. Start sonar
Note: sonar is not allowed to start with root by default, so we need to create sonar users and start with sonar users.
[root@c7-node1 ~]# useradd sonar
[root@c7-node1 ~]# chown -R sonar:sonar /data/service/sonar/
[root@c7-node1 ~]# su sonar
[sonar@c7-node1 root]$ /etc/init.d/sonar start
When sonar is started successfully, the web interface of sonar can be opened by accessing port 9000 of the server. The default account and password is admin:admin. Note: sonar is not allowed to start by root by default, so we need to create sonar user and start by sonar user.

The following pages show that sonar installation is successful. If sonar installation fails, it can be checked according to the contents of log errors.
3. Use and Sinicization of Sonar Plug-in
Sonar can expand its functions by installing plug-ins. Specific information can access sonar's plug-in library. There are many code analysis plug-ins, authentication and authorization plug-ins, external analysis plug-ins, language plug-ins, visual/report plug-ins and so on. Next, we will demonstrate the installation of sonar plug-ins by installing Chinese plug-ins such as sonar.
sonar plug-in library: https://docs.sonarqube.org/di...
3.1. Install Chinese plug-in in the background
After login to sonar, search Chinese in Administration -> System -> Update Center -> Available to see the Chinese plug-in package, and click Install to install it. However, the installation time is very slow and even fails. It is recommended to install it manually.

3.2. Manual Installation of Plug-ins
Chinese plug-in github address: https://github.com/SonarQubeC...
We downloaded the source code of the Chinese plug-in to our local area and switched to the corresponding version (sonar 6.6 version I installed, need to switch to 1.18tag) for compilation.
git clone https://github.com/SonarQubeCommunity/sonar-l10n-zh.git
cd sonar-l10n-zh/
git checkout sonar-l10n-zh-plugin-1.18
mvn package
cp target/sonar-l10n-zh-plugin-1.18-SNAPSHOT.jar /data/service/sonar/sonarqube-6.6/extensions/plugins/
After copying the Chinese plug-in to the sonar plug-in directory, restart sonar to take effect
After restarting sonar, you can see the success of Sinicization by visiting the validation effect of web

In this way, our Chinese plug-in is installed. If you need to install other plug-ins, you can directly visit the official plug-in library for installation.
4.Sonar Analysis Python Code Example
Sonar installation can be used for actual analysis code, I prepared a small example of python code analysis to demonstrate the sonar analysis code process.
Example: My python project was developed using version 3.0, but using 2.0 grammar, let's try sonar to analyze it (sonar has built-in python 3.0 analysis plug-in, we don't need to install it extra). The demo script is just one, which functions as sending mail. The print is 2.0 grammar. It can not run normally in 3.0 environment. We analyze this script to demonstrate sonar's analysis code process.
[sonar@c7-node1 ~]$ cat python_test/sendEmail.py
#!/usr/bin/python
# -*- coding: UTF-8 -*-

import sys
import smtplib
from email.mime.text import MIMEText
from email.header import Header

# Third-party SMTP services
mail_host="xxx" #Setting up the server
mail_user="xxx" #User name
mail_pass="xxx" #Password


sender = 'bigdata_monitor@xueleyun.com'
receivers = sys.argv[1]

content=sys.argv[3]
message = MIMEText(content, 'plain', 'utf-8')

message['From'] = Header(sender, 'utf-8')
message['To'] = Header(receivers, 'utf-8')

subject = sys.argv[2]
message['Subject'] = Header(subject, 'utf-8')


try:
smtpObj = smtplib.SMTP()
smtpObj.connect(mail_host, 25) # 25 is the SMTP port number
smtpObj.login(mail_user,mail_pass)
smtpObj.sendmail(sender, receivers, message.as_string())
print "Successful mail delivery"
except smtplib.SMTPException:
print "Error: Unable to send mail"
Create a configuration file sonar-project.properties in the project root directory. If the project is not created in sonar, the first analysis will automatically be created based on the name and key entered into the configuration file.
[sonar@c7-node1 ~]$ cat python_test/sonar-project.properties
sonar.projectKey=python_test
sonar.projectName=python_test
sonar.projectVersion=1.0
sonar.sources=.
sonar.sourceEncoding=UTF-8
Start the analysis by running the following commands in the project root directory
sonar-scanner
When the scan is complete, we open the web page again and see that our sonar automatically creates the python_test project based on the content filled in by the configuration file, and we analyze two bug s.

Click on the project name to enter the project and view the detailed analysis information of the project.

Click on bugs to see the specific bug information. We can see that the bug information is a problem with the python print statement.

sonar can not only find bug s, but also tell us why we are wrong in this way, and give the right examples.
Look at the bug details: The print statement was deleted in Python 3.0. Built-in functions should be used, and the correct examples are given.

5.Sonar integrated Jenkins use
5.1. Setting tokens in sonar
Log in sonarQube with admin user, [Configuration] -> [Privileges] -> [User]


5.2.Jenkins installs sonar-related plug-ins
Install two plug-ins in the red box
5.3.Jenkins configures sonar plug-ins
Click on System Management -> System Settings to configure Sonar authentication information and save the settings.

Click on System Management -> Global Tool Configuration to configure sonar scanner information

5.4. Configuring sonar in Jenkins job
In order to operate conveniently, I will not pull the code from GIT and configure the working directory directly as python_test directory. According to the actual situation of the company, you can choose to get the code from svn or git for analysis.

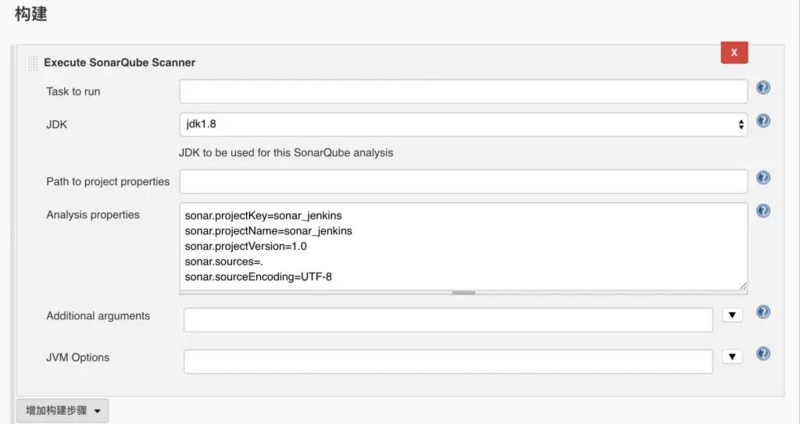
Add a build step, select Execute SonarQube Scanner, select a jdk for analysis, and fill in the Analysis properties configuration file for sonar-project.properties that you just scanned manually.
So the sonar part of Jenkins is configured. We can save the job to build and build it. We can jump to the analysis page directly by building history, as shown in the figure below, and attach the complete content of Jenkins job and build video.

6. Postscript
This is the end of this article. Although some contents of sonar, such as project management, security, monitoring, e-mail notification, are not mentioned in the article, I think the sonar management after Sinicization is more convenient and easy to operate. Here you can login to the background to explore.
There is also the sonar+Jenkins job is not very comprehensive, lack of automatic code acquisition and distribution configuration, but sonar configuration is correct, you only need to add it to the first operation after your code acquisition, or before compilation.
The article is the author's original contribution. Author: Ximen Feibing, a post-90s it man, has been working in Beijing, love sports, love adventure, love travel.
