The HDFS cluster consists of a master / slave architecture. A single server running the NameNode process is the master node server, and multiple servers running the DataNode process are slave node servers
Installation preparation
| host name | IP address | The server |
|---|---|---|
| node-01 | 192.168.229.21 | NameNode server, DataNode server |
| node-02 | 192.168.229.22 | DataNode server |
| node-03 | 192.168.229.23 | DataNode server |
Installation steps
1. Upload the hadoop installation package to the virtual machine node-01
Installation package storage path: / root/apps
[root@node-01 apps]# ll
 Total consumption 350780
-rw-r--r--. 1 root root 359196911 11 December 16:45 hadoop-3.2.1.tar.gz
2. Unzip the hadoop installation package
[root@node-01 apps]# tar -zxvf hadoop-3.2.1.tar.gz
3. After decompression, delete the hadoop installation package (too large)
[root@node-01 apps]# rm -rf hadoop-3.2.1.tar.gz
4. Delete hadoop document (too large)
[root@node-01 hadoop]# cd /root/apps/hadoop-3.2.1/share/
[root@node-01 share]# rm -rf doc
5. Configure hadoop
hadoop core configuration is as follows:
- Set the default file system of hadoop as hdfs
- Set the virtual machine where the namenode node of hdfs is located
- Set the local directory where the namenode software stores metadata
- Set the local directory where the datanode software stores file blocks
- Modify hadoop-env.sh environment variable
The vim command opens the hadoop-env.sh file, uncomments the "#JAVA_HOME" in line 54, and sets it as the Java installation path
[root@node-01 hadoop]# cd /root/apps/hadoop-3.2.1/etc/hadoop
[root@node-01 hadoop]# vim hadoop-env.sh
export JAVA_HOME=/root/apps/jdk1.8.0_141/
- Modify the core-site.xml configuration file
Open the core-site.xml file with the vim command, and Add configuration items between to configure the access URL and port number of HDFS
[root@node-01 hadoop]# cd /root/apps/hadoop-3.2.1/etc/hadoop
[root@node-01 hadoop]# vim core-site.xml
<configuration
    <!-- appoint hdfs of nameservice by node-01 -->
	<property>
		<name>fs.defaultFS</name>
		<value>hdfs://node-01:9000/</value>
	</property>
</configuration>
-
Modify the hdfs-site.xml configuration file
The vim command opens the hdfs-site.xml file, which is displayed in the Add configuration items between, configure the metadata storage path to access NameNode and DataNode, and the access port of SecondaryNameNode
Copy code[root@node-01 hadoop]# cd /root/apps/hadoop-3.2.1/etc/hadoop [root@node-01 hadoop]# vi hdfs-site.xml <configuration> <property> <name>dfs.namenode.name.dir</name> <value>/root/apps/hadoop-3.2.1/data/namenode</value> </property> <property> <name>dfs.datanode.data.dir</name> <value>/root/apps/hadoop-3.2.1/data/datanode</value> </property> <property> <name>dfs.namenode.secondary.http-address</name> <value>node-02:9868</value> </property> </configuration> -
Modify the yarn-site.xml configuration file
The vim command opens the yarn-site.xml file, where Add configuration items between, and configure the access ports of nodemanager and resource manager
Copy code[root@node-01 hadoop]# cd /root/apps/hadoop-3.2.1/etc/hadoop [root@node-01 hadoop]# vim yarn-site.xml <configuration> <property> <name>yarn.nodemanager.aux-services</name> <value>mapreduce_shuffle</value> </property> <property> <name>yarn.nodemanager.aux-services.mapreduce_shuffle.class</name> <value>org.apache.hadoop.mapred.ShuffleHandler</value> </property> <property> <name>yarn.resourcemanager.resource-tracker.address</name> <value>node-01:8025</value> </property> <property> <name>yarn.resourcemanager.scheduler.address</name> <value>node-01:8030</value> </property> <property> <name>yarn.resourcemanager.address</name> <value>node-01:8050</value> </property> </configuration> -
Configure Hadoop environment variables and set the user of each Hadoop process to root
Copy code[root@node-01 hadoop-3.2.1]# cd /etc [root@node-01 etc]# vi profile export JAVA_HOME=/root/apps/jdk1.8.0_141/ export HADOOP_HOME=/root/apps/hadoop-3.2.1 export PATH=$PATH:$JAVA_HOME/bin:$HADOOP_HOME/bin:$HADOOP_HOME/sbin export HDFS_NAMENODE_USER=root export HDFS_DATANODE_USER=root export HDFS_SECONDARYNAMENODE_USER=root export YARN_RESOURCEMANAGER_USER=root export YARN_NODEMANAGER_USER=root
-
Make the configured environment variables effective
Copy code[root@node-01 etc]# source /etc/profile
6. Copy the configured hadoop installation directory on virtual machine node-01 to other virtual machines
# Copy the hadoop directory to node-02 and node-03
root@node-01 etc]# cd /root/apps/
[root@node-01 apps]# scp -r hadoop-3.2.1 node-02:$PWD
[root@node-01 apps]# scp -r hadoop-3.2.1 node-03:$PWD

#Copy configuration to node-02 and node-03
[root@node-01 hadoop-3.2.1]# cd /etc
[root@node-01 etc]# scp profile node-02:$PWD
[root@node-01 etc]# scp profile node-03:$PWD
#Execution configuration takes effect
[root@node-02 etc]# source /etc/profile
[root@node-03 etc]# source /etc/profile
7. Start the NameNode process of HDFS
-
format
Before starting Hadoop, format it first. After starting, you can verify whether Hadoop is running normally through process viewing, file browsing and browser
[root@node-01 etc]# hadoop namenode -format
WARNING: Use of this script to execute namenode is deprecated.
WARNING: Attempting to execute replacement "hdfs namenode" instead.

WARNING: /root/apps/hadoop-3.2.1/logs does not exist. Creating.
2020-11-13 02:08:39,891 INFO namenode.NameNode: STARTUP_MSG:
/************************************************************
STARTUP_MSG: Starting NameNode
STARTUP_MSG:   host = node-01/192.168.229.21
STARTUP_MSG:   args = [-format]
STARTUP_MSG:   version = 3.2.1
...
2020-11-13 02:08:41,969 INFO common.Storage: Storage directory /root/hdpdata/name has been successfully formatted. #Indicates that the format was successful
Note: if an error occurs during the use of Hadoop, or Hadoop cannot be started, it may need to be reformatted. For reformatting, refer to the steps of stopping Hadoop, deleting the data and logs folders under Hadoop and formatting.
- Start the namenode process on the virtual machine node-01
[root@node-01 hadoop]# hdfs --daemon start namenode
[root@node-01 hadoop]# jps
2217 NameNode
2283 Jps
The jps command is specifically used to view the Java process. You can check whether the namenode process exists through the jps command to determine whether the namenode process is started successfully
-
View the port number on which the namenode process listens
Note: 2217 after grep is the current NameNode process number queried by the previous jps command. The NameNode process number is different each time you start it
Copy code[root@node-01 hadoop]# netstat -nltp | grep 2217 tcp 0 0 192.168.229.11:9000 0.0.0.0:* LISTEN 2217/java tcp 0 0 0.0.0.0:9870 0.0.0.0:* LISTEN 2217/java
-
9000 port: used for communication between client and hdfs
-
Port 9870: used for the built-in web server port of hdfs
-
-
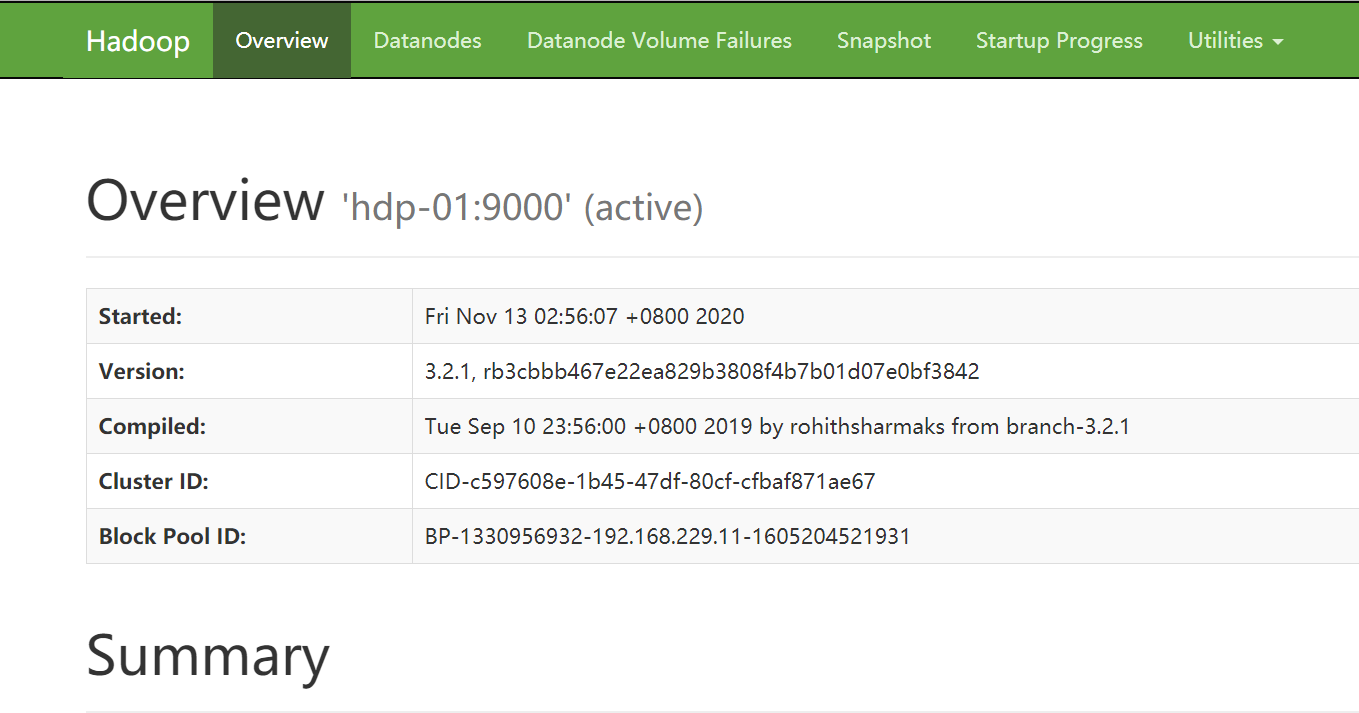
Access the web UI interface provided by namenode in windows browser
url address: http://192.168.229.21:9870 (the IP address is the address of virtual machine node-01)
8. Start the DataNode of HDFS
-
Start the DataNode process on the virtual machine node-02 and node-03 respectively
The first startup prompt is / root / apps / hadoop-3.2.1 / logs does not exist. Creating., and then restart
[root@node-02 ~]# hdfs --daemon start datanode
[root@node-02 ~]# jps
2341 DataNode
2421 Jps

[root@node-03 ~]# hdfs --daemon start datanode
[root@node-03 ~]# jps
2341 DataNode
2421 Jps
-
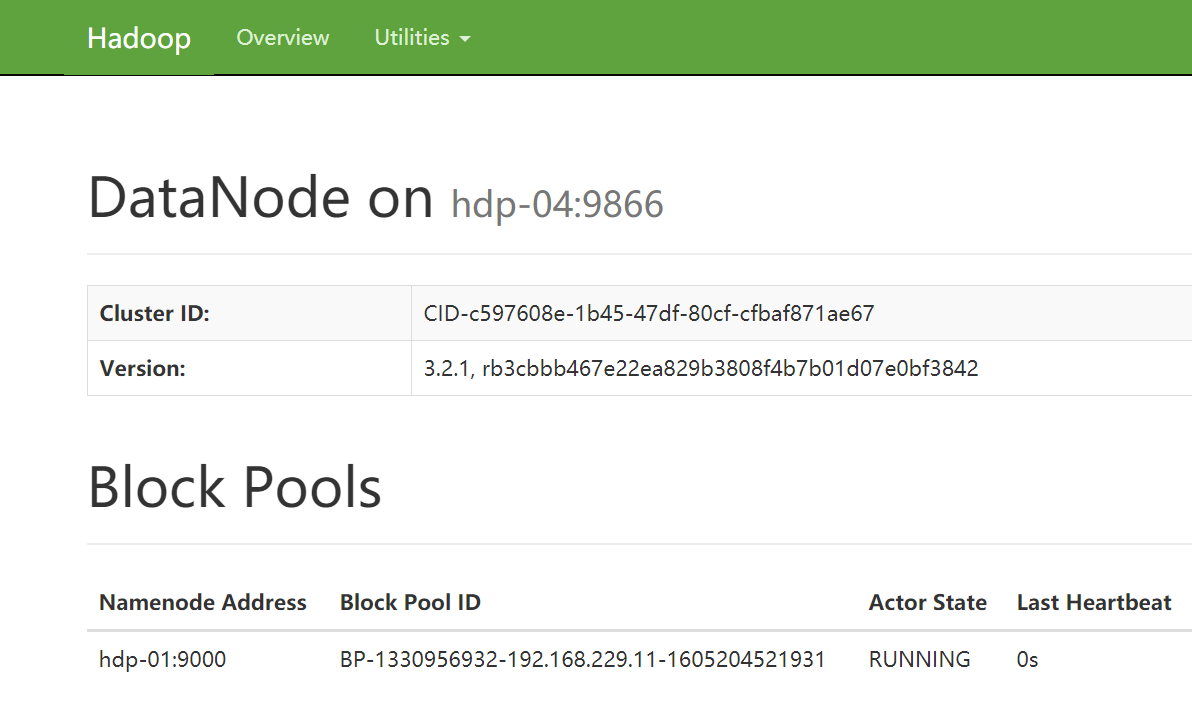
Access the web UI interface provided by datanode in windows browser
url address: http://192.168.229.22:9864 (the IP address is the address of virtual machine node-02)
9. Script batch start HDFS
It is too cumbersome to start each virtual machine in the HDFS cluster separately. You can start HDFS in batches through scripts
- Confirm that the virtual machine node-01 has been configured to log in to all virtual machines (including itself) in the cluster without secret
- Modify the / etc/hadoop/workers script file in the hadoop installation directory (list the nodes that need to start the datanode process)
[root@node-01 hadoop]# cd /root/apps/hadoop-3.2.1/etc/hadoop
[root@node-01 hadoop]# vi workers
node-01
node-02
node-03
-
Run the script start-dfs.sh on the virtual machine node-01 to automatically start the entire cluster hdfs process
Copy code[root@node-01 hadoop]# start-dfs.sh
-
Run the script stop-dfs.sh on the virtual machine node-01 to automatically stop the entire cluster hdfs process
Copy code[root@node-01 hadoop]# stop-dfs.sh