Construction of Jenkins continuous integration platform based on kubernetes/k8s
Jenkins' master slave distributed construction
What is a master slave distributed build
Jenkins's Master Slave distributed construction is to reduce the pressure on the Master node by assigning the construction process to the Slave node, and multiple can be built at the same time, which is somewhat similar to the concept of load balancing.
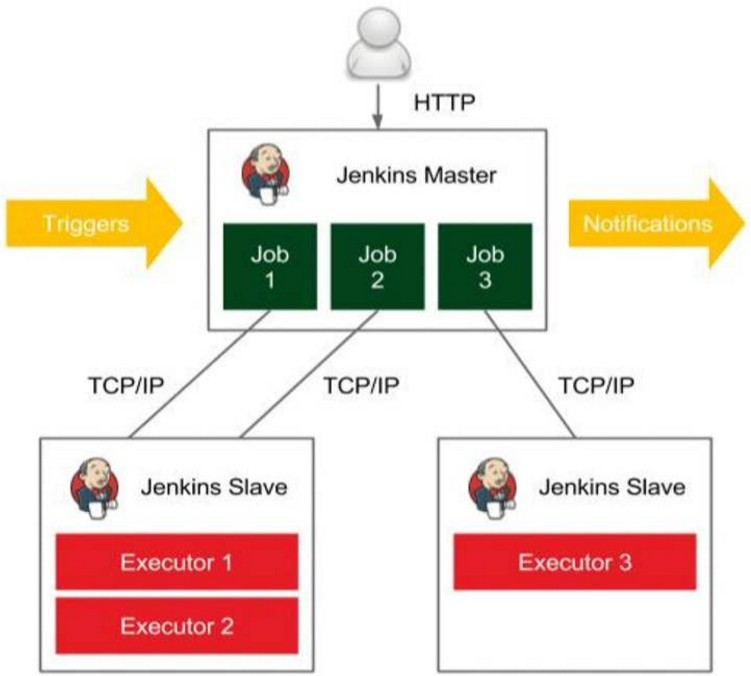
Jenkins implements master slave distributed construction
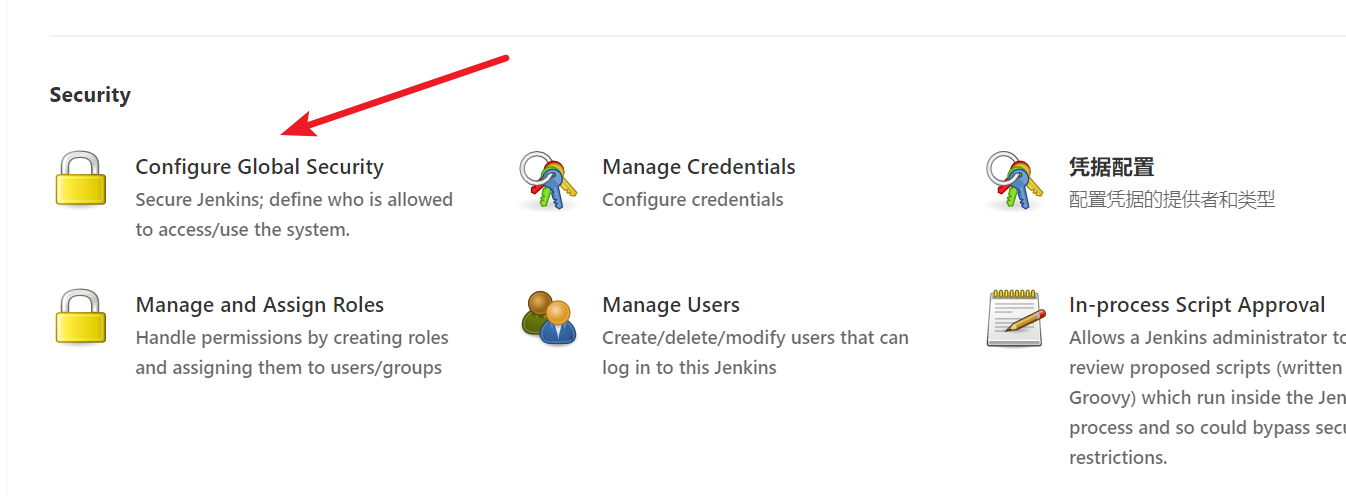
Open the TCP port of the agent
Manage Jenkins -> Configure Global Security
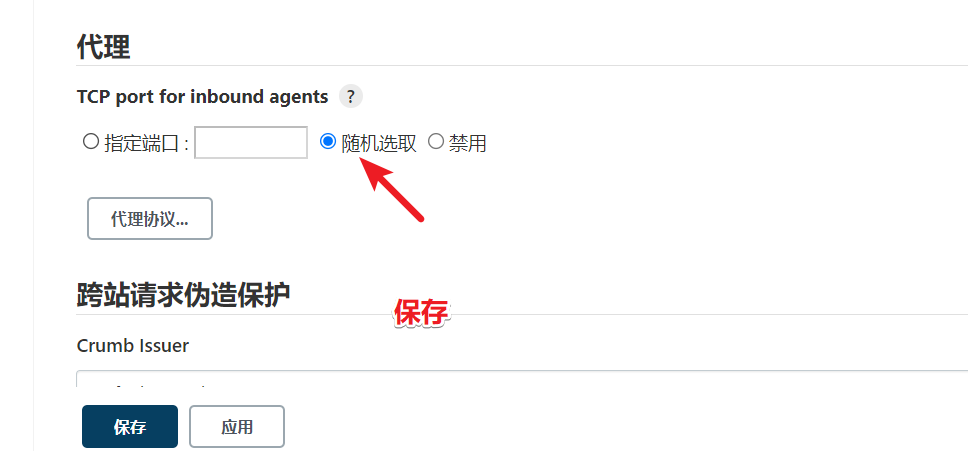
TCP port for inbound agents -- > select randomly -- > save
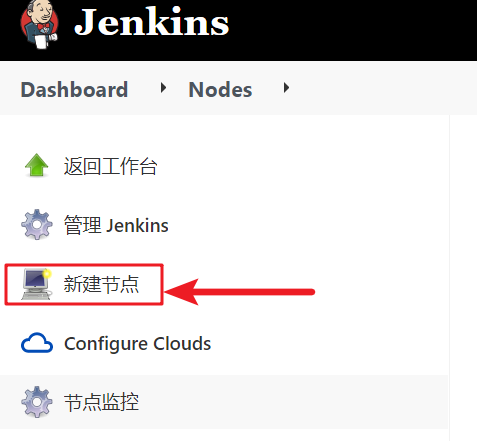
Create a new node on jenkins
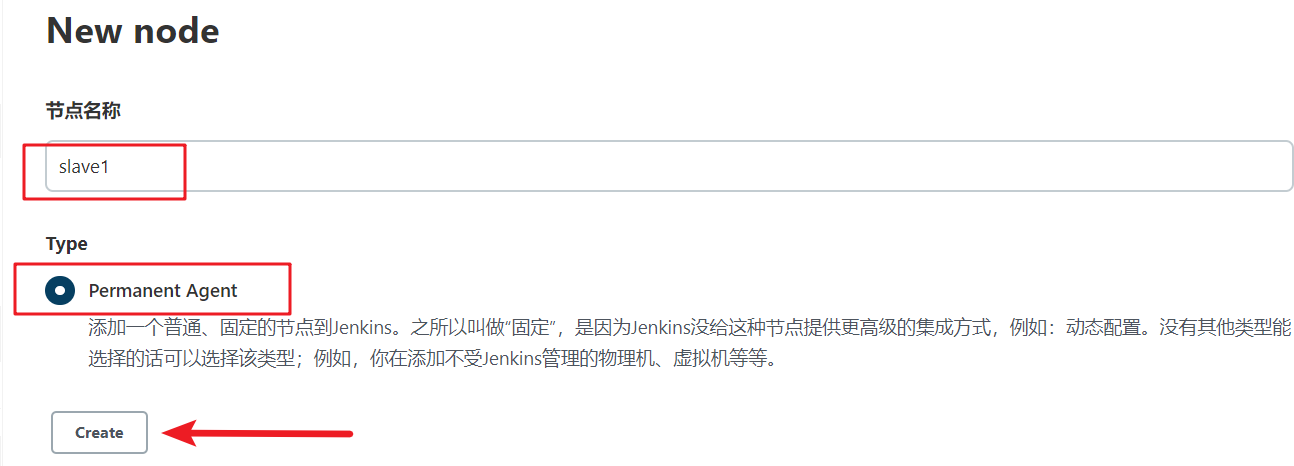
Manage Jenkins - Manage Nodes - new node

Note that the node name here will be called in the subsequent Jenkinsfile
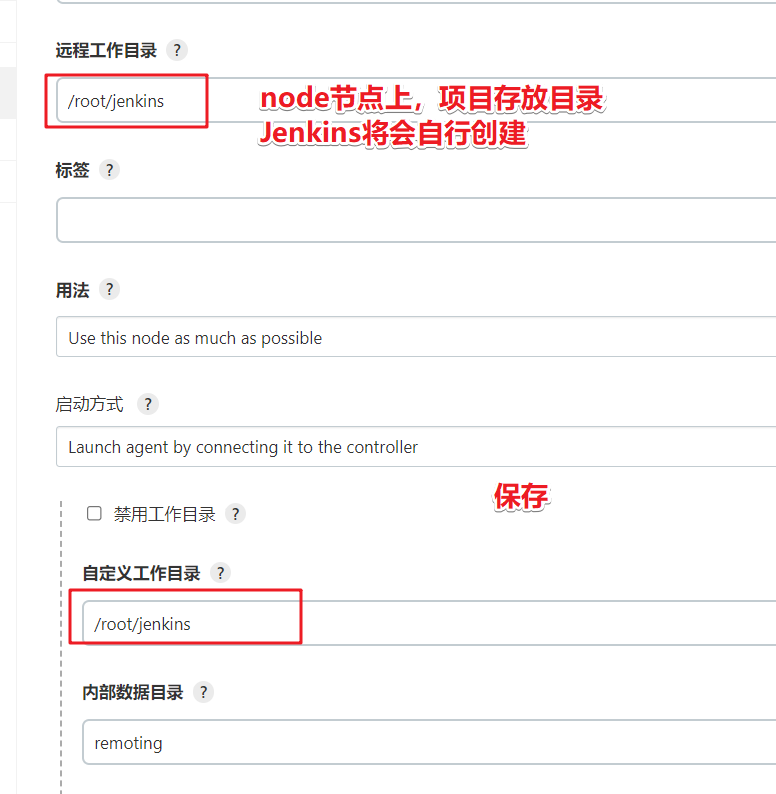
Custom working directory, remote working directory, setting


Click to download the jar package. This jar package needs to be passed to the node server

Jenkins slave node server configuration
Upload the downloaded jar package to the slave node

Jenkins shuts down the firewall from the node, selinux, and downloads git
systemctl disable firewalld --now
setenforce 0
sed -i '/^SELINUX/ s/enforcing/disabled/' /etc/selinux/config

yum -y install git
In agent Execute the command in the directory where the jar package is located

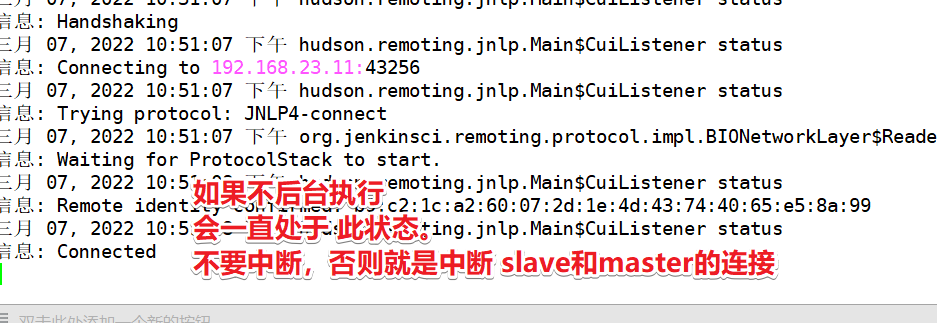

test
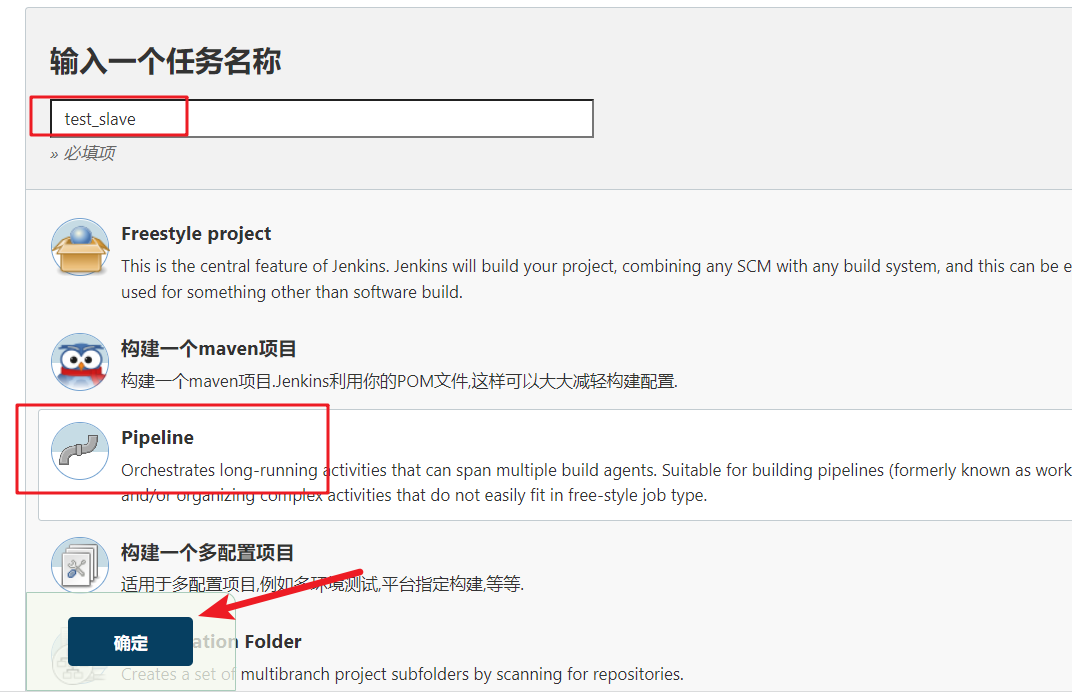
New assembly line
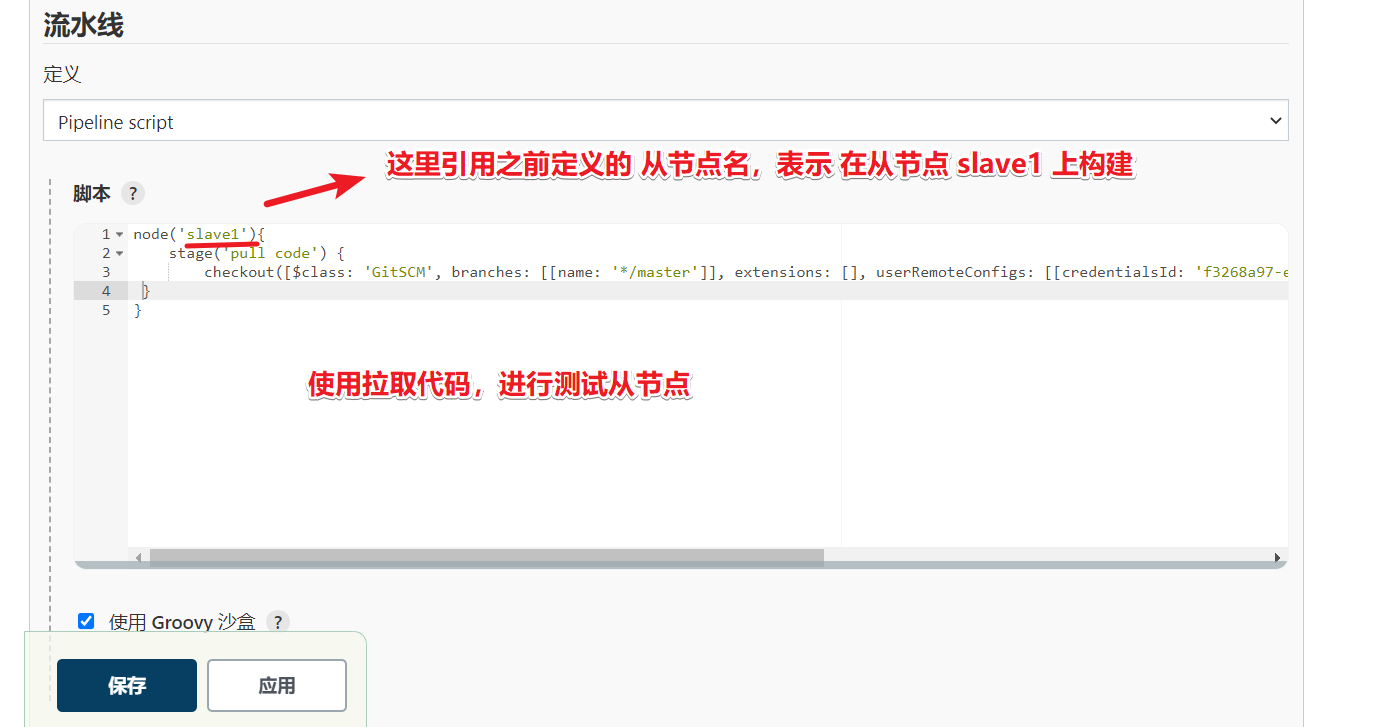
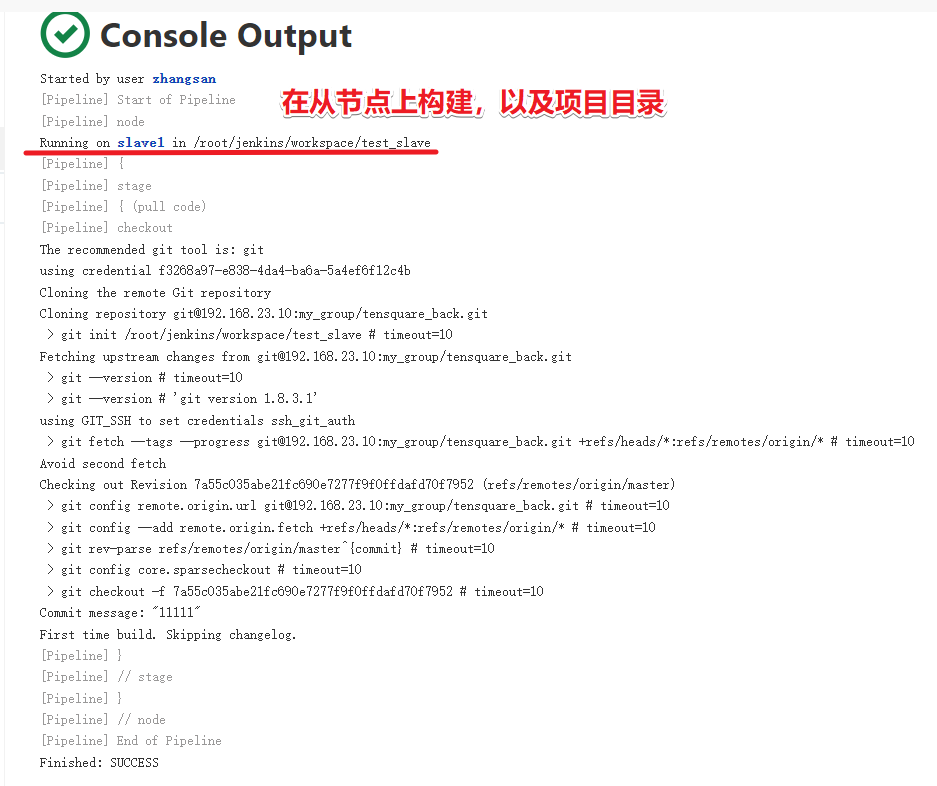

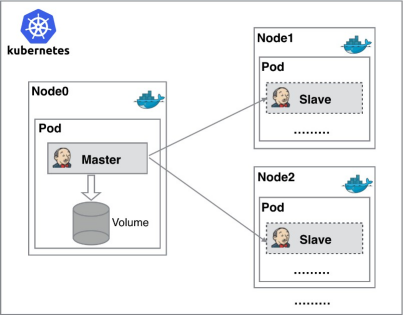
Kubernets implementation of master slave distributed construction scheme
Defects of traditional slave master scheme
- When a single point of failure occurs in the Master node, the whole process is unavailable
- The configuration environment of each Slave node is different to complete the compilation and packaging of different languages. However, these differentiated configurations make it very inconvenient to manage and difficult to maintain
- The resource allocation is uneven. Some Slave nodes queue for job s to run, while some Slave nodes are idle
- Waste of resources. Each Slave node may be a physical machine or VM. When the Slave node is idle, it will not completely release resources
We can introduce Kubernetes to solve the above problems
Introduction to Kubernetes
Kubernetes (K8S) is Google's open source container cluster management system. Based on Docker technology, kubernetes provides a series of complete functions for container applications, such as deployment and operation, resource scheduling, service discovery and dynamic scaling, which improves the convenience of large-scale container cluster management. Its main functions are as follows:
- Use Docker to package, instantiate and run the application.
- Run and manage containers across machines in a cluster manner. Run and manage containers across machines in a cluster manner.
- Solve the communication problem between dockers across machine containers. Solve the communication problem between dockers across machine containers
- Kubernetes' self-healing mechanism makes the container cluster always run in the state expected by users.
Kubernetes+Docker+Jenkins continuous integration architecture diagram
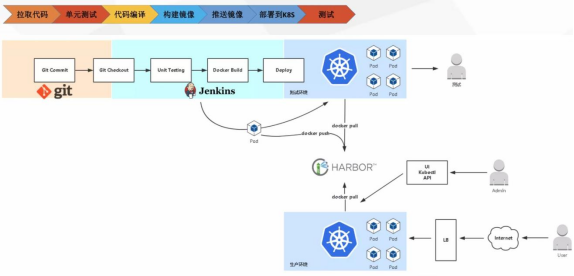
General workflow: manual / automatic build - > Jenkins scheduling K8S API - > dynamically generate Jenkins Slave pod - > Slave pod pull Git code / compile / package image - > push to image warehouse Harbor - > Slave work is completed, pod is automatically destroyed - > deploy to test or production Kubernetes platform. (fully automated without manual intervention)
Benefits of Kubernetes+Docker+Jenkins continuous integration scheme
- High availability of services: when the Jenkins Master fails, Kubernetes will automatically create a new Jenkins Master container and assign the Volume to the newly created container to ensure no data loss, so as to achieve high availability of cluster services.
- Dynamic scaling and rational use of resources: each time a Job is run, a Jenkins Slave will be automatically created. After the Job is completed, the Slave will automatically log off and delete the container, and the resources will be automatically released. Moreover, Kubernetes will dynamically allocate the Slave to the idle node according to the usage of each resource, so as to reduce the occurrence of high resource utilization of a node, It is also queued at the node.
- Good scalability: when the Kubernetes cluster is seriously short of resources and leads to Job queuing, it is easy to add a Kubernetes Node to the cluster to realize expansion.
Kubedm installing Kubernetes
Kubernetes architecture
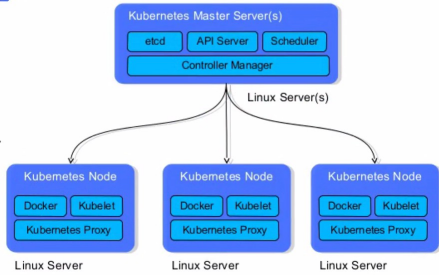
- API server: used to expose the kubernetes API. The call operation of any resource request is carried out through the interface provided by Kube apiserver.
- Etcd: it is the default storage system provided by Kubernetes to save all cluster data. When in use, it is necessary to provide a backup plan for etcd data.
- Controller Manager: as the management control center within the cluster, it is responsible for the management of nodes, Pod replicas, service endpoints, namespaces, service accounts and resource quotas in the cluster. When a Node goes down unexpectedly, the controller manager will find and execute the automatic repair process in time, Ensure that the cluster is always in the expected working state.
- Scheduler: monitors newly created pods that are not assigned to nodes, and selects a Node for the Pod.
- Kubelet: responsible for maintaining the life cycle of containers and managing volumes and networks
- Kube proxy: it is the core component of Kubernetes and deployed on each Node. It is an important component to realize the communication and load balancing mechanism of Kubernetes Service.
Installation environment description
| Host name | IP address | Installed software |
|---|---|---|
| Code hosting server | 192.168.23.10 | Gitlab-12.4.2 |
| Docker warehouse server | 192.168.23.13 | Harbor1.9.2 |
| k8s-master | 192.168.23.15 | kube-apiserver,kube-controller-manager,kube- scheduler,docker,etcd,calico,NFS |
| k8s-node1 | 192.168.23.16 | kubelet,kubeproxy,Docker18.06.1-ce |
| k8s-node2 | 192.168.23.17 | kubelet,kubeproxy,Docker18.06.1-ce |
All three k8s servers need to be completed
Modify the hostname and hosts files of the three machines
hostnamectl set-hostname k8s-master
hostnamectl set-hostname k8s-node1
hostnamectl set-hostname k8s-node2
cat >>/etc/hosts<<EOF
192.168.23.15 k8s-master
192.168.23.16 k8s-node1
192.168.23.17 k8s-node2
EOF
Turn off firewall and selinux
systemctl disable firewalld --now
setenforce 0
sed -i '/^SELINUX/ s/enforcing/disabled/' /etc/selinux/config
Set system parameters and load br_netfilter module
The setting allows routing forwarding and does not process the data of the bridge
modprobe br_netfilter

cat >>/etc/sysctl.d/k8s.conf<<EOF
net.bridge.bridge-nf-call-ip6tables = 1
net.bridge.bridge-nf-call-iptables = 1
net.ipv4.ip_forward = 1
vm.swappiness = 0
EOF

sysctl -p /etc/sysctl.d/k8s.conf
Installing and configuring docker CE
yum install -y yum-utils  device-mapper-persistent-data lvm2
yum-config-manager --add-repo https://mirrors.aliyun.com/docker-ce/linux/centos/docker-ce.repo

yum -y install docker-ce

systemctl enable docker --now

#Configure image acceleration and trusted warehouse
cat >>/etc/docker/daemon.json<<'EOF'
{
  "registry-mirrors": ["https://k0ki64fw.mirror.aliyuncs.com"],
  "insecure-registries": ["192.168.23.13:85"]
}
EOF

systemctl restart docker
Preconditions for opening Kube proxy
cat > /etc/sysconfig/modules/ipvs.modules <<EOF
#!/bin/bash
modprobe -- ip_vs
modprobe -- ip_vs_rr
modprobe -- ip_vs_wrr
modprobe -- ip_vs_sh
modprobe -- nf_conntrack_ipv4
EOF

chmod 755 /etc/sysconfig/modules/ipvs.modules && bash
/etc/sysconfig/modules/ipvs.modules && lsmod | grep -e ip_vs -e nf_conntrack_ipv4

All nodes close swap space
swapoff  -a

sed -i '/swap/ s/^/#/' /etc/fstab
mount -a
Install kubelet, kubedm, kubectl
-
Kubedm: the instruction used to initialize the cluster.
-
kubelet: used to start the pod and container on each node in the cluster.
-
kubectl: command line tool used to communicate with the cluster.
yum clean all

#Install yum source
cat <<EOF > /etc/yum.repos.d/kubernetes.repo
[kubernetes]
name=Kubernetes
baseurl=https://mirrors.aliyun.com/kubernetes/yum/repos/kubernetes-el7-x86_64/
enabled=1
gpgcheck=0
repo_gpgcheck=0
gpgkey=https://mirrors.aliyun.com/kubernetes/yum/doc/yum-key.gpg https://mirrors.aliyun.com/kubernetes/yum/doc/rpm-package-key.gpg
EOF

ls /etc/yum.repos.d/

#Note: to install version 1.17
yum install -y kubelet-1.17.0 kubeadm-1.17.0 kubectl-1.17.0
kubelet setting startup
Note: don't start it first. If you start it now, an error will be reported
systemctl enable kubelet
kubelet --version

Master node needs to be completed
Note that the following operations are only performed on the master node
Run the initialization command (requires docker environment)
kubeadm init --kubernetes-version=1.17.0 \
--apiserver-advertise-address=192.168.23.15 \
--image-repository registry.aliyuncs.com/google_containers \
--service-cidr=10.1.0.0/16 \
--pod-network-cidr=10.244.0.0/16
Note: apiserver advertisement address must be the address of the master machine
The addresses of service CIDR and pod network CIDR cannot be the same
Initialization error resolution
Error 1:
[WARNING IsDockerSystemdCheck]: detected "cgroupfs" as the Docker cgroup driver
As Docker cgroup driver., The Docker driver recommended by Kubernetes is "systemd"
Solution: modify the configuration of Docker: VI / etc / Docker / daemon JSON, join
{
"exec-opts":["native.cgroupdriver=systemd"]
}
Then restart docker
Error 2:
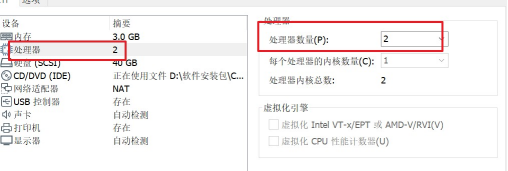
[ERROR NumCPU]: the number of available CPUs 1 is less than the required 2
Solution: modify the number of CPU s of the virtual machine to at least 2
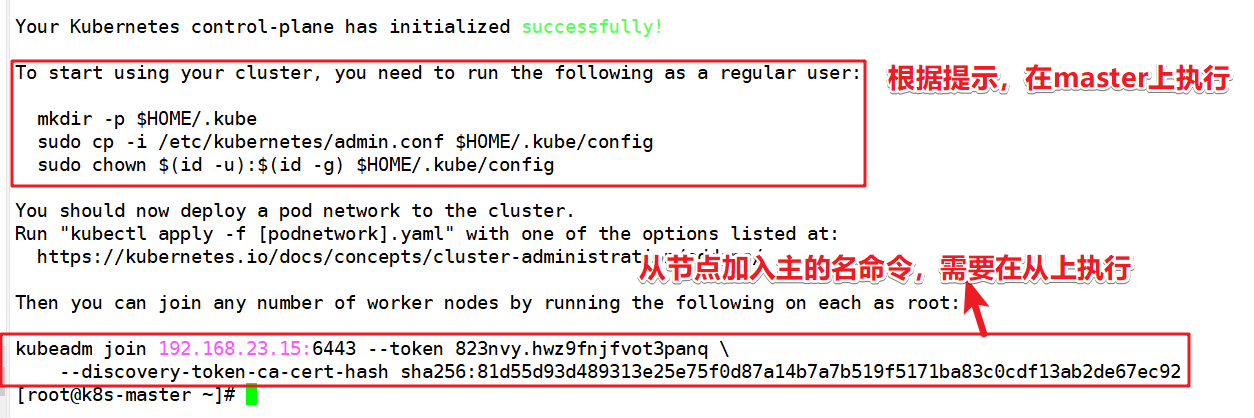
After installation, prompt the node installation command, which must be recorded
Configure kubectl tool
  mkdir -p $HOME/.kube
  sudo cp -i /etc/kubernetes/admin.conf $HOME/.kube/config
  sudo chown $(id -u):$(id -g) $HOME/.kube/config
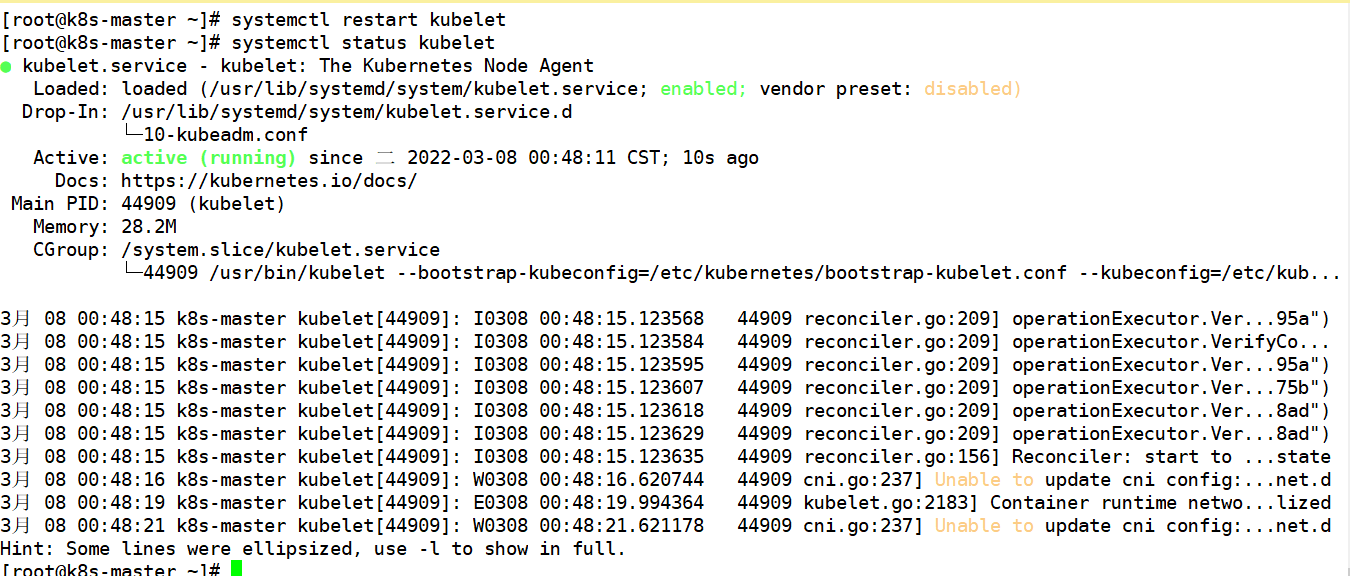
Launch kubelet
systemctl restart kubelet
systemctl status kubelet
Installing calico
mkdir k8s
cd k8s

#Download calico without checking credentials yaml
wget --no-check-certificate https://docs.projectcalico.org/v3.10/getting-started/kubernetes/installation/hosted/kubernetes-datastore/calico-networking/1.7/calico.yaml

//Address change to facilitate communication from the node
sed -i 's/192.168.0.0/10.244.0.0/g' calico.yaml

kubectl apply -f calico.yaml
Check the status of all pods and ensure that all pods are in Running status (it will take a short time)
kubectl get pod --all-namespaces -o wide

Slave node needs to be completed
The following operations are performed on all slave nodes
Let all nodes join the cluster environment
Join the cluster using the command generated by the master node
kubeadm join 192.168.23.15:6443 --token 823nvy.hwz9fnjfvot3panq \
    --discovery-token-ca-cert-hash sha256:81d55d93d489313e25e75f0d87a14b7a7b519f5171ba83c0cdf13ab2de67ec92

View cluster status on the master node
Check the cluster status on the master node. If the status is all Ready, it means that the cluster environment has been built successfully (it will take a short time)
kubectl get nodes

kubectl common commands
kubectl get nodes	   #Check the status of all master-slave nodes. If there is a noready status, take a look at the kubelet of the slave node
kubectl get ns	     #Get all namespace resources
kubectl get pods -n {$nameSpace}	        #Gets the pod of the specified namespace
kubectl describe pod Name of	-n {$nameSpace}	  #View the execution process of a pod
kubectl logs --tail=1000 pod Name of | less	  #view log
kubectl create -f xxx.yml	   # Create a cluster resource object through the configuration file
kubectl delete -f xxx.yml	   #Delete a cluster resource object through the configuration file
kubectl apply -f xxx.yml     #It has the same function as create, and can also upgrade resources through configuration files