#What are you doing with this double eleven? Get up quickly and collect the goose feathers!
Double eleven venue portal https://cloud.tencent.com/act/double11
##Goose feather first step, stroll around the main venue

You can buy lightweight application servers at an ultra-low price! I'll pull the hatred! I grabbed a 11.11. Is hee hee very fragrant?
Don't worry about the friends you didn't grab. The second kill below is also very good!
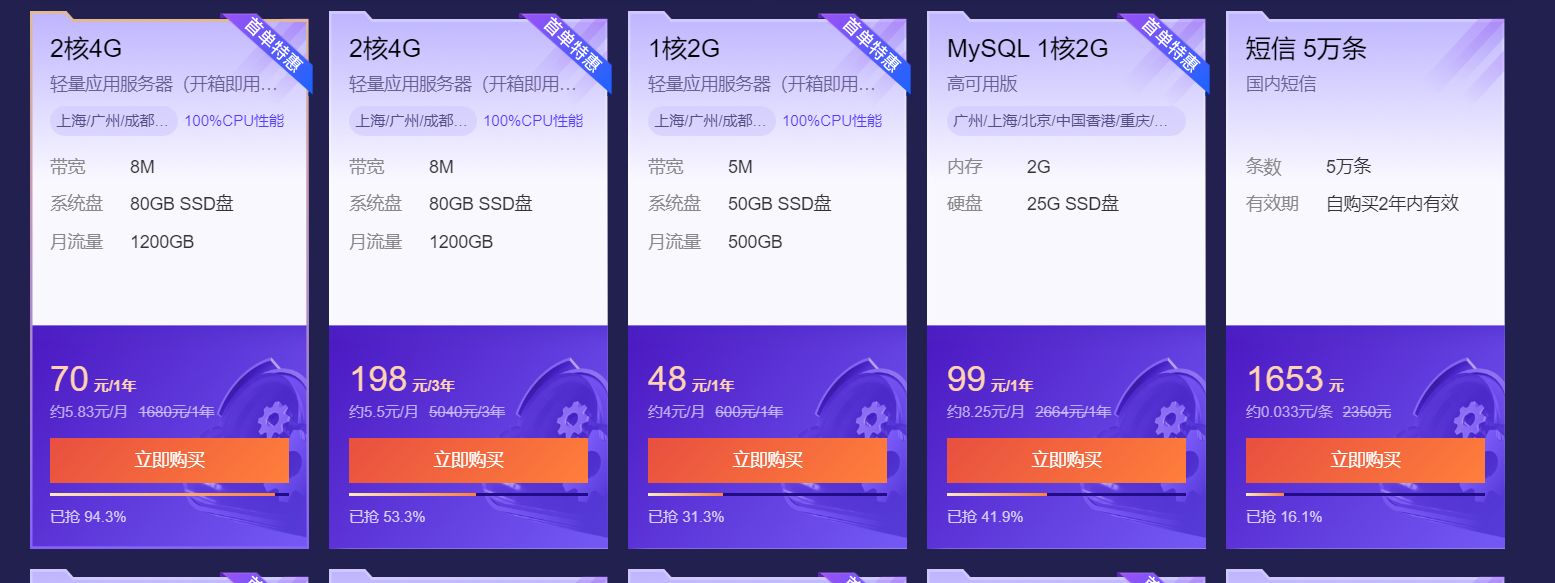
70 lightweight application servers a year, rounding is free! And mysql is also very fragrant! Children's shoes with database can consider the separation of main database! The intranet interconnection of Tencent cloud is great!
##Goose feather second step, dnspod branch venue walk!

I can't help such a fragrant golden roll! Instantly chop a domain name, and DNSPOD professional version resolution, so that your domain name resolution is faster!
##Goose feather third step, invite new people to get a big gift!

It smells good! Invite new users to buy their own JD E card!
All right! The server also has a domain name. Why not? Let's build a mastodon together!
Hands on novice tutorial!
Mastodon (also known as Mammoth or Vientiane) is a free and open source decentralized distributed micro blog social network. Its user interface and operation mode are similar to Twitter and microblog, but the whole network is not operated by a single organization, but a decentralized social network composed of multiple servers operated independently by different operators to exchange data in a federated way. Each mastodon operation site is called "Instance". Users can register with any open registration entity, and users on any entity can communicate with users on other entities. The content published by users on Twitter is called "tweet", while the content published on mastodon is called "Toot". Users can adjust privacy settings to restrict the reading or viewing of Toot by other people or entities.
Due to the convenience of using docker and migration, I prefer to deploy mastodon with docker
##1. Suggestions on server purchase
Because mammoths need higher configuration and eat more hardware, you must have a higher configuration server to run mammoths(~~1 Nuclear 1 G Don't think about it, be honest miiskey bar~~). My recommended configuration is 2-core 4 g Add 2 GB of swap,And larger hard drives (80 G Above), here I recommend some good places to sell servers.
1.1 Tencent cloud Hong Kong lightweight application server
Tencent cloud, the stability of large domestic manufacturers goes without saying, and the lines in Hong Kong are good enough, and there is no problem in daily use. It is recommended to buy the one for 67 yuan, 2-core AMD U, 4G memory and 80GB hard disk.
Advantages: excellent domestic access and good stability. It can be used together with other Tencent cloud products (such as COS, etc.), 24-hour work order and quick refund (pheasant)
2. Basic environment configuration of server (take Tencent cloud CentOS 7.6 as an example)
2.1 purchasing servers
Light weight purchase portal: https://buy.cloud.tencent.com/lighthouse
The purchase steps are shown in the figure (it is recommended to select CentOS 7.6, Debian or ubuntu system)
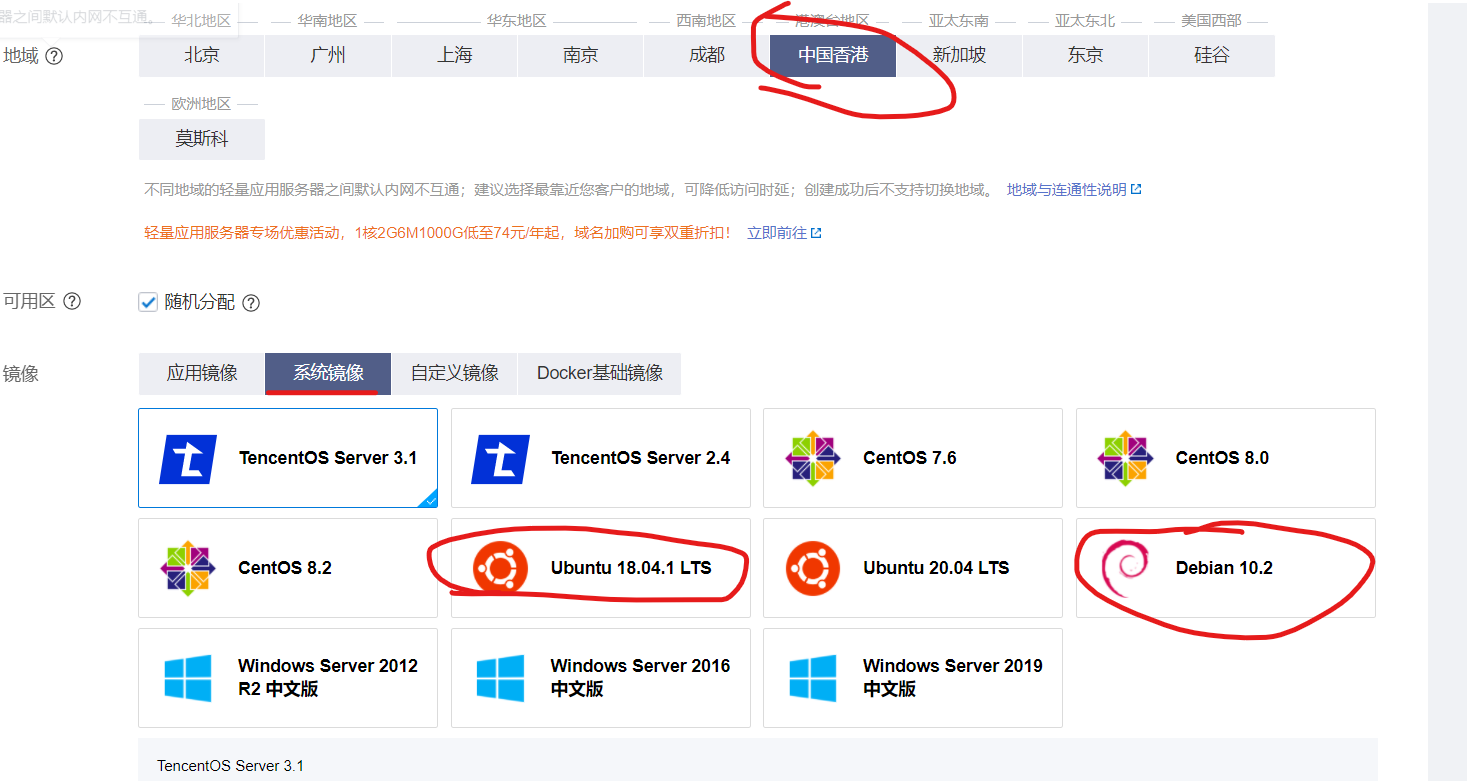
2.2 reset the server password and release the security group
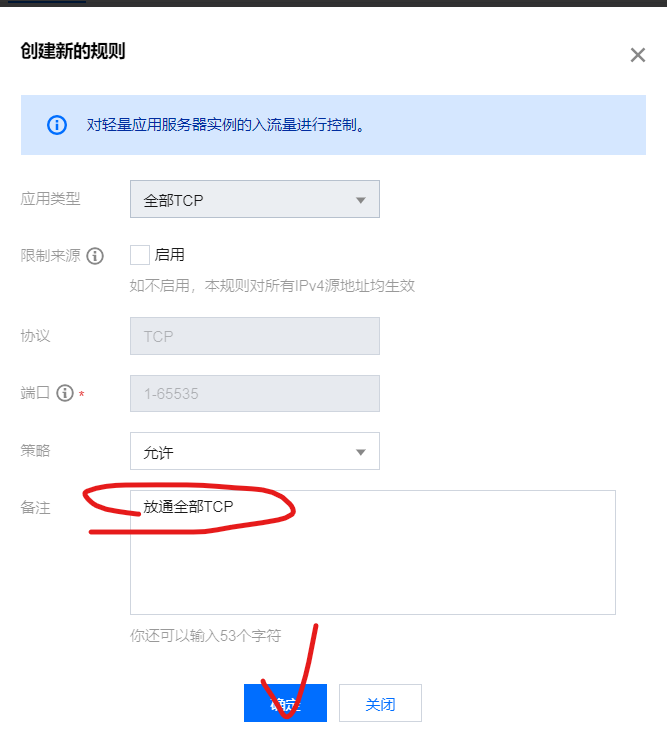
Click the Add Rule button

Click OK
Click reset password in this area
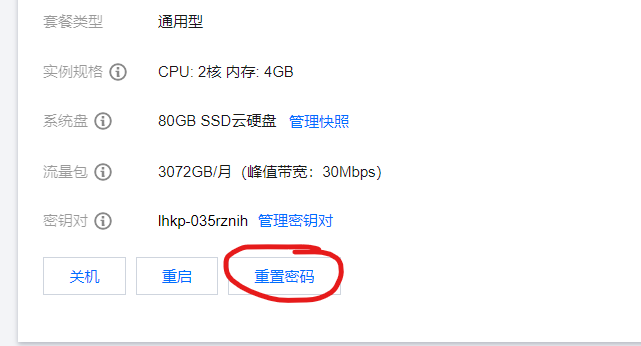
This page will pop up, enter your new password and wait for restart!
2.3 linked server SSH
There are many server SSH terminals: putty, Xshell, Terminus... And so on
Let me take Xshell as an example
Xshell installation steps
2.3.1 installing xshell
Visit xshell official website https://www.netsarang.com/zh/free-for-home-school/
Fill in your email, name, and select xshell. The download link will be sent to your email. Just click download.
2.3.2 linked server ssh
Click the circle as shown in the figure, fill in the server ip and the user name root
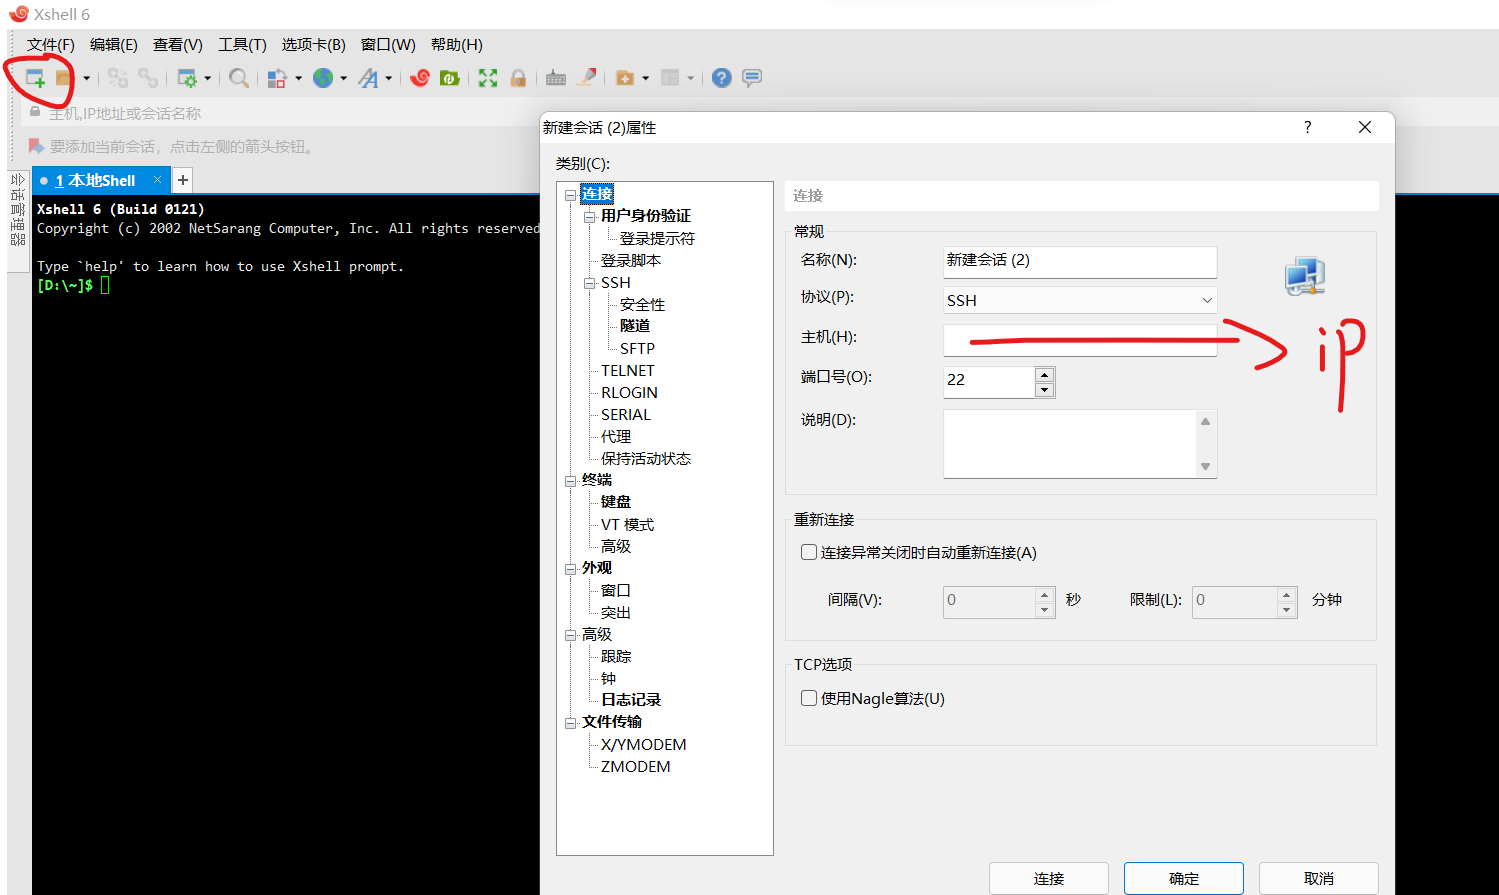
Whether to accept the server key will pop up later. Click Save, and then enter your reset password in the interface box

When such an interface appears, the link is successful! After the link is successful, run the following command
yum install curl git #centos
apt install curl git #ubuntu debian
3. Install docker and docker compose
The commands are as follows (copy and paste directly into xshell. Note that one command is copied one command at a time
curl -fsSL https://get.docker.com | bash # install docker
curl -L "https://Github.com/docker/compose/releases/download/1.25.0/docker-compose - $(uname - s) - $(uname - M) "- O / usr / local / bin / docker compose # install docker compose
chmod +x /usr/local/bin/docker-compose  #Give docker compose executable permission
docker -v
docker-compose -v
Finally, after entering docker-v and docker-compose - V, the installation is successful

4. Pull the mastodon source code
Here, I plan to put the mastodon file in the / root/mastodon file path. You can also modify it yourself
git clone https://github.com/tootsuite/mastodon.git # clone source code from github
cd mastodon
cp .env.production.sample .env.production        #Copy a. env.production file
rm -rf  docker-compose.yml #Delete docker-compose.yml from the source code
Let's write a docker-compose.yml file ourselves
touch docker-compose.yml #Create docker-compose.yml file
nano docker-compose.yml #Edit file
Write the following
version: '3'

services:
 db:
    image: postgres:9.6-alpine
    shm_size: 256mb
    environment:
      POSTGRES_DB: mastodon
      POSTGRES_USER: mastodon
      POSTGRES_PASSWORD: Change your password
    healthcheck:
      test: ["CMD", "pg_isready", "-U", "postgres"]
    volumes:
      - ./postgres:/var/lib/postgresql/data
    restart: unless-stopped

redis:
    image: redis:6.0-alpine
    healthcheck:
      test: ["CMD", "redis-cli", "ping"]
    volumes:
      - ./redis:/data
    restart: unless-stopped

  mastodon-web:
    image: tootsuite/mastodon
    env_file: .env.production
    command: bash -c "rm -f /mastodon/tmp/pids/server.pid; bundle exec rails s -p 3000"
    depends_on:
      - db
      - redis
    healthcheck:
      test: ["CMD-SHELL", "wget -q --spider --proxy=off localhost:3000/health || exit 1"]
    ports:
      - "127.0.0.1:3000:3000"
    volumes:
      - ./public/system:/mastodon/public/system
    restart: unless-stopped

  mastodon-streaming:
    image: tootsuite/mastodon
    env_file: .env.production
    command: node ./streaming
    depends_on:
      - db
      - redis
    healthcheck:
      test: ["CMD-SHELL", "wget -q --spider --proxy=off localhost:4000/api/v1/streaming/health || exit 1"]
    ports:
      - "127.0.0.1:4000:4000"
    restart: unless-stopped

  mastodon-sidekiq:
    image: tootsuite/mastodon
    env_file: .env.production
    command: bundle exec sidekiq
    depends_on:
      - db
      - redis
    volumes:
      - ./public/system:/mastodon/public/system
    restart: unless-stopped
Use the key combination ctrl+s to save, and then use ctrl+x to exit
5.mastodon configure smtp mail sending (from this blogger)
It is recommended to refer to the blogger's example: Portal (I'm too lazy to build the wheel again)
Generally speaking, configure zoho mailbox - resolve domain name - configure sending domain name - obtain smtp
In general, you need to get the following information:
1. Your smtp server
2. Your email name
3. Your email password
Examples are as follows
SMTP server: smtp.zoho.eu
port: 587
user: The email name you set
password: The password you set for this mailbox
authentication: plain
OpenSSL verify mode: none(These two steps can be pressed twice (enter)
from: The email name you set
In fact, QQ email, gmail and outlook all support it. You can search the method of configuring smtp
6. Install mastodon according to the guidance of mastodon
cd /root/mastodon
docker-compose run --rm mastodon-web bundle exec rake mastodon:setup #Start the mastodon installation wizard
Domain name: # Fill in your domain name
Do you want to enable single user mode? # Yes
Are you using Docker to run Mastodon? # Yes
PostgreSQL host: # db
PostgreSQL port: # 5432
Name of PostgreSQL database: # mastodon
Name of PostgreSQL user: # mastodon
Password of PostgreSQL user: # Fill in the password you set in compose
Redis host: # mastodon-redis
Redis port: # 6379
Redis password: # Leave blank and enter directly
Do you want to store uploaded files on the cloud? # No
Do you want to send e-mails from localhost? # Yes
Send a test e-mail with this configuration right now? # No
Save configuration? Yes
Then you will be guided to set the administrator account and password. Pay attention to saving!
7. Officially run mastodon
After all this is done, you can run mastodon!
chown -R 991:991 public#Give public directory permission
docker-compose up -d
After running, use the command docker ps to see the following container running

8. Use nginx to configure the reverse proxy
yum install nginx #centos
apt install nginx  #debian,ubuntu
cd /etc/nginx/conf.d/
nano mastodon.conf
open https://github.com/mastodon/mastodon/blob/main/dist/nginx.conf
fork a copy of nginx.conf and modify it
1. Change example.com to your domain name
2. Change the / home/mastodon/live/public path to / root/mastodon/live/public
3. Remove the comment of SSL Certificate (as shown below), and change the certificate directory to your own path

And use the command nginx -t to check whether the setting is successful
9. Domain name access
Use your configured domain name to access mastodon! enjoy it!
10. Problems encountered in my own construction -- CSS can't get down after using cloudflare
Reason: since mastodon enables CSS verification, but cloudflare compresses CSS, resulting in incorrect MD5 value, a white screen will appear.
Solution: cloudflare can turn off CSS compression
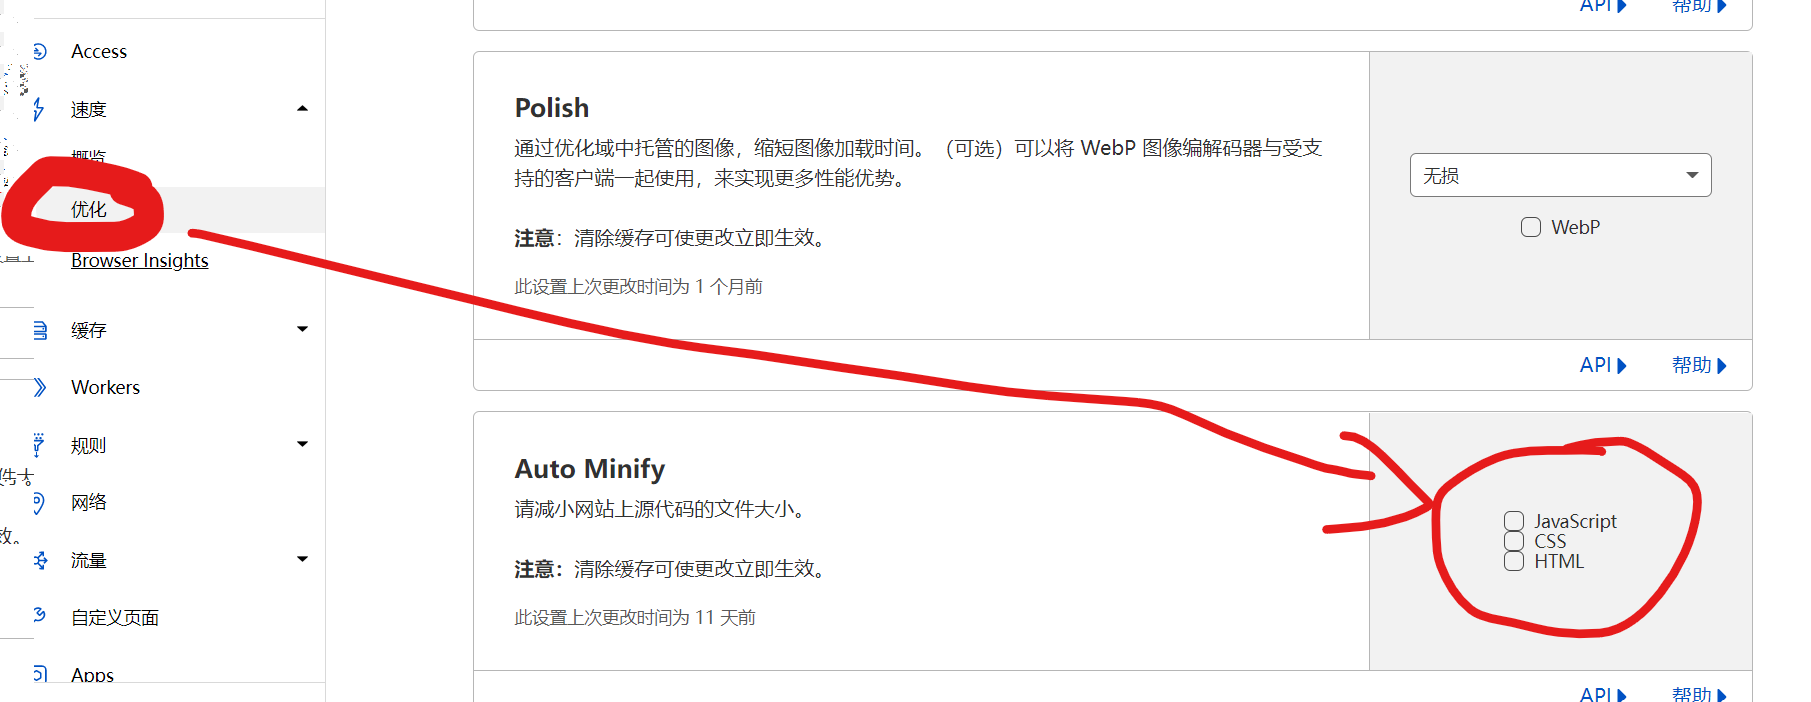
Special thanks to the following two big guys for their articles
LALA https://lala.im/7634.html
For more magic reform tutorials, please go to https://pullopen.github.io/ see
There are a lot of activities in Tencent's cloud double 11 venue. Big guys go and have a look. There are a lot of benefits!
https://cloud.tencent.com/act/double11
Welcome to my blog boke
Welcome to visit my blog!! boke