1, System migration
1. View the home directory: log in to jenkins website and view the home directory address on the system management - > system configuration page

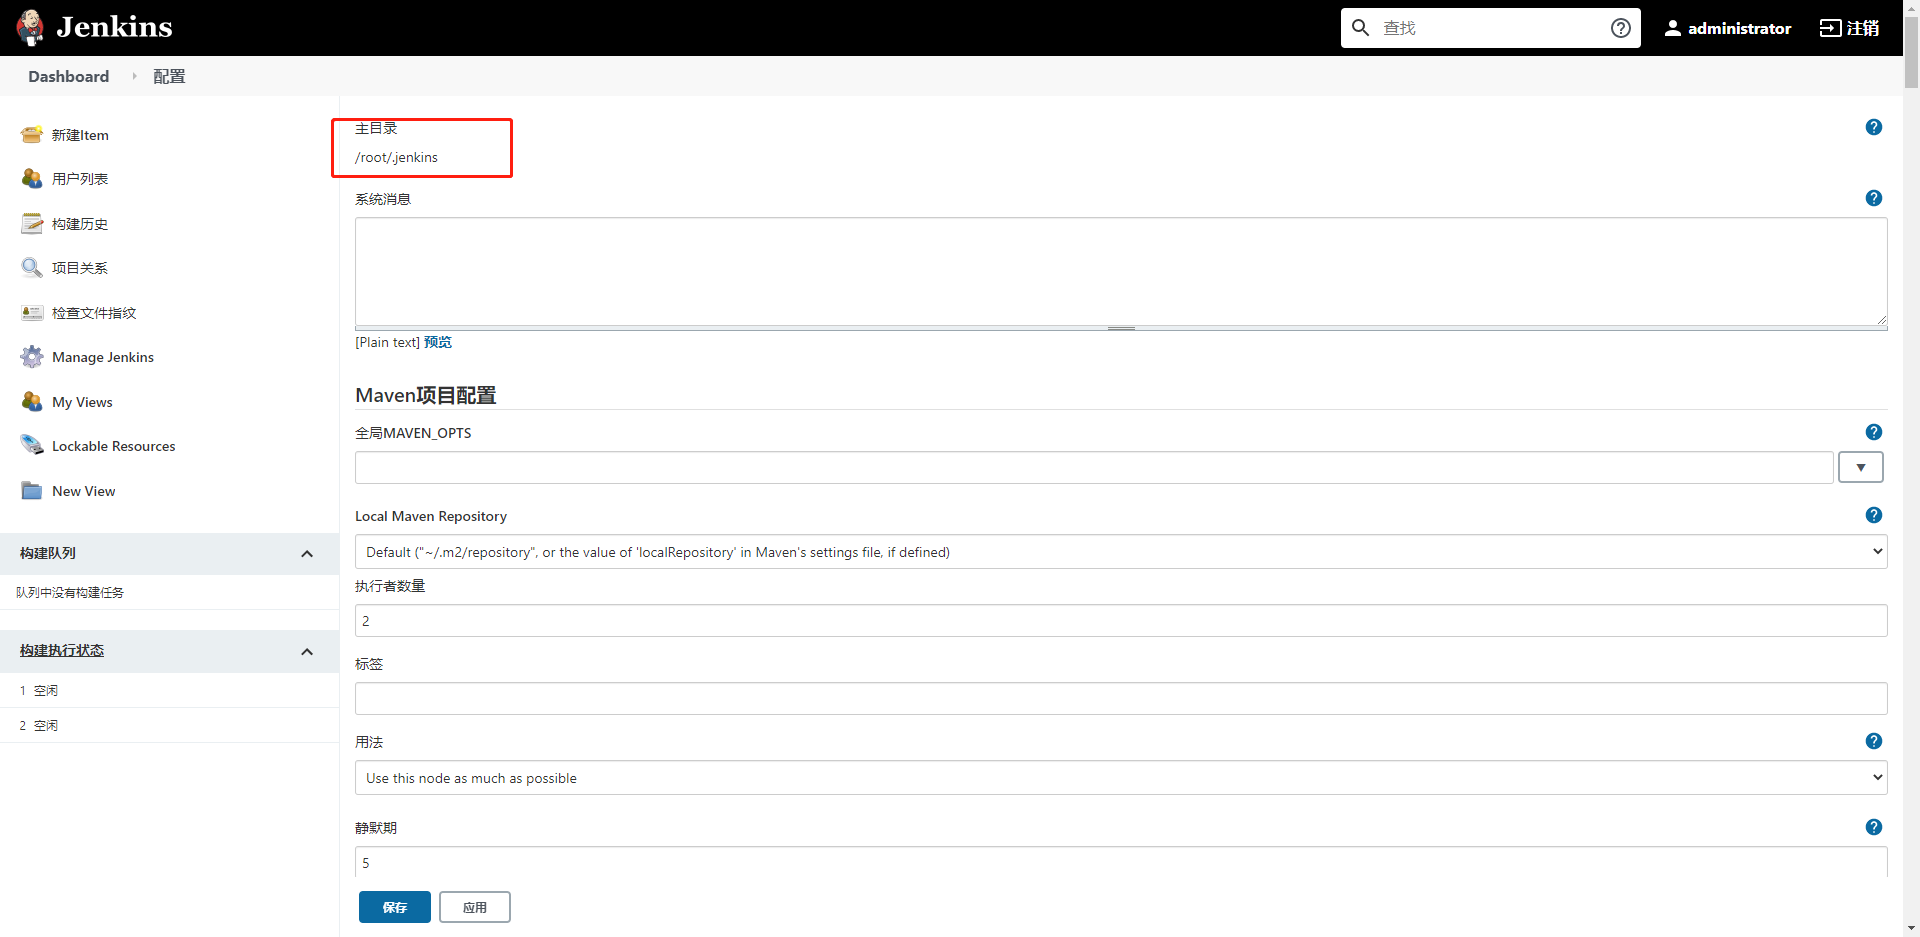
As can be seen from the above figure, the address of Jenkins home directory is the hidden directory under the root directory: / root / jenkins.
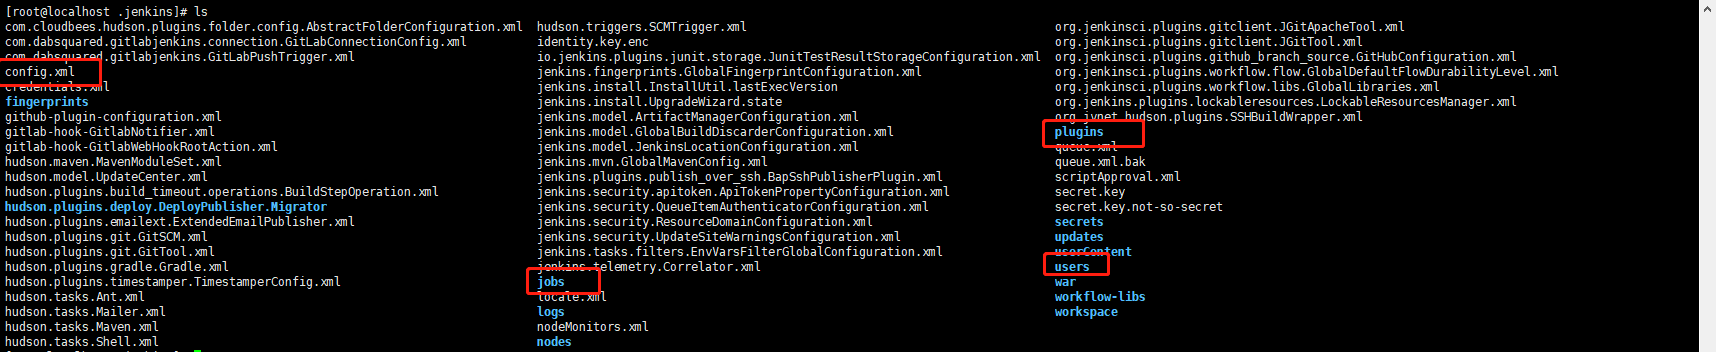
After entering the home directory, you can see many files. Do you need to package them all? In fact, you only need to package four files, as shown in the figure above, which are config XML file, jobs folder, users folder and plugins folder. You can see their functions from the name, config XML stores configuration information, jobs stores created projects, users stores user account information, and plugins stores plug-ins.
Since it contains two directories, it is recommended to package first:
[root@localhost .jenkins]# tar -czvf jenkins.tar.gz config.xml jobs/ plugins/ users/
After packaging, you can find a file named jenkins tar. GZ files can be transferred to the new jenkins server through the scp command:
scp jenkins.tar.gz root@192.168.6.12:/root/.jenkins
2, Configure secret free transmission
If files are transferred between two servers for a long time, you can configure the two servers with key pairs and use the scp command without password.
2.1 generate key pair
Suppose A and B are two servers. Now you need to log in to machine B with root on machine A without entering A password. Then we can follow the following steps:
#Generate rsa certificate on local server A and run the command:
ssh-keygen -t rsa
1. During the generation process, you will be prompted to enter the location where the key pair is saved. Press enter directly and accept the default value.
2. Then you will be prompted to enter a password, enter directly and leave it empty. Of course, you can also enter a password.
3. Then enter the confirmation password. After entering, the Enter key pair is generated.
#The complete operation is as follows:
[root@localhost ~]# ssh-keygen -t rsa
Generating public/private rsa key pair.
Enter file in which to save the key (/root/.ssh/id_rsa):
Created directory '/root/.ssh'.
Enter passphrase (empty for no passphrase):
Enter same passphrase again:
Your identification has been saved in /root/.ssh/id_rsa.
Your public key has been saved in /root/.ssh/id_rsa.pub.
The key fingerprint is:
SHA256:xNBtzmkuOigVLN+bLwi3Owcni70/YI/sjRug6wZKd8M root@localhost.localdomain
The key's randomart image is:
+---[RSA 2048]----+
|      .. .       |
|       o. o      |
|   .    o+ .     |
|  . o  .  =      |
|  .o.o  So       |
|.o.oOEo . .      |
|= .Oo%.+ .       |
|.oo X+X          |
|+. o*Bo=.        |
+----[SHA256]-----+
At / root / ID generated under SSH_ RSA and id_rsa.pub two files,
Where the public key is saved in / root / ssh/id_ rsa. Pub, the private key is saved in / root / ssh/id_ rsa.
#cp generates RSA public key certificate on local server a, and then in / root / Copy a backup ID under SSH_ rsa. Pub is named id_rsa.pub.A. To copy to remote server B.
Execute cp command to copy:
cp id_rsa.pub id_rsa.pub.A
2.2. cp generates rsa public key certificate to remote server B
Use the scp command for remote replication and the ID generated by machine a_ rsa. pub. A copy to / root /. Of remote server B SSH Directory:
[root@localhost .ssh]# scp /root/.ssh/id_rsa.pub.A root@192.168.6.13ip:/root/.ssh/
root@192.168.6.13's password:
id_rsa.pub.A
Here, you need to enter the password to use the scp command. After we complete the third step below, if the local server A uses the scp command to copy the file to the remote server B, you don't need to enter the password again.
3, Key pairing
3.1 creating authorized_keys file
In the second step, the ID on server a_ rsa. pub. A file is copied to the directory / root /. Of server B The screenshot after SSH is as follows:

Now in / root / Create authorized under SSH_ Keys file, use the following command:
touch authorized_keys
3.2. Set the ID through the cat command_ rsa. pub. A is written to authorized_ In the keys file, the commands are as follows:
cat id_rsa.pub.A >> authorized_keys
3.3 modifying authorized_ Permissions of keys file
Execute the following command to modify authorized_ Permissions of keys file
chmod 400 authorized_keys
authorized_ The permissions of the keys file are very important. If it is set to 777, you still need to provide a password when logging in.
3.4 testing
Test whether server A needs A password to copy files to server B using scp command
On service A, use the command just now again. It is found that the password is no longer required.