Primary directory 1 Container deployment scheme
Secondary directory 1.1 Container architecture
Secondary directory 1.2 Overall process
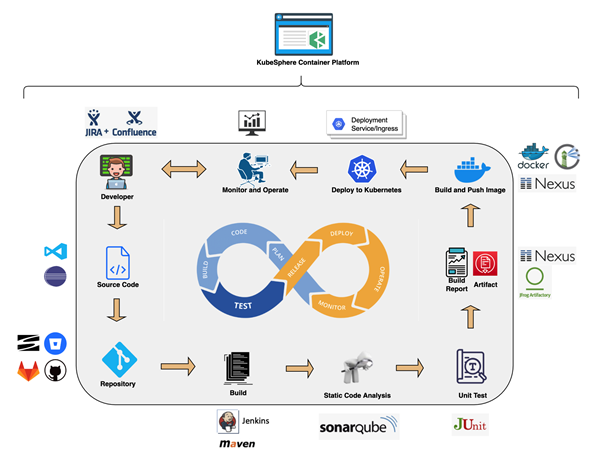
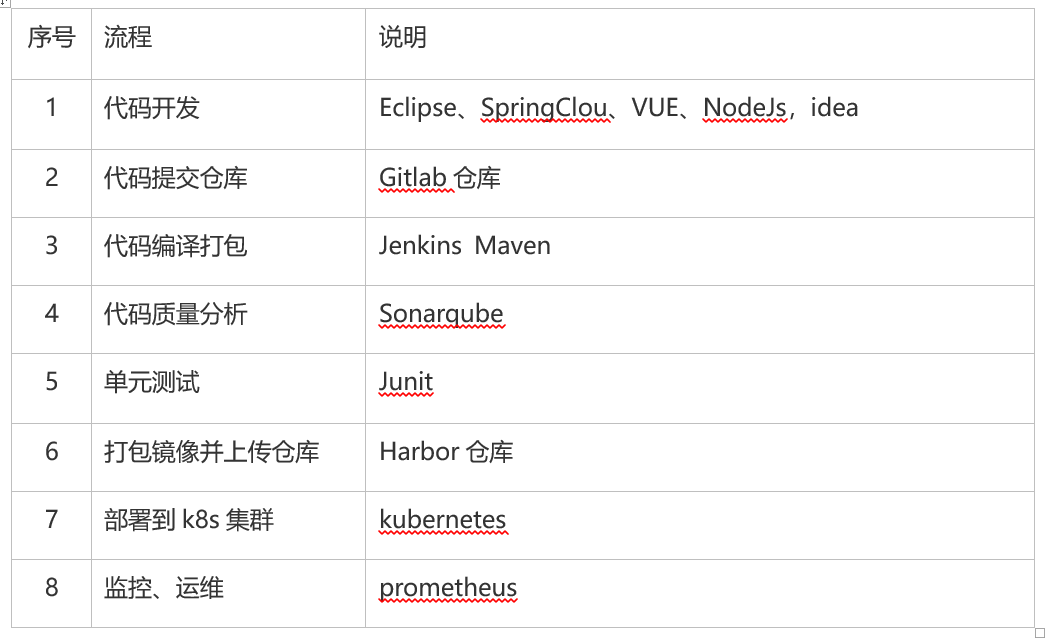
Process Description:
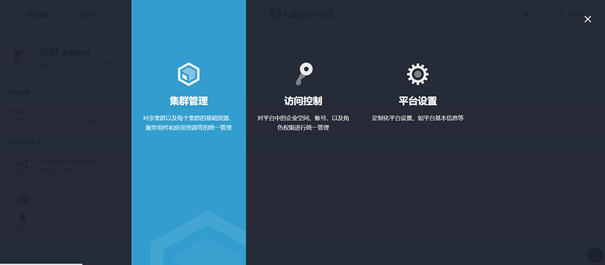
Help documentation
Shortcut key directory title text style list link code slice table footnotes custom list LaTeX mathematical formula insert Gantt chart insert UML chart insert Mermaid Flowchart insert Flowchart insert class chart
Directory replication
Primary directory 2 Description of containerized components
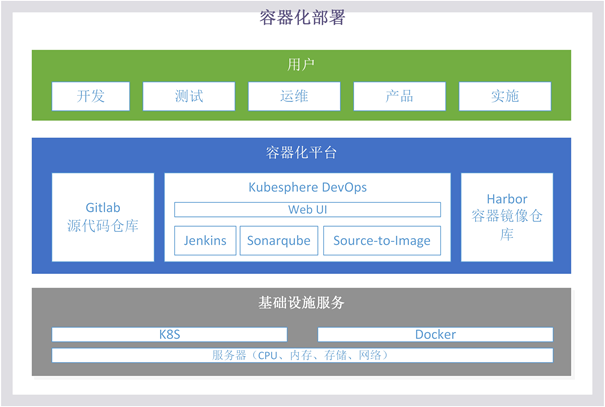
The container deployment process mainly includes the container orchestration platform Kubesphere, the source code warehouse Gitlab, and the container image warehouse Harbor.
Secondary directory 2.1 KubeSphere
Level 3 directory 2.1.1 Kubesphere introduces rancher
KubeSphere is a distributed operating system for cloud native applications built on Kubernetes. IT supports multi cloud and multi cluster management, provides the ability of full stack IT automatic operation and maintenance, and simplifies the DevOps workflow of enterprises. Its architecture makes IT very convenient for third-party applications to plug and play with cloud native ecological components.
As a full stack container deployment and multi tenant management platform, KubeSphere provides an operation and maintenance friendly wizard operation interface to help enterprises quickly build a powerful and feature rich container cloud platform. It has the most common functions required by Kubernetes enterprise services, such as Kubernetes resource management, DevOps, multi cluster deployment and management, application life cycle management, microservice governance, log query and collection, service and network, multi tenant management, monitoring and alarm, event audit, storage, access control, GPU support, network policy Image warehouse management and security management.
KubeSphere integrates various ecosystem tools around Kubernetes, providing a consistent user experience to reduce complexity. At the same time, it also has new functions not yet provided by Kubernetes, which aims to solve the pain points of Kubernetes such as storage, network, security and ease of use. KubeSphere not only allows developers and DevOps teams to use their favorite tools in a unified console, but most importantly, these functions are loosely coupled to the platform because they can choose whether to install these pluggable components.
Level 3 directory 2.1.2 Kubesphere architecture
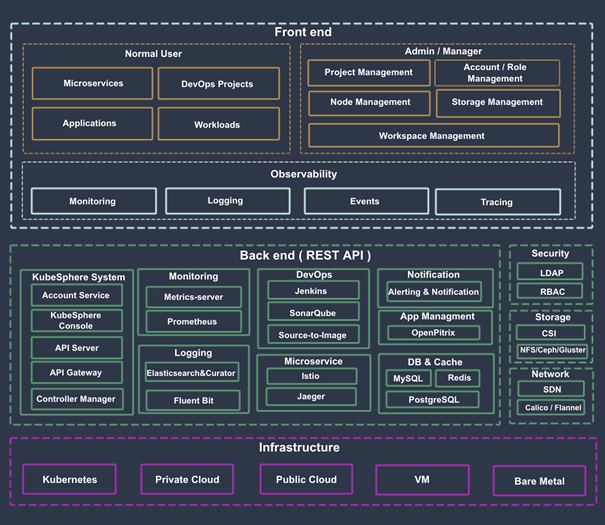
Level 3 directory 2.1.3 Kubesphere module list
KS apiserver is the API interface of the whole cluster management, the communication hub between various modules in the cluster, and the cluster security control.
KS console provides console services for KubeSphere.
KS controller manager implements business logic, for example, when creating an enterprise space, create corresponding permissions for it; Or generate the corresponding Istio configuration when creating a service policy.
The monitoring component of metrics server kubernetes collects indicator information from Kubelet of each node.
Prometheus provides monitoring indicators and services for clusters, nodes, workloads and API objects.
Elasticsearch provides cluster log indexing, query, data management and other services. It can also connect to your existing ES during installation to reduce resource consumption.
Fluent Bit provides log receiving and forwarding, and can send the collected log information to ElasticSearch and Kafka.
Jenkins provides CI/CD pipeline services.
SonarQube optional installation item, providing code static inspection and quality analysis.
Source to image automatically compiles and packages the source code into a Docker image to facilitate the rapid construction of the image.
Istio provides micro service governance and traffic control, such as gray release, Canary release, fuse, traffic image, etc.
Jaeger collects Sidecar data and provides distributed Tracing services.
OpenPitrix provides application lifecycle management, such as application templates, application deployment and management services, etc.
Alert provides custom alarm services at cluster, Workload, Pod and container levels.
Notification is a comprehensive Notification Service; It currently supports mail delivery methods.
Redis stores the data of KS console and KS account in the memory storage system.
The database of MySQL Cluster back-end components, monitoring, alarm, DevOps and OpenPitrix share MySQL services.
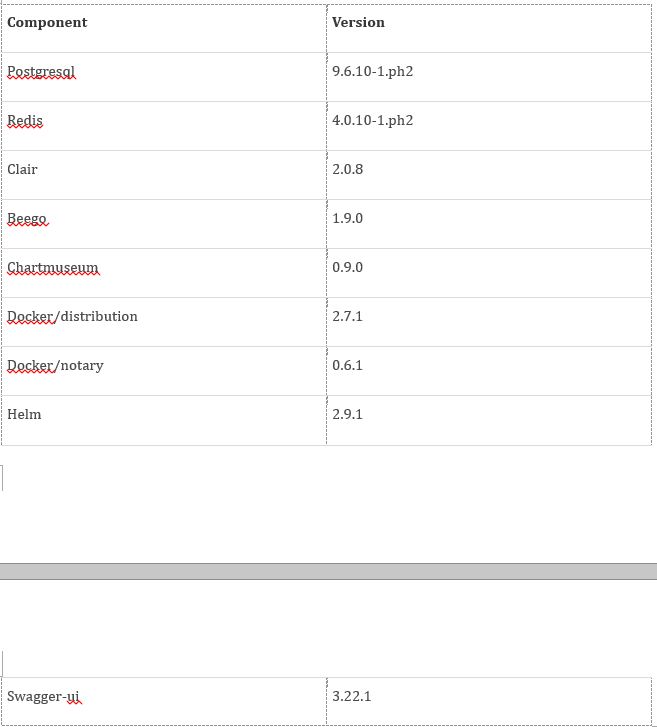
The backend databases of PostgreSQL, sonarqube and Harbor.
OpenLDAP is responsible for centrally storing and managing user account information and connecting with external LDAP.
The built-in CSI plug-in of Storage is connected to the cloud platform Storage service, and the open source NFS/Ceph/Gluster client can be installed optionally.
Network can optionally install Calico/Flannel and other open-source network plug-ins to support docking with the cloud platform SDN.
Level 3 directory 2.1.4 Introduction to Devops
What is the KubeSphere DevOps system
KubeSphere DevOps system based on Jenkins is specially designed for CI/CD workflow in Kubernetes. It provides a one-stop solution to help development and operation and maintenance teams build, test and release applications to Kubernetes in a very simple way. It also has plug-in management, binary to image (b2i), source to image (S2i), code dependency cache, code quality analysis, pipeline log and other functions.
DevOps system provides users with an automatic environment, and applications can be automatically published to the same platform. It is also compatible with third-party private image repositories (such as Harbor) and code bases (such as GitLab/GitHub/SVN/BitBucket). It provides users with a comprehensive and visual CI/CD pipeline, creating an excellent user experience, and this highly compatible pipeline capability is very useful in offline environments.
Secondary directory 2.2 Gitlab
Git is an open source distributed version control system, which can effectively and quickly handle version management from very small to very large projects. It is the most advanced distributed version control system in the world.
Git lab is an open-source code warehouse that can be used as a tool for GitLab project management.
Secondary directory 2.3 Harbor
Level 3 directory 2.3.1 Harbor introduction
Harbor is an enterprise Registry server used to store and distribute Docker images. It extends the open source Docker Distribution by adding some necessary functional features for enterprises, such as security, identification and management. As an enterprise private Registry server, harbor provides better performance and security. Improve the efficiency of transferring images using Registry to build and run the environment. Harbor supports the replication of image resources installed in multiple Registry nodes. All images are saved in the private Registry to ensure that data and intellectual property rights are controlled in the company's internal network. In addition, harbor also provides advanced security features, such as user management, access control and activity audit.
Level 3 directory 2.3.2 Harbor function
role based access control: users and Docker image warehouses are organized and managed through "projects". A user can have different permissions on multiple image warehouses in the same namespace (project).
image replication: images can be replicated (synchronized) in multiple Registry instances. It is especially suitable for load balancing, high availability, mixed cloud and cloudy scenarios.
graphical user interface: users can browse through the browser, retrieve the current Docker image warehouse, and manage projects and namespaces.
AD/LDAP:-Harbor can integrate the existing AD/LDAP in the enterprise for authentication management.
audit management: all operations against the mirror warehouse can be recorded and traced for audit management.
Internationalization: it has localized versions in English, Chinese, German, Japanese and Russian. More languages will be added.
RESTful API: provide administrators with more control over Harbor, making it easier to integrate with other management software.
simple deployment: online and offline installation tools are provided, and can also be installed to vSphere platform (OVA mode) virtual devices.
Primary directory 3 Installation configuration
This chapter mainly describes the installation and configuration of all components of the container platform.
Secondary directory 3.1 Environmental preparation
server configuration: 2CPU, 8GB memory, 100GB hard disk, 10Mbps bandwidth or higher.
operating system: centos7 eight
the increase of data volume needs to be considered. The code warehouse and container image warehouse should support easy capacity expansion.
close the firewall and selinux
the server can access the public network.
Secondary directory 3.2 Gitlab installation
Level 3 directory 3.2.1 Software installation
#1.ssh login to the server
#2. Installation foundation
yum install -y curl policycoreutils-python openssh-server
#3. Install and start postfix to send notification mail
yum install postfix
systemctl enable postfix
systemctl start postfix
#4. Add gitlab package dependency
curl -s https://packages.gitlab.com/install/repositories/gitlab/gitlab-ce/script.rpm.sh | sudo bash
#5. Install the open source version of gitlab CE community, which is installed to / opt/gitlab by default
yum install -y gitlab-ce
After installation, you can use the server IP for direct access (default port 80)
Default installation directory: / opt/gitlab
Level 3 directory 3.2.2 Configuration optimization
Configuration file: / etc / gitlab / gitlab RB, the main configuration items involved in modification are as follows:
#gitlab address, used when accessing or clone code
external_url 'http://49.233.1.65'
Mail server configuration
#Start smtp service
gitlab_rails['smtp_enable'] = true
#Mail smtp server
gitlab_rails['smtp_address'] = "smtp.qq.com"
#smtp port, 465 by default
gitlab_rails['smtp_port'] = 465
#Sender email address
gitlab_rails['smtp_user_name'] = "xxx@foxmail.com"
#Sender mail password
gitlab_rails['smtp_password'] = "xxxxxxxxxx"
#Sending server domain name
gitlab_rails['smtp_domain'] = "qq.com"
#smtp authentication method, which can be used by default
gitlab_rails['smtp_authentication'] = "login"
#Activate tls encryption. true is sufficient
gitlab_rails['smtp_enable_starttls_auto'] = true
gitlab_rails['smtp_tls'] = true
#Activate mail service
gitlab_rails['gitlab_email_enabled'] = true
gitlab_rails['gitlab_email_from'] = 'myjoylink@foxmail.com'
#Display name of the sender who sent the message
gitlab_rails['gitlab_email_display_name'] = 'Gitlab'

#The data backup directory can be modified to the specified directory
gitlab_rails['backup_path'] = "/data/gitlab/backups"
#Data backup retention time, unit: seconds. Backup files exceeding this time will be deleted
gitlab_rails['backup_keep_time'] = 1209600
#The data store directory cannot contain symbolic links (soft links)
git_data_dirs({
"default" => {
"path" => "/data/gitlab/git-data"
}
})
Related commands:
#Service startup
gitlab-ctl start
#Service shutdown
gitlab-ctl stop
#Service restart
gitlab-ctlrestart
#Initialize after modifying the configuration
gitlab-ctlreconfigure
#Startup self startup
systemctlenablegitlab-runsvdir.service
Secondary directory 3.3 Harbor installation
Level 3 directory 3.3.1 Installation requirements
VMware officially provides that Harbor installation and operation depends on docker and docker compose environment. Version requirements:
docker 17.06.0-ce+
docker-compose 1.18.0+
Installation:
yum install -y docker-ce docker-compose
#View version
docker --version
docker-compose --version
Level 3 directory 3.3.2 Installation configuration
Harbor core components:
Harbor download address: https://github.com/goharbor/harbor/releases
It is divided into online installation version and offline installation version. It is recommended to download the offline version directly through Xunlei and other tools:
harbor-offline-installer-vx.x.x.tgz
#Unzip the installation package
tarzxfharbor-offline-installer-vx.x.x.tgz
cd harbor

#Modify the configuration file: vimharbor yml
hostname:#Change the public IP address / domain name to visit harbor
http:
port: 80#Port 80 is used by default and can be modified
harbor_admin_password: Harbor12345#Default initial login password. Remember this password
data_volume: /data/harbor#The data storage directory can be changed to other directories according to the actual configuration
#Execute installation script
./install.sh
#View component startup
docker-compose ps
Harbor service operation command, in the harbor installation directory
docker-compose down -v#Out of Service
docker-compose up -d#Start service
#Because harbor uses http protocol and docker uses https by default, the docker configuration needs to be modified
vim/etc/docker/daemon.json# add the following configuration and restart docker:
{"insecure-registries": ["harbor ip"]}
systemctl daemon-reload
systemctl restart docker
Secondary directory 3.4 Kubesphere installation
Official installation reference: https://kubesphere.io/zh/docs/quick-start/all-in-one-on-linux/
Level 3 directory 3.4.1 Environmental preparation
1.KubeSphere requires some ports for communication between services. If firewall rules are enabled, you need to ensure that the basic components can communicate with each other through the following specific ports:

You can use sphere kuberall development mode to quickly deploy and test the environment.
The node must be able to connect through SSH, and the sudo/curl/openssl command can be used on the node. Online installation is recommended. The server is required to be connected to the external network.
3. Install dependencies: yum install -y socat conntrack ebtables ipset
4. Network and DNS configuration: ensure / etc / resolv The DNS configuration in conf is available.
Level 3 directory 3.4.2 Download installation script
Download address: https://github.com/kubesphere/kubekey/releases
Download the latest release version, which is currently 1.0.1:
curl -sfL https://get-kk.kubesphere.io | VERSION=v1.0.1 sh -
#Add executable permissions
chmod +x kk
Level 3 directory 3.4.3 Start installation
#kubernetes uses v1 In version 17.9, kubesphere uses v3 Version 0.0, which can be modified according to the actual situation.
#Currently supported Kubernetes version: v1.0 15.12, v1. 16.13, v1. 17.9 (default), v1 18.6.
#Execute the following command to start the installation:
./kk create cluster --with-kubernetes v1.17.9 --with-kubesphere v3.0.0
After executing the installation command, you will see the following table for environmental inspection:

After ensuring that the installation requirements marked y above are met, enter yes to continue the installation.
Level 3 directory 3.4.4 Verify installation results
When you see the following output, it indicates that the installation has been completed (if the installation cannot be completed normally, please analyze the output error message):

Enter the following command to check the installation results:
kubectl logs -n kubesphere-system $(kubectl get pod -n kubesphere-system -l app=ks-install -o jsonpath='{.items[0].metadata.name}') -f
The output will display the IP address and port number of the Web console. The default NodePort is 30880. You can now use the default account and password (admin)/ P@88w0rd )Access the console via IP:30880:
#####################################################
Welcome to KubeSphere!
#####################################################
Console: http://192.168.0.2:30880
Account: admin
Password: P@88w0rd
NOTES:
- After logging into the console, please check the
monitoring status of service components in
the "Cluster Management". If any service is not
ready, please wait patiently until all components
are ready. - Please modify the default password after login.
#####################################################
https://kubesphere.io 20xx-xx-xx xx:xx:xx
#####################################################
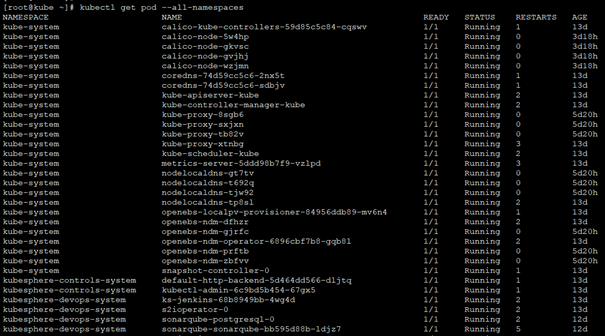
Check the status of each component:
Method 1:
#Check whether all pod s are running
kubectl get pod --all-namespaces
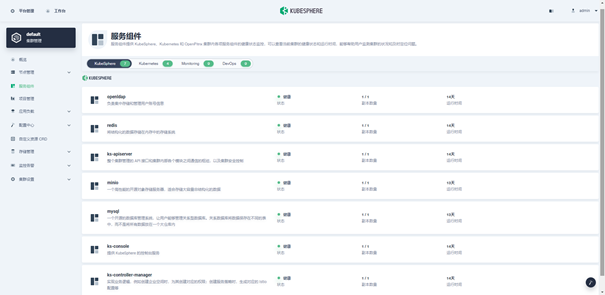
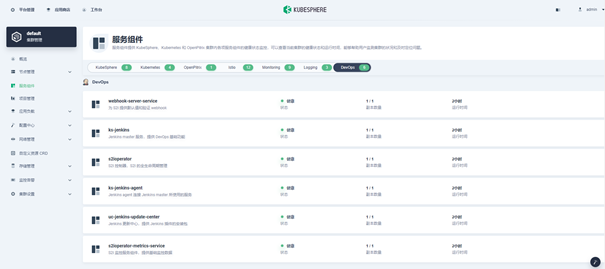
Method 2: log in to kubesphere web console to check the component status. Visit: platform management → cluster management → service component:
Level 3 directory 3.4.5 Open DevOps component
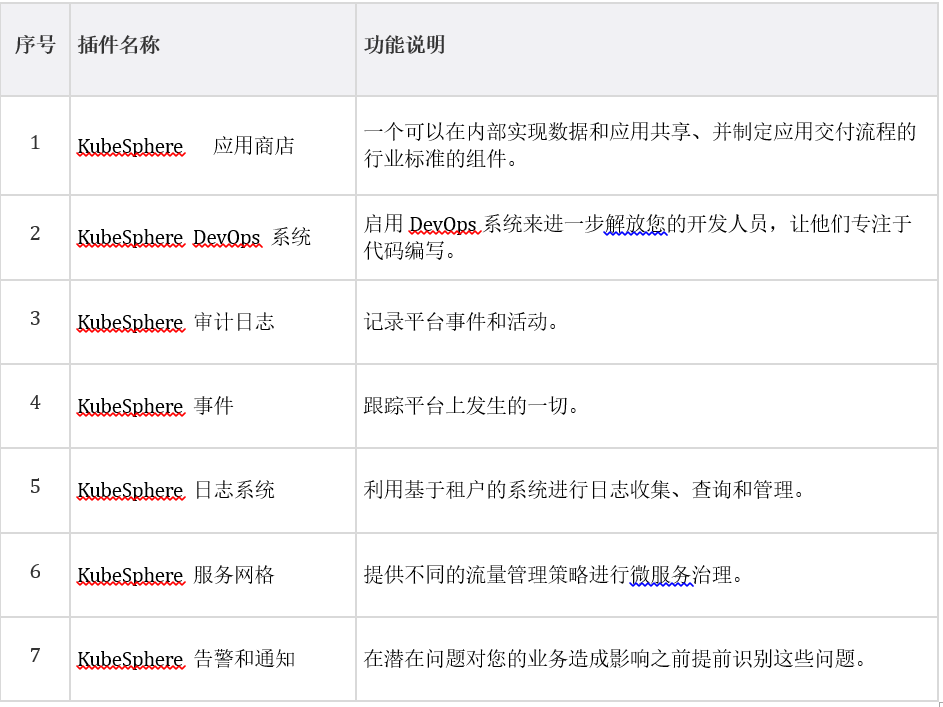
kubesphere only enables core components by default. The following optional components are not enabled by default.
This document requires the KubeSphere DevOps system, so the following describes how to enable DevOps components after kubesphere installation:
-
Log in to the console as admin, click platform management in the upper left corner, and select cluster management.
-
Click the custom resource CRD, enter cluster configuration in the search bar, and click the search results to view its detailed page.
-
In the resource list, click the three points on the right of KS installer and select edit profile.
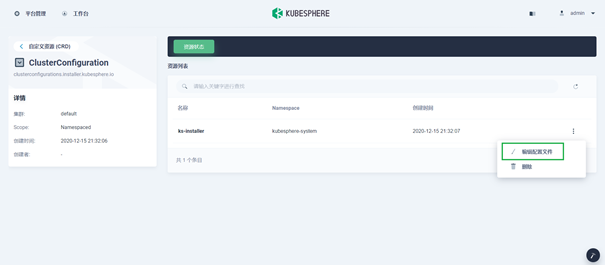
-
In the YAML file, find devops and change the enabled false to true. When finished, click Update in the lower right corner to save the configuration.
devops:
enabled: true # Change "false" to "true" -
Verify the installation of the devops component
Method 1: verify on the web console
Method 2: verify with kubectl command
Execute the following command to check the status of the Pod:
kubectl get pod -n kubesphere-devops-system
If the component runs successfully, the output results are as follows:
NAME                                       READY   STATUS    RESTARTS   AGE
ks-jenkins-68b8949bb-jcvkt                 1/1     Running   0          1h3m
s2ioperator-0                              1/1     Running   1          1h3m
uc-jenkins-update-center-8c898f44f-hqv78   1/1     Running   0          1h14m
Primary directory 4 Automatic deployment configuration
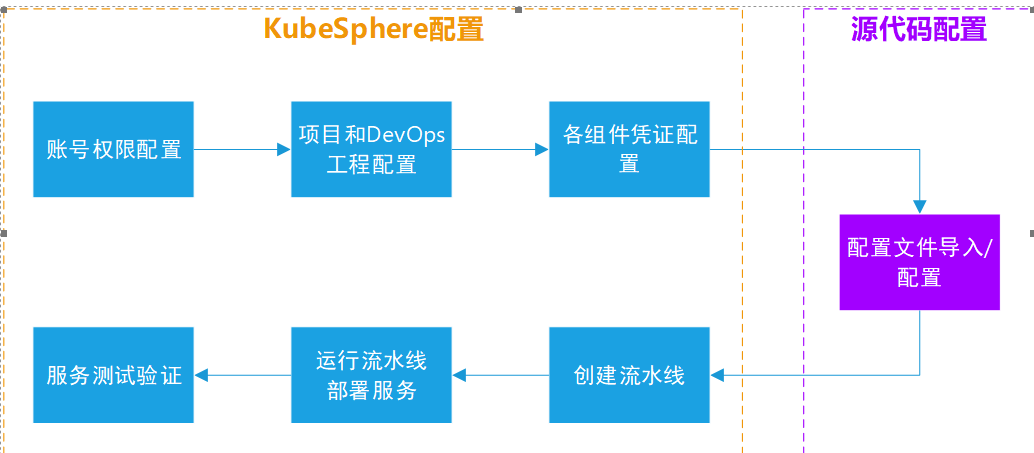
Secondary directory 4.1 Step 1: kubesphere basic configuration
Level 3 directory 4.1.1 Account permission configuration
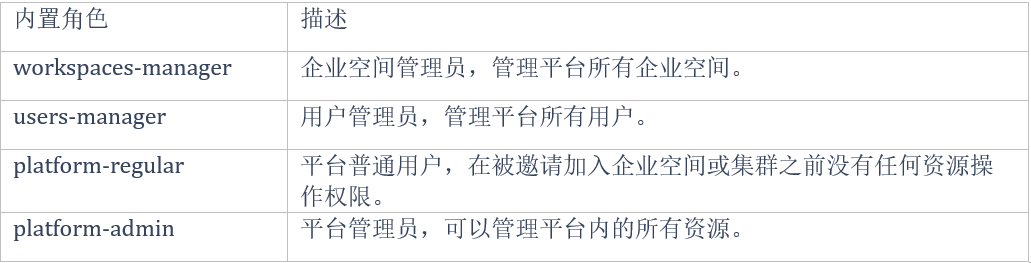
System classification and role introduction:
KubeSphere's multi tenant system is divided into three levels: cluster, enterprise space and project. Items in KubeSphere are equivalent to the Kubernetes namespace.
Cluster: it is used internally by the R & D team. Generally, a single cluster can be used;
Enterprise space: it is a logical unit for organizing projects and DevOps projects, managing resource access rights and sharing resources within the team. It can be used as an independent workspace for team work. Multiple enterprise spaces can be created according to the actual scenario (system space is not used directly).
Project: it can be divided into development environment, test environment and production environment based on the project, and each project can specify a certain resource quota.
Create account:

Level 3 directory 4.1.2 Project and DevOps engineering configuration
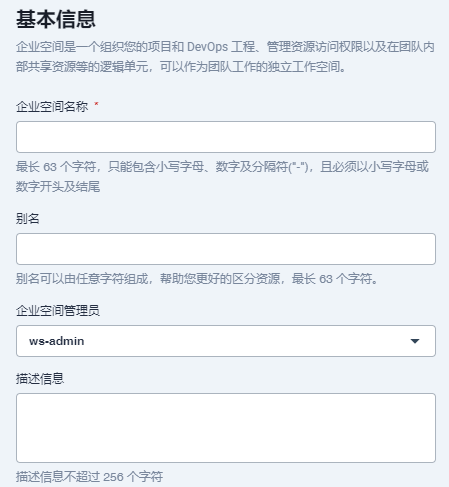
- Enterprise space configuration
Log in to the system with admin, enter workbench → enterprise space, create enterprise space, and specify the space administrator:
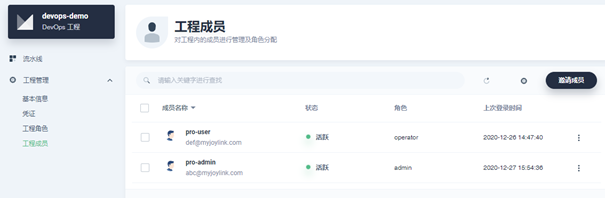
Enter the created enterprise space and invite members:
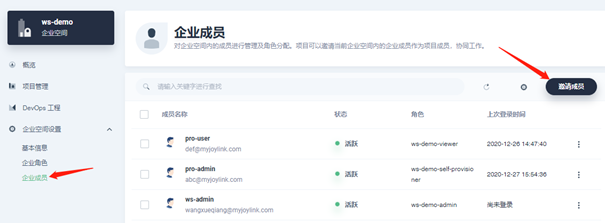
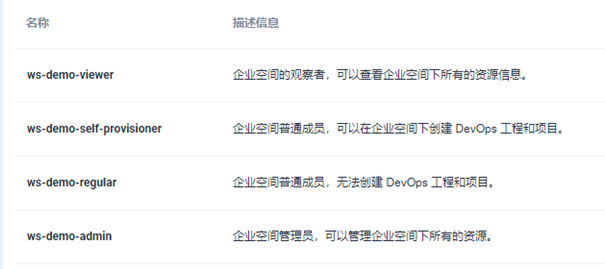
Enterprise members have four roles:
Invite the pro admin account role as WS demo self provider, the Pro User account role as WS demo viewer, and finally the following three accounts:

The viewer role invites multiple accounts such as development and testing according to the actual situation.
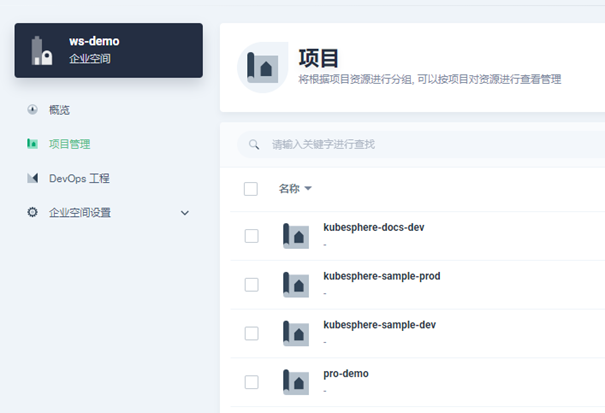
- Project configuration
Log in to the pro admin project administrator account for project management. The project concept corresponds to the namespace in k8s.
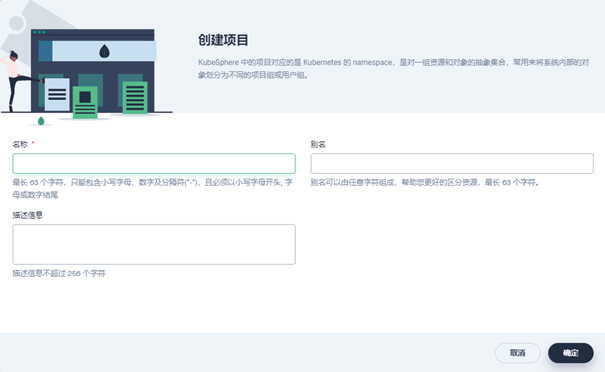
Workbench → enterprise space → project management, create a project. The project name here needs to be consistent with the namespace specified in the subsequent container deployment configuration file:
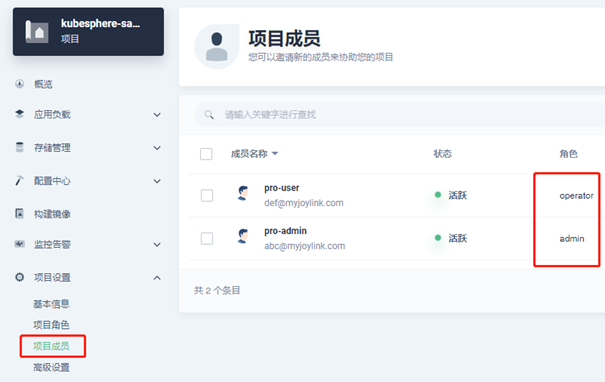
Enter the newly created project, invite project members, and grant the role of operator to Pro User (the project maintainer can manage resources other than users and roles under the project):
- DevOps engineering configuration
Enter the newly created enterprise space above, DevOps project → create:
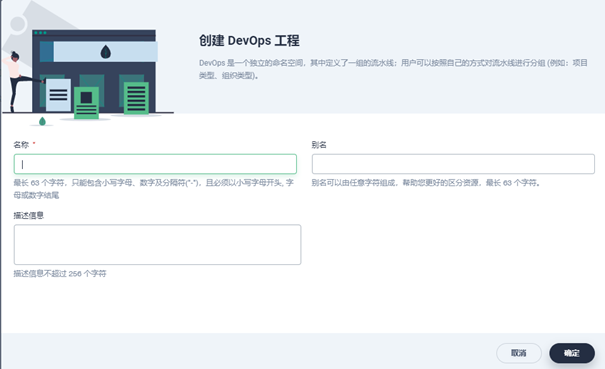
Enter the new DevOps project, click the project member, and invite the Pro User account as the operator role:
Subsequently, the Pro User account will be used to create a configuration pipeline and other operations.
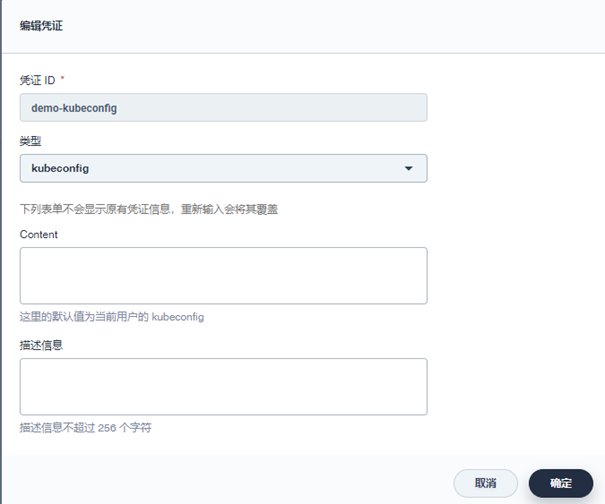
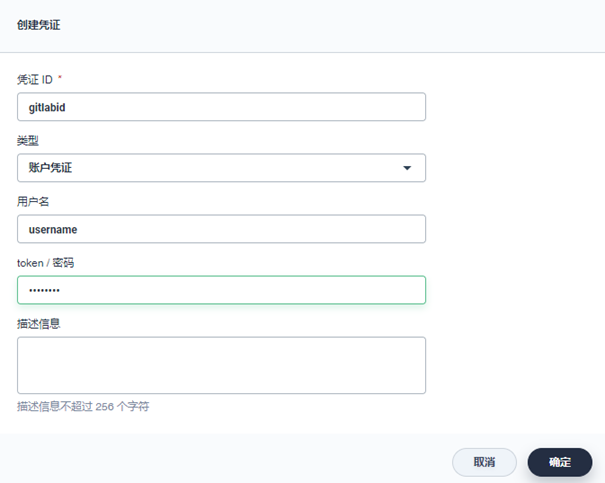
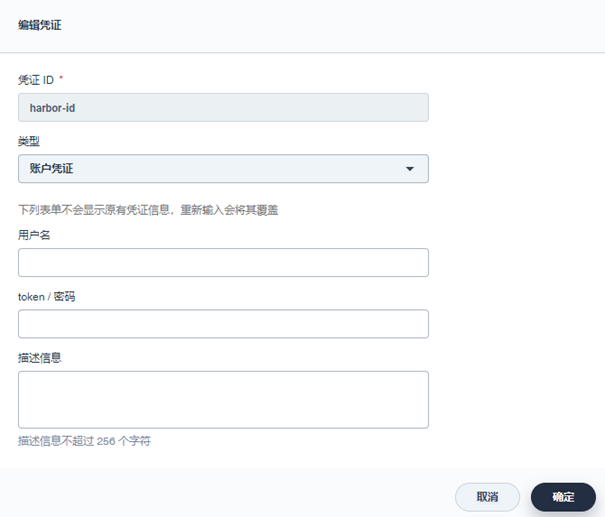
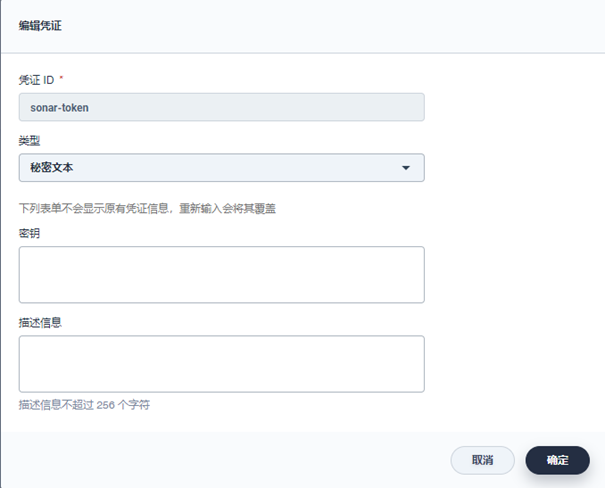
Level 3 directory 4.1.3 Component credential configuration
In the container deployment process, independent account and password are required to access each component, so it is necessary to configure each voucher information in advance to avoid directly referencing the plaintext password in the configuration file or script. It mainly includes: k8s cluster, code warehouse, image warehouse and sonarqube.
Enter the DevOps project → project management → credentials page created above to create credentials:
-
k8s cluster kubeconfig:
-
Gitlab code warehouse:
-
Harbor image warehouse:
-
Sonarqube: if code quality analysis is used, it needs to be configured. You need to obtain the key in sonarqube first:
Secondary directory 4.2 Step 2: Git source configuration file
The configuration file contains:
Jenkins file: overall process configuration file, which defines all the above processes;
Dockerfile: container image packaging configuration file, which defines all configurations of the container itself, including basic environment, working directory, startup command, etc.
deployment: container deployment and operation configuration file, defining deployment and startup configuration, including deployment directory, startup port, environment variable, image address, etc.
service: container deployment service configuration file, which defines k8s service configuration, including basic service information, external port and other configurations.
All configuration files need to be placed in the source code. The specific path is:
Jenkinsfile: source code project root directory;
Dockerfile: source code project root directory;
deployment.yaml,service.yaml: deploy/dev /, deploy/test /, deploy/prod /, etc. under the root directory. Different directories are configured for different environments;
Note: if there are multiple modules in a project, each module needs to be configured with a separate configuration file. In this way, the root directory mentioned above will become the directory of each module.
The following is a description of the specific configuration information of the configuration file. The red font part needs to be modified according to the actual project situation:
Level 3 directory 4.2.1 Jenkinsfile
Front end nodejs project:
pipeline {
  agent {
    node {
      label 'nodejs'
    }
  }
  #Environment variable, which is used for the necessary parameters used in each stage of the assembly line. The R & D center project can be used by default, and the production line can be modified according to its own environment
  environment {
    #gitlab credentials
    GITLAB_CREDENTIAL_ID = 'gitlab-id'
    #k8s credentials
    KUBECONFIG_CREDENTIAL_ID = 'demo-kubeconfig'
    #entry name
    APP_NAME = 'devops-docs-sample'
    #Mirror warehouse address
    REGISTRY = '49.233.127.116'
    #harbor warehouse credentials
    HARBOR_CREDENTIAL_ID = 'harbor-id'
    #harbor warehouse project name
    HARBOR_NAMESPACE = 'harbor-demo'
  }

  stages {
    #clone code to local
    stage('checkout scm') {
      steps {
        checkout(scm)
      }
    }

    #Get related dependencies
    stage('get dependencies') {
      steps {
        container('nodejs') {
          sh 'npm install -g cnpm --registry=https://registry.npm.taobao.org'
          sh 'cnpm i --no-package-lock'
        }

      }
    }
    #Compile, package and push the image to the image warehouse
    stage('build & push snapshot') {
      steps {
        container('nodejs') {
          #Build packaging
          sh 'yarn build'
          #Package image
          sh 'docker build -t $REGISTRY/$HARBOR_NAMESPACE/$APP_NAME:SNAPSHOT-$BRANCH_NAME-$BUILD_NUMBER .'
          #Obtain the account and password of harbor warehouse
          withCredentials([usernamePassword(passwordVariable : 'DOCKER_PASSWORD' ,usernameVariable : 'DOCKER_USERNAME' ,credentialsId : "$HARBOR_CREDENTIAL_ID")]) {
            #Log in to the harbor image warehouse
            sh 'echo "$DOCKER_PASSWORD" | docker login -u "$DOCKER_USERNAME" --password-stdin $REGISTRY'
            #Push image to warehouse
            sh 'docker push  $REGISTRY/$HARBOR_NAMESPACE/$APP_NAME:SNAPSHOT-$BRANCH_NAME-$BUILD_NUMBER '
          }
        }
      }
    }
    #Pull and deploy container image
    stage('deploy to dev') {
      when{
        branch 'master'
      }
      steps {
        kubernetesDeploy(configs: 'deploy/dev/**', enableConfigSubstitution: true, kubeconfigId: "$KUBECONFIG_CREDENTIAL_ID")
      }
    }
  }
}
java backend service:
pipeline {
  agent {
    node {
      label 'maven'
    }
  }

    parameters {
        string(name:'TAG_NAME',defaultValue: '',description:'')
    }

    environment {
        HARBOR_CREDENTIAL_ID = 'harbor-id'
        GITLAB_CREDENTIAL_ID = 'gitlab-id'
        KUBECONFIG_CREDENTIAL_ID = 'demo-kubeconfig'
        REGISTRY = '49.233.127.116'
        HARBOR_NAMESPACE = 'harbor-demo'
        GITLAB_ACCOUNT = 'test'
        APP_NAME = 'devops-java-sample'
        SONAR_CREDENTIAL_ID= 'sonar-token'
    }

    stages {
        stage ('checkout scm') {
            steps {
                checkout(scm)
            }
        }

        stage ('build & push') {
            steps {
                container ('maven') {
                    sh 'mvn -o -Dmaven.test.skip=true -gs `pwd`/configuration/settings.xml clean package'
                    sh 'docker login -u admin -p hy7Gk2ocK $REGISTRY'
                    sh 'docker build --no-cache -f Dockerfile-on-prem -t $REGISTRY/$HARBOR_NAMESPACE/$APP_NAME:SNAPSHOT-$BRANCH_NAME-$BUILD_NUMBER .'
                    withCredentials([usernamePassword(passwordVariable : 'DOCKER_PASSWORD' ,usernameVariable : 'DOCKER_USERNAME' ,credentialsId : "$HARBOR_CREDENTIAL_ID" ,)]) {
                        sh 'echo "$DOCKER_PASSWORD" | docker login $REGISTRY -u "$DOCKER_USERNAME" --password-stdin'
                        sh 'docker push  $REGISTRY/$HARBOR_NAMESPACE/$APP_NAME:SNAPSHOT-$BRANCH_NAME-$BUILD_NUMBER'
                    }
                }
            }
        }

        stage('deploy to dev') {
          when{
            branch 'sonarqube'
          }
          steps {
            input(id: 'deploy-to-dev', message: 'deploy to dev?')
            kubernetesDeploy(configs: 'deploy/dev/**', enableConfigSubstitution: true, kubeconfigId: "$KUBECONFIG_CREDENTIAL_ID")
          }
        }
    }
}
Level 3 directory 4.2.2 Deployment
apiVersion: apps/v1  #api version, default
kind: Deployment  #Deployment type deployment supports multi copy deployment
metadata:  #metadata
  labels:   # The label of Deployment, in key value format, can be modified according to the actual situation, not necessarily the following
    app: kubesphere  #apply name
    component: ks-sample-dev  #Component name
    tier: backend  #Component type, front end, back end, etc
  name: ks-sample-dev  #Required, the name of the workload will appear in the kubesphere list.
  namespace: kubesphere-sample-dev  #Project name (k8s namespace)
spec:
  progressDeadlineSeconds: 600  #Confirmation time of process jam
  replicas: 1  #Number of copies 1
  selector:  #Selector to match the corresponding pod according to the label
    matchLabels:
      app: kubesphere
      component: ks-sample-dev
      tier: backend
  template:  #Container template that specifies the configuration of the container to run
    metadata:  #Label of the container itself
      labels:
        app: kubesphere
        component: ks-sample-dev
        tier: backend
    spec:
      containers:
        - env:  #The system environment scalar passed into the container
            - name: CACHE_IGNORE
              value: js|html
            - name: CACHE_PUBLIC_EXPIRATION
              value: 3d
          image: $REGISTRY/$HARBOR_NAMESPACE/$APP_NAME:SNAPSHOT-$BRANCH_NAME-$BUILD_NUMBER  #Container mirror path
          imagePullPolicy: Always  #The image pull strategy always pulls the image again
          name: ks-sample  #Container name
          ports:
            - containerPort: 8080  #The container port needs to be modified. It is different in the same pod
              protocol: TCP  #Protocol. Generally, TCP is the default
          resources:  #Resource constraints, no special requirements, default
            limits:
              cpu: 300m
              memory: 600Mi
            requests:
              cpu: 100m
              memory: 100Mi
          terminationMessagePath: /dev/termination-log  #Logging after container hangs
          terminationMessagePolicy: File
      dnsPolicy: ClusterFirst
      restartPolicy: Always
      terminationGracePeriodSeconds: 30
Level 3 directory 4.2.3 Service
apiVersion: v1
kind: Service
metadata:
  labels:
    app: kubesphere
    component: ks-docs-sample-dev  #Deployment name
  name: ks-docs-sample-dev  #Service name, using the name of the actual service
  namespace: kubesphere-docs-dev  #k8s namespace name / kubesphere project name, need to be modified
spec:
  ports:
    - name: http
      port: 80  #Service port
      protocol: TCP  #The protocol is generally tcp
      targetPort: 80  #Container port
      nodePort: 30860  #Node port
  selector:  #If the tag matches, the service will be delegated to the pod matching the following tag, which matches the following pod configuration
    app: kubesphere
    component: ks-docs-sample-dev
    tier: backend
  sessionAffinity: None  #Whether to keep the session. You can use None without special needs
  type: NodePort  #Internet access type, using nodeport
Level 3 directory 4.2.4 Dockerfile
#Develop container base image
FROM harbor.devops.kubesphere.local:30280/library/java:openjdk-8-jre-alpine
#Specify the working directory and select it according to the actual situation. For example, here is the jar package storage directory
WORKDIR /home
#Copy the jar package to the working directory
COPY target/*.jar /home
#Execute the command to start the service
ENTRYPOINT java -jar *.jar
Level 3 directory 4.2.5 Node binding configuration
label is a core concept of K8S system. It is attached to various objects in the form of key/value pairs, such as Pod, Service, RC, Node, etc. it defines the identifiable attributes of these objects for their management and selection.
Specify the server node on which the container runs by adding a label to the node and specifying a filter in the container configuration file. The main configurations are as follows:
- Add node label
Go to kubesphere's platform management → cluster management → node management → cluster node, select the node to be specified on the right, enter the node details page, and select more operations → edit tab:
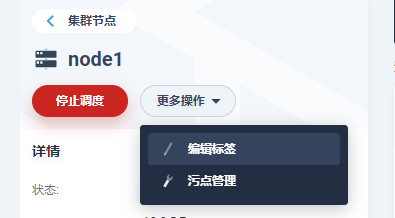
You can see that some tags used by the system itself have been predefined. Without modifying the existing tags, you can directly add the content we need. For example, here I added a tag with key as service type to identify the service type (front-end service, back-end service, etc.). The key and value here can be defined arbitrarily:

- k8s profile configuration
Container workload profile deployment yaml,spec.template. Add the following configuration to the spec:
spec:
nodeSelector:
service-type: workflow
among service-type: workflow This is the label defined for the node in step 1 above.
Secondary directory 4.3 Step 3: pipeline configuration
Pipeline is a collection of plug-ins that can be combined to achieve continuous integration and continuous delivery.
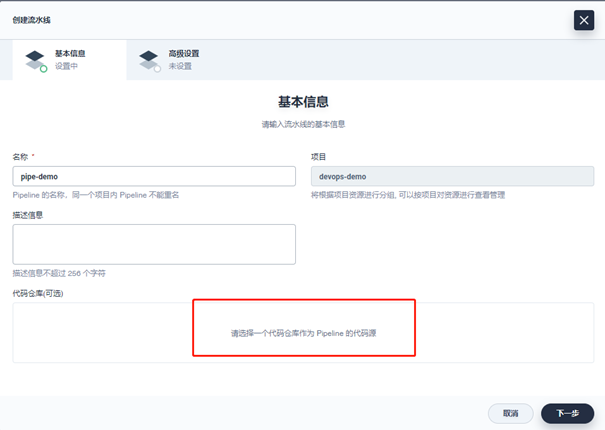
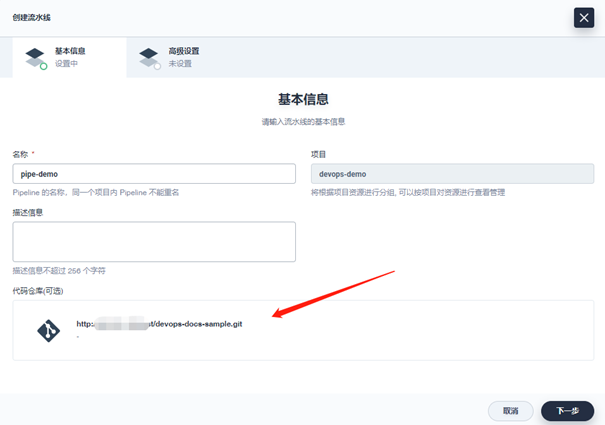
To enter the DevOps project → pipeline created above and create a pipeline, you need to use the configuration files and credentials configured above:
-
Create a pipeline and fill in the name, description, etc.:
-
Specify the code project warehouse address and select the voucher. Gitlab is used here. Select Git:

-
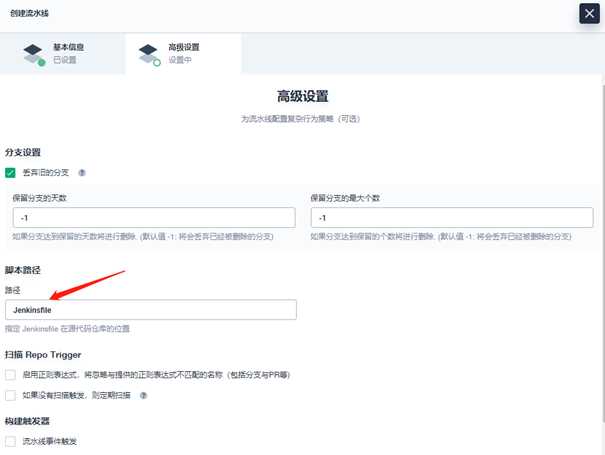
Next, go to advanced settings:
Mainly specify the Jenkinsfile file path. If it is placed in the root directory, specify the file name. Otherwise, specify the specific directory (fill in the relative path based on the root directory in the path), for example:
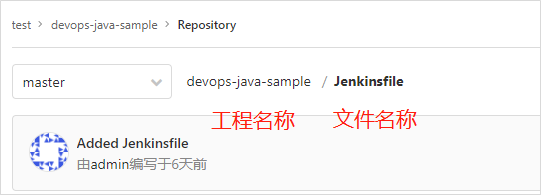
A. If the Jenkinsfile file is placed in the project root directory, the script path in the pipeline configuration can directly fill in the file name;
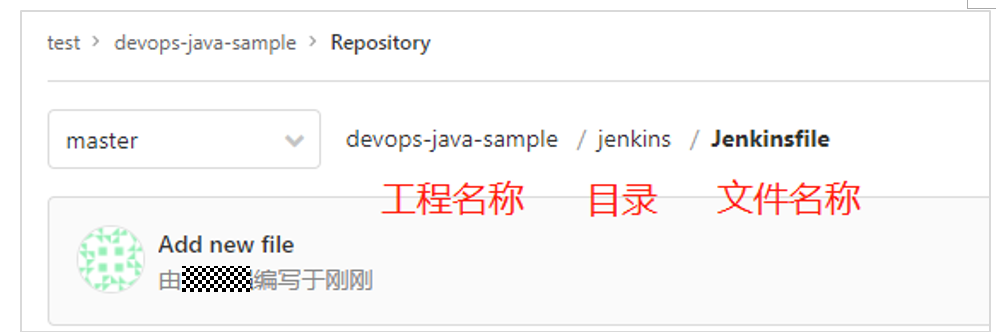
B. If the jenkins file is placed in the jenkins directory of the project, the script path in the pipeline configuration needs to fill in jenkins / jenkins file
Other options can default to:
Secondary directory 4.4 Step 4: kubesphere pipeline operation
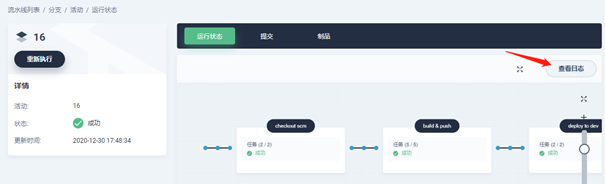
Enter the pipeline built above, click Run, select branches and enter preset parameters, and click OK to start the pipeline running task:

After starting the operation, click the operation task to enter the details page, and the pipeline will start to prepare the environment. It may take a few minutes normally, and then you will see the operation process. Click view log to see the execution record of each step:
Secondary directory 4.5 Step 5: service test and verification
Enter workbench → enterprise space → project management → select project → service:
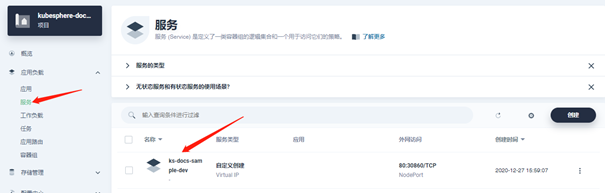
The service name here is consistent with the name defined in the service configuration file mentioned above. Click the service name to enter the details, and you can see the external IP and port after the container is running:
Use IP and ports to access running services.