1, Noun analysis
1. What is overfit
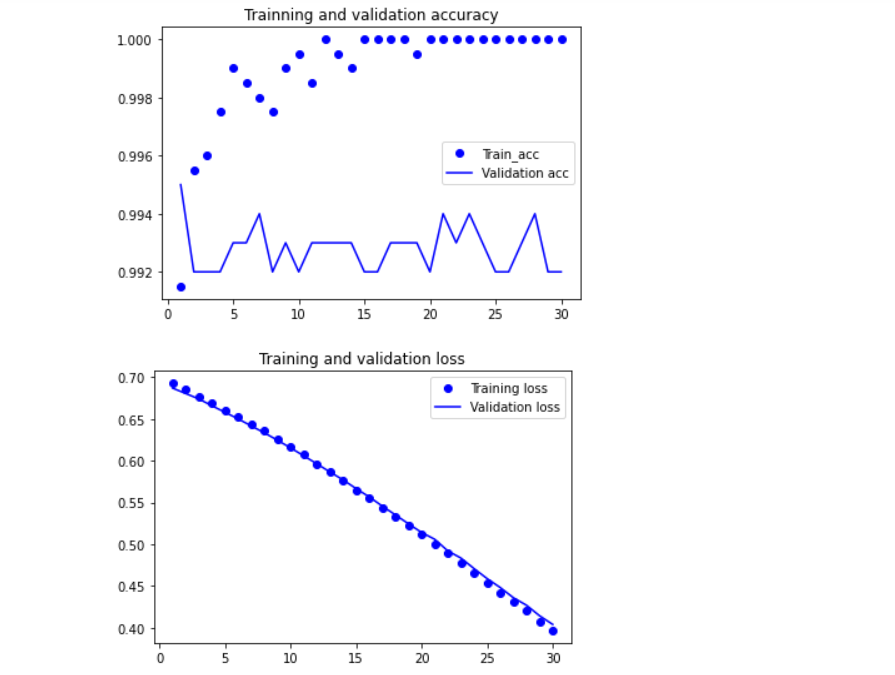
1. The simple understanding is that the output of the training sample is basically consistent with the expected output, but the output of the test sample is very different from the expected output of the test sample.
2. Overfitting is defined as making assumptions overly complex in order to obtain consistent assumptions. Imagine that a learning algorithm produces an over fitting classifier, which can correctly classify the sample data 100% (that is, it will never be wrong to give it the documents in the sample), but in order to completely and correctly classify the samples, its structure is so fine and complex and its rules are so strict, So that any document slightly different from the sample data is considered not to belong to this category!
2. What is data enhancement
Data enhancement is also called data amplification, which means that limited data can produce value equivalent to more data without substantial increase of data
2, Environment construction
1. Add jupyter_contrib_nbextensions plug-in
Installing jupyter_contrib_nbextensions Library:
pip install jupyter_contrib_nbextensions -i https://pypi.douban.com/simple/
Configure to jupyter
jupyter contrib nbextension install --user --skip-running-check
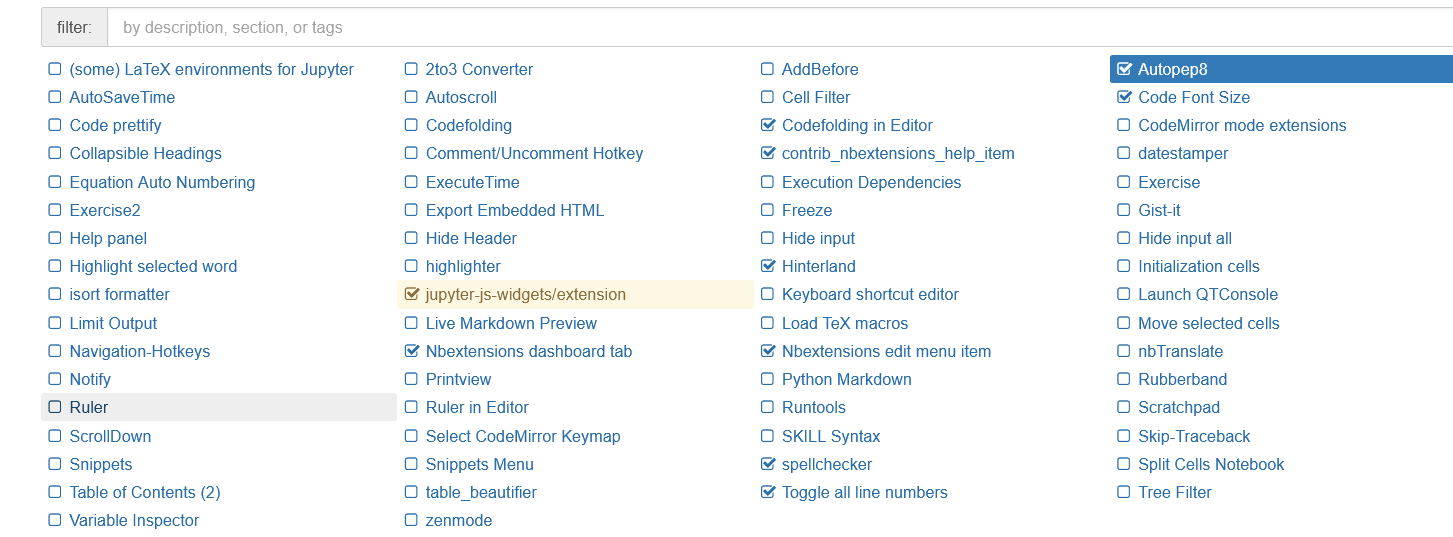
Click nbextenses and check the following directory when it is already selected:
2. Add TensorFlow and Keras Libraries
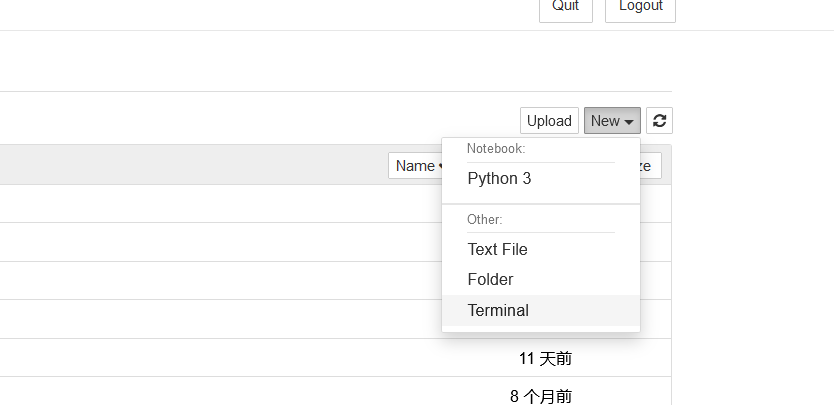
Open file - > New - > temporary
 Install using the command:
pip install tensorflow
pip install keras
Create a new python3 file import library and check whether the installation is successful

3, Data preparation
(1) Dataset Download
Download address: https://www.kaggle.com/lizhensheng/-2000
(2) The data are classified and processed according to the name
Classification code:
import tensorflow as tf
import keras
import os, shutil
# The path of the original directory
original_dataset_dir = 'E:\\dogs-vs-cats\\train\\train'

# Catalog after dataset classification
base_dir = 'E:\\dogs-vs-cats\\train\\train\\cats_and_dogs_small'
os.mkdir(base_dir)

# # Directory of training, validation and test data sets
train_dir = os.path.join(base_dir, 'train')
os.mkdir(train_dir)
validation_dir = os.path.join(base_dir, 'validation')
os.mkdir(validation_dir)
test_dir = os.path.join(base_dir, 'test')
os.mkdir(test_dir)

# Cat training picture directory
train_cats_dir = os.path.join(train_dir, 'cats')
os.mkdir(train_cats_dir)

# Directory of dog training pictures
train_dogs_dir = os.path.join(train_dir, 'dogs')
os.mkdir(train_dogs_dir)

# Cat verification picture directory
validation_cats_dir = os.path.join(validation_dir, 'cats')
os.mkdir(validation_cats_dir)

# Directory where the dog validation dataset is located
validation_dogs_dir = os.path.join(validation_dir, 'dogs')
os.mkdir(validation_dogs_dir)

# Directory of cat test data set
test_cats_dir = os.path.join(test_dir, 'cats')
os.mkdir(test_cats_dir)

# Directory of dog test data set
test_dogs_dir = os.path.join(test_dir, 'dogs')
os.mkdir(test_dogs_dir)

# Copy the first 1000 cat images to train_cats_dir
fnames = ['cat.{}.jpg'.format(i) for i in range(1000)]
for fname in fnames:
    src = os.path.join(original_dataset_dir, fname)
    dst = os.path.join(train_cats_dir, fname)
    shutil.copyfile(src, dst)

# Copy the next 500 cat images to validation_cats_dir
fnames = ['cat.{}.jpg'.format(i) for i in range(1000, 1500)]
for fname in fnames:
    src = os.path.join(original_dataset_dir, fname)
    dst = os.path.join(validation_cats_dir, fname)
    shutil.copyfile(src, dst)

# Copy the next 500 cat images to test_cats_dir
fnames = ['cat.{}.jpg'.format(i) for i in range(1500, 2000)]
for fname in fnames:
    src = os.path.join(original_dataset_dir, fname)
    dst = os.path.join(test_cats_dir, fname)
    shutil.copyfile(src, dst)

# Copy the first 1000 dog images to train_dogs_dir
fnames = ['dog.{}.jpg'.format(i) for i in range(1000)]
for fname in fnames:
    src = os.path.join(original_dataset_dir, fname)
    dst = os.path.join(train_dogs_dir, fname)
    shutil.copyfile(src, dst)

# Copy the next 500 dog images to validation_dogs_dir
fnames = ['dog.{}.jpg'.format(i) for i in range(1000, 1500)]
for fname in fnames:
    src = os.path.join(original_dataset_dir, fname)
    dst = os.path.join(validation_dogs_dir, fname)
    shutil.copyfile(src, dst)

# Copy the next 500 dog images to test_dogs_dir
fnames = ['dog.{}.jpg'.format(i) for i in range(1500, 2000)]
for fname in fnames:
    src = os.path.join(original_dataset_dir, fname)
    dst = os.path.join(test_dogs_dir, fname)
    shutil.copyfile(src, dst)
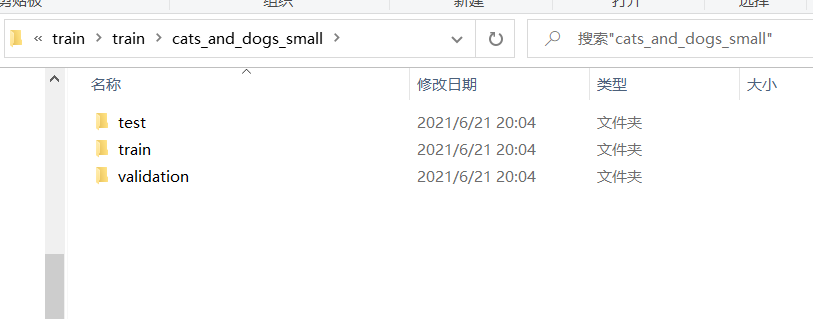
Directory after classified data:
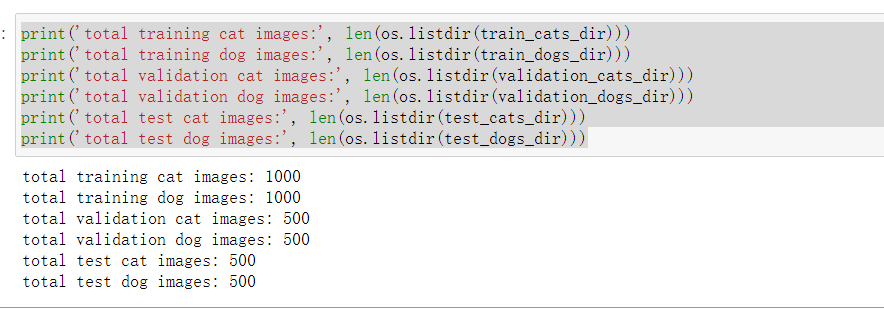
Print the size of the new data:
print('total training cat images:', len(os.listdir(train_cats_dir)))
print('total training dog images:', len(os.listdir(train_dogs_dir)))
print('total validation cat images:', len(os.listdir(validation_cats_dir)))
print('total validation dog images:', len(os.listdir(validation_dogs_dir)))
print('total test cat images:', len(os.listdir(test_cats_dir)))
print('total test dog images:', len(os.listdir(test_dogs_dir)))
4, Cat dog dataset classification experiment
(1) Network construction
1. Constructing small convolution network
from keras import layers
from keras import models
model = models.Sequential()
model.add(layers.Conv2D(32, (3, 3), activation='relu',
                        input_shape=(150, 150, 3)))
model.add(layers.MaxPooling2D((2, 2)))
model.add(layers.Conv2D(64, (3, 3), activation='relu'))
model.add(layers.MaxPooling2D((2, 2)))
model.add(layers.Conv2D(128, (3, 3), activation='relu'))
model.add(layers.MaxPooling2D((2, 2)))
model.add(layers.Conv2D(128, (3, 3), activation='relu'))
model.add(layers.MaxPooling2D((2, 2)))
model.add(layers.Flatten())
model.add(layers.Dense(512, activation='relu'))
model.add(layers.Dense(1, activation='sigmoid'))
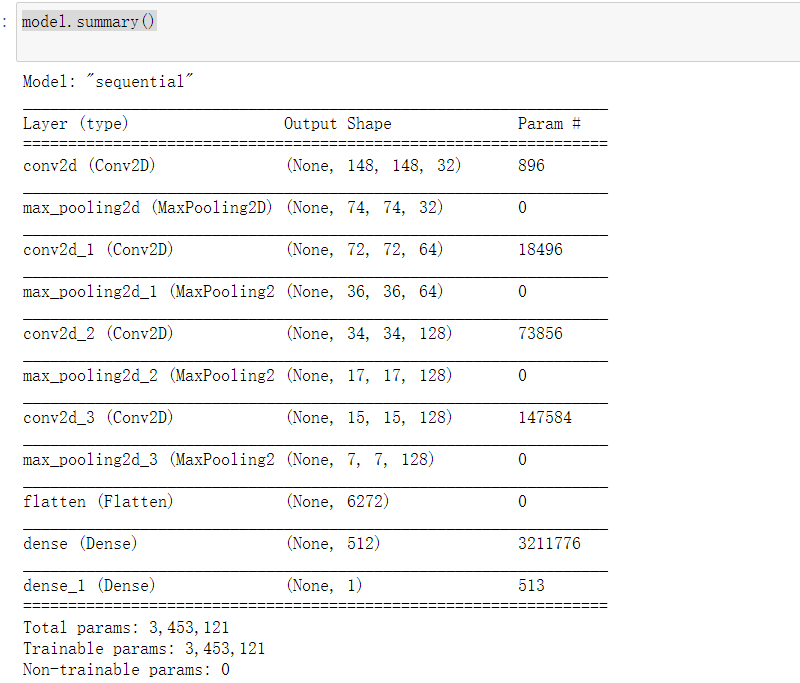
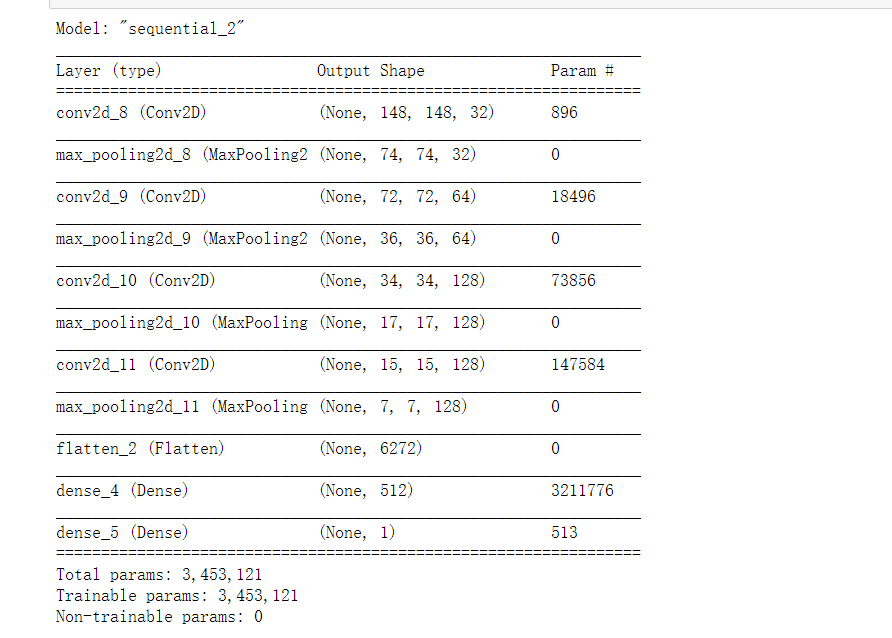
2. Understand how the size of the picture changes with each layer
model.summary()
3. Use the RMSprop optimizer. Since our network ends with a single sigmoid unit, we will use the binary cross matrix as our loss
(2) Data preprocessing
1. Before entering the data into our network, the data should be formatted into a properly preprocessed floating-point tensor
from keras.preprocessing.image import ImageDataGenerator

# All images will be rescaled by 1./255
train_datagen = ImageDataGenerator(rescale=1./255)
test_datagen = ImageDataGenerator(rescale=1./255)

train_generator = train_datagen.flow_from_directory(
        # This is the target directory
        train_dir,
        # All images will be resized to 150x150
        target_size=(150, 150),
        batch_size=20,
        # Since we use binary_crossentropy loss, we need binary labels
        class_mode='binary')

validation_generator = test_datagen.flow_from_directory(
        validation_dir,
        target_size=(150, 150),
        batch_size=20,
        class_mode='binary')

2. View generator output

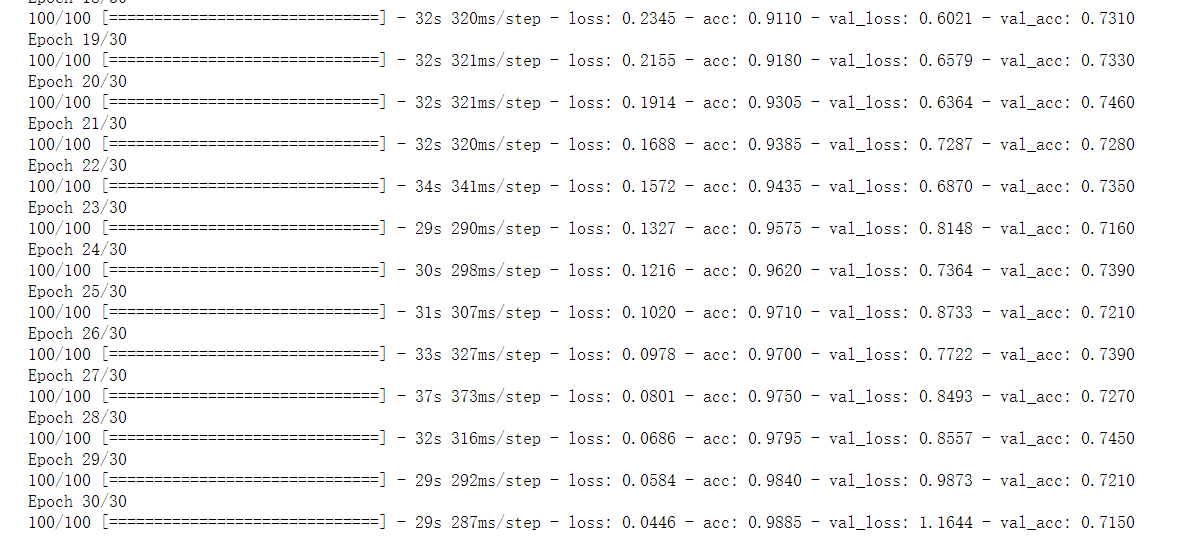
3. Use the generator to adapt our model to the data
4. Save model
Note: this model is saved in the current path
model.save('cats_and_dogs_small_1.h5')
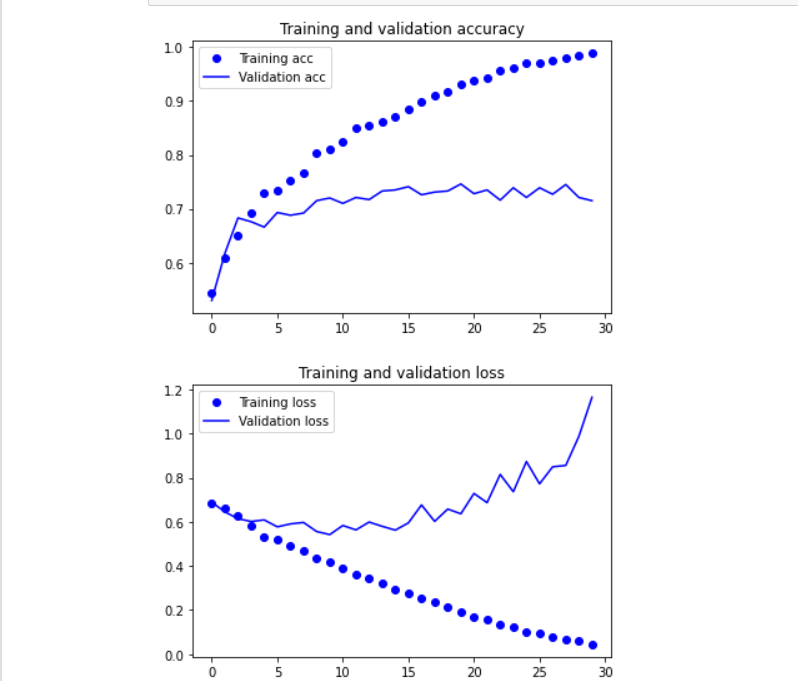
5. Draw model
import matplotlib.pyplot as plt
acc = history.history['acc']
val_acc = history.history['val_acc']
loss = history.history['loss']
val_loss = history.history['val_loss']
epochs = range(len(acc))
plt.plot(epochs, acc, 'bo', label='Training acc')
plt.plot(epochs, val_acc, 'b', label='Validation acc')
plt.title('Training and validation accuracy')
plt.legend()
plt.figure()
plt.plot(epochs, loss, 'bo', label='Training loss')
plt.plot(epochs, val_loss, 'b', label='Validation loss')
plt.title('Training and validation loss')
plt.legend()
plt.show()
(3) Using data enhancement
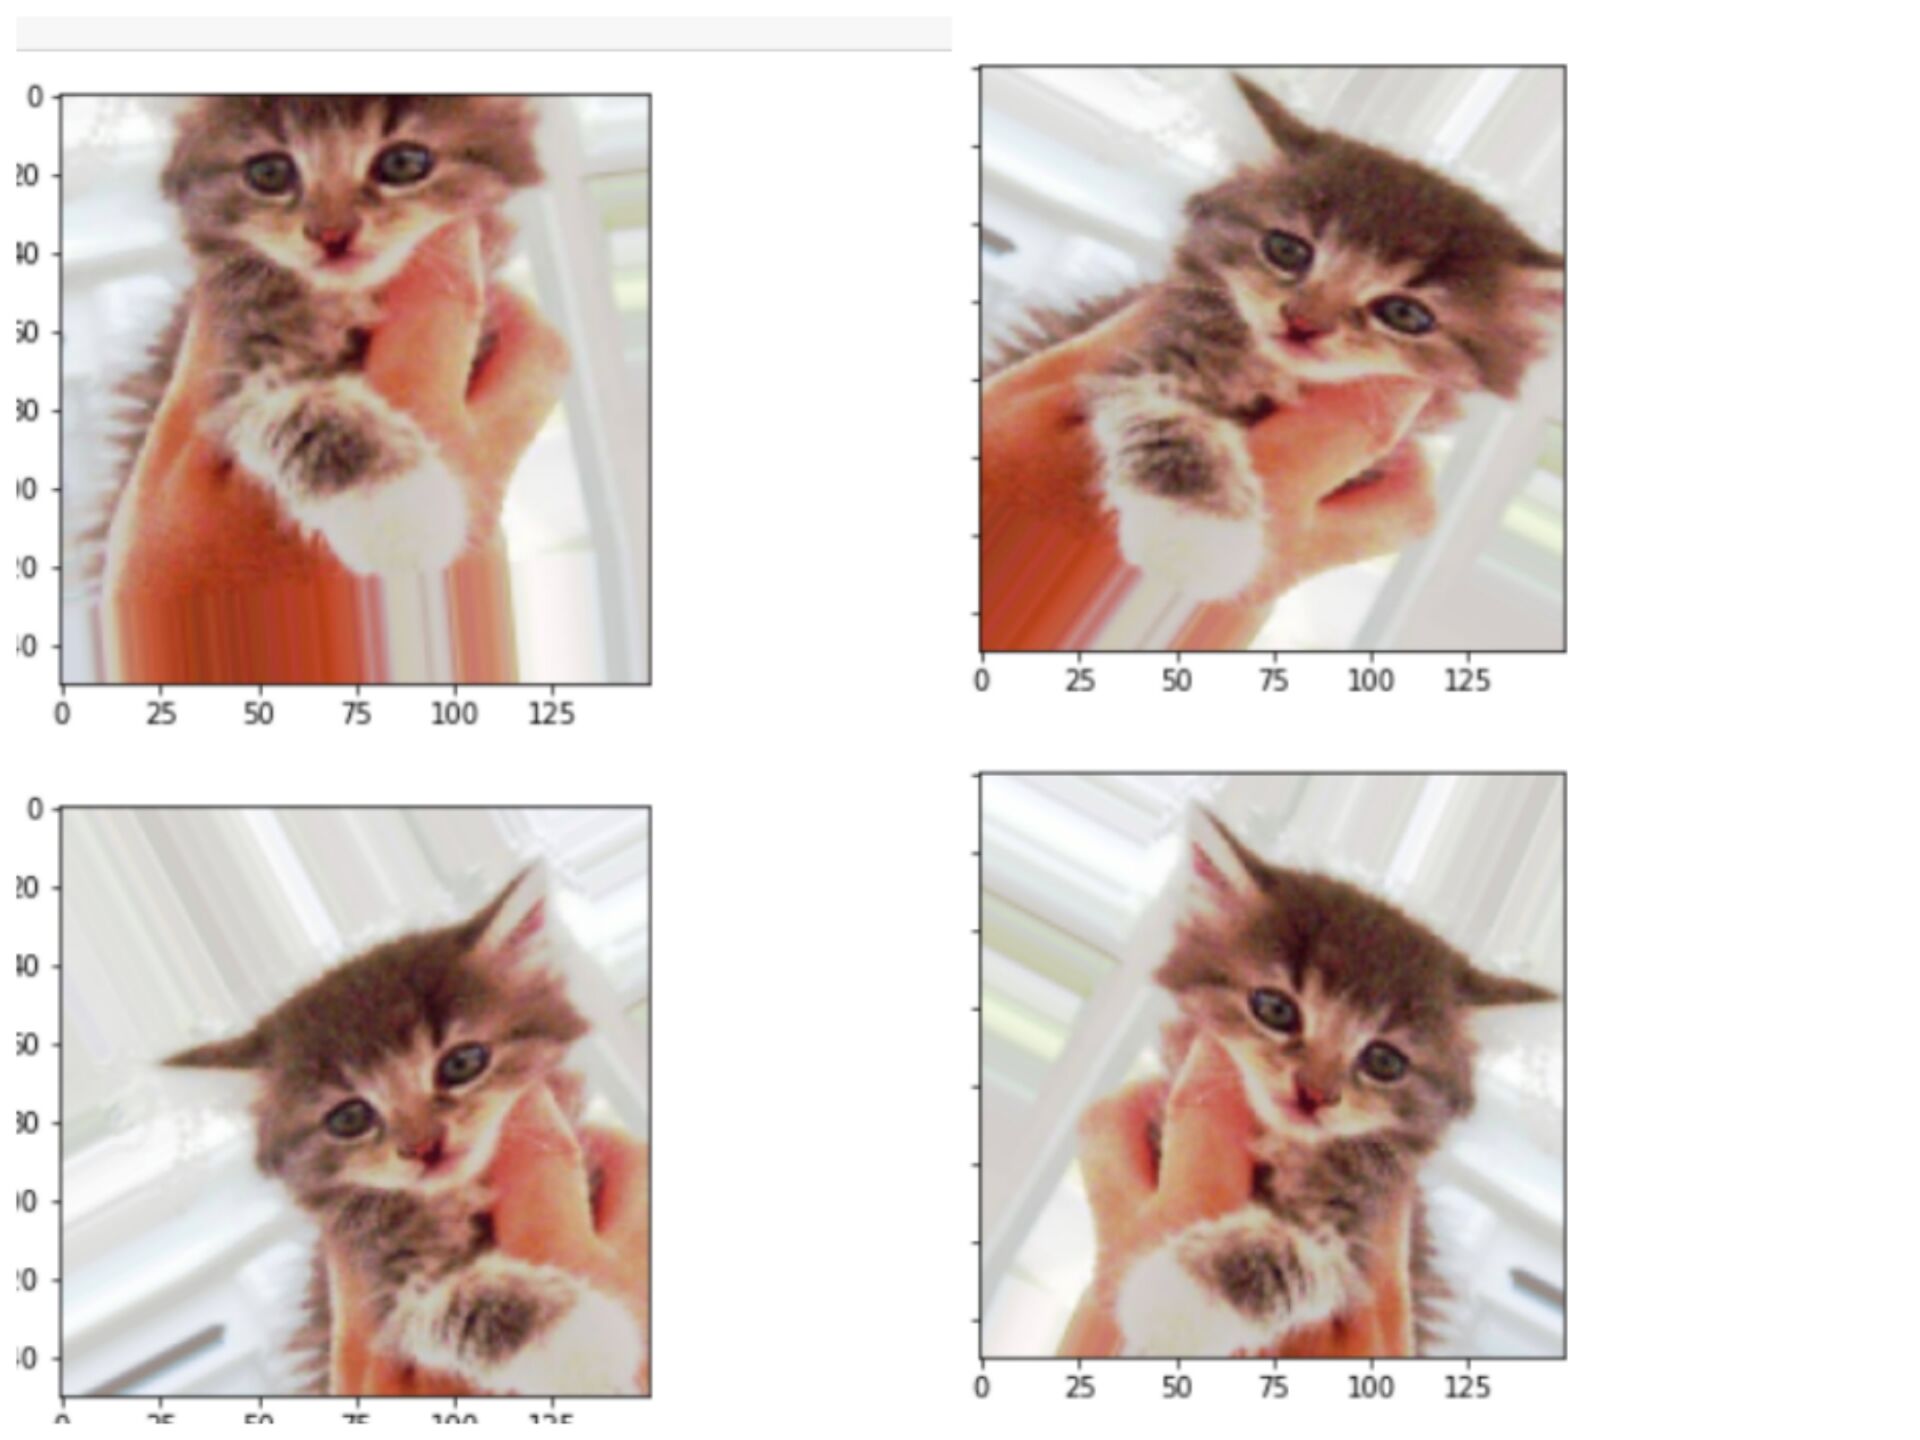
The method of data enhancement is to generate more training data from the existing training samples. The method is to "enhance" the samples through a series of random transformations, so as to produce credible images
1. Image data generator enhancement data
datagen = ImageDataGenerator(
      rotation_range=40,
      width_shift_range=0.2,
      height_shift_range=0.2,
      shear_range=0.2,
      zoom_range=0.2,
      horizontal_flip=True,
      fill_mode='nearest')
2. View enhanced images
# This is module with image preprocessing utilities
from keras.preprocessing import image
fnames = [os.path.join(train_cats_dir, fname) for fname in os.listdir(train_cats_dir)]
# We pick one image to "augment"
img_path = fnames[3]
# Read the image and resize it
img = image.load_img(img_path, target_size=(150, 150))
# Convert it to a Numpy array with shape (150, 150, 3)
x = image.img_to_array(img)
# Reshape it to (1, 150, 150, 3)
x = x.reshape((1,) + x.shape)
# The .flow() command below generates batches of randomly transformed images.
# It will loop indefinitely, so we need to `break` the loop at some point!
i = 0
for batch in datagen.flow(x, batch_size=1):
    plt.figure(i)
    imgplot = plt.imshow(image.array_to_img(batch[0]))
    i += 1
    if i % 4 == 0:
        break
plt.show()
(4) Add a Dropout layer
model = models.Sequential()
model.add(layers.Conv2D(32, (3, 3), activation='relu',
                        input_shape=(150, 150, 3)))
model.add(layers.MaxPooling2D((2, 2)))
model.add(layers.Conv2D(64, (3, 3), activation='relu'))
model.add(layers.MaxPooling2D((2, 2)))
model.add(layers.Conv2D(128, (3, 3), activation='relu'))
model.add(layers.MaxPooling2D((2, 2)))
model.add(layers.Conv2D(128, (3, 3), activation='relu'))
model.add(layers.MaxPooling2D((2, 2)))
model.add(layers.Flatten())
model.add(layers.Dropout(0.5))
model.add(layers.Dense(512, activation='relu'))
model.add(layers.Dense(1, activation='sigmoid'))

model.compile(loss='binary_crossentropy',
              optimizer=optimizers.RMSprop(lr=1e-4),
              metrics=['acc'])
Training network
train_datagen = ImageDataGenerator(
    rescale=1./255,
    rotation_range=40,
    width_shift_range=0.2,
    height_shift_range=0.2,
    shear_range=0.2,
    zoom_range=0.2,
    horizontal_flip=True,)
# Note that the validation data should not be augmented!
test_datagen = ImageDataGenerator(rescale=1./255)
train_generator = train_datagen.flow_from_directory(
        # This is the target directory
        train_dir,
        # All images will be resized to 150x150
        target_size=(150, 150),
        batch_size=32,
        # Since we use binary_crossentropy loss, we need binary labels
        class_mode='binary')
validation_generator = test_datagen.flow_from_directory(
        validation_dir,
        target_size=(150, 150),
        batch_size=32,
        class_mode='binary')
history = model.fit_generator(
      train_generator,
      steps_per_epoch=100,
      epochs=100,
      validation_data=validation_generator,
      validation_steps=50)
Save model:
model.save('cats_and_dogs_small_2.h5')
Draw the model:
acc = history.history['acc']
val_acc = history.history['val_acc']
loss = history.history['loss']
val_loss = history.history['val_loss']
epochs = range(len(acc))
plt.plot(epochs, acc, 'bo', label='Training acc')
plt.plot(epochs, val_acc, 'b', label='Validation acc')
plt.title('Training and validation accuracy')
plt.legend()
plt.figure()
plt.plot(epochs, loss, 'bo', label='Training loss')
plt.plot(epochs, val_loss, 'b', label='Validation loss')
plt.title('Training and validation loss')
plt.legend()
plt.show()
5, Vgg19 network model completes dog cat classification
(1) Constructing convolution network
from keras import layers
from keras import models
from keras import optimizers
model = models.Sequential()
#The input picture size is 150 * 150. 3 indicates that the picture pixels are represented by (R,G,B)
model.add(layers.Conv2D(32, (3,3), activation='relu', input_shape=(150 , 150, 3)))
model.add(layers.MaxPooling2D((2,2)))
model.add(layers.Conv2D(64, (3,3), activation='relu'))
model.add(layers.MaxPooling2D((2,2)))
model.add(layers.Conv2D(128, (3,3), activation='relu'))
model.add(layers.MaxPooling2D((2,2)))
model.add(layers.Conv2D(128, (3,3), activation='relu'))
model.add(layers.MaxPooling2D((2,2)))
model.add(layers.Flatten())
model.add(layers.Dense(512, activation='relu'))
model.add(layers.Dense(1, activation='sigmoid'))
model.compile(loss='binary_crossentropy', optimizer=optimizers.RMSprop(lr=1e-4),
             metrics=['acc'])
model.summary()
(2) Build VGG19 network
from keras.applications import VGG19
conv_base = VGG19(weights = 'imagenet', include_top = False, input_shape=(150, 150, 3))
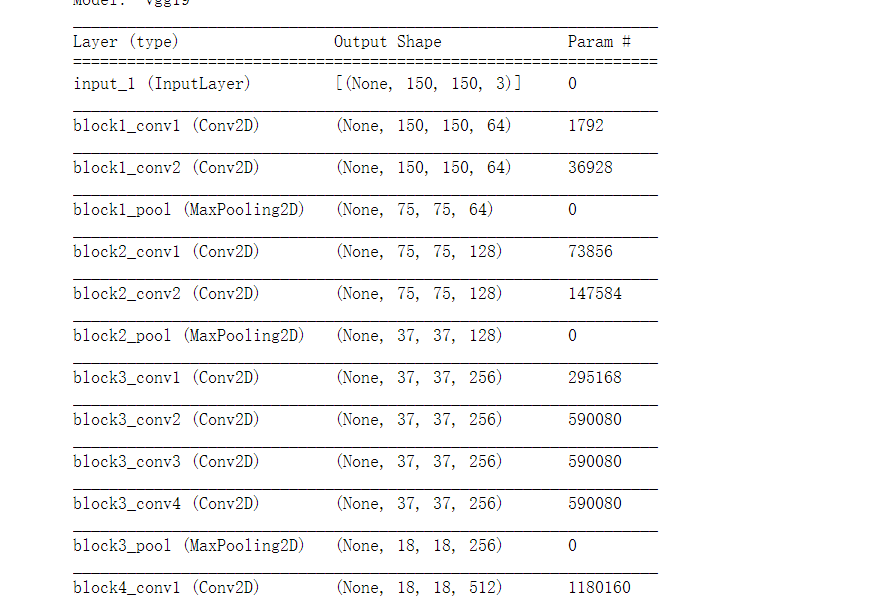
conv_base.summary()
When running for the first time, the h5 format file will be automatically downloaded from the corresponding website

After downloading:

(3) Transfer the cat and dog data set to neural network
1. The data set is passed to the neural network to extract the hidden information of the picture
Note: the data used at this time is the data generated after classification in the above steps
import os
import numpy as np
from keras.preprocessing.image import ImageDataGenerator
base_dir = 'E:\\dogs-vs-cats\\train\\train\\cats_and_dogs_small'
train_dir = os.path.join(base_dir, 'train')
validation_dir = os.path.join(base_dir, 'validation')
test_dir = os.path.join(base_dir, 'test')
datagen = ImageDataGenerator(rescale = 1. / 255)
batch_size = 20
def extract_features(directory, sample_count):
    features = np.zeros(shape = (sample_count, 4, 4, 512))
    labels = np.zeros(shape = (sample_count))
    generator = datagen.flow_from_directory(directory, target_size = (150, 150),
                                            batch_size = batch_size,
                                            class_mode = 'binary')
    i = 0
    for inputs_batch, labels_batch in generator:
        #Input the picture into VGG16 convolution layer and let it extract the picture information
        features_batch = conv_base.predict(inputs_batch)
        #feature_batch is a 4 * 4 * 512 structure
        features[i * batch_size : (i + 1)*batch_size] = features_batch
        labels[i * batch_size : (i+1)*batch_size] = labels_batch
        i += 1
        if i * batch_size >= sample_count :
            #The cycle of for in on the generator is endless, so we must take the initiative to break it
            break
        return features , labels
#extract_ The returned data format of features is (samples, 4, 4, 512)
train_features, train_labels = extract_features(train_dir, 2000)
validation_features, validation_labels = extract_features(validation_dir, 1000)
test_features, test_labels = extract_features(test_dir, 1000)

2. Input the extracted features into our own neural layer for classification

3. Draw the training results and verification results
