catalogue
3. Vue is the implementer of MVVM mode
4, Vue bidirectional binding v-model
1. What is bidirectional binding
2. Why do you want to realize two-way binding of data
3. Use two-way data binding in the form
(2) Pass parameters using props attribute
7, Calculation properties, content distribution, custom events
7.1. What are calculation attributes
14, Routing hooks and asynchronous requests
2. Routing hooks and asynchronous requests
3. Use asynchronous request in hook function
Vue (read / vju /, similar to view) is a set of progressive framework for building user interface, which was released in February 2014. Different from other large frameworks, Vue is designed to be applied layer by layer from bottom to top. Vue core library only focuses on visual layers, which is not only easy to use, but also easy to integrate with third-party libraries (such as Vue Router: jump, Vue resource: communication, vuex: Management) or existing projects.
Official website: Introduction - Vue.js
Developer: you Yuxi
Vue.js API refers to AngularJS, KnockoutJS, aggressive.js and rivers.js.
Vue.js API's reference to other frameworks is not only a reference, but also contains many unique functions of vue.js.
Vue's core library only focuses on view layers, which is convenient for and Third party Library Or integration of existing projects.
HTML + CSS + JS: View: Show the user and refresh the background data
Network Communications: axios
Page Jump: vue-router
Status management: vuex
Vue-UI : ICE , Element UI
1, Front end core analysis
1. VUE overview
Vue (pronounced / vju /, similar to view) is a progressive framework for building user interfaces, which was released in February 2014. Unlike other large frameworks, Vue is designed to be applied layer by layer from bottom to top. Vue's core library only focuses on view layers, which is not only easy to start, but also easy to integrate with third-party libraries (such as Vue Router: jump, Vue resource: communication, vuex: Management) or existing projects
2. Front end three elements
HTML (structure): Hyper Text Markup Language, which determines the structure and content of web pages
CSS (presentation): cascading style sheets to set the presentation style of web pages
JavaScript (behavior): it is a weak type scripting language. Its source code does not need to be compiled, but is interpreted and run by the browser to control the behavior of web pages
3. JavaScript framework
jQuery: the well-known JavaScript framework has the advantage of simplifying DOM operation, but the disadvantage is that DOM operation is too frequent, affecting the front-end performance; In the eyes of the front end, it is only used to be compatible with IE6, 7 and 8;
Angular: the front-end framework acquired by Google was developed by a group of Java programmers. It is characterized by moving the background MVC mode to the front-end and adding the concept of modular development. It is developed in cooperation with Microsoft using TypeScript syntax; Friendly to background programmers, not very friendly to front-end programmers; The biggest disadvantage is that the version iteration is unreasonable (for example, generation 1 - > generation 2, except for the name, there are basically two things; angular6 has been launched as of the time of publishing the blog)
React: produced by Facebook, a high-performance JS front-end framework; The feature is that a new concept [virtual DOM] is proposed to reduce real DOM operations and simulate DOM operations in memory, which effectively improves the front-end rendering efficiency; The disadvantage is that it is complex to use, because you need to learn an additional [JSX] language;
Vue: a progressive JavaScript framework. The so-called progressive means to gradually realize new features, such as modular development, routing, state management and other new features. It combines the advantages of Angular (Modular) and React (virtual DOM);
Axios: front end communication framework; Because the boundary of Vue is very clear, it is to deal with DOM, so it does not have communication capability. At this time, it is necessary to use an additional communication framework to interact with the server; Of course, you can also directly choose to use the AJAX communication function provided by jQuery;
Three front-end frameworks: Angular, React and Vue
2, First Vue program
1. What is MVVM
MVVM (model view ViewModel) is a software architecture design pattern developed by Ken Cooper and Ted Peters, architects of Microsoft WPF (used to replace WinForm, which was used to develop desktop applications) and Silverlight (similar to Java Applet, simply put, WPF running on browser). It is an event driven programming method to simplify the user interface. It was published by John Gossman (also the architect of WPF and Silverlight) on his blog in 2005.
MVVM originates from the classic MVC (modi view controller) mode. The core of MVVM is the ViewModel layer, which is responsible for transforming the data objects in the Model to make the data easier to manage and use. Its functions are as follows:
- This layer performs bidirectional data binding with the view layer upward
- Data interaction with the Model layer through interface requests
2. Why use MVVM
MVVM mode is the same as MVC mode. Its main purpose is to separate view and model. It has several advantages:
- Low coupling: the View can be changed and modified independently of the Model. A ViewModel can be bound to different views. When the View changes, the Model can remain unchanged, and when the Model changes, the View can remain unchanged.
- Reusability: you can put some View logic in a ViewModel to make many views reuse this View logic.
- Independent development: developers can focus on the development of business logic and data (ViewModel), and designers can focus on page design.
- Testability: the interface is always difficult to test, but now the test can be written for ViewModel.
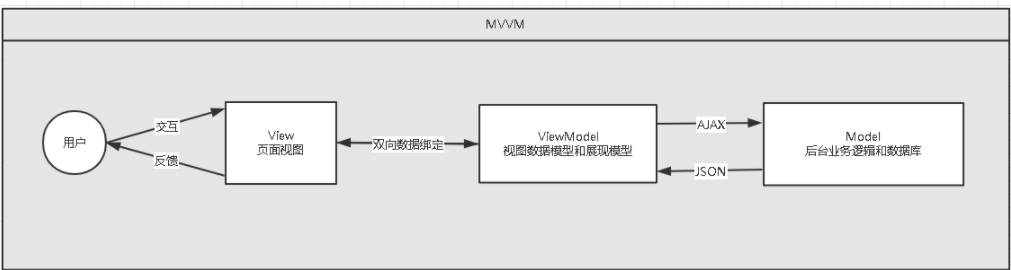
3. Vue is the implementer of MVVM mode
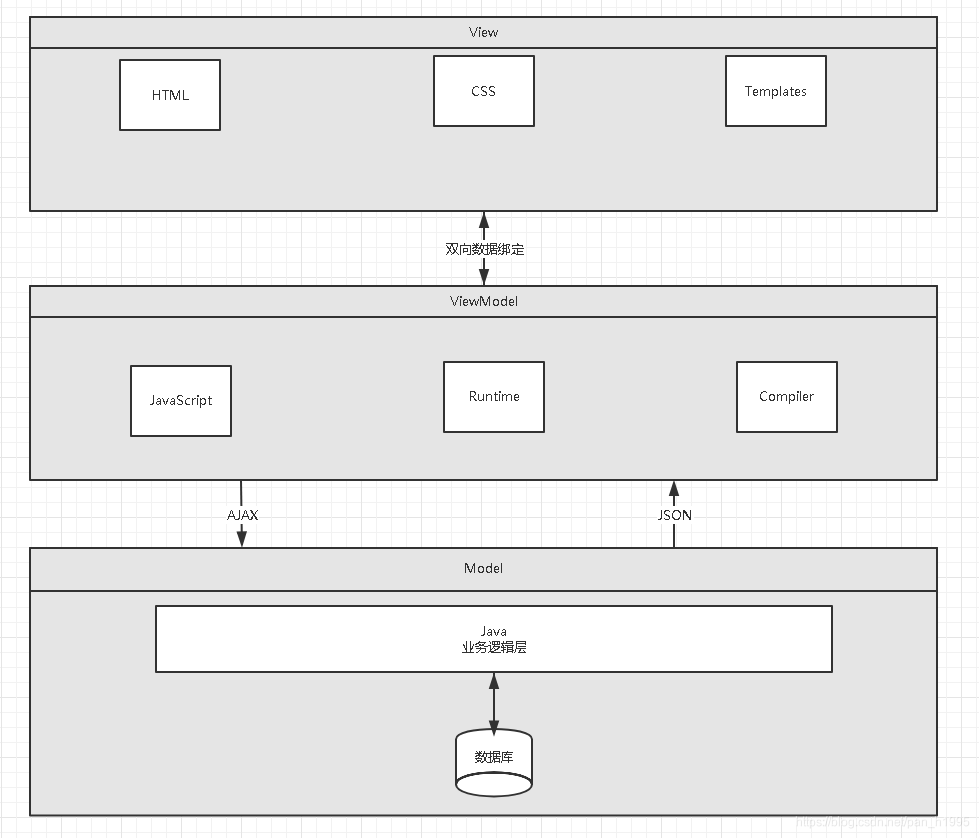
- Model: the model layer, where JavaScript objects are represented
- View: view layer, which represents DOM (element of HTML operation)
- ViewModel: middleware connecting views and data. Vue.js is the implementer of the ViewModel layer in MVVM. In MVVM architecture, data and views are not allowed to communicate directly, but only through ViewModel, which defines an Observer observer
- ViewModel can observe the changes of data and update the content corresponding to the view
- ViewModel can listen to changes in the view and notify data changes
So far, we understand that Vue.js is an implementer of MVVM, and its core is to realize DOM listening and data binding
Vue online cdn:
<script src="https://cdn.jsdelivr.net/npm/vue@2.5.21/dist/vue.min.js"></script>
3, Vue basic syntax
1. v-bind
Now that the data and DOM have been associated, everything is responsive. We operate the properties of objects on the console, and the interface can be updated in real time. We can use v-bind to bind element attributes!
<!DOCTYPE html>
<html lang="en">
<head>
    <meta charset="UTF-8">
    <title>Title</title>
</head>
<body>
<p>Madness theory Java</p>

<!--view Layer template-->
<div id="app">
    <span v-bind:title="message">Hover for a few seconds to view the prompt information of dynamic binding here!</span>
</div>
</body>

<!--Import js-->
<script src="https://cdn.jsdelivr.net/npm/vue@2.5.21/dist/vue.min.js"></script>
<script>
    var vm = new Vue({
        el: "#app",
        data: {
            message: "hello,vue"
        }
    })
</script>
</html>
two v-if and v-else
<!DOCTYPE html>
<html lang="en">
<head>
   <meta charset="UTF-8">
   <title>Title</title>
</head>
<body>
<p>Madness theory Java</p>

<!--view Layer template-->
<div id="app">
   <h1 v-if="type==='A'">A</h1>
   <h1 v-else-if="type==='B'">B</h1>
   <h1 v-else>C</h1>
</div>
</body>

<!--Import js-->
<script src="https://cdn.jsdelivr.net/npm/vue@2.5.21/dist/vue.min.js"></script>
<script>
   var vm = new Vue({
       el: "#app",
       data: {
           type: "A"
       }
   })
</script>
</html>
3. v-for
<!DOCTYPE html>
<html lang="en">
<head>
    <meta charset="UTF-8">
    <title>Title</title>
</head>
<body>
<p>Madness theory Java</p>

<!--view Layer template-->
<div id="app">
    <li v-for="item in items">
        full name:{{item.name}},Age:{{item.age}}
    </li>
</div>
</body>

<!--Import js-->
<script src="https://cdn.jsdelivr.net/npm/vue@2.5.21/dist/vue.min.js"></script>
<script>
    var vm = new Vue({
        el: "#app",
        data: {
            items: [
                {name: "zhangsan", age: 12},
                {name: "lisi", age: 10},
                {name: "wangwu", age: 16}
            ]
        }
    })
</script>
</html>
four v-on Event binding
<!DOCTYPE html>
<html lang="en">
<head>
    <meta charset="UTF-8">
    <title>Title</title>
</head>
<body>
<p>Madness theory Java</p>

<!--view Layer template-->
<div id="app">
    <button v-on:click="sayHi">Click Me</button>
</div>
</body>

<!--Import js-->
<script src="https://cdn.jsdelivr.net/npm/vue@2.5.21/dist/vue.min.js"></script>
<script>
    var vm = new Vue({
        el: "#app",
        data: {
            message: "Why did you order me?"
        },
        methods: {
            //Method must be bound in Vue's Methods object, v-on: Event
            sayHi: (function (event) {
                alert(this.message)
            })
        }
    })
</script>
</html>
4, Vue bidirectional binding v-model
1. What is bidirectional binding
Vue.js is an MVVM framework, that is, two-way data binding, that is, when the data changes, the view will change, and when the view changes, the data will change synchronously. This is the essence of vue.js.
It is worth noting that the two-way data binding must be for UI controls, and non UI controls will not involve two-way data binding. One way data binding is a prerequisite for using state management tools. If we use vuex, the data flow is also single, which will conflict with two-way data binding.
2. Why do you want to realize two-way binding of data
In Vue.js, if vuex is used, the data is actually one-way. The reason why it is two-way data binding is the UI control used. For us to process forms, Vue.js's two-way data binding is particularly comfortable. That is, the two are not mutually exclusive, and a single item is used in the global data flow to facilitate tracking; Local data flow is bidirectional and easy to operate.
3. Use two-way data binding in the form
You can use the v-model instruction to create two-way data bindings on form < input >, < textarea > and < Select > elements. It automatically selects the correct method to update the element according to the control type. Although some magic, v-model is essentially just a syntax sugar. It is responsible for listening to user input events to update data, and some special processing for some extreme scenarios.
(1) Single line text
<!DOCTYPE html>
<html lang="en">
<head>
    <meta charset="UTF-8">
    <title>Title</title>
</head>
<body>
<div id="app">
    Text entered:<input type="text" v-model="message" value="hello">{{message}}
</div>

<script src="../js/vue.js"></script>
<script type="text/javascript">
    var vm = new Vue({
        el:"#app",
        data:{
            message:""
        }
    });
</script>
</body>
</html>
(2) Multiline text
<!DOCTYPE html>
<html lang="en">
<head>
<meta charset="UTF-8">
<title>Title</title>
</head>
<body>
<div id="app">
Multiline text:<textarea v-model="pan"></textarea> Multiline text is:{{pan}}
</div>
<script src="../js/vue.js"></script>
<script type="text/javascript">
var vm = new Vue({
el:"#app",
data:{
message:"Hello hello!"
}
});
</script>
</body>
</html>
(3) Single check box
<!DOCTYPE html>
<html lang="en">
<head>
<meta charset="UTF-8">
<title>Title</title>
</head>
<body>
<div id="app">
Single check box:
<input type="checkbox" id="checkbox" v-model="checked">
<label for="checkbox">{{checked}}</label>
</div>
<script src="../js/vue.js"></script>
<script type="text/javascript">
var vm = new Vue({
el:"#app",
data:{
checked:false
}
});
</script>
</body>
</html>
(4) Multiple check boxes
<!DOCTYPE html>
<html lang="en">
<head>
<meta charset="UTF-8">
<title>Title</title>
</head>
<body>
<div id="app">
Multiple check boxes:
<input type="checkbox" id="jack" value="Jack" v-model="checkedNames">
<label for="jack">Jack</label>
<input type="checkbox" id="join" value="Join" v-model="checkedNames">
<label for="join">Jack</label>
<input type="checkbox" id="mike" value="Mike" v-model="checkedNames">
<label for="mike">Mike</label>
<span>Selected value:{{checkedNames}}</span>
</div>
<script src="../js/vue.js"></script>
<script type="text/javascript">
var vm = new Vue({
el:"#app",
data:{
checkedNames:[]
}
});
</script>
</body>
</html>
(5) Radio button
<!DOCTYPE html>
<html lang="en">
<head>
    <meta charset="UTF-8">
    <title>Title</title>
</head>
<body>

<div id="app">
    Radio button
    <input type="radio" id="one" value="One" v-model="picked">
    <label for="one">One</label>
    <input type="radio" id="two" value="Two" v-model="picked">
    <label for="two">Two</label>
    <span>Selected value:{{picked}}</span>
</div>

<script src="../js/vue.js"></script>
<script type="text/javascript">
    var vm = new Vue({
        el:"#app",
        data:{
            picked:'Two'
        }
    });
</script>
</body>
</html>
(6) Drop down box
<!DOCTYPE html>
<html lang="en">
<head>
    <meta charset="UTF-8">
    <title>Title</title>
</head>
<body>
<div id="app">
<!--    Gender:
    <input type="radio" name="sex" value="male" v-model="pan">male
    <input type="radio" name="sex" value="female" v-model="pan">female
    <p>Checked:{{pan}}</p>-->

    Drop down box:
    <select v-model="pan">
        <option value="" disabled>---Please select---</option>
        <option>A</option>
        <option>B</option>
        <option>C</option>
        <option>D</option>
    </select>
    <span>value:{{pan}}</span>


</div>

<script src="../js/vue.js"></script>
<script type="text/javascript">
    var vm = new Vue({
        el:"#app",
        data:{
            pan:"A"
        }
    });
</script>
</body>
</html>
Note: v-model will ignore the initial values of the value, checked and selected attributes of all elements and always take the data of Vue instances as the data source. You should declare it in the data option of the component through JavaScript.
<!DOCTYPE html>
<html lang="en">
<head>
    <meta charset="UTF-8">
    <title>Title</title>
</head>
<body>

<!--view Layer template-->
<div id="app">
    Drop down box:
    <select v-model="selected">
        <option value="" disabled>-Please select-</option>
        <option>A</option>
        <option>B</option>
        <option>C</option>
    </select>
    <p>value:{{selected}}</p>
</div>
</body>

<!--Import js-->
<script src="https://cdn.jsdelivr.net/npm/vue@2.5.21/dist/vue.min.js"></script>
<script>
    var vm = new Vue({
        el: "#app",
        data: {
            selected: ""
        }
    })
</script>
</html>
5, Vue components
A component is a reusable Vue instance. To put it bluntly, it is a set of reusable templates, like the custom tag of JSTL and the th:fragment of Thymeleaf Such a framework has the same merit. Usually, an application is organized in the form of a nested component tree:
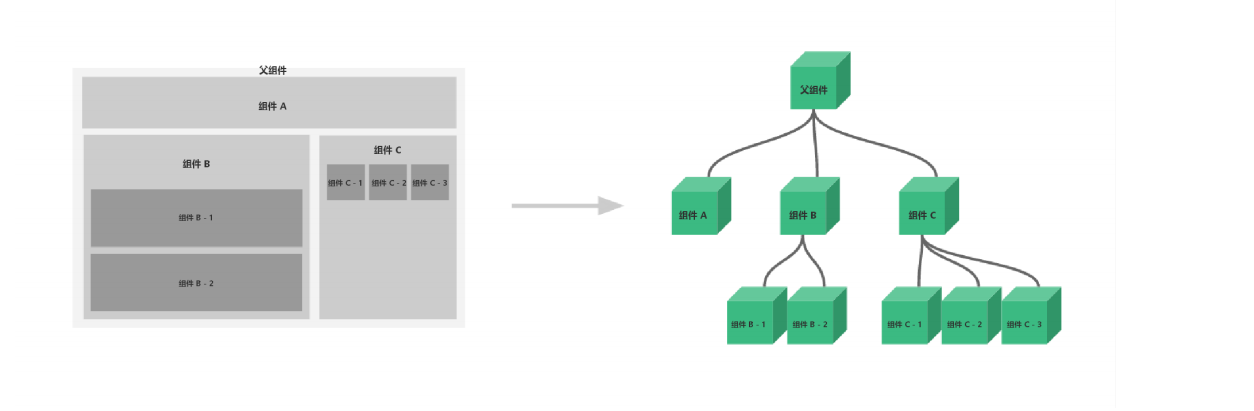
For example, you may have components such as page header, sidebar and content area, and each component contains other components such as navigation links and blog posts.
(1) First Vue component
Note: in actual development, we will not develop components in the following way, but in the way of vue cli creation and vue template file. The following methods are only for everyone to understand what components are.
use Vue.component() method to register components in the following format:
<div id="app">
  <pan></pan>
</div>

<script src="https://cdn.jsdelivr.net/npm/vue@2.5.21/dist/vue.min.js"></script>
<script type="text/javascript">
    //Register components first
    Vue.component("pan",{

        template:'<li>Hello</li>'

    });
    //Re instantiate Vue
    var vm = new Vue({
        el:"#app",
    });
</script>
explain:
- Vue.component(): register components
- pan: name of the custom component
- Template: the template of the component
(2) Pass parameters using props attribute
Using components like the above does not make any sense, so we need to pass parameters to components. At this time, we need to use props attribute!
note: under the default rule, the value in props attribute cannot be capitalized;
<!DOCTYPE html>
<html lang="en">
<head>
    <meta charset="UTF-8">
    <title>Title</title>
</head>
<body>

<!--view Layer template-->
<div id="app">
    <qinjiang v-for="item in items" v-bind:qin="item"></qinjiang>
</div>
</body>

<!--Import js-->
<script src="https://cdn.jsdelivr.net/npm/vue@2.5.21/dist/vue.min.js"></script>
<script>
    Vue.component("qinjiang",{
        props: ['qin'],
        template: '<li>{{qin}}</li>'
    })

    var vm = new Vue({
        el: "#app",
        data: {
            items: ['Java','Python','Php']
        }
    })
</script>
</html>
explain:
- v-for = "item in items": traverse the array named items defined in the Vue instance and create the same number of components
- v-bind:panh = "item": bind the traversed item item to the item attribute named item defined by props in the component= Panh on the left of the number is the attribute name defined by props (arbitrarily defined), and on the right is the value of the item item item traversed in item in items
6, Axios communication
1. What is Axios
Axios is an open source asynchronous communication framework that can be used in browser and NodeJS. Its main function is to realize AJAX asynchronous communication. Its functional features are as follows:
- Create XMLHttpRequests from the browser
- Create http request from node.js
- Support promise API [chain programming in JS]
- Intercept requests and responses
- Convert request data and response data
- Cancel request
- Automatically convert JSON data
- The client supports defense against XSRF (Cross Site Request Forgery)
GitHub: https://github.com/ axios/axios
Chinese documents: axios Chinese website | axios API Chinese document | axios
2. Why use Axios
Because Vue.js is a view layer framework and the author (you Yuxi) strictly abides by the SOC (separation of concerns principle), Vue.js does not include AJAX communication function. In order to solve the communication problem, the author separately developed a plug-in named Vue resource. However, after entering version 2.0, he stopped the maintenance of the plug-in and recommended the Axios framework. Use jQuery less because it operates Dom too often!
3. First Axios application
Most of the interfaces we developed are in JSON format. You can first simulate a piece of JSON data in the project. The data content is as follows: create a file named data.json, fill in the above content, and put it in the root directory of the project
1.data.json
{
  "name": "Madness theory Java",
  "url": "https://blog.kuangstudy.com",
  "page": 1,
  "isNonProfit": true,
  "address": {
    "street": "Light gate",
    "city": "Xi'an, Shaanxi",
    "country": "China"
  },
  "links": [
    {
      "name": "bilibili",
      "url": "https://space.bilibili.com/95256449"
    },
    {
      "name": "Madness theory Java",
      "url": "https://blog.kuangstudy.com"
    },
    {
      "name": "Baidu",
      "url": "https://www.baidu.com/"
    }
  ]
}
2. Test code
<!DOCTYPE html>
<html lang="en" xmlns:v-binf="http://www.w3.org/1999/xhtml">
<head>
    <meta charset="UTF-8">
    <title>Title</title>
    <!--v-cloak Solve flicker problem-->
    <style>
        [v-cloak]{
            display: none;
        }
    </style>
</head>
<body>
<div id="vue">
    <div>Place name:{{info.name}}</div>
    <div>Address:{{info.address.country}}--{{info.address.city}}--{{info.address.street}}</div>
    <div>Link:<a v-binf:href="info.url" target="_blank">{{info.url}}</a> </div>
</div>

<!--introduce js file-->
<script src="https://cdn.jsdelivr.net/npm/vue@2.5.21/dist/vue.min.js"></script>
<script src="https://unpkg.com/axios/dist/axios.min.js"></script>
<script type="text/javascript">
    var vm = new Vue({
        el:"#vue",
        //data: attribute: vm
        data(){
            return{
                info:{
                    name:null,
                    address:{
                        country:null,
                        city:null,
                        street:null
                    },
                    url:null
                }
            }
        },
        mounted(){//Hook function
            axios
                .get('data.json')
                .then(response=>(this.info=response.data));
        }
    });
</script>
</body>
</html>
explain:
- Here, v-bind is used to bind the attribute value of a:href to the data in the Vue instance
- Use the get method of axios framework to request AJAX and automatically encapsulate the data into the data object of Vue instance
- Our data structure in data must match the data format returned by Ajax response!
4. Life cycle of Vue
Official documents: Vue instance - Vue.js Lifecycle diagram
Vue instances have a complete life cycle, that is, a series of processes such as creating initialization data, compiling templates, mounting DOM, rendering update rendering, unloading, etc. we call this the life cycle of Vue. Generally speaking, it is the process from creation to destruction of Vue instances, which is the life cycle.
in the whole life cycle of Vue, it provides a series of events that enable us to register JS methods when the event is triggered, and enable us to control the overall situation with our own registered JS methods. this in these event response methods directly points to Vue instances.
7, Calculation properties, content distribution, custom events
7.1. What are calculation attributes
The focus of computing attribute is on attribute (attribute is a noun). Firstly, it is an attribute. Secondly, this attribute has the ability of computing (computing is a verb). The calculation here is a function: in short, it is a attribute that can cache the calculation results (convert the behavior into a static attribute), that's all; Think of it as a cache!
<!DOCTYPE html>
<html lang="en">
<head>
    <meta charset="UTF-8">
    <title>Title</title>
</head>
<body>
<!--view Layer, template-->
<div id="app">
    <p>currentTime1:{{currentTime1()}}</p>
    <p>currentTime2:{{currentTime2}}</p>
</div>

<!--1.Import Vue.js-->
<script src="https://cdn.jsdelivr.net/npm/vue@2.5.21/dist/vue.min.js"></script>
<script type="text/javascript">
    var vm = new Vue({
        el:"#app",
        data:{
          message:"pan"
        },
        methods:{
            currentTime1:function(){
                return Date.now();//Returns a timestamp
            }
        },
        computed:{
            currentTime2:function(){//Calculation attribute: methods and calculated method names cannot be duplicate. After duplicate names, only methods will be called
                this.message;
                return Date.now();//Returns a timestamp
            }
        }
    });
</script>
</body>
</html>
Note: things in methods and computed cannot have the same name
explain:
- methods: define the method, and the calling method uses currentTime1(), which needs parentheses
- computed: defines the calculation attribute. The calling attribute uses currentTime2 without parentheses: this.message changes so that currentTime2 can observe data changes
- If the value in the method changes, the cache will be refreshed! You can use vm.message = "q in jiang" on the console to change the data value and test the observation effect again!
Conclusion:
When calling a method, it is necessary to perform calculation every time. Since there is a calculation process, it must incur system overhead. What if the result does not change frequently? At this time, you can consider caching the result. This can be easily achieved by using calculation attributes. The main feature of calculation attributes is to cache the calculation results that do not change frequently to save us System overhead;
7.2 content distribution
In Vue.js, we use the element as the exit to host the distribution content. The author calls it a slot, which can be applied in the scenario of composite components;
test
For example, we are going to make a todo component, which is composed of todo title and todo items, but these three components are independent of each other. How should we operate?
the first step is to define the component of a to-do
<div id="app">
    <todo></todo>
</div>
<!--1.Import Vue.js-->
<script src="https://cdn.jsdelivr.net/npm/vue@2.5.21/dist/vue.min.js"></script>
<script type="text/javascript">
    Vue.component('todo',{
        template:'<div>\
                <div>Agency matters</div>\
                <ul>\
                    <li>Learning madness theory Java</li>\
                </ul>\
            </div>'
    })
</script>
In the second step, we need to dynamically bind the title and value of the to-do. What can we do? We can leave a slot!
1 - leave the above code in a slot, that is, slot
 Vue.component('todo',{
        template:'<div>\
                <slot name="todo-title"></slot>\
                <ul>\
                    <slot name="todo-items"></slot>\
                </ul>\
            </div>'
    });
2 - define a to-do Title component named todo title and a to-do content component named todo items
Vue.component('todo-title',{
        props:['title'],
        template:'<div>{{title}}</div>'
    });

12345
//The index here is the subscript of the array. When you use the for loop, you can loop it out!
    Vue.component("todo-items",{
        props:["item","index"],
        template:"<li>{{index+1}},{{item}}</li>"
    });
3 - instantiate Vue and initialize data
 var vm = new Vue({
        el:"#vue",
        data:{
            todoItems:['test1','test2','test3']
        }
    });
4 - insert these values through the slot
<div id="vue">
    <todo>
        <todo-title slot="todo-title" title="Teacher Qin series courses"></todo-title>
        <!--<todo-items slot="todo-items" v-for="{item,index} in todoItems" v-bind:item="item"></todo-items>-->
        <!--The following is the abbreviation-->
        <todo-items slot="todo-items" v-for="item in todoItems" :item="item"></todo-items
    </todo>
</div>
Note: our todo title and todo items components are distributed to the todo title and todo items slots of todo components respectively
the complete code is as follows:
<!DOCTYPE html>
<html lang="en">
<head>
    <meta charset="UTF-8">
    <title>Title</title>
</head>
<body>
<!--view Layer, template-->
<div id="vue">
    <todo>
        <todo-title slot="todo-title" title="title"></todo-title>
        <!--<todo-items slot="todo-items" v-for="{item,index} in todoItems" v-bind:item="item"></todo-items>-->
        <!--The following is the abbreviation-->
        <todo-items slot="todo-items" v-for="item in todoItems" :item="item"></todo-items
    </todo>
</div>
<!--1.Import Vue.js-->
<script src="https://cdn.jsdelivr.net/npm/vue@2.5.21/dist/vue.min.js"></script>
<script type="text/javascript">
    Vue.component('todo',{
        template:'<div>\
                <slot name="todo-title"></slot>\
                <ul>\
                    <slot name="todo-items"></slot>\
                </ul>\
            </div>'
    });
    Vue.component('todo-title',{
        props:['title'],
        template:'<div>{{title}}</div>'
    });
    //The index here is the subscript of the array. When you use the for loop, you can loop it out!
    Vue.component("todo-items",{
        props:["item","index"],
        template:"<li>{{index+1}},{{item}}</li>"
    });

    var vm = new Vue({
        el:"#vue",
        data:{
            title:"Teacher Qin series courses",
            todoItems:['test1','test2','test3']
        }
    });
</script>
</body>
</html>
7.3. User defined events
Through the above code, it is not difficult to find that the data items are in the Vue instance, but the deletion operation needs to be completed in the component. How can the component delete the data in the Vue instance? At this time, it involves parameter passing and event distribution. Vue provides us with the function of customizing events, which helps us solve this problem; use this. $emit (user defined event name, parameter), the operation process is as follows:
1 - the methods object is added to the vue instance and a method named removeTodoltems is defined
var vm = new Vue({
        el:"#vue",
        data:{
            title_text:"Teacher Qin series courses",
            todoItems:['test1','test2','test3']
        },
        methods:{
            removeItems:function(index){
                console.log("Deleted"+this.todoItems[index]+"OK");
                //The splice () method adds / deletes items to / from the array, and then returns the deleted items, where index
                this.todoItems.splice(index,1);
            }
        }
    });
2 - modify the code of todo items to-do content component, add a delete button, and bind events!
 Vue.component("todo-items",{
        props:["item_p","index_p"],
        template:"<li>{{index_p+1}},{{item_p}} <button @click='remove'>delete</button></li>",
        methods:{
            remove:function (index) {
            //Remove here is a custom event name. You need to use v-on:remove in HTML
                //this.$emit custom event distribution
                this.$emit('remove',index);
            }
        }
    });
3 - modify the HTML code of todo items to-do content component and add a custom event, such as remove, which can be bound to the component method and then to the vue method!
<!--Increased v-on:remove="removeTodoItems(index)"Custom event, the component will call Vue Defined in the instance-->
<todo-items slot="todo-items" v-for="(item,index) in todoItems"
                    :item_p="item" :index_p="index" v-on:remove="removeItems(index)" :key="index"></todo-items>
Modify the previous code to realize the deletion function:
<!DOCTYPE html>
<html lang="en">
<head>
    <meta charset="UTF-8">
    <title>Title</title>
</head>
<body>
<!--view Layer, template-->
<div id="vue">
    <todo>
        <todo-title slot="todo-title" :title="title_text"></todo-title>
        <!--<todo-items slot="todo-items" v-for="(item,index) in todoItems" v-bind:item="item"></todo-items>-->
        <!--The following is the abbreviation-->
        <todo-items slot="todo-items" v-for="(item,index) in todoItems"
                    :item_p="item" :index_p="index" v-on:remove="removeItems(index)" :key="index"></todo-items>
    </todo>
</div>
<!--1.Import Vue.js-->
<script src="../js/vue.js"></script>
<script type="text/javascript">
    Vue.component('todo',{
        template:'<div>\
                <slot name="todo-title"></slot>\
                <ul>\
                    <slot name="todo-items"></slot>\
                </ul>\
            </div>'
    });
    Vue.component('todo-title',{
        props:['title'],
        template:'<div>{{title}}</div>'
    });
    //The index here is the subscript of the array. When you use the for loop, you can loop it out!
    Vue.component("todo-items",{
        props:["item_p","index_p"],
        template:"<li>{{index_p+1}},{{item_p}} <button @click='remove_methods'>delete</button></li>",
        methods:{
            remove_methods:function (index) {
                //this.$emit custom event distribution
                this.$emit('remove',index);
            }
        }
    });

    var vm = new Vue({
        el:"#vue",
        data:{
            title_text:"Teacher Qin series courses",
            todoItems:['test1','test2','test3']
        },
        methods:{
            removeItems:function(index){
                console.log("Deleted"+this.todoItems[index]+"OK");
                this.todoItems.splice(index,1);
            }
        }
    });
</script>
</body>
</html>

7.4 Vue introduction summary
Core: data driven, componentization
Advantages: the modular development of AngularJS and the virtual Dom of React are used for reference. The virtual Dom is to put the Demo operation into memory for execution;
Common attributes:
- v-if
- v-else-if
- v-else
- v-for
- v-on binding event, short for@
- Bidirectional binding of v-model data
- v-bind binds parameters to components, abbreviated as:
- Componentization:
Combined component slot
- this.$emit("event name", parameter) is required for internal binding events of components;
- Features of calculation attributes, cache calculation data
- Following the principle of separation of SoC concerns, Vue is a pure view framework and does not include communication functions such as Ajax. In order to solve the communication problem, we need to use the Axios framework for asynchronous communication;
explain
The development of Vue is based on NodeJS. The actual development adopts Vue cli scaffold development, Vue router routing and vuex for state management; we generally use Vue UI and interface:
- ElementUI (hungry): Element - The world's most popular Vue UI framework
- ICE (produced by Alibaba): Flying ice - R & D solution based on React | flying ice
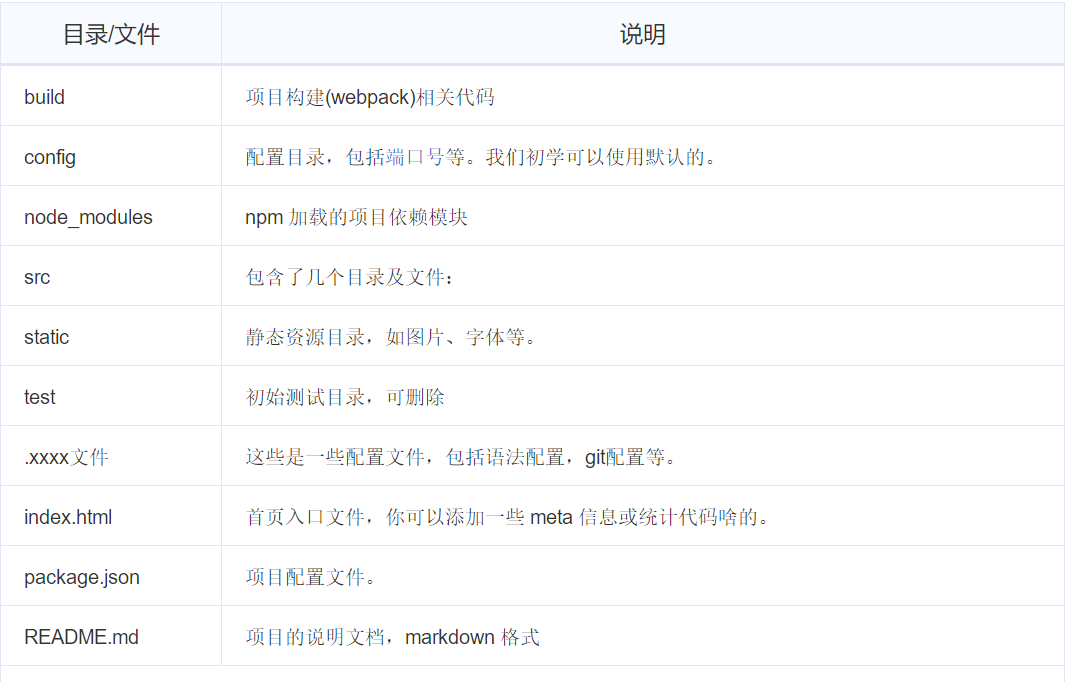
8, First Vue cli project
1. What is Vue cli
A scaffold officially provided by vue cli is used to quickly generate a vue project template;
The pre-defined directory structure and basic code are just like when we create Maven project, we can choose to create a skeleton project, which is the scaffold, and our development is faster;
Main functions:
- Unified directory structure
- Local debugging
- Hot deployment
- unit testing
- Integrated packaging Online
2. Required environment
Node.js : Download | Node.js Chinese website
The next step is just to install it in your own environment directory
Git : Git - Downloads
Mirror image: git-for-windows Mirror
Confirm that nodejs is installed successfully:
- cmd, enter node -v to check whether the publication number can be printed correctly!
- Enter npm-v under cmd to check whether the publication number can be printed correctly!
- This npm is a software package management tool, which is similar to apt software installation under linux!
npm is a package management tool in the JavaScript world and the default package management tool for the Node.js platform. npm allows you to install, share, distribute code, and manage project dependencies.
Install Node.js Taobao image accelerator (cnpm). In this way, the download will be much faster~
# -g is the global installation
npm install cnpm -g

# If the installation fails, replace the source npm source with a Taobao image
# Because npm installation plug-ins are downloaded from foreign servers, they are greatly affected by the network
npm config set registry https://registry.npm.taobao.org

# Then execute
npm install cnpm -g
Default installation location: C:\Users\Administrator\AppData\Roaming\npm
3. Install Vue cli
#Enter at the command desk
cnpm install vue-cli -g
#Check whether the installation is successful
vue list
4. First Vue cli application
To create a Vue project, we randomly create an empty folder on the computer.
Here, I create a new directory D: \ Vue \ Vue study under disk D;
Create a vue application based on the webpack template
# myvue here is the project name, which can be named according to your own needs
vue init webpack myvue
Select no all the way;
explain:
- Project name: Project name; enter by default
- Project description: Project description. Enter by default
- Author: the author of the project. Enter by default
- Install Vue Router: whether to install Vue router, select n not to install (you need to add it manually later)
- Use ESLint to lint your code: whether to use ESLint for code check, select n not to install (you need to add it manually later)
- Set up unit tests: related to unit tests, select n not to install (you need to add it manually later)
- Setupe2etests with Nightwatch: unit test related, select n not to install (you need to add it manually later)
- Should we run npm install for you after the,project has been created:!
Initialize and run:
cd myvue
npm install
npm run dev
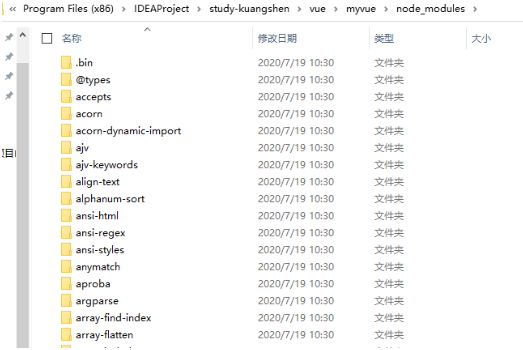
After execution, the directory has many more dependencies
9, Webpack
WebPack is a module loader and packaging tool, which can process and use various resources, such as JS, JSX, ES6, SASS, LESS, pictures, etc. as modules.
npm install webpack -g
npm install webpack-cli -g
Successful test installation: enter the following command, and the installation will be successful if the version number is output
webpack -v
webpack-cli -v
1. What is Webpack
In essence, webpack is a static module bundler for modern JavaScript applications. When webpack processes applications, it will recursively build a dependency graph, which contains each module required by the application, and then package all these modules into one or more bundles
Webpack is the most popular front-end resource modular management and packaging tool at present. It can package many loosely coupled modules into front-end resources that meet the deployment of production environment according to dependencies and rules. It can also separate the code of modules loaded on demand and load them asynchronously when they are actually needed. Through loader conversion, any form of resources can be used as modules, such as CommonsJS, AMD, ES6, CSS, JSON, CoffeeScript, LESS, etc;
with the tide of mobile Internet, more and more websites have evolved from web page mode to WebApp mode. They run in modern browsers and use new technologies such as HTML5, CSS3 and ES6 to develop rich functions. Web pages are not only to complete the basic needs of browsers; WebApp is usually a SPA (single page application) , each view is loaded asynchronously, which causes more and more JS code to be loaded during page initialization and use, which brings great challenges to the front-end development process and resource organization.
The main difference between front-end development and other development work is that the front-end is based on multi language and multi-level coding and organization. Secondly, the delivery of front-end products is based on the browser. These resources run to the browser through incremental loading. How to organize these fragmented codes and resources in the development environment and ensure their fast and excellent performance on the browser Ya's loading and updating requires a modular system. This ideal modular system is a difficult problem that front-end engineers have been exploring for many years.
2. Use Webpack
-
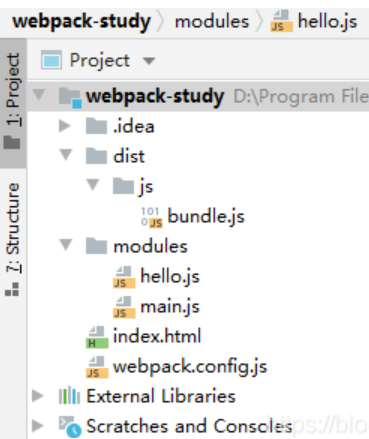
First create a package and open it by idea. An. Idea file will be generated, which means that idea is responsible for the file
- Create the modules package in the idea, and then create hello.js. The exposed interface of hello.js is equivalent to the class in Java
//Expose a method exports.sayHi = function () { document.write("<h1>Madness theory ES6</h1>>") } -
Create main.js as the main JS entry, and main.js requests hello.js to call the sayHi() method
var hello = require("./hello");
hello.sayHi()
4. Create webpack-config.js in the home directory, which is equivalent to the configuration file of webpack
- enrty requests the file of main.js
- Output is the location and name of the output
module.exports = {
    entry: './modules/main.js',
    output: {
        filename: './js/bundle.js'
    }
}
5. Enter the webpack command on the idea command console (the idea needs to be started by the administrator)
6. After completing the above operations, a dist file will be generated in the home directory, and the generated JS folder path is / dist/js/bundle.js
7. Create index.html in the home directory and import bundle.js
index.html
<html lang="en">
<head>
    <meta charset="UTF-8">
    <title>Title</title>
    <script src="dist/js/bundle.js"></script>
</head>
<body>
</body>
</html>
10, Vue router routing
Vue Router is the official routing manager (path jump) of Vue.js. It is deeply integrated with the core of Vue.js, making it easy to build single page applications. The functions include:
- Nested routing / view tables
- Modular, component-based routing configuration
- Routing parameters, queries, wildcards
- View transition effect based on Vue.js transition system
- Fine grained navigation control
- Links with automatically activated CSS class es
- HTML5 history mode or hash mode, automatically degraded in IE9
- Custom scroll bar behavior
1. Installation
Test and learn based on the first Vue cli; first check whether there is a Vue router in node_modules
Vue router is a plug-in package, so we still need to install it with npm/cnpm. Open the command line tool, enter your project directory, and enter the following command.
npm install vue-router --save-dev
Go to node after installation_ Modules path to see if there is Vue router information. If yes, it indicates that the installation is successful.
2. Vue router demo instance
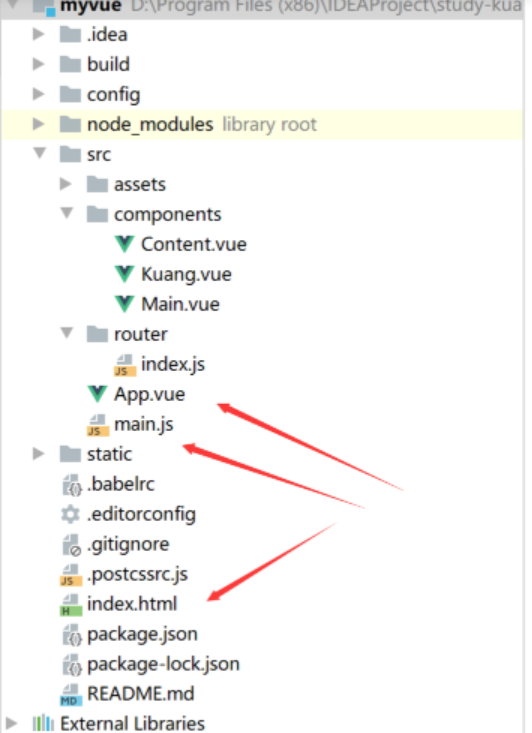
- Open the case generated by Vue cli with idea
- Clean up unused things. The logo image under assert. The helloworld component defined by component. We use our own components
- The following is the cleaned Code: App.vue and main.js under src and index.html in the root directory
The relationship between these three files is index.html calling main.js calling App.vue
index.html:
<!DOCTYPE html>
<html>
  <head>
    <meta charset="utf-8">
    <meta name="viewport" content="width=device-width,initial-scale=1.0">
    <title>myvue</title>
  </head>
  <body>
    <div id="app"></div>
    <!-- built files will be auto injected -->
  </body>
</html>
main.js:
import Vue from 'vue'
import App from './App'
import router from './router' //Automatically scan the routing configuration inside

Vue.config.productionTip = false

new Vue({
  el: '#app',
  //Configure routing
  router,
  components: { App },
  template: '<App/>'
})
App.vue:
<template>
  <div id="app">
    <img src="./assets/logo.png">
    <h1>Master di</h1>

    <router-link to="/main">home page</router-link>
    <router-link to="/content">Content page</router-link>
    <router-link to="/kuang">Kuang</router-link>
    <router-view></router-view>

  </div>
</template>

<script>

export default {
  name: 'App',
  components: {
  }
}
</script>

<style>
#app {
  font-family: 'Avenir', Helvetica, Arial, sans-serif;
  -webkit-font-smoothing: antialiased;
  -moz-osx-font-smoothing: grayscale;
  text-align: center;
  color: #2c3e50;
  margin-top: 60px;
}
</style>
Create your own components Content, test, and main in the components directory (these two components are the same as the Content content, and the sample code will not be included)
Content.vue:
<template>
  <h1>content</h1>
</template>

<script>
    export default {
        name: "Content"
    }
</script>

<style scoped>

</style>
Install the route. In the src directory, create a new folder: router to store the route index.js (the default configuration file is this name)
import Vue from "vue";
import VueRouter from "vue-router";
import Content from "../components/Content";
import Main from "../components/Main";
import Kuang from "../components/Kuang";

//Install routing
Vue.use(VueRouter);

//Configure export routes
export default new VueRouter({
  routes: [
    {
      //Routing path
      path: '/content',
      name: 'content',
      //Jump components
      component: Content
    },
    {
      //Routing path
      path: '/main',
      name: 'main',
      //Jump components
      component: Main
    },
    {
      //Routing path
      path: '/kuang',
      name: 'kuang',
      //Jump components
      component: Kuang
    }
  ]
})
Configure routing in main.js
main.js:
import Vue from 'vue'
import App from './App'
import router from './router' //Automatically scan the routing configuration inside

Vue.config.productionTip = false

new Vue({
  el: '#app',
  //Configure routing
  router,
  components: { App },
  template: '<App/>'
})
Use routing in App.vue
App.vue:
<template>
  <div id="app">
    <img src="./assets/logo.png">
    <h1>Master di</h1>

    <router-link to="/main">home page</router-link>
    <router-link to="/content">Content page</router-link>
    <router-link to="/kuang">Kuang</router-link>
    <router-view></router-view>

  </div>
</template>

<script>

export default {
  name: 'App',
  components: {
  }
}
</script>

<style>
#app {
  font-family: 'Avenir', Helvetica, Arial, sans-serif;
  -webkit-font-smoothing: antialiased;
  -moz-osx-font-smoothing: grayscale;
  text-align: center;
  color: #2c3e50;
  margin-top: 60px;
}
</style>
Start the test: npm run dev
Project structure diagram & operation effect diagram:

11, vue + ElementUI
Create a new Vue cli project as before
1. Create a project named Hello Vue
vue init webpack hello-vue
2. Installation depends, we need to install vue-router,element-ui,sass-loader And node sass Four plug-ins
# Enter project directory
cd hello-vue
# Installing Vue router
npm install vue-router --save-dev
# Installing element UI
npm i element-ui -S
# Installation dependency
npm install
# Installing the SASS loader
cnpm install sass-loader node-sass --save-dev
# Start test
npm run dev
3.Npm command interpretation
- npm install moduleName: install the module into the project directory
- npm install -g moduleName: - g means to install the module globally. The specific location of the module depends on the location of npm config prefix
- npm install moduleName -save: - save means to install the module in the project directory and write the dependencies in the dependencies node of the package file, - S is the abbreviation of this command
- NPM install modulename - save dev: – save dev means to install the module in the project directory and write dependencies in the devdependences node of the package file, - D is the abbreviation of this command
4. After the creation is successful, open it with idea, delete the net things, and create views and router folders to store views and routes
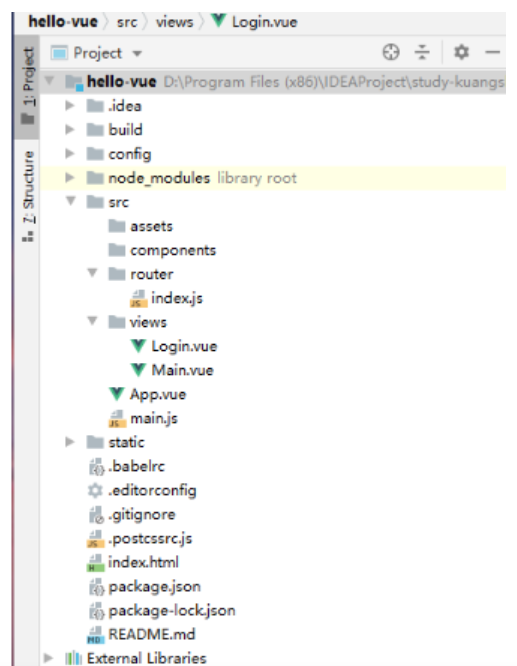
5. Create Main.vue in views
Main.vue:
<template>
  <h1>home page</h1>
</template>
<script>
    export default {
        name: "Main"
    }
</script>
<style scoped>
</style>
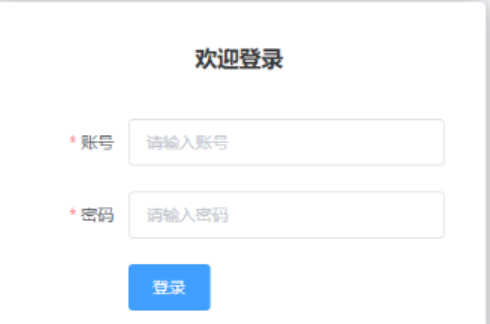
6. Create the Login.vue view component in views
Login.vue: (code in ElementUI used)
<template>
  <div>
    <el-form ref="loginForm" :model="form" :rules="rules" label-width="80px" class="login-box">
      <h3 class="login-title">Welcome to login</h3>
      <el-form-item label="account number" prop="username">
        <el-input type="text" placeholder="Please enter the account number" v-model="form.username"/>
      </el-form-item>
      <el-form-item label="password" prop="password">
        <el-input type="password" placeholder="Please input a password" v-model="form.password"/>
      </el-form-item>
      <el-form-item>
        <el-button type="primary" v-on:click="onSubmit('loginForm')">Sign in</el-button>
      </el-form-item>
    </el-form>

    <el-dialog
      title="reminder"
      :visible.sync="dialogVisible"
      width="30%"
      :before-close="handleClose">
      <span>Please enter your account and password</span>
      <span slot="footer" class="dialog-footer">
        <el-button type="primary" @click="dialogVisible = false">determine</el-button>
      </span>
    </el-dialog>
  </div>
</template>

<script>
  export default {
    name: "Login",
    data() {
      return {
        form: {
          username: '',
          password: ''
        },

        // For form validation, you need to add prop attribute in El form item element
        rules: {
          username: [
            {required: true, message: 'Account number cannot be empty', trigger: 'blur'}
          ],
          password: [
            {required: true, message: 'Password cannot be empty', trigger: 'blur'}
          ]
        },

        // Dialog box display and hide
        dialogVisible: false
      }
    },
    methods: {
      onSubmit(formName) {
        // Bind validation function for form
        this.$refs[formName].validate((valid) => {
          if (valid) {
            // Using Vue router to route to the specified page is called programmatic navigation
            this.$router.push("/main");
          } else {
            this.dialogVisible = true;
            return false;
          }
        });
      }
    }
  }
</script>

<style lang="scss" scoped>
  .login-box {
    border: 1px solid #DCDFE6;
    width: 350px;
    margin: 180px auto;
    padding: 35px 35px 15px 35px;
    border-radius: 5px;
    -webkit-border-radius: 5px;
    -moz-border-radius: 5px;
    box-shadow: 0 0 25px #909399;
  }

  .login-title {
    text-align: center;
    margin: 0 auto 40px auto;
    color: #303133;
  }
</style>
7. Create route
Create a Vue router routing configuration file named index.js in the router directory
index.js:
import Vue from "vue";
import Router from "vue-router";
import Main from "../views/Main";
import Login from "../views/Login";

Vue.use(Router);

export default new Router({
  routes: [
    {
      path: '/main',
      component: Main
    },
    {
      path: '/login',
      component: Login
    }
  ]
});
8. Configure related in main.js
main.js is called by index.html, so the previously registered components should be imported here
Don't forget to scan the routing configuration and use it in new Vue
main.js:
import Vue from 'vue'
import App from './App'
//Scan routing configuration
import router from './router'
//Import elementUI
import ElementUI from "element-ui"
//Import element css
import 'element-ui/lib/theme-chalk/index.css'

Vue.use(router);
Vue.use(ElementUI)

new Vue({
  el: '#app',
  router,
  render: h => h(App),//The ElementUI specifies this
})
9. Configure the display view in App.vue
App.vue :
<template>
  <div id="app">
    <router-link to="/login">login</router-link>
    <router-view></router-view>
  </div>
</template>
<script>
export default {
  name: 'App',
}
</script>
10. Test run
npm run dev
- Test: open in browser http://localhost:8080/#/login
- If an error occurs: it may be a compilation error caused by the too high version of SASS loader. The current maximum version is 8.0.2, which needs to be returned to 7.3.1;
- Change the version of "sass loader" in the package.json file to 7.3.1, and then cnpm install again;
12, Route nesting
Nested routing, also known as sub routing, is usually composed of multi-layer nested components in practical applications.
Demo
1. Create a user information component, and create a view component named Profile.vue in the views/user directory;
Profile.vue
<template>
  <h1>personal information</h1>
</template>
<script>
  export default {
    name: "UserProfile"
  }
</script>
<style scoped>
</style>
2. In the user list component, create a view component named List.vue in the views/user directory;
List.vue:
<template>
  <h1>User list</h1>
</template>
<script>
  export default {
    name: "UserList"
  }
</script>
<style scoped>
</style>
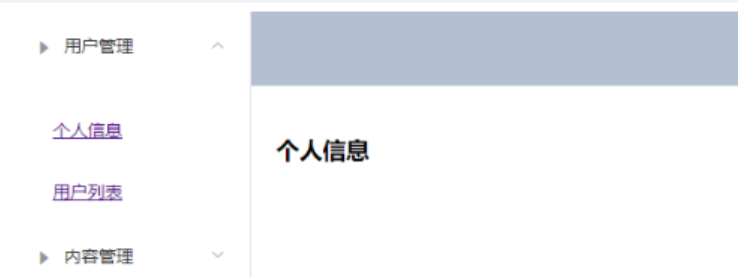
3. To modify the home page view, we modify the Main.vue view component, where the ElementUI layout container component is used, and the code is as follows:
Main.vue:
<template>
  <div>
    <el-container>
      <el-aside width="200px">
        <el-menu :default-openeds="['1']">
          <el-submenu index="1">
            <template slot="title"><i class="el-icon-caret-right"></i>user management </template>
            <el-menu-item-group>
              <el-menu-item index="1-1">
                <!--Where to insert-->
                <router-link to="/user/profile">personal information</router-link>
              </el-menu-item>
              <el-menu-item index="1-2">
                <!--Where to insert-->
                <router-link to="/user/list">User list</router-link>
              </el-menu-item>
            </el-menu-item-group>
          </el-submenu>
          <el-submenu index="2">
            <template slot="title"><i class="el-icon-caret-right"></i>Content management</template>
            <el-menu-item-group>
              <el-menu-item index="2-1">Classification management</el-menu-item>
              <el-menu-item index="2-2">Content list</el-menu-item>
            </el-menu-item-group>
          </el-submenu>
        </el-menu>
      </el-aside>

      <el-container>
        <el-header style="text-align: right; font-size: 12px">
          <el-dropdown>
            <i class="el-icon-setting" style="margin-right: 15px"></i>
            <el-dropdown-menu slot="dropdown">
              <el-dropdown-item>personal information</el-dropdown-item>
              <el-dropdown-item>Log out</el-dropdown-item>
            </el-dropdown-menu>
          </el-dropdown>
        </el-header>
        <el-main>
          <!--Show the view here-->
          <router-view />
        </el-main>
      </el-container>
    </el-container>
  </div>
</template>
<script>
  export default {
    name: "Main"
  }
</script>
<style scoped lang="scss">
  .el-header {
    background-color: #B3C0D1;
    color: #333;
    line-height: 60px;
  }
  .el-aside {
    color: #333;
  }
</style>
4. Configure nested routes, modify the index.js route configuration file under the router directory, and use children to put it into main and write sub modules. The code is as follows
index.js
import Vue from "vue";
import Router from "vue-router";
import Main from "../views/Main";
import Login from "../views/Login";
import UserList from "../views/user/List";
import UserProfile from "../views/user/Profile";

Vue.use(Router);

export default new Router({
  routes: [
    {
      path: '/main',
      component: Main,
      //Route nesting
      children: [
        {path: '/user/profile',component: UserProfile},
        {path: '/user/list',component: UserList}
      ]
    },
    {
      path: '/login',
      component: Login
    }
  ]
});
13, Parameter transfer
1. Demo
1. Front end transfer parameters
At this time, we change to: to at the route link position in Main.vue in order to use this attribute as an object. Note that the name of the name attribute in the route link must match the name of the name attribute in the route, so that Vue can find the corresponding route path;
<!--name: Pass component name params: To pass parameters, you need to bind objects: v-bind-->
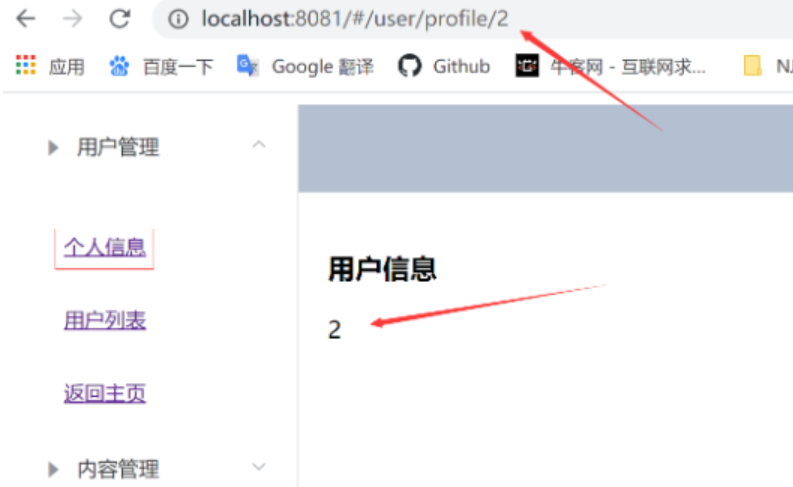
<router-link v-bind:to="{name: 'UserProfile', params: {id: 1}}">personal information</router-link>
2. Modify the routing configuration and add props: true attribute
The main reason is that placeholders such as id are added to the path attribute in index.js under router
{
  path: '/user/profile/:id',
  name: 'UserProfile',
  component: UserProfile,
  props:true
}
3. Front end display
Receive parameters in the component Profile.vue to be displayed
Profile.vue:
<template>
  <div>
    personal information
    {{ id }}
  </div>
</template>
<script>
    export default {
      props: ['id'],
      name: "UserProfile"
    }
</script>
<style scoped>
</style>
4. Operation
2. Component redirection
We all know the meaning of redirection, but the redirection in Vue is used when the paths are different but the components are the same, such as:
Configure index.js under router
{
  path: '/main',
  name: 'Main',
  component: Main
},
{
  path: '/goHome',
  redirect: '/main'
}
Note: two paths are defined here, one is / main and the other is / goHome. Where / goHome redirects to the / main path, it can be seen that the redirection does not need to define components;
If it is used, you only need to set the corresponding path in Main.vue;
<el-menu-item index="1-3">
    <router-link to="/goHome">Back to the home page</router-link>
</el-menu-item>
14, Routing hooks and asynchronous requests
1. Routing mode and 404
There are two routing modes
-
hash: the path is # signed, such as http://localhost/#/login
-
history: path without # symbol, such as http://localhost/login
Modify the routing configuration with the following code:
export default new Router({
  mode: 'history',
  routes: [
  ]
});
404 interface:
1. Create a NotFound.vue view component
<template>
    <div>
      <h1>404,Your page is lost</h1>
    </div>
</template>
<script>
    export default {
        name: "NotFound"
    }
</script>
<style scoped>
</style>
2. Modify the routing configuration index.js
import NotFound from '../views/NotFound'
{
   path: '*',
   component: NotFound
}
2. Routing hooks and asynchronous requests
beforeRouteEnter: execute before entering the route
Before route leave: execute before leaving the route
Write in Profile.vue:
  export default {
    name: "UserProfile",
    beforeRouteEnter: (to, from, next) => {
      console.log("Ready to go to the personal information page");
      next();
    },
    beforeRouteLeave: (to, from, next) => {
      console.log("Ready to leave the profile page");
      next();
    }
  }
Parameter Description:
- To: route information to jump
- from: path information before path jump
- next: control parameters of the route
- next() jumps to the next page
- next('/ path') changes the direction of the route to jump to another route
- next(false) returns to the original page
- Next ((vm) = > {}) is only available in beforeRouteEnter. vm is a component instance
3. Use asynchronous request in hook function
1. Install Axios
cnpm install --save vue-axios
2.main.js refers to Axios
import axios from 'axios'
import VueAxios from 'vue-axios'
Vue.use(VueAxios, axios)
3. Prepare data: only the files in our static directory can be accessed, so we put the static files in this directory.
The data is the same as the json data used before. You need to go to the axios example above
 4. Make asynchronous request in beforeRouteEnter
Profile.vue:
  export default {
    //The second value method
    // props:['id'],
    name: "UserProfile",
    //Hook function filter
    beforeRouteEnter: (to, from, next) => {
      //Load data
      console.log("Before entering the route")
      next(vm => {
        //Execute the getData method before entering the route
        vm.getData()
      });
    },
    beforeRouteLeave: (to, from, next) => {
      console.log("Before leaving the route")
      next();
    },
    //axios
    methods: {
      getData: function () {
        this.axios({
          method: 'get',
          url: 'http://localhost:8080/static/mock/data.json'
        }).then(function (response) {
          console.log(response)
        })
      }
    }
  }
==**Parameter Description:**==
-To: route information to jump
-from: path information before path jump
-next: control parameters of the route
-next() jumps to the next page
-next('/ path') changes the direction of the route to jump to another route
-next(false) returns to the original page
-Next ((vm) = > {}) is only available in beforeRouteEnter. vm is a component instance
5. Combination diagram of routing hook and axios
