preface
Nowadays, with the rapid development of science and technology, our home has been full of all kinds of household appliances; Among them, the kettle is one of our commonly used household equipment. The traditional kettle has only a simple heating function and can not set the heating temperature or remote control. In view of this situation, today we will refit the kettle at home and enable it to realize intelligence. First, we need to create an embedded software system, Enable our mobile phone to communicate with the kettle before boiling.
Create product
-
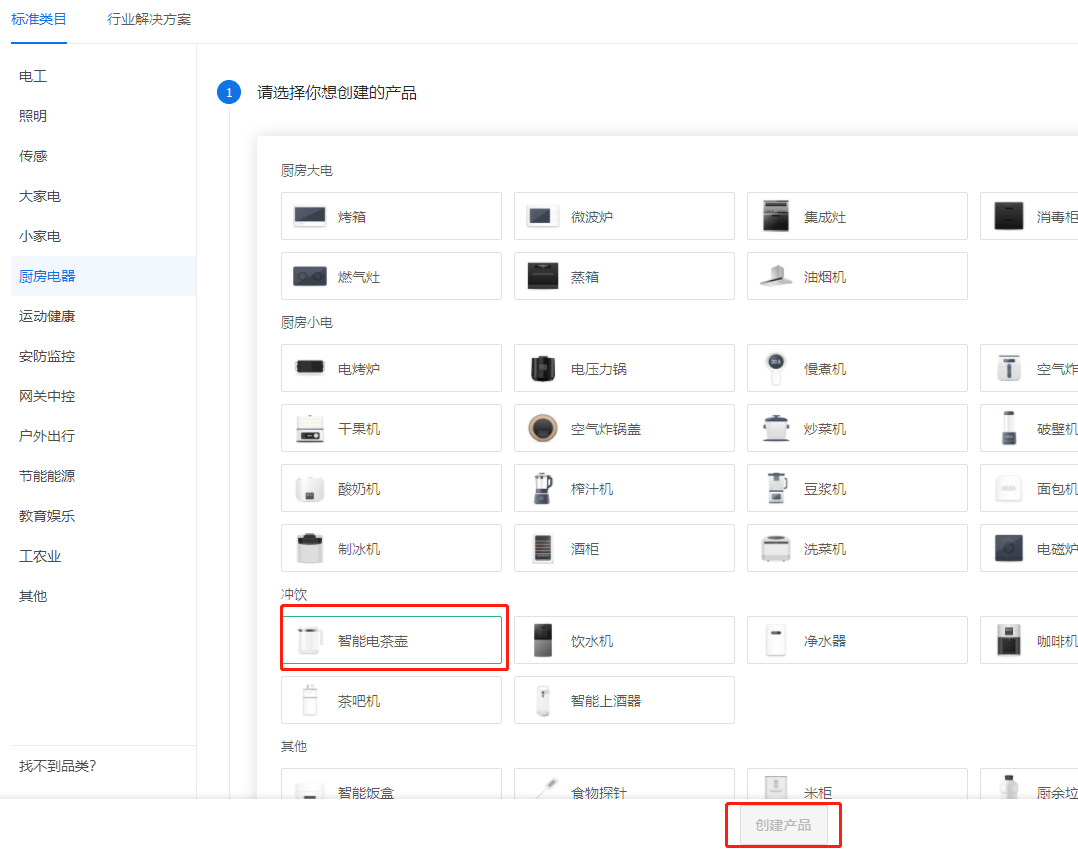
First enter Graffiti intelligent IoT platform , create a kettle product. Click create product - > kitchen appliances - > intelligent electric teapot.
-
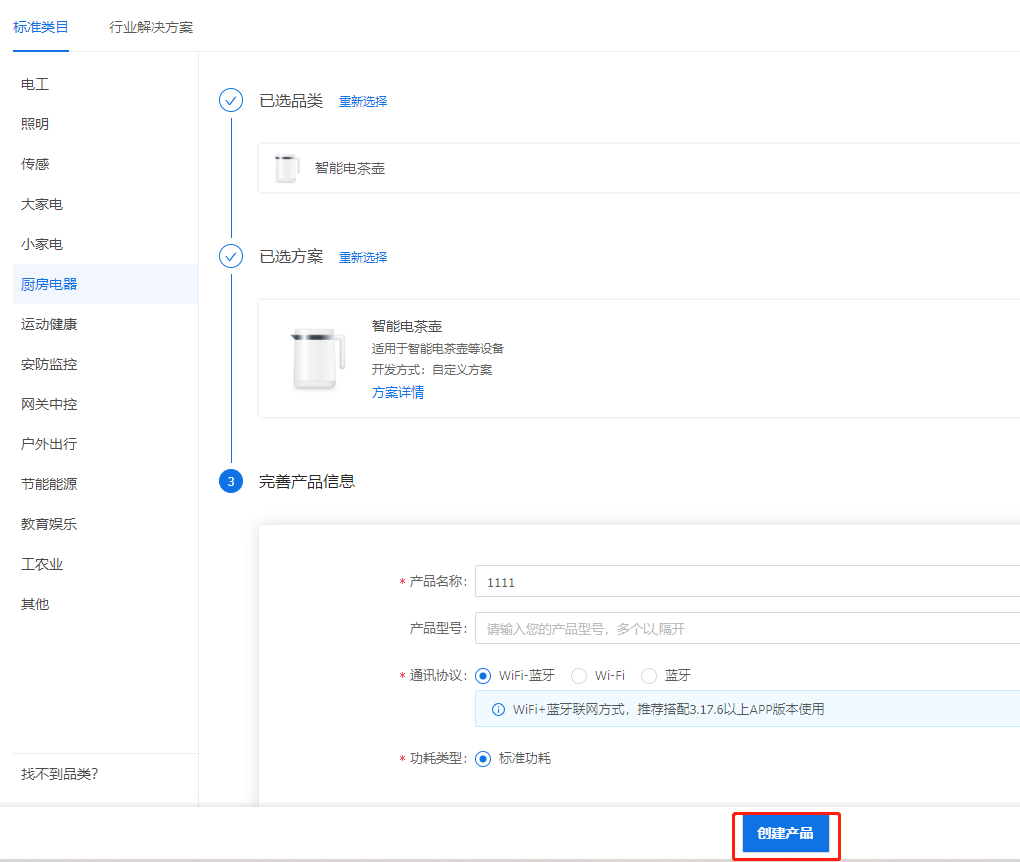
Select custom scheme, custom product name, communication protocol, WIFI + Bluetooth, and click create product.
-
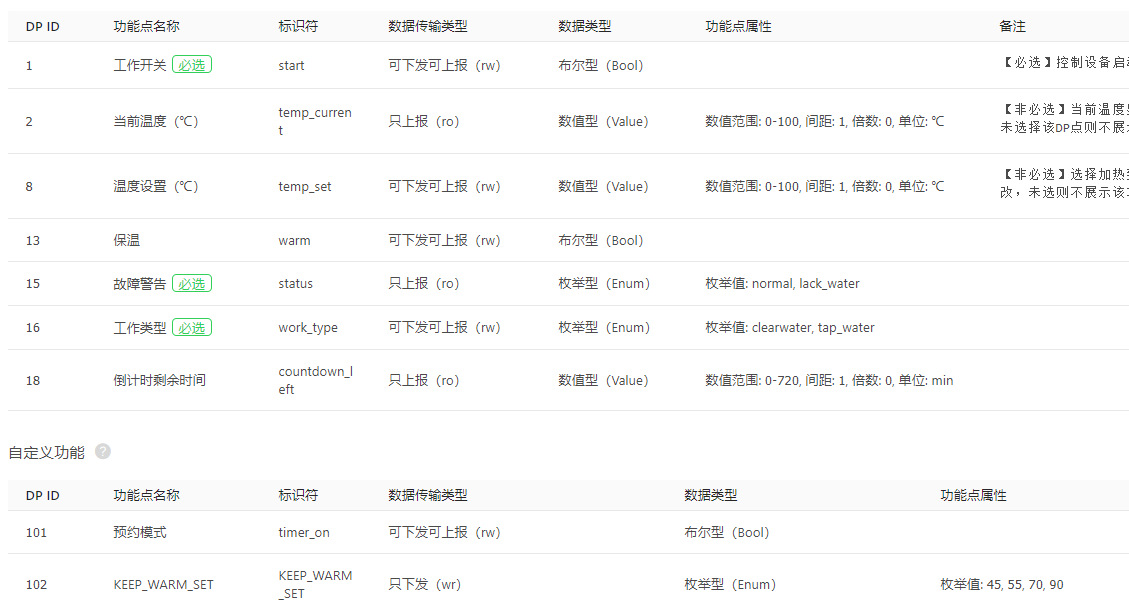
Add DP point. In this case, add standard functions: "switch", "temperature setting", "current temperature", "insulation", "fault warning" and other functions; Function points can be increased or decreased according to requirements, and function point names and attributes can also be modified according to requirements.
-
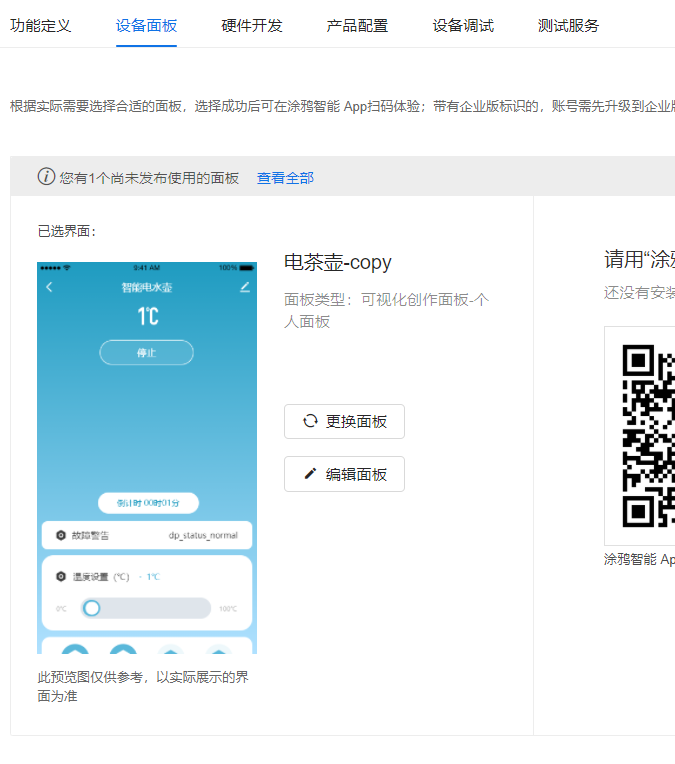
Select the equipment panel, you can choose your favorite template or your own customized panel. It is recommended to select the development and debugging panel in the debugging stage for testing
-
Select the hardware development platform, and you can choose the development platform according to your needs. Note: the panel can be used only after the chip platform is selected and the firmware is uploaded. The chip platform can be selected by itself, and the one with ADC sampling function can be selected.
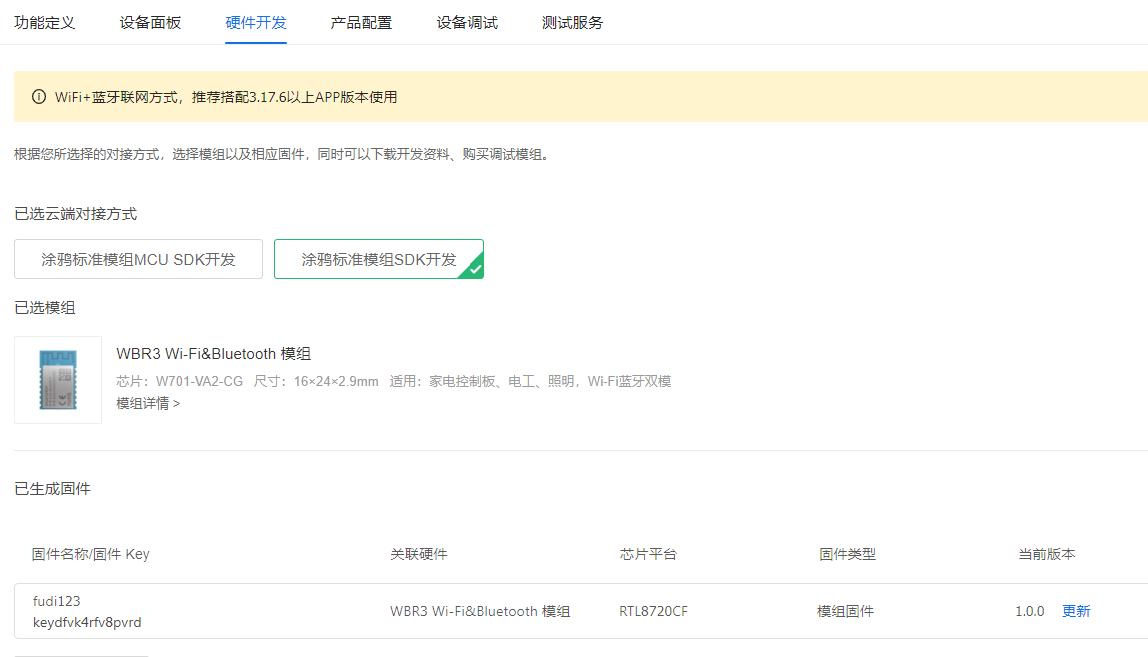
-
So far, the product creation phase has been basically completed. At this time, you can experience the reception and transmission of dp data through the "graffiti smart" app and virtual devices.

Construction of embedded system for kettle
The product has been created and the control interface on the app side has been established. In order to realize the intelligent interaction between the app and the kettle, it is necessary to establish an embedded system of the kettle device.
Establish embedded development environment
This case is SOC development based on BK7231N platform. The compilation of graffiti general SDK used in development needs linux environment. First, install Linux development environment, and then pull the demo routine containing SDK environment from graffiti warehouse..
-
download Tuya IoTOS Embeded WiFi & BLE sdk
$ cd "your directory"
$ git clone https://github.com/tuya/tuya-iotos-embeded-sdk-wifi-ble-bk7231n
git down the demo in the directory you created. There is an SDK environment attached to it. At the same time, there are several application cases in the "apps" directory. Let's use apps/tuya_demo_template this demo is a development template. On this basis, increase or decrease the code to realize an embedded system framework.
Build an embedded system framework that can connect APP with distribution network
To realize the intellectualization of the kettle, we must first build a simple embedded framework, which can realize the connection and communication between APP and equipment, and then we can modularize the function of the kettle.
- Build the system framework based on the existing demo
Current Tuya_ demo_ The file composition of the template application is as follows:
├── src
|    └── tuya_device.c            //Application layer entry file
|
├── include				//Header file directory
|    └──  tuya_device.h
|
└── output              //Compiled product
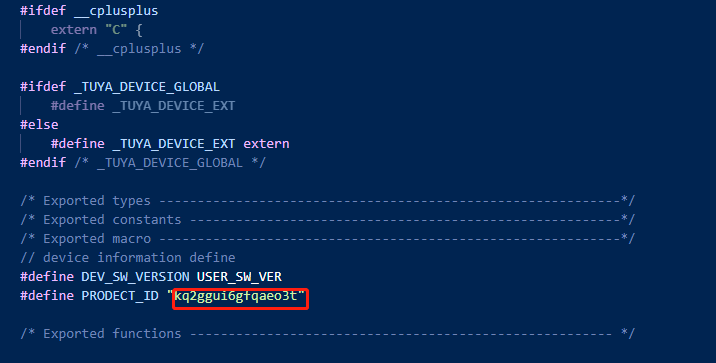
- Change Tuya_ device. The code in H is filled in according to the PID in the created product.

- Create a C file as the main application function of the kettle
The created demo file consists of the following:
├── src
|    └── tuya_device.c            //Application layer entry file
|    └── kettle_app.c            //Main application documents
|
├── include				//Header file directory
|    └──  tuya_device.h
|    └──  kettle_app.h
|
└── output              //Compiled products
- kettle_ app. DP of function point defined in H_ ID and attribute structures of different DP types, such as enumeration type and numeric type.
#ifndef __KETTLE_APP_H__
#define __KETTLE_APP_H__
/* Includes ------------------------------------------------------------------*/
#include "tuya_cloud_types.h"
#include "tuya_iot_com_api.h"
#ifdef __cplusplus
    extern "C" {
#endif /* __cplusplus */

/* Exported types ------------------------------------------------------------*/

typedef UINT8_T DP_ID_T;

typedef struct {
    DP_ID_T dp_id;

    bool power;
}DP_BOOL_T;

typedef struct {
    DP_ID_T dp_id;

    INT_T value;
}DP_VALUE_T;


/* Exported constants --------------------------------------------------------*/
/* Exported macro ------------------------------------------------------------*/

#define DP_SWITCH           1
#define DP_TEMPER           2
#define DP_TEMP_SET         8
#define DP_KEEP_WARM        13
#define DP_WORK_TYPE        16
#define DP_SHUTDOWN_TIME    18
#define DP_FAULT            15
#define DP_TIMER_ON         101
#define DP_KEEP_WARM_SET    102
/* Exported functions ------------------------------------------------------- */
VOID_T deal_dp_proc(IN CONST TY_OBJ_DP_S *root);
VOID_T report_one_dp_status(int dp_id);
VOID_T kettle_init();
#ifdef __cplusplus
}
#endif /* __cplusplus */

#endif /*__KETTLE_APP_H__ */
- kettle_ app. Implementation of deal in C_ dp_ Proc function, which is used to realize the action of the device after receiving different DP data. Implement Report_ one_ dp_ The status function is used to report DP data.
//Execute corresponding actions according to different commands issued
VOID_T deal_dp_proc(IN CONST TY_OBJ_DP_S *root)
{
    UCHAR_T dpid;
    dpid = root->dpid;

    switch (dpid){

    case DP_SWITCH: {
        PR_DEBUG("switch on/off");
        }
        break;

    case DP_TEMP_SET: {
		PR_DEBUG("temperature set");
        }
        break;

    case DP_KEEP_WARM: {

		PR_DEBUG("keep_warm on/off");
        }
        break;

    case DP_WORK_TYPE: {
		PR_DEBUG("work_type set");
        }
        break;


    case DP_TIMER_ON: {
		PR_DEBUG("time on");
        }
        break;
    case DP_KEEP_WARM_SET: {
		PR_DEBUG("keep warm temper value set ");
        }
        break;
    default:
        break;
    }

}
//dp data reporting function. After judging that the network has been connected, execute this function according to the incoming DP_ID, upload corresponding dp_ Status data for ID
VOID_T report_one_dp_status(int dp_id)
{

    OPERATE_RET op_ret = OPRT_OK;
    GW_WIFI_NW_STAT_E wifi_state = 0xFF;
    op_ret = get_wf_gw_nw_status(&wifi_state);
    if (OPRT_OK != op_ret) {
        PR_ERR("get wifi state err");
        return;
    }
    if (wifi_state <= STAT_AP_STA_DISC || wifi_state == STAT_STA_DISC) {
        return;
    }
    TY_OBJ_DP_S *dp_arr = (TY_OBJ_DP_S *)Malloc(SIZEOF(TY_OBJ_DP_S));
    if(NULL == dp_arr) {
        PR_ERR("malloc failed");
        return;
    }
    memset(dp_arr, 0, SIZEOF(TY_OBJ_DP_S));

    switch (dp_id){
    case DP_SWITCH: {
        dp_arr[0].dpid = switch_s.dp_id;
        dp_arr[0].type = PROP_BOOL;
        dp_arr[0].time_stamp = 0;
        dp_arr[0].value.dp_bool = switch_s.power;

        }
        break;

    case DP_TEMPER: {
        dp_arr[0].dpid = temper_s.dp_id;
        dp_arr[0].type = PROP_VALUE;
        dp_arr[0].time_stamp = 0;
        dp_arr[0].value.dp_value = temper_s.value;
        }
        break;

    case DP_TEMP_SET: {
        dp_arr[0].dpid = temp_set_s.dp_id;
        dp_arr[0].type = PROP_VALUE;
        dp_arr[0].time_stamp = 0;
        dp_arr[0].value.dp_bool = temp_set_s.value;
        }
        break;

    case DP_KEEP_WARM: {
        dp_arr[0].dpid = keep_warm_s.dp_id;
        dp_arr[0].type = PROP_BOOL;
        dp_arr[0].time_stamp = 0;
        dp_arr[0].value.dp_enum = keep_warm_s.power;
        }
        break;

    case DP_WORK_TYPE : {
        dp_arr[0].dpid = work_type_s.dp_id;
        dp_arr[0].type = PROP_ENUM;
        dp_arr[0].time_stamp = 0;
        dp_arr[0].value.dp_enum = work_type_s.value;
        }
        break;

    case DP_SHUTDOWN_TIME: {
        dp_arr[0].dpid = shutdown_time_s.dp_id;
        dp_arr[0].type = PROP_VALUE;
        dp_arr[0].time_stamp = 0;
        dp_arr[0].value.dp_value = shutdown_time_s.value;
        }
        break;

    case DP_FAULT: {
        dp_arr[0].dpid = fault_s.dp_id;
        dp_arr[0].type = PROP_ENUM;
        dp_arr[0].time_stamp = 0;
        dp_arr[0].value.dp_bool = fault_s.value;
        }
        break;

    case DP_TIMER_ON : {
        dp_arr[0].dpid = timer_on_s.dp_id;
        dp_arr[0].type = PROP_BOOL;
        dp_arr[0].time_stamp = 0;
        dp_arr[0].value.dp_bool = timer_on_s.power;
        }
        break;
    case DP_KEEP_WARM_SET : {
        dp_arr[0].dpid = keep_warm_set_s.dp_id;
        dp_arr[0].type = PROP_VALUE;
        dp_arr[0].time_stamp = 0;
        dp_arr[0].value.dp_value = keep_warm_set_s.value;
        }
        break;
    default:

        break;
    }

    op_ret = dev_report_dp_json_async(NULL , dp_arr, 1);
    Free(dp_arr);
    dp_arr = NULL;
    if(OPRT_OK != op_ret) {
        PR_ERR("dev_report_dp_json_async relay_config data error,err_num",op_ret);
    }
}
- Change Tuya_ device. Code in C.
Call the dp point execution function to process the action response of the device after the app side sends dp data
/**
 * @Function: dev_obj_dp_cb
 * @Description: obj dp info cmd callback, tuya cloud dp(data point) received
 * @Input: dp:obj dp info
 * @Output: none
 * @Return: none
 * @Others: app send data by dpid  control device stat
 */
VOID dev_obj_dp_cb(IN CONST TY_RECV_OBJ_DP_S *dp)
{
    PR_DEBUG("dp->cid:%s dp->dps_cnt:%d",dp->cid,dp->dps_cnt);
    UCHAR_T i = 8;

    for(i = 0;i < dp->dps_cnt;i++) {
        deal_dp_proc(&(dp->dps[i]));
        dev_report_dp_json_async(get_gw_cntl()->gw_if.id, dp->dps, dp->dps_cnt);
    }
}
At this time, a simple software framework is built. The software idea is that the app sends dp data, and the device side will have the corresponding print information, followed by compilation and burning.
Compilation and burning of programs
-
Execute the following command in the SDK root directory to start compilation:
sh build_app.sh apps/tuya_demo_template tuya_demo_template 1.0.0
-
For information about firmware burning authorization, please refer to: Wi Fi + ble series module burning authorization
-
Equipment connection and experiment
After burning, open the graffiti smart app to search the device for connection. The device name is the product name when creating the product. After the connection is successful, the app sends dp data, and the serial port 2 of the device will print the corresponding output information.
System framework establishment completed
At this time, the device has been connected with the app to realize communication, and then the functions of the intelligent kettle can be realized one by one.
The specific function implementation process will be introduced in detail in subsequent articles.
technical support
You can get graffiti support in the following ways:
- Developer Center: https://developer.tuya.com
- Help center: https://support.tuya.com/help
- Technical support work order center: https://service.console.tuya.com