catalogue
5. Preparation of CUDA program
7.2 image brightness adjustment
1. What is CUDA?
-
CUDA
Compute Unified Device Architecture
-
CUDA C/C++
The programming method based on C/C + + supports the extension of heterogeneous programming. The simple APIs can easily manage the storage system
-
Programming languages supported by CUDA:
C/C++/Python/Fortran/Java/.......
-
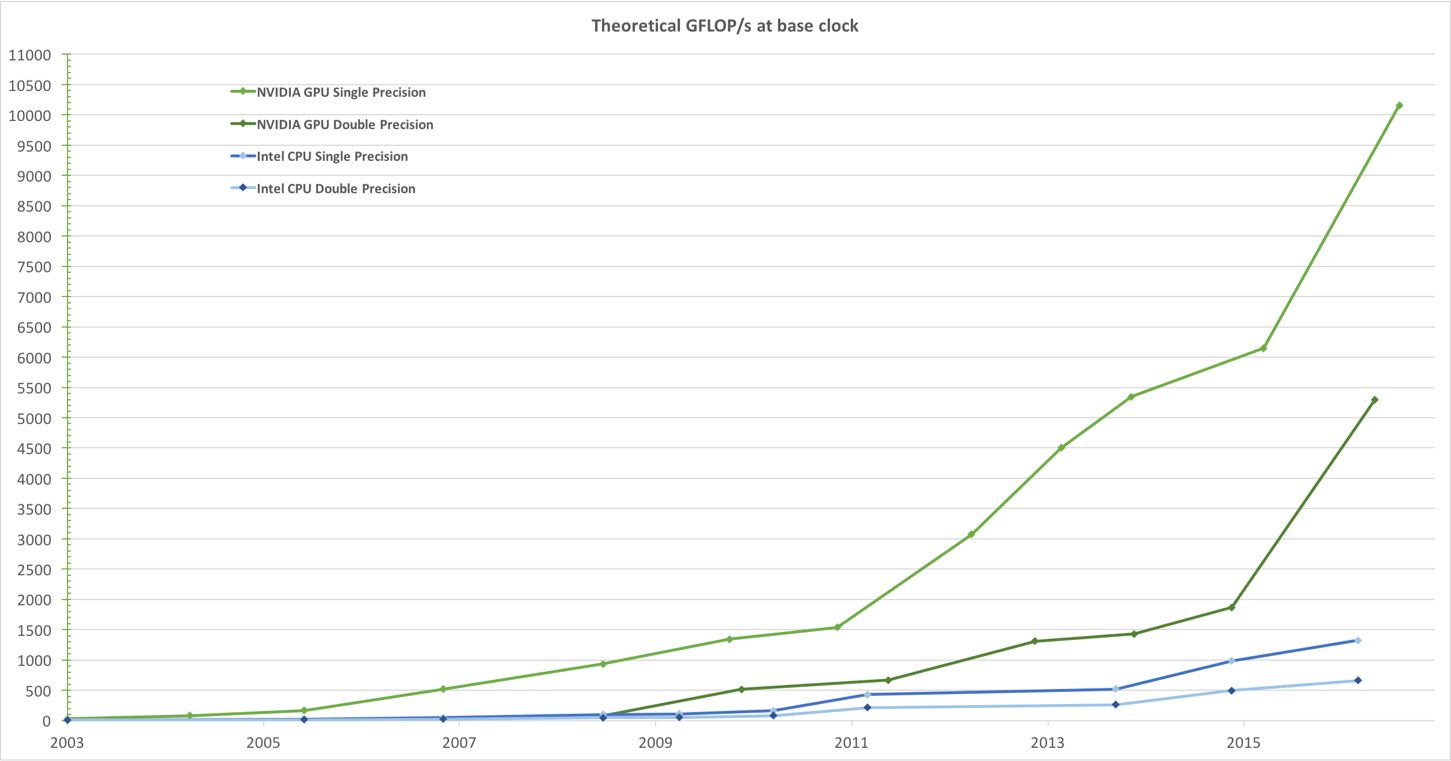
GPUvsCPU
2. Applicable equipment:
-
All servers, workstations, personal computers, embedded devices and other electronic devices including NVIDIA GPU
-
Software installation:
Windows: Installation Guide Windows :: CUDA Toolkit Documentation Only one needs to be installed exe executable
Linux: Installation Guide Linux :: CUDA Toolkit Documentation According to the above tutorial, it takes 6 / 7 steps
Jetson: JetPack SDK | NVIDIA Developer You can directly use NVIDIA SDK Manager or SD image to brush the machine
Check whether CUDA is installed through the following command
nvcc -V
nvidia-smi
(base) C:\Users\98321>nvcc -V
nvcc: NVIDIA (R) Cuda compiler driver
Copyright (c) 2005-2018 NVIDIA Corporation
Built on Sat_Aug_25_21:08:04_Central_Daylight_Time_2018
Cuda compilation tools, release 10.0, V10.0.130

(base) C:\Users\98321>nvidia-smi
Sun Dec 26 22:02:28 2021
+-----------------------------------------------------------------------------+
| NVIDIA-SMI 457.49       Driver Version: 457.49       CUDA Version: 11.1     |
|-------------------------------+----------------------+----------------------+
| GPU  Name            TCC/WDDM | Bus-Id        Disp.A | Volatile Uncorr. ECC |
| Fan  Temp  Perf  Pwr:Usage/Cap|         Memory-Usage | GPU-Util  Compute M. |
|                               |                      |               MIG M. |
|===============================+======================+======================|
|   0  GeForce GTX 166... WDDM  | 00000000:01:00.0 Off |                  N/A |
| N/A   43C    P8     6W /  N/A |    153MiB /  6144MiB |      0%      Default |
|                               |                      |                  N/A |
+-------------------------------+----------------------+----------------------+

+-----------------------------------------------------------------------------+
| Processes:                                                                  |
|  GPU   GI   CI        PID   Type   Process name                  GPU Memory |
|        ID   ID                                                   Usage      |
|=============================================================================|
|  No running processes found                                                 |
+-----------------------------------------------------------------------------+

(base) C:\Users\98321>
3. Hardware structure of GPU
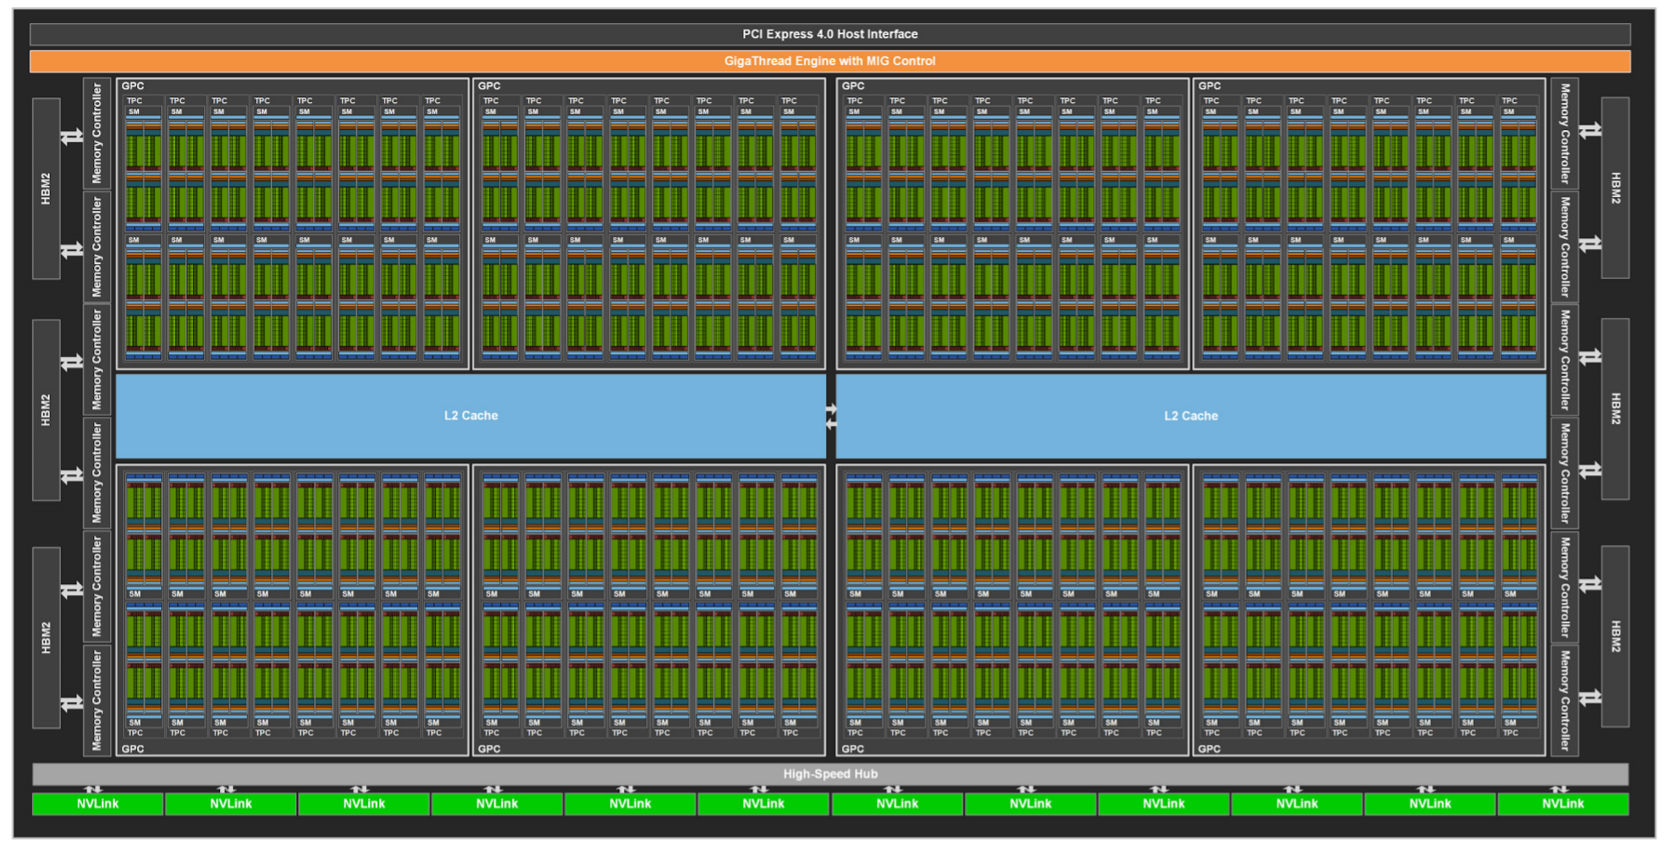
The following figure shows the hardware architecture of GA100, which includes:
- 8192 FP32 CUDA Cores
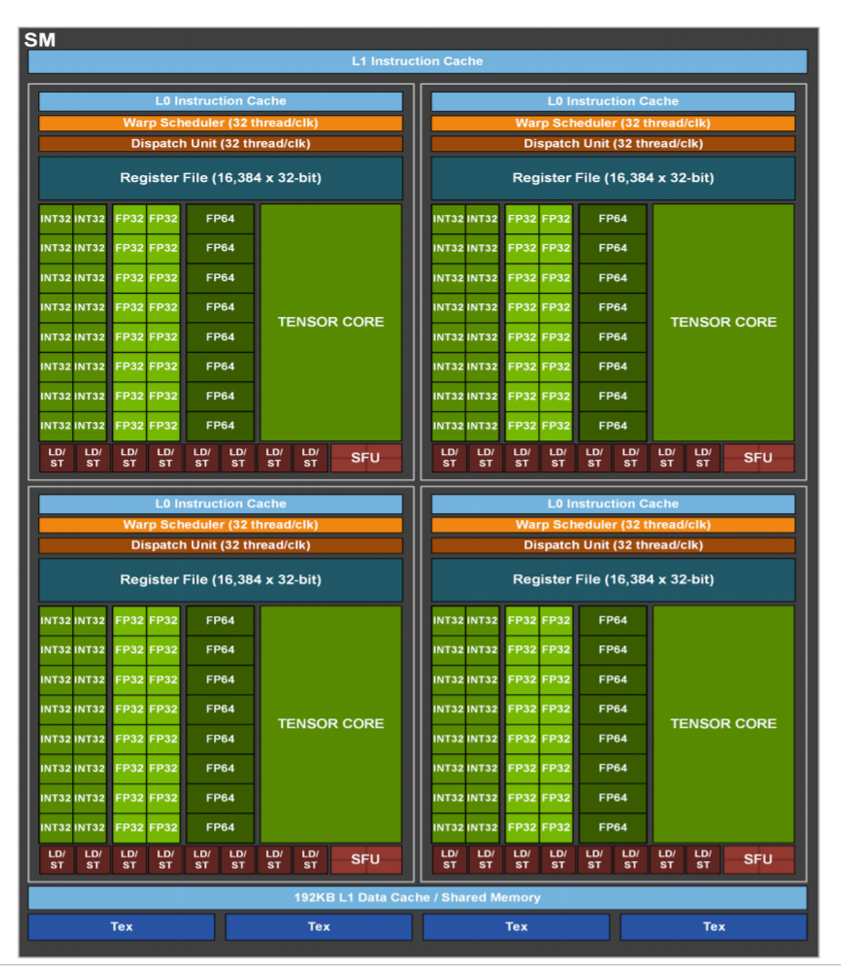
- 128 SM (SM refers to stream multiprocessor, that is, stream multiprocessor, which can facilitate the cooperation between one thread)
- Each SM contains 64 fp32 CUDA cores and 4 third generation tensor cores
-
Device
-
SM
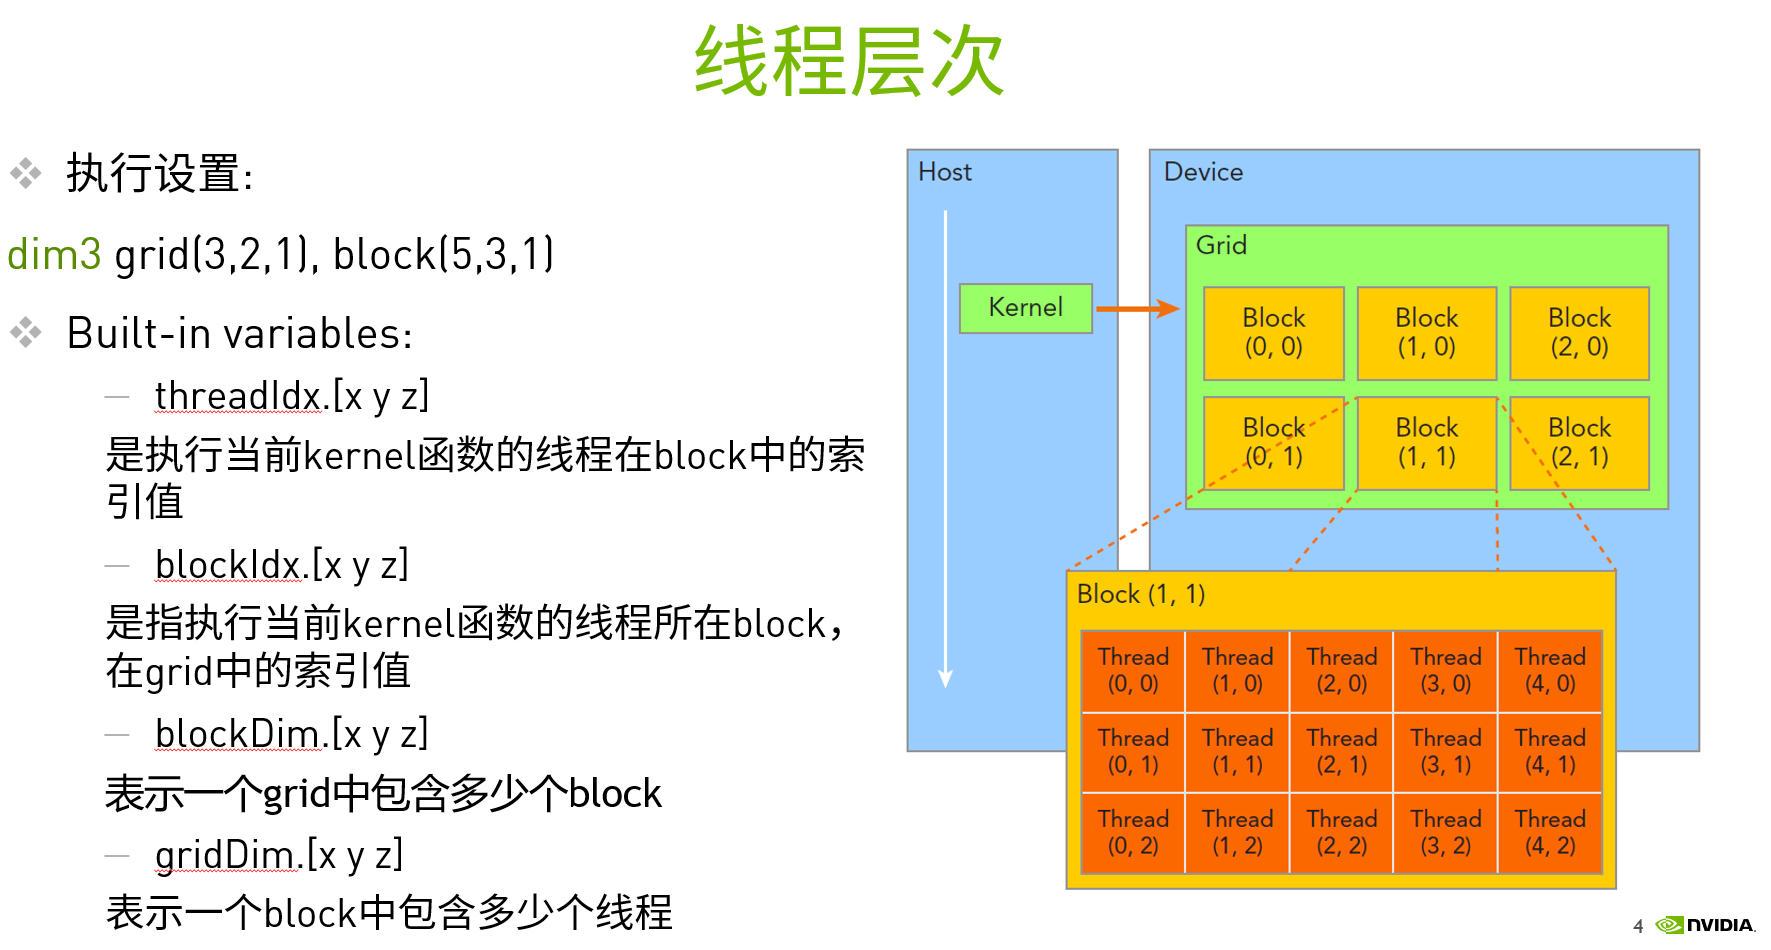
4. Thread hierarchy of CUDA
In computer science, execution thread is the smallest sequence of program instructions that can be independently managed by the scheduler.
In the GPU, threads can be managed from multiple levels:
- Thread: sequential execution unit all threads execute the same kernel function in parallel
- Thread Block: a group of threads. Threads in the same Block of a Streaming Multiprocessor (SM) can collaborate
- Thread Grid: a collection of thread blocks blocks blocks in a Grid can be executed in multiple SM
5. Preparation of CUDA program
- The implementation of kernel function needs to add @ CUDA. Before the kernel function JIT identifier
  @cuda.jit
  def add_kernel(x, y, out):
- Execution settings need to be added for calling kernel functions
add_kernel[blocks_per_grid, threads_per_block](x, y, out)
Blocks here_ per_ Grid represents the number of block s in X, y and Z dimensions in the grid
Threads here_ per_ Block represents the number of thread s in the X, y and Z dimensions of the block
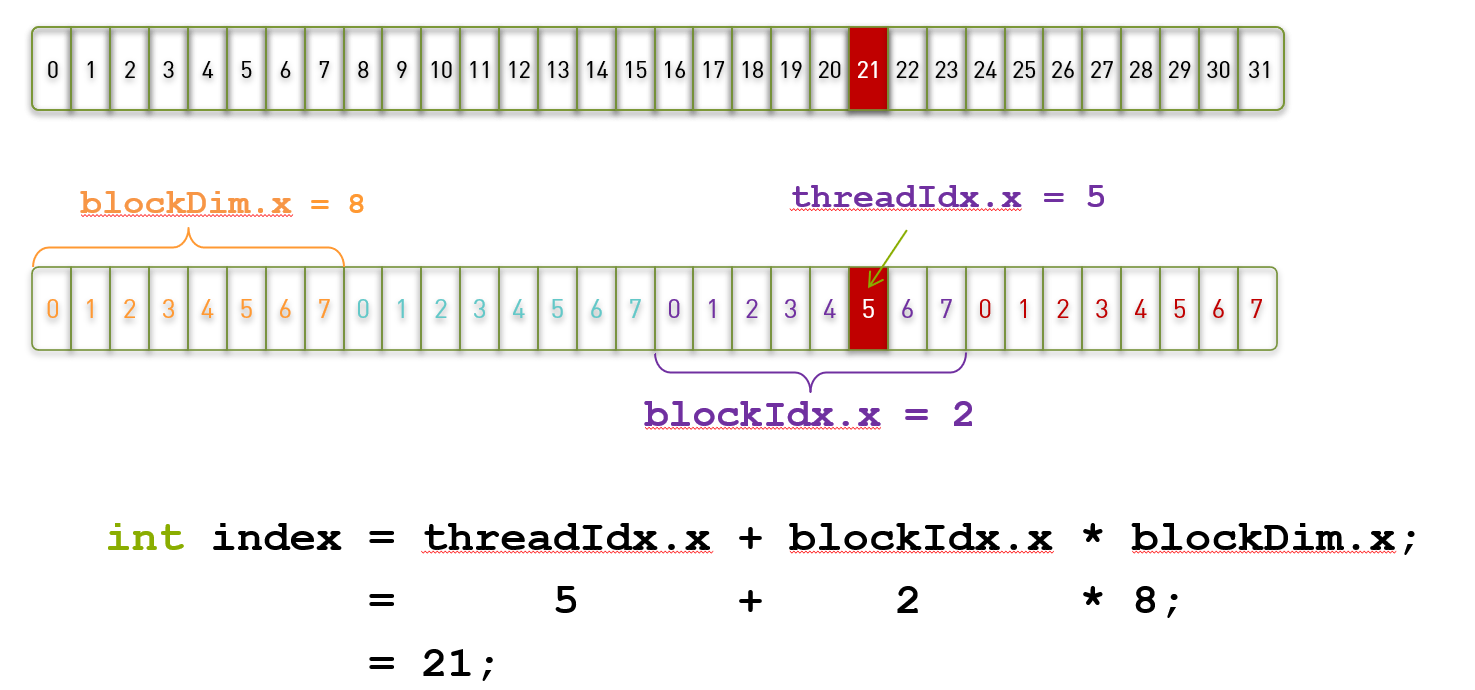
6.CUDA thread index
- We can use CUDA threadIdx,cuda.blockIdx,cuda.blockDim,cuda.gridDim to determine the data to be processed by each thread
7. Actual programming
7.1 vector addition
Next, let's try to write the first CUDA program. Let's implement an example of vector addition, adding two vectors containing 1000000 elements
When we implement it with CPU:
def vecAdd (n, a, b, c)
    for i in range(n):
        c[i] = a[i] + b[i];
When we implement it with GPU:
def add_kernel(x, y, out):
    tx = cuda.threadIdx.x # The index value of the current thread in the block
    ty = cuda.blockIdx.x  # The index value of the block of the current thread in the grid

    block_size = cuda.blockDim.x  # How many threads per block
    grid_size = cuda.gridDim.x    # How many thread blocks are there per grid

    start = tx + ty * block_size
    stride = block_size * grid_size

    for i in range(start, x.shape[0], stride):
        out[i] = x[i] + y[i]
Execute the following code to complete the example of vector addition
from numba import cuda, float32
import numpy as np
import time
import math
import cv2


def vecAdd(n, a, b, c):
    for i in range(n):
        c[i] = a[i] + b[i]

@cuda.jit
def add_kernel(x, y, out):
    tx = cuda.threadIdx.x
    ty = cuda.blockIdx.x

    block_size = cuda.blockDim.x
    grid_size = cuda.gridDim.x

    start = tx + ty * block_size
    stride = block_size * grid_size
    for i in range(start, x.shape[0], stride):
        out[i] = x[i] + y[i]

def test_add():
    n = 100000
    x = np.arange(n).astype(np.float32)
    y = 2 * x
    out = np.empty_like(x)
    out1 = np.empty_like(x)

    threads_per_block = 128
    blocks_per_grid = 30

    t1 = time.time()
    add_kernel[blocks_per_grid, threads_per_block](x, y, out)
    print('gpu cost time is:', time.time() - t1)
    print(out[:20])
    t2 = time.time()
    vecAdd(n, x, y, out1)
    print('cpu cost time is:', time.time() - t2)
    print(out1[:20])

if __name__ =="__main__":
    # test_add()
At this time, we can see that GPU has obvious speed advantage over CPU when calculating vector operation.
7.2 image brightness adjustment
Although the above example is very simple, it is often used in our practical application.
For example, when we beautify the taken photos, we need to adjust the brightness of the photos. At this time, we need to increase or decrease the value of each pixel. If we imagine all the pixel values of the picture as the vectors processed above, CUDA can be very effective for acceleration
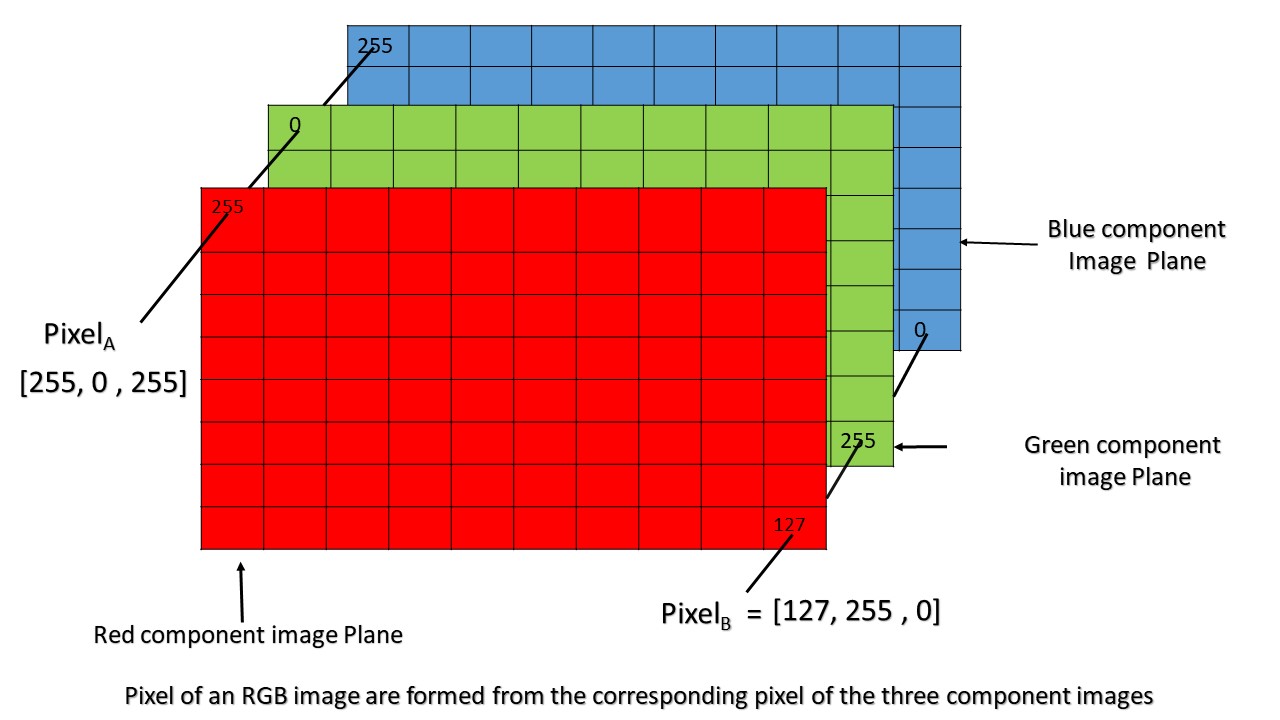
As shown in the figure above, we only need to let each thread adjust the value in one pixel to adjust the brightness and contrast of the whole picture
Next, execute the following code to complete the example of adjusting the brightness of the picture:
The first step is to complete the CUDA kernel function
import cv2
import numba
import time
import math

#GPU function
@cuda.jit
def process_gpu(img,rows,cols,channels):
    tx = cuda.blockIdx.x*cuda.blockDim.x+cuda.threadIdx.x
    ty = cuda.blockIdx.y*cuda.blockDim.y+cuda.threadIdx.y
    if tx<rows and ty<cols:
        for c in range(channels):
            color = img[tx,ty][c]*2.0+30
            if color>255:
                img[tx,ty][c]=255
            elif color<0:
                img[tx,ty][c]=0
            else:
                img[tx,ty][c]=color
The second step is to realize the code of CPU side processing
#cpu function
def process_cpu(img):
    rows,cols,channels=img.shape
    for i in range(rows):
        for j in range(cols):
            for c in range(3):
                color=img[i,j][c]*2.0+30
                if color>255:
                    img[i,j][c]=255
                elif color<0:
                    img[i,j][c]=0
                else:
                    img[i,j][c]=color
The third step is to define the main function, use opencv to read the picture, and give it to CPU and GPU for processing respectively
Step 4: execute to get the processing result
def main_image_process():
    #Create an image.
    filename = 'test1.jpg'
    img = cv2.imread(filename)
    img = cv2.resize(img,(1000,1000),interpolation = cv2.INTER_AREA)
    img2 = cv2.resize(img,(1000,1000),interpolation = cv2.INTER_AREA)
    rows,cols,channels=img.shape
    start_cpu = time.time()
    process_cpu(img)
    end_cpu = time.time()
    time_cpu = (end_cpu-start_cpu)
    print("CPU process time: "+str(time_cpu))
    ##GPU function
    threadsperblock = (16,16)
    blockspergrid_x = int(math.ceil(rows/threadsperblock[0]))
    blockspergrid_y = int(math.ceil(cols/threadsperblock[1]))
    blockspergrid = (blockspergrid_x,blockspergrid_y)
    start_gpu = time.time()
    dImg = cuda.to_device(img2)
    cuda.synchronize()
    process_gpu[blockspergrid,threadsperblock](dImg,rows,cols,channels)
    cuda.synchronize()
    end_gpu = time.time()
    dst_gpu = dImg.copy_to_host()
    time_gpu = (end_gpu-start_gpu)
    print("GPU process time: "+str(time_gpu))
    #save
    cv2.imwrite("result_cpu.png",img)
    cv2.imwrite("result_gpu.png",dst_gpu)
    print("Done.")

if __name__ =="__main__":
    main_image_process()
7.3 matrix multiplication
After completing the previous example, you will be able to do simple CUDA Programming. Next, let's try a harder example, matrix multiplication.
Matrix operation is widely used in many fields. For example, the convolution operation in the very popular convolution neural network can be completed by matrix multiplication. Next, we try to use CUDA to speed up the operation of matrix multiplication.
The following shows how to use CPU to complete matrix multiplication
def matmul_cpu(A,B,C):
    for y in range(B.shape[1]):
        for x in range(A.shape[0]):
            tmp = 0
            for k in range(A.shape[1]):
                tmp += A[x,k]*B[k,y]
            C[x,y] = tmp
At this time, we can see that the logic of the CPU code is to find the value of each element in the result matrix P one by one.
When using CUDA to accelerate, we need to apply for threads equal to the number of elements in the C matrix. Each thread processes and obtains the element value in a C matrix, and finally executes in parallel to obtain the result matrix.
@cuda.jit
def matmul_gpu(A,B,C):
    row,col = cuda.grid(2)
    if row < C.shape[0] and col < C.shape[1]:
        tmp = 0.
        for k in range(A.shape[1]):
            tmp += A[row,k]*B[k,col]
        C[row,col] = tmp
Execute the following code to complete the example of matrix multiplication
The first step is to implement the CPU side code
def matmul_cpu(A,B,C):
    for y in range(B.shape[1]):
        for x in range(A.shape[0]):
            tmp = 0
            for k in range(A.shape[1]):
                tmp += A[x,k]*B[k,y]
            C[x,y] = tmp
The second step is to realize CUDA kernel function
@cuda.jit
def matmul_gpu(A,B,C):
    row,col = cuda.grid(2)
    if row < C.shape[0] and col < C.shape[1]:
        tmp = 0.
        for k in range(A.shape[1]):
            tmp += A[row,k]*B[k,col]
        C[row,col] = tmp
The third step is to optimize the kernel function by using the Shared memory in SM
TPB = 16
@cuda.jit
def matmul_shared_mem(A,B,C):
    sA = cuda.shared.array(shape=(TPB,TPB), dtype=float32)
    sB = cuda.shared.array(shape=(TPB,TPB), dtype=float32)

    x,y = cuda.grid(2)

    tx = cuda.threadIdx.x
    ty = cuda.threadIdx.y
    if x>=C.shape[0] or y >= C.shape[1]:
        return
    tmp = 0.
    for i in range(int(A.shape[1]/TPB)):
        sA[tx, ty] = A[x, ty+i*TPB]
        sB[tx, ty] = B[tx+i*TPB, y]
        cuda.syncthreads()
        for j in range(TPB):
            tmp += sA[tx,j]*sB[j,ty]
    C[x,y] = tmp
The fourth step is to define the main function. In this part, we initialize the A and B matrices and transfer the data to the GPU
def main_matrix_mul():
    TPB = 16
    A = np.full((TPB*10,TPB*10), 3.0, np.float)
    B = np.full((TPB*10,TPB*10), 4.0, np.float)
    C_cpu = np.full((A.shape[0],B.shape[1]), 0, np.float)

    #Start in CPU
    print("Start processing in CPU")
    start_cpu = time.time()
    matmul_cpu(A,B,C_cpu)
    end_cpu = time.time()
    time_cpu = (end_cpu - start_cpu)
    print("CPU time: "+str(time_cpu))

    #Start in GPU
    A_global_mem = cuda.to_device(A)
    B_global_mem = cuda.to_device(B)

    C_global_mem = cuda.device_array((A.shape[0],B.shape[1]))
    C_shared_mem = cuda.device_array((A.shape[0],B.shape[1]))

    threadsperblock = (TPB, TPB)
    blockspergrid_x = int(math.ceil(A.shape[0]/threadsperblock[0]))
    blockspergrid_y = int(math.ceil(A.shape[1]/threadsperblock[1]))
    blockspergrid = (blockspergrid_x,blockspergrid_y)

    print("Start processing in GPU")
    start_gpu = time.time()
    matmul_gpu[blockspergrid, threadsperblock](A_global_mem,B_global_mem,C_global_mem)
    cuda.synchronize()
    end_gpu = time.time()
    time_gpu = (end_gpu - start_gpu)
    print("GPU time(global memory):"+str(time_gpu))
    C_global_gpu = C_global_mem.copy_to_host()

    print("Start processing in GPU (shared memory)")
    start_gpu = time.time()
    matmul_shared_mem[blockspergrid, threadsperblock](A_global_mem,B_global_mem,C_global_mem)
    cuda.synchronize()
    end_gpu = time.time()
    time_gpu = (end_gpu - start_gpu)
    print("GPU time(shared memory):"+str(time_gpu))
    C_shared_gpu = C_shared_mem.copy_to_host
Step 5: execute the main function to compare the speed differences of using different methods to accelerate matrix multiplication
if __name__ =="__main__":
    main_matrix_mul()
7.4 image blur by convolution
Please execute the following code:
from numba import cuda, float32
import numpy as np
import time
import math
import cv2


@cuda.jit
def convolve(result, mask, image):
    i, j = cuda.grid(2)
    image_rows, image_cols, channels = image.shape
    if (i <= image_rows) and (j <= image_cols):
        delta_rows = mask.shape[0] // 2
        delta_cols = mask.shape[1] // 2
        for c in range(3):
            result[i, j][c] = 0
        for k in range(mask.shape[0]):
            for l in range(mask.shape[1]):
                i_k = i - k + delta_rows
                j_l = j - l + delta_cols
                if (i_k >= 0) and (i_k < image_rows) and (j_l >= 0) and (j_l < image_cols):
                    for c in range(3):
                        result[i, j][c] += mask[k, l] * image[i_k, j_l][c]

def main_convolve():
    filename = 'test1.jpg'
    img = cv2.imread(filename).astype(np.float32)
    dImg = cuda.to_device(img)
    result = cuda.to_device(img)
    rows,cols,channels=img.shape
    dst_gpu = img.copy()

    mask = np.random.rand(13, 13).astype(np.float32)
    mask /= mask.sum()

    ##GPU function
    threadsperblock = (16,16)
    blockspergrid_x = int(math.ceil(rows/threadsperblock[0]))
    blockspergrid_y = int(math.ceil(cols/threadsperblock[1]))
    blockspergrid = (blockspergrid_x,blockspergrid_y)
    cuda.synchronize()
    start_gpu = time.time()
    convolve[blockspergrid,threadsperblock](result,mask,dImg)
    cuda.synchronize()
    end_gpu = time.time()
    result_gpu = result.copy_to_host()
    time_gpu = (end_gpu-start_gpu)
    print("GPU process time: "+str(time_gpu))
    #save
    cv2.imwrite("result_gpu_convolve.png",result_gpu)
    print("Done.")

if __name__ =="__main__":
    main_convolve()
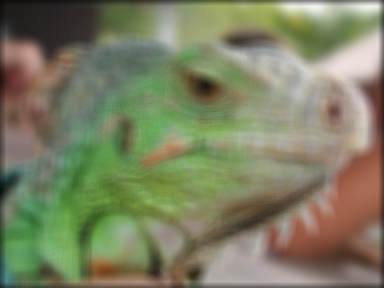
Comparison of figures before and after blur

performance

Source:
https://github.com/sangyy/CUDA_Python