Introduction layout
If you've ever used an iPhone, you know that almost every iPhone app has a title bar at the top of its interface.
There will be one or two buttons on the title bar that can be used for return or other operations (the iPhone does not have an entity return key). There are a lot of them now.
Android programs also like to imitate the style of the iPhone by placing a title bar at the top of the interface. Although the Android system
Every activity has been provided with the title bar function, but here we still decided not to use it, but to create a custom one.
Title bar.
After learning from the previous two sections, I think it's no longer difficult for you to create a title bar layout.
Just add two Button s and a TextView and place them in the layout. But there's still room for that.
In general, there may be many activities in our program that need such a title bar, if in each activity.
Writing the same title bar code once in the layout will obviously lead to a lot of duplication of the code. That's when we can do it.
To solve this problem by introducing layout, create a new layout title.xml, the code is as follows:
<LinearLayout xmlns:android="http://schemas.android.com/apk/res/android"
android:layout_width="match_parent"
android:layout_height="wrap_content"
android:background="@drawable/title_bg" >
<Button
android:id="@+id/title_back"
android:layout_width="wrap_content"
android:layout_height="wrap_content"
android:layout_gravity="center"
android:layout_margin="5dip"
android:background="@drawable/back_bg"
android:text="Back"
android:textColor="#fff" />
<TextView
android:id="@+id/title_text"
android:layout_width="0dip"
android:layout_height="wrap_content"
android:layout_gravity="center"
android:layout_weight="1"
android:gravity="center"
android:text="Title Text"
android:textColor="#fff"
android:textSize="24sp" />
<Button
android:id="@+id/title_edit"
android:layout_width="wrap_content"
android:layout_height="wrap_content"
android:layout_gravity="center"
android:layout_margin="5dip"
android:background="@drawable/edit_bg"
android:text="Edit"
android:textColor="#fff" />
</LinearLayout>
As you can see, we added two Buttons and one TextView to Linear Layout, respectively, with Button on the left.
It can be used for return, Button on the right can be used for editing, and TextView in the middle can display a section of heading text. Above
You've seen most of the attributes in your code, so let me explain a few of the attributes you haven't talked about before.
android:background is used to specify a background for a layout or control. It can be filled with colors or pictures.
Here I prepared three pictures in advance, title_bg.png, back_bg.png and edit_bg.png, respectively, for the title bar,
Return the background of the Button and the edit Button. In the other two Buttons, we used the genus android:layout_margin.
Sex, it can specify the distance from which the control is offset in the left and right directions, or, of course, it can use android:layout_marginLeft
Or android:layout_marginTop and other attributes to specify the distance of the control offset in a certain direction separately.
Now that the title bar layout has been written, the rest is how to use the title bar in the program, modify it.
The code in activity_main.xml is as follows:
<LinearLayout xmlns:android="http://schemas.android.com/apk/res/android" android:layout_width="match_parent" android:layout_height="match_parent" >
<include layout="@layout/title" />
</LinearLayout>
88 Build Custom Controls
The introduction of layout techniques does solve the problem of repeating layout code, but if there are some control requirements in layout
To be able to respond to events, we still need to write event registration code for these controls individually in each activity. such as
When it comes to the return button in the title bar, the function of the button is the same no matter which activity it is in, that is, to destroy it.
Get rid of current activities. And if you need to re-register the click event of the return button in every activity, it will undoubtedly increase again.
Add a lot of duplicate code, this situation is best solved by using custom controls.
New TitleLayout inherits from LinearLayout and makes it our custom title bar control. The code is as follows
It is shown that:
public class TitleLayout extends LinearLayout {
p
ublic TitleLayout(Context context, AttributeSet attrs) {
super(context, attrs);
LayoutInflater.from(context).inflate(R.layout.title, this);
}
}
First, we rewrite the constructor with two parameters in Linear Layout and introduce TitleLayout into the layout.
Control calls this constructor. Then in the constructor, you need to dynamically load the layout of the title bar, which you need to borrow.
Help LayoutInflater to implement it. A LayoutInflater can be constructed by LayoutInflater's from() method
Object, and then call the inflate() method to dynamically load a layout file. The inflate() method receives two parameters.
One parameter is the id of the layout file to be loaded. Here we pass in R.layout.title. The second parameter is the id of the layout file to be loaded.
The layout adds a parent layout, where we want to specify TitleLayout, and we pass it in directly.
Now that the custom control has been created, we need to add this custom control to the layout file and modify it.
The code in activity_main.xml is as follows:
<LinearLayout xmlns:android="http://schemas.android.com/apk/res/android"
android:layout_width="match_parent"
android:layout_height="match_parent" >
<com.example.uicustomviews.TitleLayout
android:layout_width="match_parent"
android:layout_height="wrap_content"
></com.example.uicustomviews.TitleLayout>
</LinearLayout>
Adding custom controls is basically the same as adding normal controls, except when adding custom controls
We need to specify the full class name of the control, and the package name cannot be omitted here.
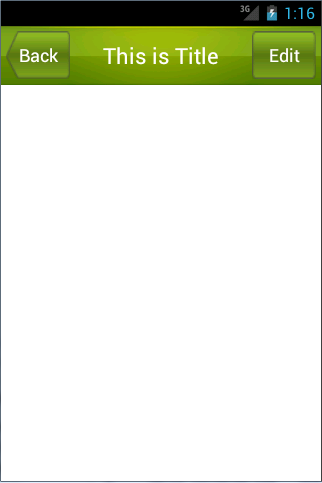
Rerun the program and you will find that the effect is the same as that of introducing layout.
Then we try to register click events for the buttons in the title bar and modify the code in TitleLayout as follows:
public class TitleLayout extends LinearLayout {
public TitleLayout(Context context, AttributeSet attrs) {
super(context, attrs);
LayoutInflater.from(context).inflate(R.layout.title, this);
Button titleBack = (Button) findViewById(R.id.title_back);
Button titleEdit = (Button) findViewById(R.id.title_edit);
titleBack.setOnClickListener(new OnClickListener() {
@Override
public void onClick(View v) {
((Activity) getContext()).finish();
}
});
titleEdit.setOnClickListener(new OnClickListener() {
@Override
public void onClick(View v) {
Toast.makeText(getContext(), "You clicked Edit button",
Toast.LENGTH_SHORT).show();
}
});
}
}
First, we get an instance of the button through the findViewById() method, and then call setOnClickListener() separately.
Method registers click events for two buttons, destroys the current activity when clicking the return button, and clicks the edit button.
A text pops up. Rerun the program and click the edit button. The effect is as follows 
Reproduced in: https://my.oschina.net/u/2385466/blog/547060