Link to mycat:
Mycat official website
Mycat download link
Official documents of Mycat,Baidu online disk official document download link, extraction code: f9nq.
Mycat short document
Before you start, read the brief Mycat documentation to get a general idea of it.
Note: MyCAT supports a variety of database access, including mongodb, oracle, sqlserver, hive, db2 and postgresql.
The application scenario of mycat is as follows:
- Simple read-write separation. At this time, the configuration is the simplest. It supports read-write separation and master-slave switching;
- Sub table and sub database: for more than 10 million tables, the maximum support is 100 billion single table fragmentation;
- For multi tenant applications, each application has a library, but the application only connects to Mycat, so the program itself is not modified and multi tenant is realized;
- Report system, with the help of Mycat's ability to separate reports, deals with large-scale report statistics;
- Replace Hbase and analyze big data;
- As a simple and effective solution for real-time query of massive data, for example, 10 billion frequently queried records need to find results within 3 seconds. In addition to the query based on the primary key, there may also be range query or other attribute query. At this time, Mycat may be the most simple and effective option.
There are three more important terms in mycat. Here is a brief description:
- Schema: logical library, corresponding to databases in MySQL. A logical library defines the included table s.
- Table: a logical table is a table stored in a physical database. Unlike a traditional database, the table here should declare the logical data node it stores, datanode, and then specify the table fragmentation rules.
- datanode: the logical data node of mycat, which is the specific physical node storing the table, also known as the partition node, is associated to a specific database at the back end through datasource.
- Data source: defines the access address of a physical library, which is used to bind to the datanode.
The functions of this blog are as follows:
- Two MySQL servers for master-slave replication;
- One mycat server is used to separate the reading and writing of two MySQL servers.
The above environment is similar to the web cluster. The front-end nginx agent (here is mycat), the back-end two MySQL services, the slave server is used to read data, and the master server is used to write data.
1. Prepare mycat deployment environment
| system | IP | host name | service |
|---|---|---|---|
| Centos 7.5 | 192.168.20.2 | mysql01 | MySQL 5.7.24 |
| Centos 7.5 | 192.168.20.3 | mysql02 | MySQL 5.7.24 |
| Centos 7.5 | 192.168.20.4 | mycat | Mycat |
The installation and deployment of mycat requires jdk1.7 and above, and mysql is recommended to be 5.5 and above.
To deploy two MySQL masters and slaves, please refer to the blog: MySQL high availability solution - dual primary (Note: you only need to refer to the blog to make a master-slave effect. You don't need double masters or keepalived to make high availability).
2. Install jdk
[root@mycat ~]# java -version         #Check whether the jdk version is appropriate
openjdk version "1.8.0_161"
OpenJDK Runtime Environment (build 1.8.0_161-b14)
OpenJDK 64-Bit Server VM (build 25.161-b14, mixed mode)
#If the above command returns an error, you can execute the following command to install the jdk environment
[root@mycat ~]# yum -y install java
3. Deploy mycat
The downloaded mycat package can be directly decompressed for use.
#Download and unzip
[root@mycat src]# wget http://dl.mycat.io/1.6-RELEASE/Mycat-server-1.6-RELEASE-20161028204710-linux.tar.gz
[root@mycat src]# tar zxf Mycat-server-1.6-RELEASE-20161028204710-linux.tar.gz -C /usr/local/
#View the directory structure after decompression
[root@mycat src]# tree -L 1  /usr/local/mycat/
/usr/local/mycat/
├── bin
├── catlet
├── conf
├── lib
├── logs
└── version.txt
Among them:
- bin: start directory;
- lib: the storage directory of mycat's own jar package or dependent jar package;
- Logs: the directory where mycat logs are stored. Logs are stored in logs/log, one file per day;
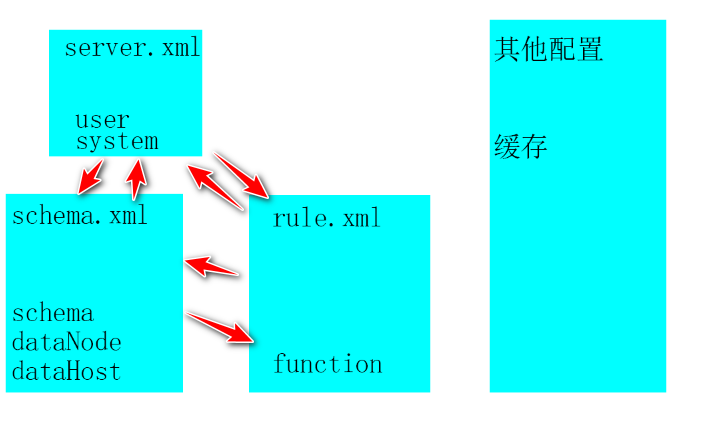
- conf: configuration directory, used to store configuration files
- --server.xml: it is the configuration file for Mycat server parameter adjustment and user authorization.
- --schema.xml: it is the configuration file of logical library definition, table and fragment definition.
- --rule.xml: it is the configuration file of fragmentation rules. Some specific parameter information of fragmentation rules is stored as a file separately. In this directory, MyCAT needs to be restarted to modify the configuration file.
- --Log4j.xml: logs are stored in logs/log, one file per day. The configuration of logs is in conf/log4j.xml. According to your own needs, you can adjust the output level to debug level, which will output more information and facilitate troubleshooting.
- --Auto partition-long.txt, partition hash int.txt, sequence conf.properties, sequence DB conf.properties partition related id partition rule configuration file
The following picture describes the three most important configuration files of mycat:
4. Modify mycat configuration file to realize read-write separation for back-end database
1) Modify the server.xml file
#Specify the user name and password of the client's connection to mycat. The account password here is independent of the MySQL database
[root@mycat mycat]# vim conf/server.xml    #Navigate to about line 80, and modify it as follows
        <user name="mycat" defaultAccount="true">  #mycat is the user name
                <property name="password">pwd@123</property>   #Password here
                <property name="schemas">teset_mycat</property>    #Logical library name here

                <!-- Table level DML Permission settings -->
                <!--
                <privileges check="false">
                        <schema name="TESTDB" dml="0110" >
                                <table name="tb01" dml="0000"></table>
                                <table name="tb02" dml="1111"></table>
                        </schema>
                </privileges>
                 -->
        </user>
2) Modify schema.xml file
<?xml version="1.0"?>
<!DOCTYPE mycat:schema SYSTEM "schema.dtd">
<mycat:schema xmlns:mycat="http://io.mycat/">
<!--Underneath schema Must match the schema name(Logical library name).-->
        <schema name="teset_mycat" checkSQLschema="false" sqlMaxLimit="100" dataNode="dn1">
        </schema>
        <dataNode name="dn1" dataHost="host1" database="test" />    <!--There database It specifies which database to connect to the backend. Here, it connects to the test library-->
                <!--The following is the specified backend real MySQL Host, about balance Value, with three optional values, to be written down below-->
        <dataHost name="host1" maxCon="1000" minCon="10" balance="3"
                          writeType="0" dbType="mysql" dbDriver="native" switchType="1"  slaveThreshold="100">
                <heartbeat>select user()</heartbeat>
                <!-- can have multi write hosts -->
                                <!--Specify which host on the back end is used to write data-->
                <writeHost host="hostM1" url="192.168.20.2:3306" user="root"
                                   password="123.com">
                        <!-- can have multi read hosts -->
                                                <!--Specify which host on the back end is used to read data-->
                        <readHost host="hostS2" url="192.168.20.3:3306" user="root" password="123.com" />
                </writeHost>
        </dataHost>
</mycat:schema>
Note: the data host field balance load balancing type mentioned above has the following four values at present:
- balance="0", do not turn on the read-write separation mechanism. All read operations are sent to the currently available writeHost (default).
- balance="1", all readhosts and stand by writehosts participate in the load balancing of select statements. In short, when the dual master and dual slave modes (M1 - > S1, M2 - > S2, and M1 and M2 are primary and standby for each other), M2, S1 and S2 normally participate in the load balancing of select statements.
- balance="2", all read operations are randomly distributed on writeHost and readhost.
- balance="3", all read requests are randomly distributed to the corresponding readhost of wiriterHost for execution. writerHost does not bear the reading pressure. Note that balance=3 only exists in 1.4 and later versions, but not in 1.3.
The writeTyep field has three values:
1. writeType="0", all write operations are sent to the first configured writeHost, and the first one is hung to the second surviving writeHost. After restart, the one that has been switched will prevail. The switch is recorded in the configuration file: dnindex.properties.
2. writeType="1", all write operations are randomly sent to the configured writeHost. It is not recommended to discard after 1.5. switchType property
- -1 means no automatic switching.
- 1 default, auto switch.
- 2. Decide whether to switch based on the status of MySQL master-slave synchronization.
3) Test whether the mycat host can log in to the back-end two databases
#Copy a mysql command
[root@mycat mycat]# scp root@192.168.20.2:/usr/local/mysql/bin/mysql /usr/local/bin/
#Log in test for two back-end databases
[root@mycat mycat]# mysql -uroot -p123.com -h 192.168.20.2
[root@mycat mycat]# mysql -uroot -p123.com -h 192.168.20.3
#Make sure that when you execute the above instructions to log in to the database, you can log in successfully.
#If the login is not successful, it is necessary to consider whether the root user of the database has the right of remote login, or whether the firewall has the problem.
4) In the above configuration files, some configurations need to be deleted. If they are not deleted, the startup will fail. Therefore, the modified complete configuration file is attached here
The contents of the server.xml file are as follows:
<?xml version="1.0" encoding="UTF-8"?>
<!DOCTYPE mycat:server SYSTEM "server.dtd">
<mycat:server xmlns:mycat="http://io.mycat/">
        <system>
        <property name="useSqlStat">0</property>  <!-- 1 To turn on real-time statistics, 0 to turn off -->
        <property name="useGlobleTableCheck">0</property>  <!-- 1 To enable full overtime consistency detection, 0 to close -->

                <property name="sequnceHandlerType">2</property>
                <property name="processorBufferPoolType">0</property>
                <property name="handleDistributedTransactions">0</property>

                <property name="useOffHeapForMerge">1</property>
                <property name="memoryPageSize">1m</property>
                <property name="spillsFileBufferSize">1k</property>

                <property name="useStreamOutput">0</property>
                <property name="systemReserveMemorySize">384m</property>

                <property name="useZKSwitch">true</property>

<!--In the above content, only some comment lines are deleted, mainly the following-->
        </system>
        <user name="mycat" >
                <property name="password">pwd@123</property>
                <property name="schemas">teset_mycat</property>
        </user>
</mycat:server>
The contents of the conf/schema.xml file are as follows:
<?xml version="1.0"?>
<!DOCTYPE mycat:schema SYSTEM "schema.dtd">
<mycat:schema xmlns:mycat="http://io.mycat/">

        <schema name="teset_mycat" checkSQLschema="false" sqlMaxLimit="100" dataNode="dn1">
        </schema>
        <dataNode name="dn1" dataHost="host1" database="test" />
        <dataHost name="host1" maxCon="1000" minCon="10" balance="3"
                          writeType="0" dbType="mysql" dbDriver="native" switchType="1"  slaveThreshold="100">
                <heartbeat>select user()</heartbeat>
                <!-- can have multi write hosts -->
                <writeHost host="hostM1" url="192.168.20.2:3306" user="root"
                                   password="123.com">
                        <!-- can have multi read hosts -->
                        <readHost host="hostS2" url="192.168.20.3:3306" user="root" password="123.com" />
                </writeHost>
        </dataHost>
</mycat:schema>
5. Start mycat
- . / mycat start
- . / mycat stop
- . / mycat console foreground run
- . / mycat install added to system auto start (not implemented yet)
- . / mycat remove cancel auto start with the system (not implemented yet)
- . / mycat restart restart service
- . / mycat pause
- . / mycat status view startup status
#Create command soft connection
[root@mycat mycat]# ln -sf /usr/local/mycat/bin/mycat /usr/local/bin/
#Start mycat
[root@mycat mycat]# mycat start   #It is more recommended to use the mycat console foreground to start. If there is an error, it will be directly output to the screen for troubleshooting
#After debugging, use mycat start to start in the background.
Starting Mycat-server...
[root@mycat conf]# ss -lnp | grep 8066   #If the port is not listening, the startup fails. Check the log for troubleshooting.
tcp    LISTEN     0      100      :::8066                 :::*                   users:(("java",pid=62070,fd=78))
#Use the user name and password defined in the server.xml file to log in and view
[root@mycat conf]# mysql -umycat -ppwd@123 -h 192.168.20.4 -P 8066
mysql> show databases;   #The following test [MYCAT] library corresponds to the back-end test library
+-------------+
| DATABASE    |
+-------------+
| teset_mycat |
+-------------+
1 row in set (0.00 sec)
mysql> use teset_mycat
#All the table data in the database corresponds to the backend database
mysql> show tables;
+----------------+
| Tables_in_test |
+----------------+
| t1             |
+----------------+
1 row in set (0.00 sec)

mysql> select * from t1;
+------+------+
| id   | name |
+------+------+
|    1 | a    |
|    2 | b    |
|    3 | c    |
|    4 | d    |
+------+------+
At this point, we have successfully accessed mycat to connect to the back-end database, but the main functions of mycat have not been shown, and I will continue to update the later content. In fact, it is more recommended to read Official documents of Mycat . Official documents are also relatively easy to understand.