catalogue
1, Web APIs
1. Basic relevance between web APIs and JS
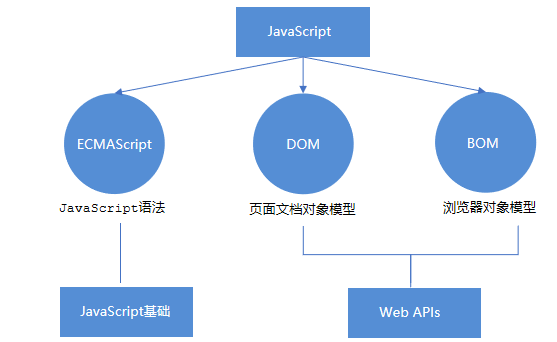
2.API and Web API
①API
API (Application Programming Interface) is some pre-defined functions, which aims to provide the ability for application programs and developers to access a set of routines based on some software or hardware without accessing the source code or understanding the details of the internal working mechanism.
API is a tool for programmers to realize the functions they want to accomplish more easily.
②Web API
Web API is a set of APIs (BOM and DOM) provided by the browser to operate browser functions and page elements.
At this stage, we mainly explain the commonly used API s for browsers, and mainly do interactive effects for browsers.
For example, we want to pop up a warning box in the browser and directly use alert('pop up ')
MDN detailed API: https://developer.mozilla.org/zh-CN/docs/Web/API
③ API and Web API summary
1. API is an interface provided for our programmers to help us realize certain functions. We can use it without worrying about how to implement it internally
2. For the browser, the API mainly provides interaction effects for the browser.
3. Web API s generally have inputs and outputs (parameters and return values of functions). Many web APIs are methods (functions)
4. Learning Web API can be combined with the previous idea of learning built-in object methods
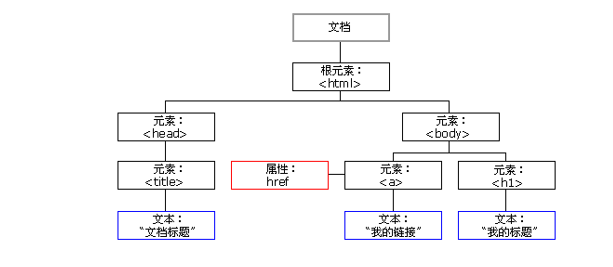
2, DOM
1.DOM introduction
① DOM Document Object Model (DOM) is a standard programming interface recommended by W3C organization to deal with extensible markup language (HTML or XML).
W3C has defined a series of DOM interfaces, which can change the content, structure and style of web pages.
② DOM tree
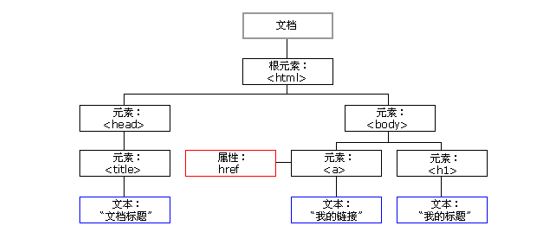
Document: a page is a document, which is represented by document in DOM
Element: all tags in the page are elements, which are represented by element in DOM
Node: all contents in a web page are nodes (labels, attributes, text, comments, etc.), which are represented by node in DOM
DOM regards all the above as objects
2. Get element
① Get by ID
Use the getElementById() method to get the element object with ID.
document.getElementById('id');
    <div id="time">2019-9-9</div>
    <script>
        // 1. Because our document page is loaded from top to bottom, there must be a label first, so we write the script below the label
        // 2. get the element by through the hump naming method
        // 3. The parameter id is a case sensitive string
        // 4. An element object is returned
        var timer = document.getElementById('time');
        console.log(timer);
        console.log(typeof timer);
        // 5. console.dir prints the element object we returned to better view the properties and methods inside
        console.dir(timer);

    </script>
② Get by tag name
Use the getElementsByTagName() method to return a collection of objects with the specified tag name.
document.getElementsByTagName('tag name ');
be careful:
Because the result is a collection of objects, we need to traverse if we want to operate the elements inside.
The resulting element object is dynamic
If the element cannot be obtained, an empty pseudo array is returned (because the object cannot be obtained)
Gets all the child elements with the specified tag name inside an element (parent element)
element.getElementsByTagName('tag name ');
Note: the parent element must be a single object (which element object must be specified) The parent element itself is not included in the acquisition.
    <ul>
        <li>1111111111</li>
        <li>1111111111</li>
        <li>1111111111</li>
        <li>1111111111</li>

    </ul>
    <ol id="ol">
        <li>22222222</li>
        <li>22222222</li>
        <li>22222222</li>
        <li>22222222</li>
    </ol>

    <script>
        // 1. The returned is the collection of obtained element objects stored in the form of pseudo array
        var lis = document.getElementsByTagName('li');
        console.log(lis);
        console.log(lis[0]);
        // 2. We want to print the element objects in turn. We can take the way of traversal
        for (var i = 0; i < lis.length; i++) {
            console.log(lis[i]);

        }
        // 3. If there is only one li in the page, the return is still in the form of pseudo array
        // 4. If there is no such element in the page, the form of empty pseudo array is returned
        // 5. element.getElementsByTagName('tag name '); The parent element must be a single element specified
        // var ol = document.getElementsByTagName('ol'); // [ol]
        // console.log(ol[0].getElementsByTagName('li'));
        var ol = document.getElementById('ol');
        console.log(ol.getElementsByTagName('li'));
    </script>
③ HTML5 new method acquisition
1. document.getElementsByClassName('class name ')// Returns a collection of element objects based on the class name
2. document.querySelector('selector '); / / returns the first element object according to the specified selector
3. document.querySelectorAll('selector '); / / return according to the specified selector
be careful:
The selectors in queryselector and querySelectorAll need to be signed, such as document querySelector('#nav');
    <div class="box">Box 1</div>
    <div class="box">Box 2</div>
    <div id="nav">
        <ul>
            <li>home page</li>
            <li>product</li>
        </ul>
    </div>
    <script>
        // 1. getElementsByClassName obtains some element collections according to the class name
        var boxs = document.getElementsByClassName('box');
        console.log(boxs);
        // 2. querySelector returns the first element object of the specified selector. Remember that the selector in it needs to be signed box  #nav
        var firstBox = document.querySelector('.box');
        console.log(firstBox);
        var nav = document.querySelector('#nav');
        console.log(nav);
        var li = document.querySelector('li');
        console.log(li);
        // 3. querySelectorAll() returns the collection of all element objects of the specified selector
        var allBox = document.querySelectorAll('.box');
        console.log(allBox);
        var lis = document.querySelectorAll('li');
        console.log(lis);
    </script>
④
Get special elements (body, html)
1. doucumnet.body / / returns the body element object
1. document.documentElement / / returns the html element object
    <script>
        // 1. Get the body element
        var bodyEle = document.body;
        console.log(bodyEle);
        console.dir(bodyEle);
        // 2. Get html elements
        // var htmlEle = document.html;
        var htmlEle = document.documentElement;
        console.log(htmlEle);
    </script>
3. Event basis
① Event overview
JavaScript enables us to create dynamic pages, and events are behaviors that can be detected by JavaScript.
Simple understanding: trigger response mechanism.
Each element in the web page can generate some events that can trigger JavaScript. For example, we can generate an event when the user clicks a button, and then perform some operations.
② Three elements of event
1. Event source (who)
2. Event type (what event)
3. Event handler (what to do)
case
Click the button to pop up the warning box
    <button id="btn">Tang Bohu</button>
    <script>
        // Click a button to pop up a dialog box
        // 1. An event is an event handler that consists of three parts: event source, event type, and we also call it event three elements
        //(1) Event source: the object whose button the event is triggered
        var btn = document.getElementById('btn');
        //(2) How do event types trigger what events, such as onclick, mouse over or keyboard down
        //(3) The event handler is completed by assigning a value to a function
        btn.onclick = function() {
            alert('Some autumn fragrance');
        }
    </script>
③ To execute an event
1. Get event source
Event binding (2)
3. Add event handler (in the form of function assignment)
<div>123</div>
<script>
// Perform event steps
// Click the output of div console, and I am selected
// 1. Get event source
var div = document.querySelector('div');
// 2. Binding event registration event
// div.onclick
// 3. Add event handler
div.onclick = function() {
console.log('I was chosen');
}
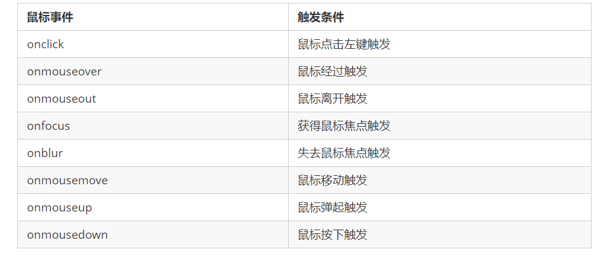
</script>④ Common mouse events
⑤ Three elements of analysis event
4. Operation elements
The DOM operation of JavaScript can change the content, structure and style of web pages. We can use DOM operation elements to change the content, attributes and so on. Note that the following are attributes
① Change element content
element.innerText
Content from start to end, but it removes html tags, as well as spaces and line breaks
   <button>Displays the current system time</button>
    <div>At a certain time</div>
    <p>1123</p>
    <script>
        // When we click the button, the text in div will change
        // 1. Get element
        var btn = document.querySelector('button');
        var div = document.querySelector('div');
        // 2. Registration event / / 3 Execution event
        btn.onclick = function() {
            // div.innerText = '2021-2-14';
            div.innerHTML = getDate();
        }

        function getDate() {
            var date = new Date();
            //  Monday, February 14, 2022
            var year = date.getFullYear();
            var month = date.getMonth() + 1;
            var dates = date.getDate();
            var arr = ['Sunday', 'Monday', 'Tuesday', 'Wednesday', 'Thursday', 'Friday', 'Saturday'];
            var day = date.getDay();
            return 'Today is:' + year + 'year' + month + 'month' + dates + 'day ' + arr[day];
        }
        // Elements can be added without adding events
        //Get element
        var p = document.querySelector('p');
        //Execution event
        p.innerHTML = getDate();
    </script>
element.innerHTML
All contents from the start position to the end position, including html tags, while retaining spaces and line breaks
The difference between innerText and innerHTML
1. innerText does not recognize html tags. Nonstandard} remove spaces and line breaks
2. innerHTML recognizes html tags. W3C standard preserves spaces and line breaks
3. These two attributes are readable and writable, and you can get the contents of the element
② Attribute operation of common elements
1. innerText and innerHTML change element content
2. src,href
3. id,alt,title
    <button id="ldh">Lau Andy</button>
    <button id="zxy">Xue You Zhang</button> <br>
    <img src="images/ldh.jpg" alt="" title="Lau Andy">

    <script>
        // Modify element attribute src
        // 1. Get element
        var ldh = document.getElementById('ldh');
        var zxy = document.getElementById('zxy');
        var img = document.querySelector('img');
        // 2. Register event handlers
        zxy.onclick = function() {
            img.src = 'images/zxy.jpg';
            img.title = 'Xue You Zhang';
        }
        ldh.onclick = function() {
            img.src = 'images/ldh.jpg';
            img.title = 'Lau Andy';
        }
    </script>
case
Time sharing displays different pictures and greetings
    <img src="images/s.gif" alt="">
    <div>Good morning</div>
    <script>
        // It is judged according to different time of the system, so the date built-in object is required
        // Use multi branch statements to set different pictures
        // If you need a picture and modify the picture according to time, you need to use the src attribute of the operation element
        // You need a div element to display different greetings. You can modify the content of the element
        // 1. Get element
        var img = document.querySelector('img');
        var div = document.querySelector('div');
        // 2. Get the current hours
        var date = new Date();
        var h = date.getHours();
        // 3. Judge the number of hours and change the picture and text information
        if (h < 12) {
            img.src = 'images/s.gif';
            div.innerHTML = 'Good morning';
        } else if (h < 18) {
            img.src = 'images/x.gif';
            div.innerHTML = 'Good afternoon';
        } else {
            img.src = 'images/w.gif';
            div.innerHTML = 'Good evening';

        }
    </script>
③ Attribute operation of form element
type,value,checked,selected,disabled
    <button>Button</button>
    <input type="text" value="Input content">
    <script>
        // 1. Get element
        var btn = document.querySelector('button');
        var input = document.querySelector('input');
        // 2. Register event handlers
        btn.onclick = function() {
            // input.innerHTML = 'clicked'; This is an ordinary box, such as the contents in the div tag
            // The value text content in the form is modified through value
            input.value = 'It was clicked';
            // If you want a form to be disabled, you can no longer click disabled. We want this button to be disabled
            // btn.disabled = true;
            this.disabled = true;
            // this refers to the caller btn of the event function
        }
    </script>
Case: imitation Jingdong display password
<!DOCTYPE html>
<html lang="en">

<head>
    <meta charset="UTF-8">
    <meta name="viewport" content="width=device-width, initial-scale=1.0">
    <meta http-equiv="X-UA-Compatible" content="ie=edge">
    <title>Document</title>
    <style>
        .box {
            position: relative;
            width: 400px;
            border-bottom: 1px solid #ccc;
            margin: 100px auto;
        }

        .box input {
            width: 370px;
            height: 30px;
            border: 0;
            outline: none;
        }

        .box img {
            position: absolute;
            top: 2px;
            right: 2px;
            width: 24px;
        }
    </style>
</head>

<body>
    <div class="box">
        <label for="">
            <img src="images/close.png" alt="" id="eye">
        </label>
        <input type="password" name="" id="pwd">
    </div>
    <script>
        // 1. Get element
        var eye = document.getElementById('eye');
        var pwd = document.getElementById('pwd');
        // 2. Register event handlers
        var flag = 0;
        eye.onclick = function() {
            // After one click, the flag must change
            if (flag == 0) {
                pwd.type = 'text';
                eye.src = 'images/open.png';
                flag = 1; // Assignment operation
            } else {
                pwd.type = 'password';
                eye.src = 'images/close.png';
                flag = 0;
            }

        }
    </script>
</body>

</html>
④ Style attribute action
1. element.style: inline style operation
<!DOCTYPE html>
<html lang="en">

<head>
    <meta charset="UTF-8">
    <meta name="viewport" content="width=device-width, initial-scale=1.0">
    <meta http-equiv="X-UA-Compatible" content="ie=edge">
    <title>Document</title>
    <style>
        div {
            width: 200px;
            height: 200px;
            background-color: pink;
        }
    </style>
</head>

<body>
    <div></div>
    <script>
        // 1. Get element
        var div = document.querySelector('div');
        // 2. Register event handlers
        div.onclick = function() {
            // The attributes in div.style adopt hump naming method
            this.style.backgroundColor = 'purple';
            this.style.width = '250px';
        }
    </script>
</body>

</html>
be careful:
1. The style in JS adopts hump naming method, such as fontSize and backgroundColor
2.JS modifies the style operation, which produces in-line styles with high CSS weight
Case: click Taobao to close QR code
<!DOCTYPE html>
<html lang="en">

<head>
    <meta charset="UTF-8">
    <meta name="viewport" content="width=device-width, initial-scale=1.0">
    <meta http-equiv="X-UA-Compatible" content="ie=edge">
    <title>Document</title>
    <style>
        .box {
            position: relative;
            width: 74px;
            height: 88px;
            border: 1px solid #ccc;
            margin: 100px auto;
            font-size: 12px;
            text-align: center;
            color: #f40;
            /* display: block; */
        }

        .box img {
            width: 60px;
            margin-top: 5px;
        }

        .close-btn {
            position: absolute;
            top: -1px;
            left: -16px;
            width: 14px;
            height: 14px;
            border: 1px solid #ccc;
            line-height: 14px;
            font-family: Arial, Helvetica, sans-serif;
            cursor: pointer;
        }
    </style>
</head>

<body>
    <div class="box">
        Taobao QR code
        <img src="images/tao.png" alt="">
        <i class="close-btn">×</i>
    </div>
    <script>
        // 1. Get element
        var btn = document.querySelector('.close-btn');
        var box = document.querySelector('.box');
        // 2. Register event handler
        btn.onclick = function() {
            box.style.display = 'none';
        }
    </script>
</body>

</html>
Case: Circular sprite background
<!DOCTYPE html>
<html lang="en">

<head>
    <meta charset="UTF-8">
    <meta name="viewport" content="width=device-width, initial-scale=1.0">
    <meta http-equiv="X-UA-Compatible" content="ie=edge">
    <title>Document</title>
    <style>
        * {
            margin: 0;
            padding: 0;
        }

        li {
            list-style-type: none;
        }

        .box {
            width: 250px;
            margin: 100px auto;
        }

        .box li {
            float: left;
            width: 24px;
            height: 24px;
            background-color: pink;
            margin: 15px;
            background: url(images/sprite.png) no-repeat;
        }
    </style>
</head>

<body>
    <div class="box">
        <ul>
            <li></li>
            <li></li>
            <li></li>
            <li></li>
            <li></li>
            <li></li>
            <li></li>
            <li></li>
            <li></li>
            <li></li>
            <li></li>
            <li></li>
        </ul>
    </div>
    <script>
        // 1. Get all the small li of the element
        var lis = document.querySelectorAll('li');
        for (var i = 0; i < lis.length; i++) {
            // Multiplying the index number by 44 is the background y coordinate of each li, and index is our y coordinate
            var index = i * 44;
            lis[i].style.backgroundPosition = '0 -' + index + 'px';
        }
    </script>
</body>

</html>
Case: show or hide text box content
<!DOCTYPE html>
<html lang="en">

<head>
    <meta charset="UTF-8">
    <meta name="viewport" content="width=device-width, initial-scale=1.0">
    <meta http-equiv="X-UA-Compatible" content="ie=edge">
    <title>Document</title>
    <style>
        input {
            color: #999;
        }
    </style>
</head>

<body>
    <input type="text" value="mobile phone">
    <script>
        // 1. Get element
        var text = document.querySelector('input');
        // 2. Register the event to get the focus event onfocus
        text.onfocus = function() {
                // console.log('got focus');
                if (this.value === 'mobile phone') {
                    this.value = '';
                }
                // To get focus, you need to turn the text color in the text box black
                this.style.color = '#333';
            }
            // 3. Registration event lost focus event onblur
        text.onblur = function() {
            // console.log('lost focus');
            if (this.value === '') {
                this.value = 'mobile phone';
            }
            // To lose focus, you need to lighten the text color in the text box
            this.style.color = '#999';
        }
    </script>

</body>

</html>
2. element.className class name style operation
<!DOCTYPE html>
<html lang="en">

<head>
    <meta charset="UTF-8">
    <meta name="viewport" content="width=device-width, initial-scale=1.0">
    <meta http-equiv="X-UA-Compatible" content="ie=edge">
    <title>Document</title>
    <style>
        div {
            width: 100px;
            height: 100px;
            background-color: pink;
        }

        .change {
            background-color: purple;
            color: #fff;
            font-size: 25px;
            margin-top: 100px;
        }
    </style>
</head>


<body>
    <div class="first">text</div>
    <script>
        // 1. Use element Style gets and modifies the element style. It is used when there are few styles or simple functions
        var test = document.querySelector('div');
        test.onclick = function() {
            // Let's change the class name of the current element to change

            // 2. We can change the style of the element by modifying the className of the element, which is suitable for situations with many styles or complex functions
            // 3. If we want to keep the original class name, we can do so
            // this.className = 'change';
            this.className = 'first change';
        }
    </script>
</body>

</html>
be careful:
1. If there are many changes to the style, you can change the element style by operating the class name.
2. class is a reserved word, so className is used to operate the element class name attribute
3. className will directly change the class name of the element and overwrite the original class name.
Case: error message in password box format
<!DOCTYPE html>
<html lang="en">

<head>
    <meta charset="UTF-8">
    <meta name="viewport" content="width=device-width, initial-scale=1.0">
    <meta http-equiv="X-UA-Compatible" content="ie=edge">
    <title>Document</title>
    <style>
        div {
            width: 600px;
            margin: 100px auto;
        }

        .message {
            display: inline-block;
            font-size: 12px;
            color: #999;
            background: url(images/mess.png) no-repeat left center;
            padding-left: 20px;
        }

        .wrong {
            color: red;
            background-image: url(images/wrong.png);
        }

        .right {
            color: green;
            background-image: url(images/right.png);
        }
    </style>
</head>

<body>
    <div class="register">
        <input type="password" class="ipt">
        <p class="message">Please enter 6~16 Bit cipher</p>
    </div>
    <script>
        // The first event to judge is that the form loses focus onblur
        // If the input is correct, the correct information will be prompted. The color is green and the small icon changes
        // If the input is not 6 to 16 bits, the error message color will be red and the small icon will change
        // Because there are many styles changing inside, we adopt className to modify the style
        // 1. Get element
        var ipt = document.querySelector('.ipt');
        var message = document.querySelector('.message');
        //2. Registration events lose focus
        ipt.onblur = function() {
            // According to the length of the value in the form, IPT value. length
            if (this.value.length < 6 || this.value.length > 16) {
                // console.log('error ');
                message.className = 'message wrong';
                message.innerHTML = 'The number of digits you entered is not 6~16 position';
            } else {
                message.className = 'message right';
                message.innerHTML = 'Your input is correct';
            }
        }
    </script>
</body>

</html>
⑤ Homework
1. Display hidden content of century Jiayuan user name
<!DOCTYPE html>
<html lang="en">
<head>
    <meta charset="UTF-8">
    <meta http-equiv="X-UA-Compatible" content="IE=edge">
    <meta name="viewport" content="width=device-width, initial-scale=1.0">
    <title>Document</title>
    <style>
        input{
            color: #999;
            border: 1px solid #999;
            outline: none;
        }
    </style>
</head>
<body>
    <input type="text" value="user name">
    <script>
        var input=document.querySelector('input');
        input.onfocus=function(){
            if(this.value=='user name'){
                this.value='';
            }
            this.style.color='#999';
            this.style.border='1px solid pink';
        }
        input.onblur=function(){
            if(this.value==''){
                this.value='user name'
            }
            this.style.border=' 1px solid #999';
        }
    </script>

</body>
</html>
2. Sina drop-down menu
<!DOCTYPE html>
<html lang="en">
<head>
    <meta charset="UTF-8">
    <meta http-equiv="X-UA-Compatible" content="IE=edge">
    <meta name="viewport" content="width=device-width, initial-scale=1.0">
    <title>Document</title>
    <style>
        ul{
            list-style: none;
        }
        li a{
            text-decoration: none;
            color: black;
        }
        .father{
            width: 50px;
            height: 50px;
            /* background-color: pink; */
        }
        .son{
            display: none;
            /* display: ; */
        }

    </style>
</head>
<body>
    <ul id="father" class="father">
        <li >
            <a href="#"> Weibo</a>
            <ul id="son" class="son">
                <li><a href="#">1</a></li>
                <li><a href="#">1</a></li>
                <li><a href="#">1</a></li>
            </ul>
        </li>
    </ul>
    <script>
        //Get element
        var father=document.getElementById('father');
        var son=document.getElementById('son');
        //Registration event
        father.onmousemove=function (){
            son.style.display='block';
        }
        father.onmouseout=function(){
            son.style.display='none';
        }
    </script>

</body>
</html>
3. Switch lamp
<!DOCTYPE html>
<html lang="en">

<head>
    <meta charset="UTF-8">
    <meta name="viewport" content="width=device-width, initial-scale=1.0">
    <meta http-equiv="X-UA-Compatible" content="ie=edge">
    <title>Document</title>
</head>

<body>
    <button id="btn">Switch light</button>
    <script>
        var btn = document.getElementById('btn');
        var flag = 0;
        btn.onclick = function() {
            if (flag == 0) {
                document.body.style.backgroundColor = 'black';
                flag = 1;
            } else {
                document.body.style.backgroundColor = '#fff';
                flag = 0;
            }
        }
    </script>
</body>

</html>
Exclusive thought
If there is the same group of elements, we need to use the exclusive idea algorithm of loop if we want an element to realize a certain style:
1. Clear all elements (kill others)
2. Set the style for the current element (leave me)
3. Be careful not to reverse the order. Kill others first, and then set yourself
    <button>Button 1</button>
    <button>Button 2</button>
    <button>Button 3</button>
    <button>Button 4</button>
    <button>Button 5</button>
    <script>
        // 1. Get all button elements
        var btns = document.getElementsByTagName('button');
        // btns gets every element in the pseudo array btns[i]
        for (var i = 0; i < btns.length; i++) {
            btns[i].onclick = function() {
                // (1) Let's remove all the button background colors and kill everyone first
                for (var i = 0; i < btns.length; i++) {
                    btns[i].style.backgroundColor = '';
                }
                // (2) Then let the current element background color be pink, leaving me
                this.style.backgroundColor = 'pink';

            }
        }
        //2. First exclude others, and then set your own style. This idea of excluding others becomes exclusive
    </script>
Case: Baidu skin change
<!DOCTYPE html>
<html lang="en">

<head>
    <meta charset="UTF-8">
    <meta name="viewport" content="width=device-width, initial-scale=1.0">
    <meta http-equiv="X-UA-Compatible" content="ie=edge">
    <title>Document</title>
    <style>
        * {
            margin: 0;
            padding: 0;
        }

        body {
            background: url(images/1.jpg) no-repeat center top;
        }

        li {
            list-style: none;
        }

        .baidu {
            overflow: hidden;
            margin: 100px auto;
            background-color: #fff;
            width: 410px;
            padding-top: 3px;
        }

        .baidu li {
            float: left;
            margin: 0 1px;
            cursor: pointer;
        }

        .baidu img {
            width: 100px;
        }
    </style>
</head>

<body>
    <ul class="baidu">
        <li><img src="images/1.jpg"></li>
        <li><img src="images/2.jpg"></li>
        <li><img src="images/3.jpg"></li>
        <li><img src="images/4.jpg"></li>
    </ul>
    <script>
        // 1. Get element
        var imgs = document.querySelector('.baidu').querySelectorAll('img');
        // console.log(imgs);
        // 2. Circular registration event
        for (var i = 0; i < imgs.length; i++) {
            imgs[i].onclick = function() {
                // this.src is the path where we click images / 2 jpg
                // console.log(this.src);
                // Put this path this Just give SRC to the body
                document.body.style.backgroundImage = 'url(' + this.src + ')';
            }
        }
    </script>
</body>

</html>
Case: table interlaced color change
<!DOCTYPE html>
<html lang="en">

<head>
    <meta charset="UTF-8">
    <meta name="viewport" content="width=device-width, initial-scale=1.0">
    <meta http-equiv="X-UA-Compatible" content="ie=edge">
    <title>Document</title>
    <style>
        table {
            width: 800px;
            margin: 100px auto;
            text-align: center;
            border-collapse: collapse;
            font-size: 14px;
        }

        thead tr {
            height: 30px;
            background-color: skyblue;
        }

        tbody tr {
            height: 30px;
        }

        tbody td {
            border-bottom: 1px solid #d7d7d7;
            font-size: 12px;
            color: blue;
        }

        .bg {
            background-color: pink;
        }
    </style>
</head>

<body>
    <table>
        <thead>
            <tr>
                <th>code</th>
                <th>name</th>
                <th>Latest published net worth</th>
                <th>Accumulated Net </th>
                <th>Net value of previous unit</th>
                <th>Net worth growth rate</th>
            </tr>
        </thead>
        <tbody>
            <tr>
                <td>003526</td>
                <td>Agricultural Bank of China Jinsui 3-month regular bond opening</td>
                <td>1.075</td>
                <td>1.079</td>
                <td>1.074</td>
                <td>+0.047%</td>
            </tr>
            <tr>
                <td>003526</td>
                <td>Agricultural Bank of China Jinsui 3-month regular bond opening</td>
                <td>1.075</td>
                <td>1.079</td>
                <td>1.074</td>
                <td>+0.047%</td>
            </tr>
            <tr>
                <td>003526</td>
                <td>Agricultural Bank of China Jinsui 3-month regular bond opening</td>
                <td>1.075</td>
                <td>1.079</td>
                <td>1.074</td>
                <td>+0.047%</td>
            </tr>
            <tr>
                <td>003526</td>
                <td>Agricultural Bank of China Jinsui 3-month regular bond opening</td>
                <td>1.075</td>
                <td>1.079</td>
                <td>1.074</td>
                <td>+0.047%</td>
            </tr>
            <tr>
                <td>003526</td>
                <td>Agricultural Bank of China Jinsui 3-month regular bond opening</td>
                <td>1.075</td>
                <td>1.079</td>
                <td>1.074</td>
                <td>+0.047%</td>
            </tr>
            <tr>
                <td>003526</td>
                <td>Agricultural Bank of China Jinsui 3-month regular bond opening</td>
                <td>1.075</td>
                <td>1.079</td>
                <td>1.074</td>
                <td>+0.047%</td>
            </tr>
        </tbody>
    </table>
    <script>
        // 1. Get elements get all the lines in tbody
        var trs = document.querySelector('tbody').querySelectorAll('tr');
        // 2. Register events with circular binding
        for (var i = 0; i < trs.length; i++) {
            // 3. Mouse over event onmouseover
            trs[i].onmouseover = function() {
                    // console.log(11);
                    this.className = 'bg';
                }
                // 4. Mouse leaving event onmouseout
            trs[i].onmouseout = function() {
                this.className = '';
            }
        }
    </script>
</body>

</html>
Case: deselect all cases in the form
<!DOCTYPE html>
<html>

<head lang="en">
    <meta charset="UTF-8">
    <title></title>
    <style>
        * {
            padding: 0;
            margin: 0;
        }

        .wrap {
            width: 300px;
            margin: 100px auto 0;
        }

        table {
            border-collapse: collapse;
            border-spacing: 0;
            border: 1px solid #c0c0c0;
            width: 300px;
        }

        th,
        td {
            border: 1px solid #d0d0d0;
            color: #404060;
            padding: 10px;
        }

        th {
            background-color: #09c;
            font: bold 16px "Microsoft YaHei ";
            color: #fff;
        }

        td {
            font: 14px "Microsoft YaHei ";
        }

        tbody tr {
            background-color: #f0f0f0;
        }

        tbody tr:hover {
            cursor: pointer;
            background-color: #fafafa;
        }
    </style>

</head>

<body>
    <div class="wrap">
        <table>
            <thead>
                <tr>
                    <th>
                        <input type="checkbox" id="j_cbAll" />
                    </th>
                    <th>commodity</th>
                    <th>price</th>
                </tr>
            </thead>
            <tbody id="j_tb">
                <tr>
                    <td>
                        <input type="checkbox" />
                    </td>
                    <td>iPhone8</td>
                    <td>8000</td>
                </tr>
                <tr>
                    <td>
                        <input type="checkbox" />
                    </td>
                    <td>iPad Pro</td>
                    <td>5000</td>
                </tr>
                <tr>
                    <td>
                        <input type="checkbox" />
                    </td>
                    <td>iPad Air</td>
                    <td>2000</td>
                </tr>
                <tr>
                    <td>
                        <input type="checkbox" />
                    </td>
                    <td>Apple Watch</td>
                    <td>2000</td>
                </tr>

            </tbody>
        </table>
    </div>
    <script>
        // 1. Select all and deselect all: let the checked attribute (selected status) of all the check boxes below follow the select all button
        // Get element
        var j_cbAll = document.getElementById('j_cbAll'); // Select all button
        var j_tbs = document.getElementById('j_tb').getElementsByTagName('input'); // All check boxes below
        // Registration event
        j_cbAll.onclick = function() {
                // this.checked it can get the selected status of the current check box. If it is true, it is selected; if it is false, it is not selected
                console.log(this.checked);
                for (var i = 0; i < j_tbs.length; i++) {
                    j_tbs[i].checked = this.checked;
                }
            }
            // 2. All the check boxes below need to be selected, and all the check boxes above can be selected. Practice: bind click events to all the check boxes below. Each time you click, you should cycle to check whether all the check boxes below are selected. If one is not selected, select all the check boxes above will not be selected.
        for (var i = 0; i < j_tbs.length; i++) {
            j_tbs[i].onclick = function() {
                // flag controls whether the select all button is selected
                var flag = true;
                // Each time you click the check box below, you will cycle to check whether all four small buttons are selected
                for (var i = 0; i < j_tbs.length; i++) {
                    if (!j_tbs[i].checked) {
                        flag = false;
                        break; // Exiting the for loop can improve the execution efficiency, because as long as one is not selected, there is no need to judge the rest of the loop
                    }
                }
                j_cbAll.checked = flag;
            }
        }
    </script>
</body>

</html>
⑦ Actions for custom attributes
1. Get attribute value
element. Property} gets the property value.
element.getAttribute('attribute ');
difference:
element. Attribute # get the built-in attribute value (the attribute of the element itself)
element.getAttribute('attribute '); It mainly obtains customized attributes (standard) and programmer customized attributes
2. Set attribute value
element. Attribute = 'value' sets the built-in attribute value.
element.setAttribute('attribute ',' value ');
difference:
element. Property} sets the value of the built-in property
element.setAttribute('attribute '); Mainly set custom attributes (standard)
3. Remove attributes
element.removeAttribute('attribute ');
Case: tab bar switching (key cases)
<!DOCTYPE html>
<html lang="en">

<head>
    <meta charset="UTF-8">
    <meta name="viewport" content="width=device-width, initial-scale=1.0">
    <meta http-equiv="X-UA-Compatible" content="ie=edge">
    <title>Document</title>
    <style>
        * {
            margin: 0;
            padding: 0;
        }

        li {
            list-style-type: none;
        }

        .tab {
            width: 978px;
            margin: 100px auto;
        }

        .tab_list {
            height: 39px;
            border: 1px solid #ccc;
            background-color: #f1f1f1;
        }

        .tab_list li {
            float: left;
            height: 39px;
            line-height: 39px;
            padding: 0 20px;
            text-align: center;
            cursor: pointer;
        }

        .tab_list .current {
            background-color: #c81623;
            color: #fff;
        }

        .item_info {
            padding: 20px 0 0 20px;
        }

        .item {
            display: none;
        }
    </style>
</head>

<body>
    <div class="tab">
        <div class="tab_list">
            <ul>
                <li class="current">Product introduction</li>
                <li>Specification and packaging</li>
                <li>After sales guarantee</li>
                <li>Commodity evaluation (50000)</li>
                <li>Mobile community</li>
            </ul>
        </div>
        <div class="tab_con">
            <div class="item" style="display: block;">
                Content of product introduction module
            </div>
            <div class="item">
                Specification and packaging module content
            </div>
            <div class="item">
                Content of after sales guarantee module
            </div>
            <div class="item">
                Content of commodity evaluation (50000) module
            </div>
            <div class="item">
                Mobile community module content
            </div>

        </div>
    </div>
    <script>
        // Get element
        var tab_list = document.querySelector('.tab_list');
        var lis = tab_list.querySelectorAll('li');
        var items = document.querySelectorAll('.item');
        // for loop binding click event
        for (var i = 0; i < lis.length; i++) {
            // Start setting index numbers for the five small li
            lis[i].setAttribute('index', i);
            lis[i].onclick = function() {
                // 1. Click a module on the module tab, the current background color will be red, and the rest will remain unchanged (exclusive thinking) the way to modify the class name

                // Kill everyone else and clear the class
                for (var i = 0; i < lis.length; i++) {
                    lis[i].className = '';
                }
                // Leave me alone
                this.className = 'current';
                // 2. The following display content module
                var index = this.getAttribute('index');
                console.log(index);
                // Kill everyone and let the rest of the item s hide these div s
                for (var i = 0; i < items.length; i++) {
                    items[i].style.display = 'none';
                }
                // Leave me to display the corresponding item
                items[index].style.display = 'block';
            }
        }
    </script>
</body>

</html>
⑧ H5 custom attributes
Custom attribute purpose: to save and use data. Some data can be saved to the page instead of the database.
The custom attribute is obtained through getAttribute('attribute ').
However, some custom attributes are easy to cause ambiguity, and it is not easy to judge whether they are built-in attributes or custom attributes of elements.
H5 adds custom attributes to us:
1. Set H5 custom attribute
H5 specifies that the beginning of the custom attribute data - is used as the attribute name and assigned value.
For example, < div data index = "1" > < / div >
Or use JS settings
element.setAttribute('data-index', 2)
2. Get H5 custom attribute
Get compatibility element getAttribute(‘data-index’);
H5 new element dataset. Index or element Dataset ['index'] ie 11 started to support
5. Node operation
① All contents in a web page are nodes (labels, attributes, text, comments, etc.), and nodes are represented by nodes in DOM.
All nodes in the HTML DOM tree can be accessed through JavaScript, and all HTML elements (nodes) can be modified, created or deleted.
② Generally, a node has at least three basic attributes: nodeType, nodeName, and nodeValue.
Element node # nodeType # is 1
Attribute node # nodeType # is 2
Text node # nodeType # is 3 (text node includes text, space, line feed, etc.)
In our actual development, node operations mainly operate on element nodes
③ Using DOM tree, nodes can be divided into different hierarchical relationships. The common hierarchical relationship is parent-child brother.
1. Parent node
node.parentNode
The parentNode property returns the parent node of a node. Note that it is the nearest parent node
Returns null if the specified node has no parent node
2. Child nodes
1. parentNode.childNodes (standard)
parentNode.childNodes returns a collection of child nodes containing the specified node, which is a collection of immediate updates.
Note: the return value contains all child nodes, including element nodes, text nodes, etc.
If you only want to get the element nodes inside, you need to deal with them specially. Therefore, we generally do not advocate the use of childNodes
var ul = document. querySelector('ul');
for(var i = 0; i < ul.childNodes.length;i++) {
if (ul.childNodes[i].nodeType == 1) {     // ul.childNodes[i] is an element node
    console.log(ul.childNodes[i]); }
}
2. parentNode.children (non-standard)
parentNode.children is a read-only attribute that returns all child element nodes. It only returns child element nodes, and other nodes do not return (this is what we focus on).
Although children is a non-standard, it is supported by various browsers, so we can use it with confidence
3. parentNode.firstChild
firstChild returns the first child node. If it cannot be found, it returns null. Similarly, it also contains all nodes (whether text nodes or element nodes).
4. parentNode.lastChild
lastChild returns the last child node. If it cannot be found, it returns null. Similarly, it contains all nodes.
5. parentNode.firstElementChild
firstElementChild returns the first child element node. If it cannot be found, it returns null.
6. parentNode.lastElementChild
lastElementChild returns the last child element node. If it cannot be found, it returns null.
In the actual development, firstChild and lastChild contain other nodes, which is inconvenient to operate, and firstElementChild and lastElementChild have compatibility problems, so how can we obtain the first child element node or the last child element node?
Solution:
If you want the first child element node, you can use parentnode chilren[0]
If you want the last child element node, you can use parentnode chilren[parentNode.chilren.length - 1]
    <ol>
        <li>I am li1</li>
        <li>I am li2</li>
        <li>I am li3</li>
        <li>I am li4</li>
        <li>I am li5</li>
    </ol>
    <script>
        var ol = document.querySelector('ol');
        // 1. The first child node of firstchild is either a text node or an element node
        console.log(ol.firstChild);
        console.log(ol.lastChild);
        // 2. firstElementChild is supported only when it returns the first child element node ie9
        console.log(ol.firstElementChild);
        console.log(ol.lastElementChild);
        // 3. The actual development method has no compatibility problem and returns the first child element

        console.log(ol.children[0]);
        console.log(ol.children[ol.children.length - 1]);
    </script>
Case: drop down menu
<!DOCTYPE html>
<html lang="en">

<head>
    <meta charset="UTF-8">
    <meta name="viewport" content="width=device-width, initial-scale=1.0">
    <meta http-equiv="X-UA-Compatible" content="ie=edge">
    <title>Document</title>
    <style>
        * {
            margin: 0;
            padding: 0;
        }

        li {
            list-style-type: none;
        }

        a {
            text-decoration: none;
            font-size: 14px;
        }

        .nav {
            margin: 100px;
        }

        .nav>li {
            position: relative;
            float: left;
            width: 80px;
            height: 41px;
            text-align: center;
        }

        .nav li a {
            display: block;
            width: 100%;
            height: 100%;
            line-height: 41px;
            color: #333;
        }

        .nav>li>a:hover {
            background-color: #eee;
        }

        .nav ul {
            display: none;
            position: absolute;
            top: 41px;
            left: 0;
            width: 100%;
            border-left: 1px solid #FECC5B;
            border-right: 1px solid #FECC5B;
        }

        .nav ul li {
            border-bottom: 1px solid #FECC5B;
        }

        .nav ul li a:hover {
            background-color: #FFF5DA;
        }
    </style>
</head>

<body>
    <ul class="nav">
        <li>
            <a href="#"> Weibo</a>
            <ul>
                <li>
                    <a href="">private letter</a>
                </li>
                <li>
                    <a href="">comment</a>
                </li>
                <li>
                    <a href="">@I</a>
                </li>
            </ul>
        </li>
    </ul>
    <script>
        // 1. Get element
        var nav = document.querySelector('.nav');
        var lis = nav.children; // Get 4 small li
        // 2. Circular registration event
        for (var i = 0; i < lis.length; i++) {
            lis[i].onmouseover = function() {
                this.children[1].style.display = 'block';
            }
            lis[i].onmouseout = function() {
                this.children[1].style.display = 'none';
            }
        }
    </script>
</body>

</html>
3. Brother node
1. node.nextSibling
nextSibling returns the next sibling element node of the current element. If it cannot be found, it returns null. Similarly, it contains all nodes.
2. node.previousSibling
previousSibling returns the previous sibling element node of the current element. If it cannot be found, it returns null. Similarly, it contains all nodes.
3. node.nextElementSibling
Nextlementsibling returns the next sibling element node of the current element. If it cannot be found, it returns null.
4. node.previousElementSibling
previousElementSibling returns the previous sibling node of the current element. If it cannot be found, it returns null.
Solve the compatibility problem: encapsulate a compatibility function
   function getNextElementSibling(element) {
      var el = element;
      while (el = el.nextSibling) {
        if (el.nodeType === 1) {
            return el;
        }
      }
      return null;
    }
④ Create node
document.createElement('tagName')
document. The createElement () method creates the HTML element specified by tagName. Because these elements did not exist before and were generated dynamically according to our requirements, we also call them dynamic element nodes.
1. node.appendChild(child)
node. The appendChild () method adds a node to the end of the child node list of the specified parent node. Similar to the after pseudo element in CSS.
2. node.insertBefore(child, specify element)
node. The insertBefore () method adds a node in front of the specified child node of the parent node. Similar to the before pseudo element in CSS.
    <ul>
        <li>123</li>
    </ul>
    <script>
        // 1. Create node element node
        var li = document.createElement('li');
        // 2. Add node AppendChild (child) node the parent child is the child, followed by additional elements, similar to the push in the array
        var ul = document.querySelector('ul');
        ul.appendChild(li);
        // 3. Add node InsertBefore (child, specifies the element);
        var lili = document.createElement('li');
        ul.insertBefore(lili, ul.children[0]);
        // 4. We want to add a new element to the page: 1 Create element 2 Add element
    </script>
Case: simple version release message case
<!DOCTYPE html>
<html lang="en">

<head>
    <meta charset="UTF-8">
    <meta name="viewport" content="width=device-width, initial-scale=1.0">
    <meta http-equiv="X-UA-Compatible" content="ie=edge">
    <title>Document</title>
    <style>
        * {
            margin: 0;
            padding: 0;
        }

        body {
            padding: 100px;
        }

        textarea {
            width: 200px;
            height: 100px;
            border: 1px solid pink;
            outline: none;
            resize: none;
        }

        ul {
            margin-top: 50px;
        }

        li {
            width: 300px;
            padding: 5px;
            background-color: rgb(245, 209, 243);
            color: red;
            font-size: 14px;
            margin: 15px 0;
        }
    </style>
</head>

<body>
    <textarea name="" id=""></textarea>
    <button>release</button>
    <ul>

    </ul>
    <script>
        // 1. Get element
        var btn = document.querySelector('button');
        var text = document.querySelector('textarea');
        var ul = document.querySelector('ul');
        // 2. Registration event
        btn.onclick = function() {
            if (text.value == '') {
                alert('You have not entered anything');
                return false;
            } else {
                // console.log(text.value);
                // (1) Create element
                var li = document.createElement('li');
                // There must be li before assignment
                li.innerHTML = text.value;
                // (2) Add element
                // ul.appendChild(li);
                ul.insertBefore(li, ul.children[0]);
            }
        }
    </script>
</body>

</html>
⑤ Delete node
node.removeChild(child)
node. The removechild () method deletes a child node from the DOM and returns the deleted node.
Case: delete message case
Prevent link jump: href='javascript:;javascript:void(0);
<!DOCTYPE html>
<html lang="en">

<head>
    <meta charset="UTF-8">
    <meta name="viewport" content="width=device-width, initial-scale=1.0">
    <meta http-equiv="X-UA-Compatible" content="ie=edge">
    <title>Document</title>
    <style>
        * {
            margin: 0;
            padding: 0;
        }

        body {
            padding: 100px;
        }

        textarea {
            width: 200px;
            height: 100px;
            border: 1px solid pink;
            outline: none;
            resize: none;
        }

        ul {
            margin-top: 50px;
        }

        li {
            width: 300px;
            padding: 5px;
            background-color: rgb(245, 209, 243);
            color: red;
            font-size: 14px;
            margin: 15px 0;
        }

        li a {
            float: right;
        }
    </style>
</head>

<body>
    <textarea name="" id=""></textarea>
    <button>release</button>
    <ul>

    </ul>
    <script>
        // 1. Get element
        var btn = document.querySelector('button');
        var text = document.querySelector('textarea');
        var ul = document.querySelector('ul');
        // 2. Registration event
        btn.onclick = function() {
            if (text.value == '') {
                alert('You have not entered anything');
                return false;
            } else {
                // console.log(text.value);
                // (1) Create element
                var li = document.createElement('li');
                // There must be li before assignment
                li.innerHTML = text.value + "<a href='javascript:;'>delete</a>";
                // (2) Add element
                // ul.appendChild(li);
                ul.insertBefore(li, ul.children[0]);
                // (3) Delete element deletes the currently linked li and its father
                var as = document.querySelectorAll('a');
                for (var i = 0; i < as.length; i++) {
                    as[i].onclick = function() {
                        // node.removeChild(child);  What is deleted is li this, where li is currently a parentNode;
                        ul.removeChild(this.parentNode);
                    }
                }
            }
        }
    </script>
</body>

</html>
⑥ Replication node (clone node)
node.cloneNode()
node. The cloneNode () method returns a copy of the node that called the method. Also known as clone node / copy node
be careful:
1. If the bracket parameter is empty or false, it is a shallow copy, that is, only clone the replication node itself, not the child nodes inside.
2. If the parenthesis parameter is true, it is a deep copy, and the node itself and all its child nodes will be copied.
Case: dynamically generating tables
<!DOCTYPE html>
<html lang="en">

<head>
    <meta charset="UTF-8">
    <meta name="viewport" content="width=device-width, initial-scale=1.0">
    <meta http-equiv="X-UA-Compatible" content="ie=edge">
    <title>Document</title>
    <style>
        table {
            width: 500px;
            margin: 100px auto;
            border-collapse: collapse;
            text-align: center;
        }

        td,
        th {
            border: 1px solid #333;
        }

        thead tr {
            height: 40px;
            background-color: #ccc;
        }
    </style>
</head>

<body>
    <table cellspacing="0">
        <thead>
            <tr>
                <th>full name</th>
                <th>subject</th>
                <th>achievement</th>
                <th>operation</th>
            </tr>
        </thead>
        <tbody>

        </tbody>
    </table>
    <script>
        // 1. Prepare the students' data first
        var datas = [{
            name: 'Wei Yingluo',
            subject: 'JavaScript',
            score: 100
        }, {
            name: 'Hongli',
            subject: 'JavaScript',
            score: 98
        }, {
            name: 'Fu Heng',
            subject: 'JavaScript',
            score: 99
        }, {
            name: 'Mingyu',
            subject: 'JavaScript',
            score: 88
        }, {
            name: 'unfaithful man',
            subject: 'JavaScript',
            score: 0
        }];
        // 2. Create rows into tbody: we create rows for several people (through the length of the array)
        var tbody = document.querySelector('tbody');
        for (var i = 0; i < datas.length; i++) { // Outer for loop tube line tr
            // 1. Create tr line
            var tr = document.createElement('tr');
            tbody.appendChild(tr);
            // 2. Create cells in the row (three cells related to data). The number of td cells depends on the number of attributes in each object. for loop through object data [i]
            for (var k in datas[i]) { // Inside the for loop tube row td
                // Creating Cells
                var td = document.createElement('td');
                // Give the attribute value data [i] [k] in the object to td
                // console.log(datas[i][k]);
                td.innerHTML = datas[i][k];
                tr.appendChild(td);
            }
            // 3. Create a cell with 2 words deleted
            var td = document.createElement('td');
            td.innerHTML = '<a href="javascript:;">delete </a>';
            tr.appendChild(td);

        }
        // 4. Delete operation starts
        var as = document.querySelectorAll('a');
        for (var i = 0; i < as.length; i++) {
            as[i].onclick = function() {
                // Click a to delete the current a line (linked dad's dad) node removeChild(child)
                tbody.removeChild(this.parentNode.parentNode)
            }
        }
        // for(var k in obj) {
        //     k gets the attribute name
        //     obj[k] gets the attribute value
        // }
    </script>
</body>

</html>
⑦ Differences between three dynamic creation elements
document.write()
element.innerHTML
document.createElement()
1. document.write is the content stream that directly writes the content to the page, but when the document stream is completed, it will cause all pages to be redrawn
2. innerHTML is to write the content to a DOM node, which will not cause all pages to be redrawn
3. innerHTML is more efficient to create multiple elements (do not splice strings, but splice in the form of arrays), and the structure is slightly complex
4. createElement() is a little less efficient in creating multiple elements, but its structure is clearer
Summary: innerHTML is more efficient than createElement in different browsers
6. DOM key core
As for dom operations, we mainly focus on element operations. It mainly includes creation, addition, deletion, modification, query, attribute operation and event operation.
① Create
1.document.write
2.innerHTML
3.createElement
② Increase
1. appendChild
2. insertBefore
③ Delete
1. removeChild
④ Change
It mainly modifies the element attributes of dom, the contents and attributes of dom elements, and the values of forms
1. Modify element attributes: src, href, title, etc
2. Modify the content of common elements: innerHTML, innerText
3. Modify form elements: value, type, disabled, etc
4. Modify element style: style, className
⑤ Check
It mainly gets the elements of the query dom
1. The API methods provided by Dom: getElementById, getElementsByTagName, old usage is not recommended
2. New methods provided by H5: querySelector, querySelectorAll
3. Use node operations to obtain elements: parent node, children, and brother (previousElementSibling, nexterelementsibling)
⑥ Attribute operation
It is mainly aimed at custom attributes.
1. setAttribute: sets the attribute value of dom
2. getAttribute: get the attribute value of dom
3. removeAttribute remove attribute
⑦ Event operation
Register the event for the element and take the {event source Event type = event handler