1. Introduction to Shiro
Apache Shiro is an open source security framework that provides authentication, authorization, cryptography, and session management. Shiro framework is intuitive and easy to use. At the same time, it can also provide robust security. Although its function is not as powerful as spring security, it is still enough in ordinary projects.
1.1 origin
Shiro's predecessor is Jsecurity. In 2004, Les Hazlewood and Jeremy Hailec founded Jsecurity. At that time, they couldn't find a suitable Java security framework for the application level, and were very disappointed with JAAS. From 2004 to 2008, Jsecurity was hosted on SourceForge, with contributors including Peter Ledbrook, Alan Ditzel and Tim Veil. In 2008, the Jsecurity project contributed to the Apache Software Foundation (ASF) and was accepted as the Apache Incubator project, which is managed by tutors and aims to become a top-level Apache project. During this period, Jsecurity was briefly renamed Ki, and then the North Community was renamed "Shiro" due to trademark issues. Subsequently, the project continued to incubate in Apache Incubator, and the contributor Kalle Korhonen was added. In July 2010, Shiro community released version 1.0. Then the community established its project management committee and elected Les Hazlewood as chairman. On September 22, 2010, Shiro became the top project (TLP) of Apache Software Foundation.
1.2 what are the functions
Apache Shiro is a powerful and flexible open source security framework that cleanly handles authentication, authorization, enterprise session management, and encryption. Apache Shiro's primary goal is ease of use and understanding. Security is sometimes complex and even painful, but it is not necessary. The framework should cover up the complexity as much as possible and expose a clean and intuitive API to simplify the time spent by developers on application security.
Here are some things you can do with Apache Shiro:
-
Authenticate users to verify their identity
-
Perform access control on users, such as judging whether users are assigned a certain security role; Determine whether the user is allowed to do something
-
Use the Session API in any environment, even if there is no Web container
-
Respond to time during authentication, access control, or during the lifetime of a session
-
Aggregate the data source of one or more user security data and act as a single composite user "view"
-
Single sign on (SSO) function
-
Enable the "member me" service for users who are not associated with the login
wait
Apache Shiro is a comprehensive program security framework with many functions. The following chart shows Shiro's focus:
[external link image transfer fails, and the source station may have anti-theft chain mechanism. It is recommended to save the image and upload it directly (img-q1WsJYkw-1646457308268)(G: \ wechat image \ wechat image _20220302205315.jpg)]
Shiro has four cornerstones - authentication, authorization, session management and encryption.
-
Authentication: sometimes referred to as "login", this is the act of proving who the user is.
-
Authorization: the process of access control, that is, deciding who will access what.
-
Session Management: manage user specific sessions in non Web or EJB applications
-
Cryptography: keep data secure and easy to use by using encryption algorithms.
In addition to these additional security features, Shiro also provides:
- Web Support: Shiro's web supported API can easily help protect web applications.
- Caching: caching is the first tier citizen in Apache Shiro to ensure that safe operations are fast and efficient.
- Concurrency: Apache Shiro uses its concurrency feature to support multithreaded applications.
- Testing: test support exists to help you write unit tests and integration tests.
- "Run As": a function that allows users to assume the identity of another user (if allowed), which is sometimes useful in managing scripts.
- "Member me": remember the user's identity in the session, so that the user only needs to log in when forced login.
2. Start identity authentication with a simple case
2.1 shiro Download
To learn Shiro, we first need to go to Shiro's official website to download Shiro, the official website address https://shiro.apache.org/
1.apache shiro2.github-shiro
2.2 create demonstration project
Here, we don't rush to write the code. First, we open the source code we just downloaded. There is a samples directory in the source code, as follows:
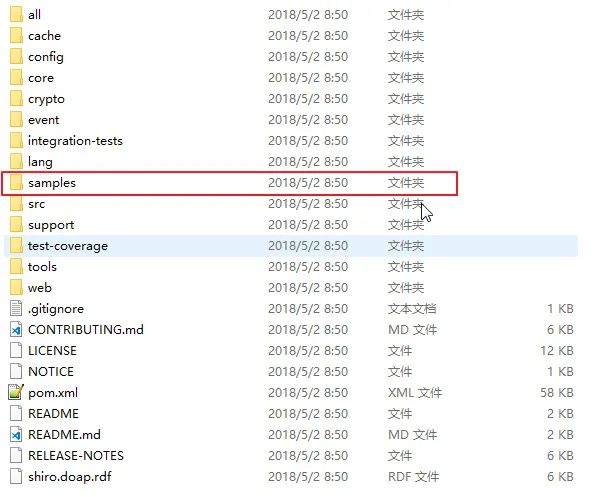
The samples directory is some demonstration cases officially given to us. Among them, there is a quickstart project, which is a maven project. Refer to this quickstart, let's create our own demonstration project.
1. First create a JavaSE project using maven. After the project is created successfully, add the following dependencies to the pom file:
<dependency>
 <groupId>org.apache.shiro</groupId>
 <artifactId>shiro-all</artifactId>
 <version>RELEASE</version>
</dependency>
2. Configure users
Refer to Shiro in quickstart project INI file, let's configure a user. The configuration method is as follows: first, create a Shiro in the resources directory INI file, the contents of which are as follows:
[users]
sang=123,admin
[roles]
admin=*
The above configuration indicates that we have created a user named sang. The password of the user is 123. The role of the user is admin, and admin has the permission to operate all resources.
3. Execute login
OK, after completing the above steps, we can see how to realize a simple login operation. This login operation is still implemented by referring to the classes in the quickstart project. First, we need to use Shiro Ini creates a SecurityManager, and then sets the SecurityManager to singleton mode, as follows:
Factory<org.apache.shiro.mgt.SecurityManager> factory = new IniSecurityManagerFactory("classpath:shiro.ini");
org.apache.shiro.mgt.SecurityManager securityManager = factory.getInstance();
SecurityUtils.setSecurityManager(securityManager);
After that, we have configured a basic Shiro environment. Pay attention to the user and role information at this time. We configure it in Shiro Ini configuration file, then we can obtain a Subject, which is our current user object. The acquisition method is as follows:
Subject currentUser = SecurityUtils.getSubject();
After obtaining the user object, we can obtain a session. The operation of this session is basically the same as that of HttpSession in our web. The difference is that this session does not depend on any container and can be obtained anytime and anywhere. The methods of obtaining and operating are as follows:
//Get session
Session session = currentUser.getSession();
//Set attribute value for session
session.setAttribute("someKey", "aValue");
//Gets the property value in the session
String value = (String) session.getAttribute("someKey");
After all, our user has not logged in yet. There is an isAuthenticated method in the Subject to determine whether the current user has logged in. If the isAuthenticated method returns false, it means that the current user has not logged in, then we can log in. The login method is as follows:
if (!currentUser.isAuthenticated()) {
    UsernamePasswordToken token = new UsernamePasswordToken("sang", "123");
    try {
        currentUser.login(token);
    } catch (UnknownAccountException uae) {
        log.info("There is no user with username of " + token.getPrincipal());
    } catch (IncorrectCredentialsException ice) {
        log.info("Password for account " + token.getPrincipal() + " was incorrect!");
    } catch (LockedAccountException lae) {
        log.info("The account for username " + token.getPrincipal() + " is locked.  " +
                "Please contact your administrator to unlock it.");
    }
    catch (AuthenticationException ae) {
    }
}
First, we construct UsernamePasswordToken. The two parameter is our username and password. Then we call the login method in Subject to execute the login. When the user name is wrongly transferred, the password is wrongly transferred or the account lock occurs, the system will inform the caller of these problems by throwing the exception.
After successful login, we can obtain the user name of the current login user in the following ways:
log.info("User [" + currentUser.getPrincipal() + "] logged in successfully.");
We can also call the hasRole and isPermitted methods in the Subject to determine whether the current user has a certain role or permission, as follows:
if (currentUser.hasRole("admin")) {
    log.info("May the Schwartz be with you!");
} else {
    log.info("Hello, mere mortal.");
}
if (currentUser.isPermitted("lightsaber:wield")) {
    log.info("You may use a lightsaber ring.  Use it wisely.");
} else {
    log.info("Sorry, lightsaber rings are for schwartz masters only.");
}
Finally, we can log out of this login through the logout method, as follows:
currentUser.logout();
OK, so far, we have briefly introduced the login operation in Shiro to our partners through the official case. For the complete case, you can refer to the official demo.
3. Talk about real in Shiro
3.1 what is the login process
First, let's take a look at the login flow chart in shiro's official document:
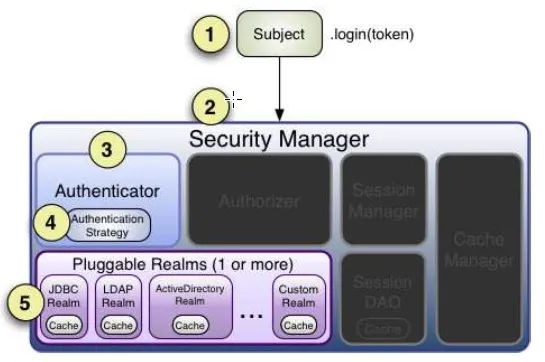
Referring to this figure, our login needs to go through the following steps:
- The application code calls subject The login method passes the created AuthenticationToken instance containing the end user's principals and credentials (that is, the usernamepasswordtoken in the above example).
- The Subject instance, usually DelegatingSubject (or subclass), delegates the SecurityManager of the application by calling SecurityManager Login (token) starts the real verification work (you can see the break point in the login method of DelegatingSubject class).
- As part of a basic "umbrella", the SubjectManager receives tokens and simply delegates them to an internal Authenticator instance by calling Authenticator authenticate(token). This is usually a ModularRealmAuthenticator instance that supports coordinating one or more Realm instances in authentication. ModularRealmAuthenticator essentially provides Apache Shiro with a PAM style paradigm (where each Realm is a 'module' in PAM terminology).
- If more than one Realm is configured in the application, the ModularRealmAuthenticator instance will use the configured AuthenticationStrategy to start the multi Realm authentication attempt. Before, during and after Realms are invoked by authentication, the AuthenticationStrategy is invoked to enable it to respond to the results of each Realm. If only a single Realm is configured, it will be called directly, because there is no need to use authentication strategy for a single Realm application.
- Each configured Realm is used to help see whether it supports the submitted AuthenticationToken. If yes, the getAuthenticationInfo method that supports real will be called along with the submitted token.
OK, through the above introduction, I believe the partners have a certain understanding of the whole login process. The partners can verify the five steps mentioned above through the interruption points. In the above five steps, we see that there is a real undertaking a very important part of the work, so what is this real? Let's take a closer look.
3.2 what is Realm
As explained in the Realms documentation, Realms acts as a "bridge" or "connector" between Shiro and your application's security data. When it actually interacts with security related data, such as user accounts used to perform authentication (login) and authorization (access control), Shiro looks for many of these things from one or more Realms configured for applications. In this sense, Realm is essentially a specific secure DAO: it encapsulates the connection details of the data source and makes the relevant data required by Shiro available. When configuring Shiro, you must specify at least one Realm for authentication and / or authorization. SecurityManager may configure multiple Realms, but at least one is required. Shiro provides immediately available Realms to connect to some secure data sources (i.e. directories), such as LDAP, relational database (JDBC), text configuration sources, such as INI and property files, and more. You can insert your own Realm implementation to represent the customized data source. If Realm does not meet your needs by default.
After reading the above explanation, there may be little partners in the clouds. Next, let's see what role real plays through a simple case. Note that the case of this paper is completed on the basis of the above case. First, customize a MyRealm as follows:
public class MyRealm implements Realm {
    public String getName() {
        return "MyRealm";
    }
    public boolean supports(AuthenticationToken token) {
        return token instanceof UsernamePasswordToken;
    }
    public AuthenticationInfo getAuthenticationInfo(AuthenticationToken token) throws AuthenticationException {
        String password = new String(((char[]) token.getCredentials()));
        String username = token.getPrincipal().toString();
        if (!"sang".equals(username)) {
            throw new UnknownAccountException("user does not exist");
        }
        if (!"123".equals(password)) {
            throw new IncorrectCredentialsException("Incorrect password");
        }
        return new SimpleAuthenticationInfo(username, password, getName());
    }
}
Custom realm implements the realm interface. There are three methods in this interface. The first getName method is used to obtain the name of the current realm, and the second supports method is used to judge the token supported by this realm. Here, I assume that the value only supports tokens of UsernamePasswordToken type, and the third getAuthenticationInfo method makes login logic judgment, Take the user name and password from the token and judge. Of course, I omit the database operation here. When there is a problem in login verification, throw an exception. The exception thrown here, It will be captured at the execution login (note that since MyRealm defined here implements the realm interface, I need to manually judge whether the user name and password here are correct. I will introduce other writing methods in the later article).
OK, after creating MyRealm, it's not enough. We need to make a simple configuration to make MyRealm take effect. Shiro Comment out everything in the INI file and add the following two lines:
MyRealm= org.sang.MyRealm
securityManager.realms=$MyRealm
The first line indicates that a realm is defined. The second line gives the defined realm to securityManger. In fact, setRealms method of RealmSecurityManager class will be called here. OK, after doing this, the partners can set breakpoints on some key nodes in the MyRealm class, execute the main method again, and see the whole login process.
4. Let's talk about real in Shiro
4.1 inheritance of realm
By viewing the inheritance relationship of classes, we find that there are actually many subclasses of Realm. Here we will take a look at some representative ones:
- IniRealm
Maybe we don't know. In fact, this class has been used in our second article. This class has the following two lines of definitions from the beginning:
public static final String USERS_SECTION_NAME = "users";
public static final String ROLES_SECTION_NAME = "roles";
These two lines of configuration represent Shiro In the INI file, the table under [users] indicates the user name, password and role, and the corresponding relationship between role and permission is under [roles].
- PropertiesRealm
PropertiesRealm specifies another user and role definition method, as follows:
user.user1=password,role1 role.role1=permission1
- JdbcRealm
As the name suggests, this is to query the user's role, authority and other information from the database. Open the JdbcRealm class, and we can see the following lines in the source code:
protected static final String DEFAULT_AUTHENTICATION_QUERY = "select password from users where username = ?";
protected static final String DEFAULT_SALTED_AUTHENTICATION_QUERY = "select password, password_salt from users where username = ?";
protected static final String DEFAULT_USER_ROLES_QUERY = "select role_name from user_roles where username = ?";
protected static final String DEFAULT_PERMISSIONS_QUERY = "select permission from roles_permissions where role_name = ?";
According to the preset SQL in these lines, we can roughly infer the names and fields of the tables in the database. Of course, we can also customize the SQL. JdbcRealm is actually a subclass of AuthenticatingRealm. We will talk about AuthenticatingRealm in detail later. We won't expand it here first. Let's talk about this in detail.
4.2 JdbcRealm
- preparation
Using JdbcRealm involves database operations and requires database connection pool. Here I use Druid database connection pool, so first add the following dependencies:
<dependency>
    <groupId>com.alibaba</groupId>
    <artifactId>druid</artifactId>
    <version>RELEASE</version>
</dependency>
<dependency>
    <groupId>mysql</groupId>
    <artifactId>mysql-connector-java</artifactId>
    <version>5.1.27</version>
</dependency>
- Database creation
To use JdbcRealm, I must first create a database. According to the preset SQL in JdbcRealm, the database table structure I define is as follows:
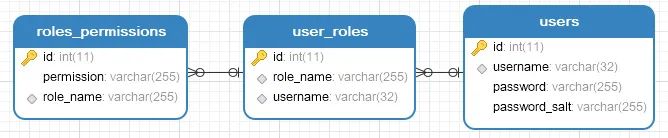
Here, in order for you to intuitively see the relationship between tables, I use foreign keys. In actual work, it depends on the situation. Then add several pieces of test data to the table. Database script partners can be downloaded from GitHub( https://github.com/lenve/shiroSamples/blob/v4/shiroDemo.sql ).
- Profile processing
Then Shiro Note out all configurations in ini and add the following configuration:
jdbcRealm=org.apache.shiro.realm.jdbc.JdbcRealm
dataSource=com.alibaba.druid.pool.DruidDataSource
dataSource.driverClassName=com.mysql.jdbc.Driver
dataSource.url=jdbc:mysql://localhost:3306/shiroDemo
dataSource.username=root
dataSource.password=123
jdbcRealm.dataSource=$dataSource
jdbcRealm.permissionsLookupEnabled=true
securityManager.realms=$jdbcRealm
The configuration files here are very simple. I won't elaborate too much. The only thing you need to pay attention to is that permissionsLookupEnabled needs to be set to true. Otherwise, JdbcRealm won't query user permissions later.
- test
OK, after completing the above steps, we can test. The test method is the same as that in the second article. We can test the user login, user role and user permission.
- Custom query SQL
After you understand the above, you have no problem with custom query SQL. Let me give a simple example here. For example, I want to customize the corresponding SQL of authenticationQuery and check the source code of JdbcRealm. We found that the corresponding SQL of authenticationQuery was originally select password from users where username =?, If it needs to be modified, for example, my table name is not users but employee, then in Shiro Ini can be configured as follows:
jdbcRealm.authenticationQuery=select password from employee where username = ?
OK, this little friend comes down and tries it by himself. I won't demonstrate it here.
5. Authentication strategy of multiple realms in Shiro
5.1 multi Realm authentication strategy
I wonder if the partners still remember this login flow chart:
From this figure, we can clearly see that there can be multiple realms, but so far, all our cases are still single realms. Let's take a simple multi realms case first.
In the previous article, we created a MyRealm ourselves and also used JdbcRealm, but they are used separately. Now I want to use the two together, just modify Shiro Ini configuration is enough, as follows:
MyRealm= org.sang.MyRealm

jdbcRealm=org.apache.shiro.realm.jdbc.JdbcRealm
dataSource=com.alibaba.druid.pool.DruidDataSource
dataSource.driverClassName=com.mysql.jdbc.Driver
dataSource.url=jdbc:mysql://localhost:3306/shiroDemo
dataSource.username=root
dataSource.password=123
jdbcRealm.dataSource=$dataSource
jdbcRealm.permissionsLookupEnabled=true
securityManager.realms=$jdbcRealm,$MyRealm
However, at this time, the user information in my database is sang/123, and the information configured in MyRealm is also sang/123. I modify the user information in MyRealm to a little rain in Jiangnan / 456. At this time, my getAuthenticationInfo method of MyRealm is as follows:
public AuthenticationInfo getAuthenticationInfo(AuthenticationToken token) throws AuthenticationException {
    String password = new String(((char[]) token.getCredentials()));
    String username = token.getPrincipal().toString();
    if (!"A little rain in the south of the Yangtze River".equals(username)) {
        throw new UnknownAccountException("user does not exist");
    }
    if (!"456".equals(password)) {
        throw new IncorrectCredentialsException("Incorrect password");
    }
    return new SimpleAuthenticationInfo(username, password, getName());
}
At this time, we configured two realms and used our initial test code for login test. At this time, we found that I can log in using either Jiangnan yidianyu / 456 or sang/123. After logging in successfully with sang/123, the user's role information is the same as before, It is also easy to understand that the user does not have a role after successfully logging in with Jiangnan yidianyu / 456, because we do not configure any permissions for the user in MyRealm. In a word, after I have two realms, I only need any one of them to be authenticated successfully, even if my current user is authenticated successfully.
5.2 principle tracking
Well, after having the above problem, next we break the point on the login method of Subject and follow the execution steps of the program. We come to the domultirealauthentication method of ModularRealmAuthenticator class, as follows:
protected AuthenticationInfo doAuthenticate(AuthenticationToken authenticationToken) throws AuthenticationException {
    this.assertRealmsConfigured();
    Collection<Realm> realms = this.getRealms();
    return realms.size() == 1?this.doSingleRealmAuthentication((Realm)realms.iterator().next(), authenticationToken):this.doMultiRealmAuthentication(realms, authenticationToken);
}
In this method, we will first obtain the current total number of realms. If there is only one, we will execute dosinglerealauthentication method for processing. If there are multiple realms, we will execute domultirealauthentication method for processing. The source code of dosinglerealauthentication method is as follows:
protected AuthenticationInfo doSingleRealmAuthentication(Realm realm, AuthenticationToken token) {
    ...
    ...
    AuthenticationInfo info = realm.getAuthenticationInfo(token);
    if(info == null) {
        String msg = "Realm [" + realm + "] was unable to find account data for the submitted AuthenticationToken [" + token + "].";
        throw new UnknownAccountException(msg);
    } else {
        return info;
    }
}
After seeing this, we can see that we have called the getAuthenticationInfo method of realm, which is actually the getAuthenticationInfo method in MyRealm implemented by ourselves.
What if there are multiple realms? Let's take a look at the implementation of domultirealauthentication method. Part of the source code is as follows:
protected AuthenticationInfo doMultiRealmAuthentication(Collection<Realm> realms, AuthenticationToken token) {
    AuthenticationStrategy strategy = this.getAuthenticationStrategy();
    AuthenticationInfo aggregate = strategy.beforeAllAttempts(realms, token);
    Iterator var5 = realms.iterator();
    while(var5.hasNext()) {
        Realm realm = (Realm)var5.next();
        aggregate = strategy.beforeAttempt(realm, token, aggregate);
        if(realm.supports(token)) {
            AuthenticationInfo info = null;
            Throwable t = null;
            try {
                info = realm.getAuthenticationInfo(token);
            } catch (Throwable var11) {
            }
            aggregate = strategy.afterAttempt(realm, token, info, aggregate, t);
        } else {
            log.debug("Realm [{}] does not support token {}.  Skipping realm.", realm, token);
        }
    }
    aggregate = strategy.afterAllAttempts(token, aggregate);
    return aggregate;
}
Here I will mainly talk about the implementation idea of this method:
- First, obtain the multi Realm authentication policy
- Build an AuthenticationInfo to store the information returned after successful authentication
- Traverse the Realm and call the getAuthenticationInfo method in each Realm to see if the authentication is successful
- Every time the AuthenticationInfo is obtained, the afterAttempt method is called to merge the results
- After traversing all the Realm, call afterAllAttempts to merge the results. Here is the main point to decide if none of them match.
5.3 free configuration authentication strategy
OK, after the above simple analysis, the partners should have a general understanding of the authentication strategy. In Shiro, three different authentication strategies are supported, as follows:
- All successful strategy, which means that all realms are authenticated successfully
- Atleastonesuccessful strategy, which means that as long as one Realm authentication is successful, the authentication is successful, and this policy is the default
- First successful strategy, which means that as long as the first real authentication is successful, the authentication is successful
The configuration method is also very simple. In Shiro Ini. Based on the above configuration, the following configuration is added:
authenticator=org.apache.shiro.authc.pam.ModularRealmAuthenticator
securityManager.authenticator=$authenticator
allSuccessfulStrategy=org.apache.shiro.authc.pam.AllSuccessfulStrategy
securityManager.authenticator.authenticationStrategy=$allSuccessfulStrategy
At this point, if we conduct the login test again, we will require each Realm to pass the authentication.
6. Password encryption in Shiro
6.1 why should passwords be encrypted
On December 21, 2011, someone disclosed a database containing 6 million CSDN user data on the network. All the data are stored in clear text, including user name, password and registered email. After the incident, CSDN issued a statement on microblog, official website and other channels, explaining that the database was used for backup in 2009. It was leaked for unknown reasons and has been reported to the police. Later, he sent a public apology letter on the official website. In the next ten days, Jinshan, Netease, Jingdong, Dangdang, Sina and other companies were involved in the incident. The most shocking thing in the whole incident is that CSDN stores the user password in clear text. Because many users share a password with multiple websites, the disclosure of a website password will cause great security risks. With so many lessons learned, we now need to encrypt the password when we make the system.
We generally use hash function in password encryption, also known as hash algorithm and hash function. It is a method to create a small digital "fingerprint" from any kind of data. The hash function compresses the message or data into a summary to reduce the amount of data and fix the format of data. This function scrambles and mixes the data and recreates a fingerprint called hash value. Hash values are usually represented by a short string of random letters and numbers. Good hash functions rarely have hash conflicts in the input field. In hash table and data processing, it is difficult to find database records without suppressing conflicts to distinguish data. The hash functions we commonly use are as follows:
- MD5 message digest algorithm
MD5 message digest algorithm is a widely used cryptographic hash function, which can generate a 128 bit (16 byte) hash value to ensure the integrity and consistency of information transmission. MD5 was designed by American Cryptologist Ronald Levitt and published in 1992 to replace MD4 algorithm. The program of this algorithm is standardized in RFC 1321. The basic principle of hash algorithm is to change the operation of data (such as a paragraph of text) into another fixed length value. It has been proved that there are weaknesses after 1996 and can be cracked. For data requiring high security, experts generally recommend to use other algorithms, such as SHA-2. In 2004, it was confirmed that MD5 algorithm can not prevent collision, so it is not suitable for security authentication, such as SSL public key authentication or digital signature.
- Secure hash algorithm
Secure Hash Algorithm is a family of cryptographic hash functions. It is a Secure Hash Algorithm authenticated by FIPS. An algorithm that can calculate a fixed length string (also known as message digest) corresponding to a digital message. And if the input messages are different, they have a high probability of corresponding to different strings. The algorithm of Sha family is designed by the national security agency of the United States and issued by the National Institute of standards and technology of the United States. It is the government standard of the United States. They are: SHA-0: issued in 1993, which is the predecessor of SHA-1; SHA-1: released in 1995, SHA-1 is widely used in many security protocols, including TLS and SSL, PGP, SSH, S/MIME and IPsec. It was once regarded as the successor of MD5. However, the security of SHA-1 has not been accepted by most encryption scenarios since 2000. In 2017, the Dutch cryptography research group CWI and Google officially announced that they had broken SHA-1; SHA-2: released in 2001, including SHA-224, SHA-256, SHA-384, SHA-512, SHA-512/224 and SHA-512/256. Although there is no effective attack on SHA-2, its algorithm is basically similar to SHA-1; Therefore, some people began to develop other alternative hash algorithms; SHA-3: officially released in 2015, SHA-3 is not intended to replace SHA-2, because SHA-2 has no obvious weakness at present. Due to the successful cracking of MD5 and the theoretical cracking of SHA-0 and SHA-1, NIST feels that it needs an alternative encryption hash algorithm different from the previous algorithm, that is, SHA-3.
6.2 how to encrypt in Shiro
Shiro supports the above two hash algorithms. For MD5, the method of generating message summary in Shiro is as follows:
Md5Hash md5Hash = new Md5Hash("123", null, 1024);
The first parameter is the plaintext of the password to be generated, the second parameter is the salt value of the password, and the third parameter is the number of iterations to generate the message summary.
Shiro supports the following secure hash algorithms (multiple algorithms are supported, here I give an example):
Sha512Hash sha512Hash = new Sha512Hash("123", null, 1024);
The meanings of the three parameters here are basically the same as those above and will not be repeated. shiro also provides general algorithms as follows:
SimpleHash md5 = new SimpleHash("md5", "123", null, 1024);
SimpleHash sha512 = new SimpleHash("sha-512", "123", null, 1024);
When the user registers, we can encrypt the password in the above way and store the encrypted string in the database. For simplicity, I will not write the registration function here. I will change the password 123 of the user in yesterday's database to the string corresponding to sha512, as follows:
cb5143cfcf5791478e057be9689d2360005b3aac951f947af1e6e71e3661bf95a7d14183dadfb0967bd6338eb4eb2689e9c227761e1640e6a033b8725fabc783
At the same time, in order to avoid the interference of other realms, I only configure one JdbcRealm in the database.
At this time, if I do not make other modifications, the login will inevitably fail. The reason is very simple: the password I entered when logging in is 123, but the password in the database is a very long string, so the login will not succeed. Through the break point, we find that the final password comparison is carried out in the doCredentialsMatch method in the SimpleCredentialsMatcher class. The comparison method is also very simple. We directly use the password entered by the user and the password in the database to generate a byte array, and then compare it. The final comparison is in the isEqual method of MessageDigest class. Part of the logic is as follows:
protected boolean equals(Object tokenCredentials, Object accountCredentials) {
        ...
        ...
        //Gets the byte array of the password entered by the user
        byte[] tokenBytes = this.toBytes(tokenCredentials);
        //Gets the byte array of passwords in the database
        byte[] accountBytes = this.toBytes(accountCredentials);
        return MessageDigest.isEqual(tokenBytes, accountBytes);
        ...
}
The isEqual method of MessageDigest is as follows:
public static boolean isEqual(byte[] digesta, byte[] digestb) {
    if (digesta == digestb) return true;
    if (digesta == null || digestb == null) {
        return false;
    }
    if (digesta.length != digestb.length) {
        return false;
    }

    int result = 0;
    // time-constant comparison
    for (int i = 0; i < digesta.length; i++) {
        result |= digesta[i] ^ digestb[i];
    }
    return result == 0;
}
Are easy to understand comparison codes, which will not be repeated here. The reason why we failed to log in now is that the password entered by the user is not encrypted. Through the analysis of the source code, we found that it is because we obtained a password matcher named SimpleCredentialsMatcher in the assertCredentialsMatch method of AuthenticatingRealm class. The comparison method in this password matcher is simple comparison, So if only we could replace this password comparator. Let's take a look at the inheritance relationship of CredentialsMatcher:
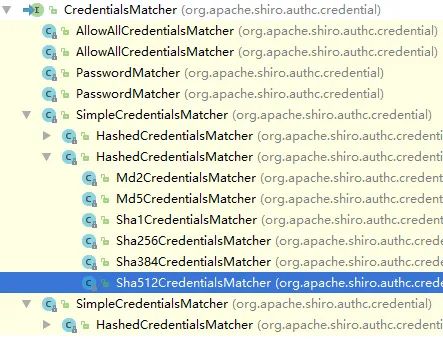
We found that there happens to be a Sha512CredentialsMatcher comparator. The doCredentialsMatch method of this comparator is in its parent class HashedCredentialsMatcher. The content of the method is as follows:
public boolean doCredentialsMatch(AuthenticationToken token, AuthenticationInfo info) {
    Object tokenHashedCredentials = hashProvidedCredentials(token, info);
    Object accountCredentials = getCredentials(info);
    return equals(tokenHashedCredentials, accountCredentials);
}
At this time, we find that the method of obtaining tokenHashedCredentials is not as simple and rough as before, but calls the hashProvidedCredentials method, and the hashProvidedCredentials method will eventually come to the following overloaded method:
protected Hash hashProvidedCredentials(Object credentials, Object salt, int hashIterations) {
    String hashAlgorithmName = assertHashAlgorithmName();
    return new SimpleHash(hashAlgorithmName, credentials, salt, hashIterations);
}
These lines of code are familiar. Obviously, the system helped us convert the password entered by the user. After knowing this, I just need to take Shiro The login can be realized by modifying ini as follows:
sha512=org.apache.shiro.authc.credential.Sha512CredentialsMatcher
# Number of iterations
sha512.hashIterations=1024
jdbcRealm=org.apache.shiro.realm.jdbc.JdbcRealm
dataSource=com.alibaba.druid.pool.DruidDataSource
dataSource.driverClassName=com.mysql.jdbc.Driver
dataSource.url=jdbc:mysql://localhost:3306/shiroDemo
dataSource.username=root
dataSource.password=123
jdbcRealm.dataSource=$dataSource
jdbcRealm.permissionsLookupEnabled=true
# Modify the credentialsMatcher property in the JdbcRealm
jdbcRealm.credentialsMatcher=$sha512
securityManager.realms=$jdbcRealm
After that, we will conduct the login test again and the login will be successful.
Case download in this section: https://github.com/lenve/shiroSamples/archive/refs/tags/v6.zip
7. Password salt in Shiro
7.1 why add salt to the password
Whether it is a message digest algorithm or a secure hash algorithm, if the original text is the same, the generated ciphertext is the same. In this case, if the original password of two users is the same, the ciphertext stored in the database is the same, and it is still unsafe. We need to do further processing. The common solution is to add salt. Where does the salt come from? We can use the user id (because in general, the user id is unique) or a random character. I use the first scheme here.
7.2 how to add salt in Shiro
The method of adding salt in shiro is very simple. When generating password ciphertext during user registration, salt should be added, as follows:
Md5Hash md5Hash = new Md5Hash("123", "sang", 1024);
Sha512Hash sha512Hash = new Sha512Hash("123", "sang", 1024);
SimpleHash md5 = new SimpleHash("md5", "123", "sang", 1024);
SimpleHash sha512 = new SimpleHash("sha-512", "123", "sang", 1024)
Then we first put the string generated by sha512 into the database. Next, I want to configure my JDBC realm because I want to specify what my salt is. Here, my salt is my user name. The user name of each user is different, so it can't be written here. In jdbcrealm, the system provides four different saltstyles, as follows:
| SaltStyle | meaning |
|---|---|
| NO_SALT | By default, the password is not salted |
| CRYPT | Passwords are stored in Unix encryption |
| COLUMN | salt is a separate column stored in the database |
| EXTERNAL | salt is not stored in the database and needs to be saved through jdbcrealm Getsaltforuser (string) function |
Four different saltstyles correspond to four different password processing methods. Some source codes are as follows:
switch (saltStyle) {
case NO_SALT:
    password = getPasswordForUser(conn, username)[0];
    break;
case CRYPT:
    // TODO: separate password and hash from getPasswordForUser[0]
    throw new ConfigurationException("Not implemented yet");
    //break;
case COLUMN:
    String[] queryResults = getPasswordForUser(conn, username);
    password = queryResults[0];
    salt = queryResults[1];
    break;
case EXTERNAL:
    password = getPasswordForUser(conn, username)[0];
    salt = getSaltForUser(username);
}
In the case of COLUMN, the SQL query result should contain two columns. The first COLUMN is password and the second COLUMN is salt. The SQL executed by default here is defined at the beginning of JdbcRealm, as follows:
protected static final String DEFAULT_SALTED_AUTHENTICATION_QUERY = "select password, password_salt from users where username = ?";
That is, the system defaults to the password in the data table_ Salt is provided, but the username field is provided here, so I'll customize this SQL later. The customization method is very simple. Modify Shiro INI file, add the following two lines:
jdbcRealm.saltStyle=COLUMN
jdbcRealm.authenticationQuery=select password,username from users where username=?
First set saltStyle to COLUMN, and then redefine the SQL corresponding to authenticationQuery. Note that the order of return columns is very important and cannot be adjusted at will. After that, the system will automatically take the username field as the salt.
However, because enumeration is not supported in ini file, the value of saltStyle is actually an enumeration type, so we need to add an enumeration converter in our main method during testing, as follows:
BeanUtilsBean.getInstance().getConvertUtils().register(new AbstractConverter() {
    @Override
    protected String convertToString(Object value) throws Throwable {
        return ((Enum) value).name();
    }

    @Override
    protected Object convertToType(Class type, Object value) throws Throwable {
        return Enum.valueOf(type, value.toString());
    }

    @Override
    protected Class getDefaultType() {
        return null;
    }
}, JdbcRealm.SaltStyle.class);
Of course, when we integrate shiro and web projects in the future, we don't need this converter.
After that, we can conduct the login test again and find that there is no problem.
7.3 how to configure salt for non JdbcRealm
OK, you just configured salt in the JdbcRealm. If you don't use the JdbcRealm, but the ordinary Realm you define, how can you solve the problem of configuring salt?
First of all, we need to explain that in the previous articles, when customizing the realm, we implement the realm interface. One defect of this method is that the password comparison needs to be completed by ourselves. Generally, in the project, we customize the realm by inheriting authenticating realm or authorizing realm, Because both of these two methods rewrite the getAuthenticationInfo method, and in the getAuthenticationInfo method, calling the doGetAuthenticationInfo method to get the logged in user, then we will call the assertCredentialsMatch method for the password comparison, and we directly implement the Realm interface without this step.
public final AuthenticationInfo getAuthenticationInfo(AuthenticationToken token) throws AuthenticationException {
    AuthenticationInfo info = getCachedAuthenticationInfo(token);
    if (info == null) {
        //Call doGetAuthenticationInfo to get info. This doGetAuthenticationInfo is implemented by ourselves in the custom Realm
        info = doGetAuthenticationInfo(token);
        log.debug("Looked up AuthenticationInfo [{}] from doGetAuthenticationInfo", info);
        if (token != null && info != null) {
            cacheAuthenticationInfoIfPossible(token, info);
        }
    } else {
        log.debug("Using cached authentication info [{}] to perform credentials matching.", info);
    }
    if (info != null) {
        //After obtaining the info, compare the passwords
        assertCredentialsMatch(token, info);
    } else {
        log.debug("No AuthenticationInfo found for submitted AuthenticationToken [{}].  Returning null.", token);
    }

    return info;
}
For the above reasons, I will inherit AuthenticatingRealm first, as follows:
public class MyRealm extends AuthenticatingRealm {
    public String getName() {
        return "MyRealm";
    }
    public boolean supports(AuthenticationToken token) {
        return token instanceof UsernamePasswordToken;
    }
    protected AuthenticationInfo doGetAuthenticationInfo(AuthenticationToken token) throws AuthenticationException {
        String username = token.getPrincipal().toString();
        if (!"sang".equals(username)) {
            throw new UnknownAccountException("user does not exist");
        }
        String dbPassword = "a593ccad1351a26cf6d91d5f0f24234c6a4da5cb63208fae56fda809732dcd519129acd74046a1f9c5992db8903f50ebf3c1091b3aaf67a05c82b7ee470d9e58";
        return new SimpleAuthenticationInfo(username, dbPassword, ByteSource.Util.bytes(username), getName());
    }
}
About this class, I say the following:
- The user name is determined manually here. In fact, this place needs to query the user information from the database. If the user information cannot be found, the UnknownAccountException will be thrown directly
- In the returned SimpleAuthenticationInfo, the second parameter is the password. Under normal circumstances, this password is queried from the database. I wrote it directly here
- The third parameter is the salt value. After the SimpleAuthenticationInfo is constructed, shiro will judge whether the password entered by the user is correct
The above core step is the third step. The system automatically compares whether the password is entered correctly. In the process of comparison, it needs to salt and encrypt the password entered by the user first. Since the salt encryption will involve the credentialsMatcher, the credentialsMatcher we want to use here is actually the same as the credentialsMatcher used in JdbcRealm, Just add the following line to the configuration file:
MyRealm.credentialsMatcher=$sha512
sha512 is consistent with our definition above, so we won't repeat it here.
Case download in this section: https://github.com/lenve/shiroSamples/archive/refs/tags/v7.zip
8. Customize realms with roles and permissions in Shiro
There should be no problem with password encryption and salt, but the previous articles have brought us a new problem: IniRealm, JdbcRealm and user-defined MyRealm. The first two can realize user authentication and authorization, that is, we can manage user login and user role, and our user-defined MyRealm, At present, only login can be realized, but authorization cannot be realized. In this article, let's take a look at how user-defined Realm realizes authorization.
8.1 problem tracking
In the previous article, we did not implement the authorization operation of custom Realm, but this does not affect us to call the hasRole method to obtain the user's permission. I tested the currentuser on the code above Through layer by layer tracing, we found that we finally came to the hasRole method of the ModularRealmAuthorizer class. Some source codes are as follows:
public boolean hasRole(PrincipalCollection principals, String roleIdentifier) {
    assertRealmsConfigured();
    for (Realm realm : getRealms()) {
        if (!(realm instanceof Authorizer)) continue;
        if (((Authorizer) realm).hasRole(principals, roleIdentifier)) {
            return true;
        }
    }
    return false;
}
We can see that all realms will be traversed here. If this realm is an instance of Authorizer, further authorization operations will be carried out. If it is not an instance of Authorizer, it will be skipped directly. However, we have only one custom MyRealm inherited from AuthenticatingRealm, which is obviously not an instance of Authorizer. Therefore, false must be returned here, and authorization fails, Therefore, to solve the authorization problem, the first step is to make our MyRealm an instance of the Authorizer.
8.2 solutions
The following figure shows the inheritance relationship of the Authorizer:

My friends see that there is an authoringrealm in the implementation class of the Authorizer. Open this class and we find its inheritance relationship as follows:
public abstract class AuthorizingRealm extends AuthenticatingRealm
        implements Authorizer, Initializable, PermissionResolverAware, RolePermissionResolverAware {
            ...
        }
We found that this authorizing realm is not only the implementation class of the Authorizer, but also the implementation class of the authenticating realm we used above. Since authorizing realm is the implementation class of these two classes at the same time, changing the inheritance relationship of MyRealm from authenticating realm to authorizing realm will certainly not affect my functions above, The modified MyRealm is as follows (some key codes):
public class MyRealm extends AuthorizingRealm {
    protected AuthenticationInfo doGetAuthenticationInfo(AuthenticationToken token) throws AuthenticationException {
        String username = token.getPrincipal().toString();
        if (!"sang".equals(username)) {
            throw new UnknownAccountException("user does not exist");
        }
        String dbPassword = "a593ccad1351a26cf6d91d5f0f24234c6a4da5cb63208fae56fda809732dcd519129acd74046a1f9c5992db8903f50ebf3c1091b3aaf67a05c82b7ee470d9e58";
        return new SimpleAuthenticationInfo(username, dbPassword, ByteSource.Util.bytes(username), getName());
    }

    protected AuthorizationInfo doGetAuthorizationInfo(PrincipalCollection principals) {
        Set<String> roles = new HashSet<String>();
        if ("sang".equals(principals.getPrimaryPrincipal().toString())) {
            roles.add("Ordinary users");
        }
        return new SimpleAuthorizationInfo(roles);
    }
}
After inheriting the AuthorizingRealm, we need to implement the doGetAuthorizationInfo method. In this method, we configure the user's permissions. For convenience, I directly add the permission of ordinary users. In fact, I should query the permission in the database according to the user name. The query method is not repeated.
Through source code tracing, we find that the final authorization will come to the following two methods of the AuthorizingRealm class:
public boolean hasRole(PrincipalCollection principal, String roleIdentifier) {
    AuthorizationInfo info = getAuthorizationInfo(principal);
    return hasRole(roleIdentifier, info);
}

protected boolean hasRole(String roleIdentifier, AuthorizationInfo info) {
    return info != null && info.getRoles() != null && info.getRoles().contains(roleIdentifier);
}
The logic of these two methods is very simple. The getAuthorizationInfo method invoked in the first method will eventually be invoked to our custom doGetAuthorizationInfo method, the two parameters received by the second hasRole methods, the first is the user application role, and the second is the user role set. A simple contains function determines whether a user has a role.
However, at this time, users only have roles and no permissions. We can further improve the doGetAuthorizationInfo method, as follows:
protected AuthorizationInfo doGetAuthorizationInfo(PrincipalCollection principals) {
    Set<String> roles = new HashSet<String>();
    Set<String> permiss = new HashSet<String>();
    if ("sang".equals(principals.getPrimaryPrincipal().toString())) {
        roles.add("Ordinary users");
        permiss.add("book:update");
    }
    SimpleAuthorizationInfo info = new SimpleAuthorizationInfo(roles);
    info.setStringPermissions(permiss);
    return info;
}
Of course, under normal circumstances, the permission should also be obtained from the database query. I'll simplify it here.
So how is this role verified? Tracing the source code, we come to the following two methods of the authoringrealm class:
public boolean isPermitted(PrincipalCollection principals, Permission permission) {
    AuthorizationInfo info = getAuthorizationInfo(principals);
    return isPermitted(permission, info);
}

//visibility changed from private to protected per SHIRO-332
protected boolean isPermitted(Permission permission, AuthorizationInfo info) {
    Collection<Permission> perms = getPermissions(info);
    if (perms != null && !perms.isEmpty()) {
        for (Permission perm : perms) {
            if (perm.implies(permission)) {
                return true;
            }
        }
    }
    return false;
}
The first isPermitted method calls the getAuthorizationInfo method, and the getAuthorizationInfo method will eventually call the doGetAuthorizationInfo method defined by ourselves, that is, get the role permission information of the user, and then traverse it in the second method to see if it has the corresponding permissions. The first parameter of the second ispermitted method is the permission to be applied by the user.
Case download in this section: https://github.com/lenve/shiroSamples/archive/refs/tags/v8.zip
9. Shiro integrates Spring
9.1 construction of Spring & Spring MVC environment
On the whole, the construction of spring and spring MVC environment is relatively easy, because this is not the focus of this article, so I won't introduce it in detail here. Small partners can download the source code at the end of the article to view the construction of Spring + spring MVC environment. At the same time, since the integration of MyBatis is relatively easy, in order to reduce the complexity of the project, I will not introduce MyBatis first.
For project dependencies, in addition to Spring, Spring MVC and Shiro related dependencies, you also need to add jar s integrated by Shiro and Spring, as follows:
<dependency>
    <groupId>org.apache.shiro</groupId>
    <artifactId>shiro-spring</artifactId>
    <version>RELEASE</version>
</dependency>
9.2 integration Shiro
After setting up the Spring + spring MVC environment and integrating Shiro, we mainly configure two places:
- web. Configure proxy filter in XML as follows:
<filter>
    <filter-name>shiroFilter</filter-name>
    <filter-class>org.springframework.web.filter.DelegatingFilterProxy</filter-class>
    <init-param>
        <param-name>targetFilterLifecycle</param-name>
        <param-value>true</param-value>
    </init-param>
</filter>
<filter-mapping>
    <filter-name>shiroFilter</filter-name>
    <url-pattern>/*</url-pattern>
</filter-mapping>
After that, when DelegatingFilterProxy intercepts all requests, it will delegate them to shiroFilter, which is an instance configured in the Spring container in the second step.
- Configure Spring container
At least two beans in the Spring container need to be configured. One is shiroFilter in the first step and the other is SecurityManager. The complete configuration is as follows:
<bean class="org.apache.shiro.web.mgt.DefaultWebSecurityManager" id="securityManager">
</bean>
<bean class="org.apache.shiro.spring.web.ShiroFilterFactoryBean" id="shiroFilter">
    <property name="securityManager" ref="securityManager"/>
    <property name="loginUrl" value="/login.jsp"></property>
    <property name="successUrl" value="/success.jsp"/>
    <property name="unauthorizedUrl" value="/unauthorized.jsp"/>
    <property name="filterChainDefinitions">
        <value>
            /**=authc
        </value>
    </property>
</bean>
This is a very simple configuration, and we will continue to improve it in future articles. About this configuration, I say the following:
- First, we need to configure a securityManager, and then our realm will be configured here.
- Also configure a bean named shiroFilter, which is similar to web The names of proxy filters in XML are consistent.
- In shiroFilter, loginUrl indicates the address of the login page.
- successUrl indicates the address of successful login.
- unauthorizedUrl indicates the address of authorization failure.
- / * * = authc configured in filterChainDefinitions means that all pages can be accessed only after authentication (login).
- authc is actually a filter, which we will talk about in detail later.
- The matching character follows Ant style path expression. Multiple matching characters can be configured here. The matching order is from top to bottom, and there will be no matching. For example, the following expression:
/a/b/*=anon
/a/**=authc
Assuming my path is / a/b/c, it will match the first filter anon instead of authc, so the order here is very important.
OK, after these configurations are written, create the corresponding jsp file in the webpap directory, as follows:

At this point, start the project to visit in the browser. No matter what address we visit, we will finally return to login JSP pages, because all pages (even non-existent addresses) can be accessed only after authentication.
Cases in this section: https://github.com/lenve/shiroSamples/archive/refs/tags/v9.zip
10. Shiro handles login in three ways
10.1 preparation
Obviously, no matter what kind of login, it is inseparable from the database. Here, I use the database in front of us, and I won't repeat it here (the database script can be downloaded at the end of the article), but I need to configure JdbcRealm in ApplicationContext First configure the data source in XML as follows:
<context:property-placeholder location="classpath:db.properties"/>
<bean class="com.alibaba.druid.pool.DruidDataSource" id="dataSource">
    <property name="username" value="${db.username}"/>
    <property name="password" value="${db.password}"/>
    <property name="url" value="${db.url}"/>
</bean>
After having the data source, configure JdbcRealm as follows:
<bean class="org.apache.shiro.realm.jdbc.JdbcRealm" id="jdbcRealm">
    <property name="dataSource" ref="dataSource"/>
    <property name="credentialsMatcher">
        <bean class="org.apache.shiro.authc.credential.HashedCredentialsMatcher">
            <property name="hashAlgorithmName" value="sha-512"/>
            <property name="hashIterations" value="1024"/>
        </bean>
    </property>
    <property name="saltStyle" value="COLUMN"/>
    <property name="authenticationQuery" value="select password, username from users where username = ?"/>
</bean>
These attributes in JdbcRealm are basically consistent with the seventh article in this series. First, we configured the password comparator as HashedCredentialsMatcher, the corresponding algorithm as sha512, and the number of password encryption iterations is 1024. Then, we configured the salt of the password from the column of the data table, and the username column is our salt. These configurations are consistent with the above, For those who don't know, please refer to our seventh article in this series.
10.2 custom login logic
The custom login logic is relatively simple. First, we put login Simple transformation of JSP page:
<form action="/login" method="post">
    <table>
        <tr>
            <td>user name:</td>
            <td><input type="text" name="username"></td>
        </tr>
        <tr>
            <td>password:</td>
            <td><input type="password" name="password"></td>
        </tr>
        <tr>
            <td colspan="2"><input type="submit" value="Sign in"></td>
        </tr>
    </table>
</form>
Then create our login processing Controller as follows:
@PostMapping("/login")
public String login(String username, String password) {
    Subject currentUser = SecurityUtils.getSubject();
    UsernamePasswordToken token = new UsernamePasswordToken(username, password);
    try {
        currentUser.login(token);
        return "success";
    } catch (AuthenticationException e) {
    }
    return "login";
}
If the login is successful, we will go to the success page, and if the login fails, we will return to the login page. After these two steps, we need to modify the filterChainDefinitions property in shiroFilter to set the / login interface to allow anonymous access, as follows:
<bean class="org.apache.shiro.spring.web.ShiroFilterFactoryBean" id="shiroFilter">
    <property name="securityManager" ref="securityManager"/>
    <property name="loginUrl" value="/login.jsp"></property>
    <property name="successUrl" value="/success.jsp"/>
    <property name="unauthorizedUrl" value="/unauthorized.jsp"/>
    <property name="filterChainDefinitions">
        <value>
            /login=anon
            /**=authc
        </value>
    </property>
</bean>
After that, you can go to login JSP page test login.
The above method is that we write our own login logic. shiro also provides us with two login methods without writing our own login logic. Please continue to read.
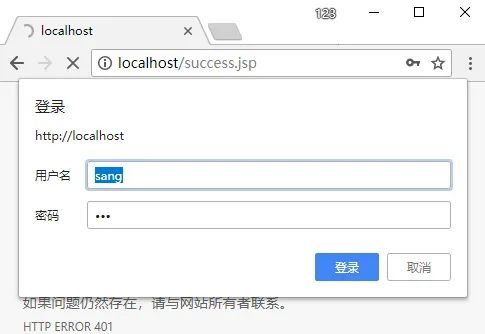
10.3 HTTP based authentication
shiro also provides authentication based on http protocol. Of course, this authentication also needs the assistance of database. As before, we only need to modify one configuration, as shown below:
<bean class="org.apache.shiro.spring.web.ShiroFilterFactoryBean" id="shiroFilter">
    <property name="securityManager" ref="securityManager"/>
    <property name="filterChainDefinitions">
        <value>
            /**=authcBasic
        </value>
    </property>
</bean>
This means that all pages must be authenticated based on http. At this point, we open any page, and the authentication method is as follows:
10.4 form login
Form login is similar to HTTP based login. We don't need to write our own login logic, but the error logic needs to be handled slightly. First, modify shiroFilter:
<bean class="org.apache.shiro.spring.web.ShiroFilterFactoryBean" id="shiroFilter">
    <property name="securityManager" ref="securityManager"/>
    <property name="loginUrl" value="/login"/>
    <property name="successUrl" value="/success.jsp"/>
    <property name="filterChainDefinitions">
        <value>
            /**=authc
        </value>
    </property>
</bean>
Configure the login page and the jump page after successful login. At the same time, set that all pages can be accessed only after login.
Configure the login page request as follows:
@RequestMapping("/login")
public String login(HttpServletRequest req, Model model) {
    String shiroLoginFailure = (String) req.getAttribute("shiroLoginFailure");
    if (UnknownAccountException.class.getName().equals(shiroLoginFailure)) {
        model.addAttribute("error", "Account does not exist!");
    }
    if (IncorrectCredentialsException.class.getName().equals(shiroLoginFailure)) {
        model.addAttribute("error", "Incorrect password!");
    }
    return "login";
}
If the login fails, there will be a shiroLoginFailure attribute in the request that stores the abnormal class name of the login failure. By judging the class name, we can know what caused the login failure.
OK, after configuring these two steps, you can go to the login page to test.
10.5 log out
Logging out and logging in is relatively simple. A filter is configured as follows:
<property name="filterChainDefinitions">
    <value>
        /logout=logout
        /**=authc
    </value>
</property>
Log out by accessing / logout through get request.
There are three cases in this section. The download address is as follows:
- https://github.com/lenve/shiroSamples/archive/refs/tags/v10.1.zip
- https://github.com/lenve/shiroSamples/archive/refs/tags/v10.2.zip
- https://github.com/lenve/shiroSamples/archive/refs/tags/v10.3.zip
11. Authorization in Shiro
11.1 configuring roles
The case of this article is completed on the basis of the above. Therefore, I still use JdbcRealm in Realm, so the relevant authorization does not need to be configured. However, the database script here is updated, and the little partner needs to download and re execute it( https://github.com/lenve/shiroSamples/blob/v11/shiroDemo.sql ).
First, let's introduce the current users in the database. There are two users in the database. sang has the role of admin and has the permissions of book: * and author:create at the same time. lisi has the role of user and has the permissions of user:info and user:delete at the same time. Modify shiroFilter as follows:
<bean class="org.apache.shiro.spring.web.ShiroFilterFactoryBean" id="shiroFilter">
    <property name="securityManager" ref="securityManager"/>
    <property name="loginUrl" value="/login"/>
    <property name="successUrl" value="/success.jsp"/>
    <property name="unauthorizedUrl" value="/unauthorized.jsp"/>
    <property name="filterChainDefinitions">
        <value>
            /admin.jsp=authc,roles[admin]
            /user.jsp=authc,roles[user]
            /logout=logout
            /**=authc
        </value>
    </property>
</bean>
The configuration here is as follows:
- unauthorizedUrl represents the page displayed when authorization fails
- In filterChainDefinitions, we have configured admin The JSP page can only be accessed after logging in. At the same time, the logged in user must have the role of admin, user JSP can only be accessed after logging in, and the logged in user must have the user role
11.2 testing
During the test, we log in with sang/123 and lisi/123 respectively. After successful login, we visit user JSP and Admin JSP can see the effect.
11.3 configure permissions
The above method is to configure roles, but permissions have not been configured. To configure permissions, first add the query of permission information in jdbcRealm:
<property name="permissionsLookupEnabled" value="true"/>
Then configure shiroFilter:
<property name="filterChainDefinitions">
    <value>
        /admin.jsp=authc,roles[admin]
        /user.jsp=authc,roles[user]
        /userinfo.jsp=authc,perms[user:info]
        /bookinfo.jsp=authc,perms[book:info]
        /logout=logout
        /**=authc
    </value>
</property>
Suppose you visit userinfo JSP needs user:info permission to access bookinfo JSP requires book:info permission.
OK, after that, you can test. Log in with sang/123 and lisi/123 respectively. After successful login, visit bookinfo JSP and userinfo JSP can see different effects.
Case download in this section: https://github.com/lenve/shiroSamples/archive/refs/tags/v11.zip
12. JSP tag in Shiro
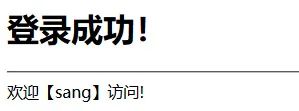
12.1 origin
In the last article, we were in success JSP contains many hyperlinks like the following:
<h1>Login succeeded!</h1>
<h3><a href="/logout">cancellation</a></h3>
<h3><a href="/admin.jsp">admin.jsp</a></h3>
<h3><a href="/user.jsp">user.jsp</a></h3>
<h3><a href="/bookinfo.jsp">bookinfo.jsp</a></h3>
<h3><a href="/userinfo.jsp">userinfo.jsp</a></h3>
However, for users with different identities, not every link is valid. Clicking on an invalid link will enter an unauthorized page, which is not a good user experience. It is best to automatically hide unreachable links. At the same time, I also hope to be able to easily obtain the information of the currently logged in user. Considering these needs, Let's talk about jsp tags in shiro.
12.2 label introduction
There are not many labels in shiro, mainly including the following:
- shiro:guest
Shiro: the guest tab displays the contents only when you are not currently logged in, as follows:
<shiro:guest>
    Welcome [tourists] to visit!
</shiro:guest>
- shiro:user
shiro:user displays the contents of this tag after the user logs in, either through normal login or through member me, as follows:
<shiro:user>
    Welcome[<shiro:principal/>]visit!
</shiro:user>
- shiro:principal
shiro:principal is used to obtain the information of the currently logged in user. The display effect is as follows:
4.shiro:authenticated
Compared with shiro:user, the scope of shiro:authenticated becomes smaller. When the user is authenticated successfully but not through the member me authentication, the contents of this tag will be displayed:
<shiro:authenticated>
    User[<shiro:principal/>]Identity authentication passed, not passed Remember Me authentication!
</shiro:authenticated>
- shiro:notAuthenticated
shiro:notAuthenticated also displays the content when the user is not authenticated. Unlike shiro:guest, shiro:guest will not display the content for authentication through Remember Me, but shiro:notAuthenticated will display the content (because it is not a tourist at this time, but it is not authenticated), as follows:
<shiro:notAuthenticated>
    The user is not authenticated
</shiro:notAuthenticated>
- shiro:lacksRole
When the user does not have a role, the display content is as follows:
<shiro:lacksRole name="admin">
    User does not have admin role
</shiro:lacksRole>
- shiro:lacksPermission
When the user does not have a certain permission, the following contents are displayed:
<shiro:lacksPermission name="book:info">
    User does not have book:info jurisdiction
</shiro:lacksPermission>
- shiro:hasRole
What is displayed when a user has a role:
<shiro:hasRole name="admin">
    <h3><a href="/admin.jsp">admin.jsp</a></h3>
</shiro:hasRole>
- shiro:hasAnyRoles
What is displayed when a user has one of multiple roles:
<shiro:hasAnyRoles name="user,aaa">
    <h3><a href="/user.jsp">user.jsp</a></h3>
</shiro:hasAnyRoles>
- shiro:hasPermission
Content displayed when the user has a certain permission:
<shiro:hasPermission name="book:info">
    <h3><a href="/bookinfo.jsp">bookinfo.jsp</a></h3>
</shiro:hasPermission>
Case download in this section: https://github.com/lenve/shiroSamples/archive/refs/tags/v12.zip
13. Cache mechanism in Shiro
13.1 adding dependencies
To use cache, you need to add related dependencies first, as follows:
<dependency>
    <groupId>org.apache.shiro</groupId>
    <artifactId>shiro-ehcache</artifactId>
    <version>1.4.0</version>
</dependency>
13.2 add profile
The configuration file of ehcache mainly refers to the official configuration and creates ehcache in the resources directory XML file, as follows:
<ehcache>
    <diskStore path="java.io.tmpdir/shiro-spring-sample"/>
    <defaultCache
            maxElementsInMemory="10000"
            eternal="false"
            timeToIdleSeconds="120"
            timeToLiveSeconds="120"
            overflowToDisk="false"
            diskPersistent="false"
            diskExpiryThreadIntervalSeconds="120"
    />
    <cache name="shiro-activeSessionCache"
           maxElementsInMemory="10000"
           eternal="true"
           overflowToDisk="true"
           diskPersistent="true"
           diskExpiryThreadIntervalSeconds="600"/>
    <cache name="org.apache.shiro.realm.SimpleAccountRealm.authorization"
           maxElementsInMemory="100"
           eternal="false"
           timeToLiveSeconds="600"
           overflowToDisk="false"/>
</ehcache>
These are the conventional configurations in ehcache cache. I won't explain the meaning one by one. There are comments on the download source code at the end of the article.
13.3 cache configuration
Next, we only need to simply configure the cache in applicationContext. The configuration method is as follows:
<bean class="org.apache.shiro.cache.ehcache.EhCacheManager" id="cacheManager">
    <property name="cacheManagerConfigFile" value="classpath:ehcache.xml"/>
</bean>
<bean class="org.apache.shiro.web.mgt.DefaultWebSecurityManager" id="securityManager">
    <property name="realm" ref="jdbcRealm"/>
    <property name="cacheManager" ref="cacheManager"/>
</bean>
First configure the EhCacheManager class, specify the cache location, and then introduce the cacheManager into the DefaultWebSecurityManager. After that, our cache will be applied.
13.4 testing
Since I use JdbcRealm here, if I use custom Realm, I can check whether caching is used by logging. After using JdbcRealm, we can check whether caching is applied by breaking points. For example, I execute the following code:
subject.checkRole("admin");
subject.checkPermission("book:info");
Through breakpoint tracking, it is found that it will eventually come to the getAuthorizationInfo method of authorizing real. In this method, the data will be checked in the cache first. If there is data in the cache, the doGetAuthorizationInfo method will not be executed (the database operation is carried out in the doGetAuthorizationInfo method). If there is no data in the cache, Then the doGetAuthorizationInfo method will be executed, and the data will be saved to the cache after successful execution (provided that the cache is configured and the cache is not null). At this time, through the breakpoint, we find that the cache is executed without querying the data in the database. Some source codes are as follows:
protected AuthorizationInfo getAuthorizationInfo(PrincipalCollection principals) {
    AuthorizationInfo info = null;
    Cache<Object, AuthorizationInfo> cache = getAvailableAuthorizationCache();
    if (cache != null) {
        Object key = getAuthorizationCacheKey(principals);
        info = cache.get(key);
    }
    if (info == null) {
        info = doGetAuthorizationInfo(principals);
        if (info != null && cache != null) {
            Object key = getAuthorizationCacheKey(principals);
            cache.put(key, info);
        }
    }
    return info;
}
OK, on the whole, the cache configuration in shiro is very simple.
That's all.