Note link:
Note link: Grain Mall - personal notes (Advanced Chapter 3)
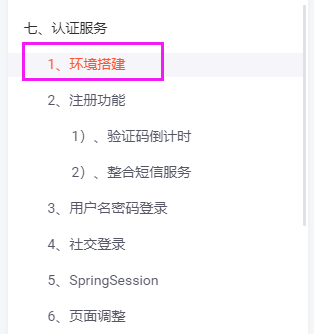
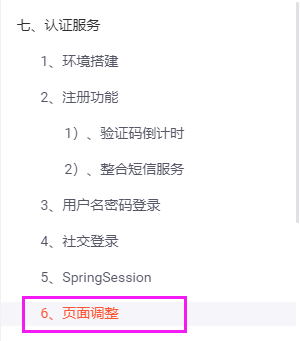
P211 establishment of certification service environment

P212 registration page - Verification Code countdown
P213 registration page - Integrated SMS service 1
Always say:
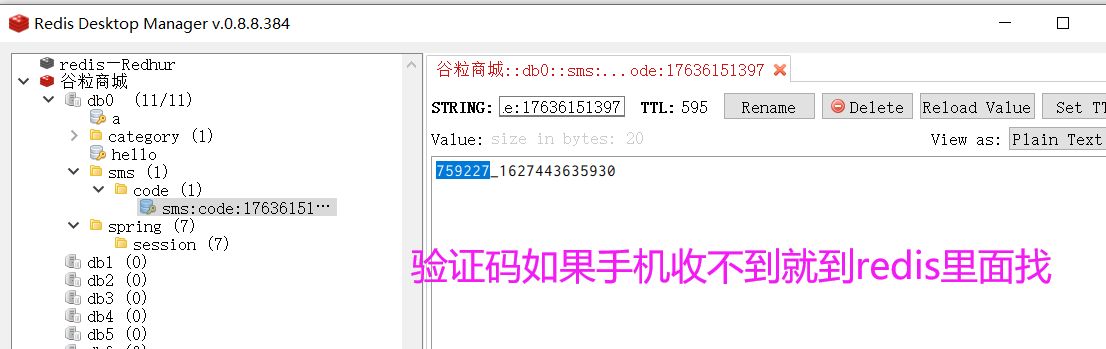
These operations of p213 and p214 are to complete the user's operation of sending the verification code on the registration page: the foreground sends the request of / sms/sendcode to the gulimall auth server in the background, and then the gulimall auth server will first verify whether the verification code was sent 60 seconds ago, If not, use OpenFeign to remotely call the sendCode method of the gulimall thrid party to complete the sending verification code function of the third-party service


P214 registration page - Integrated SMS service 2
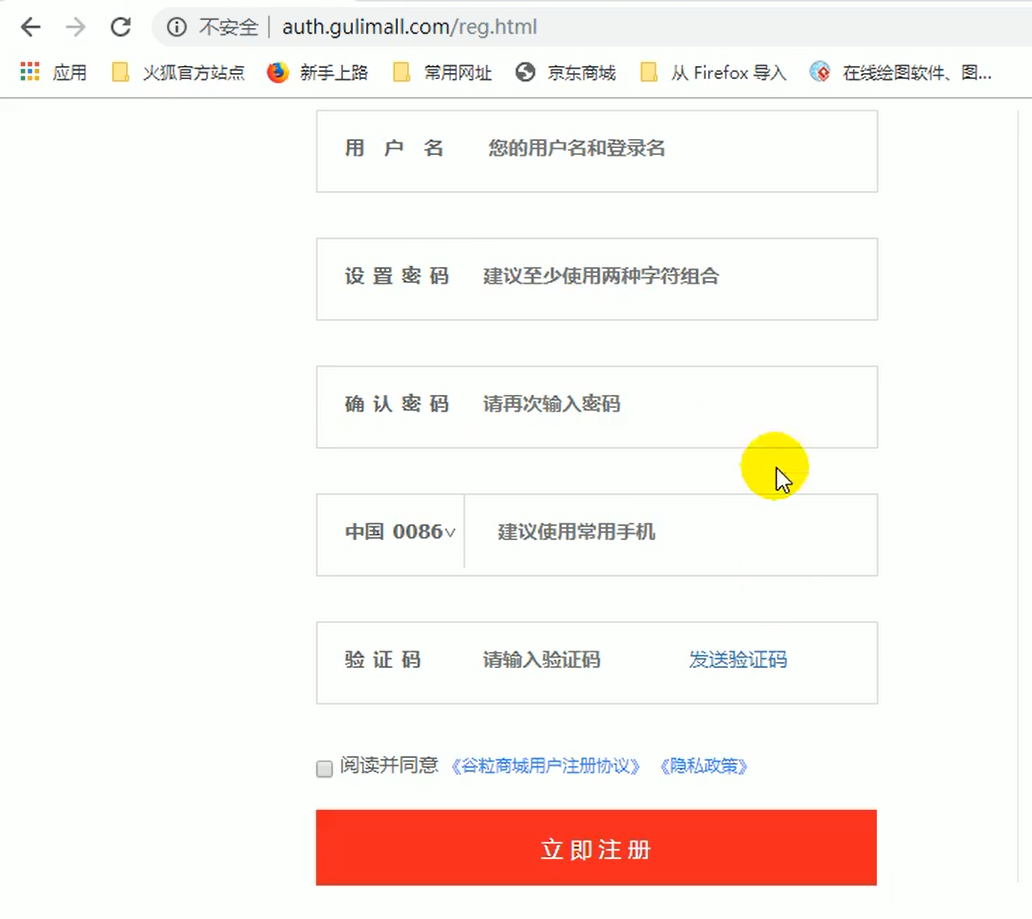
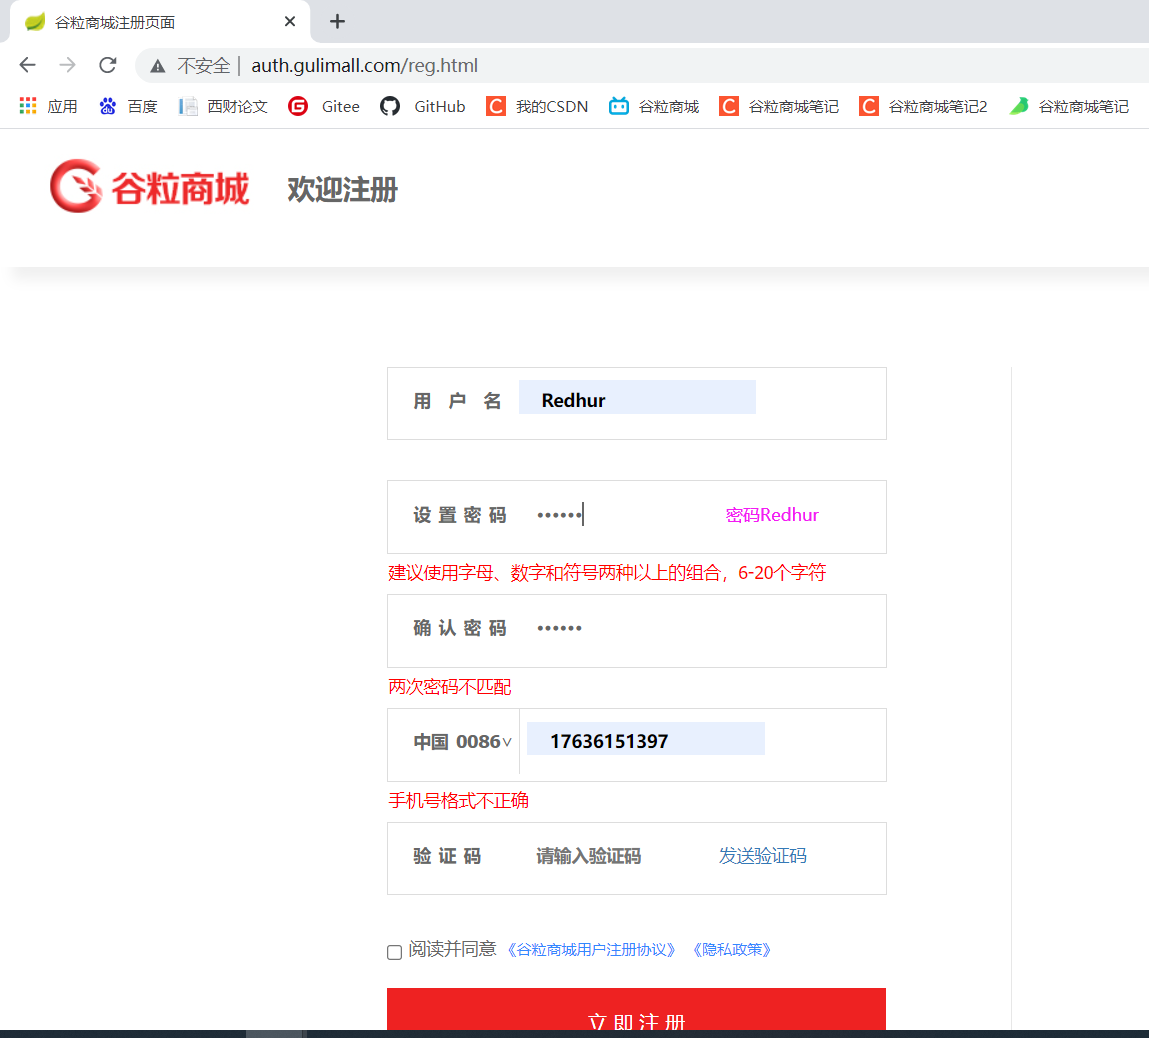
P215 registration page - registration function 1
Always say:
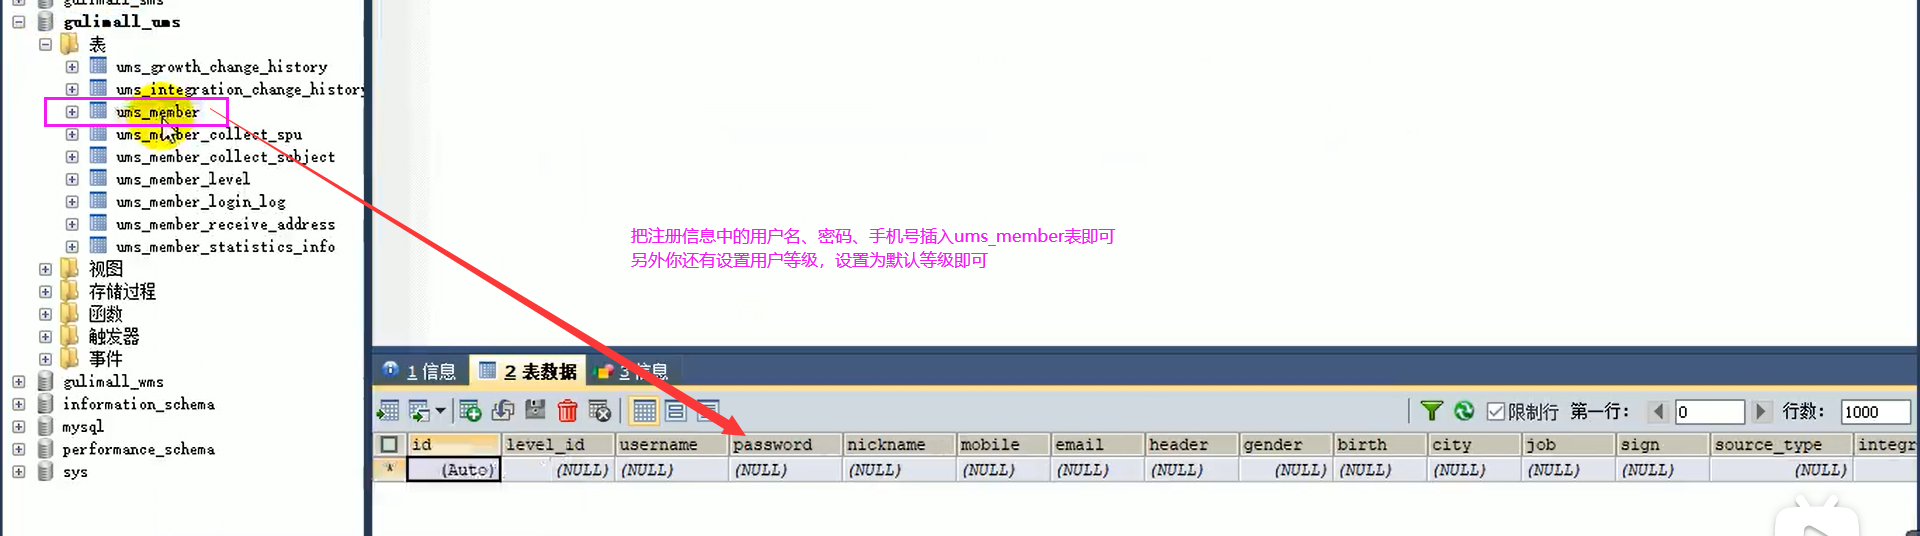
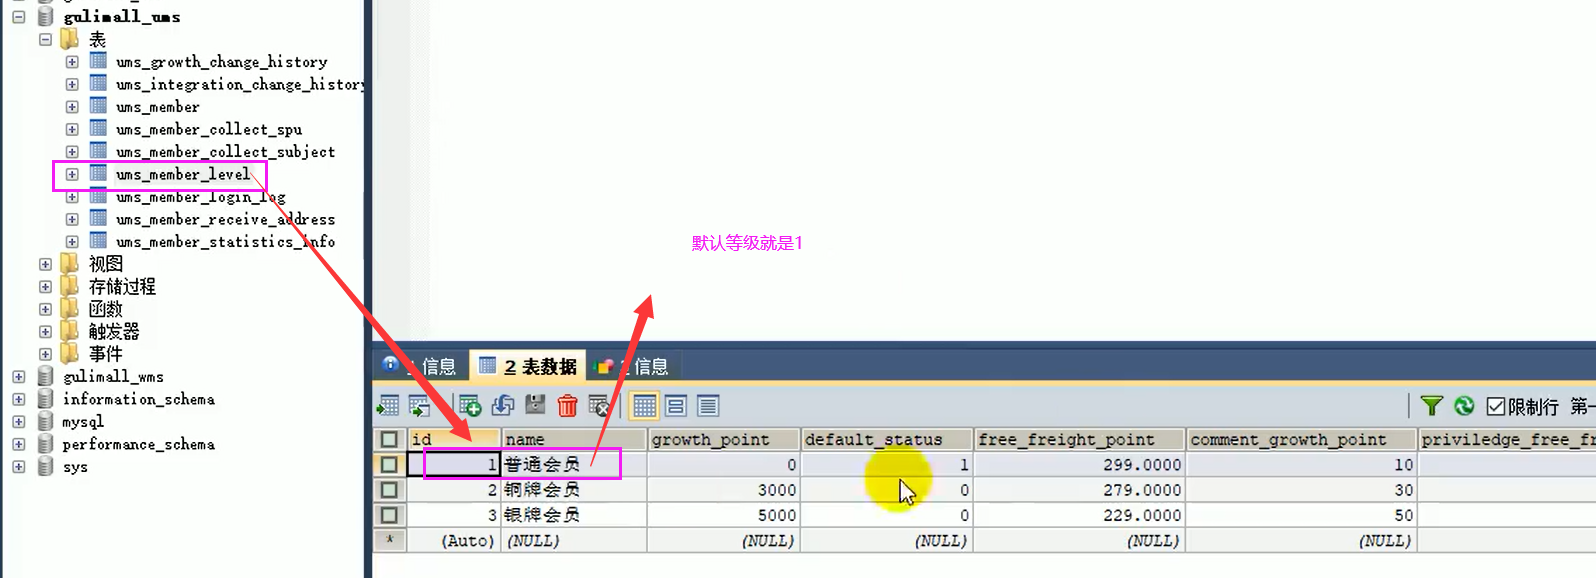
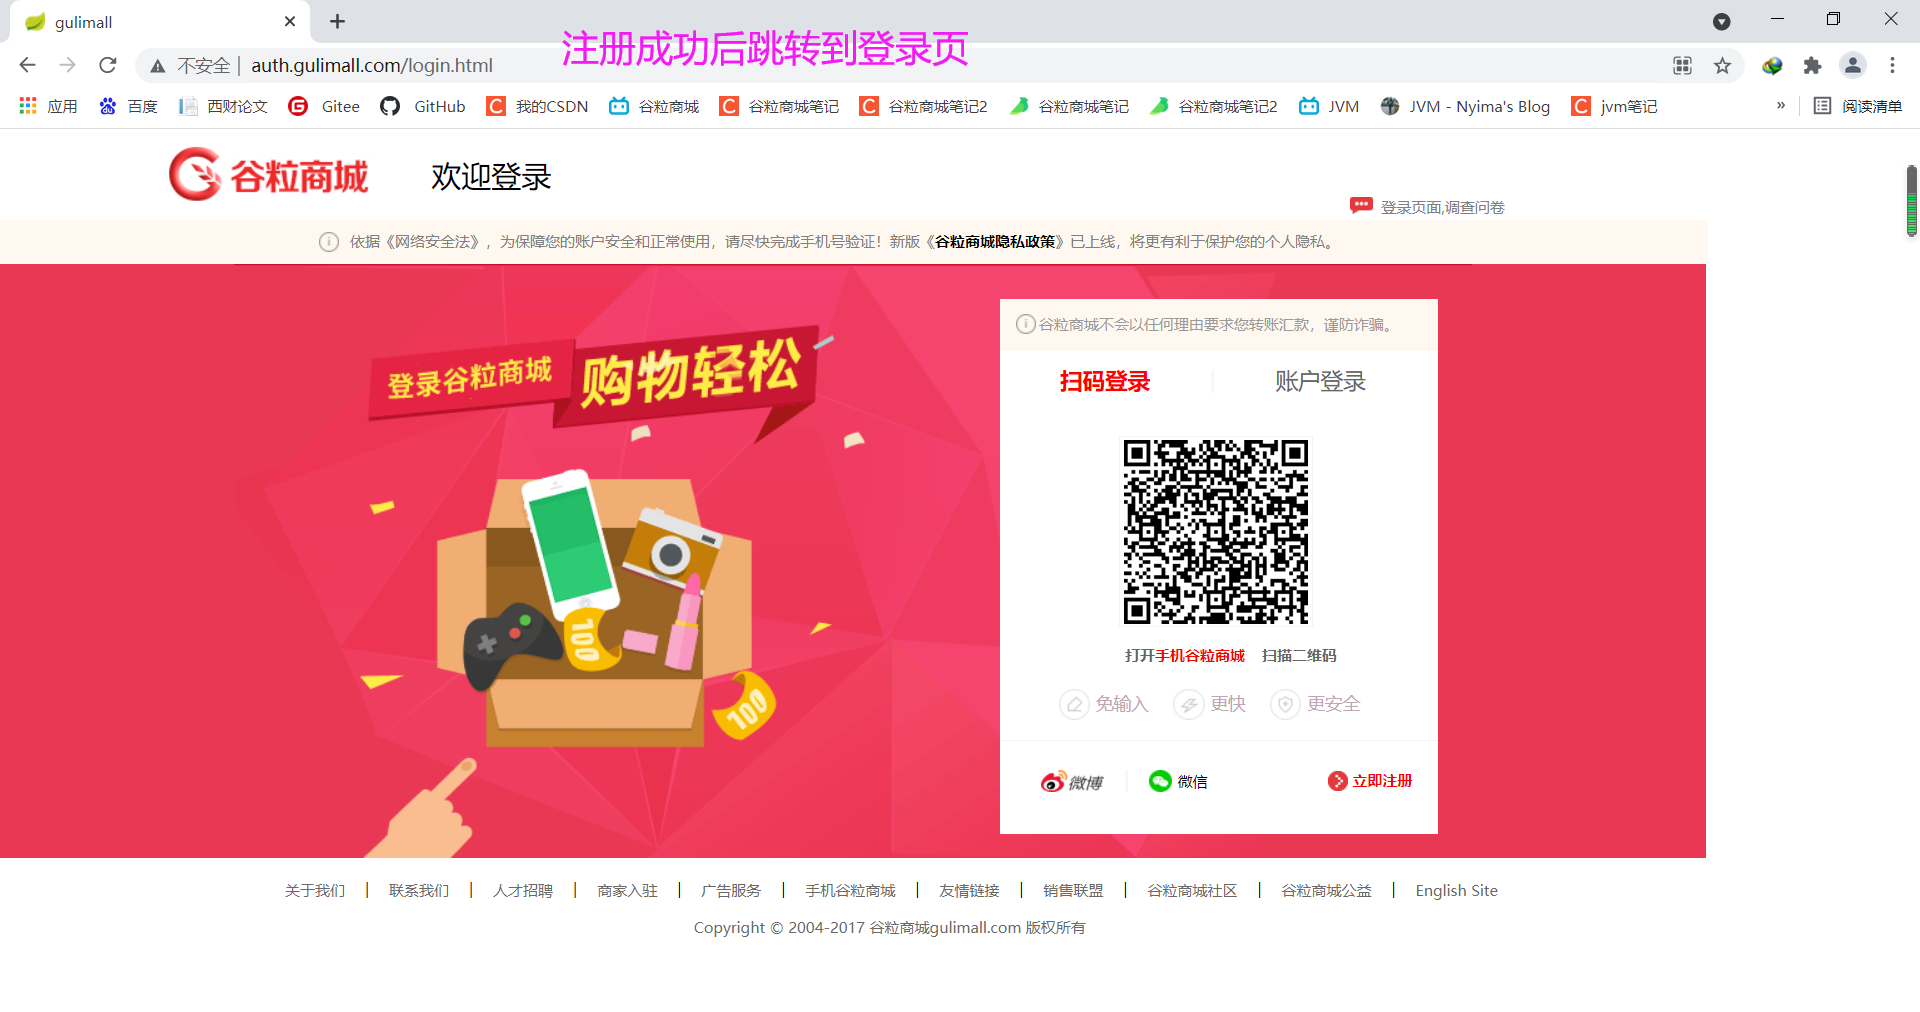
These operations of p215, p216, p217 and p218 are to complete the user's registration function on the registration page: we sent the verification code to the user before. The user will fill in the verification code and registration information and send it to the gulimall auth server, and then the gulimall auth server will conduct preliminary verification (verify the password format, mobile phone number format + verification code), If the verification passes, we will use OpenFeign to remotely call the register() method of gulimall member to register members. Member registration must fail and succeed. For those registration failures, we use the exception mechanism
Please read the notes in this section carefully. If you don't understand, go back to the video. This section still talks about a lot of useful things
P216 registration page - registration function 2
P217 registration page - registration function 3
Comparison of three methods of user password encryption: MD5 encryption, salt value encryption and BCrypt encryption
P218 registration page - registration function 4
The content of this session is to complete the test

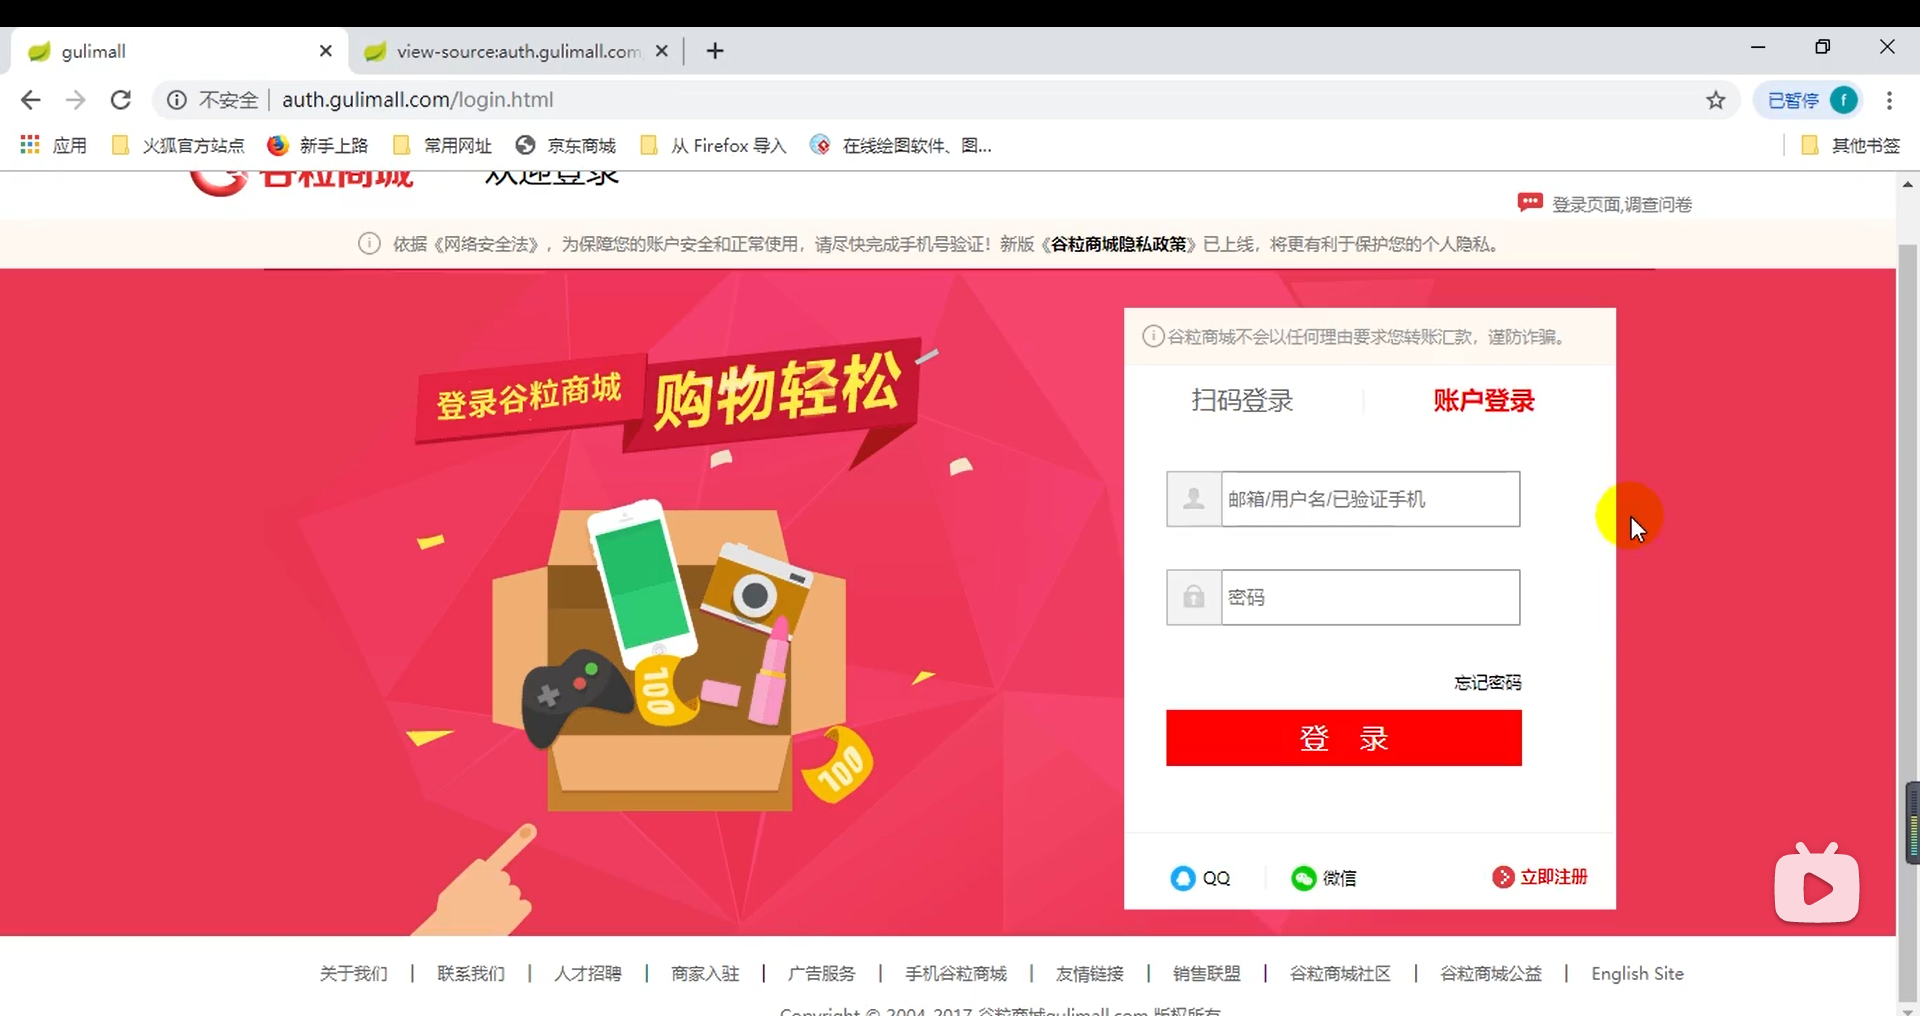
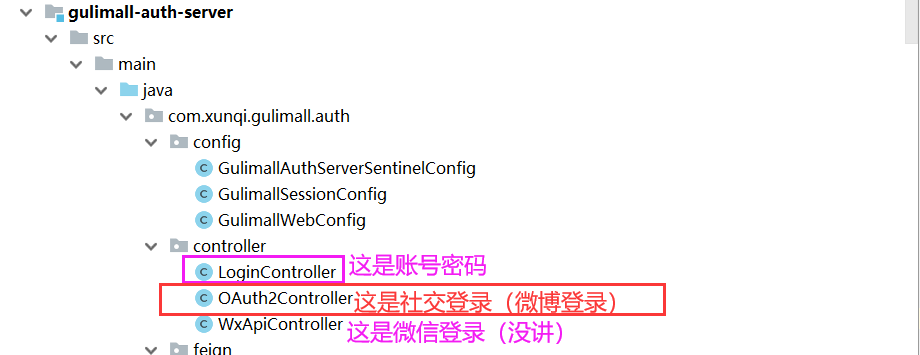
P219 login page - user name and password login
Always say:
The foreground sends / login to the gulimall auth server module in the background, and then the gulimall auth server will use OpenFeign to remotely call the login() method of gulimall member, in which the user name and password are compared to complete the login

P220 landing page - complete microblog login 1
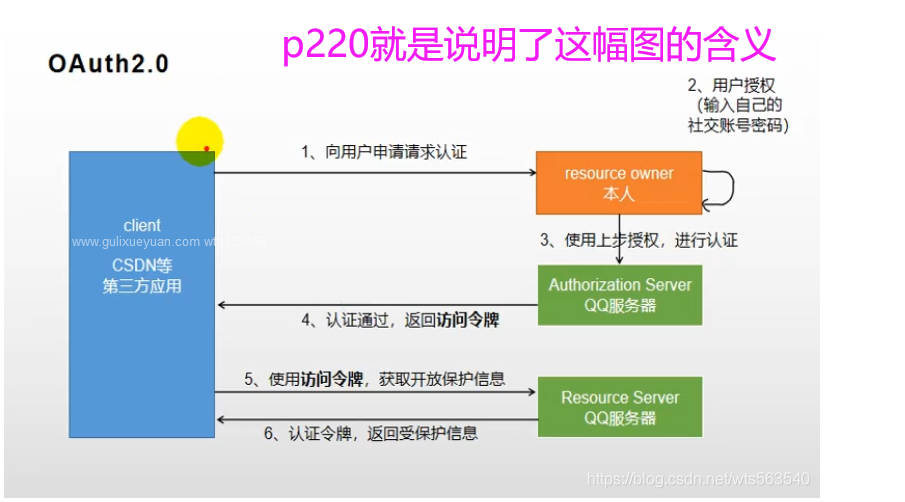
P221 landing page - complete microblog login 2
P221 talked about going to the microblog open platform for social login application and testing
Two addresses are important,
(1) Is the address of "guide the user to the authorization page on the login page":
This step is completed by the foreground. The url in the foreground html should be written as
Get
https://api.weibo.com/oauth2/authorize?client_id=2636917288&response_type=code&redirect_uri=http://gulimall.com/oauth2.0/weibo/success
client_id: is the app key when you create a website application,
redirect_uri is where the user redirects after logging in with microblog.
We specify redirect_uri=http://gulimall.com/oauth2.0/weibo/success That is to say, after the user logs in with microblog, it is equivalent to sending / oauth2 0 / Weibo / success to the gumal auth server module in the background, then the gumal auth server will exchange the code for the token, which involves the url of the token:
(2) Is the url of the token
This step is completed in the background. The token can only be obtained by sending such a url in the background
POST
https://api.weibo.com/oauth2/access_token?client_id=2636917288&client_secret=5d7746d10c4d926ed38692c8d17b7e31&grant_type=authorization_code&redirect_uri=http://auth.gulimall.com/oauth2.0/weibo/success&code=CODE
client_id: app key when creating website application;
client_secret: app secret when creating website application
redirect_uri: jump link after authentication (it needs to be consistent with the advanced settings of the platform);
Code: authentication code in exchange for token
If you send such a request in the background, you can exchange the token according to the code returned by the user authorization (not only the token, but also the uid user id, expires_in token expiration time, etc.). After you get the token, you can send other requests to the microblog official in exchange for user information
P222 landing page - complete social login 3
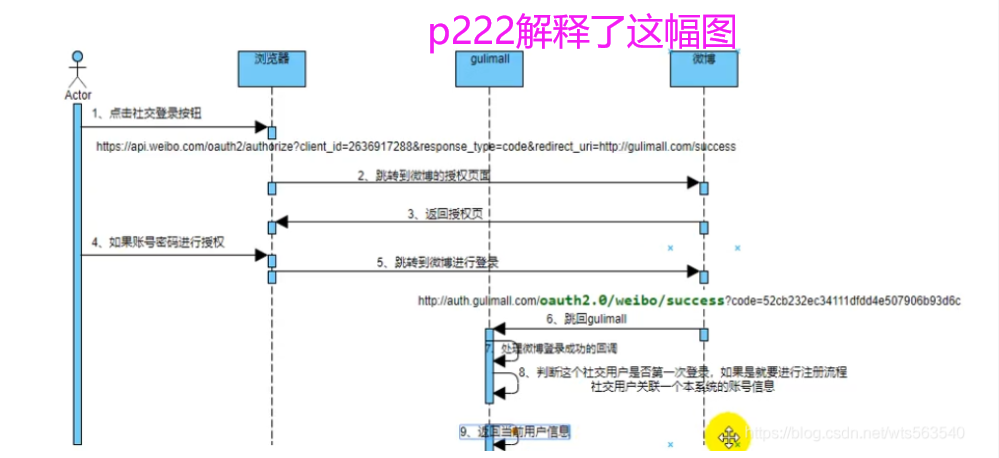
P223 landing page - complete microblog login 4
P224 landing page - complete microblog login 5
p222-p224 is coding and testing
Always say:
① Foreground send / oauth2 0 / Weibo / success to the gumal auth server module in the background, and then the gumal auth server will exchange the code for the token, and then take the token to OpenFeign to remotely call the oauth2Login() method of gumal member. In this method, it will first judge whether the user is logging in with microblog for the first time, If it is the first time, we have to register the user (query the user's basic information in the microblog and store it in our database); If the user has logged in with microblog before, update the token in the database
② After the foreground user logs in with the microblog, we will get the user's code, and the background uses the code to the microblog in exchange for a token, so that we can use the token to access the user's basic information; Every time a user logs in to visit the microblog, the token will change, so when the user logs in with the microblog next time, we need to update the token in the database
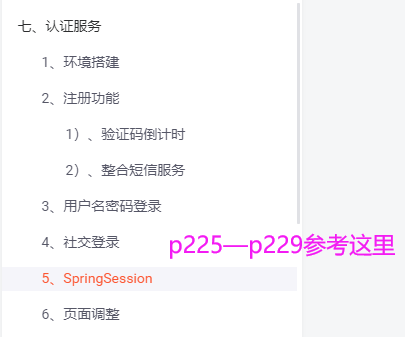
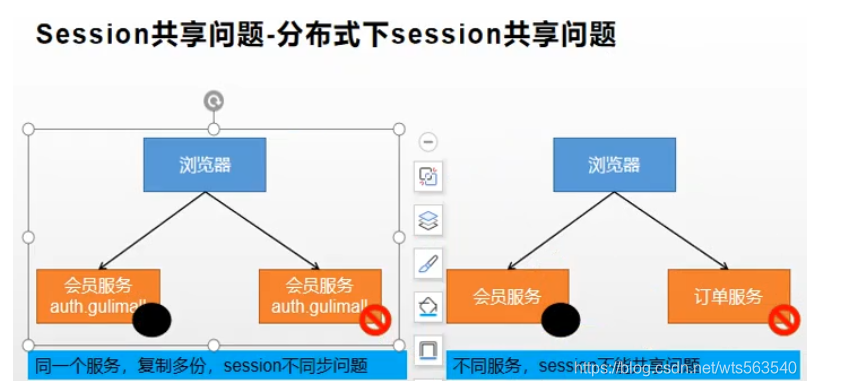
P225 SpringSession - session is not shared or cross domain
(1) session cannot cross domain issues
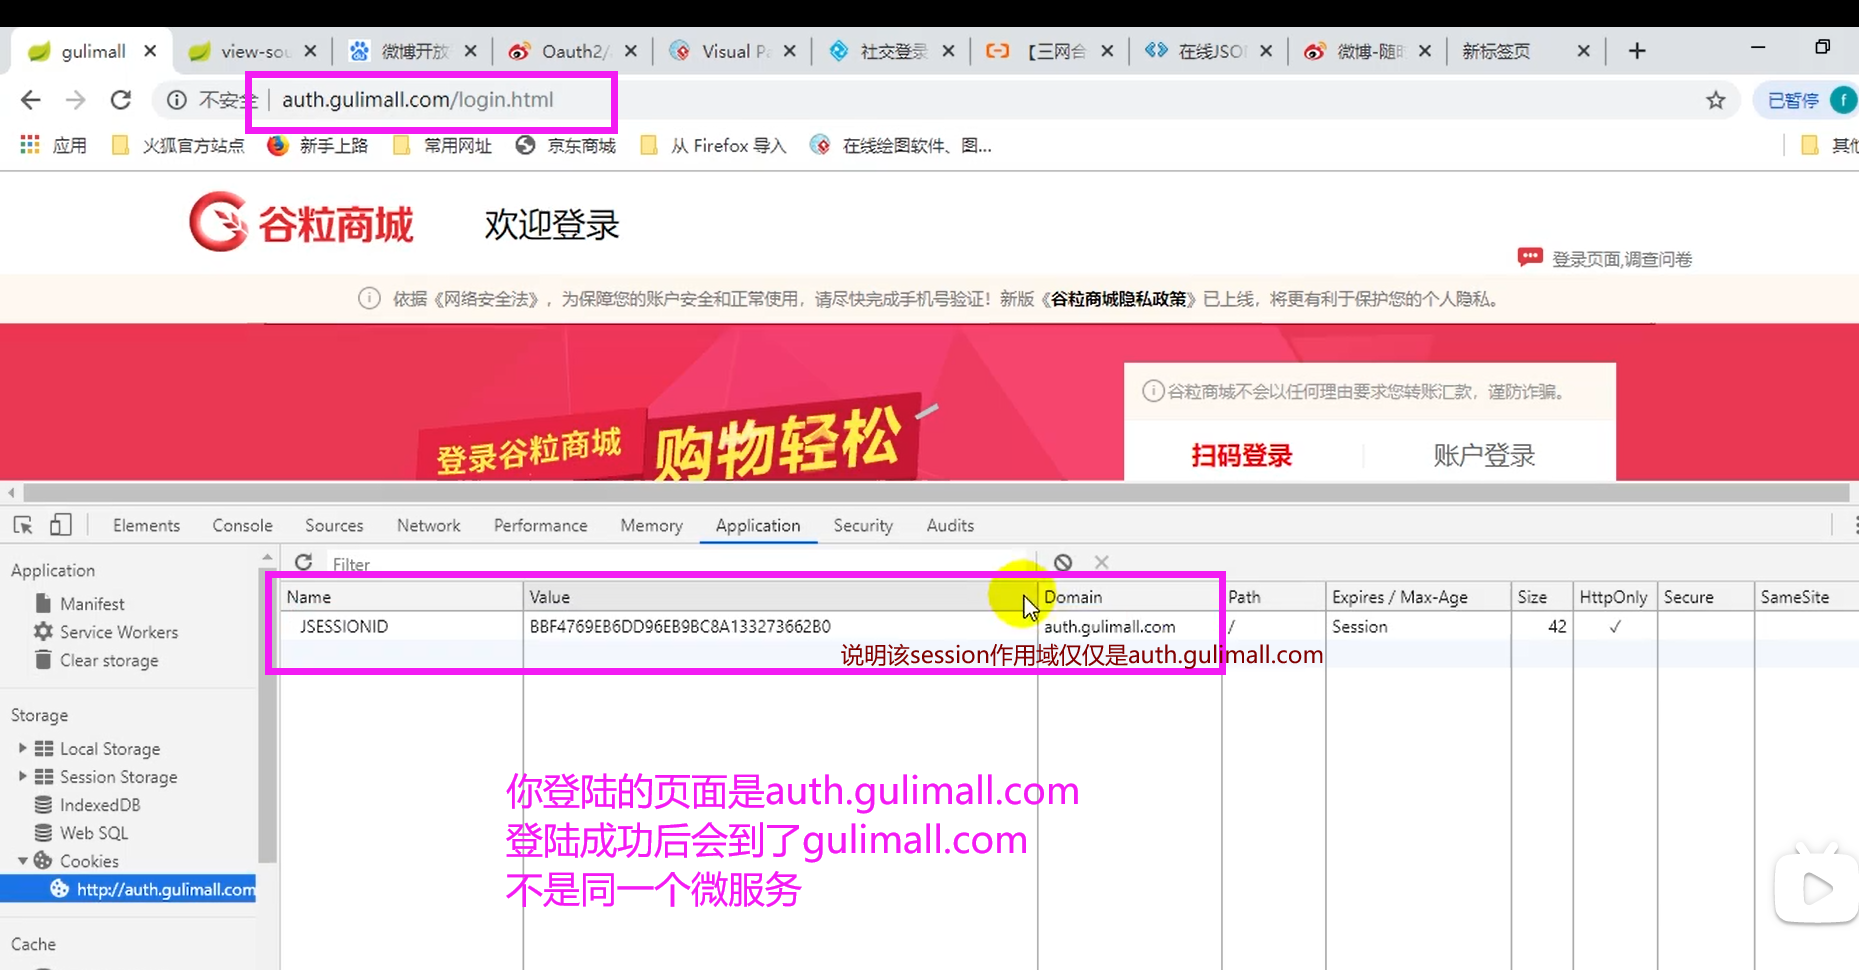
(2) session sharing in distributed environment
Multiple servers have member services. You save user information in memory on server A. if it falls on server B next time, even if the browser comes with a cookie, there must be no user information stored in server B's memory, which is also a problem.
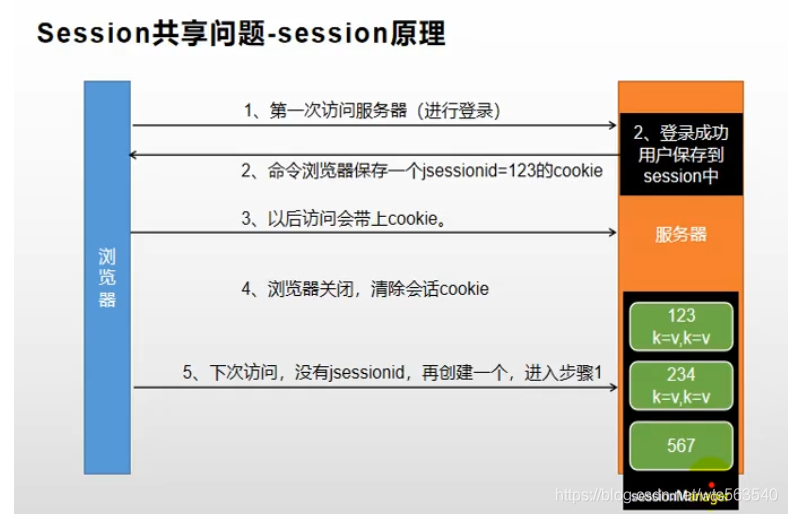
P226 SpringSession - session problem solving
-
session replication
After the user logs in, server A gets the session and copies the session to other machines. Obviously, this kind of processing is very bad -
Client storage
Storing the session on the browser is certainly quite unsafe -
hash consistency
According to the user, log in to the specified machine. However, remote calling is still difficult to solve -
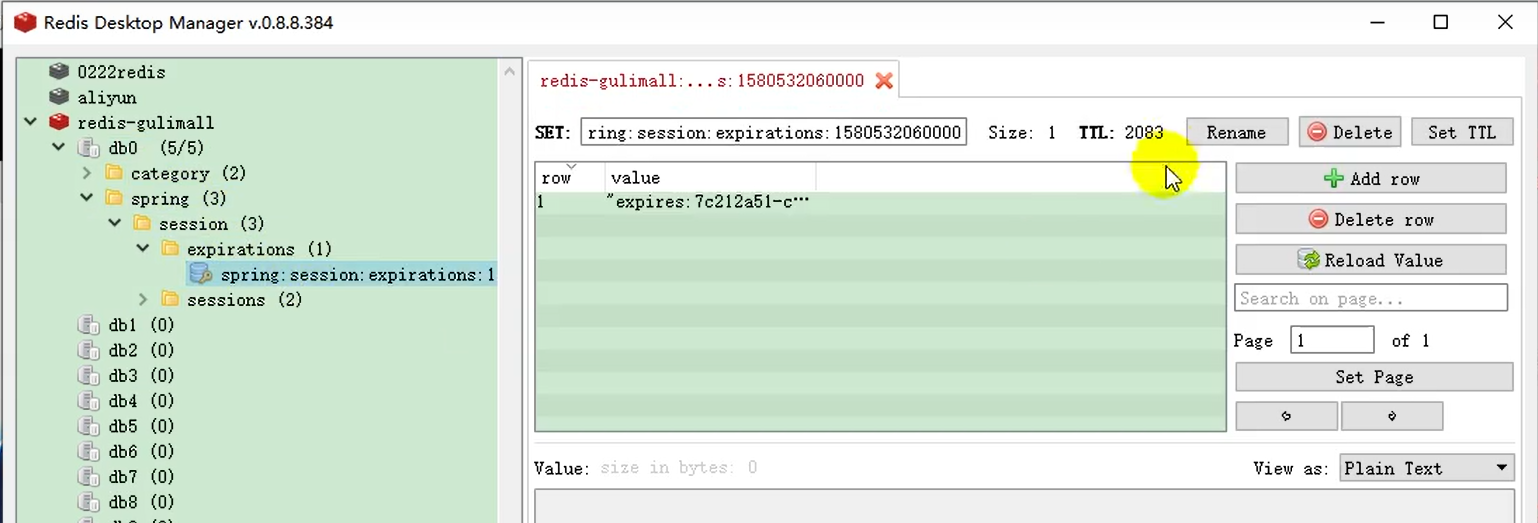
redis unified storage
The final choice is to put the session into redis so that each micro service can obtain the session
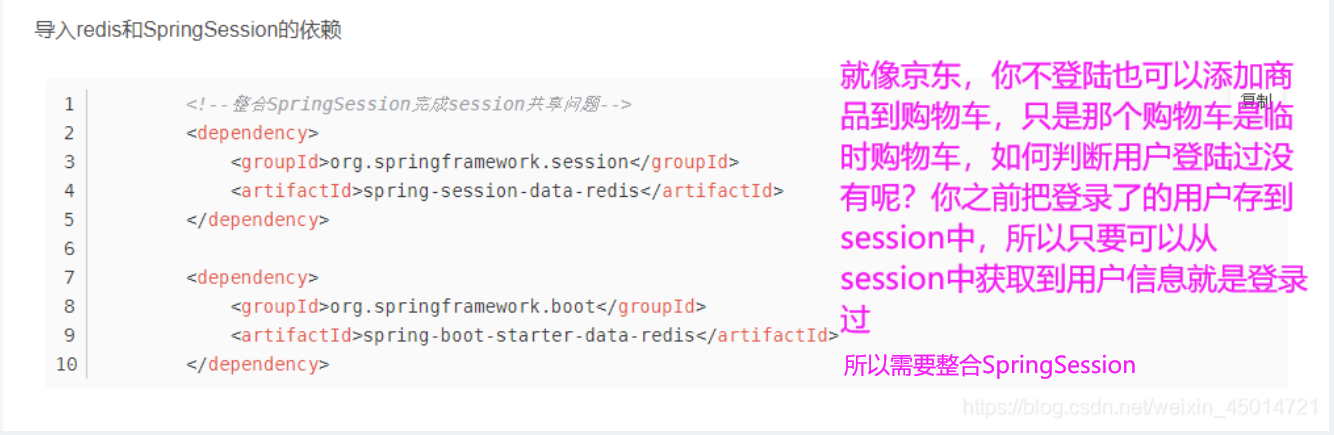
P227 spring session - spring session integration redis1
P228 spring session - spring session integration redis2
P229 spring session - spring session integration redis3
Always say:
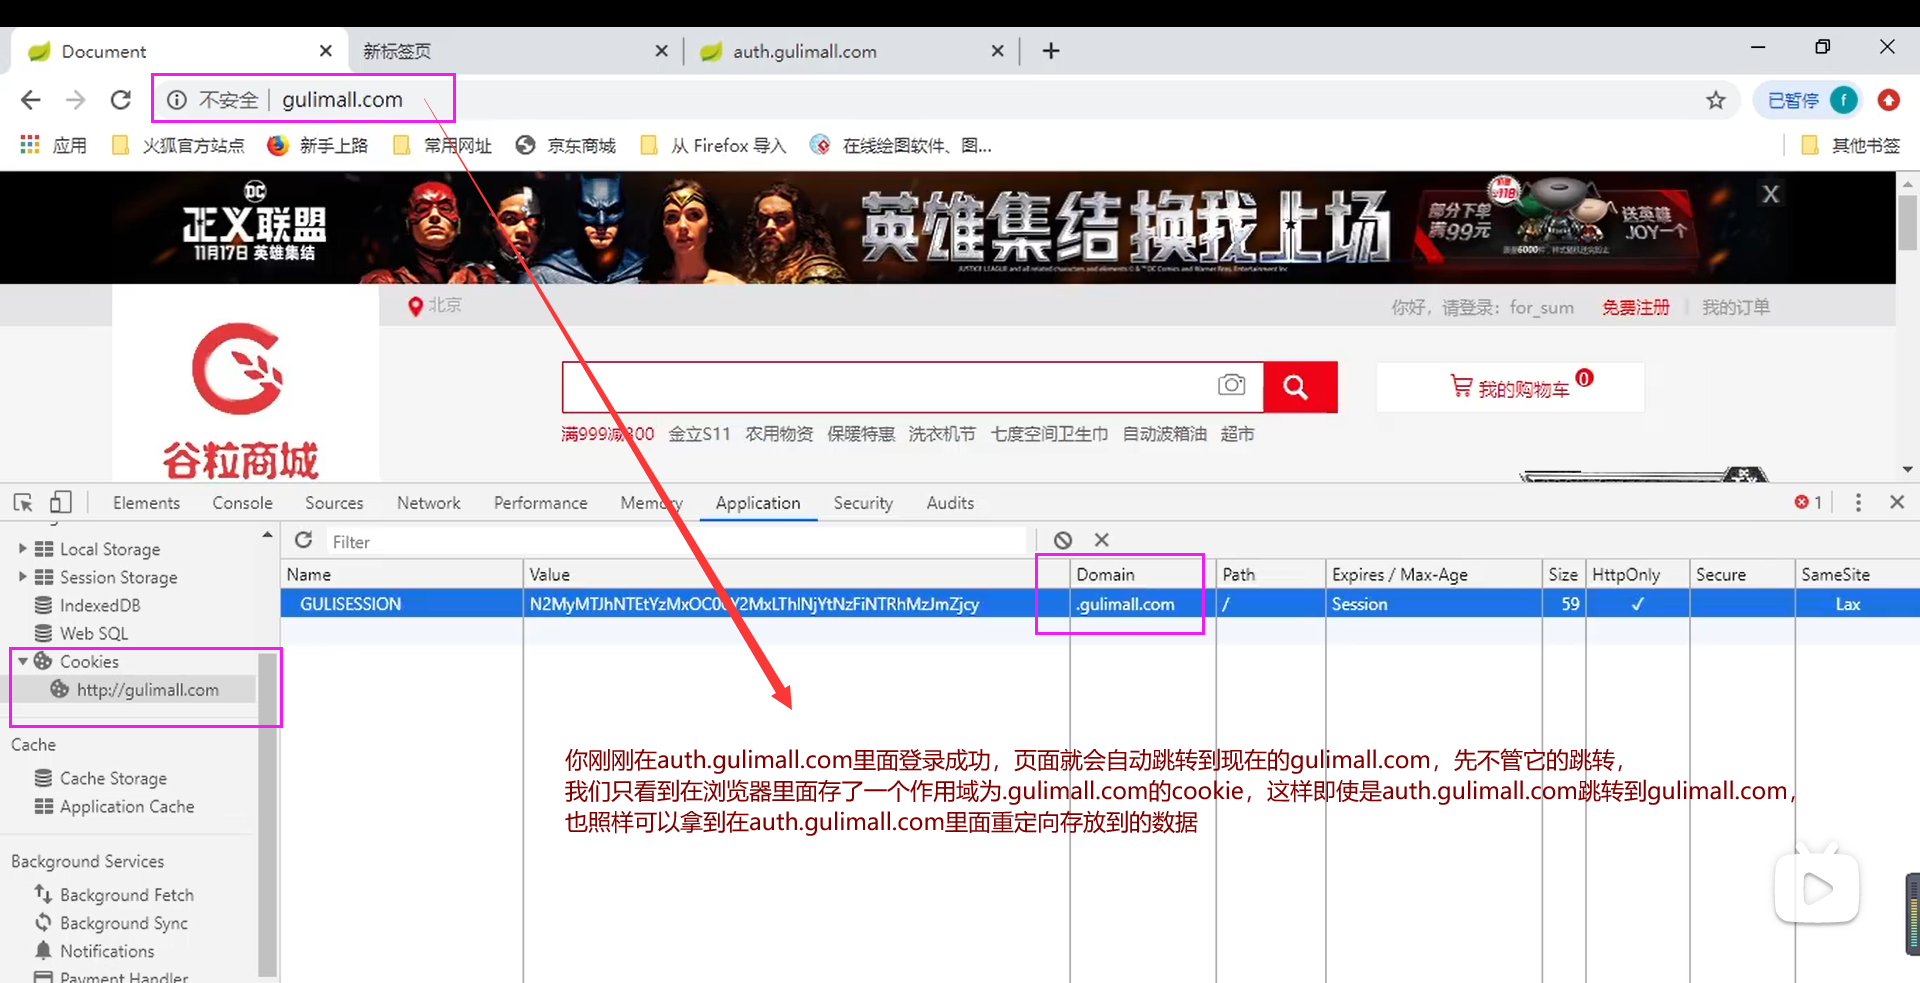
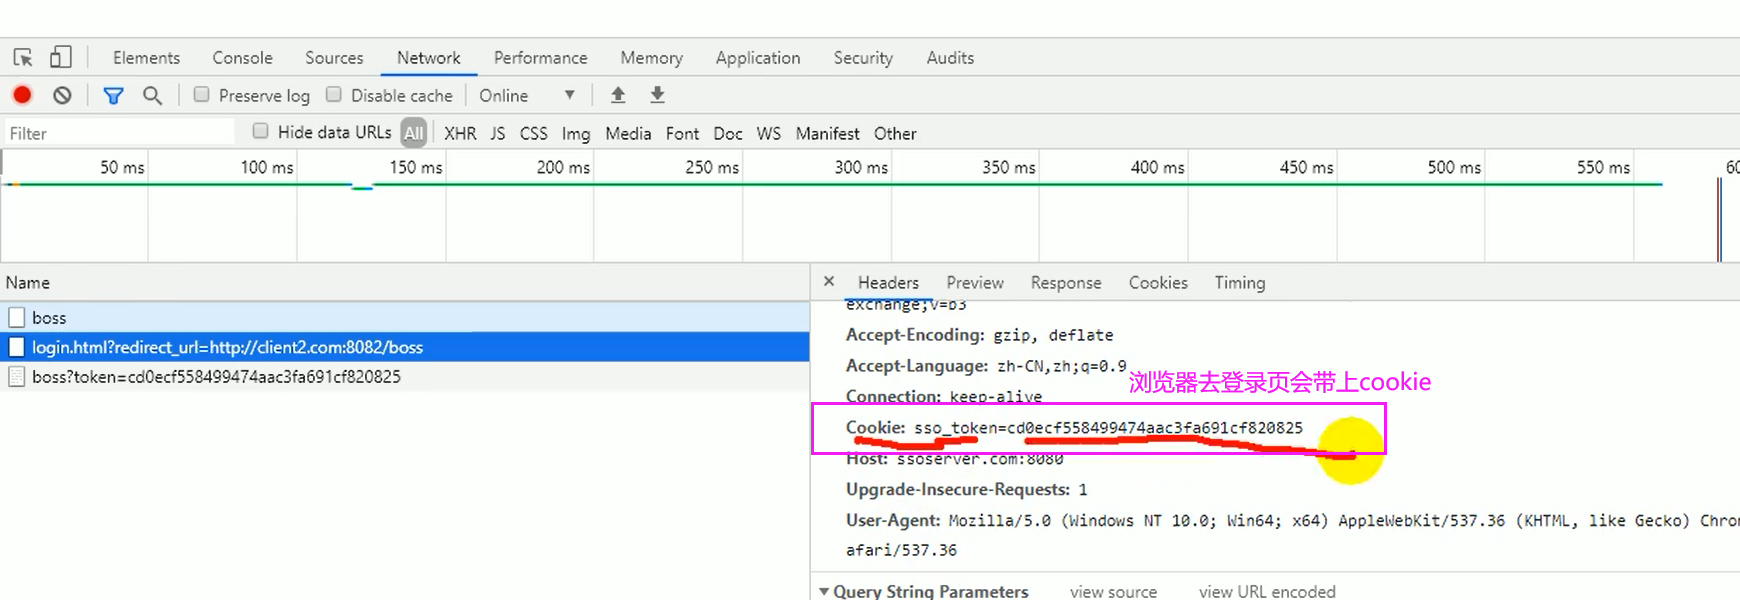
The browser will be in gulimall.com, auth gulimall.com will save the user related information of the successful login user from the database into the session, and when saving the session, it will not be stored in its own memory, but in redis, and then auth gulimall.com sends a cookie to the browser, and the scope of the cookie cannot be only auth gulimall. Instead, enlarge the service to. Com gulimall.com. At this time, the browser will bring this cookie when accessing any other service.
If you clear the session information in redis, you have to clear the logged in user information. Although the foreground browser carries cookie information when accessing the background, you can't find the user information in redis, so you have to log in again. Moreover, we have set the session in redis to expire in 30 minutes by default, that is, there will be no user information in redis after 30 minutes

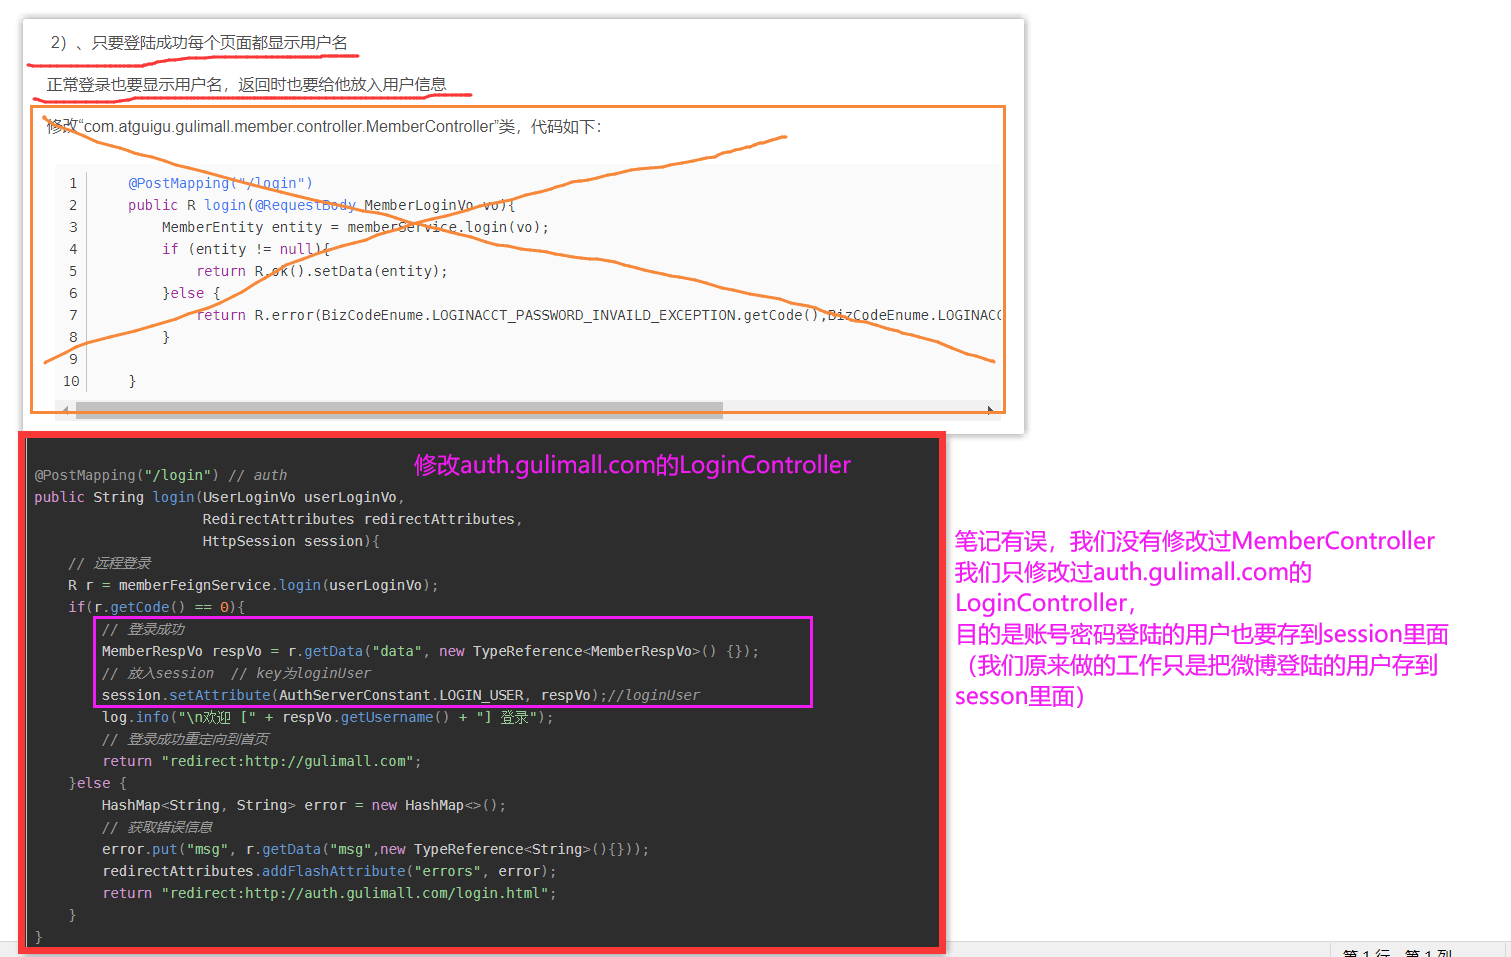
P230 page adjustment
P231 single sign on 1
P232 single sign on 2
P233 single sign on 3
P234 single sign on 4
P235 single sign on 5
1. Why single sign on?
Spring session can only put auth gulimall. Zoom in to gulimall.com scope If you visit Silicon Valley, you can share the same domain name as session. Com, but if you visit Silicon Valley, you can still solve the problem What about it. Www. 68mn? This different domain name also wants to share session. What should I do?
When you register and log in to Sina Weibo, you should ensure that you can get session data in sina sports and Sina News
2. How does single sign on work?
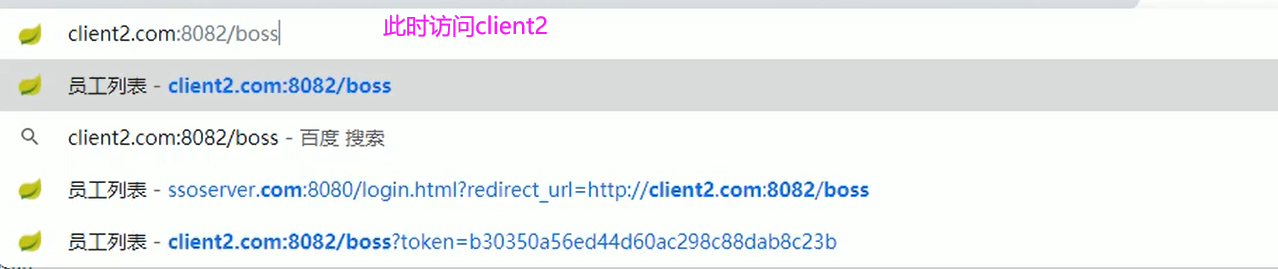
Two servers with different domain names, client1 and client2, a SSO server responsible for login, and a browser. The story between them
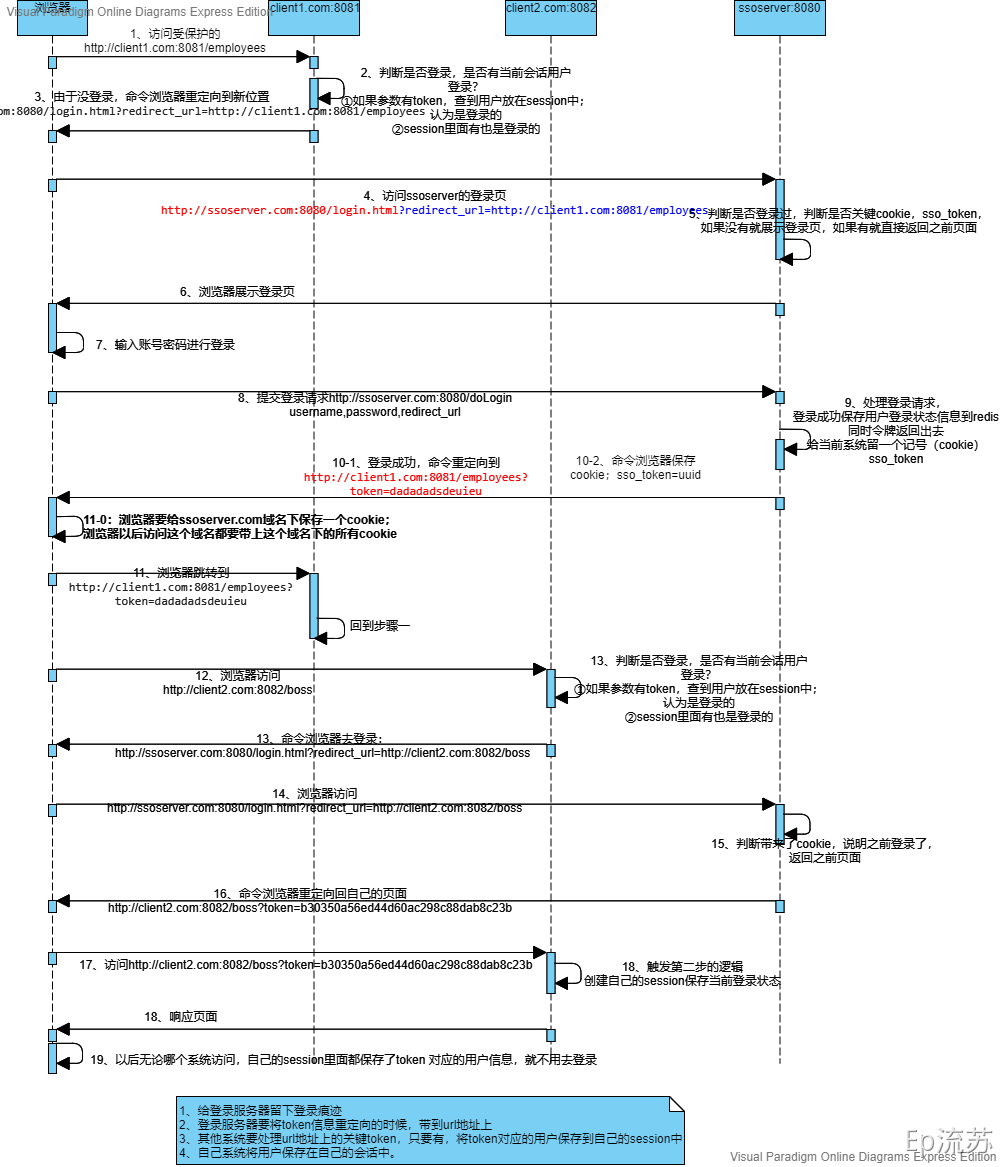
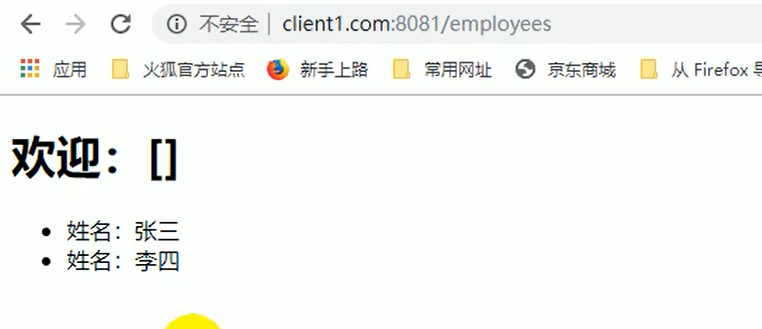
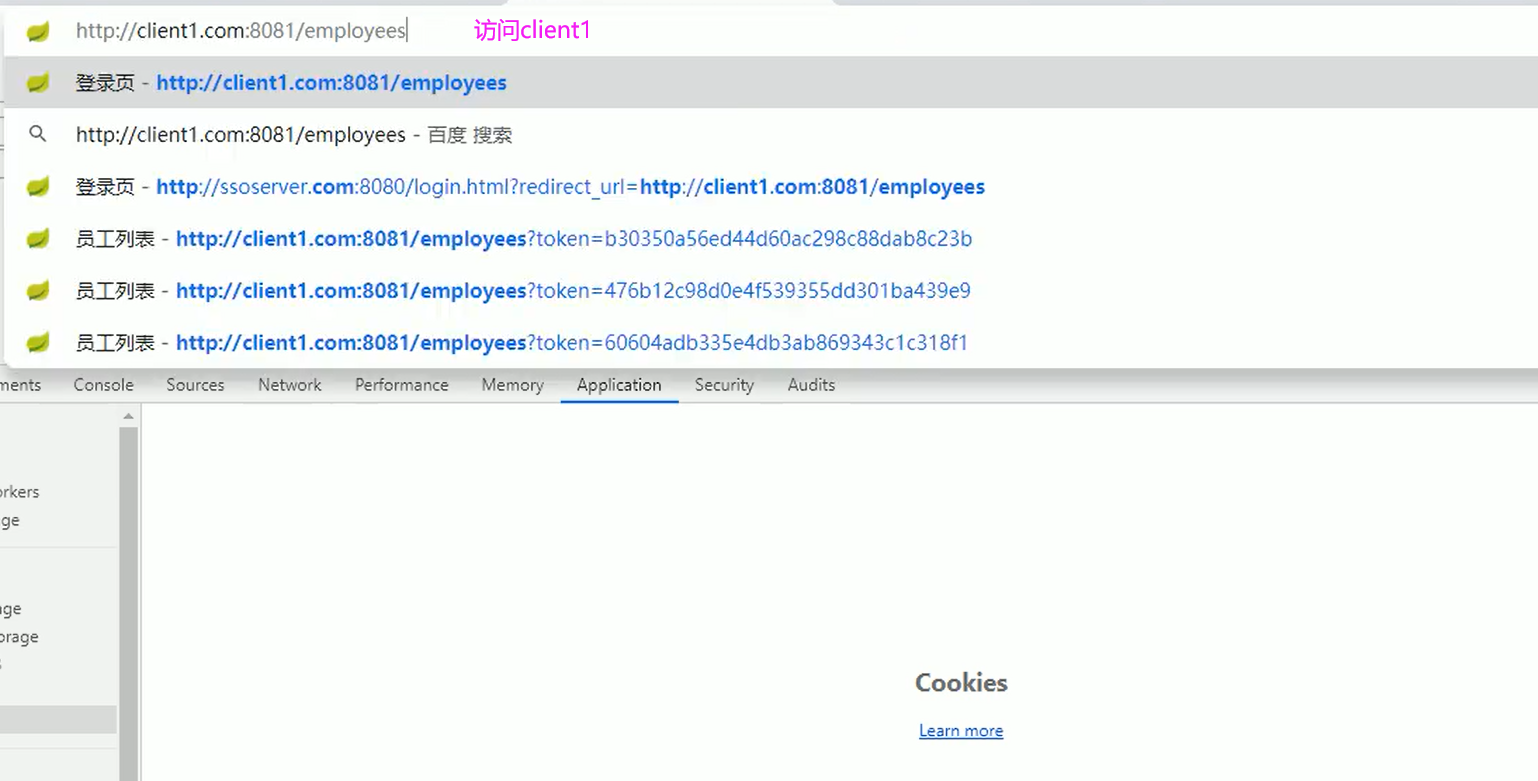
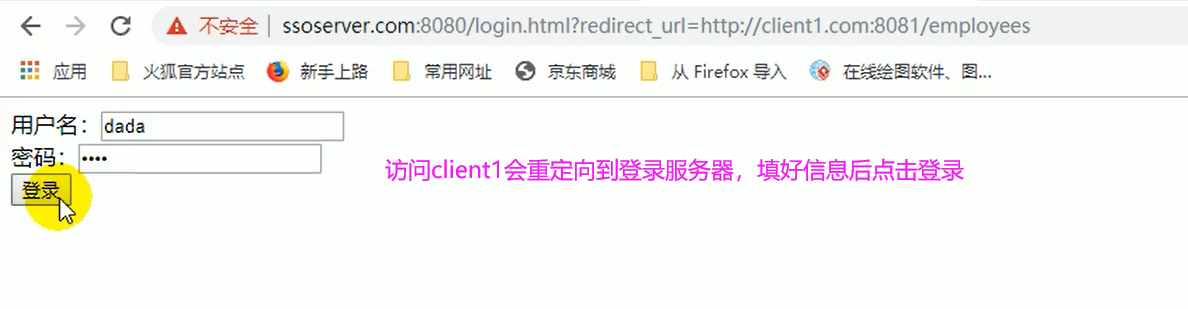
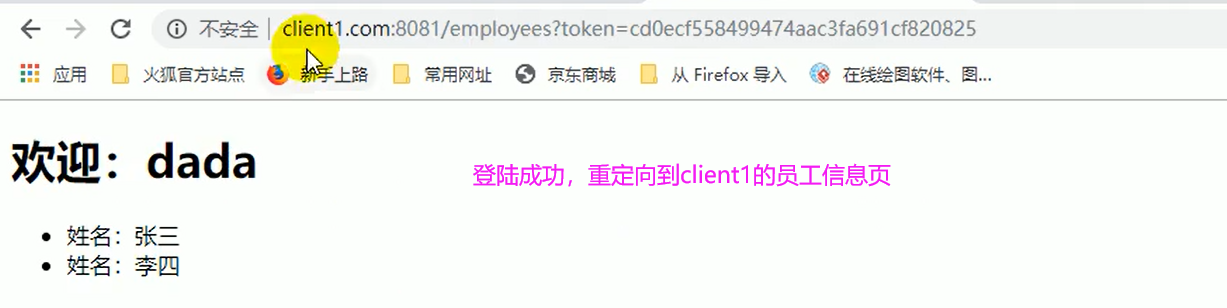
First, explain the meaning of this path: http://ssoserver.com:8080/login.html?redirect_url=http:I/client1.com:8081/employees The meaning of is to let you visit http://ssoserver.com:8080/login.html Login page, and redirect_ url=http:I/client1. COM: 8081 / employees means that you will be redirected to http: I / client1 when you finish logging in Location of COM: 8081 / employees
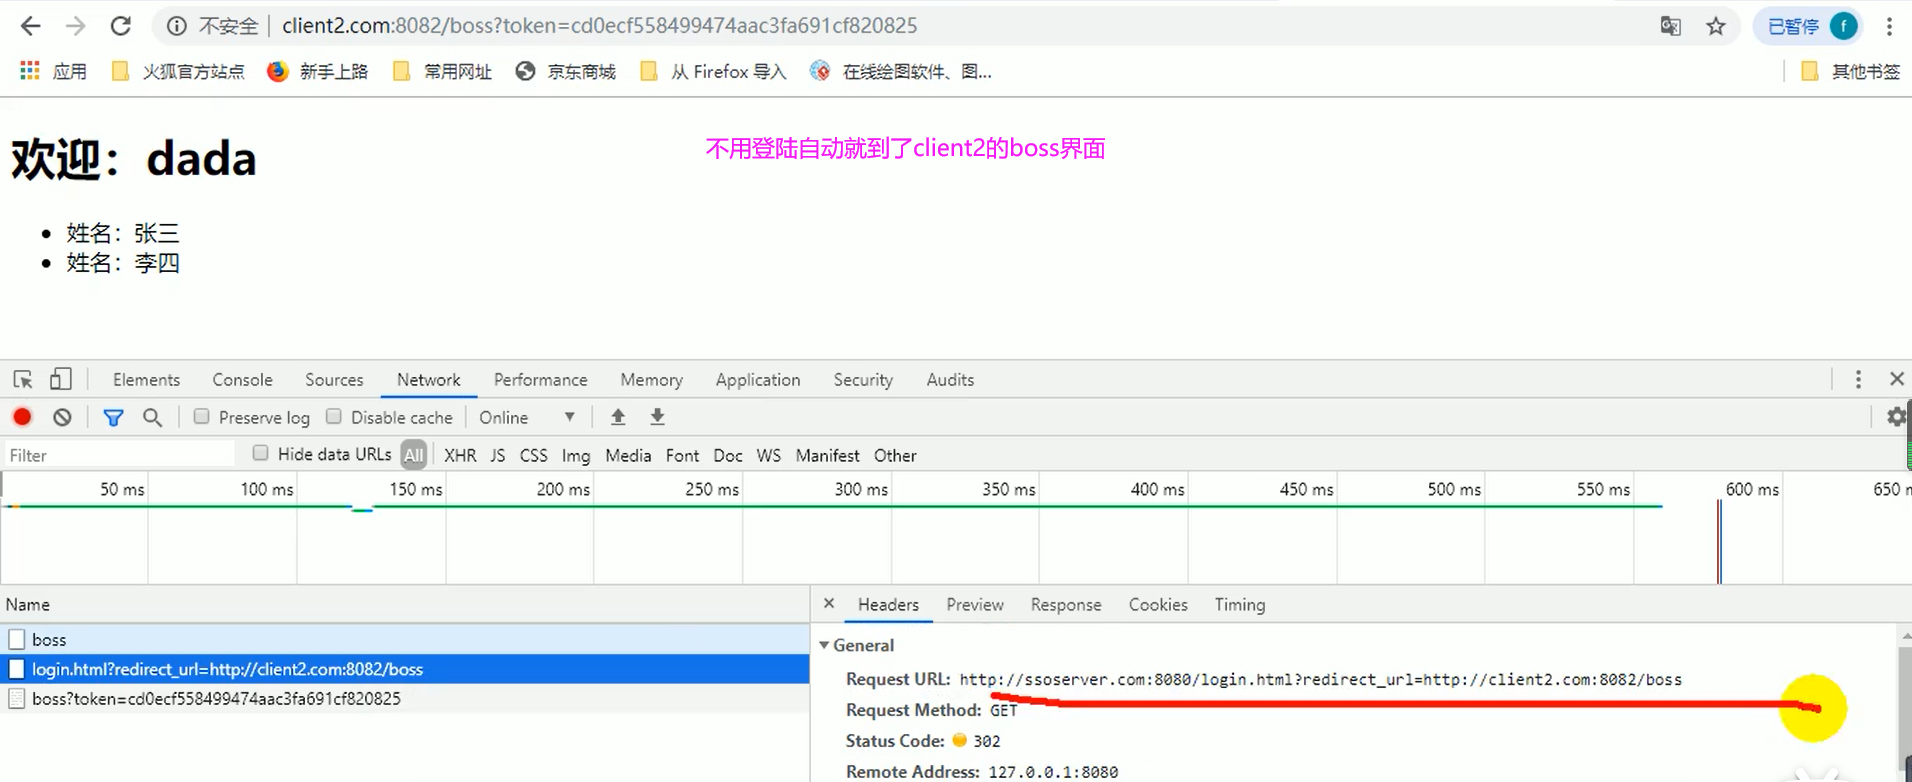
Analysis of steps 1-11: you can view employee information only after logging in. At first, the browser accesses client1 Employee information http: I / client1 COM: 8081 / employees, client1 will judge whether to log in according to whether the URL has a token parameter. Because there is no token parameter, that is, there is no login, the server will command the browser to redirect to ssoserver COM, http: I / ssoserver com:8080/login. html? redirect_ url=http:I/client1.com:8081/employees,ssoserver.com will judge whether it has logged in. If it has not logged in, the login page will be displayed. The user will enter the account and password to log in and submit the login request http: / ssoserver com:8080/doLogin? usermame,password,redirect_ URL to ssoserver COM, then ssoserver Com will save the user status to redis and ssoserver Com will redirect the command to http: / lclient1 com:8081/employees? Token = dadsdeuieu (browser access path), and ssoserver Com will command the browser to save SSO_ Token = dadsdeuieu cookie. The browser can access the employee information this time. His access path is just mentioned http://lclient1.com:8081/employees?token=dadadadsdeuieu Http: I / client1.0 to access employee information at the beginning COM: 8081 / employees has more token = dadsdeuieu, which goes back to step 2. Client1 will judge whether to log in according to the token parameter. This time, client1 will feel that it has logged in and can access employee information.
Step 12-19 parsing: this time, the browser will access the boss information of client 2 http: I / client2 COM: 8081 / boss, client2 will judge whether to log in according to whether there is a token parameter. Because there is no token parameter, that is, there is no login, the server will command the browser to redirect to ssoserver COM, http: I / ssoserver com:8080/login. html? redirect_ url=http:I/client2.com:8081/boss,ssoserver.com will determine whether you have logged in, because the browser has SSO_ A cookie like token = dadsdeuieu, which can be found in redis, indicates that it has previously logged in to client1 or client2, ssoserver Com will redirect the command to http: / lclient2 com:8082/boss? Token = dadsdeuieu, so the browser will access http://lclient2.com:8082/boss?token=dadadadsdeuieu , this returns to step 2. Client2 will judge whether to log in according to whether there is a token parameter. Once logged in, it will respond to the page.
Therefore, no matter whether the browser accesses client1 or client2 in the future, since cookie s are saved in the browser, ssoserver Com will determine that it has logged in, so it doesn't need to log in in in the future.
3. Implementation of single sign on code
Code of client1:
@GetMapping(value = "/employees")
public String employees(Model model,
                        HttpSession session,
                        @RequestParam(value = "redisKey", required = false) String redisKey) {

    if (!StringUtils.isEmpty(redisKey)) {
    	//If the redisKey is not empty (that is, the token is not empty), it means that you have logged in to the server

    	// Take the token to the server and find out the user's username from redis on the server
        RestTemplate restTemplate=new RestTemplate();

        ResponseEntity<Object> forEntity = restTemplate.getForEntity("http://ssoserver.com:8080/userInfo?redisKey="+ redisKey, Object.class);

        Object loginUser = forEntity.getBody();

        session.setAttribute("loginUser", loginUser);//Set to your own session
    }
    //Try to get "loginUser" from your session
    Object loginUser = session.getAttribute("loginUser");

    if (loginUser == null) {
    	//There is no token, and there is no "loginUser" in the session. Let it log in on the login page
        return "redirect:" + "http://ssoserver.com:8080/login.html" + "?url=http://clientA.com/employees";
    } else {
    	//There is "loginUser" in your session. Even if there is no token, it means you have logged in
        List<String> emps = new ArrayList<>();
        emps.add("Zhang San");
        emps.add("Li Si");
        model.addAttribute("emps", emps);
        return "employees"; //Go to the front-end page, and the front-end will show the data
    }
}
Code of client2:
The code is as like as two peas, which is to change the access path @GetMapping(value = "/boss").
Code of ssoserver:
<body>
<form action="/doLogin" method="post">
    <!--You just asked for data url,No, it doesn't matter. Don't jump-->
    <input type="hidden" name="url" th:value="${url}">
    <!--Bring the currently logged in username-->
<!--    <input type="hidden" name="user" th:value="${username}">-->
        user name:<input name="username" value="test"><br/>
        password:<input name="password" type="password" value="test">
    <input type="submit" value="Sign in">
</form>
</body>
@Controller
public class LoginController {

	@Autowired
	private StringRedisTemplate stringRedisTemplate;

	@ResponseBody
	@GetMapping("/userInfo") //client1 or client2 will call this method to get the stored user information in redis
	public Object userInfo(@RequestParam("redisKey") String redisKey){
		// Take the token s forwarded from other domain names and check in redis
		Object loginUser = stringRedisTemplate.opsForValue().get(redisKey);
		return loginUser;
	}


	@GetMapping("/login.html") // Subsystems are here
	public String loginPage(@RequestParam("url") String url,
							Model model,
							@CookieValue(value = "redisKey", required = false) String redisKey) {

		//This is the cookie obtained from the browser. Non empty representatives have logged in
		if (!StringUtils.isEmpty(redisKey)) {
			//Non empty representatives have logged in
			return "redirect:" + url + "?redisKey=" + redisKey;
		}

		model.addAttribute("url", url);

		//Go to the login page before logging in
		return "login";
	}


	@PostMapping("/doLogin") //After entering the user name and password in the front end, you will come here for unified authentication on the server side
	public String doLogin(@RequestParam("username") String username,
						  @RequestParam("password") String password,
						  HttpServletResponse response,
						  @RequestParam(value="url",required = false) String url){

		//After confirming the user, a cookie is generated and stored in the browser and redis
		if(!StringUtils.isEmpty(username) && !StringUtils.isEmpty(password)){//If it is not empty, it simply thinks that the login is correct

			String redisKey = UUID.randomUUID().toString().replace("-", "");//Replace token with uuid

			Cookie cookie = new Cookie("redisKey", redisKey);

			response.addCookie(cookie);//Store cookie s in browser

			stringRedisTemplate.opsForValue().set(redisKey, username+password+"...", 30, TimeUnit.MINUTES);//Stored in redis

			return "redirect:" + url + "?redisKey=" + redisKey;//Take the token when redirecting
		}

		// Login failed, login again
		return "login";
	}

}
demonstration
The code is used by netizens, and the screenshot is used by teachers. Netizens like to name themselves and change the token to redisKey or something. Don't care about the differences in details
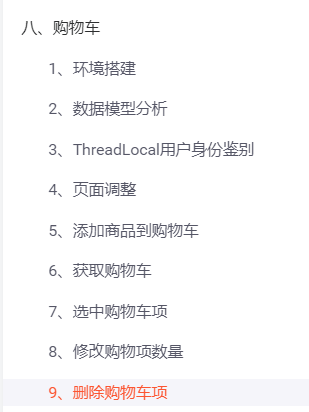
P236 shopping cart - environment construction
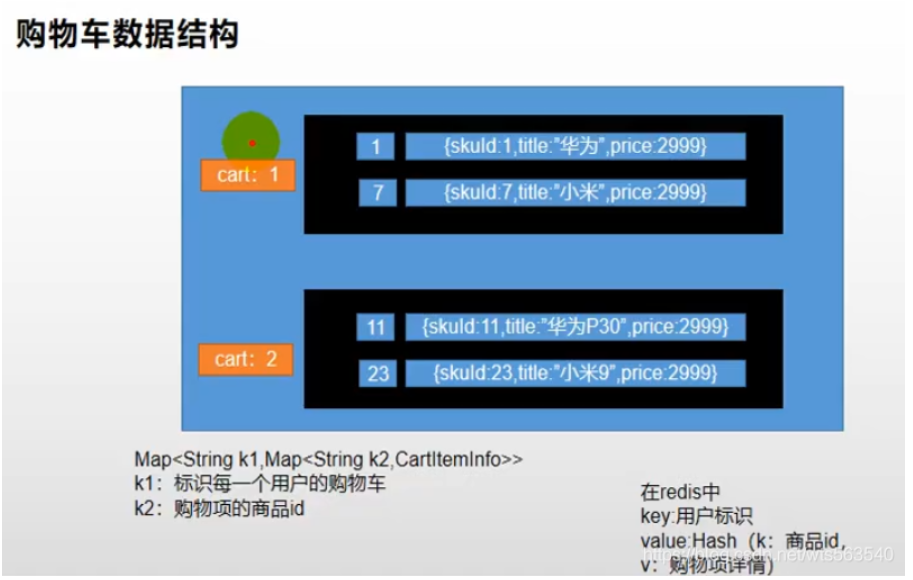
P237 shopping cart - Analysis of data model 1
P238 shopping cart - Analysis of data model 2
Always say:
This section explains which database (MySQL or Redis?) should be used to store the information in the user's shopping cart, And whether to use List to store this information or Hash to store this information after using Redis? And the preparation of shopping cart VO and shopping item vo


(3) why write getter and setter methods instead of @ Data in VO writing? Because the calculation of "total price = unit price x quantity" in the shopping item VO needs to be calculated manually, using @ Data will only override the user-defined setter method; Moreover, in the shopping cart VO, you should obtain the total price and the quantity of goods, so some properties should not have setter methods.
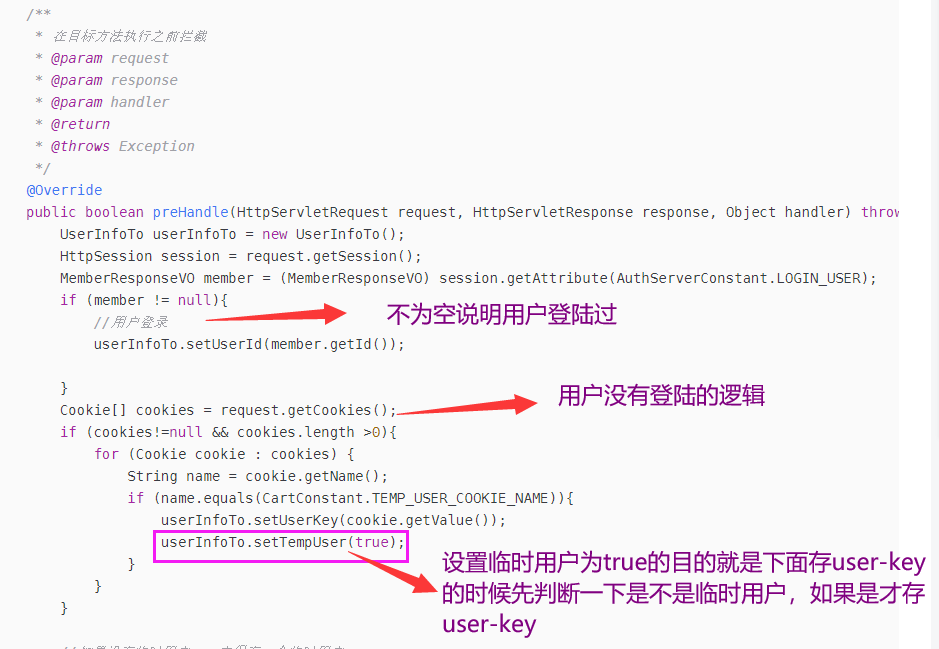
P239 shopping cart - interceptor authenticates users
Always say:
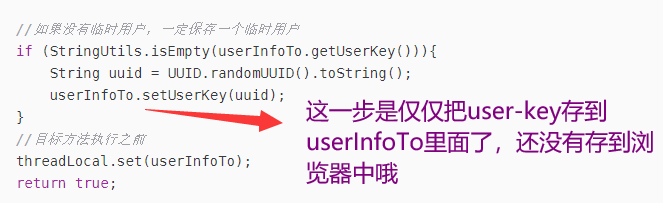
Before all controllers of the shopping cart are executed, we execute an interceptor. Judge whether the user logs in in the interceptor. If the user information cannot be obtained from the session, it means that he has not logged in. If he has not logged in, get the user key from the browser. If there is no user key in the browser, it means that the user enters JD for the first time without logging in. We have to create a cookie named user key and set the scope of the cookie Expiration time. If he comes tomorrow, we can get the user key of the user from the browser.
When a user comes in, the process of "interceptor Controller Service Dao" executed by us allows the same thread to execute, which uses ThreadLocal technology. ThreadLocal is the same thread sharing data, and the data in this thread will be shared. The use process is as follows:
ThreadLocal<UserInfoTo> threadLocal = new ThreadLocal<>();//Create a threadLocal
threadLocal.set(userInfoTo);//Set the data to be shared
....
UserInfoTo userInfoTo = threadLocal.get();//The shared data can be obtained later
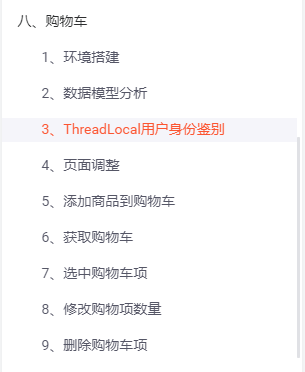
P240 page adjustment
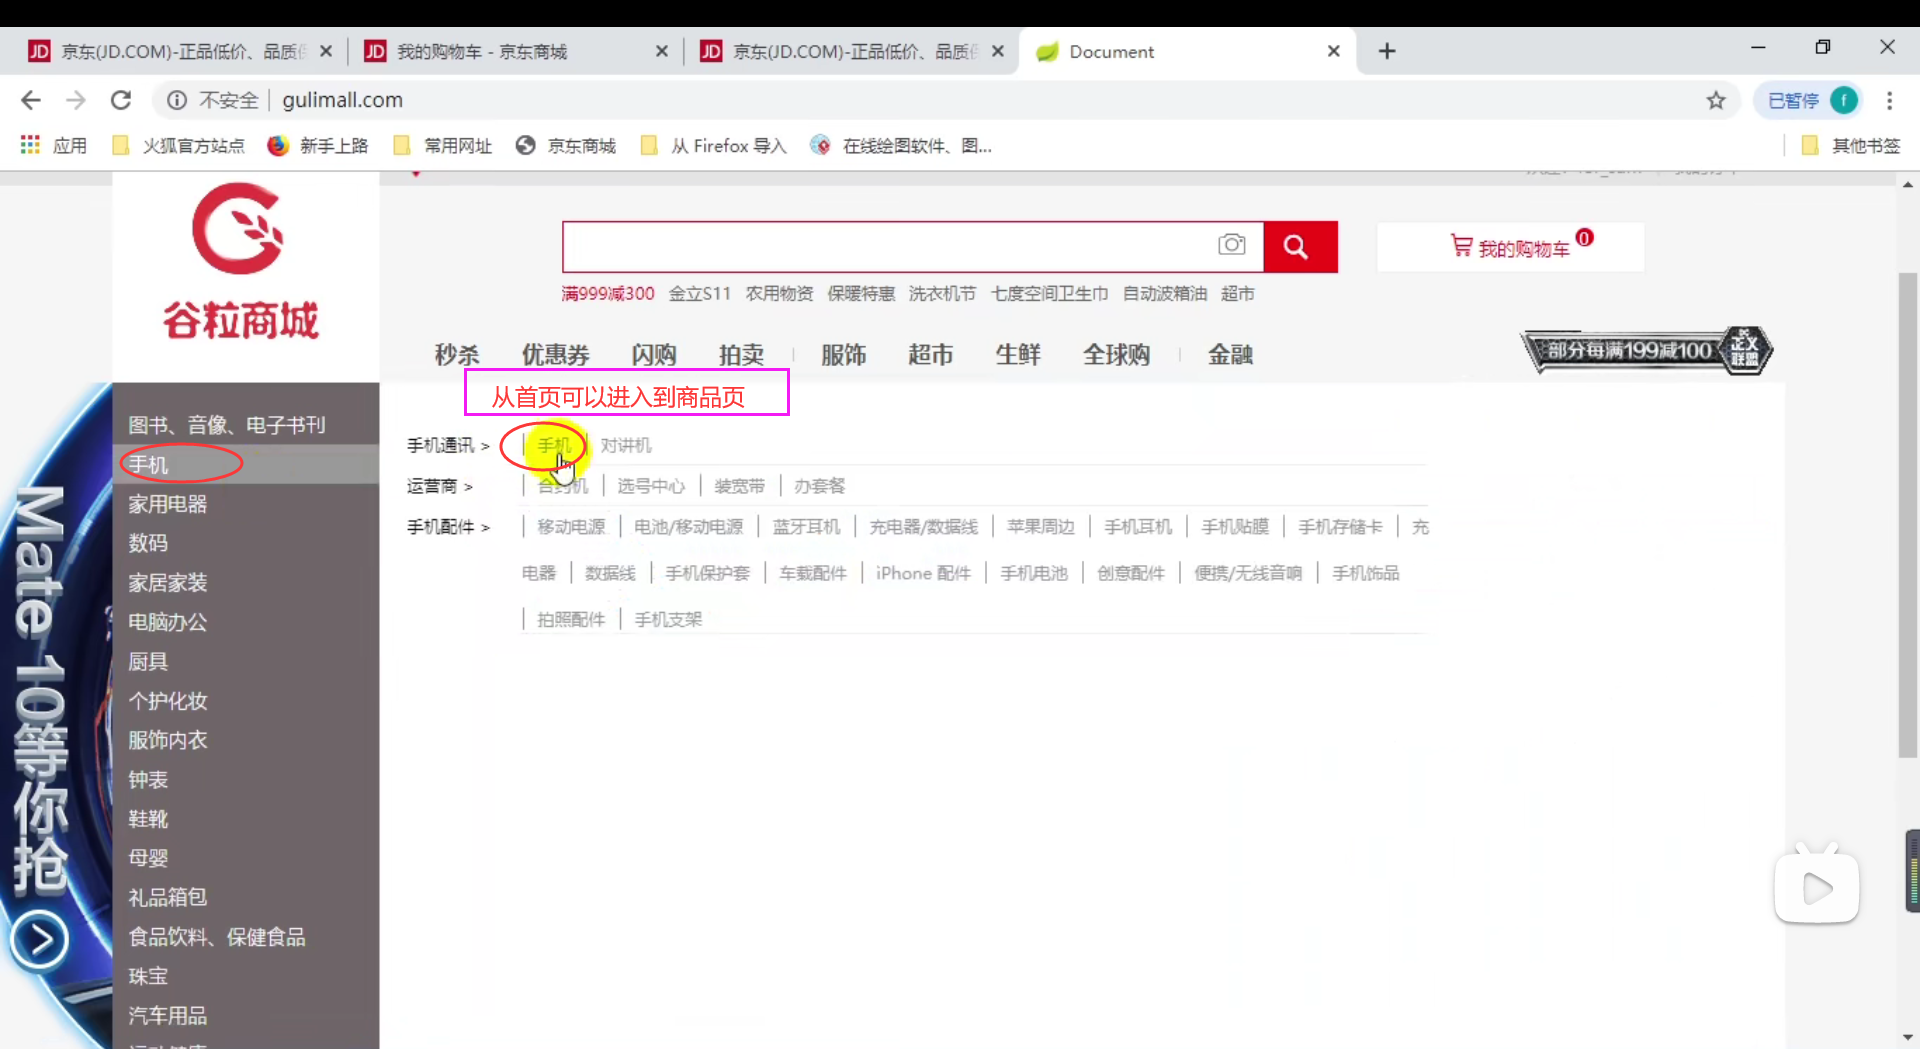
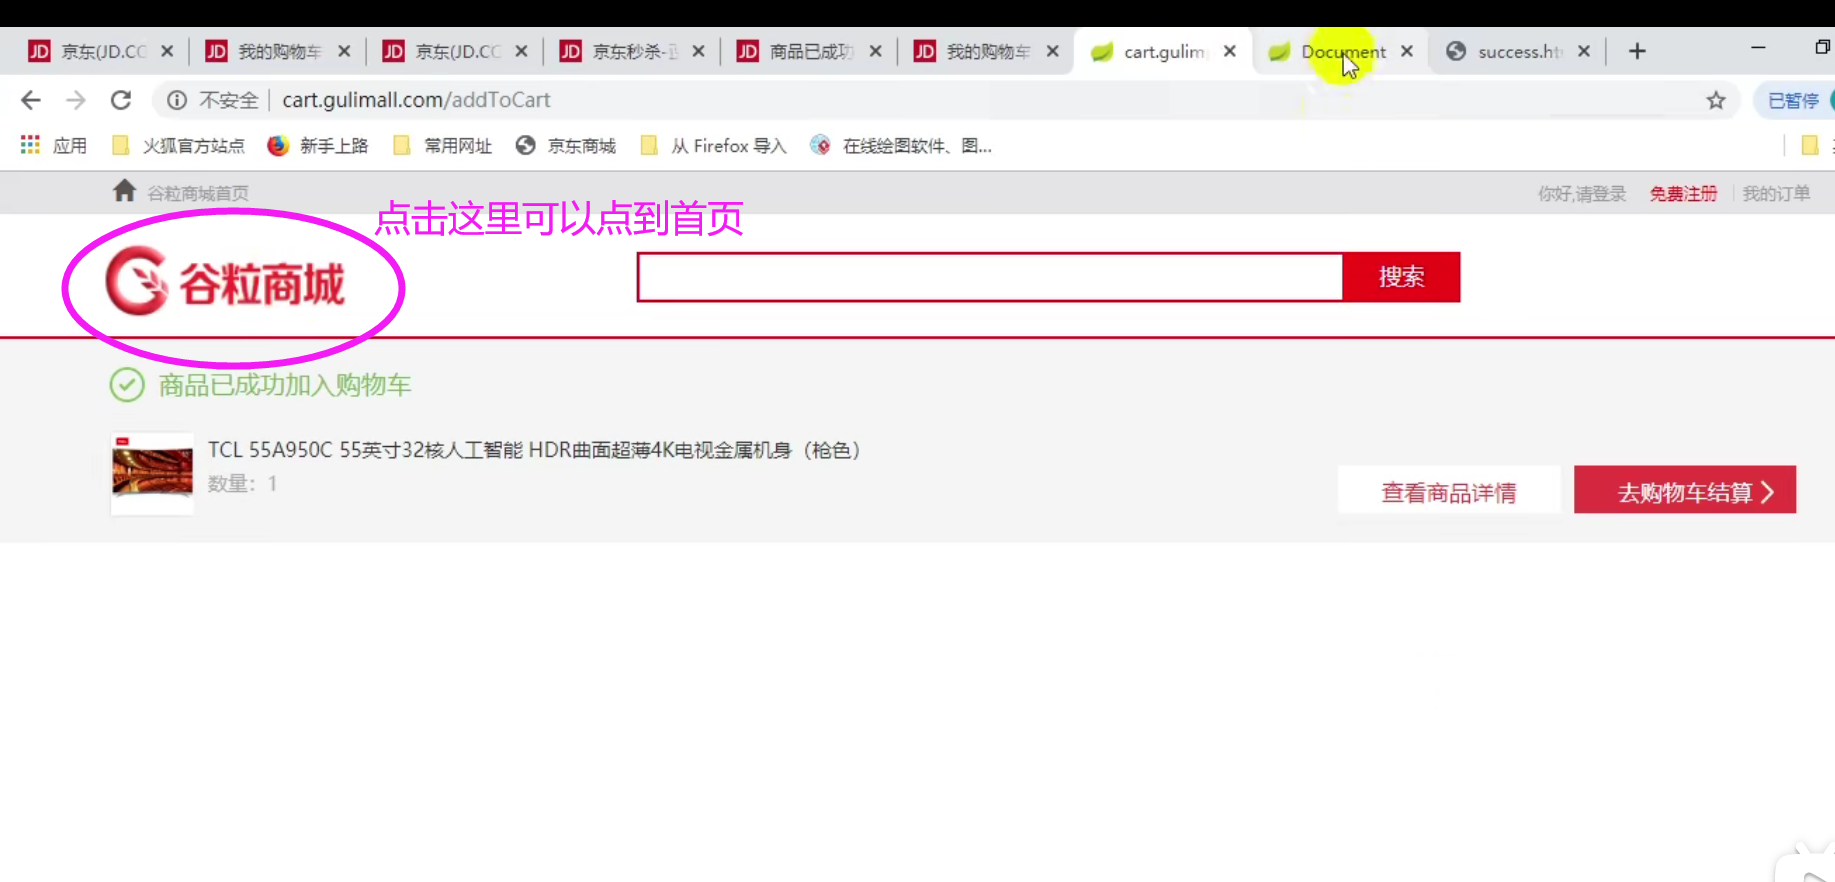
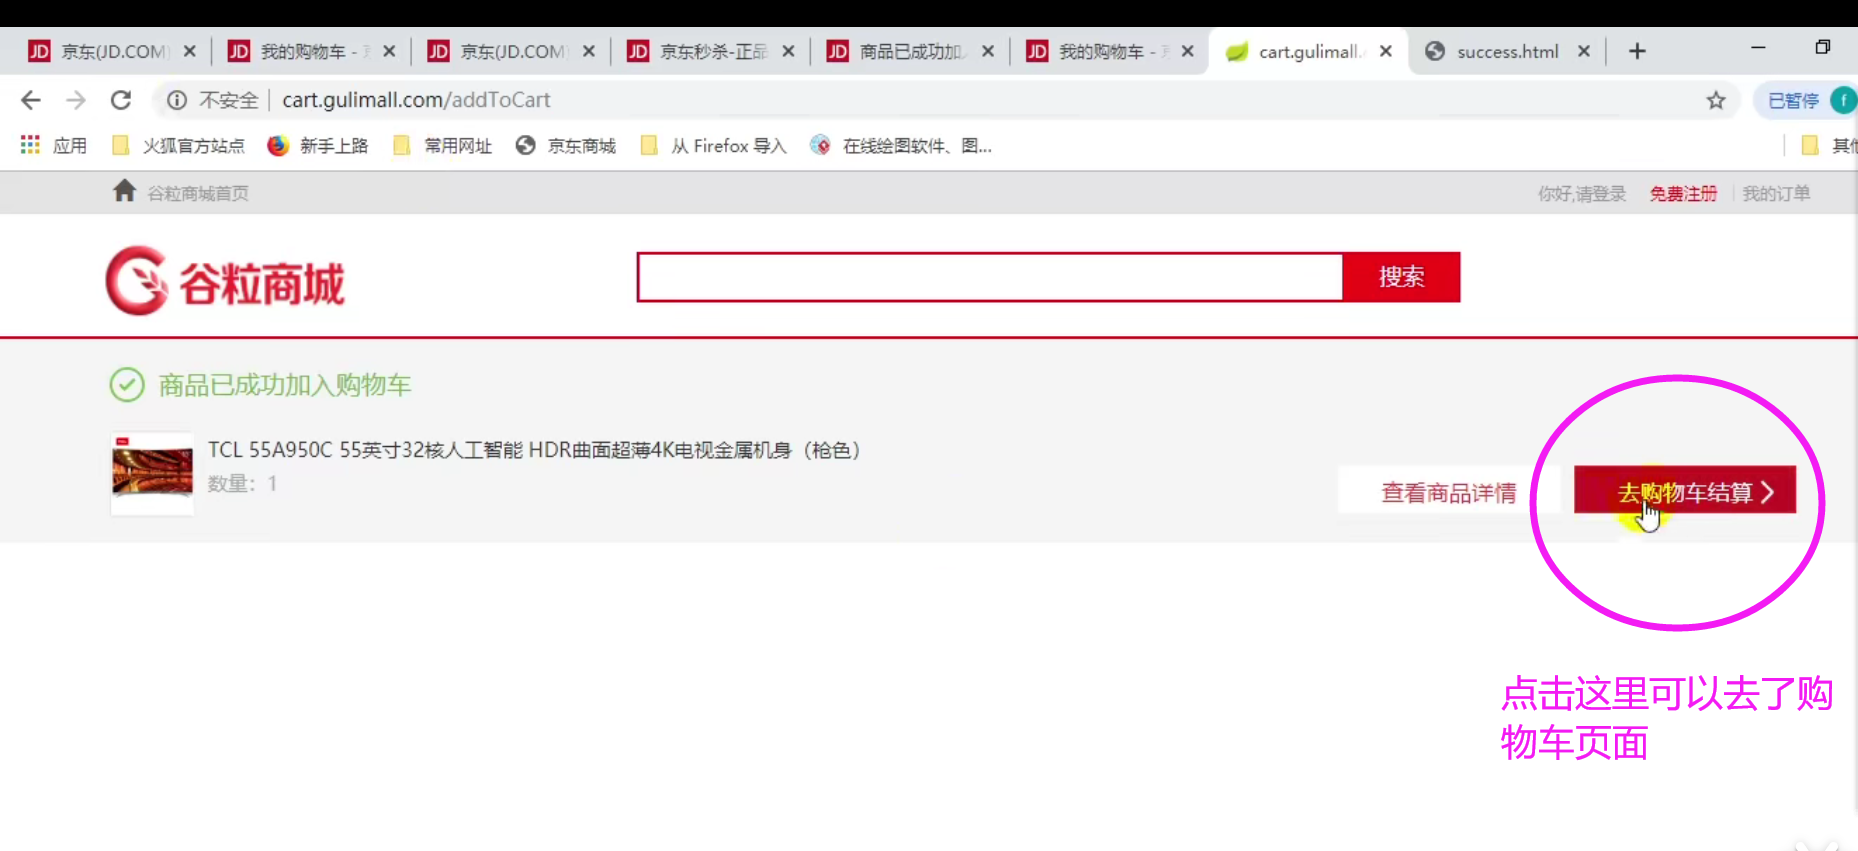
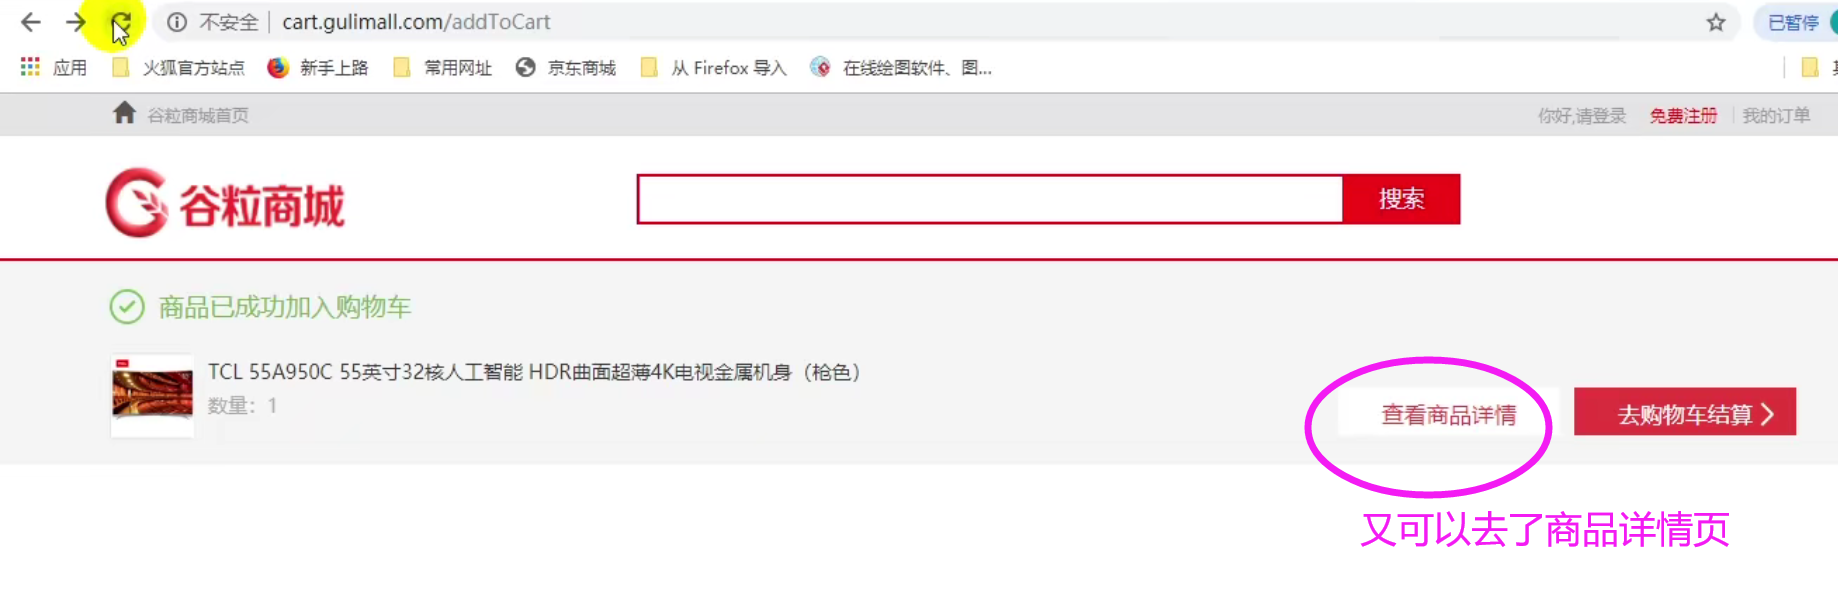
The interceptor is written, but the Controller and service are not written. Before that, we first open the whole page (the home page can enter the commodity page, add commodities from the commodity page to the shopping cart, and then click the shopping cart to enter the shopping cart page). The content of this section is the foreground code.

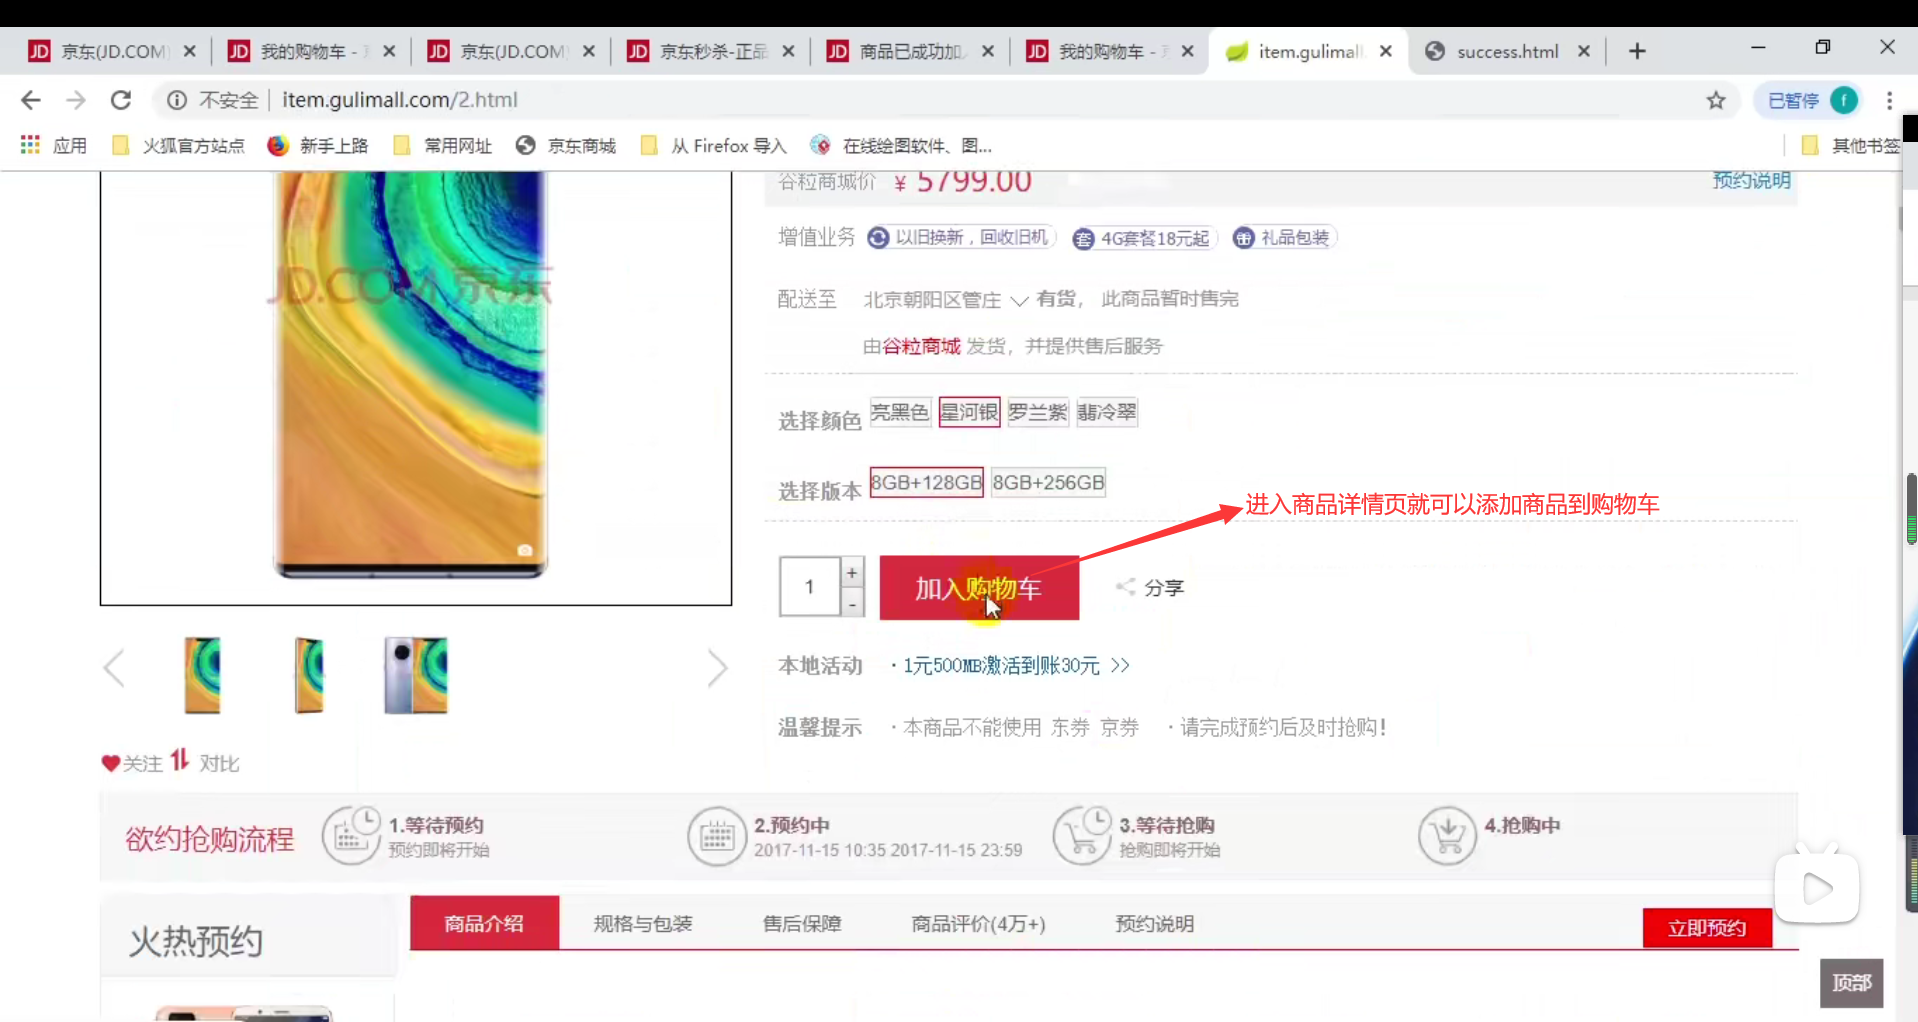
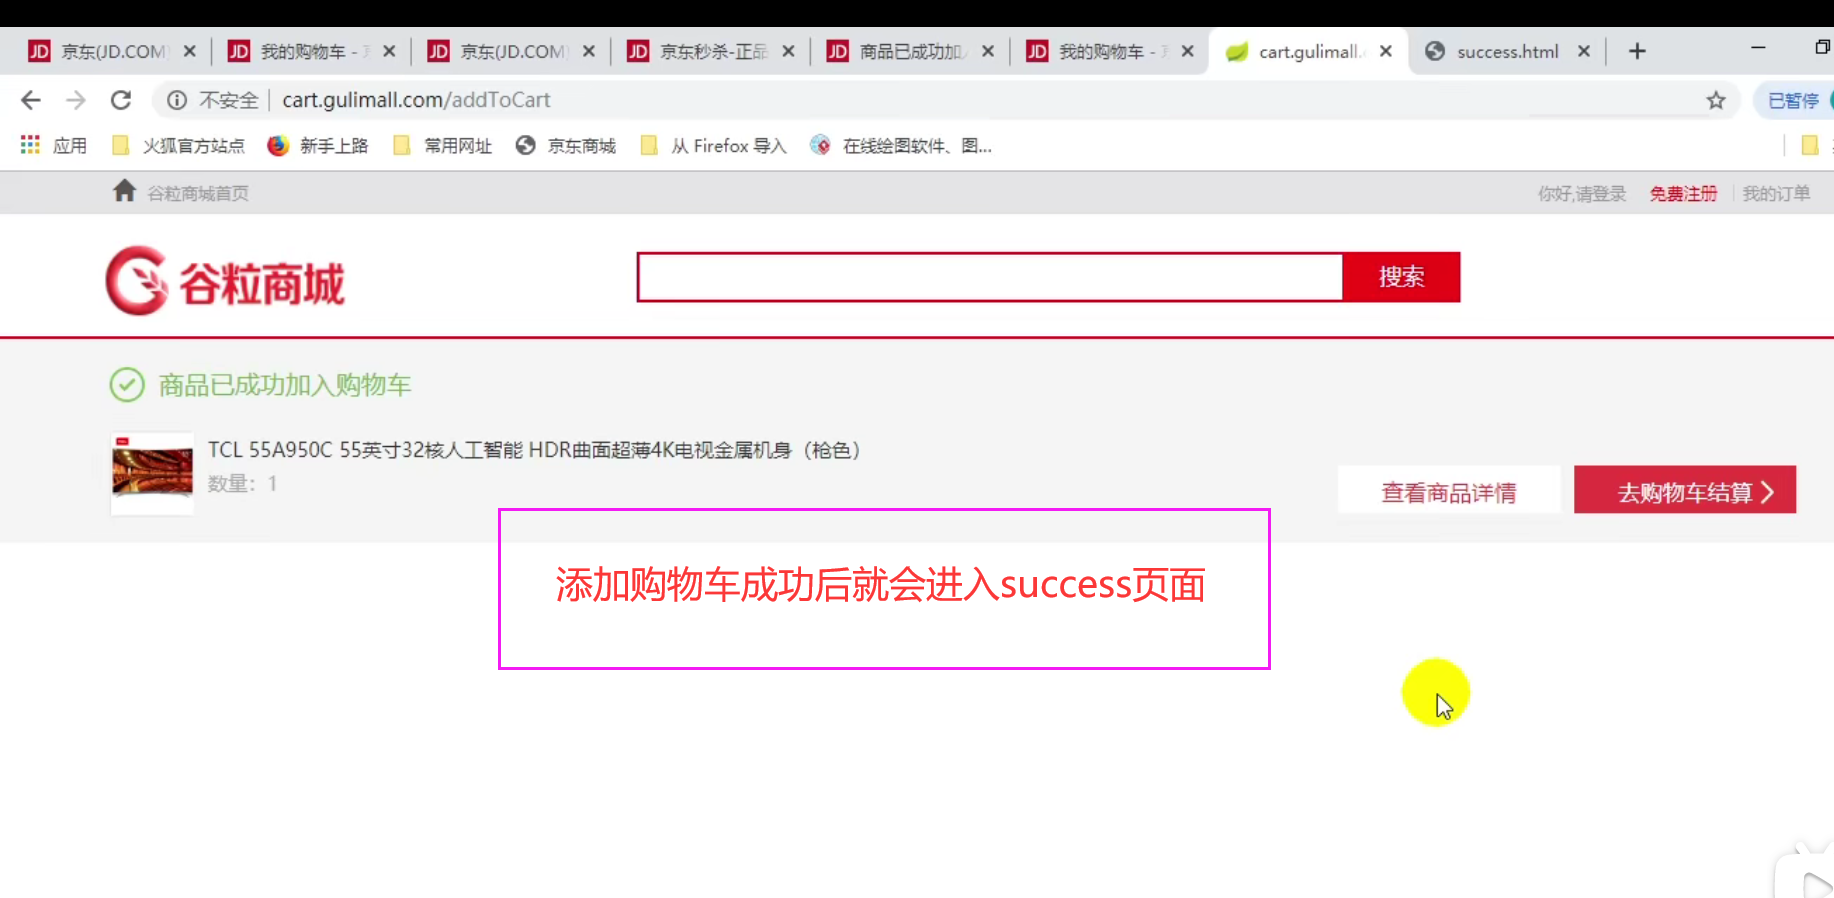
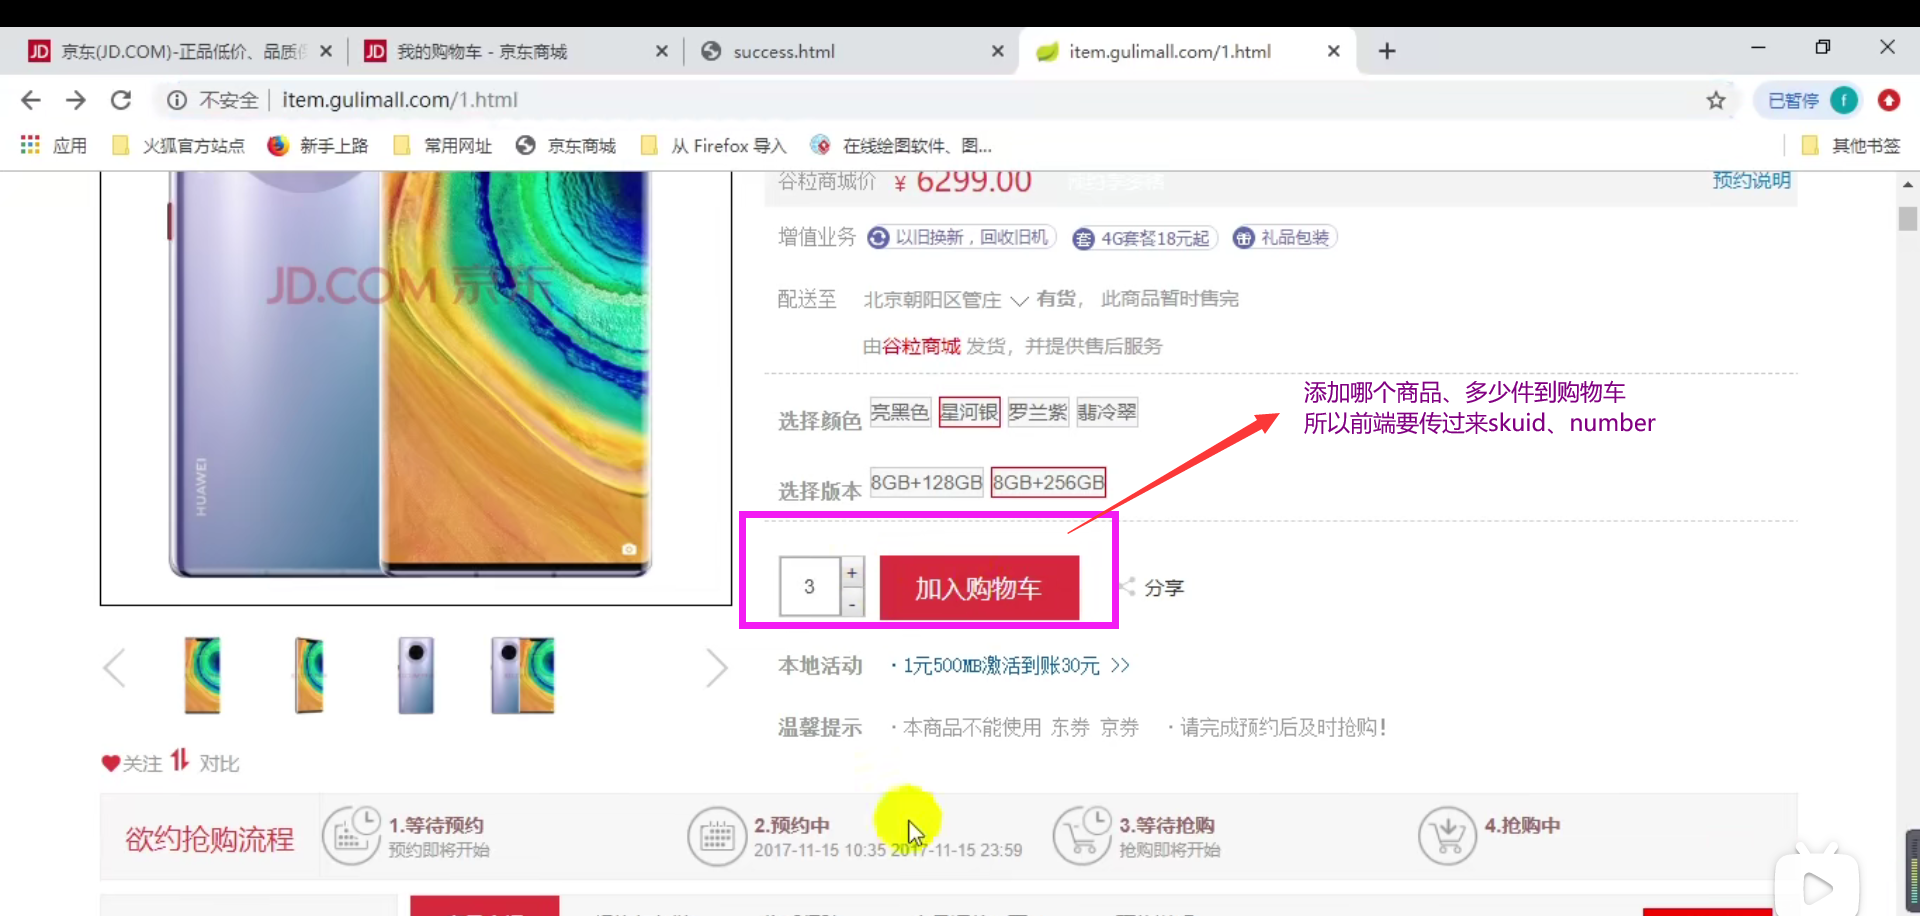
P241 add item to cart 1
P242 add item to cart 2
P243 add item to cart 3
Always say:
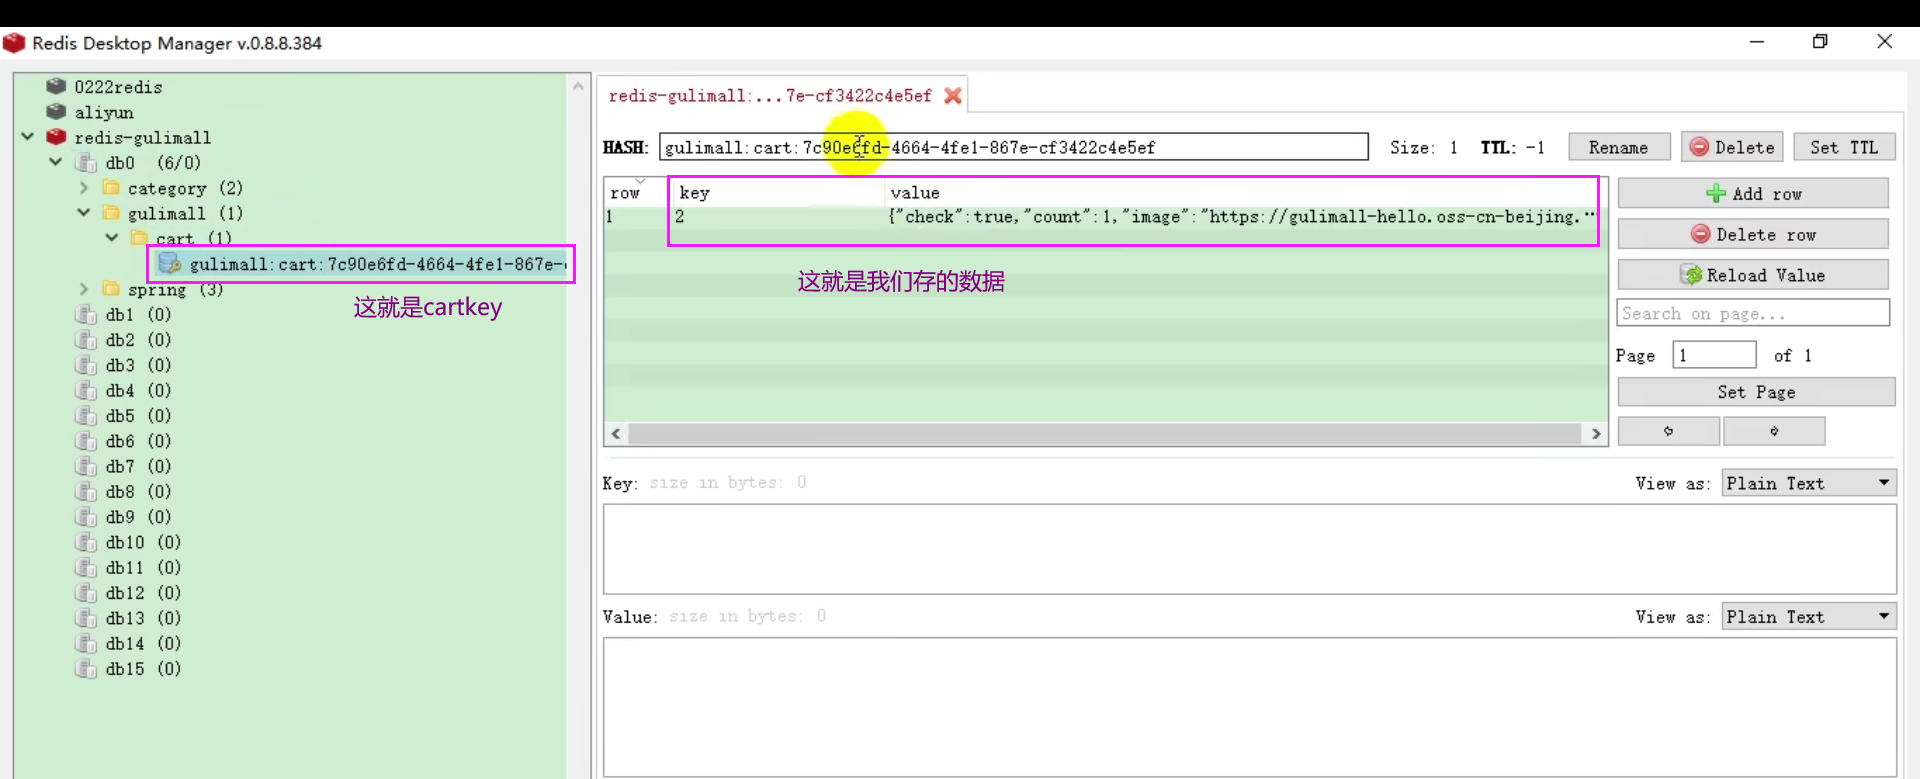
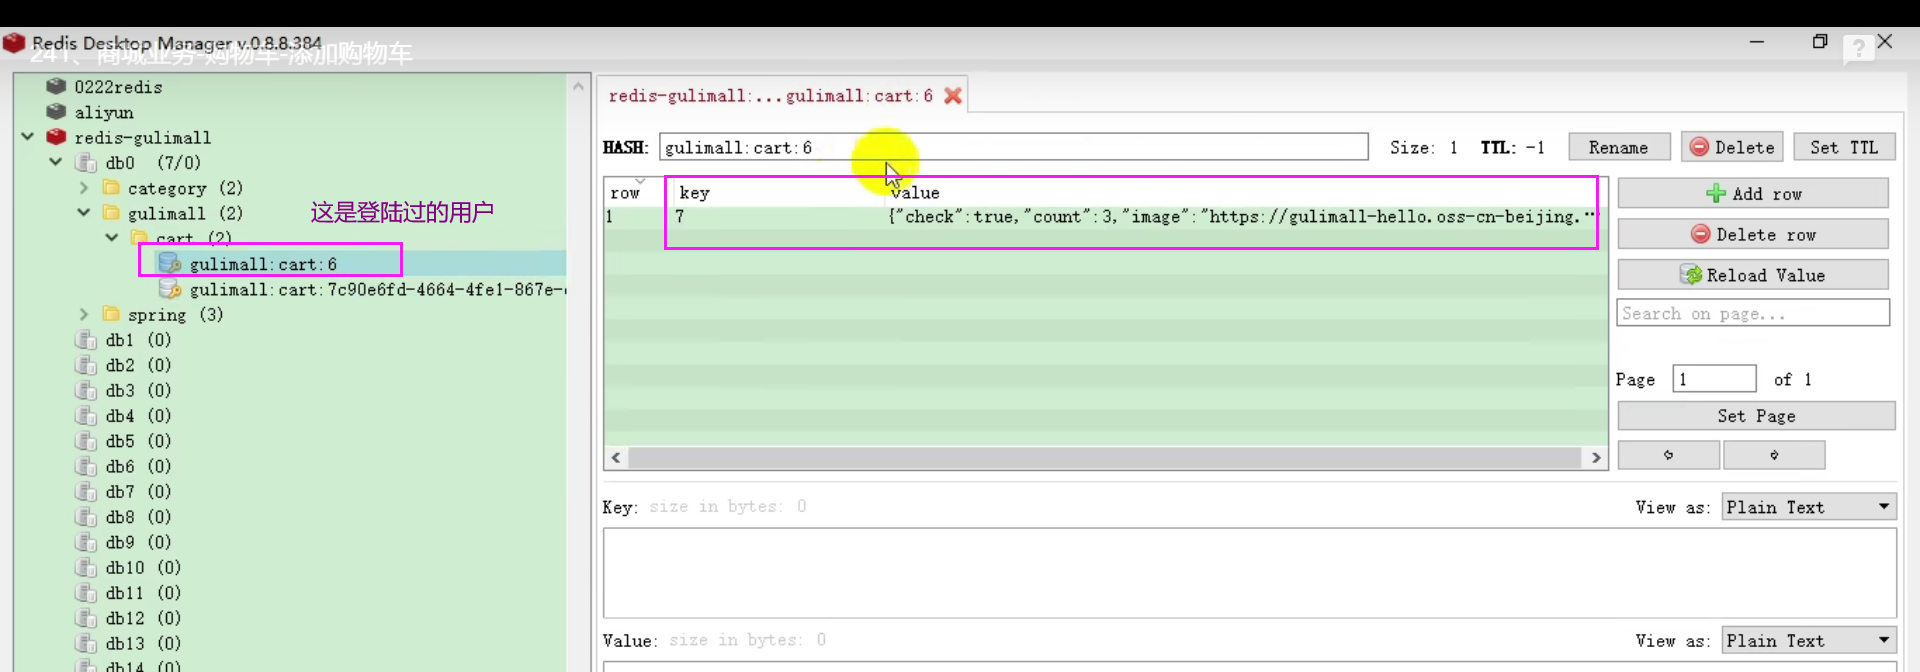
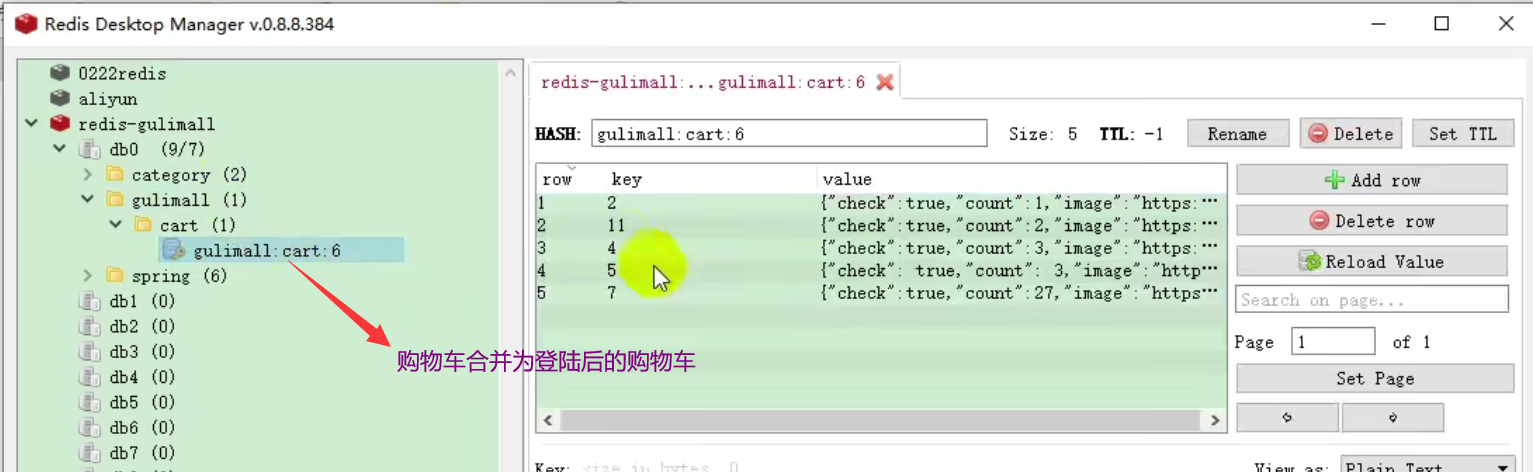
Because the interceptor executes first, the returned result of the interceptor ThreadLocal is userinfoto userinfoto = ThreadLocal Get() if userinfoto If getuserid() is not empty, it means that the account is a user, otherwise it is a temporary user, and then decide whether to use a temporary shopping cart or a user shopping cart. Store the user's shopping cart information in redis. A key value pair must be required in redis. The key in redis of the account user's shopping cart is gulimall:cart:1(1 is the user id, indicating the shopping cart of user 1); The key in the redis of the temporary user is gulimall:cart:uuid, where uuid is the user key stored in our interceptor. redisTemplate.boundHashOps(cartKey) means that all future additions, deletions and modifications to redis are for those whose key is cartKey in redia. The above set of logic is encapsulated in the getCartOps() method.
To add a new product to the shopping cart, the first step is to check whether the skuid can be found in redis. If not, it means that this product has not been added in the shopping cart before, so you need to query a series of information about this product remotely; If you can find this item in the shopping cart, take out the data and modify the quantity.

//The blog in the original text lacks the explanation of getCartItem(Long skuId) method. You may ask where getCartItem() is missing? Do you still need to ask? You'll find out soon after you search Ctrl+F
    @Override
    public CartItemVo getCartItem(Long skuId) {
        //Get the shopping cart information to operate
        BoundHashOperations<String, Object, Object> cartOps = getCartOps();

        String redisValue = (String) cartOps.get(skuId.toString());

        CartItemVo cartItemVo = JSON.parseObject(redisValue, CartItemVo.class);

        return cartItemVo;
    }
test
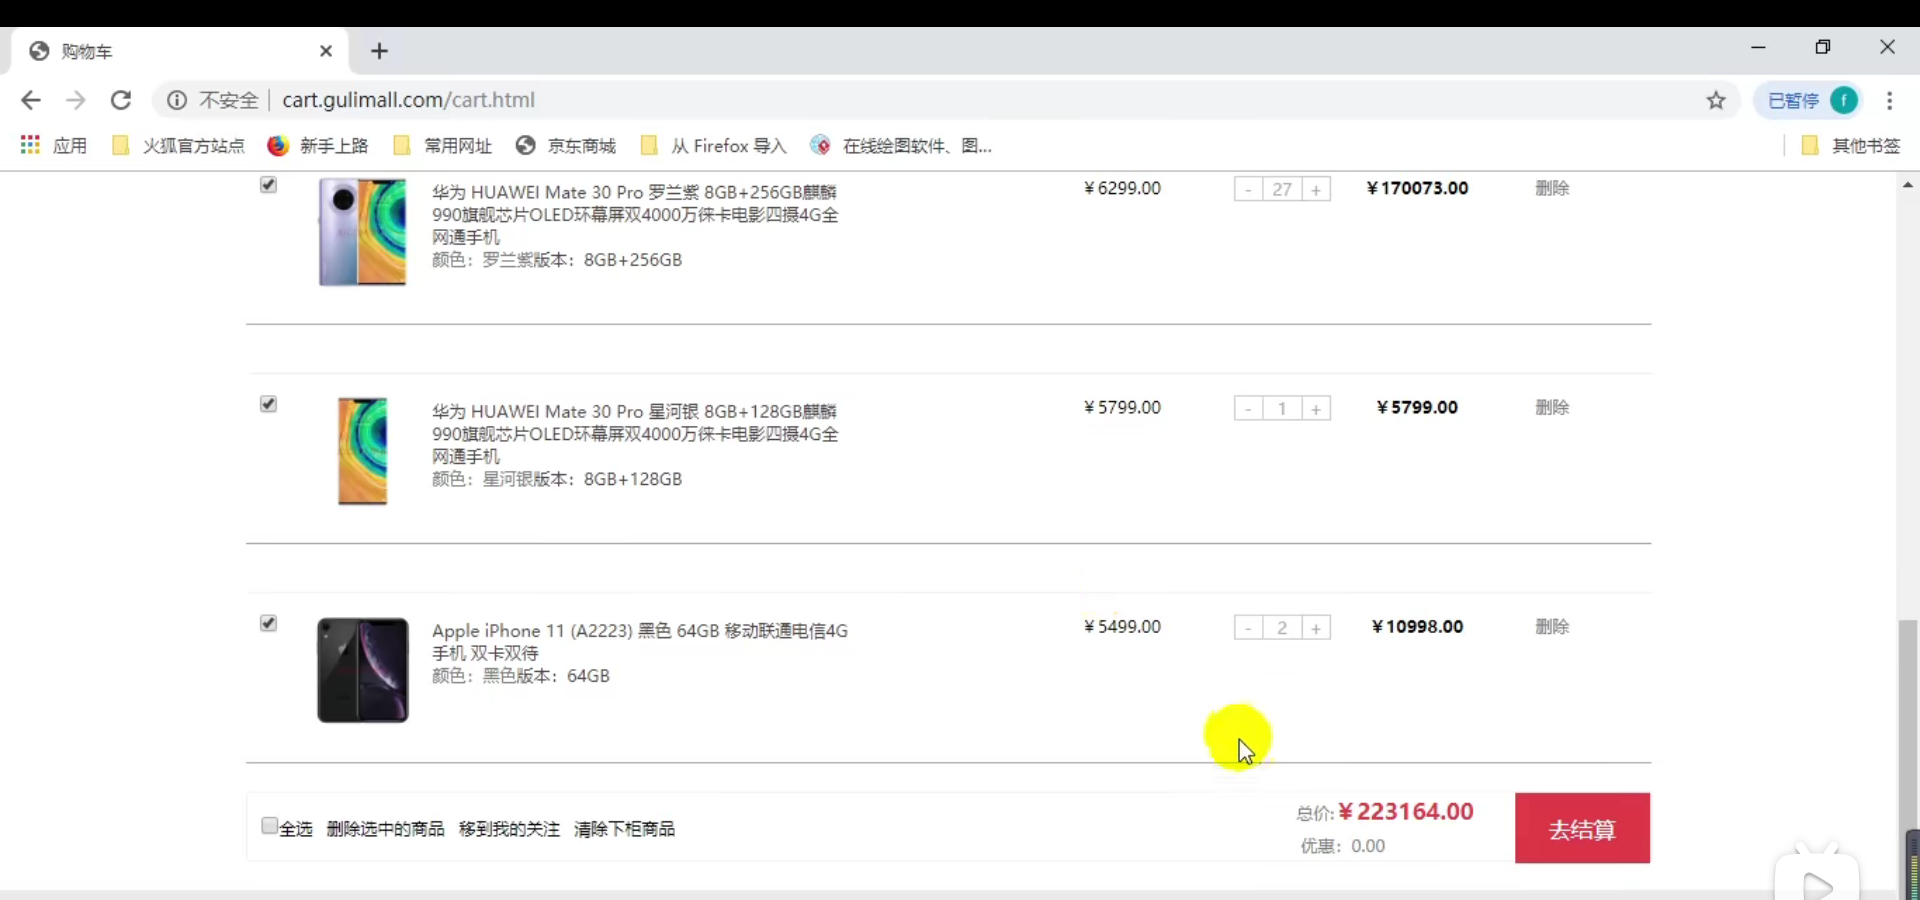
P244 get shopping cart
Always say:
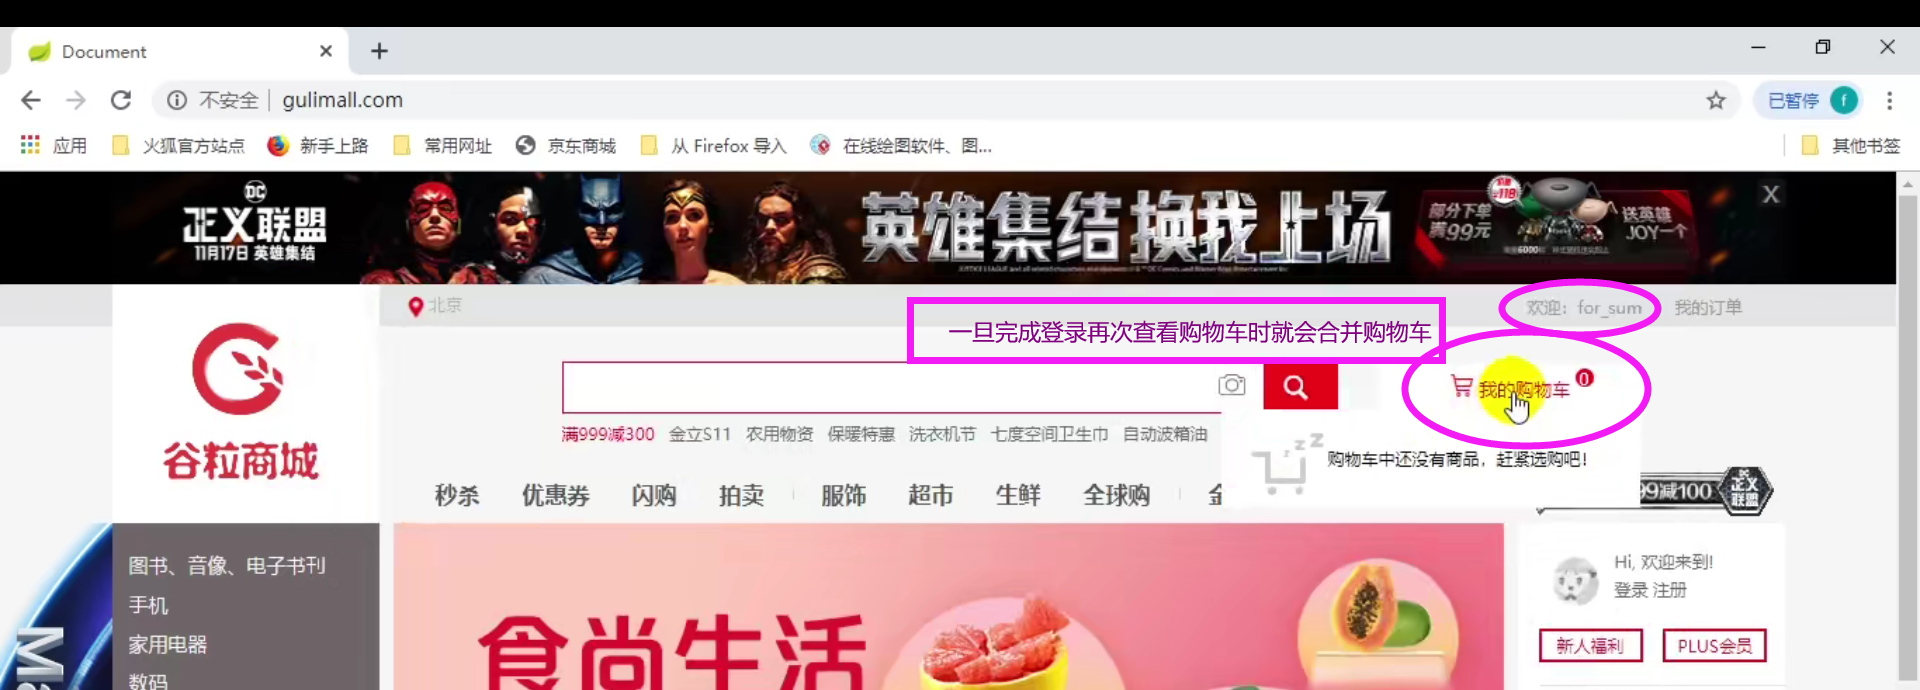
If the user is not logged in, the user key is directly used to obtain the shopping cart data; Otherwise, use userId to obtain the shopping cart data, merge the temporary shopping cart data corresponding to user key with the user shopping cart data, and delete the temporary shopping cart
The notes on csdn are just to clearly record what the teacher did in this class, and my suggestion is to look at the code on idea as much as possible, not csdn,
//The blog in the original text lacks an explanation of the getCartItems(String cartKey) method

     * Get the data in the shopping cart
    private List<CartItemVo> getCartItems(String cartKey) {
        //Get all the goods in the shopping cart
        BoundHashOperations<String, Object, Object> operations = redisTemplate.boundHashOps(cartKey);
        List<Object> values = operations.values();
        if (values != null && values.size() > 0) {
            List<CartItemVo> cartItemVoStream = values.stream().map((obj) -> {
                String str = (String) obj;
                CartItemVo cartItem = JSON.parseObject(str, CartItemVo.class);
                return cartItem;
            }).collect(Collectors.toList());
            return cartItemVoStream;
        }
        return null;

    }
//The original blog lacks an explanation of the clearCart() method
    @Override
    public void clearCart(String cartKey) {
        redisTemplate.delete(cartKey);
    }
test

P245 select shopping cart item

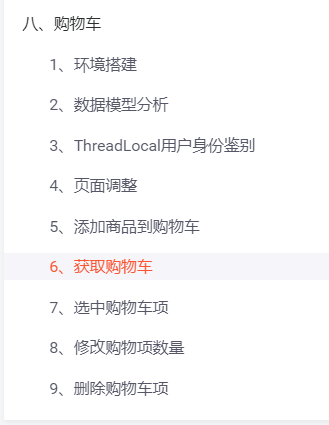
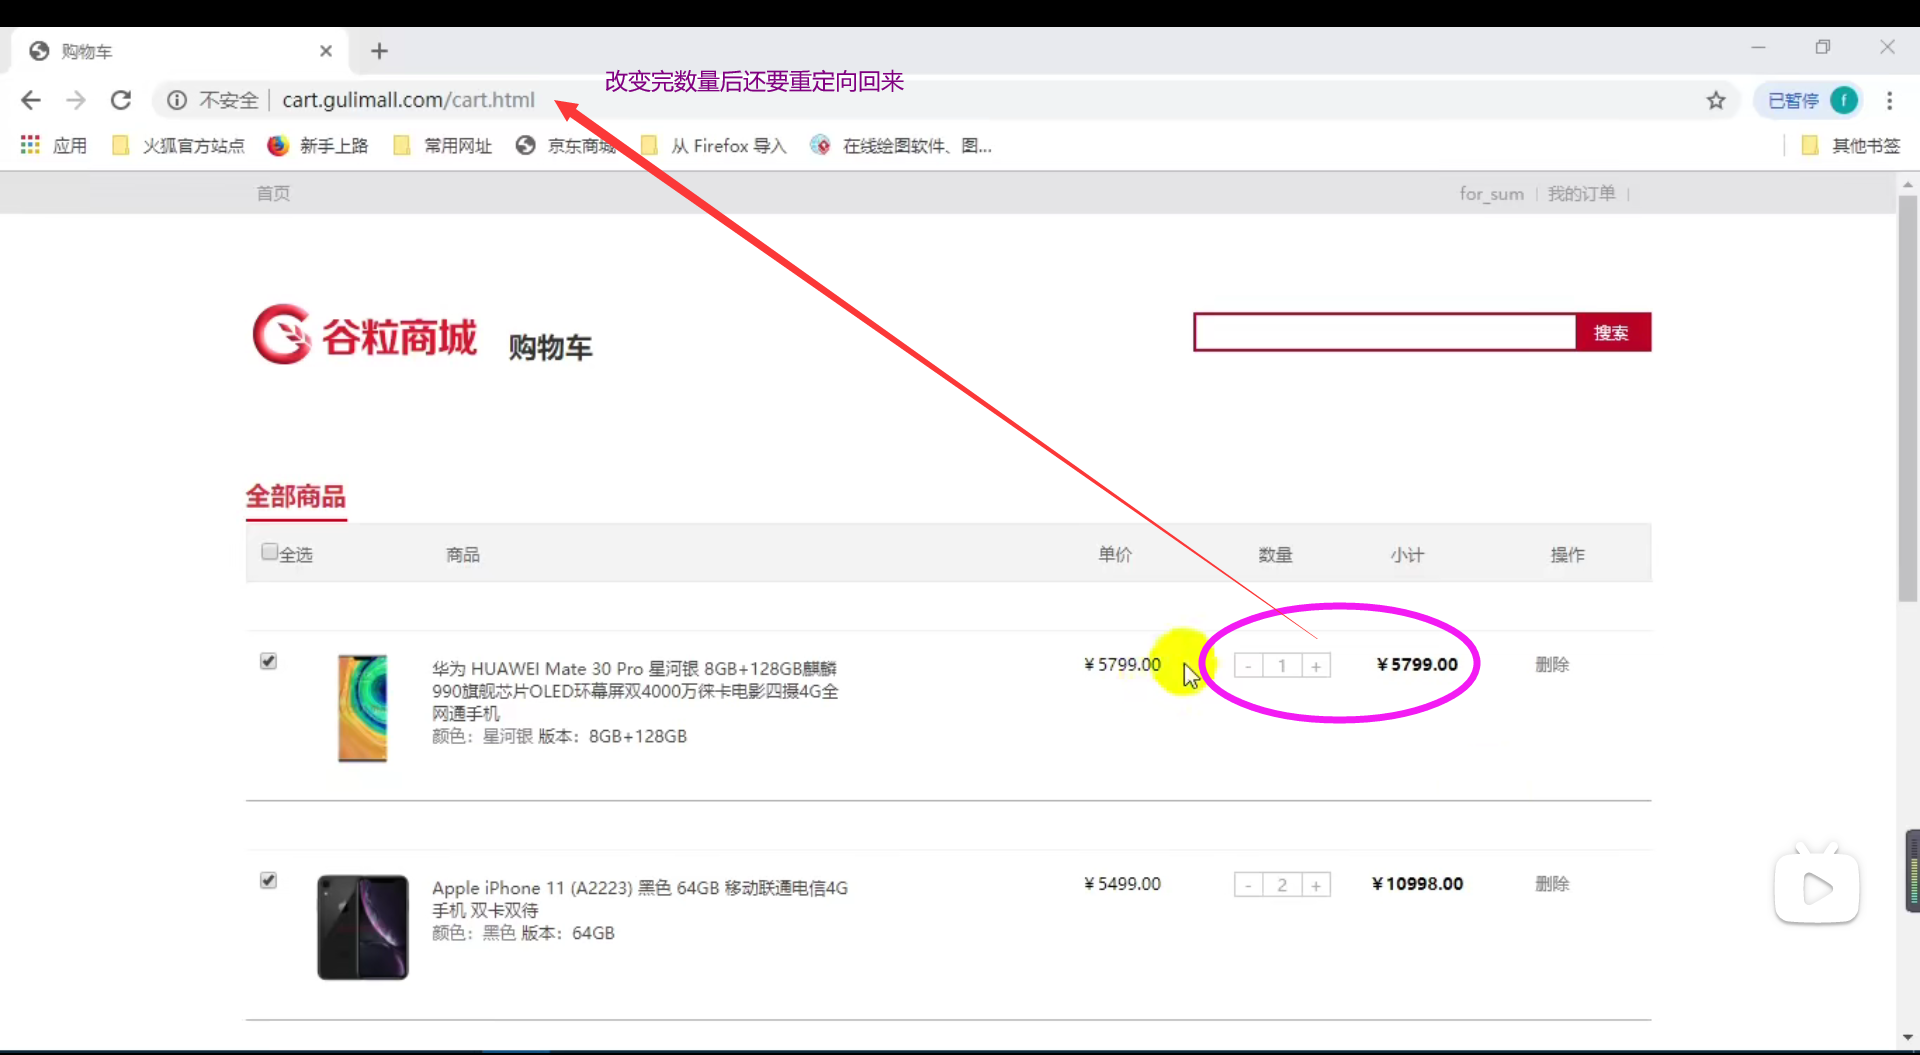
P246 modify shopping item quantity
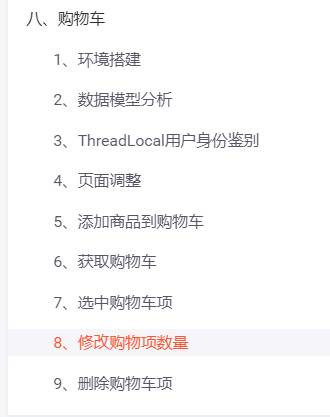
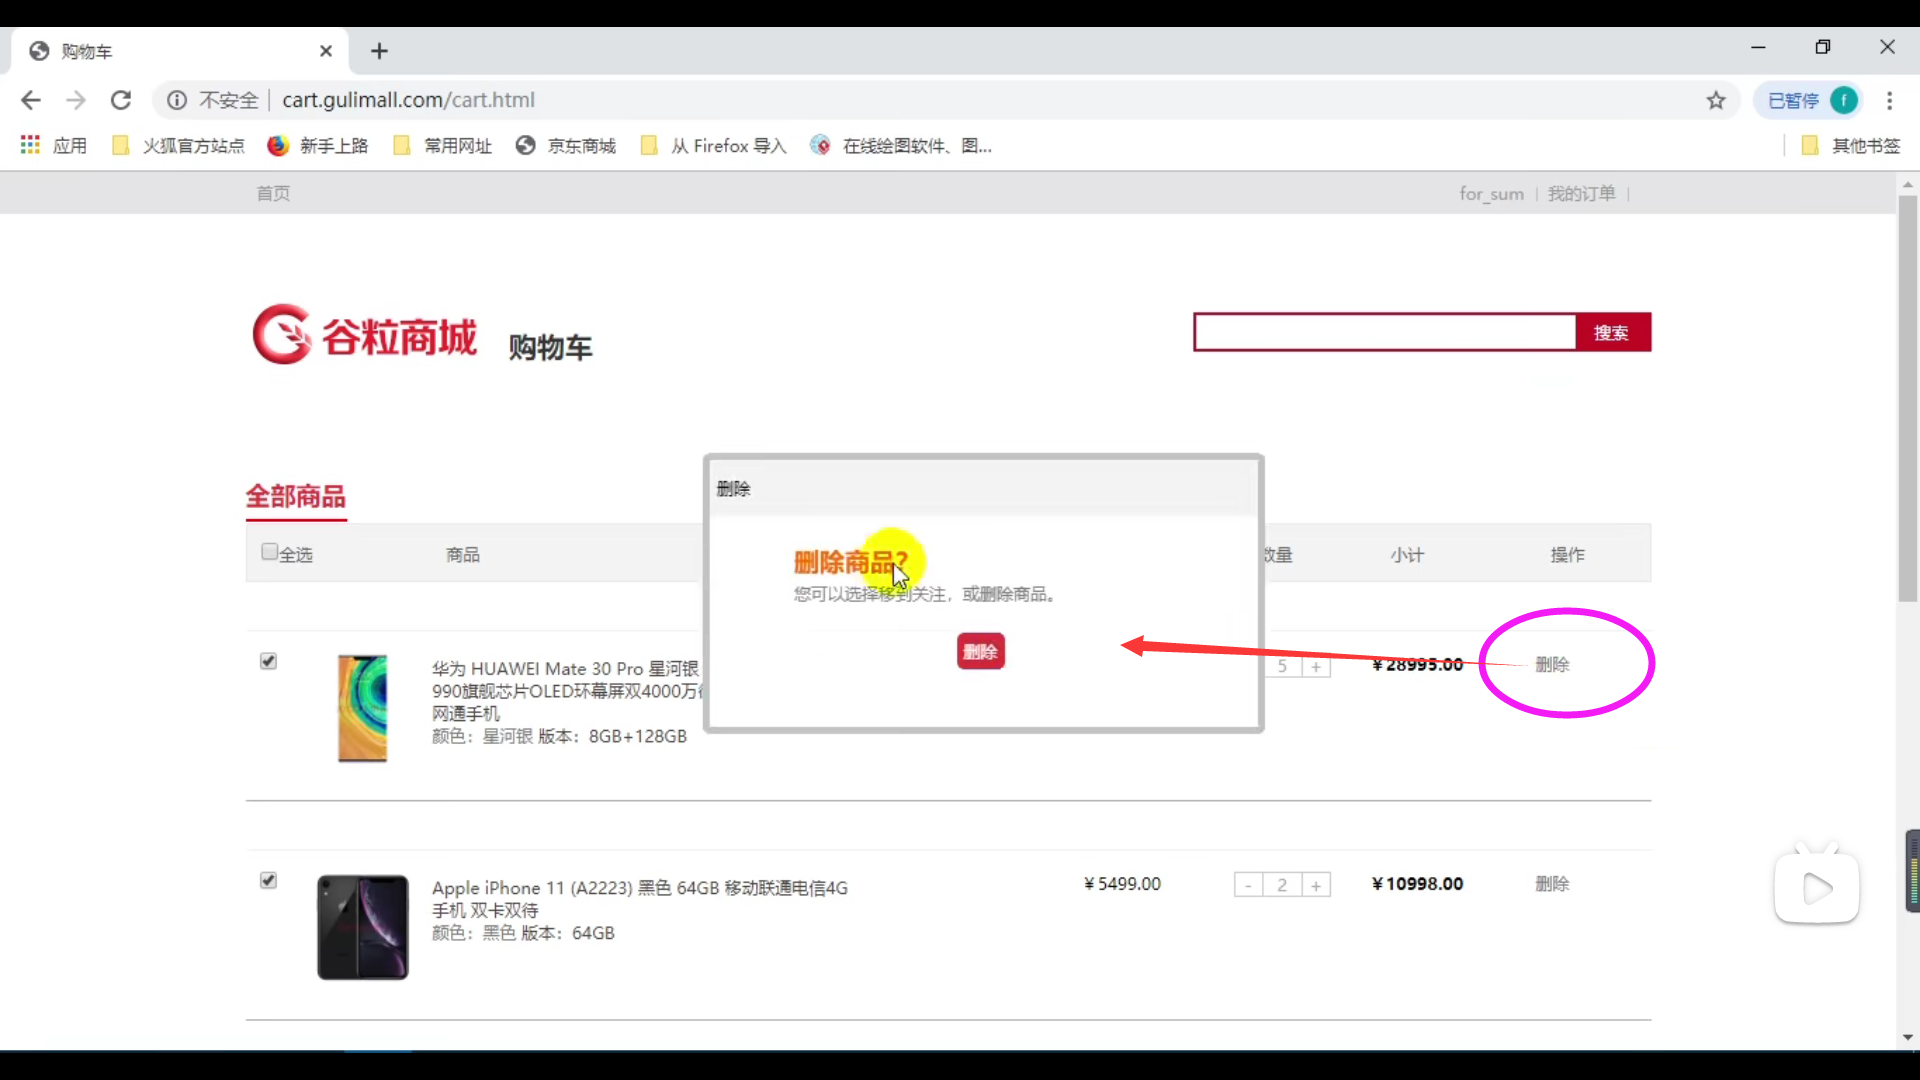
P247 delete shopping item