Learning objectives
-
Be able to tell the main differences between docker container and virtual machine
-
Be able to name the kernel technology used by docker
-
Able to install docker
-
Master common operations of mirroring
-
Master the construction and use of image warehouse
-
Master common container operation commands
-
Can find docker storage driver
-
Be able to describe the characteristics of write time replication technology
-
Be able to describe the characteristics of overlay 2 federated file system
-
Be able to use docker to run basic applications such as httpd
-
Ability to build container images using dockerfile
-
Can connect containers through link
-
Be able to name four types of docker local networks
-
Container interconnection can be realized through flannel network
PAAS introduction
Advantages of cloud: improve resource utilization, package resources into services for users, and resource providers rarely need to interact with users.

CaaS container as a service is an implementation of PAAS
Because the hypervisor virtualization technology still has some problems in performance and resource efficiency, a new virtualization technology called Container technology has emerged to help solve these problems.
Container: it is an implementation of PAAS. It has better performance and higher resource utilization than virtual machine.
Mainframe - minicomputer - PC server - Virtualization - Cloud Computing - container
1, Understanding container technology
In life, bottles, jars, pots, test tubes, jars, etc. are containers for holding things.

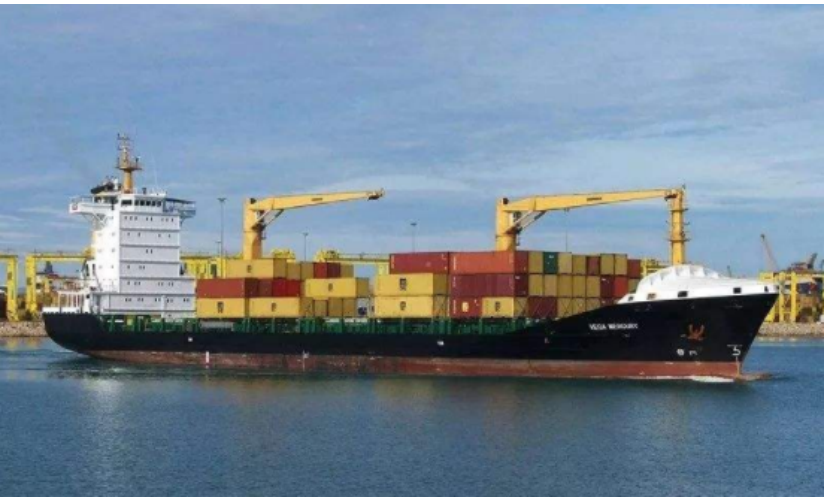
Before the container was used, the efficiency of transporting goods by sea was not high (the size and shape of goods were different). With the container, the goods can be stored and transported with unified specifications, which greatly improved the efficiency.
In IT technology:
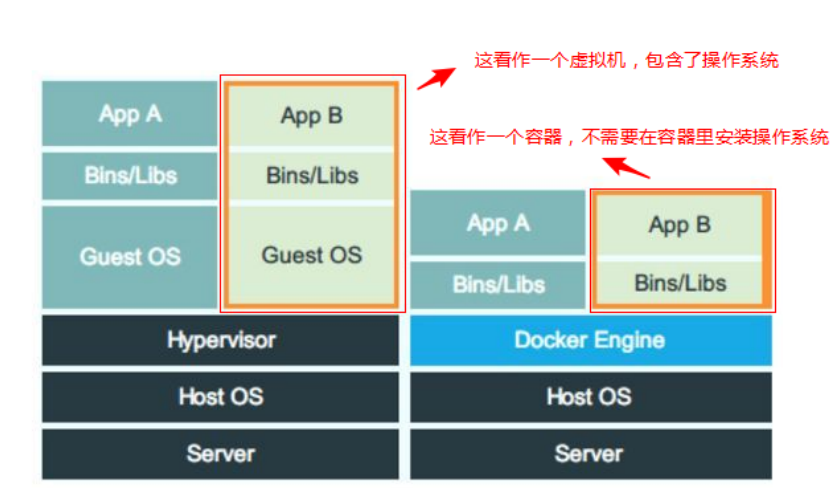
Virtualization technology can install multiple different operating systems and run multiple sets of different applications on the host computer, but it may be to run an nginx, but it also needs to run a complete operating system, kernel and other unrelated programs in the virtual machine. This method does not make high use of resources.
Therefore, we hope to pay more attention to the application itself instead of focusing on the operating system and irrelevant programs. The operating system kernel is directly shared with the host
linux container technology is a lightweight virtualization technology. Its main features are:
-
Lightweight: only the required bins / LIBS (i.e. commands and library files) are packaged. Share the operating system with the host and directly use the kernel of the host
-
Fast deployment: the image of the container is smaller than the image of the virtual machine. The deployment speed is very fast, and it is deployed in seconds
-
Good portability: build once, run anywhere.
build,ship,run -
Higher resource utilization: compared with the virtual machine, there is no need to install the operating system, so there is almost no additional CPU and memory consumption

2, docker introduction
docker is the hottest software that can implement container technology, which is developed in go(golang) language.
reference resources: https://www.docker.com/
Docker version
Before 2017
1.7 ,1.8,1.9,1.10,1.11,1.12, 1.
After March 1, 2017, the version naming of Docker began to change, and the CE version and EE version were separated.
Docker Community Edition (CE): a development pipeline for developers or small teams to create container based applications, share and automate with team members. Docker CE provides simple installation and fast installation so that development can start immediately. Docker CE integration and optimization, infrastructure.
-
17-03-ce
-
17-06-ce
-
18-03-ce
-
18-06-ce
-
18-09-ce
Docker Enterprise Edition (EE): IT is designed for the development of enterprises and IT teams. Docker EE provides enterprises with the most secure container platform and an application-centered platform.
Kernel technology used by docker
The docker container is essentially the process of the host. The process running inside the docker container can be regarded as the thread of the host.
Docker implements resource isolation through namespace
Resource restriction is realized through cgroups
NameSpace
One of the main purposes of implementing namespace in Linux kernel is to realize lightweight Virtualization (container) services. Processes in the same namespace can perceive each other's changes and know nothing about external processes.
Linux implemented part of the namespace in very early versions. For example, mount namespace was implemented in kernel 2.4.
Most of the namespace support is completed in kernel 2.6, such as IPC, Network, PID, and UTS. There are other special namespaces, such as User, which have been implemented since kernel 2.6, but only announced in kernel 3.8.
At the same time, with the development of Linux itself and the needs brought by the continuous development of container technology, new namespaces will also be supported. For example, Cgroup namespace is added to kernel 4.6.
The inux kernel provides six namespace isolated system calls
| namespace | System call parameters | Isolate content |
|---|---|---|
| UTS | CLONE_NEWUTS | Host name or domain name |
| IPC | CLONE_NEWIPC | Semaphores, message queues, and shared memory |
| PID | CLONE_NEWPID | Process number |
| net | CLONE_NEWNET | Network equipment interface, IP routing table, firewall rules, etc |
| mount | CLONE_NEWNS | Mount point (file system) |
| user | CLONE_NEWUSER | Users and user groups |
UTS: each NameSpace has an independent host name or domain name. Each NameSpace can be regarded as an independent host.
IPC: each container still uses the method of process interaction in the linux kernel to realize inter process communication
PID: each container has an independent process tree, and the container is a process in the physical machine, so the process in the container is the thread of the physical machine
Net: the network of each container is isolated
Mount: the file system of each container is independent
User: the user and group ID s of each container are isolated, and each container has root user
Summary: the application runs in an isolated space. Each isolated space has independent UTS, IPC, PID, net, mount and user
Control Group
Control groups (cggroups) is a feature of Linux kernel, which is mainly used to isolate, restrict and audit shared resources.
Only by controlling the resources allocated to the container can we avoid the resource competition of the host system when multiple containers run at the same time.
The control group can limit and charge the container's memory, CPU, disk IO and other resources.
For cases, refer to the optimization course documents
Difference between LXC and docker
LXC is short for Linux Container. It can provide lightweight virtualization
The bottom layer of docker is realized by using LXC. Docker realizes more and stronger functions based on LXC.
Summary of previous contents:
-
The container belongs to typeIII virtualization and Paas
-
Container is a lightweight, process level virtual machine
-
Advantages over virtual machines
-
You do not need to install an OS and share it with the host
-
Small mirrored storage space
-
Fast startup speed (the container is in seconds, and the virtual machine generally takes about 10 seconds)
-
Better portability and portability
-
Better performance
-
-
docker is a software that implements containers, and LXC is used at the bottom
-
docker mainly uses namespace namespace technology to realize resource isolation and cgroup to realize resource restriction
3, docker environment preparation
It is recommended to run docker directly on the host machine (of course, you can also run docker in the virtual machine)
You can't directly run docker on windows (because namespace and CGroup are features of linux kernel, but windows doesn't, so you need to run linux virtual machine on windows and then docker)
-
Access to the public network is required
-
Turn off the firewall, selinux
docker software installation
Download docker CE from yum (choose one)
- Download the official ce version of docker
[root@daniel ~]# wget https://download.docker.com/linux/centos/docker-ce.repo -O /etc/yum.repos.d/docker-ce.repo
- Or use aliyun's docker CE source
[root@daniel ~]# wget https://mirrors.aliyun.com/docker-ce/linux/centos/docker-ce.repo -O /etc/yum.repos.d/docker-ce.repo
docker installation
[root@daniel ~]# yum clean all
[root@daniel ~]# yum install docker-ce -y
PS: please install docker CE version instead of docker (otherwise, the old version of 1.13 may be installed)
Start service
[root@daniel ~]# systemctl start docker
[root@daniel ~]# systemctl enable docker
[root@daniel ~]# systemctl status docker
View version information
[root@daniel ~]# docker -v
Docker version 18.09.7, build 2d0083d
[root@daniel ~]# docker info
[root@daniel ~]# docker version
Client:
Version: 18.09.7
API version: 1.39
Go version: go1.10.8
Git commit: 2d0083d
Built: Thu Jun 27 17:56:06 2019
OS/Arch: linux/amd
Experimental: false

Server: Docker Engine - Community
Engine:
Version: 18.09.7
API version: 1.39 (minimum version 1.12)
Go version: go1.10.8
Git commit: 2d0083d
Built: Thu Jun 27 17:26:28 2019
OS/Arch: linux/amd64
Experimental: false
docker daemon management
The client can be separated from the Server to realize remote docker connection. In order to implement it, the docker daemon needs to be configured accordingly.
Remote client host# docker -H container host IP version
Client:
Version: 18.09.7
API version: 1.39
Go version: go1.10.8
Git commit: 2d0083d
Built: Thu Jun 27 17:56:06 2019
OS/Arch: linux/amd
Experimental: false
Cannot connect to the Docker daemon at
tcp://10.1.1.11:2375. Is the docker daemon running?
Configuration process
1. Please close the docker daemon before modifying the docker configuration file
[root@daniel ~]# systemctl stop docker
2. Configure the docker daemon file through the / etc/docker/daemon.json file
[root@daniel ~]# vim /etc/docker/daemon.json
{
"hosts":
["tcp://0.0.0.0:2375","unix:///var/run/docker.sock"]
}
[root@daniel ~]# netstat -ntlup | grep :2375
[root@daniel ~]# ls /var/run/docker.sock
PS: docker daemon uses unix format by default. The listening file is UNIX:///run/docker.sock. Adding tcp: / / 0.0.0.0:2375 can realize remote management.
3. Adding / etc/docker/daemon.json will cause the docker daemon to fail to start. Please modify the following file contents first:
 Before modification:
[root@daniel ~]# vim /usr/lib/systemd/system/docker.service
[Service]
Type=notify
# the default is not to use systemd for cgroups because the delegate issues still
# exists and systemd currently does not support the cgroup feature set required
# for containers run by docker
ExecStart=/usr/bin/dockerd - H fd:// --containerd=/run/containerd/containerd.sock

After modification:

[root@daniel ~]# vim /usr/lib/systemd/system/docker.service
[Service]
Type=notify
# the default is not to use systemd for cgroups because the delegate issues still
# exists and systemd currently does not support the cgroup feature set required
# for containers run by docker
ExecStart=/usr/bin/dockerd
4. After modification, be sure to load this configuration file
[root@daniel ~]# systemctl daemon-reload
5. Restart the docker daemon
[root@daniel ~]# systemctl start docker
[root@daniel ~]# netstat -ntlup | grep :
tcp6 0  0 ::: 2375 :::*
LISTEN  3318 /dockerd
6. Instance remote connection method
Remote client host# docker -H container host IP version
Note: the port number is not required for remote connection of the client
Special note: the remote client host has very large permissions for remote operation. Please restore after testing
Summary: docker engine is divided into client and server, both of which are local by default
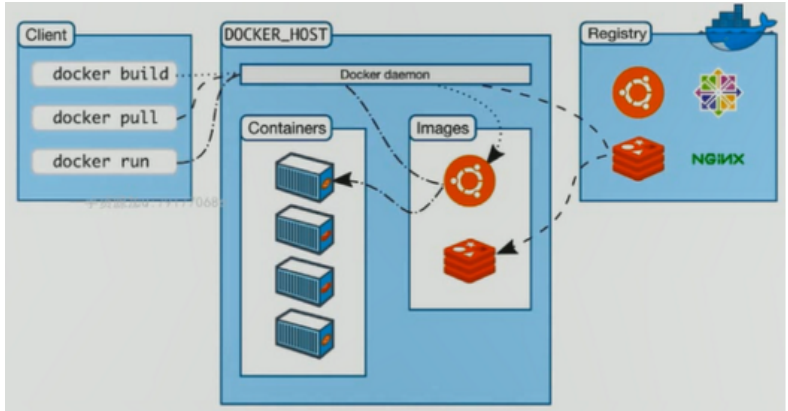
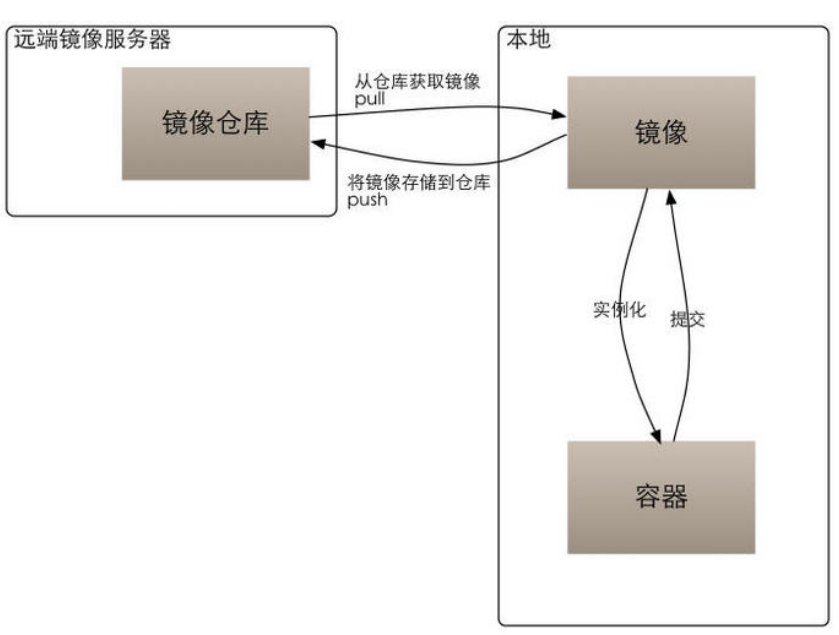
4, Image, container, warehouse
Image: image is a packaged environment and application.
Container: a container is an instance of running an image. The image is regarded as static and the container is dynamic.
Repository: a repository where multiple images are stored.
5, Common operations of mirroring
Mirror images are mainly divided into two categories:
-
Operating system classes (such as centos,ubuntu)
-
Application class
View mirror list
View the current image list through the docker images command; Use man docker images to get parameter descriptions
[root@daniel ~]# docker images
Search image
Find the official image through docker search; Use man docker search to get parameter descriptions
[root@daniel ~]# docker search centos
Pull image
Pull (download) the image through docker pull; Use man docker pull to get the parameter description
This image is about 200 M,Better network speed
[root@daniel ~]# docker pull centos
 or
[root@daniel ~]# docker pull docker.io/centos
Name is search Full name obtained when searching

If the network speed is slow,You can try Ali,tencent,Baidu,Netease and other domestic image warehouses, such as:
[root@daniel ~]# docker pull hub.c.163.com/library/centos:latest
[root@daniel ~]# docker images
REPOSITORY TAG IMAGE ID
CREATED SIZE
docker.io/centos latest 1e1148e4cc2c
 1 days ago  202 MB
hub.c.163.com/library/centos latest 328edcd84f1b
 16 months ago  193 MB
delete mirror
Delete the image through docker rmi; Man docker rmi view parameter help
[root@daniel ~]# docker rmi hub.c.163.com/library/centos:latest
Question: if the mirror pull is very slow, how to solve it?
-
docker image accelerator
-
You can pull it down from the host with good network speed, and then export it to the host with slow network speed
Mirror accelerator
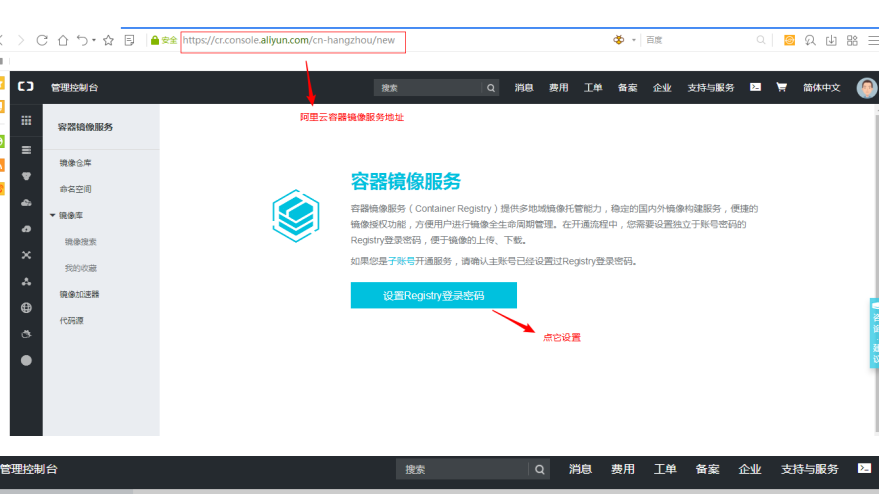
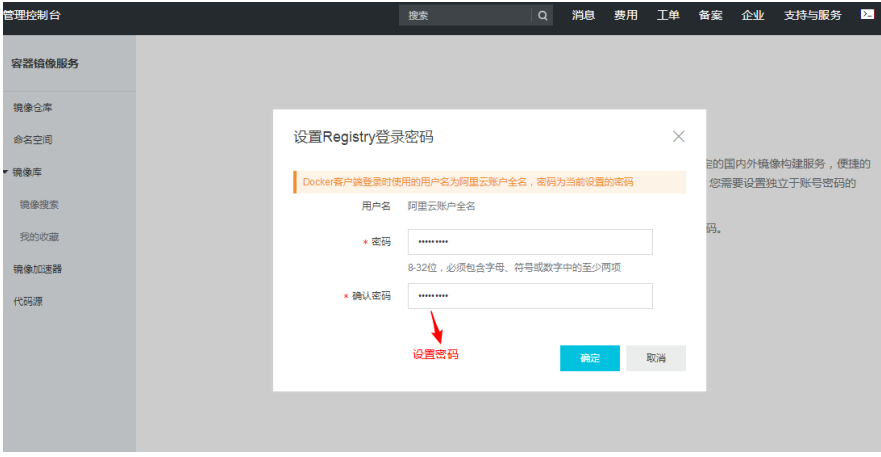
Several domestic Internet giants have their own container services. Take Alibaba cloud as an example
Alicloud container image service address: https://cr.console.aliyun.com/cn-hangzhou/new Apply for an Ali account to log in

[root@daniel ~]# vim /etc/docker/daemon.json
{
"registry-mirrors": ["https://42h8kzrh.mirror.aliyuncs.com"]
}
[root@daniel ~]# systemctl daemon-reload
[root@daniel ~]# systemctl restart docker
Mirror export
Use docker save to save (export) the image as a tar file
Mirror import
Import using docker load
[root@daniel ~]# docker save centos -o /root/dockerimage_centos.latest
When testing, you can transfer the exported file scp to another host for testing. Or delete the local image before importing the test
[root@daniel ~]# docker load < /root/dockerimage_centos.latest
If you can't see the name after importing, you can use the docker tag command to change the name
[root@daniel ~]# docker images
REPOSITORY TAG IMAGE ID
CREATED SIZE
<none> <none>  9f38484d220f
 3 months ago  202 MB

[root@daniel ~]# docker tag 9f38484d220f  docker.io/centos:latest

[root@daniel ~]# docker images
REPOSITORY TAG IMAGE ID
CREATED SIZE
docker.io/centos latest  9f38484d220f
 3 months ago  202 MB
6, Mirror warehouse
Official self built image warehouse
docker hub is the largest public warehouse, that is, the official warehouse: https://hub.docker.com/
1. If you don't have an account, apply for an account online first

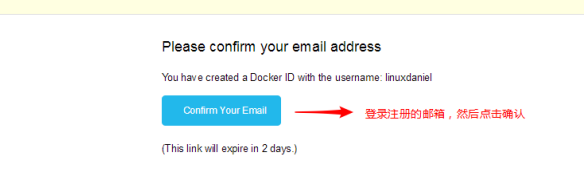
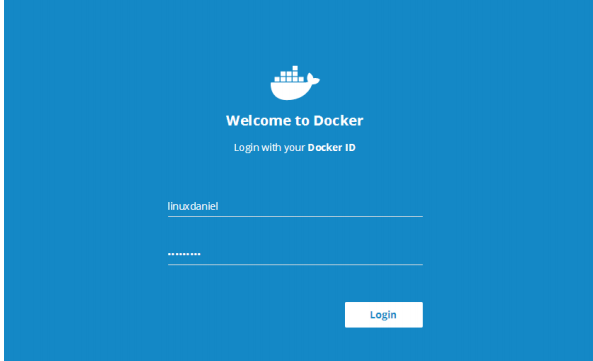


2. Go back to the host login account and password
# docker login
Login with your Docker ID to push and pull images from
Docker Hub. If you don't have a Docker ID, head over to
https://hub.docker.com to create one.
Username: linuxdaniel
Password:
Login Succeeded
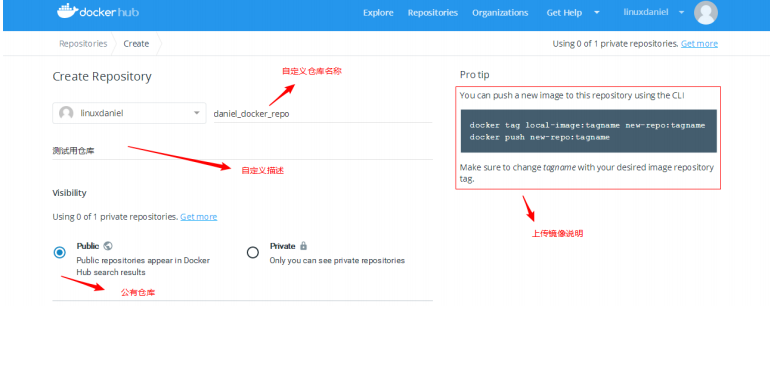
3. Tag your image
The public image we downloaded from the dockerhub cannot be uploaded directly. It needs to be tagged first (similar to re specifying the path and naming)
[root@daniel ~]# docker push centos:latest
Error response from daemon: You cannot push a "root"
repository. Please rename your repository to
docker.io/<user>/<repo> (ex: docker.io/<user>/centos)

[root@daniel ~]# docker tag centos:latest
linuxdaniel/daniel_docker_repo:V1
[root@daniel ~]# docker push
linuxdaniel/daniel_docker_repo:V1
4. Push image to warehouse
[root@daniel ~]# docker push
linuxdaniel/daniel_docker_repo:V1
5. Verification

6. Log out of the account
[root@daniel ~]# docker logout
Removing login credentials for https://index.docker.io/v1/
Alibaba cloud image warehouse
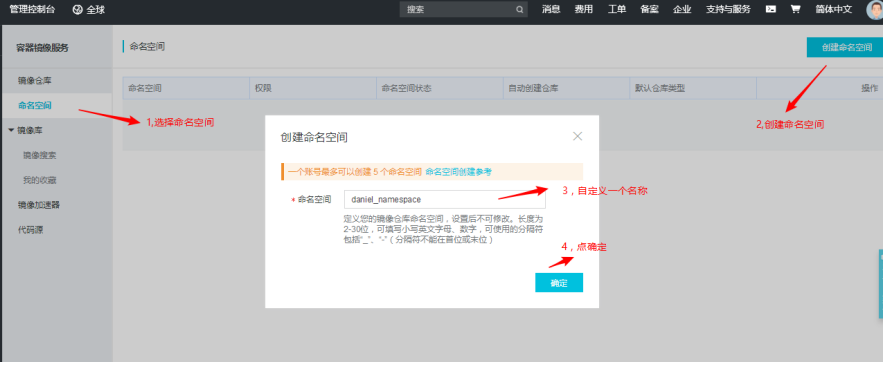
Log in to the alicloud account, find the product – > Cloud Computing Foundation – > container mirroring service – > on the main page, and then log in with the account
After successful login, do the following
1. Create a namespace (the command space and the image warehouse name are combined to form the path name of the image)

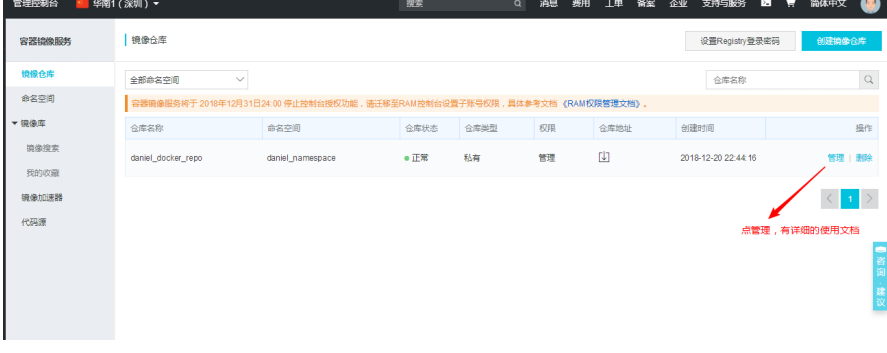
2. Create a mirror warehouse and specify the warehouse name


Logout method
use docker logout Connection address
# docker logout registry.cn-shenzhen.aliyuncs.com
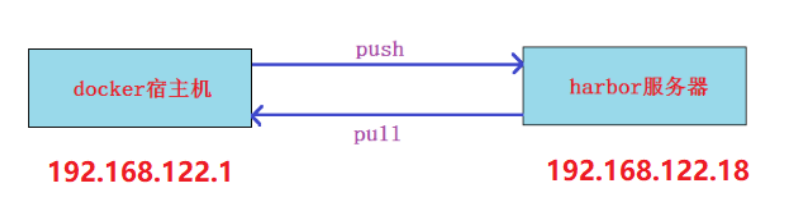
harbor private image warehouse
Harbor is an open source enterprise Registry project of VMware, which can help users quickly build an enterprise Docker registry service
harbor is developed by python language and needs to be started with docker compose tool
Note: docker compose is a container choreography tool, which will be explained later in the docker three swordsmen
Environmental preparation
Prepare a new virtual machine (192.168.122.18) as the harbor server
setup script
1. Install docker compose
Choose one of the following three methods
Installation method 1:
Because python2.7 is installed by default on CentOS 7, we install python2 PIP here, and then install the docker compose module through pip
[root@harbor ~]# yum install epel-release -y
[root@harbor ~]# yum install python2-pip -y
[root@harbor ~]# pip install -i https://pypi.tuna.tsinghua.edu.cn/simple docker-compose
 The specified source is installed faster

[root@harbor ~]# docker-compose -v
docker-compose version 1.24.1, build 4667896b
Installation method 2:
[root@harbor ~]# curl -L https://get.daocloud.io/docker/compose/releases/download/1.24.1/docker-compose-`uname -s`-`uname -m` > /usr/local/bin/docker-compose
[root@harbor ~]# chmod +x /usr/local/bin/docker-compose
Installation method 3:
[root@harbor ~]# yum install epel-release
[root@harbor ~]# yum install docker-compose
 be careful:This installation method installs an earlier version,If harbor The version is too new and may be incompatible
2. Install docker CE on the harbor server and start the docker service
[root@harbor ~]# wget https://mirrors.aliyun.com/docker-ce/linux/centos/docker-ce.repo -O /etc/yum.repos.d/docker-ce.repo
[root@harbor ~]# yum install docker-ce

[root@harbor ~]# systemctl start docker
[root@harbor ~]# systemctl enable docker
3. Install harbor
harbor is divided into offline package and online package. The online package is small, but it needs to be downloaded online. I use offline packages here
Download address: https://github.com/goharbor/harbor/releases
I provide harbor-offline-installer-v1.8.2.tgz to copy to the harbor server
[root@harbor ~]# tar xf harbor-offline-installer-v1.8.2.tgz -C /usr/local/
[root@harbor ~]# cd /usr/local/harbor/
[root@harbor ~]# vim harbor.cfg
5 hostname = 192.168.122.18 take hostname Change to harbor Server IP
27 harbor_admin_password = 123 admin The user's default password is changed here to simple 123

[root@harbor harbor]# ./install.sh
......
......
......
✔ ----Harbor has been installed and started
successfully.----

Now you should be able to visit the admin portal at
http://192.168.122.18.
For more details, please visit
https://github.com/goharbor/harbor .
4. Browser access http://192.168.122.18 , login for configuration
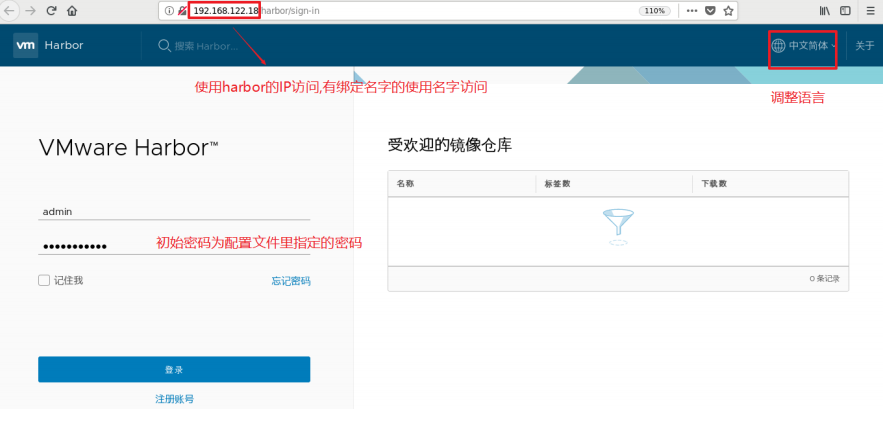
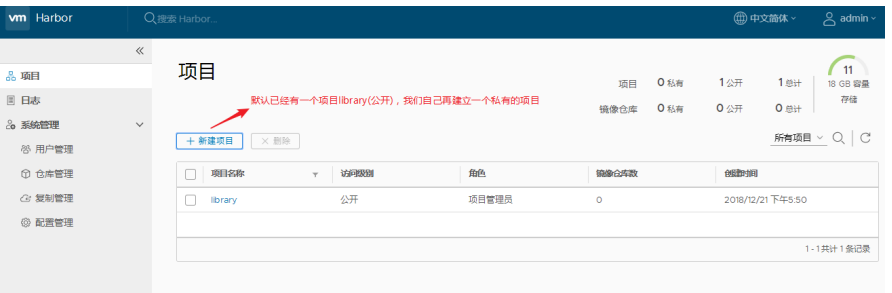

Public project: docker login is not required to download the image, but docker login is still required to upload the image
Private projects: all require docker login before uploading and downloading
Image upload and download operation
5. Configure a non https connection on the docker host
Because docker communicates with https, it also needs to make a certificate. It's too troublesome.
Configure "secure registers": ["harbor server IP"] to use http communication
[root@daniel ~]# vim /etc/docker/daemon.json
{
"registry-mirrors":
["https://42h8kzrh.mirror.aliyuncs.com "], there is a comma here
"insecure-registries": ["192.168.122.18"]
}
[root@daniel ~]# systemctl restart docker
6. Download a test image on the docker host and TAG it as harborIP / project name / image name: TAG
[root@daniel ~]# docker pull hello-world
[root@daniel ~]# docker tag hello-world 192.168.122.18/test/hello-world:v1
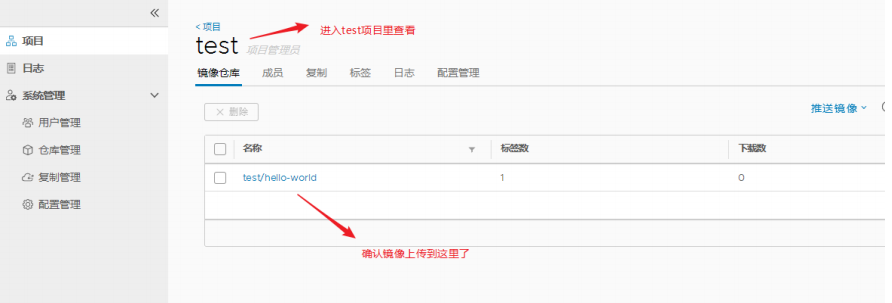
7. Log in to the server and push to upload the image
[root@daniel ~]# docker login 192.168.122.18
Username: admin
Password: The password is modified 123
Login Succeeded

[root@daniel ~]# docker push 192.168.122.18/test/hello-
world:v1

No, you can logout
[root@daniel ~]# docker logout 192.168.122.18
8. Browser interface verification
9. If the docker host wants to pull the uploaded image, it can do so
Delete the mirror and restart from harbor Download from warehouse
[root@daniel ~]# docker rmi 192.168.122.18/test/hello-world:v1

Images in private projects need to be logged in first,again pull(Images in public projects can be used directly without login
pull,Please test yourself)
[root@daniel ~]# docker login 192.168.122.18
Username: admin
Password: The password is 123 set previously
Login Succeeded

[root@daniel ~]# docker pull 192.168.122.18/test/hello-world:v1
Summary: remote warehouse
-
Disadvantages of official warehouse: network problems
-
Advantages of image warehouse provided by domestic cloud operators: good network speed disadvantages: security considerations
-
Advantages of self built warehouse: good network speed and security disadvantages: self maintenance requires server and storage costs
7, Common container operations
View container list
List all status containers, now empty list
Get the parameter description using man docker PS
[root@daniel ~]# docker ps -a
Run the first container
Run a container (random name if no container name is defined) through the Hello world image
- If the current docker host (container host) has a hello world image, it can be used directly
- If there is no relevant image, it will be downloaded from the docker hub (if the image accelerator is configured, the accelerator is preferred)
Use man docker run to get the parameter description
[root@daniel ~]# docker run hello-world
Check the container list again. There is one more container, but its status is exited. This container is running a Hello from Docker! I quit (the container name here is silly_lovelace randomly)
[root@daniel ~]# docker ps -a
CONTAINER ID IMAGE COMMAND
CREATED STATUS PORTS
NAMES
6e3f991b9e8a hello-world "/hello"
 3 minutes ago Exited ( 0 ) 2 minutes ago
silly_lovelace

The format of the above list is quite long and looks uncomfortable. It can be handled simply,View only the important columns
[root@daniel ~]# docker ps -a |awk -F"[ ]{2}*" '{print $1"\t\t"$3"\t\t"$5"\t"$NF}'
CONTAINER ID COMMAND STATUS
NAMES
6e3f991b9e8a "/hello" Exited ( 0 ) 3
minutes ago silly_lovelace
Question: Why did the container quit after running Hello world instead of continuing?
We compared the container to a lightweight virtual machine, but the container is actually just a process. Of course, it will exit after running, unless it is a daemon like a service.
The container runs a command or script
Specify to run the "echo haha" command using the docker.io/centos image. Latest is the default TAG tag and can be omitted; Other tags cannot be omitted, otherwise it will default to latest
[root@daniel ~]# docker run centos:latest echo haha
haha
docker runs an uninterrupted script, - d means running in the background (running in the background means not outputting results to the screen)
[root@daniel ~]# docker run -d centos /bin/bash -c "while true; do echo haha;sleep 3;done"
View the container you just ran
Only the container that runs scripts continuously is still there UP Status, others are Exited state
[root@daniel ~]# docker ps -a |awk -F"[ ]{2}*" '{print $1"\t\t"$3"\t\t"$5"\t"$NF}'
CONTAINER ID COMMAND STATUS
NAMES
21086dab3efa "/bin/bash -c 'whi..." Up 1 minutes
sleepy_ride
495310e96d9f "echo haha" Exited (0) 3 minutes
ago unruffled_jepsen
6e3f991b9e8a "/hello" Exited (0) 15 minutes
ago silly_lovelace
View container operation results
Followed by container ID,You can also take the container name
[root@daniel ~]# docker logs 21086dab3efa
Stop container
[root@daniel ~]# docker stop 21086dab3efa
Start container
[root@daniel ~]# docker start 21086dab3efa
View information about containers
[root@daniel ~]# docker inspect 21086dab3efa
Run the container and operate interactively
Start the container using the following command;-i Finger interaction;-t finger tty terminal;--name Is used to specify the container name
[root@daniel ~]# docker run -i -t --name=c1 centos:latest /bin/bash
[root@f736fe36002c /]# cat /etc/redhat-release
CentOS Linux release 7.6.1810 (Core) You can see what we downloaded centos It's 7.6 edition
[root@f736fe36002c /]# uname -r
3.10.0- 862 .el7.x86_64 The viewed kernel is different from the host
centos7.5 equally,Description is the kernel of the shared host

Operation in container(I create a file here and exit)
[root@f736fe36002c /]# touch /root/daniel
[root@f736fe36002c /]# exit
exit
Experiment: how to view or modify the files previously created in the container after the interactive operation exits?
Do not use the following command again, because the name conflicts, and an error will be reported (changing the name will start a new container))
[root@daniel ~]# docker run -i -t --name=c1 centos:latest
/bin/bash
1. Use the following command to check that c1 container is in Exited status; - l indicates the nearest container in the list
[root@daniel ~]# docker ps -l
CONTAINER ID IMAGE COMMAND
CREATED STATUS
PORTS NAMES
f736fe36002c centos:latest "/bin/bash"
 2 minutes ago Exited ( 0 ) 1 minutes ago
c1
2. Start the container
[root@daniel ~]# docker start c1
3. Then use the attach instruction to connect containers in the UP state (containers in the Exited state cannot be attached)
[root@daniel ~]# docker attach c1
4. Validation documents can be modified as required
[root@f736fe36002c /]# ls /root/daniel -l
- rw-r--r-- 1 root root 0 Dec 19 12:30 /root/daniel
[root@f736fe36002c /]# exit
exit
5. Commit to a new image; c63d63bff173 is the container ID;test_image is the name of the new image
[root@daniel ~]# docker commit c63d63bff173 test_image
sha256:bfb4e268cc6b683e1fc19346daf446ddd85dc7d75bcaa5cfd80
978ac271a913f
6. Verify the new image
[root@daniel ~]# docker images |grep test_image
test_image latest bfb4e268cc6b
 47 seconds ago  202 MB
Specify the container run command outside the container
The host can send commands to the container through the exec command for execution, but the container is required to be in the UP state
[root@daniel ~]# docker start c1

stay container1 Create a file in the container and verify it;man docker-exec view help
[root@daniel ~]# docker exec c1 touch /root/123
[root@daniel ~]# docker exec c1 ls -l /root/123

Or use the following command to connect to interactive operation
[root@daniel ~]# docker exec -it c1 /bin/bash
Delete container
Containers in UP status must be stopped before they can be deleted
[root@daniel ~]# docker stop 21086dab3efa
[root@daniel ~]# docker rm 21086dab3efa
Batch delete all containers
plus-q Parameter to view only the of all containers ID
[root@daniel ~]# docker ps -aq
f736fe36002c
21086dab3efa
495310e96d9f
6e3f991b9e8a
 Stop all containers
[root@daniel ~]# docker stop $(docker ps -aq)
Delete all containers
[root@daniel ~]# docker rm $(docker ps -aq)
Summary:
-
docker ps -a: lists all local container information
-
docker run parameter option -- name container name image name: the command passed from TAG to the container for internal execution
-
docker logs container name or container ID: output the results of executing commands in the container
-
docker stop container name or container ID: stop container
-
docker start container name or container ID: start container
-
docker attach container name or container ID: connect a container in UP status and interact with it (only those with bash environment)
-
docker exec container name or container ID command: you can pass external commands to internal operations of the container without connecting to the container
-
docker exec -it container name or container ID /bin/bash connection container interaction
-
docker inspect container name or container ID: view the properties of the container
-
docker rm container name or container ID: delete container
-
docker commit container name or container ID new image name: TAG submits the container as an image
Core commands to remember:
-
docker ps -a
-
docker run
-
docker start ; docker stop;
-
docker commit
-
docker exec; docker exec -it container name or container ID /bin/bash
-
docker rm
8, docker storage driver
Copy on write and time allocation
Through the above learning, we know that an image can run across multiple containers. If each container copies a file system in the image, it will occupy a lot of storage space. docker uses copy on write (cow) and allocate on demand technologies to improve storage utilization.
Copy on write:
-
Copy on write technology allows multiple containers to share the file system of the same image, and all data is read from the image
-
Only when a file is to be written, can the file to be written be copied from the image to its own file system for modification. Therefore, no matter how many containers share the same image, the write operation is performed on the replica copied from the image to its own file system, and the source file of the image will not be modified
-
When multiple containers operate on the same file, a replica will be generated in the file system of each container. What each container modifies is its own replica, which is isolated from each other and does not affect each other
Time allocation:
Starting a container does not pre allocate some disk space for the container, but allocates new space as needed when a new file is written
Federated file system
Union file system (unifs) is to merge directories from different physical locations into the same directory
For example, you can mount a CD together with the directory on a hard disk, and then modify the read-only CD file. The modified file is not saved back to the CD for overwriting, but stored in the hard disk directory. This achieves the purpose of modifying without affecting the original data of the CD.
Thinking: consider the CD as an image in docker and the hard disk directory as a container. Think again?
docker supports aufs and overlay.
aufs
Docker first adopted AUFS as the file system. Thanks to the concept of AUFS layering, multiple containers can share the same image.
aufs(Another UnionFS), later called Alternative UnionFS, may not be domineering enough, and later called Advance UnionFS
Docker first adopted AUFS as the file system. Thanks to the concept of AUFS layering, multiple containers can share the same image

Except that the top layer is the read / write layer, the other layers below are read-only mirror layers
overlay
Because AUFS is not incorporated into the Linux kernel and only supports Ubuntu, in consideration of compatibility, storage drivers are introduced into Docker version 0.7. At present, Docker supports five storage drivers: AUFS, overlayfs, Btrfs, device mapper and ZFS
At present, aufs is the default storage method on ubuntu distribution, and Overlay or Overlay 2 is the default storage method on CentOS distribution
# docker info |grep "Storage Driver"
Storage Driver: overlay2
# lsmod |egrep 'aufs|overlay'
overlay  71964  7
The overlay module is loaded on centos. It has entered the main line of Linux kernel since the kernel of version 3.18
Overlay is supported by Linux kernel after 3.18 (currently 3.10 kernel loading module can also be used). It is also a Union FS. Unlike AUFS, overlay has only two layers: an upper file system and a lower file system, representing the container layer and image layer of Docker respectively
The underlying directory of overlay FS is called lowerdir, and the high-level directory is called upperdir. Merging unified views is called merged. When a file needs to be modified, use cow to copy the file from the read-only Lower to the writable Upper for modification, and the results are also saved in the Upper layer. In Docker, the Lower read-only layer is image, and the writable layer is Container
The image layer is lowdir, the container layer is upperdir, and the unified view layer is merged
The view layer provides users with a unified perspective, hides the complexity of multiple layers, and there is only one file system for users.
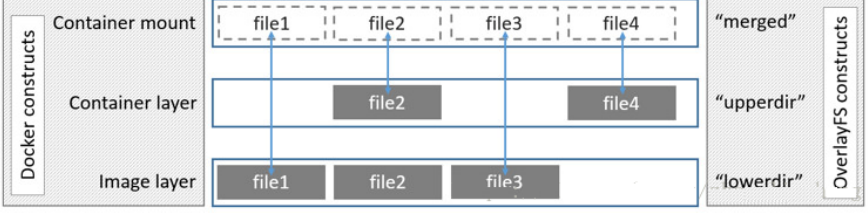
As can be seen from the above figure:
-
If upperdir and lowerdir have files with the same name, the file of upperdir will be used
-
When reading a file, if the file is not in upperdir, it is read from lowerdir
-
If the written file is not in uppderdir but in lowerdir, copy it from lowerdir to upperdir.
-
No matter how large the file is, write it after copy. Deleting the file in the image layer only generates a whiteout file flag in the container layer (marked as deleted, not really deleted) (the effect will be reflected in the following dockefile chapter)
Comparison of aufs, overlay and overlay 2
aufs: using multiple layers
overlay: two layers are used to share data. Only one layer is mounted through hard connection, and other layers are shared through hard connection at the top layer (increasing the burden of disk inode s)
overlay2: it uses 2-layer layered drivers to support multi-layer lower overlay images natively (up to 128 layers). Compared with overlay drivers, it consumes less inode s
Observe the storage at different stages
Prepare a new VM instance, reinstall docker (refer to the previous chapter for the installation process), and conduct the following tests
Before the first start of docker
Just before installing docker CE and starting the service for the first time, there was no docker directory under / var/lib /
After docker starts
After systemctl start docker is started for the first time, the / var/lib/docker directory will be generated
[root@vm2 ~]# systemctl start docker

[root@vm2 ~]# ls -l /var/lib/docker
total 0
drwx------ 2 root root 24 Jun 23 15 : 30 builder
drwx------ 4 root root 92 Jun 23 15 : 30 buildkit
drwx------ 2 root root  6 Jun 23 15 : 30 containers
drwx------ 3 root root 22 Jun 23 15 : 30 image
drwxr-x--- 3 root root 19 Jun 23 15 : 30 network
drwx------ 3 root root 40 Jun 23 15 : 39 overlay2
drwx------ 4 root root 32 Jun 23 15 : 30 plugins
drwx------ 2 root root  6 Jun 23 15 : 39 runtimes
drwx------ 2 root root  6 Jun 23 15 : 30 swarm
drwx------ 2 root root  6 Jun 23 15 : 41 tmp
drwx------ 2 root root  6 Jun 23 15 : 30 trust
drwx------ 2 root root 25 Jun 23 15 : 30 volumes
[root@vm2 ~]# cd /var/lib/docker/overlay2/
[root@vm2 overlay2]# ls
total 0
brw------- 1 root root 8 , 3 Jul 26 14 : 10 backingFsBlockDev
drwx------ 2 root root  6 Jul 26 14 : 10 l
After downloading the image
[root@vm2 overlay2]# docker pull centos
Using default tag:latest
latest: Pulling from library/centos
8 ba884070f61: Pull complete
Digest:
sha256:a799dd8a2ded4a83484bbae769d97655392b3f86533ceb7dd96
bbac929809f3c
Status: Downloaded newer image for centos:latest
[root@vm2 overlay2]# pwd
/var/lib/docker/overlay2
[root@vm2 overlay2]# ls
23664d7a4167e74ee04838d87cd3568cc82be49f781bba2212b9bff942
bb8fa4 backingFsBlockDev l

[root@vm2 overlay2]# ls
23664d7a4167e74ee04838d87cd3568cc82be49f781bba2212b9bff942
bb8fa4/
diff link

[root@vm2 overlay2]# ls
23664d7a4167e74ee04838d87cd3568cc82be49f781bba2212b9bff942
bb8fa4/diff/

anaconda-post.log bin dev etc home lib lib64 media
mnt opt proc root run sbin srv sys tmp usr var

[root@vm2 overlay2]# cat
23664d7a4167e74ee04838d87cd3568cc82be49f781bba2212b9bff942
bb8fa4/link
5D7D6BY2V3FKMZHUU6VHK7ILWL

[root@vm2 overlay2]# ll l
total 0
lrwxrwxrwx 1 root root 72 Jul 26 14:16
5D7D6BY2V3FKMZHUU6VHK7ILWL ->
../23664d7a4167e74ee04838d87cd3568cc82be49f781bba2212b9bff
942bb8fa4/diff
-
After downloading the image, there is an additional 23664 in the overlay 2 Directory... This directory has only one layer
-
The diff subdirectory within this directory records each layer's own data
-
Link records the link directory of this layer (consistent with the link recorded in l subdirectory under overlay directory)
-
l the subdirectory contains many soft links. Short names are used to point to other layers. Short names are used to avoid reaching the page size limit when the mount parameter is used
After running the container
[root@vm2 overlay2]# docker run -i -t --name=c1
centos:latest /bin/bash
[root@9169c38e6424 /]
Press simultaneously ctrl+p+q Three key exit,Keep container UP state
[root@vm2 overlay2]# docker ps -a
CONTAINER ID IMAGE COMMAND CREATED
STATUS PORTS NAMES
9169 c38e6424 centos:latest "/bin/bash"  12 seconds ago
Up 10 seconds c1
After the container runs, check the overlay 2 directory again


[root@vm2 overlay2]# ll 3652e67b65ebe7eaed7cc879f8470983181fc19fee2f3d72173e6766e28ec74/
total 8
drwxr-xr-x 2 root root  6 Jul 26 14 : 30 diff
- rw-r--r-- 1 root root 26 Jul 26 14 : 30 link
- rw-r--r-- 1 root root 57 Jul 26 14 : 30 lower
drwxr-xr-x 1 root root  6 Jul 26 14 : 30 merged
drwx------ 3 root root 18 Jul 26 14 : 30 work
-
Lower specifies the lower level
-
work is used to complete operations such as copy on_write.
[root@vm2 overlay2]# cat 3652e67b65ebe7eaed7cc879f8470983181fc19fee2f3d72173e67666e28ec74/lower
l/UQF6DWQE64JXS3TEBUFOBSD3TY:l/5D7D6BY2V3FKMZHUU6VHK7ILWL

[root@vm2 overlay2]# ls -l l/
total 0
lrwxrwxrwx 1 root root 72 Jul 26 14 : 16
5D7D6BY2V3FKMZHUU6VHK7ILWL -> ../23664d7a4167e74ee04838d87cd3568cc82be49f781bba2212b9bff
942bb8fa4/diff
lrwxrwxrwx 1 root root 72 Jul 26 14 : 30
KBKN2UECH7JGUJBUGIVHYV4ERX -> ../3652e67b65ebe7eaed7cc879f8470983181fc19fee2f3d72173e676
66e28ec74/diff
lrwxrwxrwx 1 root root 77 Jul 26 14 : 30
UQF6DWQE64JXS3TEBUFOBSD3TY -> ../3652e67b65ebe7eaed7cc879f8470983181fc19fee2f3d72173e676
66e28ec74-init/diff
Through the above test summary:
- The file system layer seen by the user is:
/var/lib/docker/overlay2/3652e67b65ebe7eaed7cc879f8470983181fc19fee2f3d72173e67666e28ec74/merged
- It consists of
/var/lib/docker/overlay2/3652e67b65ebe7eaed7cc879f8470983181fc19fee2f3d72173e67666e28ec74-init/diff/
and
/var/lib/docker/overlay2/23664d7a4167e74ee04838d87cd3568cc82be49f781bba2212b9bff942bb8fa4/diff/
Jointly mounted
- The following directories are used for copy on write operations
/var/lib/docker/overlay2/3652e67b65ebe7eaed7cc879f8470983181fc19fee2f3d72173e67666e28ec74/work
- If you use the docker attach container name to connect and create a file in the container, it will be stored in
/var/lib/docker/overlay2/3652e67b65ebe7eaed7cc879f8470983181fc19fee2f3d72173e67666e28ec74/diff
Summary:
-
Currently, the storage driver used by docker in CentOS 7 is overlay 2
-
docker improves storage efficiency through write time replication (cow) and time allocation
-
aufs and ovelay are federated file systems
-
aufs is multi-layered
-
The overlay mainly consists of 2 two layers: lowerdir and upperdir
-
Overlay 2 saves innode s compared to overlay
9, Running applications in containers
Previously, we were familiar with the common operations of containers, but applications have not been run in containers, while production environments use containers to run applications.
Open ip_forward on the host, because we want to map the port of the container to the host. Only by opening ip_forward can the mapping succeed
[root@daniel ~]# vim /etc/sysctl.conf
net.ipv4.ip_forward = 1
[root@daniel ~]# sysctl -p
Running httpd applications in containers
Review mirroring:
-
System image
-
Apply mirror
First, we run httpd through the system image
Case 1: port mapping
Use the official centos image to run the container and run the httpd service. Because the httpd service is not installed in the official centos image by default, we need to customize the installation
Docker runs httpd internally and starts port 80. Port mapping with docker_host (host) is required to allow the client to access through the network
1. Running the container httpd1; -p 8000:80 means mapping port 80 in the container to port 8000 of docker_host
[root@daniel ~]# docker run -it -p 8000:80 --name=httpd1 centos:latest /bin/bash
[root@b0a9623d3920 /]# yum install httpd httpd-devel -y
Failed to get D-Bus connection: Operation not permitted
 Start service.Used here systemctl start httpd Starting the service will report an error, so you can use the command directly
 Order start
[root@b0a9623d3920 /]# httpd -k start
[root@b0a9623d3920 /]# ss -an |grep :80
tcp LISTEN 0  0 ::: 80
:::*
2. If exit exits, the started service will also be closed. Press ctrl+q+p at the same time to exit the container and keep the container running in the background
You can see that the container is still UP state
[root@daniel ~]# docker ps -l
CONTAINER ID IMAGE COMMAND
CREATED STATUS PORTS
NAMES
b0a9623d3920 centos:latest "/bin/bash"
1 minutes ago Up 1 minutes 0.0.0.0:8000-> 80 /tcp httpd1
3. Use another machine browser to access http: / / host IP:8000 test
Case 2: Customize httpd and submit it as an image
There is no httpd in the cenots image, so you need to install it. But it's unbearable to install httpd every time you start a container. So we install it in a container, do everything we want to customize, and then commit the container to a new image.
In the future, you can run the container with this new image, so you don't have to install the environment again.
1. Run container httpd2, install httpd related software and customize the configuration
[root@daniel ~]# docker run -it --name=httpd2 centos:latest /bin/bash

[root@82b985aea72c /]# yum install httpd httpd-devel -y

[root@82b985aea72c /]# mkdir /www
[root@82b985aea72c /]# echo "main page" > /www/index.html

Modify the home directory of lines 119 and 131 to/www
[root@82b985aea72c /]# vi /etc/httpd/conf/httpd.conf

[root@82b985aea72c /]# exit
exit
2. After exit, the container changes to the Exited state
[root@daniel ~]# docker ps -l
CONTAINER ID IMAGE COMMAND
CREATED STATUS PORTS
NAMES
82 b985aea72c centos:latest "/bin/bash"
5 minutes ago Exited (0) 6 seconds ago
httpd2
3. commit the built environment into a new image (this image is user-defined, and can be push ed to the image warehouse as required in the production environment)
[root@daniel ~]# docker commit httpd2 httpd_image
4. Start a new container with the commit ted image, and map port 80 to 8001 of the host
[root@daniel ~]# docker run -d -p 8001:80 --name=httpd3  httpd_image /usr/sbin/httpd -D FOREGROUND
dcaca836b94655364749c064519ad66c8229657262465e7ea8194f2616980b61
[root@daniel ~]# lsof -i:8001
COMMAND PID USER FD TYPE DEVICE SIZE/OFF NODE NAME
docker-pr 23130 root  4u IPv6 183572  0 t0 TCP
*:vcom-tunnel (LISTEN)
5. Use another machine browser to access http: / / host IP:8001 test
Question: / usr / SBIN / httpd - D foreround can you make automatic parameter transfer?
Answer: Yes, it will be discussed in the chapter of building images in dockerfile.
Case 3: docker data volume mount
Question: when I have the following needs:
-
The configuration file in the container needs to be modified
-
The data in the container (such as the data in httpd home directory) needs to be saved
-
Data needs to be shared between different containers (e.g. data sharing between two httpd containers' home directory)
When the container is deleted, the relevant changed data in it will also be deleted, that is, the data cannot be persisted.
We can map the service configuration file, data directory, log directory, etc. with the directory of the host to keep the data on the host to realize data persistence
The directory of the host can also be shared among multiple containers.
Mount the directory (data volume) of the host into the container (the configuration file can also be mounted)
1. First create a directory on the host computer and create a home page with different contents
[root@daniel ~]# mkdir /docker_www
[root@daniel ~]# echo daniel > /docker_www/index.html
2. Run the container httpd4 and send the / docker of the host machine_ The WWW / directory is mounted to the / www / directory in the container
[root@daniel ~]# docker run -d -p 8002:80 -v
/docker_www/:/www --name=httpd4 httpd_image
/usr/sbin/httpd -D FOREGROUND

[root@daniel ~]# docker ps -l
CONTAINER ID IMAGE COMMAND
CREATED STATUS PORTS
NAMES
484d7432d7ef httpd_image "/usr/sbin/httpd
-..."  21 seconds ago Up 20 seconds
0.0.0.0: 8002->80/tcp httpd4
3. Use another machine browser to access http: / / host IP:8002 test
(Note: if you can't access the home page, please check whether SELinux is closed)
4. Try to modify the host / docker_ The contents of WWW / index.html and the access results will also change with the modification
expand:
The default centos image time is 8 hours less than ours, so this is a time zone difference, which can be solved in the following ways
# docker run -it -v /etc/localtime:/etc/localtime --name c2 centos /bin/bash
explain:
-
Because we are the centos:latest image pull ed from the official docker, it defaults to the UTC time zone
-
We need to change to our own time zone. We can mount the mapping with - v /etc/localtime:/etc/localtime when starting the container
-
If you find it troublesome to mount the time zone file every time, you can customize the time zone file and keep it as a new image for reuse
# docker run -d --name httpd1 -p 8000:80 \
> - v /httpd_www:/www - v
/test/httpd.conf:/etc/httpd/conf/httpd.conf \
> httpd_image /usr/sbin/httpd - DFOREGROUND
explain:
-
/httpd_www / directory can be created automatically without creating it in advance
-
/test/httpd.conf this file needs to be prepared in advance (the home directory in the configuration file should be changed to / www)
-
After mounting, the destination of modifying the internal data of the container is achieved by modifying the data of the host
Case 4: Official httpd image running container
reference resources: https://hub.docker.com/_/httpd
1. Pull the official httpd image
[root@daniel ~]# docker search httpd
[root@daniel ~]# docker pull httpd
2. Operation container
/data/www Directories can be created in advance or not(It will help us create it automatically)
[root@daniel ~]# docker run -d -p 8003:80 --name=httpd4 -v n/data/www/:/usr/local/apache2/htdocs/ httpd:latest

[root@daniel ~]# echo "new page" > /data/www/index.html
3. Use another machine browser to access http: / / host IP:8003 test
Run mysql or mariadb application in container
Case 1: Official mysql image running container
1. Pull the mysql image first
[root@daniel ~]# docker pull mysql:5.6
2. Start the container
--restart=always Indicates restart docker It will restart automatically after service
- e MYSQL_ROOT_PASSWORD= 123 appoint mysql of root User password
[root@daniel ~]# docker run -d -p 3306:3306 --name=mysql1 -v /data/mysql:/var/lib/mysql --restart=always -e MYSQL_ROOT_PASSWORD=123 mysql:5.6

View the of the host after startup/data/mysql/catalogue,Found that the data has been initialized
[root@daniel ~]# ls /data/mysql/
auto.cnf ibdata1 ib_logfile0 ib_logfile1 mysql
performance_schema
For more parameters and detailed descriptions, please refer to: https://hub.docker.com/_/mysql
3. Connect it and use it freely as required
[root@daniel ~]# mysql -h 127.0.0.1 -u root -p123
Case 2:centos image custom mariadb environment
[root@daniel ~]# docker run -it -d -p 3307:3306 -v /data/mysql2:/var/lib/mysql --restart=always --name=mariadb2 centos:latest /bin/bash

[root@daniel ~]# docker attach mariadb2

[root@7dccf1c72315 /]# yum install mariadb-server -y
[root@7dccf1c72315 /]# mysql_install_db --datadir=/var/lib/mysql/ --user=mysql
[root@7dccf1c72315 /]# mysqld_safe --defaults-file=/etc/my.cnf &
[root@7dccf1c72315 /]# mysql
MariaDB [(none)]> grant all on *.* to 'abc'@'%' identified by ' 123 ';
MariaDB [(none)]> flush privileges;
MariaDB [(none)]> quit
[root@7dccf1c72315 /]#
Last press ctrl+p+q Exit and keep the container running in the background
2. Find another remote connection test, OK
# mysql -h docker host IP -u abc -p123 -P 3307
Running nginx applications in containers
reference resources: https://hub.docker.com/_/nginx
Case 1: Official nginx image running container
1. Pull the image
[root@daniel ~]# docker pull nginx
2. Prepare a nginx.conf configuration file
[root@daniel ~]# mkdir /data/nginx/etc -p
 Prepare the following configuration file(Write one or copy it yourself)
[root@daniel ~]# ls /data/nginx/etc/nginx.conf
3. Run the container and prepare a home page file
[root@daniel ~]# docker run -d -p 8004:80 --restart=always --name=nginx1 -v /data/nginx/html:/usr/share/nginx/html -v /data/nginx/etc/nginx.conf:/etc/nginx/nginx.conf -v /data/nginx/log:/var/log/nginx nginx:latest

[root@daniel ~]# echo "nginx main page" > /data/nginx/html/index.html
4. Use another machine browser to access http: / / host IP:8003 test
5. If you want to modify the nginx configuration file, you can follow the steps below
[root@daniel ~]# vim /data/nginx/etc/nginx.conf
 Restart the container again
[root@daniel ~]# docker stop nginx1
[root@daniel ~]# docker start nginx1
Exercise: use centos image to customize nginx environment
Running tomcat application in container
reference resources: https://hub.docker.com/_/tomcat
Case 1: Official tomcat image running container
[root@daniel ~]# docker run -d -p 8080:8080 --name=tomcat1 tomcat:latest
visit http://docker Host IP:8080 authentication
After class interest exercise: search various official application images, and modify the configuration file as required
10, Building images using Dockerfile
In addition to submitting custom containers as images using docker commit, you can also use Dockerfile to build custom images.
What is Dockerfile?
A: Dockerfile writes out the steps of building an image, and then executes them in order to automatically build an image. It is similar to script files, ansible playbook,saltstack sls files, etc.
dockerfile directive
You can view the detailed instructions through the man dockerfile. Here I simply translate and list the commonly used instructions
1, FROM
The FROM directive is used to specify the underlying image to be used for subsequent construction of the new image.
The FROM instruction must be the first command in the Dockerfile file.
The basic image specified by the FROM instruction can be in the official remote warehouse or in the local warehouse, with priority given to the local warehouse.
format:FROM <image>:<tag>
example:FROM centos:latest
2, RUN
The RUN instruction is used to execute commands in the build image. It has the following two formats:
- shell format
format:RUN <command>
example:RUN echo daniel > /var/www/html/index.html
- exec format
format:RUN ["Executable file", "Parameter 1", "Parameter 2"]
example:RUN ["/bin/bash", "-c", "echo daniel > /var/www/html/index.html"]
Note: from the perspective of Optimization: when there are multiple commands to be executed, do not use multiple runs, and try to connect the & & symbol and the \ symbol into one line. Because multiple RUN commands will make the image establish multiple layers (in short, it will become bloated) 😃).
RUN yum install httpd httpd-devel -y
RUN echo daniel > /var/www/html/index.html
 Can be changed to
RUN yum install httpd httpd-devel -y && echo daniel > /var/www/html/index.html
 Or change it to
RUN yum install httpd httpd-devel -y \
&& echo daniel > /var/www/html/index.html
3, CMD
CMD is different from RUN. CMD is used to specify the command to be executed when the container is started, while RUN is used to specify the command to be executed when the image is built.
There are three formats:
CMD ["executable","param1","param2"]
CMD ["param1","param2"]
CMD command param1 param2
Each Dockerfile can only have one CMD command. If multiple commands are specified, only the last one will be executed.
If the user specifies the command to run when starting the container, the command specified by CMD will be overwritten.
What is the command that you specify to run when you start the container?
# docker run -d -p 80:80 command to run with image name
4, EXPOSE
The export directive specifies the port on which the container listens at run time
format:EXPOSE <port> [<port>...]
example:EXPOSE 80 3306 8080
The above running port also needs to be mapped to the port of the host through the - p parameter when using docker run to run the container
5, ENV
The ENV instruction specifies an environment variable
format:ENV <key> <value> perhaps ENV <key>=<value>
example:ENV JAVA_HOME /usr/local/jdkxxxx/
6, ADD
The ADD instruction is used to copy the files on the host to the image
format:ADD <src> <dest>
<src>It can be a local file, a local compressed file, or a url,If you put<src>Write a url,that ADD It's similar to wget command
<dest>The path can be either an absolute path in the container or a relative path relative to the working directory
7, COPY
The COPY directive is similar to the ADD directive, but the source file of COPY can only be a local file
format:COPY <src> <dest>
8, ENTRYPOINT
ENTRYPOINT is very similar to CMD
Similarities: only one Dockerfile is written. If multiple dockerfiles are written, only the last one will take effect when the container is started
difference:
If the user specifies the running command when starting the container, ENTRYPOINT will not be overwritten by the running command, but CMD will be overwritten
There are two formats:
ENTRYPOINT ["executable", "param1", "param2"]
ENTRYPOINT command param1 param2
9, VOLUME
The VOLUME instruction is used to map the directory in the host to the directory in the container
Only the mount point is specified, and the directory mapped by the docker host is automatically generated.
format:VOLUME ["<mountpoint>"]
10, USER
The USER instruction sets the USER who starts the container (for example, hadoop requires hadoop USER operation and oracle requires oracle USER operation), which can be a USER name or UID
USER daemon
USER 1001
Note: if the container is set to run with the daemon user, RUN,CMD and ENTRYPOINT will run with this user
After the image is built, when running the container through docker run, you can override the specified user through the - u parameter
11, WORKDIR
The WORKDIR directive sets the working directory, similar to the cd command. RUN cd /root is not recommended. WORKDIR is recommended
WORKDIR /root
Steps:
1. Create a folder (directory)
2. Create Dockerfile (and write) and other files in the folder (directory)
3. Use the docker build command to build the image
4. Start the container using the built image
Case 1:Dockerfile builds httpd image v1
1. Prepare a directory (custom)
[root@daniel ~]# mkdir /dockerfile
2. Write dockerfile
[root@daniel ~]# cd /dockerfile
[root@daniel dockerfile]# vim dockerfile_httpd
FROM centos:7.6.1810

MAINTAINER daniel

RUN yum install httpd httpd-devel - y \
&& echo "container main page" > /var/www/html/index.html

EXPOSE  80
CMD ["/usr/sbin/httpd","-D","FOREGROUND"]
3. Use docker build to build the image. Note that there is one last point (representing the current directory)
[root@daniel dockerfile]# docker build -f dockerfile_httpd -t my_httpd:v1 .
4. Verify the image
[root@daniel dockerfile]# docker images |grep my_httpd
my_httpd v1 e316739796ae
 1 minutes ago 348 MB
5. Create a container using the built image
[root@daniel dockerfile]# docker run -d -p 8005:80 my_httpd:v1

[root@daniel dockerfile]# docker ps -a |grep my_httpd
c539e6161463 my_httpd:v1 "/usr/sbin/httpd
-..." 1 minutes ago Up 8 minutes
0.0.0.0: 8005->80 /tcp boring_goldstine
6. Client access http://docker Host IP:8005 test
Expansion: if the speed of the public network source is particularly slow, you can try to build your own yum source for httpd
1. Mount the iso image, share it using http or ftp, and create the yum configuration locally
[root@daniel dockerfile]# mkdir /share/yum -p
[root@daniel dockerfile]# mount /share/iso/CentOS-7-x86_64-DVD-1810.iso /share/yum/

[root@daniel dockerfile]# vim /etc/httpd/conf/httpd.conf
 Add the following configuration
Alias /yum /share/yum

<Directory "/share/yum">
Options Indexes
AllowOverride None
Require all granted
</Directory>

# systemctl restart httpd
[root@daniel dockerfile]# vim local.repo
[local]
name=local
baseurl=http://172.17.0.1/yum # IP is the host docker0
 Bridge IP
gpgcheck= 0
enabled= 1
2. Write dockerfile file
[root@daniel dockerfile]# vim dockerfile_httpd
FROM centos:7.6.1810

MAINTAINER daniel

RUN rm - rf /etc/yum.repos.d/*
ADD local.repo /etc/yum.repos.d/local.repo # Means to compare with
dockerfile Same directory local.repo Copy to container
RUN yum install httpd - y && echo dockerfile_web1 > /var/www/html/index.html

EXPOSE 80
CMD /usr/sbin/httpd -D FOREGROUND
3. Use docker build to build the image
[root@daniel dockerfile]# docker build -f dockerfile_httpd -t my_httpd:v1 .
Case 2:Dockerfile builds httpd image v2
1. Write dockerfile
[root@daniel dockerfile]# vim dockerfile_httpd2
FROM centos:7.6.1810

MAINTAINER daniel

RUN yum install httpd httpd-devel - y

VOLUME ["/var/www/html/"]

EXPOSE  80
CMD ["/usr/sbin/httpd","-D","FOREGROUND"]
2. Use docker build to build the image
[root@daniel dockerfile]# docker build -f dockerfile_httpd2 -t my_httpd:v2 .
3. Verify the image
[root@daniel dockerfile]# docker images |grep my_httpd|grep v2
my_httpd v2 3146d5503f39
 1 minutes ago 382MB
4. Create a container using the built image
Will be on the host/data/www2/Attached to the container/var/www/html/
[root@daniel dockerfile]# docker run -d -p 8006:80 -v /data/www2:/var/www/html my_httpd:v2

[root@daniel dockerfile]# echo haha > /data/www2/index.html
Think: we use - v /data/www2:/var/www/html to mount the data volume. What is the role of VOLUME ["/var/www/html /"]?
No manual-v Specify data volume mount,be docker Will be on the host/var/lib/docker/volumes/Generate a volume directory and mount it to the directory you specify
5. Client access http://docker Host IP:8006 test
Case 3: Dockerfile builds tomcat image v1
1. Prepare the jdk,tomcat and other software packages required by tomcat, as well as the startup.sh and shutdown.sh files configured with environment variables
[root@daniel dockerfile]# ls /dockerfile
apache-tomcat-9.0.14.tar.gz jdk-8u191-linux-x64.tar.gz
shutdown.sh startup.sh dockerfile_tomcat

stay startup.sh and shutdown.sh Add the following section of environment variable configuration at the beginning of the file
export JAVA_HOME=/usr/local/jdk1.8.0_191
export TOMCAT_HOME=/usr/local/tomcat
export PATH=$JAVA_HOME/bin:$TOMCAT_HOME/bin:$PATH
2. Write dockerfile
[root@daniel dockerfile]# vim dockerfile_tomcat
FROM centos:7.6.1810

MAINTAINER daniel

WORKDIR /usr/local/
COPY jdk-8u191-linux-x64.tar.gz .
COPY apache-tomcat-9.0.14.tar.gz .

RUN tar xf jdk-8u191-linux-x64.tar.gz - C /usr/local/ && tar xf apache-tomcat-9.0.14.tar.gz - C /usr/local/ && mv /usr/local/apache-tomcat-9.0.14/ /usr/local/tomcat

COPY startup.sh /usr/local/tomcat/bin/startup.sh
COPY shutdown.sh /usr/local/tomcat/bin/shutdown.sh

RUN chmod 755 /usr/local/tomcat/bin/startup.sh && chmod 755 /usr/local/tomcat/bin/shutdown.sh

EXPOSE  8080
CMD ["/usr/local/tomcat/bin/startup.sh"]
3. Use docker build to build the image
[root@daniel dockerfile]# docker build -f dockerfile_tomcat -t my_tomcat:v1 .
4. Verify the image
[root@daniel dockerfile]# docker images |grep my_tomcat
my_tomcat v1 d4e628380b39
 41 seconds ago 815MB
5. Create a container using the built image
[root@daniel dockerfile]# docker run -itd -p 8081:8080 --name=tomcat2 my_tomcat:v1 /bin/bash

use startup.sh Can't start,It can only be started interactively(Next case improvement)

[root@daniel dockerfile]# docker exec tomcat2 /usr/local/tomcat/bin/startup.sh
Tomcat started .
6. Client access http://docker Host IP:8081 test
Case 4: Dockerfile builds tomcat image v2
Improvement case 3
1. Write a new dockerfile
[root@daniel dockerfile]# vim dockerfile_tomcat2

FROM centos:7.6.1810

MAINTAINER daniel

COPY jdk-8u191-linux-x64.tar.gz .
COPY apache-tomcat-9.0.14.tar.gz .

RUN tar xf jdk-8u191-linux-x64.tar.gz - C /usr/local && \
tar xf apache-tomcat-9.0.14.tar.gz - C /usr/local && \
mv /usr/local/apache-tomcat-9.0.14 /usr/local/tomcat && \
rm - rf jdk-8u191-linux-x64.tar.gz && \
rm - rf apache-tomcat-9.0.14.tar.gz && \
sed - i 1 a"export JAVA_HOME=/usr/local/jdk1.8.0_191" /usr/local/tomcat/bin/catalina.sh

EXPOSE  8080
CMD /usr/local/tomcat/bin/catalina.sh run
2. Use docker build to build the image
[root@daniel dockerfile]# docker build -f dockerfile_tomcat2 -t my_tomcat:v2 .
3. Verify the image
[root@daniel dockerfile]# docker images |grep tomcat |grep v2
my_tomcat v2 b9b1aae7a02f
 5 minutes ago 815MB
4. Create a container using the built image
[root@daniel dockerfile]# docker run -d -p 8082:8080 --name=tomcat3 my_tomcat:v2
 perhaps
[root@daniel dockerfile]# docker run -d --name tomcat3 -v /data/tomcat_data:/usr/local/tomcat/webapps/ROOT -p 8082:8080 my_tomcat:v2
5. Client access http://docker Host IP:8082 test
Improve again
Deleting the unzipped jdk and tomcat packages will not reduce the image size (because of the characteristics of the overlay file system), so it will not be deleted here
Environment variables can be specified using ENV
[root@daniel dockerfile]# vim dockerfile_tomcat2

FROM centos:7.6.1810

MAINTAINER daniel

ENV JAVA_HOME=/usr/local/jdk1.8.0_191

COPY jdk-8u191-linux-x64.tar.gz .
COPY apache-tomcat-9.0.14.tar.gz .

RUN tar xf jdk-8u191-linux-x64.tar.gz - C /usr/local && \
tar xf apache-tomcat-9.0.14.tar.gz - C /usr/local && \
mv /usr/local/apache-tomcat-9.0.14 /usr/local/tomcat

EXPOSE  8080
CMD /usr/local/tomcat/bin/catalina.sh run
Improve again
Need to be in docker in advance_ Unzip jdk and tomcat on host
FROM centos:7.6.1810

MAINTAINER daniel

ENV JAVA_HOME=/usr/local/jdk1.8.0_191

ADD jdk1.8.0_191 /usr/local/jdk1.8.0_191
ADD tomcat /usr/local/tomcat

EXPOSE 8080
CMD /usr/local/tomcat/bin/catalina.sh run
Case 5: building mariadb image from dockerfile
1. Prepare a script to execute mysql initialization and startup
[root@daniel dockerfile]# vim mariadb.sh

#!/bin/bash

mysql_install_db --datadir=/var/lib/mysql/ --user=mysql
sleep 3
mysqld_safe --defaults-file=/etc/my.cnf &
sleep 3

mysql - e "grant all privileges on *.* to 'root'@'%' identified by '123';"
mysql - e "grant all privileges on *.* to 'abc'@'%' identified by '123';"
mysql - e "flush privileges;"
explain:
-
The reason for using the script instead of directly using the RUN instruction in the dockerfile is that you need to use & put it in the background to start the mysql service, but putting the background symbol in the RUN will cause problems with the RUN command, so you can use the script alone
-
Sleep lasts for 3 seconds because it takes a certain time to initialize and start the service. Wait for 3 seconds to buffer
2. Create dockerfile
[root@daniel dockerfile]# vim dockerfile_mariadb
FROM centos:7.6.1810

MAINTAINER daniel

RUN rm - rf /etc/yum.repos.d/*
ADD local.repo /etc/yum.repos.d/local.repo
RUN yum install mariadb-server mariadb - y

COPY mariadb.sh .
RUN sh mariadb.sh

EXPOSE 3306
CMD mysqld_safe --defaults-file=/etc/my.cnf
3, docker build
[root@daniel dockerfile]# docker build -f ndockerfile_mariadb -t my_mariadb:v1 .
4. Use the image of build to start the container
[root@daniel dockerfile]# docker run -d -p 3306:3306 --name mariadb2 my_mariadb:v1
11, Single host container interconnection mode
Sometimes we want to communicate between containers and realize the connection of services (such as nginx, remote mysql, etc.).
Connect via link
The link method can be used to connect two containers, but the direction is one-way.
Prepare 2 terminals on the docker host
Terminal I
[root@daniel ~]# docker run -it --name c1 centos /bin/bash
[root@551b2985d420 /]# ip a |grep inet
inet 127.0.0.1/ 8 scope host lo
inet 172.17.0.4/ 16 brd 172.17.255.255 scope global
eth0

Can see c1 Container IP 172.17.0.4/16
Terminal II
Use – link c1:alias1 to connect the c1 container; haha is the alias of the c1 container
[root@daniel ~]# docker run -it --link c1:haha --name c2 centos /bin/bash

[root@1e8cd36da3af /]# tail -1 /etc/hosts
172.17.0.4 haha d64d657b4e1f c1
 Can see c2 Container handle c1 Container IP And alias haha Bound

[root@1e8cd36da3af /]# ping haha
PING haha (172.17.0.4) 56 ( 84 ) bytes of data.
64 bytes from haha (172.17.0.4): icmp_seq=1 ttl=64
time=0.280 ms
64 bytes from haha (172.17.0.4): icmp_seq=2 ttl=64
time=0.137 ms
64 bytes from haha (172.17.0.4): icmp_seq=3 ttl=64
time=0.130 ms
Summary:
-
The c2 container is created using – link c1:haha. In fact, the host name alias binding of c1 is added to the / etc/hosts file in the c2 container
-
link to realize one-way communication
Connect via network
The containers created by default are all on the same network, and the docker0 network card of the host is also connected to this network.
Open another terminal
Terminal III
View container c1 and c2 of IP It is found that the two containers are on the same network by default,So use these two directly
 individual IP You can communicate directly with each other
[root@daniel ~]# docker inspect c1 |grep IPAddress |tail -1
"IPAddress": "172.17.0.4",
[root@daniel ~]# docker inspect c2 |grep IPAddress |tail -1
"IPAddress": "172.17.0.5",
[root@daniel ~]# ifconfig docker0 |head -2
docker0: flags= 4163 <UP,BROADCAST,RUNNING,MULTICAST> mtu 1500
inet 172.17.0.1 netmask 255.255.0.0 broadcast 0.0.0.0
Terminal I
container c1 in ping container c2 of IP,Can pass
[root@551b2985d420 /]# ping -c 4 172.17.0.5
PING 172.17.0.5 (172.17.0.5) 56 ( 84 ) bytes of data.
64 bytes from 172.17.0.5: icmp_seq=1 ttl=64 time=0.237 ms
64 bytes from 172.17.0.5: icmp_seq=2 ttl=64 time=0.394 ms
64 bytes from 172.17.0.5: icmp_seq=3 ttl=64 time=0.118 ms
64 bytes from 172.17.0.5: icmp_seq=4 ttl=64 time=0.081 ms
Terminal II
container c2 in ping container c1 of IP,Can pass
[root@1e8cd36da3af /]# ping -c 4 172.17.0.4
PING 172.17.0.4 (172.17.0.4) 56 (84) bytes of data.
64 bytes from 172.17.0.4: icmp_seq=1 ttl=64 time=0.340 ms
64 bytes from 172.17.0.4: icmp_seq=2 ttl=64 time=0.077 ms
64 bytes from 172.17.0.4: icmp_seq=3 ttl=64 time=0.054 ms
64 bytes from 172.17.0.4: icmp_seq=4 ttl=64 time=0.100 ms
12, docker network
Local network
docker has four types of local networks:
-
bridge
The bridge here is different from the bridge network type in the virtual machine. You can think of this as similar to the NAT type in the virtual machine.
If the host can access the public network, the container connected to the network can also access the public network.
This is the default network type (that is, the network is not specified when running the container, which belongs to this type by default).
The docker0 network card on the host computer belongs to this network -
Host and host share the network.
The container connected to this network uses ifconfig to view the same information as the host without NAT conversion, which is similar to running on the host. -
none the container connected to this network has no IP address and other information, only lo local loopback network card.
Unable to connect to the public network. -
container multiple containers are connected to this network, so the containers can communicate with each other and are not shared with the host.
[root@daniel ~]# docker network ls
NETWORK ID NAME DRIVER
SCOPE
6 f92ca98b6e7 bridge bridge
local
658477d11b2c host host
local
411dc19aef37 none null
local

[root@daniel ~]# docker inspect bridge
 see bridge Network related information
bridge mode
1. Create a bridge type network named bridge0. The specified network segment is 10.3.3.0/24 (this network segment cannot conflict with the existing network segment of the host), and the gateway is 10.3.3.1
[root@daniel ~]# docker network create -d bridge --subnet "10.3.3.0/24" --gateway "10.3.3.1" bridge0

Can view bridge0 This network,To delete, use docker network rm
bridge0 command
[root@daniel ~]# docker network ls
NETWORK ID NAME DRIVER
SCOPE
6 f92ca98b6e7 bridge bridge
local
39 fe88f034d6 bridge0 bridge
local
658477d11b2c host host
local
411dc19aef37 none null
local
2. Run the container and specify to use the newly created network
[root@daniel ~]# docker run -it -d --name c4 --network bridge0 centos:latest
3. Verify and test the network of this container
[root@daniel ~]# docker inspect c4 |grep IPAddress |tail -1
"IPAddress": "10.3.3.2",

sure ping Communication gateway
[root@daniel ~]# docker exec c4 ping -c1 10.3.3.1
PING 10.3.3.1 (10.3.3.1) 56 ( 84 ) bytes of data.
64 bytes from 10.3.3.1: icmp_seq= 1 ttl= 64 time=0.319 ms

Internet access
[root@daniel ~]# docker exec c4 ping -c1 http://www.baidu.cn
PING http://www.a.shifen.com (14.215.177.39) 56 ( 84 ) bytes of data.
64 bytes from 14.215.177.39 (14.215.177.39): icmp_seq=1 ttl=55 time=7.51 ms
4. A gateway with network card name br xxxxx and IP address 10.3.3.1 will be generated on the host computer
[root@daniel ~]# ifconfig |head -2
br-39fe88f034d6:
flags= 4163 <UP,BROADCAST,RUNNING,MULTICAST> mtu 1500
inet 10.3.3.1 netmask 255.255.255.0 broadcast
0.0.0.0

If you want to change your name, follow the steps below
[root@daniel ~]# ifconfig br-39fe88f034d6 down
[root@daniel ~]# ip link set dev br-39fe88f034d6 name
docker1
[root@daniel ~]# ifconfig docker1 up
[root@daniel ~]# ifconfig docker1 |head -2
docker1: flags= 4163 <UP,BROADCAST,RUNNING,MULTICAST> mtu
1500
inet 10.3.3.1 netmask 255.255.255.0 broadcast
0.0.0.0
[root@daniel ~]# systemctl restart docker
host mode
1. The host can only have one host mode network (shared with docker host), and an error will be reported if it is created again
[root@daniel ~]# docker network create -d host host0
Error response from daemon: only one instance of "host"
network is allowed
2. Run the container and specify the host network
[root@daniel ~]# docker run -it -d --name c5 --network host centos:latest
3. Verify and test the network of this container
[root@daniel ~]# docker exec c5 ping -c1 http://www.baidu.com
PING http://www.a.shifen.com (14.215.177.39) 56 ( 84 ) bytes of data.
64 bytes from 14.215.177.39 (14.215.177.39): icmp_seq=1 ttl=55 time=7.51 ms

[root@daniel ~]# docker exec c5 yum install net-tools -y
 In the container ifconfig Get the information on the host ifconfig The information obtained is consistent
[root@daniel ~]# docker exec c5 ifconfig
none mode
Can not communicate with the Internet, only lo local communication
[root@daniel ~]# docker run -itd --name c7 --network=none centos:latest /bin/bash
container mode
[root@daniel ~]# docker run -itd --name c8 --network=container:c1 centos:latest /bin/bash
You can access the public network
explain:
- The network of c8 container is consistent with that of c1 container (including IP)
Cross docker host network
Containers on different hosts communicate through mapped ports, and then communicate through the IP and mapped ports of the two hosts. However, this makes use of the host network, which is inconvenient in some scenarios.
Can we establish a network between hosts so that containers can communicate with each other using their own IP? The answer is yes, and there are many schemes: docker native overlay, macvlan and third-party schemes, such as flannel, weave, calico, etc
Here we focus on flannel[ ˈ flæn ə l] , reference: https://coreos.com/blog/introdu
cing-rudder.html
Introduction to flannel
flannel is kubernetes[kub ə’ netis] the network plug-in is provided by default and is designed by the CoreOS team
flannel is essentially an "overlay network", that is, TCP data is packaged in another network packet for routing, forwarding and communication. At present, it supports data forwarding methods such as UDP, VxLAN, AWS VPC and GCE routing.
The default data communication mode between nodes is UDP forwarding. The following schematic diagram is displayed on the GitHub page of Flannel:

flannel can use etcd to store, distribute and maintain subnet information, and finally realize the interworking of different subnets in a large network
flannel experimental test
Here, in order to avoid confusing the previous environment, I will prepare two new virtual machines for the experiment
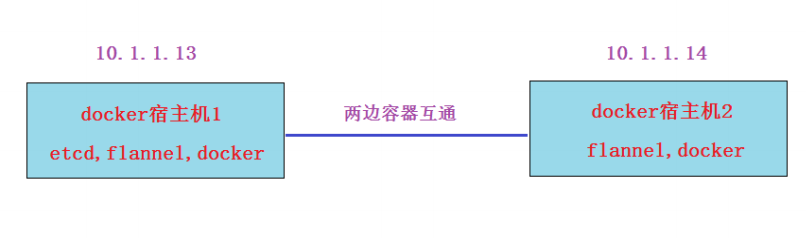
1. IP static
2. Host name binding
10.1.1.13 vm3.cluster.com
10.1.1.14 vm4.cluster.com
3. Time synchronization
4. Turn off the firewall and selinux
5. yum source (the default yum source after centos installation plus the following docker CE source)
# wget https://mirrors.aliyun.com/docker-ce/linux/centos/docker-ce.repo -O /etc/yum.repos.d/docker-ce.repo
Experimental process:
Step 1: install etcd, flannel and docker on docker host 1 (host name vm3)
[root@vm3 ~]# yum install etcd flannel docker-ce -y
Step 2: configure etcd service on docker host 1 and start it
[root@vm3 ~]# vim /etc/etcd/etcd.conf
6 ETCD_LISTEN_CLIENT_URLS="http://0.0.0.0:2379 "listen to 0.0.0.0 here so that the flanneld service can connect

[root@vm3 ~]# systemctl start etcd
[root@vm3 ~]# systemctl enable etcd
Step 3: configure the flanneld service on docker host 1, create a network, and start the service
[root@vm3 ~]# vim /etc/sysconfig/flanneld
4 FLANNEL_ETCD_ENDPOINTS="http://10.1.1.13:2379 "note
 meaning:here IP Change to etcd service IP

Create a virtual network(I create 172 here.18.0.0/16)
[root@vm3 ~]# etcdctl mk //atomic.io/network/config
'{"Network":"172.18.0.0/16"}'
{"Network":"172.18.0.0/16"}

[root@vm3 ~]# systemctl start flanneld
[root@vm3 ~]# systemctl enable flanneld

Verify assigned network(At 172.18.0.0/16 Random in)
[root@vm3 ~]# cat /run/flannel/subnet.env
FLANNEL_NETWORK=172.18.0.0/16
FLANNEL_SUBNET=172.18.86.1/24
FLANNEL_MTU= 1472
FLANNEL_IPMASQ=false
Step 4: Associate docker0 network and flannel0 network on docker host 1, start docker service, and verify the network
[root@vm3 ~]# systemctl start docker # Start first
docker Will produce/etc/docker/catalogue
[root@vm3 ~]# vim /etc/docker/daemon.json
{
"bip": "172.18.86.1/24",
"mtu": 1472
}
explain:
-
The bip boundary IP corresponds to the / run/flannel/subnet.env configuration file
-
The maximum transmission unit of mtu network also corresponds to that in / run/flannel/subnet.env configuration file
You have to restart here docker service;Otherwise, it is created above flannel The network cannot take effect
[root@vm3 ~]# systemctl restart docker
[root@vm3 ~]# systemctl enable docker

[root@vm3 ~]# ifconfig |grep -E 'docker0|flannel0' -A 1
docker0: flags= 4099 <UP,BROADCAST,MULTICAST> mtu 1500
inet 172.18.86.1 netmask 255.255.255.0 broadcast
172.18.84.255
--
flannel0:
flags= 4305 <UP,POINTOPOINT,RUNNING,NOARP,MULTICAST> mtu
1472
inet 172.18.86.0 netmask 255.255.0.0 destination
172.18.84.0
Step 5: install flannel and docker on docker host 2 (host name vm4)
[root@vm4 ~]# yum install flannel docker-ce -y
Step 6: configure flanneld service on docker host 2 and start the service
[root@vm4 ~]# vim /etc/sysconfig/flanneld
4 FLANNEL_ETCD_ENDPOINTS="http://10.1.1.13:2379 "note
 meaning:here IP Change to etcd service IP

[root@vm4 ~]# systemctl start flanneld
[root@vm4 ~]# systemctl enable flanneld

Verify assigned network
[root@vm4 ~]# cat /run/flannel/subnet.env
FLANNEL_NETWORK=172.18.0.0/ 16
FLANNEL_SUBNET=172.18.42.1/ 24
FLANNEL_MTU= 1472
FLANNEL_IPMASQ=false
Step 7: start the docker service on docker host 2 and verify the network
[root@vm4 ~]# systemctl start docker # Start first
docker Will produce/etc/docker/catalogue
[root@vm4 ~]# vim /etc/docker/daemon.json
{
"bip": "172.18.42.1/24",
"mtu": 1472
}

[root@vm4 ~]# systemctl restart docker
[root@vm4 ~]# systemctl enable docker

[root@vm3 ~]# ifconfig |grep -E 'docker0|flannel0' -A 1
docker0: flags= 4099 <UP,BROADCAST,MULTICAST> mtu 1500
inet 172.18.42.1 netmask 255.255.255.0 broadcast
172.18.84.255
--
flannel0:
flags= 4305 <UP,POINTOPOINT,RUNNING,NOARP,MULTICAST> mtu
1472
inet 172.18.42.0 netmask 255.255.0.0 destination
172.18.84.0
Step 8: run the container on two docker host computers
Both Download busybox image(This image contains ifconfig command,The image is also small,Download fast)
[root@vm3 ~]# docker pull busybox
[root@vm4 ~]# docker pull busybox

[root@vm3 ~]# docker run -itd --name=c1 busybox /bin/sh
5 b4fa3e8e71e53229f75a94ea993f4486f80ac0706678d1f1a214dea44
d69b7f
[root@vm3 ~]# docker exec c1 ifconfig |head -2
eth0 Link encap:Ethernet HWaddr 02 : 42 :AC: 12 : 56 : 02
inet addr:172.18.86.2 Bcast:0.0.0.0
Mask:255.255.255.0

[root@vm4 ~]# docker run -itd --name=c1 busybox /bin/sh
79e5f60ef310721901ac870f88a1475aaef7a8ab45575c02e947dcbee3
2b4d5a
[root@vm4 ~]# docker exec c1 ifconfig |head -2
eth0 Link encap:Ethernet HWaddr 02:42:AC:12:2A:02
inet addr:172.18.42.2 Bcast:0.0.0.0
Mask:255.255.255.0
Step 9: conduct container connectivity test on two docker host computers
vm3 Upper c1 container ping test vm4 Upper c1 container,Impassability
[root@vm3 ~]# docker exec c1 ping -c 2 172.18.42.2
 This is restricted by the firewall(start-up docker service,Will produce iptables Rules of),Clear rule(be careful FORWARD Chain default rule to be changed)
[root@vm3 ~]# iptables -F
[root@vm3 ~]# iptables -P FORWARD ACCEPT
[root@vm4 ~]# iptables -F
[root@vm4 ~]# iptables -P FORWARD ACCEPT

Finally, it was interconnected
[root@vm3 ~]# docker exec c1 ping -c 2 172.18.42.2
PING 172.18.42.2 (172.18.42.2):56 data bytes
64 bytes from 172.18.42.2: seq=0 ttl=60 time=1.652 ms
64 bytes from 172.18.42.2: seq=1 ttl=60 time=2.491 ms

[root@vm4 ~]# docker exec c1 ping -c2 172.18.86.2
PING 172.18.86.2 (172.18.86.2): 56 data bytes
64 bytes from 172.18.86.2: seq=0 ttl=60 time=1.804 ms
64 bytes from 172.18.86.2: seq=1 ttl=60 time=1.981 ms
13, docker's web Management Platform
I think beginners are confused by the complex commands of docker. They hope to have a graphical management platform that can easily manage containers. Similar open-source web management platforms mainly include docker UI, container, shipyard, etc.
DockerUI
1. Pull the image of docker UI
[root@daniel ~]# docker pull uifd/ui-for-docker
2. Operation container
Note: the / var/run/docker.sock of the docker host must correspond to the / var/run/docker.sock of the container to manage
[root@daniel ~]# docker run -d --name dockerui -p 9000:9000 -v /var/run/docker.sock:/var/run/docker.sock uifd/ui-for-docker
23112ee4132b974af2647762e155592da00ab30def797953cb03b1bcad
e18434

[root@daniel ~]# lsof -i:9000
COMMAND PID USER FD TYPE DEVICE SIZE/OFF NODE NAME
docker-pr 13154 root  4u IPv6 178230  0 t0 TCP
*:cslistener (LISTEN)
3. Access with browser http://docker Host IP:9000
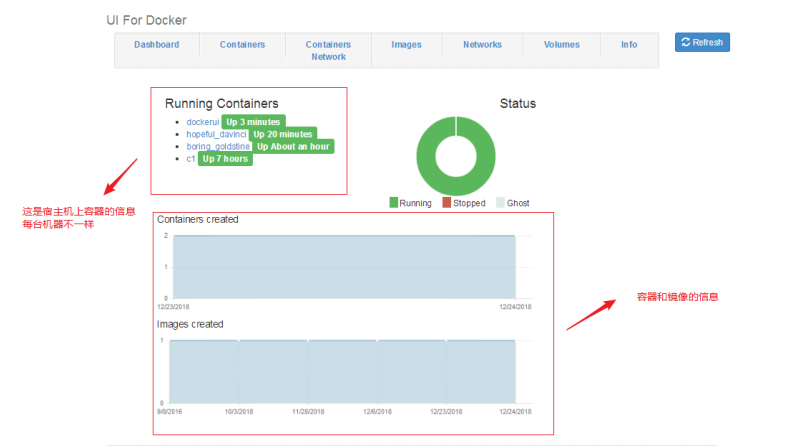
portainer
1. Pull the portal image
[root@daniel ~]# docker pull portainer/portainer
2. Operation container
Note: the / var/run/docker.sock of the docker host must correspond to the / var/run/docker.sock of the container to manage
[root@daniel ~]# docker run -d -p 9001:9000 --name=portainer -v /var/run/docker.sock:/var/run/docker.sock portainer/portainer

[root@daniel ~]# lsof -i:9001
COMMAND PID USER FD TYPE DEVICE SIZE/OFF NODE NAME
docker-pr 70010 root  4u IPv6 293808  0t0 TCP
*:etlservicemgr (LISTEN)
Use your browser to access http: / / host IP:9001
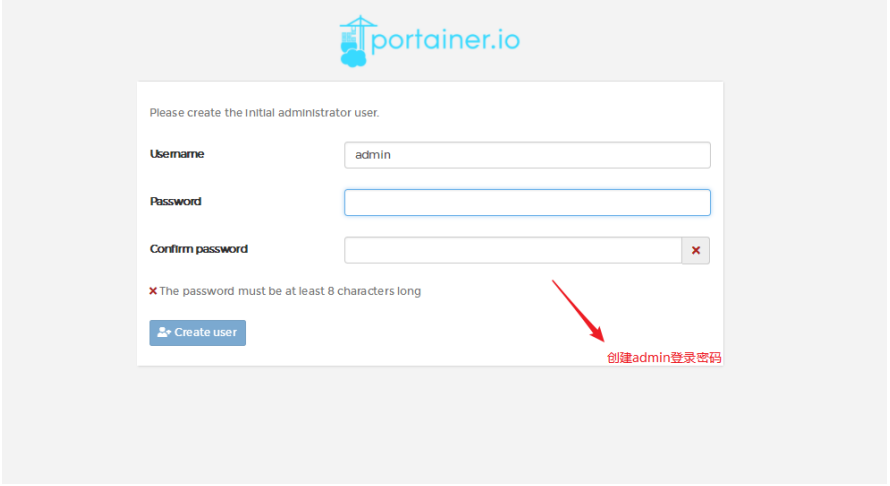

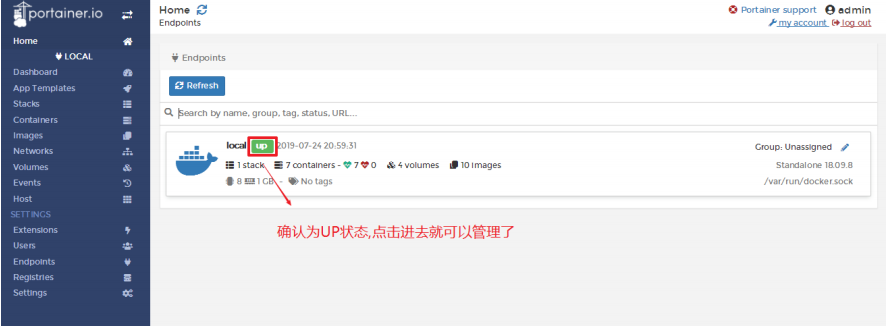
Shipyard
This tool is also very powerful. Unfortunately, it has stopped maintenance at present.