1, Decoration mode:
1. Basic theory:
Decoration pattern: dynamically add some additional responsibilities to an object. In terms of adding functions, decoration pattern is more flexible than generating subclasses
Decoration mode summary:
A way to dynamically add more functions to existing functions.
When the system needs new functionality, it adds new code to the old class. These newly added codes usually decorate the core responsibilities and main behaviors of the original class, but the problem of this approach is to add new fields, new methods and new logic to the main class, thus increasing the complexity of the main class, and these newly added things are only to meet the needs of some special behaviors that can be executed only under certain specific conditions.
Decoration mode provides a good solution. It puts each function to be decorated in a separate class and lets these classes contain the objects to be decorated. Therefore, when special behavior needs to be performed, the customer code can selectively and sequentially use the decoration function to wrap the objects according to the needs at runtime.
Advantages of decoration mode: move and remove the decoration functions in the class from the class, simplify the original class, and effectively distinguish the core responsibilities of the class from the decoration functions. Moreover, it can remove the repeated decoration logic in related classes.
2. Code implementation:
#include<iostream>
using namespace std;
#include<vector>
#include<string>

//Parent class
class person
{
private:
	string name;
public:
	person() {};
	person(string name) :name(name) {};
	virtual void show()
	{
		cout << "Dressed" << name << endl;
	}
};

//Subclass I clothes
class clothes :public person
{
protected:
	person* component;

public:
	void decorate(person* component)
	{
		component = component;
	}
	virtual void show()
	{
		cout << "Call here:";
		component->show();//Call function via - > function
	}
};

//Subclass II jeans
class jeans :public clothes
{
public:
	void show()
	{
		cout << "cowboy";
		component->show();
	}

};

//Subclass III T_shits
class T_shits :public clothes
{
public:
	void show()
	{
		cout << "T_shits";
		component->show();
	}
};


int main()
{
	person th("Th");
	jeans* j = new jeans();
	T_shits* t = new T_shits();
	//The following is the decoration code
	j->decorate(&th);
	t->decorate(j);
	t->show();
	return 0;
}
Two prototype model
1 Overview:
When using the prototype pattern, we need to create a prototype object first, and then create more objects of the same type by copying the prototype object.
The prototype pattern is defined as follows:
Prototype pattern: use prototype instances to specify the type of objects to be created, and create new objects by copying these prototypes.
Prototype pattern is an object creation pattern.
The working principle of prototype mode is simple:
Pass a prototype object to the object to be created. The object to be created implements the creation process by requesting the prototype object to copy itself.
Because we often encounter the need to create multiple identical or similar objects in software systems, the frequency of prototype pattern in real development is still very high.
Prototype pattern is an "alternative" creation pattern. The factory that creates cloned objects is the prototype class itself, and the factory method is implemented by the cloning method.
  It should be noted that the objects created by the cloning method are brand-new objects. They have new addresses in memory. Generally, modifying the cloned objects will not have any impact on the prototype objects,
  Each cloned object is independent of each other. A series of similar but not identical objects can be obtained by modifying in different ways.
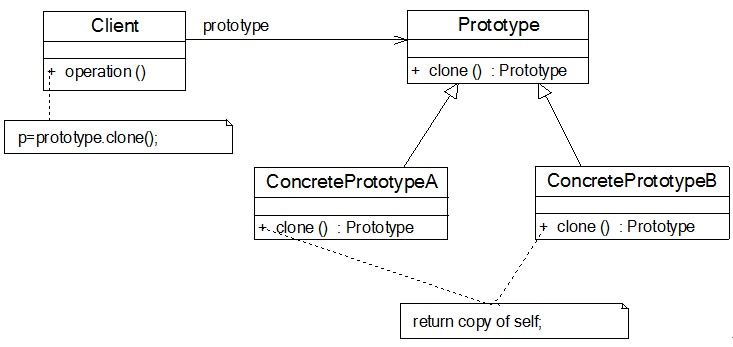
The structure of the prototype mode is shown in the figure:

The prototype pattern structure diagram contains the following roles:
  ●**Prototype(Abstract prototype class**): It is an interface for declaring cloning methods and a common parent class of all concrete prototype classes. It can be an abstract class, an interface, or even a concrete implementation class.

  ● ConcretePrototype(Concrete prototype class): it implements the clone method declared in the Abstract prototype class, and returns one of its own clone objects in the clone method.

  ● Client(Customer class): let a prototype object clone itself to create a new object. In the customer class, you only need to directly instantiate or create a prototype object through factory methods,
  Multiple identical objects can be obtained by calling the cloning method of the object. Because the customer class is for the Abstract prototype class Prototype Programming, so users can select specific prototype classes as needed,
  The system has good scalability, and it is convenient to add or replace specific prototype classes
The core of prototype pattern is how to implement cloning method.
2 code implementation
#include <iostream>
#include <string>
#include <unordered_map>
using namespace std;

class reuse
{
private:
    string name;
    string sex;
    int age;
    unordered_map<string,string> workExperience;//hands-on background
public:
    reuse(string name){
        this->name=name;
    }
    reuse(const reuse &b){//copy constructor
        name=b.name;
        sex=b.sex;
        age=b.age;
        workExperience=b.workExperience;
    }
    reuse& operator=(const reuse & right){//Overload = operator here
        if(this!=&right){
            name=right.name;
            sex=right.sex;
            age=right.age;
            workExperience=right.workExperience;
        }
        return *this;
    }
    void set_age(int age){
        this->age=age;
    }
    void set_sex(string sex){
        this->sex=sex;
    }
    void set_workExper(string year,string exper){
        workExperience[year]=exper;
    }
    void display(){
        cout<<name<<" "<<sex<<" "<<age<<endl;
        for(auto k:workExperience){
            cout<<k.first<<" "<<k.second<<endl;
        }
    }
};

int main(){
    reuse a("petty thief");
    a.set_age(20);
    a.set_sex("male");
    a.set_workExper("2018-2019","Huawei");
    a.display();
    reuse b(a);
    b.display();
    reuse c=b;
    c.display();
    return 0;
}
Reduce the generation code of duplicate objects in client code. You can implement the copy method in a class. Or use the copy amplitude operator of C + +. Copy constructor and other technologies to realize the generation of similar objects.
#include <iostream>
#include <string>
using namespace std;
class Resume
{
private:
string name,sex,age,timeArea,company;
public:
Resume(string s)
{
name=s;
}
void setPersonalInfo(string s,string a)
{
sex=s;
age=a;
}
void setWorkExperience(string t,string c)
{
timeArea=t;
company=c;
}
void display()
{
cout<<name<<" "<<sex<<" "<<age<<endl;
cout<<"��������: "<<timeArea<<" "<<company<<endl<<endl;
}
Resume *clone()
{
Resume *b;
b=new Resume(name);
b->setPersonalInfo(sex,age);
b->setWorkExperience(timeArea,company);
return b;
}
};
int main()
{
Resume *r=new Resume("���");
r->setPersonalInfo("��","26");
r->setWorkExperience("2007-2010","�����");
r->display();
Resume *r2=r->clone();
r2->setWorkExperience("2003-2007","������");
r->display();
r2->display();
return 0;
}