Spring overall architecture and environment construction
Spring overall architecture

Spring Core: the most basic part of the framework, which provides IoC container to manage bean s.
Spring Context: inherits BeanFactory, provides context information, and extends JNDI, EJB, e-mail, internationalization and other functions.
Spring DAO: provides an abstraction layer of JDBC and a declarative transaction management method.
Spring ORM: provides ORM mapping layers such as JPA, JDO, Hibernate and MyBatis
Spring AOP: integrates all AOP functions
Spring Web: provides basic context information for web development. Existing web frameworks, such as JSF, Tapestry, structures, etc., provide integration
Spring Web MVC: provides the full function implementation of model view controller for Web applications.
Environment construction
Refer to the articles on the Internet.
Basic implementation of container
2.1 basic usage of container
public class Hello {
public void sayHello() {
System.out.println("Hello, spring");
}
}
public static void main(String[] args) {
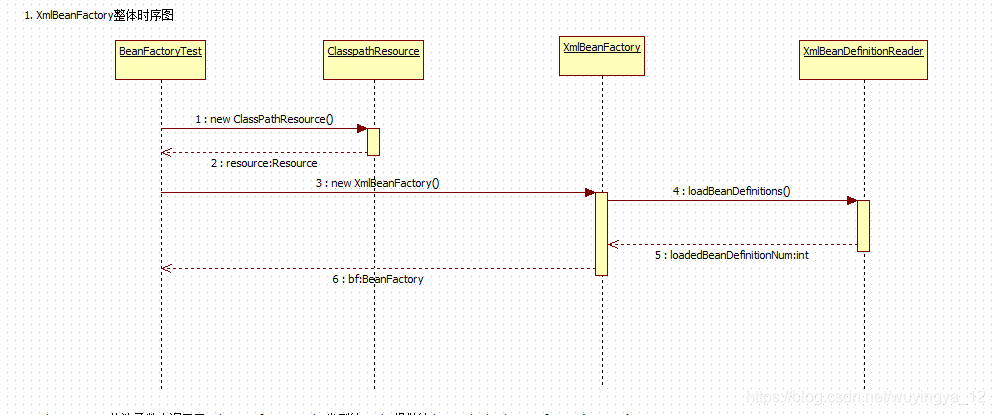
BeanFactory beanFactory = new XmlBeanFactory(new ClassPathResource("applicationContext.xml"));
Hello hello = (Hello)beanFactory.getBean("hello");
hello.sayHello();
}
xml configuration:
<?xml version="1.0" encoding="UTF-8"?>
<beans xmlns="http://www.springframework.org/schema/beans"
       xmlns:xsi="http://www.w3.org/2001/XMLSchema-instance"
       xsi:schemaLocation="http://www.springframework.org/schema/beans http://www.springframework.org/schema/beans/spring-beans.xsd">

    <bean id="hello" class="Hello"></bean>

</beans>
2.4 structure of spring
2.4.1 hierarchical structure of beans package
The functions of the source package of the whole beans project are as follows:
src/main/java: used to show the main logic of Spring;
src/main/resource: used to store system configuration files;
src/test/java: used for unit testing of main logic;
src/test/resource: used to store configuration files for testing.
2.4.2 introduction to core classes
DefaultListableBeanFactory
XmlBeanFactory inherits from DefaultListableBeanFactory, which is the core part of the whole bean loading and the default implementation of Spring registration and loading beans. The difference between XmlBeanFactory and DefaultListableBeanFactory is that a custom XML reader XmlBeanDefinitionReader is used in XmlBeanFactory, Personalized BeanDefinitionReader reading is implemented. DefaultListableBeanFactory inherits AbstractAutowireCapableBeanFactory and implements ConfigurableListableBeanFactory and BeanDefinitionRegistry interfaces.
XmlBeanDefinitionReader
Reading XML configuration files is an important function in Spring, because most of the functions of Spring take configuration files as the entry point. The main functions of XmlBeanDefinitionReader are resource file reading, parsing and registration.
Through the above analysis, we can sort out the whole process of reading XML configuration files:
- Use the method inherited from AbstractBeanDefinitionReader to convert the Resource file path into the corresponding Resource file using RourceLoader;
- Convert the Resource file to Document file through DocumentLoader;
- Resolve the Document by implementing the DefaultBeanDefinitionDocumentReader class of the interface BeanDefinitionDocumentReader, and resolve the Element by using BeanDefinitionParserDelegate.
2.5 container's underlying XmlBeanFactory
2.5.1 profile encapsulation
Spring implements its own abstract structure for the resources used internally: Resource interface to encapsulate the underlying resources.
There are corresponding Resource implementations for Resource files from different sources: file (FileSystemResource), Classpath Resource (ClasspathResource), URL Resource (UrlResource), InputResource(InputStreamResource), Byte array (ByteArrayResource), etc.
2.5.2 loading beans
There are several methods for initializing XmlBeanFactory, this reader. Loadbean definitions (resources) is the real implementation of resource loading
public XmlBeanFactory(Resource resource, BeanFactory parentBeanFactory) throws BeansException {
		super(parentBeanFactory);
		this.reader.loadBeanDefinitions(resource);
	}
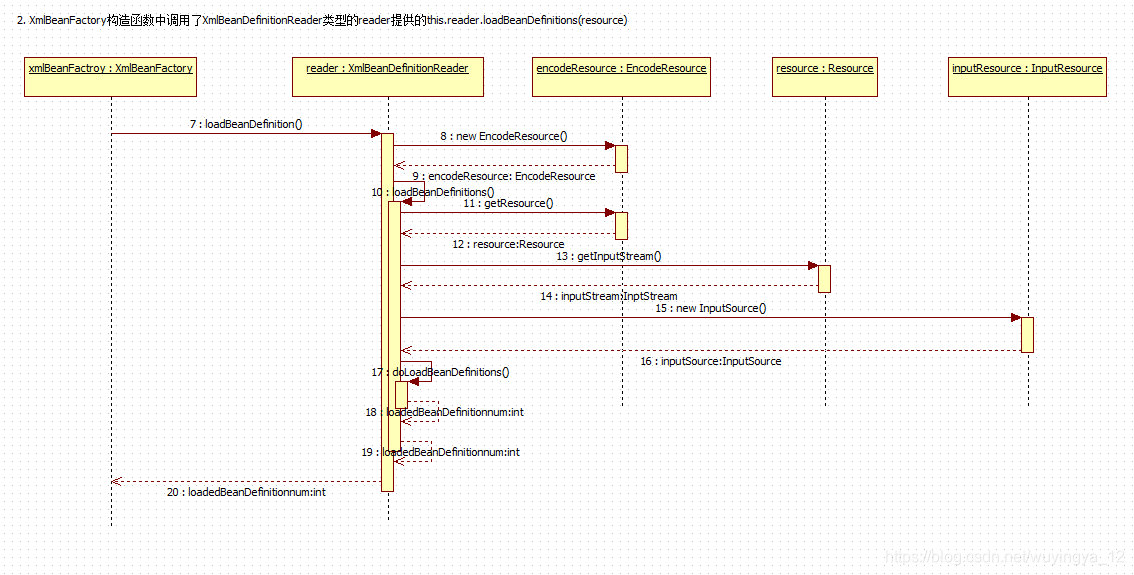
The whole process is as follows:
- Encapsulate Resource files. After entering the XmlBeanDefinitionReader, first use the parameter Resource
EncodeResource class; - Gets the input stream. Obtain the corresponding InputStream from the Resource and construct the InputSource;
- Continue to call the function doloadbean definitions through the constructed InputSource instance and Resource instance.
2.6 get XML validation schema
As long as you understand the usage of XSD and DTD, Spring's way to detect the validation mode is to judge whether DOCTYPE is included. If it is included, it is DTD, otherwise it is XSD.
2.7 get Document
After the verification mode preparation steps, the Document can be loaded. Similarly, the XmlBeanFactoryReader does not personally read the Document, but delegates it to the DocumentLoader. Here, the DocumentLoader is just an interface, and the DefaultDocumentLoader is actually called.
2.8 parsing and registering BeanDefinitions
After the file is converted to Document, the next extraction and registration bean is the main play. Continue the above analysis. When the program already has the Document instance object of the XML Document, the registerBeanDefinition(Document doc,Resource resource) method will be introduced, in which the parameter doc is loaded and converted through loadDocument in the previous section. In this method, the principle of single responsibility in object-oriented is well applied, and the logic is delegated to a single class for processing, and this logic processing class is BeanDefinitionDocumentReader. BeanDefinitionDocumentReader is an interface, and instantiation is completed in createBeanDefinitionDocumentReader(). Through this method, the real type of BeanDefinitionDocumentReader is DefaultBeanDefinitionDocumentReader. After entering DefaultBeanDefinitionDocumentReader, one of the important purposes of issuing this method is to extract root, In order to continue the registration of BeanDefinition with root as a parameter again. That is, the underlying doregisterbean definitions (root) of the core logic.
		preProcessXml(root);
		parseBeanDefinitions(root, this.delegate);
		postProcessXml(root);
Resolution of default labels
Tags in Spring include default tags and custom tags, and the usage and parsing methods of these two tags are very different.
The parsing of default tags is carried out in the parseDefaultElement function. The functional logic in the function is clear at a glance. Different tags (import, alisa, beans and beans) in 4 are handled differently.
private void parseDefaultElement(Element ele,BeanDefinitionParserDetegate detegate){
	// Handling of import Tags
importBeanDefinitionResource(ele);
// Processing of alisa Tags
proccessAlisaRegistration(ele);
// Processing of bean Tags
proccessBeanDefinition(ele,detegate);
// Processing of beans tag 0
doRegisterDefinition(ele);
}
3.1 parsing and registration of bean Tags
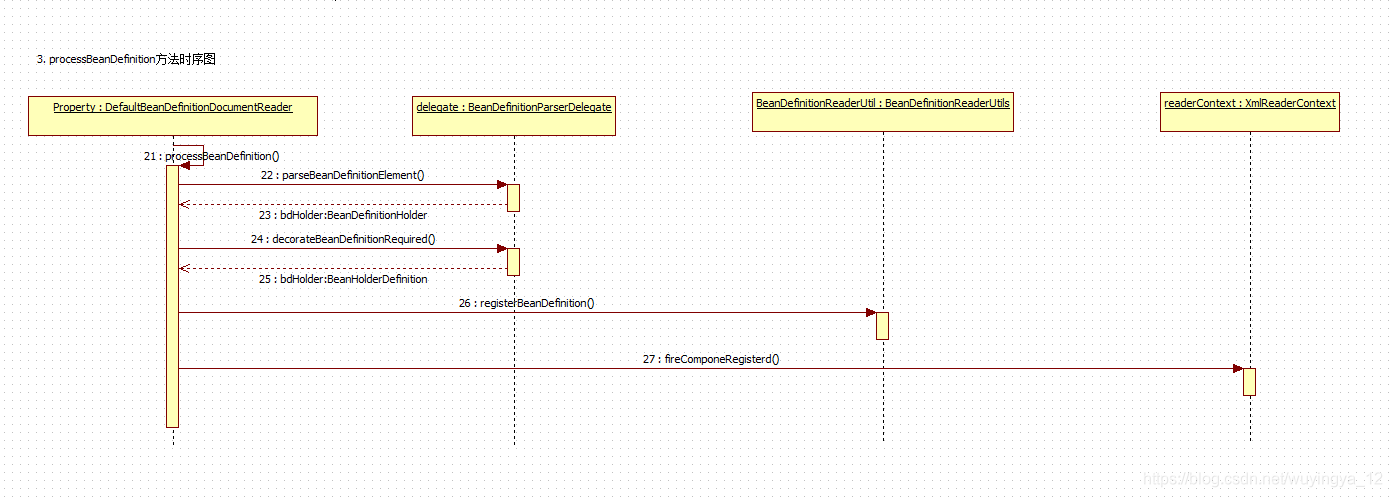
  protected void processBeanDefinition(Element ele, BeanDefinitionParserDelegate delegate) {
    BeanDefinitionHolder bdHolder = delegate.parseBeanDefinitionElement(ele);
    if(bdHolder != null) {
        bdHolder = delegate.decorateBeanDefinitionIfRequired(ele, bdHolder);

        try {
            BeanDefinitionReaderUtils.registerBeanDefinition(bdHolder, this.getReaderContext().getRegistry());
        } catch (BeanDefinitionStoreException var5) {
            this.getReaderContext().error("Failed to register bean definition with name \'" + bdHolder.getBeanName() + "\'", ele, var5);
        }

        this.getReaderContext().fireComponentRegistered(new BeanComponentDefinition(bdHolder));
    }

}
The general logic is as follows:
- First, delegate the parseBeanDefinitionElement method of BeanDefinitionDelegate class to perform element parsing and return the instance bdHolder of BeanDefinitionHolder type. After this method, the bdHolder instance already contains various attributes configured in our configuration file, such as class, name, id, alias and so on
- When the returned bdHolder is not empty, if there are custom attributes under the child nodes of the default label, you need to resolve the custom label again
- After parsing, you need to register the parsed bdHolder. Similarly, the registration operation is delegated to the registerBeanDefinition method of BeanDefinitionReaderUtils
- Finally, a response event is issued to notify the relevant listener that the bean has been loaded
3.1.1 bean tag parsing and registration
Start with element parsing and information extraction, that is
BeanDefinitionHolder bdHolder = delegate.parseBeanDefinitionElement(ele), enter the parseBeanDefinitionElement method of BeanDefinitionDelegate class.
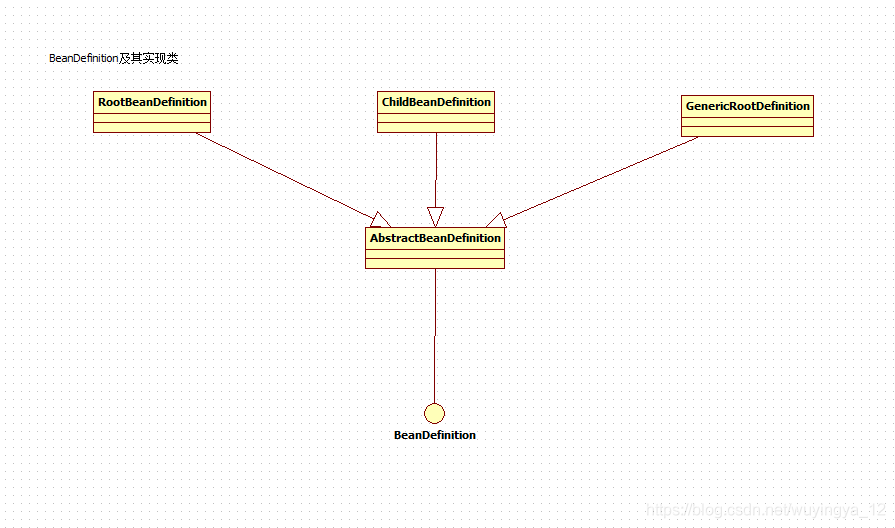
- Create a BeanDefinition for property hosting
BeanDefinition is an interface. There are three implementations in Spring: RootBeanDefinition, ChildBeanDefinition and GenericBeanDefinition, all of which inherit AbstractBeanDefinition. BeanDefinition is the internal representation of the < bean > element tag of the configuration file in the container< The bean > element tag has class, scope, lazy init and other configuration attributes. BeanDefinition provides corresponding beanClass, scope and lazyInit attributes. The attributes in BeanDefinition and < bean > correspond one-to-one. RootBeanDefinition is the most commonly used implementation class, which corresponds to the general < bean > element tag, GenericBeanDefinition is a new definition class added to bean file configuration properties since version 2.5. It is a one-stop service class.
Spring converts the configuration information into the container's internal ID through BeanDefinition, and registers these beandefinitions in BeanDefinitionRegistry. The BeanDefinitionRegistry of spring container is like the memory database of spring configuration information, which is mainly saved in the form of map. Subsequent operations directly read the configuration information from BeanDefinitionRegistry.
- Resolve various attributes
After creating the bearing instance of bean information and parsing various attributes of bean information, first enter the parseBeanDefinitionAttributes method. parseBeanDefinitionAttributes method resolves all element attributes of element:
public AbstractBeanDefinition parseBeanDefinitionAttributes(Element ele, String beanName,
			@Nullable BeanDefinition containingBean, AbstractBeanDefinition bd) {
	// Resolve scope property
	// Resolve singleton attribute
	// Resolve abstract attribute
	// Resolve lazy init attribute
	// Resolve autowire properties
	// Resolve dependency check property
	// Resolve dependencies on attribute
	// Resolve autowire candidate attribute
	// Resolve primary attribute
	// Resolve init method attribute
	// Resolve destroy method attribute
	// Resolve the factory method property
	// Resolve factory bean property
}
- Parse child element meta
public void parseMetaElement(Element ele,BeanMetadataAttributeAccessor attributeAccessor)
// Gets all elements of the current node
// Extract meta
// Use key and value to construct beanmetadatattribute
// Record information
}
-
Parse child element lookup method
The child element lookup method does not seem to be very common, but it is very useful in some cases. It is usually called getter injection. Referring to a sentence in Spring in Action: getter injection is a special method injection. It is a method declared to put back a certain type of bean, but the bean to be returned is actually configured in the configuration file, This method releases the program dependency on some pluggable functions. -
Resolve child element replaced method
This method is mainly used to extract the replaced method sub element in the bean. Method replacement: you can replace the existing method with a new method at runtime. Different from the previous look up, the replace method can not only dynamically replace the returned entity bean, but also dynamically change the logic of the original method. -
Parse sub element constructor ARG
Spring implements the parsing of the constructor Arg child elements through the parseConstructorArgElements function -
Resolve child element property
The parsePropertyElement function extracts the property attribute. The specific parsing process is as follows: -
Resolve child element qualifier
For the acquisition of qualifier elements, the contact is more in the form of annotations. When using automatic injection in the Spring framework, there must be only one matching candidate Bean in the Spring container. When a matching Bean cannot be found, the Spring container will throw a BeanCreationException exception and point out that there must be at least one matching Bean.
Spring allows you to specify the name of the injected Bean through Qualifier, which eliminates ambiguity.
3.1.2 AbstractBeanDefinition attribute
So far, the transformation from XML document to GenericBeanDefinition has been completed. That is, all configurations in XML can find the corresponding configuration in the instance of GenericBeanDefinition.
GenericBeanDefinition is only a subclass implementation, and most of the common properties are saved in AbstractBeanDefinition.
public abstract class AbstractDeanDefinition extends BeanMetadateAttributeAccessor implements BeanDefinition,Cloneable{
// Scope of the bean, corresponding to the scope of the bean attribute
// Is it a singleton from the bean attribute scope
// Whether it is a prototype, from the bean attribute scope
// Whether it is abstract comes from the bean attribute abstract
// Whether to delay loading, from lazy init
// Automatic injection mode, corresponding to bean attribute autowire
// Dependency check. This property is discarded after Spring 3.0
// It is used to indicate that the instantiation of one bean depends on the instantiation of another bean, and the corresponding bean attribute is dependent on
// The autowire candidate property is set to false, so that the container will not consider the bean when looking for the auto assembly object, that is, it will not be considered as a candidate for auto assembly of other beans, but the bean can still be injected into other beans using auto assembly. Corresponding bean attribute autowire candidate
// During automatic assembly, when there are multiple bean candidates, they will be used as the first choice, corresponding to the bean attribute primary
// Used to record Qualifier, corresponding to the child element Qualifier
// Allows access to non-public constructors and methods, and program settings
// Is the constructor parsed in a relaxed pattern
// Record constructor injection attribute, corresponding to bean attribute constructor ARG
// General attribute set
// Method, record the lookup method and replace method elements
// Corresponding bean attribute factory bean
// Corresponding bean attribute factory method
// Initialization method, corresponding to bean attribute init mothod method
// Destruction method, corresponding to the bean property destruction method
// Whether to execute init mothod method and program settings
// Whether to execute the destroy method method and program settings
// Whether it is user-defined rather than defined by the application itself. It is true when creating AOP, and the program setting
// Define the APPLICATION of the bean. APPLICATION: user; Infrastructrue: it is completely used internally and has nothing to do with the user; SUPPORT: part of some complex configurations, program settings
// Description of the bean
// Resources defined by this bean
}
3.1.3 parsing custom label elements in default labels
public BeanDefinitionHolder decorateBeanDefinitionIfRequire(Element ele,BeanDefinitionHolder definitionHolder,null)
You can see that the function calls the decorateifreuiled function on all attributes and child elements of the element
3.1.4 register resolved BeanDefinition
For the configuration file, the parsing is finished and the decoration is finished. The obtained beanDefinition can meet the subsequent use requirements. The rest is to register, that is, beandefinitionreaderutils in the processBeanDefinition function registryBeanDefinition(bdHolder,getReaderContext(). Getregistry()) code has been parsed
public static void registryBeanDefinition(BeanDefinitionHolder definitionHolder,BeanDefinitionRegistry registry)
// Register with beanName as unique ID
// Register all aliases
- Register BeanDefinition with beanName
For the registration of beanName, many people think that the best way is to put the beanDefinition directly into the map and use beanName as the key. Indeed, Spring does this, but it also does something else
public void registryBeanDefinition(String beanName,Definition beanDefinition) throws BeanDefinitionStoreException
// The last verification before registration. The verification here is different from the previous XML file verification. It is mainly for the methodOverrides verification in the AbstractBeanDefinition attribute to verify whether the methodOverrides coexist with the factory method or whether the corresponding method of methodOverrides does not exist at all
// Because beanDefinitionMap is a global variable, there must be concurrent access here
// Handle the registered beanName
// If the corresponding BeanName has been registered and the bean configured in the configuration is not allowed to be overwritten, an exception is thrown
// Record beanName
// Register beanDefinition
// Reset the cache corresponding to all beannames
}
As can be seen from the above code, there are several steps in the bean registration processing method:
- Validation of AbstractBeanDefinition. When parsing an XML file, the verification is for the XML format, and the verification at this time is for the methodOverrides attribute of AbstractBeanDefinition;
- Processing of beanName already registered. If it is not set not to allow bean overrides, you need to throw an exception. Add map cache
- Clear the cache of the corresponding beanName left before parsing
- Register BeanDefinition by alias
After understanding the principle of registering bean s, it is much easier to understand the principle of alias registration
public void registryAlias(String name,String alisa)
// If beanName is the same as alisa, alisa will not be recorded and the corresponding alisa will be deleted
// Throw an exception if alisa is not allowed to be overwritten
}
From the above code, you can see the steps to register alisa as follows:
- If alisa and beanName are the same, do not process and delete the original alisa if alisa and beanName are the same;
- alisa overwrite processing. If alisana has been used and pointed to another beanName, it needs to be processed according to the user's settings;
- alisa loop check: when a - > b exists, if a - > C - > b occurs again, an exception will be thrown; Register alisa.
3.2 analysis of Alisa tag
When defining a bean, in addition to using the id attribute to specify the name, you can use the alisa tag to specify the name, and all these names point to the same bean. In some cases, providing aliases is very useful, for example, to make it easier for each component of the application to reference public components.
processAlisaRegistation(Elemet ele)
// Get beanName
// Get alisa
// Register alisa
// After the alias is registered, notify the listener to handle it accordingly
}
3.3 analysis of import tag
For the preparation of Spring configuration file, module division is the method that most people can think of. Using import is a good method. ApplicationContext The import method is used in the XML file to import the module configuration file. If a new module is added in the future, the file can be simply modified, which can greatly simplify the complexity of post configuration maintenance and make the configuration modular and easy to manage. The analysis method of import tag:
protected void importBeanDefinitionResource(Element ele)
// Get resource property
// If the resource attribute does not exist, it will not be processed
// Resolve system attributes, such as: "${user.dir}"
// Determine whether location is an absolute URI or a URI first
// If it is an absolute URI, the corresponding configuration file is loaded directly according to the address
// If it is a relative address, the absolute address is calculated according to the relative address
// There are multiple subclass implementations of resource, and the createRelative method of each resource is different, so the subclass method is used for parsing first
// If the parsing is unsuccessful, the default parser ResourcePatternResolver is used for parsing
}
Custom label resolution
bean loading
After the previous analysis, the parsing of the XML configuration file is finally completed. The next step is to explore bean loading. The implementation of bean loading function is much more complex than bean parsing. For the function of loading beans, the calling methods in Spring are as follows:
public Object getBean(String name) throws BeanException
return doGetBean(name,null,null,false)

protected < T> T doGetBean(final String beanName,final Class< T> requireType,final Object [] args,boolean typeCheckOnly) throws BeanException
// Extract the corresponding beanName
// Check whether there is a corresponding instance in the cache or in the instance factory. Why use this code first? Because there will be dependency injection when creating a singleton bean. In order to avoid circular dependency when creating a dependency, Spring's principle for creating a bean is to create the ObjectFactory of the bean before the bean is created, That is, add ObjectFactory to the cache. Once the next bean needs to rely on the previous bean when it is created, use ObjectFactory directly
// Try to get directly from the cache or ObjectFactory in singletonFactories
// Return the corresponding example. Sometimes, when there is a BeanFactory, it does not directly return the instance itself, but returns the instance returned by the specified method
// In the singleton case, we will try to solve the circular dependency. In the prototype mode, if there is A B attribute in A and A attribute in B, the dependency injection will produce A circular dependency when A has not been created, because the creation of B returns to create A again, resulting in A circular dependency
// If beanName is not included in beanDefinitionMap, that is, in all loaded classes, try to detect it from parentBeanFactory
// Recursion to BeanFactory to find
// If you create a bean instead of just doing type checking, you need to record it
// Convert the GenericBeanDefinition stored in to RootBeanDefinition. If the specified BeanName is a child Bean, the related attributes of the parent class will be merged at the same time
// If there are dependencies, you need to recursively instantiate the dependent bean s and cache the dependent calls
// After instantiating the dependent bean, you can instantiate the mbd itself
// Creation of singleton pattern
// Creation of prototype pattern
// Instantiate bean on specified scope
// Check whether the required type matches the actual type of the bean
}
- Transform the corresponding beanName
The parameters passed in here may be aliases or factorybeans, so a series of parsing is required. These parsing contents include the following contents.
1.1 remove the modifier of FactroyBean, that is, if "& aa", it will be removed first and make name = "aa".
1.2 remove the final beanName represented by alisa. For example, if alias A points to A bean with name B, B will be returned; C is returned if alias A points to alias B, which in turn points to A bean named C. - Trying to load a singleton from the cache
The singleton will only be created once in the Spring unified container, and the subsequent beans will be obtained directly from the singleton cache. Of course, you also try to load here. If it is unsuccessful, try to load from singletonFactories again. When creating a singleton bean, there will be dependency injection. In order to avoid circular dependency, the principle of creating a bean in Spring is to add the ObjectFactory of the created bean to the cache before the bean is created. Once the next bean is created, it needs to rely on the previous bean and use the ObjectFactory directly. - bean instantiation
If you get the original state of the bean from the cache, you need to instantiate the bean. It must be emphasized here that what is recorded in the cache is only the original bean state, not necessarily the final desired bean. All use getObjectForBeanInstance to do this. - Dependency checking for prototype patterns
Only in the single case can we try to solve the circular dependency. If there is an attribute of B in A and an attribute of A in B, the dependency injection will be generated. When A has not been created, the creation of B will return to create A again, resulting in circular dependency. That is, isPrototypeCurrentlyInCreation(beanName) is judged to be true. - Detect parentBeanFactory
From the perspective of code, if there is no data in the cache, it will be directly transferred to the parent class factory for loading. Why? It detects that if the loaded XML configuration file does not contain the configuration corresponding to beanName, you can only try to load it in parentBeanFactory, and then call the getBean method recursively. - Convert the GenericBeanDefinition that stores the XML configuration file to RootBeanDefinition.
Because the bean information read from the XML configuration file is stored in GenericBeanDefinition, but all subsequent bean processing is for RootBeanDefinition, a conversion is required here. At the same time, if the parent bean is not empty, the properties of the parent class will be merged. - Looking for dependencies
Because some properties may be used during bean initialization, and some properties may be dynamically configured and configured to depend on other beans, it is necessary to load the dependent beans first. Therefore, when initializing a bean in Spring loading sequence, the dependency corresponding to the bean will be initialized first. - Create bean s for different scopes. There are different scopes in Spring. The default is singleton, but there are also injections of prototype and request. In this step, Spring will carry out different initialization strategies according to different configurations.
- Type conversion
The program basically ends after returning the bean here. Usually, the calling parameter requireType of the method is empty, but there may be such a situation. The returned bean is actually a String, but requireType is passed in Integer type. Then this step will work. Its function is to convert the returned bean to the type specified by requireType. Of course, the conversion from String to Integer is the simplest one. Various converters are provided in Spring. Users can also expand the converter to meet their own needs.
5.1 use of factorybean
In general, spring instantiates a bean by specifying an implementation class using the bean's class attribute through the reflection mechanism. In some cases, the process of instantiating beans is complex. If you follow the traditional method, you need to extract a large amount of configuration information from < bean >, and the flexibility of the configuration method is limited. At this time, a simple scheme may be obtained by coding. Spring provides an org. Org for this purpose SpringFramework. bean. factory. Factorybean factory class interface. Users can customize the logic of instantiating beans by implementing this interface.
public interface FactoryBean<T> {
	T getObject: Return yes FactoryBean Created bean Instance, if isSingleton()return true,The instance will also be placed in the Spring Container in the single instance cache pool.
	boolean isSingleton(): Return yes FactoryBean Created bean The scope of the instance is singleton still prototype.
	Class< T> getObjectType() : return FactoryBean Created bean Type.
}
When the implementation class of the < bean > class attribute accessory in the configuration file is FactoryBean, the object returned by the FactoryBean#getObject() method is not the FactoryBean itself, which is equivalent to that the FactoryBean#getObject() method proxies the getBean() method.
5.2 cache fetch singleton bean
After introducing the usage of FactoryBean, you can understand the loading process of bean. As mentioned earlier, a singleton will only be created once in the same Spring container, and the subsequent beans will be obtained directly from the singleton cache. Of course, this is just an attempt to load. First, try to load from the cache, and then try to load from singletonFactories again. When creating a singleton bean, there will be dependency injection. In order to avoid circular dependency when creating a dependency, Spring's principle for creating a bean is to add the bean's ObjectFactory to the cache in advance before the bean is created. Once the next bean needs to depend on the previous bean when it is created, the ObjectFactory will be used directly.
protected Object getSingleton(String beanName,boolean allowEarlyReference)
// Check whether there are instances in the cache
// If empty, the global variable is locked and processed
// If this bean is loading, it will not be processed
// When some methods need to be initialized in advance, the addSingletonFactory method will be called to store the corresponding ObjectFactory initialization policy in singletonFactories
// Call the preset getObject method
// Recorded in the cache, earlySingletonObjects and singletonFactories are mutually exclusive
}
- singletonObjects: used to save the relationship between BeanName and bean instance creation. Bean name -- > bean
instance - singletonFactories: used to save the relationship between BeanName and the factory that created the bean. Bean name -- >
ObjectFactory - earlySingletonObjects: it is also the relationship between saving BeanName and creating bean instances. The difference from singletonObjects is that when a singleton bean is placed here, it can be obtained through the getBean method while the bean is still being created. Its purpose is to detect the of circular references.
- registeredSingleton: used to save the registered bean s currently used.
5.3 getting objects from bean instances
In getBean, getObjectForBeanInstance is a frequently used method, whether it is to obtain beans from the cache or load beans according to different scope policies. In short, the first step after we get the bean instance is to call this method to check the correctness. In fact, it is used to detect whether the current bean is a FactoryBean type bean. If so, we need to call getObject() of the FactoryBean instance corresponding to the bean as the return value.
5.4 obtaining single example
Previously, we explained the process of obtaining singletons from the cache. If there are no loaded singletons in the cache, you need to start the bean loading process from scratch, and Spring uses the overload method of getSingleton to implement the bean loading process.
public Object getSingleton(String beanName, ObjectFactory singletonFactory)
// Global variables need to be synchronized
// First, check whether the corresponding bean has been loaded, because the singleton pattern is actually reusing the created bean, so this step is necessary
// If it is empty, you can initialize the singleton bean
// Initialize bean
// Add cache
}
The callback method is actually used in the above code, so that the program can do some preparation and processing operations before and after singleton creation. The real method of obtaining singleton bean is not implemented in this method. Its implementation logic is implemented in singletonFactory, an instance of ObjectFactory type. These preparation and processing operations include the following:
- Check whether the cache has been loaded;
- If it is not loaded, record the loading status of beanName;
- Record the status before loading the singleton.
In fact, the core part of ObjectFactory only calls the createBean method, so you also need to find the truth in the createBean method.
getSingleton(beanName,new ObjectFactory< Object>()
// return createBean(beanName,mbd,args)
5.5 preparing to create bean s
We can't expect to complete a complex logic in a function, and we've tracked so much Spring code. Through so many functions, we also find some rules more or less: a real working function actually starts with do; The function that gives us the illusion is actually just to do some overall work from the overall perspective. This rule is no exception for createBean. What preparations are made in the createBean function:
protected Object createBean(final String beanName,final RootBeanDefinition mbd,final Object[] args) throws BeanCreationException
// Lock the class, and resolve the class according to the set class attribute or the className
// Methods of verifying and preparing coverage
// Give BeanPostProcessors a chance to return a proxy to replace the real instance
// Call the doCreateBean() method
}
The specific steps and functions of the function can be summarized from the code
- Resolve class according to the set class attribute or className;
- Mark and verify the override attribute.
5.5.1 handling override attribute
protected void prepareMethodOverride(MethodOverride mo) throws BeanDefinitionValidationException
// Gets the number of Chinese names of the corresponding class
// If the number is 1, the mark MethodOverride is not overwritten temporarily to avoid the cost of parameter type checking
}
The code of the above two functions realizes the two configuration functions mentioned repeatedly before. In Spring configuration, there are two configuration functions: lookup method and replace method. In fact, the loading of this configuration is to uniformly store the configuration in the methodOverrides attribute in BeanDefinition, The implementation principle of these two functions is that if the methodOverrides attribute is detected during bean instantiation, a proxy will be dynamically generated for the current bean and the corresponding interceptor will be used to enhance the bean.
5.5.2 pre processing of instantiation
Before calling the doCreate method to create an instance of a bean, this method resolvebeforeinstance (beanname, MBD) is used to preprocess the properties in the BeanDefinition. Of course, we can understand whether there is a corresponding logic implementation or not, because it is also an embodiment of extensibility to leave processing functions before and after the real logic implementation. But this is not the most important. It also provides a short circuit judgment in the function, which is the most critical part.
If the returned result after preprocessing is not empty, it will directly skip the creation of subsequent beans and return the result directly. Although this feature judgment is easy to be ignored, it plays a vital role. The well-known AOP function is based on this judgment.
protected Object resolveBeforeInstantiation(String beanName,RootBeanDefinition mbd)
There are undoubtedly two most attractive methods in this method: applybeanpostprocessbeforeinstance and applyBeanPostProcessAfterInitialization. The implementation of these two methods is very simple. They are nothing more than calling the postprocessbeforeinstance method and BeanPostProcessAfterInitialization method for all post processors of InstantiationAwareBeanPostProcessor type in the post processor.
-
Application of post processor before instantiation
Before the instantiation of bean, the AbstractBeanDefinition is converted to BeanWrapper before processing, giving the subclass a chance to modify BeanDefinition, that is, when the program passes through this method, bean may not be bean we know, but it may become a processed bean, which may be generated by cglib. It can also be generated by other technologies. -
Application of instantiated post processor
When explaining how to get a singleton bean from the cache, it was mentioned that the rule in Spring is to ensure that the postProcessAfterInitialization method of the registered post processor is applied to the bean as much as possible after the bean is initialized, because if the returned bean is not empty, it will not go through the creation process of an ordinary bean again, Therefore, the postprocessor postProcessAfterInitialization method can only be applied here.
5.6 cyclic dependency
Instantiating bean s is a very complex process, and the most difficult thing to understand is the solution of circular dependency.
5.6.1 what is circular dependency
Circular dependency refers to circular reference, that is, the holding of each other between two or more bean s. For example, ClassA refers to ClassB, ClassB refers to ClassC, and ClassC refers to ClassA, and the final reaction is a ring. This is not a loop call, but a loop call between methods.
Circular call cannot be solved. Unless there is an end condition, it is an endless loop, which eventually leads to a memory overflow error.
5.6.2 how spring solves circular dependency
Spring container circular dependency includes constructor circular dependency and setter circular dependency. How does spring container solve circular dependency?
- Constructor loop dependency
Represents a circular dependency constructed by constructor injection. This dependency cannot be solved. Only beancurrentyincreationexception exception can be thrown to represent a circular dependency.
When how to create a TestA class, the constructor needs a TestB class, so it will create a TestB. When it is found that a TestC class is needed when creating a TestB class, it will create a TestC. Finally, it is found that TestA is needed when creating a TestC class, thus forming a ring. There is no way to create it.
The Spring container places each bean identifier being created in a "currently created bean pool", and the bean identifier will remain in this pool during the creation process. Therefore, when it finds that it is already in the "currently created bean pool" during the creation process, it will throw a beancurrentyincreationexception exception, indicating circular dependency, The created beans will be cleared from the "currently created bean pool".
-
setter cyclic dependency
Represents the circular dependency formed by setter injection. The circular dependency formed by setter injection is completed by exposing the beans that have just been created and completed other steps by the constructor injection unit in advance by the Spring container, and can only solve the bean circular dependency under the scope of a single instance. By exposing a singleton factory method in advance, other beans can reference the bean. -
Dependency handling of prototype scope
For prototype scope beans, the Spring container cannot complete dependency injection because the Spring container does not cache prototype scope beans because it cannot expose a created bean in advance.
For singleton scoped bean s, disable circular references by "setAllowCirularReferences(false)".
5.7 create bean(AbstractAutowireCapableBeanFactory)
After introducing the circular dependency and the processing methods of circular dependency in Spring. After the resolvebeforeinstance method is passed, the program has two choices. If a proxy is created or the postprocessbeforeinstance method of the instantiaawarebeanpostprocessor can be overridden and the bean is changed in the method postprocessbeforeinstance, the method can be used directly. Otherwise, the routine bean can be created, The creation of regular beans is completed in doCreateBean.
protected Object doCreateBean(final String beanName,final RootBeanDefinition mbd,final Object[] args)
// Create a new instance according to the specified bean using the corresponding policy, such as factory mode, automatic constructor injection, simple initialization, etc
// Whether to expose in advance: Singleton & allow circular dependency & whether the current bean is being created, and detect circular dependency
// In order to avoid late circular dependency, the ObjectFactory that creates the instance can be added to the factory after bean initialization is completed
// For a dependency reference to a bean, the SmartInstantiationAwareBeanPostProcessor is mainly used. The well-known AOP weaves advice into the bean dynamically here. If there is no advice, it will be returned directly
// Fill in bean attributes and inject attribute values. If there may be attributes that depend on other beans, the dependent beans will be recursively initialized
// Call initialization methods, such as init method
// earlySingletonReference will not be null only if circular dependency is detected
// If the exposeObject is not changed in the initialization method, it is not enhanced
// Detection dependency
// Because the bean on which the bean depends must have been created. If the actualDependentBeans is not empty, it means that the current bean has not been completely created, that is, there is a circular dependency
// Register bean s according to scope
}
Let's take a look at the general idea of the whole function:
- If it is a single instance, you need to clear the cache first;
- Instantiate the bean and convert the BeanDefinition to BeanWrapper.
- The application of MergedBeanDefinitionPostProcessor and the processing of beans after merging. Autowire implements type resolution through this method.
- For dependency processing, there will be dependency loops in Spring. For example, when A contains the attribute of B and B contains the attribute of A, it will form A cyclic dependency. At this time, if both A and B are singletons, the processing method in Spring is that when creating B involves the step of automatically injecting A, it does not directly create A again, Instead, the instance is created through the ObjectFactory placed in the cache, which solves the problem of circular dependency.
- Property filling, which fills all properties into the instance of the bean.
- Circular dependency check, as mentioned earlier, solving circular dependency in Spring is only effective for single cases. For prototype beans, Spring has no good solution. The only thing to do is throw an exception. In this step, it will detect whether the loaded beans have a dependency loop and judge whether it is necessary to throw an exception.
- Register the disposablebean. If the destroy method is configured, you need to register here to call it during destruction.
- Complete the creation and return.
It can be seen that the above steps are very cumbersome. Each step uses a lot of code to complete its functions. The most complex and difficult to understand is the processing of circular dependency. It is necessary to understand the next circular dependency before entering doCreateBean.
5.7.1 create bean instance
When you understand the circular dependency, you can go deep into each step of creating a bean, starting with createbean instance.
protected BeanWapper createBeanInstance(String beanName,RootBeanDefinition mbd,Object [] args)
// Parse class
// If the factory method is not empty, the factory method is used to initialize the policy
// A class has multiple constructors, and each constructor has different parameters. Before calling, you need to lock the constructor or the corresponding factory method according to the parameters
// If it has been resolved, the resolved constructor method does not need to be locked again
// Constructor auto injection
// Use default constructor construction
// The constructor needs to be parsed according to the parameters
// Constructor auto injection
// Use default constructor construction
}
- autowireConstructor
For instance creation, there are two cases in Spring: one is general instantiation, and the other is instantiation with parameters. The instantiation process with parameters is quite complex. Because there are uncertain lines, a lot of work has been done to judge the corresponding parameters.
public BeanWrapper autowireConstructor(final String beanName,final RootBeanDefinition mbd,Constructor [] chosenCtors,final Object [] explicitArgs)
// Explicatargs is passed in through the getBean method. If the method parameters are specified when the getBean method is called, it can be used directly
// If the getBean method is not specified, try to resolve from the configuration file
// Trying to get from cache
// Configured constructor parameters
// If it exists in the cache
// Resolve the parameter type, and the value in the cache may be the original value or the final value
// If there is no cache
// Extract the constructor parameters of the configuration in the configuration file
// The value used to carry the resolved constructor parameter
// Number of parameters that can be resolved
// Sort the given constructor. The number of public constructor priority parameters is in descending order, and the number of non-public constructor parameters is in descending order
// If the selected constructor has been found or the number of parameters required is less than that of the current constructor, it will be terminated, which means that it has been arranged in descending order according to the number of parameters
// If there are parameters, construct the parameters of the corresponding parameter type according to the
// Get parameter name on comment
// Get parameter name Explorer
// Gets the parameter name of the specified constructor
// Create parameter holder based on name and data type
// Constructor without parameters
// Detect whether there are uncertain constructors. For example, the parameters of different constructors are parent-child relationships
// Add resolved constructor to cache
// Add the constructed instance to BeanWrapper
}
Take a general overview of the whole function, and the functions of its implementation consider the following aspects:
- Constructor parameters are determined.
1.1 according to the explicatargs parameter, if the passed explicatargs parameter is not empty, you can directly confirm the parameter, because the explicatargs parameter is specified by the user when calling Bean, and there are such methods in BeanFactory class:
Object getBean(String name,Object ... args) throws BeanException
When obtaining a bean, the user can not only specify the name of the bean, but also specify the constructor of the class corresponding to the bean or the method parameters of the factory method, which is mainly used for calling static factory methods. Here, the exact matching parameters need to be given, so it can be judged. If the passed in parameter explicatargs is not empty, it can be determined that the constructor parameter is it.
1.2 get from the cache. In addition, if the method of determining parameters has been analyzed before, that is, the constructor has been recorded in the cache, it can be used directly. Moreover, it should be mentioned here that the final type of the parameter or the initial type of the parameter may be cached in the cache.
1.3 obtain the configuration file. If the parameters of the constructor cannot be confirmed according to the passed in parameter explicatargs, and the relevant information cannot be obtained in the cache, then we can only conduct a new round of analysis. The analysis starts with the Korean information of the configuration file. After the previous analysis, the information in the Spring configuration file will be carried through the BeanDefinition instance after conversion, that is, it is contained in the parameter mbd. You can call mbd Getconstructorargumentvalues() to get the configured constructor information. With the information in the configuration, you can obtain the corresponding parameter value information. The information to obtain the parameter value includes the specified value, such as directly specifying a value in the constructor as the original type, String type, or a reference to other beans. This processing is delegated to the resolveconstructorsegments method and returns the number of parameters that can be resolved. - After the first step, the constructor parameters have been determined. The next task is to lock the corresponding constructors in all constructors according to the constructor parameters, and the matching method is to match according to the number of parameters. Therefore, before matching, the constructors need to be in descending order according to the number of priority parameters of public constructors, The number of non public constructor parameters is in descending order. In this way, you can quickly judge whether the number of constructor parameters in the back row meets the conditions in the case of traversal. Because it is not the only way to restrict the use of parameter location index in the configuration file, it also supports the case of specifying parameter name and setting parameter value. In this case, you need to first determine the parameter name in the constructor, There are two ways to obtain the parameter name: one is to obtain it directly through annotation, and the other is to obtain it by using the tool class ParameterNameDiscoverer provided by Spring. The constructor, parameter name, parameter type and parameter value can be locked and the corresponding parameter type can be converted after confirmation.
- According to the parameter types corresponding to the determined constructor conversion, it is mainly converted using the type converter provided in Spring or the user-defined type converter.
- Verification of constructor uncertainty. Of course, sometimes the constructor may not be locked directly after the constructor, parameter name, parameter type and parameter value are determined. The parameters of different constructors are parent-child relationship, so Spring did another verification at the end.
- Instantiate the Bean according to the instantiation strategy and the obtained constructor and constructor parameters.
- instantiateBean
Having experienced the instance construction of constructors with parameters, there is no substantive logic in the instantiation of constructors without parameters. In the instance construction with parameters, Spring focuses on the matching of constructors and parameters, so it will be a very simple thing if there are no parameters, You can instantiate directly by substituting the instantiation strategy. - Instantiation strategy
The instantiation strategy has been mentioned repeatedly in the instantiation process. What is this used for? In fact, through the previous analysis, we have obtained all relevant information sufficient for instantiation. We can use the simplest reflection method to construct instance objects only by talking about reflection, but Spring does not do so.
In the program, first judge beandefinition Getoverrides () is null, that is, the user does not use the replace or lookup configuration method. Therefore, it is simple and fast to directly use the reflection method. However, if these two features are used, it is inappropriate to create an instance directly using reflection, because the functions provided by these two configurations need to be cut in, Therefore, the interception enhancer containing the logic corresponding to the two features must be set in the way of dynamic agent, so as to ensure that it will be enhanced by the corresponding interceptor when calling the method, and the return value is the agent instance containing the interceptor.
5.7.2 record the ObjectFactory of the created bean
There is such a code in the doCreate function:
boolean earlySingletonExposure = (mbd.isSingleton() && this.allowCirularReference && isSingletonCurrentlyInCreation(beanName));
if(earlySingletonExposure)
// To avoid late cycle dependency, you can create an instance of ObjectFactory to join the factory before bean initialization is completed

// Once again, it relies on the reference to the bean, mainly using SmartInstantiationAwareBeanPostaProcessor. Here, AOP dynamically weaves advice into the bean. If not, it will directly return to the bean without any processing
This code is not very complex, but many people don't quite understand the function of this code. Moreover, it is difficult to understand the meaning of this code only from this function. We need to think about the Spring dependency solution from the global perspective.
Early single on exposure: it literally means early exposure of a single case. You need to confirm what conditions affect this value.
mbd.isSingleton(): there is not much to explain. This RootBeanDefinition represents whether it is a singleton.
this.allowCirularReference: whether circular dependency is allowed is not found in the configuration file, but the setting function is provided in AbstractRefreshableApplicationContext, which can be set through hard coding or custom namespace
isSingletonCurrentlyInCreation(beanName): whether the bean is being created. In Spring, there will be a special attribute, which defaults to isSingletonsCurrentlyInCreation of DefaultSingletonBeanRegistry to record the loading status of the bean. Before bean creation, beanName will be recorded in the attribute. After bean creation, beanName will be removed from the attribute, Different scope s have different recording positions.
5.7.3 attribute injection
When understanding circular dependency, the main function of populateBean is attribute filling, so how to realize filling?
protected void populateBean(String beanName,AbstractBeanDefinition mbd,BeanWrapper bw)
// If there is no attribute filling, it will be returned directly
// Give instantiaawarebeanpostprocessors one last chance to change the bean before property setting, such as the type that can be used to support property injection
// If the post processor issues a stop population command, the subsequent operation is terminated
// Auto injection by name
// Automatic injection according to type
// The post processor has been initialized
// Dependency check required
// Post process all attributes requiring dependency checking
// Apply properties to bean s
}
Such a processing flow is provided in the populateBean function.
- The application of the postprocessafterinstance function of the InstantiationAwareBeanPostProcessors processor. This function can control whether the program continues to fill in properties.
- Extract the dependent bean s according to the injection type (byName/byType) and store them in PropertyValues.
- Apply the postProcessPropertyValues method of the instantiawarebeanpostprocessors processor to process the property again after the property is obtained and filled. A typical application is the verification of the property in the RequiredAnnotationBeanPostProcessor class.
- Recharge all properties in PropertyValues into BeanWrapper.
- autowireByName
As mentioned above, dependent bean s are extracted according to the injection type (byName/byType) and uniformly stored in PropertyValues. First, learn how the byName function is implemented.
prototype void autowireByName(String beanName,AbstractBeanDefinition mbd,BeanWrapper bw,MutablePropertyValues pvs)
// Find the attributes that need dependency injection in bw
// Recursive initialization of related bean s
// Registration dependency
}
- autowireByType
autowireByType and autowireByName are similar in complexity for us to understand and use, but the complexity of implementing functions is completely different.
protected void autowireByType(String beanName,AbstractBeanDefinition mbd,BeanWrapper bw,MutablePropertyValues pvs)
// Find the attributes that need dependency injection in bw
// Explore the set method for the specified property
// Resolve the matching value of the specified beanName attribute and store the resolved attribute name in autowireBeanName. When there are multiple encapsulated beans in the attribute, all bean types will be found and injected
// Registration dependency
}
5.7.4 initialization bean
In configuring bean, there is a init-method attribute in bean. The function of this attribute is to invoke the method specified by init-method before bean instantiation to instantiate it according to the business. We have now entered this method. First, take a look at the execution position of this method. The Spring program has instantiated the bean and filled in the properties. At this time, the initialization method set by the user will be called.
protected Object initialzeBean(final String beanName,final Object bean,RootBeanDefinition mbd)
invokeAwaeMethod(beanName,bean)
For special bean Handling of: Aware,BeanClassLoaderAware,BeanFactoryAware
// Application post processor
// Activate user-defined init method
// Post processor application
}
- Activate Aware method
Before analyzing the principle, let's first understand the use of Aware. Spring provides some Aware related interfaces, such as BeanFactory Aware, ApplicationContextAware, ResourceLoaderAware, ServletContextAware, etc. after initialization, the beans that implement these Aware interfaces can obtain some corresponding resources. For example, after initialization, the spring container will inject BeanFactory instances, The bean that implements ApplicationContextAware will be injected into the instance of ApplicationContext after the bean is initialized. - Application of processor
BeanPostProcess is an essential bright spot in the open architecture of Spring. It gives users sufficient permission to change or extend Spring. In addition to BeanPostProcessor, there are other postprocessors. Of course, most of them are based on it and inherit from PostProcessor. This is where the BeanPostProcessor is used. Before and after calling the custom initialization method, the postProcessBeforeInitialization and postProcessAfterInitialization methods of BeanPostProcessor will be called respectively, so that customers can respond according to their business needs. - Activate the custom init method
In addition to configuring the init method, the customized initialization method also uses a custom bean to implement the InitializingBean interface, and implements its own initialization business logic in the afterpropertieset.
Both init method and afterpropertieset are executed when initializing bean s. The execution order is that afterpropertieset is executed first and init method is executed later.
The initialization method calls of these two steps are implemented in the invokeinitialmethods method.
5.7.5 register DisponsableBean
Spring not only provides an extension entry for initialization methods, but also provides an extension entry for destruction methods. For the extension of destruction methods, in addition to the well-known destruction method method, users can also register the post processor DestructionAwareBeanPostProcessor to uniformly process bean destruction methods.
//Register the beans that need to be destroyed in the singleton mode. This method will process the beans that implement DisposableBean, and use DestructionAwareBeanPostProcessor to process DisposableBean DestructionAwareBeanPostProcessors for all beans.
//Processing of custom scope
Function extension of container
After the analysis in the previous chapters, I have a simple understanding of the container functions in Spring. In the previous chapters, I have been taking the BeanFactory interface and its default implementation class xmlbeanfactory as an example, but Spring also provides another interface ApplicationContext to extend the existing functions in BeanFactory.
Both ApplicationContext and BeanFactory are used to load beans, but in contrast, ApplicationContext provides more extended functions. In short, ApplicationContext contains all the functions of BeanFactory. It is generally recommended to take precedence over BeanFactory, except in some limited situations, such as when byte length has a great impact on memory (Applet). For most "typical" enterprise applications and systems, ApplicationContext is what you need.
So what more functions does ApplicationContext have than BeanFactory? The first is the different writing methods of using different classes to load configuration files.
use BeanFactory Method loading XML
BeanFactory bf = new XmlBeanFactory(new ClassPathResource("beanFactoryTest.xml"))
use ApplicationContext Method loading XML
ApplicationContext bf = new ClassPathXmlApplicationContext("beanFactoryTest.xml");
Similarly, take the ClassPathXmlApplicationContext as the starting point to analyze the overall function. Setting the path is an essential step. In the ClassPathXmlApplicationContext, the method of configuring the file path array can be passed in, and the ClassPathXmlApplicationContext can parse and load the array. The parsing and function implementation are implemented in the refresh() method.
6.1 setting configuration path
In ClassPathXmlApplicationContext, multiple configuration files are supported to be passed in by array method:
public void setConfigLocations(@Nullable String... locations) {
		if (locations != null) {
			Assert.noNullElements(locations, "Config locations must not be null");
			this.configLocations = new String[locations.length];
			for (int i = 0; i < locations.length; i++) {
				this.configLocations[i] = resolvePath(locations[i]).trim();
			}
		}
		else {
			this.configLocations = null;
		}
	}
This function is mainly used to parse the given path array. Of course, if the array contains special symbols, the resolvePath will search for matching system variables and replace them.
6.2 extended functions
After setting the path, you can parse the configuration file and realize various functions according to the path. It can be said that the refresh function contains almost all the functions provided in ApplicationContext, and the logic in this function is very clear, so it is easy to analyze the corresponding hierarchy and logic.
public void refresh throw BeanException,IllegalStateException
// Ready to refresh context
// Initialize BeanFactory and read the XML file
// Fill BeanFactory with various functions
// Subclass override methods do additional processing
// Activate various BeanFactory processors
// Register the Bean interceptor created by the interceptor Bean. Here, it's just that the real call is made when the getBean is registered
// Initialize the Message source for the context, i.e. Message bodies in different languages for internationalization processing
// Initialize the application message broadcaster and put it into the "applicationeventmulticast" bean
// Leave it to subclasses to initialize other bean s
// Find the Listener bean in all registered beans and register it in the message broadcaster
// Initialize the remaining single instance
// Complete the refresh process, notify the lifecycle processor of the declaration cycle processor of the refresh process, and issue the ContextRefreshEvent to notify others
}
The following is an overview of the initialization steps of ClassPathXmlApplicationContext and explains what additional functions it provides:
- Preparations before initialization, such as preparation and verification of system properties or environment variables. In some cases, the use of the project requires reading some system variables, and the setting of this variable may affect the correctness of the system. Therefore, it is very necessary for ClassPathXmlApplicationContext to provide this preparation function, It can verify the existence of necessary variables in advance when Spring starts.
- Initialize BeanFactory and read XML files. As mentioned earlier, ClassPathXmlApplicationContext contains all the features provided by BeanFactory. In this step, configuration file reading, parsing and other functions in BeanFactory will be reused. After this step, ClassPathXmlApplicationContext actually includes the functions provided by BeanFactory, That is, you can perform basic operations such as Bean extraction.
- Fill BeanFactory with various functions@ Qualifier and @ AutoWired annotations are officially added in this step.
- The subclass coverage method does additional processing. Spring is powerful and respected by the world. In addition to its functions providing convenience for everyone, it also has its perfect architecture. The development architecture makes it easy for users to expand existing functions according to business requirements. This development design can be seen everywhere in spring, For example, in this example, an empty function is provided to implement postProcessBeanFactory to facilitate programmers to further expand their business.
- Activate various BeanFactory processors.
- Register the bean processor created by the intercepting bean. This is just registration. The real call is at the time of getBean.
- Initialize the Message source for the context, that is, internationalize Message bodies in different languages.
- Initialize the application message broadcaster and put it into the "applicationeventmulticast" bean.
- Leave it to subclasses to initialize other bean s.
- Find the listener bean in all beans and register it in the message broadcaster.
- Initialize the remaining single instance (non lazy).
- Complete the refresh process, notify the lifecycle processor of the lifecycle process refresh process, and issue ContextRefreshEvnet to notify others.
protected void prepareRefresh()
// Left to subclass override
// Verify that the required property files are placed in the environment
}
6.4 loading BeanFactory
The obtainFreshBeanFactory method literally means to obtain BeanFactory. As mentioned earlier, ApplicationContext is an extension of the functions of BeanFactory. It not only contains all the functions of BeanFactory, but also adds a large number of extended applications on its basis. Then obtainFreshBeanFactory officially implements BeanFactory, that is, after this function, ApplicationContext already has all the functions of BeanFactory.
protected ConfigurableBeanFactory obtainFreshBeanFactory()
// Initialize the BeanFactory, read the XML file, and get the BeanFactory record in the attribute of the current entity
// Returns the beanFactory property of the current entity
}
Method delegates the core implementation to refreshBeanFactory:
protected final void refreshBeanFactory() throws BeanException
// Create DefaultListBeanFactory
// To serialize the specified id, if necessary, deserialize the BeanFactory from the id to the BeanFactory object
// Define beanFactory, set relevant properties, including whether it is allowed to overwrite different defined objects with the same name and circular dependency, and set @ Autowired and @ qualifier annotation parsers, qualifieannotationautowirecandidateresolver
// Initialize DocumentReader and read and parse XML files
}
6.4.2 loading BeanDefinition
In the first step, we mentioned the comparison between ClassPathXmlApplicationContext and XmlBeanFactory. In addition to the DefaultListableBeanFactory initialized in the first step, XmlBeanDefinitionReader is also required to read XML. The first thing to do in this step is to initialize XmlBeanDefinitionReader.
protected void loadBeanDefinition(DefaultListableBeanFactory beanFactory) throws BeanException,IOException
// Creates an XmlBeanDefinitionReader for the specified beanFactory
// Set the environment variable of beanDefinitionReader
// Set BeanDefinitionReader to override
}
6.5 function expansion
Before entering prepareBeanFactory, Spring has completed the analysis of the configuration, and the functional extension of ApplicationContext has been expanded.
protected void prepareBeanFactory(ConfigurableListableBeanFactory beanFactory)
// Set the classLoader of beanFactory to the classLoader of the current context
// Set the expression language processor of beanFactory. Spring 3 adds support for language expressions. By default, relevant attribute values can be called in the form of "#{bean.xxx}".
// Add a default properieditor for beanFactory, which is mainly a tool for setting and managing bean properties
// Add BeanPostProcessor
// Set up several interfaces that ignore automatic assembly
// Set up several special rules for automatic assembly
// Add support for AspectJ
// Add default system environment bean
}
The above functions are mainly extended in several aspects:
- Add support for SPEL language.
- Added support for Attribute Editor.
- Add information injection for some built-in classes, such as EnvironmentAware and MessageSourceAware.
- The dependent function is set, and the interface can be ignored.
- Register some fixed dependent properties.
- Add AspectJ support
- Register relevant environment variables and attributes in singleton mode
6.6 post processing of beanfactory
As the basis of the container function, BeanFactory is used to store the loaded beans. In order to ensure the high scalability of the program, Spring has made a lot of extensions to BeanFactory, such as the well-known PostProcessor.
6.6.1 activate the registered beanfactoryprocessor
Before the formal introduction, let's learn about the usage of beanfactoryprocessor.
The BeanFactoryPostProcessor interface is similar to the BeanPostProcessor and can process the bean definition (configuration metadata). That is, the Spring IoC container allows the beanfactoryprocessor to read the configuration metadata and possibly modify it before the container actually instantiates any other beans. If you like, you can configure multiple beanfactoryprocessors. You can also control the execution order of beanfactoryprocessor by setting the "order" attribute (you can set this attribute only when beanfactoryprocessor implements the Ordered interface, so you should consider implementing the Ordered interface when implementing beanfactoryprocessor).
AOP
Spring 2.0 uses @ AspectJ annotation to annotate POJO s, so as to define a section containing pointcut information and enhanced cross section logic. Spring 2.0 can implant this aspect into the matching target Bean@ AspectJ annotation uses AspectJ pointcut expression syntax to define pointcuts. It can define pointcuts through advanced functions such as pointcut functions, operators and wildcards, and has strong connection point description ability.
7.1 dynamic AOP usage example
@Aspect
public class AspectTest {
    @Pointcut("execution(* *.test(..))")
    public void test() {

    }

    @Before("test()")
    public void beforeTest() {
        System.out.println("beforeTest");
    }

    @After("test()")
    public void afterTest() {
        System.out.println("afterTest");
    }

    @Around("test()")
    public Object aroundTest(ProceedingJoinPoint p) {
        System.out.println("before1");
        Object o = null;
        try {
            o = p.proceed();
        } catch (Throwable e) {
            e.printStackTrace();
        }
        System.out.println("after1");
        return o;
    }
}

public class TestBean {
    private String testStr = "testStr";

    public String getTestStr() {
        return testStr;
    }

    public void setTestStr(String testStr) {
        this.testStr = testStr;
    }
    public void test(){
        System.out.println("test");
    }
}
public class MyApplication {
        public static void main(String[] args) {
            ApplicationContext applicationContext = new ClassPathXmlApplicationContext(("applicationContext.xml"));
            TestBean testBean = (TestBean) applicationContext.getBean("testBean");
            testBean.test();
        }
}
So, how does Spring implement AOP? First of all, we know whether Spring supports annotated AOP is controlled by a configuration file, that is < AOP: AspectJ AutoProxy / >. When this configuration is declared in the configuration file, Spring will support annotated AOP, so the analysis starts from this annotation.
7.2 dynamic AOP custom labels
We talked about custom annotations in Spring before. If you declare custom annotations, you must register the corresponding parser somewhere in the program. After searching the whole code, we found the corresponding function in AopNamespaceHandler
public void init() {
		// In 2.0 XSD as well as in 2.5+ XSDs
		registerBeanDefinitionParser("config", new ConfigBeanDefinitionParser());
		registerBeanDefinitionParser("aspectj-autoproxy", new AspectJAutoProxyBeanDefinitionParser());
		registerBeanDefinitionDecorator("scoped-proxy", new ScopedProxyBeanDefinitionDecorator());

		// Only in 2.0 XSD: moved to context namespace in 2.5+
		registerBeanDefinitionParser("spring-configured", new SpringConfiguredBeanDefinitionParser());
	}
When parsing files, the parser AspectJAutoProxyBeanDefinitionParser will be used once the AspectJ AutoProxy annotation is encountered, so let's take a look at the internal implementation of AspectJAutoProxyBeanDefinitionParser.
7.2.1 register AnnotationAwareAspectJAutoProxyCreator
All parsers, because they are the unified implementation of the BeanDefinitionParser interface, start with the parse function. The parse function of AspectJAutoProxyBeanDefinitionParser is as follows
// Register AnnotationAwareAspectJAutoProxyCreator
AopNamespaceUtils.registerAspectJAnnotationAwareAspectJAutoProxyCreatorIfNecessary(parserContext,element);
// Handling of annotation subclasses
extendBeanDefinition(element, parserContext);
The logic implementation of registerAspectJAnnotationAutoProxyCreatorIfNecessary is as follows:
// Register or upgrade AutoProxyCreator and define beanName as org Springframework. aop. config. beanDefinition of internalautoproxycreator
AopConfig.registerAspectJAnnotationAutoProxyCreatorIfNecessary(...);
// Handling of proxy target class and expose proxy attributes
useClassProxyIfNecessary(...);
// Register the component and notify the listener for further processing. The className of beanDefinition is AnnotationAwareAspectJAutoProxyCreator
registerComponentIfNecessary(beanDefinition,parserContext);
The registerAspectJAnnotationAutoProxyCreatorIfNecessary method mainly completes three things. Basically, each line is a complete logic.
- Registering or upgrading AnnotationAwareAspectJAutoProxyCreator basically relies on AnnotationAwareAspectJAutoProxyCreator to implement AOP. It can automatically proxy matching bean s according to the facet defined by @ Point annotation. However, for easy configuration, Spring uses custom configuration to help automatically register AnnotationAwareAspectJAutoProxyCreator, The registration process is implemented here.
registerOrEscalateApcAsRequired(...) //
If an automatic proxy creator already exists and the existing automatic proxy creator is inconsistent with the current one, you need to determine which one to use according to the priority//
If an automatic proxy creator already exists and is consistent with what will be created, you do not need to create it again
The above logic implements the function of registering the AnnotationAwareAspectJAutoProxyCreator class. At the same time, it also involves a priority problem. If there is an automatic agent creator and the existing automatic agent creator is inconsistent with the current one, you need to judge which one to use according to the priority. - Handle proxy target class and expose proxy attributes,
useClassProxyIfNecessary implements the processing of proxy target class attribute and expose proxy attribute
//Handling of proxy target class attribute
AopConfigUtils.forceAutoProxyCreatorToUseClassProxying(...) //
Handling of the expose proxy attribute
AopConfigUtils.forceAutoProxyCreatorToExposeProxying(...) //
The process of forced use is actually a process of property setting
There are some slight differences between JDK dynamic agent and CGLIB dynamic agent in actual use:
JDK dynamic proxy: its proxy object must be the implementation of an interface. It completes the proxy of the target object by creating an interface implementation class during operation.
CGLIB proxy: the implementation principle is similar to JDK dynamic proxy, except that the proxy object generated during operation is a subclass extended for the target class. CGLIB is an efficient code generation package. The bottom layer is realized by ASM operation bytecode, and its performance is better than JDK.
7.3 create AOP proxy
The above explains that the automatic registration of AnnotationAwareAspectJAutoProxyCreator type is completed through automatic configuration. What exactly does this class do to complete AOP operation?
From the hierarchical structure of AnnotationAwareAspectJAutoProxyCreator class, we can see that AnnotationAwareAspectJAutoProxyCreator implements BeanPostProcessor interface, and when BeanPostProcessor is implemented, when Spring loads this Bean, its postProcessAfterInitialization method will be called before instantiation, and our analysis of AOP logic will start.
In the code in the postProcessAfterInitialization of the parent class AbstractAutoProxyCreator:
//Build a key according to the class and name of the given bean. The format is beanClassName_beanName
//If it is suitable for being proxied, you need to encapsulate the specified bean
return wrapIfNecessary(bean,beanName,cacheKey);
// wrapIfNecessary(bean,beanName,cacheKey)
//If it has been processed, the bean instance is returned directly
//If no enhancement is required, the bean instance is returned directly
//Judge whether the given bean class represents an infrastructure class. If it is an infrastructure class, it should not be proxy, or the specified bean is configured without proxy
//If an enhanced method exists, create a proxy
Object[] specifcInterceptors = getAdviceAndAdcisorForBean(bean.getClass());
//If the enhancement is obtained, you need to create an agent for the enhancement
Object proxy = createProxy(bean.getClass(),beanName,specifcInterceptors ,new SingletonTargetSource(bean));
7.5 create AOP static proxy
AOP static agent is mainly used to enhance the target object by changing the bytecode of the target object when the virtual machine is started. Compared with dynamic agent, it has higher efficiency, because in the process of calling dynamic agent, it also needs a step to dynamically create agent class and proxy the target object, while static agent completes the bytecode enhancement at startup, When the system calls the target class again, it is no different from calling the normal class, so the efficiency will be relatively higher.
7.5.1 use of instrumentation
Java introduces Java. Java in 1.5 Lang. instrument, you can implement a Java agent through which you can modify the bytecode of a class to change a class, and implement a simple profiler through Java Instrument. Of course, instrument is not limited to profiler. Instrument can do many things. It is similar to a lower level and loosely coupled AOP, which changes the behavior of a class from the bottom.
Take calculating the running time of a method as an example. At the beginning and end of a method, you have to write duplicate code at the beginning and end of all methods to be monitored, and Java Instrument makes all this cleaner.
Write ClassFileTransformer class, implement ClassFileTransformer, and write methods to modify bytecode;
Write the agent class. When the JVM starts, perfmonagent will be called before the application is loaded Permain, then perfmonagentperfmonagent Performain instantiates a custom ClassFileTransformer class, namely performxformer, and adds the instance of PerfMonXformer to the Instrumentation instance (passed in by JVM) through inst.addTransformer(trans), which makes PerfMonXformer Transform will be called. You can change the loaded class in this method, and you can easily change the bytecode of the class using JBoss's Javaassist;
Package agent and introduce related Jar package;
Package applications.
It can be seen from the execution results that the execution sequence and adding monitoring code by changing bytecode do take effect, and the agent is implemented through Instrument to completely isolate the monitoring code from the application code.
Principle of SpringBoot system
14.2 first Starter
Spring Boot is popular because the Spring starter pattern is proposed. The emergence of Spring starter can make module development more independent, more loose interdependence and more convenient integration. From the example described above, it is precisely because the following code is introduced into the pom file:
<dependency>
			<groupId>org.springframework.boot</groupId>
			<artifactId>spring-boot-web</artifactId>
</dependency>
Newly build maven project and introduce pom:
<?xml version="1.0" encoding="UTF-8"?>
<project xmlns="http://maven.apache.org/POM/4.0.0" xmlns:xsi="http://www.w3.org/2001/XMLSchema-instance"
	xsi:schemaLocation="http://maven.apache.org/POM/4.0.0 https://maven.apache.org/xsd/maven-4.0.0.xsd">
	<modelVersion>4.0.0</modelVersion>
	<groupId>com.study</groupId>
	<artifactId>study-client-starter</artifactId>
	<version>1.0.0-SNAPSHOT</version>
	<description>Demo project for Spring Boot</description>
	<properties>
		<java.version>1.8</java.version>
	</properties>
	<dependencies>
		<dependency>
			<groupId>org.springframework.boot</groupId>
			<artifactId>spring-boot-autoconfigure</artifactId>
		</dependency>
	</dependencies>
	<dependencyManagement>
		<dependencies>
			<dependency>
				<groupId>org.springframework.boot</groupId>
				<artifactId>spring-boot-dependencies</artifactId>
				<version>2.0.1.RELEASE</version>
				<type>pom</type>
				<scope>import</scope>
			</dependency>
		</dependencies>
	</dependencyManagement>
</project>
Create a new interface and implement:
public interface HelloService {
     String sayHello();
}

@Component
public class HelloServiceImpl implements HelloService {
    @Override
    public String sayHello() {
        return "hello";
    }
}

@Configuration
@ComponentScan({"com.study.module"})
public class HelloServiceAutoConfiguration {
}
14.3 explore SpringApplication and launch Spring
We found the main function entry SpringBootDemo1Application, and found that the startup of this entry is quite strange, which is also a necessary method for Spring Boot startup. Then, this can also be used as the entry for our analysis of Spring Boot:
public ConfigurableApplicationContext run(String... args) {
...
 context = this.createApplicationContext();
            exceptionReporters = this.getSpringFactoriesInstances(SpringBootExceptionReporter.class, new Class[]{ConfigurableApplicationContext.class}, context);
            this.prepareContext(context, environment, listeners, applicationArguments, printedBanner);
            this.refreshContext(context);
....
}
SpringContext creation
protected ConfigurableApplicationContext createApplicationContext() {
        Class<?> contextClass = this.applicationContextClass;
        if (contextClass == null) {
            try {
                switch(this.webApplicationType) {
                case SERVLET:
                    contextClass = Class.forName("org.springframework.boot.web.servlet.context.AnnotationConfigServletWebServerApplicationContext");
                    break;
                case REACTIVE:
                    contextClass = Class.forName("org.springframework.boot.web.reactive.context.AnnotationConfigReactiveWebServerApplicationContext");
                    break;
                default:
                    contextClass = Class.forName("org.springframework.context.annotation.AnnotationConfigApplicationContext");
                }
            } catch (ClassNotFoundException var3) {
                throw new IllegalStateException("Unable create a default ApplicationContext, please specify an ApplicationContextClass", var3);
            }
        }

        return (ConfigurableApplicationContext)BeanUtils.instantiateClass(contextClass);
    }
bean loading
 protected void load(ApplicationContext context, Object[] sources) {
     	...
        loader.load();
    }
I believe that when readers see the class BeanDefinitionLoader, they basically know the subsequent logic. bean loading, as the core part of this book, has been analyzed as early as Chapter 1.
Loading Spring extension properties
this.refreshContext(context);
It is easier to load spring's extended attributes, because these are the original things of spring itself. Spring Boot is only activated by using refresh. If readers want to review the detailed logic of refresh, they can go back to Chapter 5 for further view.
14.4 starter automation configuration principle
We already know how Spring Boot starts Spring, but so far we haven't unveiled Spring Boot. How does Starter work? Now it seems that these logic can only be reflected in the annotation SpringBootApplication itself.
@Target({ElementType.TYPE})
@Retention(RetentionPolicy.RUNTIME)
@Documented
@Inherited
@SpringBootConfiguration
@EnableAutoConfiguration
@ComponentScan(
    excludeFilters = {@Filter(
    type = FilterType.CUSTOM,
    classes = {TypeExcludeFilter.class}
), @Filter(
    type = FilterType.CUSTOM,
    classes = {AutoConfigurationExcludeFilter.class}
)}
)
public @interface SpringBootApplication {
}
Among them, we pay more attention to the annotation content on springboot application because the annotation is transitive. EnableAutoConfiguration is a very special annotation. It is the global switch of Spring Boot. If this annotation is removed, all starters will become invalid. This is the hidden rule that the Convention is greater than the configuration, The core of Spring Boot is probably hidden in this annotation:
@Target({ElementType.TYPE})
@Retention(RetentionPolicy.RUNTIME)
@Documented
@Inherited
@AutoConfigurationPackage
@Import({AutoConfigurationImportSelector.class})
public @interface EnableAutoConfiguration {
    String ENABLED_OVERRIDE_PROPERTY = "spring.boot.enableautoconfiguration";

    Class<?>[] exclude() default {};

    String[] excludeName() default {};
}
EnableAutoConfigurationlmportSelector has finally emerged as a key option for Starter automatic import. How does Spring recognize and make this annotation work? We can see that there is only one method in this class, so we can find the final call point by looking at which method called it.
Spring. Loading of factories
Follow the train of thought to find out who called the isEnabled function and where. The powerful compiler container helps us locate the method of the AutoConfigurationlmportSelector class
Among the above functions, one is the getCandidateConfigurations function we are more concerned about:
 protected List<String> getCandidateConfigurations(AnnotationMetadata metadata, AnnotationAttributes attributes) {
        List<String> configurations = SpringFactoriesLoader.loadFactoryNames(this.getSpringFactoriesLoaderFactoryClass(), this.getBeanClassLoader());
        Assert.notEmpty(configurations, "No auto configuration classes found in META-INF/spring.factories. If you are using a custom packaging, make sure that file is correct.");
        return configurations;
    }
From the above function, we can see META-INF / spring Factories, in the previous demonstration, according to the principle that the Convention is greater than the configuration, if Starter wants to take effect, it must establish spring. In the META-INF file Factories file and declare the relevant configuration classes in it. Although this is only an error exception prompt, in fact, we can infer that this must be the processing place of this logic. Continue to enter the springfactoryesloader class:
private static Map<String, List<String>> loadSpringFactories(@Nullable ClassLoader classLoader) {
        MultiValueMap<String, String> result = (MultiValueMap)cache.get(classLoader);
        if (result != null) {
            return result;
        } else {
            try {
                Enumeration<URL> urls = classLoader != null ? classLoader.getResources("META-INF/spring.factories") : ClassLoader.getSystemResources("META-INF/spring.factories");
}
At this point, we finally understand why the effectiveness of Starter must depend on the configuration of meta-inf / spring Factories file, because there is a hard coded logic in the startup process, that is, it will scan the corresponding files in each package and retrieve the configuration.
factories call timing chart

The figure combs the call link from embedded webapplicationcontext to AutoConfigurationimportSelector. Of course, there are many additional branches of this link that are ignored. However, at least from the above figure, we can clearly see the integration process of AutoConfigurationimportSelector and Spring. The core of this call chain is that Spring Boot uses the BeanDefinitionRegistry FostProcessor extension point provided by Spring and implements the ConfigurationClassPostProcessor class, thus realizing a series of logical extensions on Spring, Let's take a look at the inheritance relationship of ConfigurationClassPostProcessor, as shown in the figure:

Of course, Spring also provides many extension points in different stages. You can get detailed extension points and implementation principles through the contents of the previous chapters.