catalogue
6. Structure after hard disk partition
7. Simple process of accessing files
3. The difference between the two
3, Recover accidentally deleted files
2. Classification of log files
4. Introduction to main log files
1, inode and block overview
The file data includes meta information and actual NC
Files are stored on the hard disk. The smallest storage unit of the hard disk is "sector", and each sector stores 512 bytes
1. block
Eight consecutive sectors form a block
Is the smallest unit of file access
2. inode (index node)
The Chinese translation is "index node", also known as i node
Used to store file meta information
3. inode content
inode contains a lot of file cloud information, but does not include file names
Each inode table record contains the following information:
inode number node number
file type
jurisdiction
UID
GID
Number of links (number of path names pointing to this file name)
The file size and different timestamps
Block pointer to a file on disk
Other data about the file
Use the stat command to view the inode information of the file
[root@localhost ~]#stat anaconda-ks.cfg
  File:"anaconda-ks.cfg"
  Size: 1766      	Block: 8          IO Block: 4096 normal files
 Equipment: fd00h/64768d	Inode: 100663365   Hard link: 1
 jurisdiction:(0600/-rw-------)  Uid: (    0/    root)   Gid: (    0/    root)
Environmental Science: system_u:object_r:admin_home_t:s0
 Recent visit: 2021-09-10 01:14:01.995561720 +0800
 Recent changes: 2021-09-10 01:10:07.338972865 +0800
 Recent changes: 2021-09-10 01:10:07.338972865 +0800
 Created on:-
[root@localhost ~]#
Linux system files have three main time attributes, namely, the latest access time, the latest change time and the latest change time. When creating a new file, the three state times are the same
Write content (echo is not turned on), the best two changes
Modify permissions, only the last change - recent changes
vim open, only the first change
Everything in the Linux system is a file, so a directory is also a kind of file
Structure of directory file
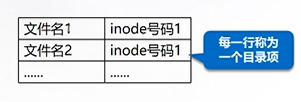
The Linux system does not use the file name, but uses the inode number to identify the file. For users, the file name is just another name for the identification of the inode number
4. cp and inode
cp command:
Assign a free inode number and generate a new entry in the inode table
Create a directory entry in the directory and associate the name with the inode number
Copy data to generate new files
rm command:
The number of hard links decreases so that the released inode number can be reused
Put data blocks in the free list
Delete directory entry
The data will not actually be deleted immediately, but will be overwritten when another file uses a data block
5. mv and inode
If the target and source of the mv command are on the same device,
It does not affect the inode table (except timestamp) or the data location on the disk: no data has been moved!
Delete the old directory correspondence and create a new directory correspondence
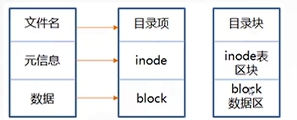
6. Structure after hard disk partition
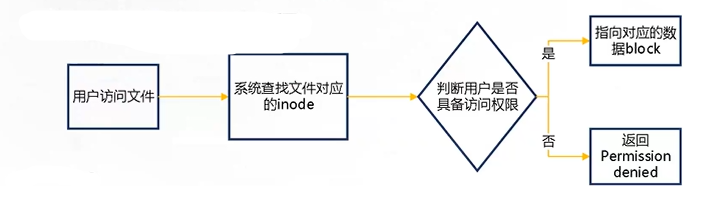
7. Simple process of accessing files
8. inode size
Inodes also consume hard disk space
The size of each inode is generally 128 bytes or 256 bytes
Determining the total number of inode s when formatting the file system
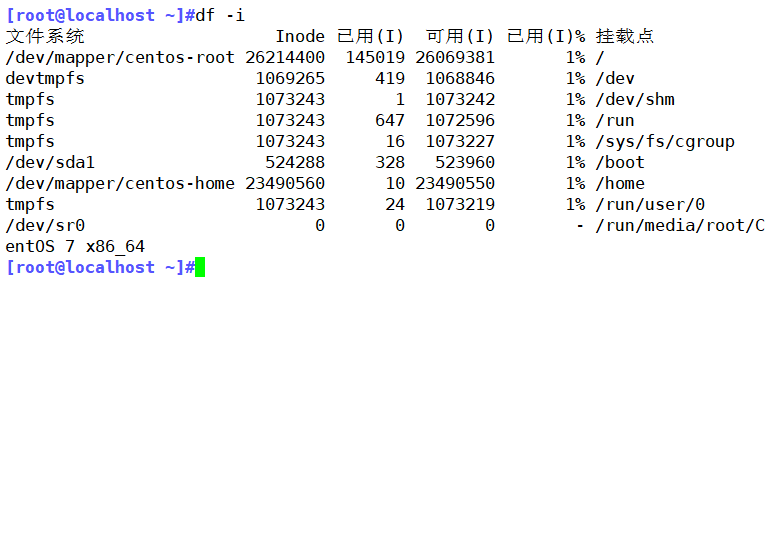
Use the df -i command to view the total number of inode s per hard disk partition and the number used
9. Special role of inode
Due to the separation of inode number and file name, some Unix/Linux systems have the following phenomena
When the file name contains special characters, the file may not be deleted normally. You can delete inode directly or delete the file
When moving or renaming a file, only the file name is changed without affecting the inode number
After opening a file, the system identifies the file by inode number, regardless of the file name
2, Hard link and soft link
1. Hard link
The same file has different names or multiple names. Folders are not supported. Create a connection number plus one to access multiple paths.
Command entry format: ln
2. Soft link
Soft link is to create a file, and this file will make the reading of data point to the file name to which it is connected
Command entry format: ln [-s] Source file or directory... Linked file or destination location
3. The difference between the two
| Comparison item | Hard link | Soft link |
| essence | Essentially the same folder | Not the same folder |
| inode | identical | inequality |
| Number of connections | When you create a new hard link, the number of links will increase. When you delete a hard link, the number of links will decrease | Delete new does not change |
| folder | I won't support it | support |
| Delete source file | Only the number of links is reduced by one, but the access of links is not affected | Unable to access linked file |
| file type | Same as source file | Linked file, independent of the source file |
| file size | Same as source file | Length of source file path |
3, Recover accidentally deleted files
When we delete a file, we do not actually clear the data of inode nodes and blocks, but only in the parent directory of the file Delete the name of this file in the block inside. Linux controls file deletion through the number of links. Only When a file does not have any links, the file will be deleted.
In the operation and maintenance of Linux system, we often encounter the loss of file data due to careless operation and operation errors Especially for some novices in customer enterprises. Of course, this refers to complete deletion, that is, it can no longer be recycled For example, use "rm -rf" to delete data. Available recovery for EXT file system under Linux Tools include debugfs, ext3grep, extundelete, etc. Extundelete is an open source Linux data Recovery tool, support ext3 file system.
1. Use the extundelete tool to recover files deleted by mistake
1. Compile and install extundelete
Before compiling and installing extundelete, you need to install two dependent packages e2fsprogs LIBS and e2fsprogs devel, which are available in the / Package directory of the system installation CD. Use rpm or yum to install them.
[root@localhost ~]#yum -y install e2fsprogs-devel e2fsprogs-libs
[root@localhost ~]#cd /opt
[root@localhost opt]#ls
rh
[root@localhost opt]#rm -rf *
[root@localhost opt]#ls
[root@localhost opt]#rz -E
rz waiting to receive.
[root@localhost opt]#ls
extundelete-0.2.4.tar.bz2
[root@localhost opt]#tar jxvf extundelete-0.2.4.tar.bz2
[root@localhost opt]#ls
extundelete-0.2.4  extundelete-0.2.4.tar.bz2
[root@localhost opt]#cd extundelete-0.2.4/
[root@localhost extundelete-0.2.4]#
[root@localhost extundelete-0.2.4]#./configure
Configuring extundelete 0.2.4
Writing generated files to disk
[root@localhost extundelete-0.2.4]#make
make -s all-recursive
Making all in src
extundelete.cc: In function'ext2_ino_t find_inode(ext2_filsys, ext2_filsys, ext2_inode*, std::string, int)'in:
extundelete.cc:1272:29: Warning: in {} Internal general'search_flags'from'int'Convert to narrower type'ext2_ino_t {aka unsigned int}' [-Wnarrowing]
    buf, match_name2, priv, 0};
                             ^
[root@localhost extundelete-0.2.4]#make install
Making install in src
  /usr/bin/install -c extundelete '/usr/local/bin'
2. Simulate deletion and restore
1) Use the fdisk command to create a new partition, mount it to the / tmp directory, and create some files or directories in this directory
[root@localhost ~]#echo "- - -"> /sys/class/scsi_host/host0/scan
[root@localhost ~]#echo "- - -"> /sys/class/scsi_host/host1/scan
[root@localhost ~]#fdisk /dev/sdb
 Welcome fdisk (util-linux 2.23.2).

The changes remain in memory until you decide to write the changes to disk.
Think twice before using the write command.

Device does not contain a recognized partition table
 Use disk identifier 0 x84abcb2e Create a new DOS Disk label.

command(input m get help): n
Partition type:
   p   primary (0 primary, 0 extended, 4 free)
   e   extended
Select (default p):
Using default response p
 Partition number (1-4,Default 1):
Start sector (2048-41943039,The default is 2048):
The default value 2048 will be used
Last a sector, +a sector or +size{K,M,G} (2048-41943039,The default is 41943039): +10G
 Partition 1 is set to Linux Type, size set to 10 GiB

command(input m get help): p

disk /dev/sdb: 21.5 GB, 21474836480 Bytes, 41943040 sectors
Units = a sector of 1 * 512 = 512 bytes
 Sector Size (logic/Physics): 512 byte / 512 byte
I/O size(minimum/optimum): 512 byte / 512 byte
 Disk label type: dos
 Disk identifier: 0 x84abcb2e

   equipment Boot      Start         End      Blocks   Id  System
/dev/sdb1            2048    20973567    10485760   83  Linux

command(input m get help): w
The partition table has been altered!

Calling ioctl() to re-read partition table.
Synchronizing disks.

[root@localhost ~]#mkfs.ext3 /dev/sdb1
mke2fs 1.42.9 (28-Dec-2013)
File system label=
OS type: Linux
 Block size=4096 (log=2)
Block size=4096 (log=2)
Stride=0 blocks, Stripe width=0 blocks
655360 inodes, 2621440 blocks
131072 blocks (5.00%) reserved for the super user
 First data block=0
Maximum filesystem blocks=2684354560
80 block groups
32768 blocks per group, 32768 fragments per group
8192 inodes per group
Superblock backups stored on blocks:
	32768, 98304, 163840, 229376, 294912, 819200, 884736, 1605632

Allocating group tables: complete
Writing inode surface: complete
Creating journal (32768 blocks): complete
Writing superblocks and filesystem accounting information: complete

[root@localhost ~]#mount /dev/sdb1 /tmp
[root@localhost ~]#df -hT
 file system                type      Capacity used available used% Mount point
/dev/mapper/centos-root xfs        50G  3.7G   47G    8% /
devtmpfs                devtmpfs  4.1G     0  4.1G    0% /dev
tmpfs                   tmpfs     4.1G     0  4.1G    0% /dev/shm
tmpfs                   tmpfs     4.1G  9.2M  4.1G    1% /run
tmpfs                   tmpfs     4.1G     0  4.1G    0% /sys/fs/cgroup
/dev/sda1               xfs      1014M  179M  836M   18% /boot
/dev/mapper/centos-home xfs        45G   33M   45G    1% /home
tmpfs                   tmpfs     839M   52K  839M    1% /run/user/0
/dev/sr0                iso9660   4.3G  4.3G     0  100% /run/media/root/CentOS 7 x86_64
/dev/sdb1               ext3      9.8G   23M  9.2G    1% /tmp
[root@localhost ~]#cd /tmp
[root@localhost tmp]#echo a>a
[root@localhost tmp]#echo a>b
[root@localhost tmp]#echo a>c
[root@localhost tmp]#echo a>d
[root@localhost tmp]#ls
a  b  c  d  lost+found
You can use extend delete / dev/sdb1 -- inode 2 to view which files exist in the file system / dev/sdb1 and the specific usage. Where -- inode 2 represents viewing from the file with node i as 2. Generally, after the file system is formatted and mounted, node i starts from 2, and 2 represents the initial directory of the file system.
2. Simulate misoperation and recover
You need to unmount before recovering
Use the "rm -rf a b" command to delete the A and b files under / tmp /. In case of misoperation, uninstall the system immediately, and then use "extend / dev/sdb1 -- restore all" to recover all contents under the / dev/sdb1 file system
After executing the restore command, a / recovered will appear in the current directory_ Files / directory, which saves the recovered files.
[root@localhost tmp]#rm -rf a b
[root@localhost tmp]#ls
c  d  lost+found
[root@localhost tmp]#cd
[root@localhost ~]#umount /tmp/
[root@localhost ~]#extundelete /dev/sdb1 --restore-all
NOTICE: Extended attributes are not restored.
Loading filesystem metadata ... 80 groups loaded.
Loading journal descriptors ... 56 descriptors loaded.
Searching for recoverable inodes in directory / ...
2 recoverable inodes found.
Looking through the directory structure for deleted files ...
0 recoverable inodes still lost.
[root@localhost ~]#ls
anaconda-ks.cfg       RECOVERED_FILES  Template picture download desktop
initial-setup-ks.cfg  public             Video document music
[root@localhost ~]#cd RECOVERED_FILES
[root@localhost RECOVERED_FILES]#ls
a  b
[root@localhost RECOVERED_FILES]#
4, Recover xfs type files
1. xfsdump command format
xfsdump -f backup location path or device file to be backed up
2. xfsdump backup level
The default is 0
0: full backup
1-9: incremental backup
3. Common options
-f: Specify backup file directory
-50: Specify the label session label
-M: Specify device label media label
-s: Backup a single file, - s cannot be directly followed by a path
4. xfsrestore command format
xfsrestore -f location of recovered files location of recovered files
5. xfsdump usage restrictions
The unmounted file system backup is not supported, so only the mounted file system can be backed up;
You must use the permission of root to operate;
Only XFS file system can be backed up;
The backed up data can only be parsed by xfsrestore;
Two file systems with the same UUID cannot be backed up (can be viewed using blkid)
6. Operation process
Add a disk first
[root@localhost ~]#echo "- - -"> /sys/class/scsi_host/host0/scan
[root@localhost ~]#echo "- - -"> /sys/class/scsi_host/host1/scan
[root@localhost ~]#echo "- - -"> /sys/class/scsi_host/host2/scan
[root@localhost ~]#fdisk -l
see Is xfsdump installed? If not, you can use yum to install it
[root@localhost ~]#rpm -q xfsdump
xfsdump-3.1.4-1.el7.x86_64
Create a new partition, format it into xfs format, mount it, copy the file in, back up the partition, and mark it
[root@localhost ~]#fdisk /dev/sdb
 Welcome fdisk (util-linux 2.23.2).

The changes remain in memory until you decide to write the changes to disk.
Think twice before using the write command.

Device does not contain a recognized partition table
 Use disk identifier 0 xbaaa9001 Create a new DOS Disk label.

command(input m get help): n
Partition type:
   p   primary (0 primary, 0 extended, 4 free)
   e   extended
Select (default p):
Using default response p
 Partition number (1-4,Default 1):
Start sector (2048-41943039,The default is 2048):
The default value 2048 will be used
Last a sector, +a sector or +size{K,M,G} (2048-41943039,The default is 41943039): +10G
 Partition 1 is set to Linux Type, size set to 10 GiB

command(input m get help): p

disk /dev/sdb: 21.5 GB, 21474836480 Bytes, 41943040 sectors
Units = a sector of 1 * 512 = 512 bytes
 Sector Size (logic/Physics): 512 byte / 512 byte
I/O size(minimum/optimum): 512 byte / 512 byte
 Disk label type: dos
 Disk identifier: 0 xbaaa9001

   equipment Boot      Start         End      Blocks   Id  System
/dev/sdb1            2048    20973567    10485760   83  Linux

command(input m get help): w
The partition table has been altered!

Calling ioctl() to re-read partition table.
Synchronizing disks.
[root@localhost ~]#mkfs.xfs /dev/sdb1
meta-data=/dev/sdb1              isize=512    agcount=4, agsize=655360 blks
         =                       sectsz=512   attr=2, projid32bit=1
         =                       crc=1        finobt=0, sparse=0
data     =                       bsize=4096   blocks=2621440, imaxpct=25
         =                       sunit=0      swidth=0 blks
naming   =version 2              bsize=4096   ascii-ci=0 ftype=1
log      =internal log           bsize=4096   blocks=2560, version=2
         =                       sectsz=512   sunit=0 blks, lazy-count=1
realtime =none                   extsz=4096   blocks=0, rtextents=0
[root@localhost ~]#mkdir /ding
[root@localhost ~]#mount /dev/sdb1 /ding
[root@localhost ~]#df -hT
 file system                type      Capacity used available used% Mount point
/dev/mapper/centos-root xfs        50G  3.6G   47G    8% /
devtmpfs                devtmpfs  4.1G     0  4.1G    0% /dev
tmpfs                   tmpfs     4.1G     0  4.1G    0% /dev/shm
tmpfs                   tmpfs     4.1G  9.2M  4.1G    1% /run
tmpfs                   tmpfs     4.1G     0  4.1G    0% /sys/fs/cgroup
/dev/sda1               xfs      1014M  179M  836M   18% /boot
/dev/mapper/centos-home xfs        45G   33M   45G    1% /home
tmpfs                   tmpfs     839M   52K  839M    1% /run/user/0
/dev/sr0                iso9660   4.3G  4.3G     0  100% /run/media/root/CentOS 7 x86_64
/dev/sdb1               xfs        10G   33M   10G    1% /ding
[root@localhost ~]#cd /ding
[root@localhost ding]#cp /etc/passwd ./
[root@localhost ding]#ls
passwd
[root@localhost ding]#xfsdump -f /opt/dump_sdb1 /dev/sdb1  -L dump_sdb1 -M sdb1
xfsdump: using file dump (drive_simple) strategy
xfsdump: version 3.1.4 (dump format 3.0) - type ^C for status and control
xfsdump: level 0 dump of localhost.localdomain:/ding
xfsdump: dump date: Sat Sep 25 12:27:41 2021
xfsdump: session id: 1fb2ce51-54e9-4d4f-93b0-3c29a985a6bb
xfsdump: session label: "dump_sdb1"
xfsdump: ino map phase 1: constructing initial dump list
xfsdump: ino map phase 2: skipping (no pruning necessary)
xfsdump: ino map phase 3: skipping (only one dump stream)
xfsdump: ino map construction complete
xfsdump: estimated dump size: 25216 bytes
xfsdump: /var/lib/xfsdump/inventory created
xfsdump: creating dump session media file 0 (media 0, file 0)
xfsdump: dumping ino map
xfsdump: dumping directories
xfsdump: dumping non-directory files
xfsdump: ending media file
xfsdump: media file size 24264 bytes
xfsdump: dump size (non-dir files) : 2592 bytes
xfsdump: dump complete: 0 seconds elapsed
xfsdump: Dump Summary:
xfsdump:   stream 0 /opt/dump_sdb1 OK (success)
xfsdump: Dump Status: SUCCESS
[root@localhost ding]#ls /opt/
dump_sdb1  rh
Recovery after simulated data loss
[root@localhost ding]#rm -rf *
[root@localhost ding]#ls
[root@localhost ding]#cd
[root@localhost ~]# xfsrestore -f /opt/dump_sdb1 /ding/
xfsrestore: using file dump (drive_simple) strategy
xfsrestore: version 3.1.4 (dump format 3.0) - type ^C for status and control
xfsrestore: searching media for dump
xfsrestore: examining media file 0
xfsrestore: dump description:
xfsrestore: hostname: localhost.localdomain
xfsrestore: mount point: /ding
xfsrestore: volume: /dev/sdb1
xfsrestore: session time: Sat Sep 25 12:27:41 2021
xfsrestore: level: 0
xfsrestore: session label: "dump_sdb1"
xfsrestore: media label: "sdb1"
xfsrestore: file system id: 3861965d-3e3b-479c-a486-66693a430767
xfsrestore: session id: 1fb2ce51-54e9-4d4f-93b0-3c29a985a6bb
xfsrestore: media id: 9a80fb47-47c0-478f-b64d-7dc714ddb2f3
xfsrestore: using online session inventory
xfsrestore: searching media for directory dump
xfsrestore: reading directories
xfsrestore: 1 directories and 1 entries processed
xfsrestore: directory post-processing
xfsrestore: restoring non-directory files
xfsrestore: restore complete: 0 seconds elapsed
xfsrestore: Restore Summary:
xfsrestore:   stream 0 /opt/dump_sdb1 OK (success)
xfsrestore: Restore Status: SUCCESS
[root@localhost ~]#ls /ding/
passwd
5, Log file
1. Log function
It is used to record various events occurring in the system and train operation
By reading the log, it is helpful to diagnose and solve system faults
2. Classification of log files
1. Kernel and system log
It is managed by the same system service rsyslog, and the log format is basically similar
2. User log
Record relevant information of system user login and logout
3. Program log
Log files independently managed by various applications have different recording formats
3. Where to save the log
It is located in the: / var/log directory by default
4. Introduction to main log files
| Log file location | Log file description |
| /var/log/messages kernel and public logs | It is the core system log file, which contains the boot information when the system is started and other status messages when the system is running. I/O errors, network errors, and other system errors are recorded in this file. Other information, such as a person's identity switching to root, and the user-defined installation software log, will also be listed here. |
| /var/log/cron scheduled task log | Record the daily records related to the scheduled tasks of the system |
| /var/log/dmesg system boot log | It records the information of the kernel self-test when the system is powered on. You can also use the dmesg command to directly view the kernel self-test information |
| /var/log/maillog mail log | Log email information |
| User log | |
| /var/log/lastlog | Log the last login time of all users in the system. This file is also a binary file. You can't view it directly with Vi. Instead, use the lastlog command to view |
| /var/log/secure | Record the double interest of authentication and authorization. As long as the procedures involving account and password are recorded, such as system login, ssh login, su switching users, sudo authorization, and even adding users and modifying user passwords will be recorded in this log file |
| /var/log/wtmp | Permanently record the login and logout information of all users, and record the system startup, restart and shutdown events. Similarly, this file is also a binary file. You can't view it directly with Vi, but with the last command |
| /var/tun/ulmp | Record the information of the currently logged in user. This file will change with the user's login and logout, and only record the information of the currently logged in user. Similarly, this file cannot be viewed directly with Vi, but with w, who, users and other commands |
5. Format of log file
The format of the log file includes the following four columns:
1. Time of occurrence
2. Host name of the server that generated the event
3. The name of the service or program that generated the event
4. Specific information of the event
6, Kernel and system log
It is uniformly managed by the system service rsyslog
The log configuration file is located in / etc/rsyslog.conf
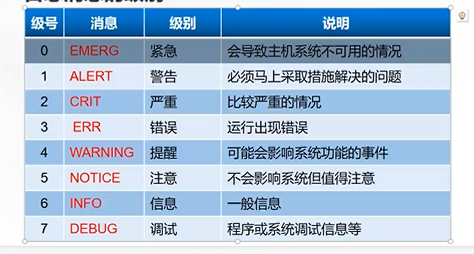
1. Level of log messages
In the Linux kernel, log messages are divided into different priority levels according to their importance (the smaller the number level is, the higher the priority is, and the more important the message is).
2. Program log analysis
Managed by the corresponding application independent process
web Service: / var/log/httpd/
access_log,error_log
Proxy service: / var/log/squid/
access_log,cache_log
FTP service: / var/logxferlog/
Analysis tools
1. File viewing, grep filtering and retrieval, and viewing in webmin Management Suite
2.awk, sed and other text filtering, formatting and editing tools
3.webalizer, awstats and other special log analysis tools
3. Log management policy
1. Timely backup and archive
2. Extend the log retention period
3. Control log access
The log may contain various sensitive information, such as account, password, etc
4. Centralized log management
Send the log files of the server to the unified log file server
It is convenient for the unified collection, sorting and analysis of log information
Prevent accidental loss, malicious tampering or deletion of log information
7, Summary
Master the method of false deletion recovery