Ioc overview
Ioc(Inversion Of Control) is translated as control inversion
First, make it clear that the control without inversion is "active control"
- Active control: all the codes we wrote before are active control, which means that we can instantiate whatever objects are needed during the running of the program
- Inversion of control: the code written with the idea of inversion of control is to save all the objects that will be used by the program to the external container and obtain them from the container when necessary
Create a Spring project
Create a Spring project
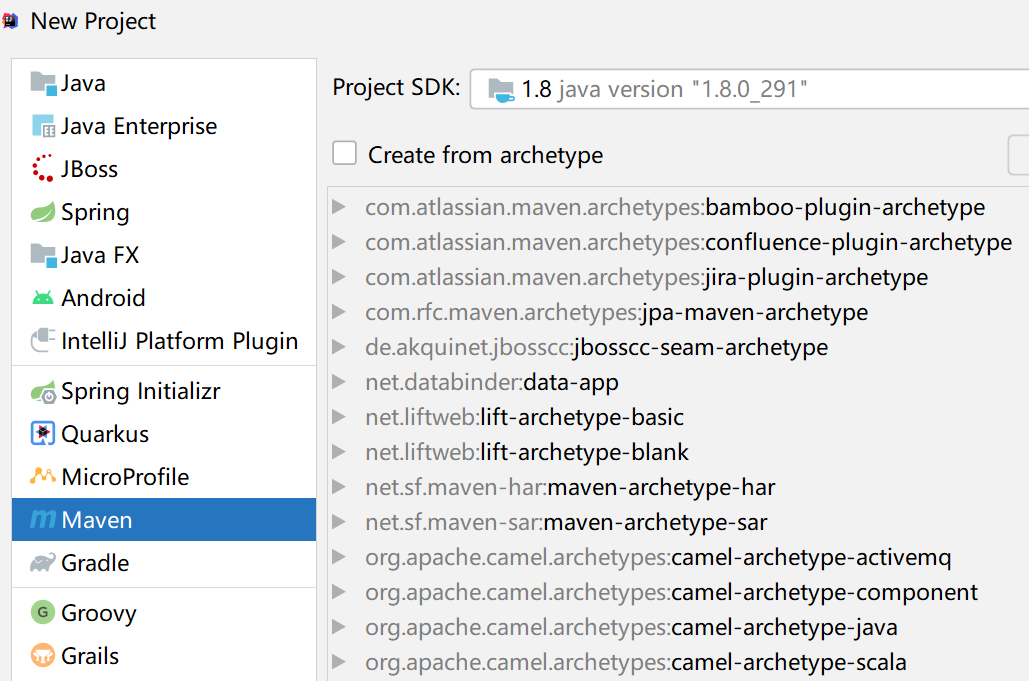
Use Idea to create Maven project, and then add Spring dependency
The POM of the current project after modification The XML file is as follows
<?xml version="1.0" encoding="UTF-8"?>
<project xmlns="http://maven.apache.org/POM/4.0.0"
         xmlns:xsi="http://www.w3.org/2001/XMLSchema-instance"
         xsi:schemaLocation="http://maven.apache.org/POM/4.0.0 http://maven.apache.org/xsd/maven-4.0.0.xsd">
    <modelVersion>4.0.0</modelVersion>

    <groupId>org.example</groupId>
    <artifactId>SpringTest</artifactId>
    <version>1.0-SNAPSHOT</version>

    <properties>
        <!-- set up JDK Version 1.8 -->
        <maven.compiler.target>1.8</maven.compiler.target>
        <maven.compiler.source>1.8</maven.compiler.source>
        <!-- Set code to UTF-8 -->
        <project.build.sourceEncoding>UTF-8</project.build.sourceEncoding>
        <project.reporting.outputEncoding>UTF-8</project.reporting.outputEncoding>
        <maven.compiler.encoding>UTF-8</maven.compiler.encoding>
    </properties>
    <dependencies>
        <!-- Spring Context -->
        <dependency>
            <groupId>org.springframework</groupId>
            <artifactId>spring-context</artifactId>
            <version>5.2.2.RELEASE</version>
        </dependency>
        <dependency>
            <groupId>javax.annotation</groupId>
            <artifactId>javax.annotation-api</artifactId>
            <version>1.3.2</version>
        </dependency>
    </dependencies>
</project>
Let's start creating a HelloWorld program that controls inversion
The first program to control inversion
Let's first create a class that contains student attributes
public class Stu {

    private Integer id;
    private String name;

    // get\set\toString omitted
}
Next, we will learn how to save an object in the Spring container to achieve control inversion
Create a new class Config
// This annotation indicates that the current class is the configuration class used to configure Spring
@Configuration
public class Config {

    // In this configuration class, you can save the object to the Spring container
    // This @ Bean annotation means to save the return value of the following method to the Spring container
    // The name of this object in the Spring container is the name of this method
    @Bean
    public Stu stu(){
        Stu stu=new Stu();
        stu.setId(1);
        stu.setName("Sun WuKong");
        return stu;
    }
}
Use the objects in the Spring container in the main method
public class DemoTest {

    public static void main(String[] args) {
        // Initialize Spring container
        AnnotationConfigApplicationContext acac=
          new AnnotationConfigApplicationContext(Config.class);
        // Get the object saved in the Spring container
        //  getBean([object name \ id], [object type. class])
        Stu stu=acac.getBean("stu",Stu.class);
        System.out.println(stu);

    }

}
Using @ Bean annotation to save objects to the Spring container is one of the main methods provided by the Spring framework
JUnit test run Spring
If you use the main method to test the program, you should create a new class to write the main method for each test
There will be many classes, and every time the main method instantiates and closes the acac object, the code is redundant
We can improve the above shortcomings by using JUnit for unit testing
First, add JUnit4 dependencies
<dependency>
    <groupId>junit</groupId>
    <artifactId>junit</artifactId>
    <version>4.13</version>
</dependency>
Create the demo package in the java folder of test
Create TestDemo class in the package, and the test code is as follows
public class TestDemo {

    // Multiple test methods that can be run can be written in a test class

    @Test
    public void run1(){
        System.out.println("run1");
    }

    @Test
    public void run2(){
        System.out.println("run2");
    }

    // Declare the ACAC object as an attribute of the test class, which can be used in all methods
    AnnotationConfigApplicationContext acac;

    // @The method marked by the Before annotation will run automatically Before the current Test class @ Test method runs
    @Before
    public void init(){
        acac=new AnnotationConfigApplicationContext(Config.class);
    }

    // @The method marked by the After annotation will run automatically After the current Test class @ Test method runs
    @After
    public void destroy(){
        acac.close();
    }

    @Test
    public void getStu(){
        Stu stu=acac.getBean("stu",Stu.class);
        System.out.println(stu);
    }

}
The component scans and saves the object to the Spring container
Above, we use the @ Bean annotation method to save the object to the Spring container
Let's learn another method to save objects to the Spring container
Create a new package san
Create a new class GuanYu in the package
The code is as follows
// @Component is one of the key annotations that the component scan saves to the Spring container
// Component means component. When the current class is scanned, an object will be instantiated automatically,
// Save to the Spring container. The ID (name) of the object is the lowercase word guanYu of the current class name

@Component
public class GuanYu {
    private String name="Guan Yu";
    public String getName() {
        return name;
    }
    public void setName(String name) {
        this.name = name;
    }
    public void fight(){
        System.out.println(name+"In battle!");
    }

}
Component scanning is also inseparable from Config class
The code for creating ConfigSan class is as follows
@Configuration
// Annotation of componentscan
// This annotation needs to specify a package. When instantiating the ACAC object and parsing the configuration file, configsan Class hour
// All classes in the specified package will be scanned, as long as there are annotation marked @ Component in these classes,
// The instantiated object will be saved to the Spring container
@ComponentScan("san")
public class ConfigSan {
}
The test obtains the object saved to the Spring container in the scanning mode of the component
public class TestSan {

    AnnotationConfigApplicationContext acac;

    @Before
    public void init(){
        acac=new AnnotationConfigApplicationContext(
                                         ConfigSan.class);
    }
    @After
    public void destroy(){
        acac.close();
    }
    @Test
    public void getGuan(){
        GuanYu guanYu=acac.getBean("guanYu",GuanYu.class);
        guanYu.fight();
    }
}
Difference between component scanning and @ Bean
1. Simpler component scanning configuration
2.@Bean can assign values to object attributes and then save them to the Spring container
3.@Bean can configure multiple different objects to be saved to the Spring container (for example, w1 and W2 of Worker)
Component scanning considerations
1. The special class name causes the special name to be saved to the Spring container
Under normal circumstances
Stu -> stu
Worker -> worker
GuanYu -> guanYu
This rule is different when the class name is special
Class name that starts with two consecutive uppercase letters
VIPStu -> VIPStu
The object name saved to the Spring container is the class name
2. The spring framework supports multiple annotations to represent the meaning of components
Spring provides the following annotation, which has the same function as @ Component
- @Controller is used to mark control layer components
- @Service is used to mark business logic layer components
- @Repository is used to tag data access layer components
The above three annotations can also indicate that the current class is instantiated and saved to the Spring container
Just because the meanings of words are different, it is convenient to know its role and increase the readability of the code
3. Custom component ID (name)
@Component("erye")

public class GuanYu {
    //.....   Code slightly
}
If the program needs to scan the current component and save the custom name of the object
After the annotation from the current @ Spring object () or the function from the @ Spring container () is saved, it needs to use the same name
Scope of bean (object)
The Bean here refers to the object in the Spring container
Scope English: scope
Scope is used to set the management policy of objects in the current Spring container
There are two main management strategies
1. Singleton (single case)
2. Prototype
Singleton strategy
The singleton policy is the default scope policy of the Spring framework
The Stu\Work\GuanYu class saved to the Spring container in the above chapter is a singleton
Let's test in the existing test class to verify the characteristics of "Singleton"
First, since it is a "Singleton", it means that the object obtained from the test class is the same object no matter how many times it is obtained
@Test
public void single(){
    // Code for testing singletons
    Stu s1=acac.getBean("stu",Stu.class);
    Stu s2=acac.getBean("stu",Stu.class);

    System.out.println(s1==s2);

    s1.setName("Qi Tian Da Sheng");
    System.out.println(s2);

}
In the code, their judgment and other codes are written first, and the output result is true
Indicates that they are the same reference
The following s1 object modifies the value of the name attribute
Output S2. The name attribute of S2 object changes with the modification of s1, which proves that they are the same object again
Advantages of single case
1. Save memory
2. It is convenient to manage, modify the current object and affect the properties of all objects
3. When multiple objects need to be obtained, single instance cannot be used, otherwise the purpose cannot be achieved
Prototype strategy
Let's introduce the use of prototype strategy
We can write it under @ Bean annotation or @ Component annotation
@Scope("prototype")
Finish the above configuration and run the following test code
@Test
public void prototype(){
    // Test prototype scope
    // Every time you get an object from the Spring container, you will get a newly instantiated object
    Stu s3=acac.getBean("stu",Stu.class);
    Stu s4=acac.getBean("stu",Stu.class);

    System.out.println(s3==s4);

    s3.setName("Monkey King");
    System.out.println(s3);
    System.out.println(s4);
}
You will find that s3==s4 is false
The property of s3 is modified, which only affects the s3 object itself, but not s4. These phenomena are completely different from the above single example
In other words, under the scope of the prototype, each time you get an object from the Spring container, you will get a newly instantiated object
Prototype strategy advantage
1. When the program needs to use a template to generate multiple objects, the prototype mode is used
2. However, the prototype strategy will be a waste of memory space
It is recommended to use singletons when it is not necessary, and prototypes when multiple objects of one type are really needed
lazy initialization
Lazy initialization is also called "lazy loading"
What is lazy initialization
The so-called lazy initialization means that when the program needs to use this object, the Spring container instantiates it
If the program does not need it during running, Spring will not instantiate it
Why do I need lazy initialization
In the process of program running, some objects may or may not be used
For this kind of object, we set it to lazy initialization, which may reduce the memory occupation
The default setting in the Spring container is not lazy, that is, by default, all singleton scope objects will be instantiated before the program runs, unless lazy initialization is set, that is, lazy initialization is for singleton scope objects
Lazy initialization is not without disadvantages. If all objects in the program are set to lazy initialization, that is, all objects need to be instantiated and used in the running process, it will significantly slow down the running speed
When to instantiate an object by default
The configuration class Config of Stu is restored to the original singleton scope
A parameterless constructor is added to the Stu class
public Stu(){
    System.out.println("Stu instantiation ");
}
Added output to the @ Before method of the TestDemo test class
@Before
public void init(){
    acac=new AnnotationConfigApplicationContext(Config.class);
    System.out.println("init Method execution completed");
}
Then run an empty test method
@Test
public void lazy(){

}
Console output is
Stu instantiation
init Method execution completed
It is proved that the Stu object is instantiated when the acac object is instantiated
If you want to set Stu as an inert initialization object, add it in the @ Bean or @ Component annotation
@Lazy
annotation
Then run the lazy method in the empty test class, and the console output is as follows
init Method execution completed
Prove that the Stu object was not instantiated when instantiating acac this time
The Stu object is instantiated only when it is actually used in the test class
@Test
public void lazy(){

    Stu ss=acac.getBean("stu", Stu.class);
    System.out.println(ss);
    //Stu sss=acac.getBean("stu",Stu.class);
}
Run the above code and enter as follows
init Method execution completed
Stu instantiation
Stu{id=1, name='Sun WuKong'}
Even if you uncomment Stu sss, the Stu object will not be instantiated again!
DI dependency injection
What is dependency injection
Dependency injection
To clarify dependency injection, we first understand what dependency is
Dependency in programs means that methods in class A need to use type B objects to run. We say that class A depends on class B
They are dependent
Guan Yu needs to rely on Qinglong Yanyue Dao to fight
How should such dependencies be represented in the program?
The code for creating DragonBlade class in san package is as follows
@Component
public class DragonBlade {

    private String name="falchion";

    public String getName() {
        return name;
    }

    public void setName(String name) {
        this.name = name;
    }

    @Override
    public String toString() {
        return name;
    }
}
Modify the GuanYu class of san package
@Component
public class GuanYu {

    private String name="Guan Yu";

    private DragonBlade dragonBlade;

    public String getName() {
        return name;
    }

    public void setName(String name) {
        this.name = name;
    }

    public DragonBlade getDragonBlade() {
        return dragonBlade;
    }

    public void setDragonBlade(DragonBlade dragonBlade) {
        this.dragonBlade = dragonBlade;
    }

    public void fight(){
        System.out.println(name+"use"+dragonBlade+"battle!");
    }

}
Test below
If you want Guan Yu to fight with Qinglong Yanyue Dao, you must obtain Guan Yu and Qinglong Yanyue Dao from the Spring container during the test
Then set their dependencies to run normally. The code is as follows
@Test
public void getGuan(){
    DragonBlade blade=acac.getBean(
            "dragonBlade",DragonBlade.class);
    GuanYu guanYu=acac.getBean("guanYu",GuanYu.class);
    guanYu.setDragonBlade(blade);
    guanYu.fight();
}
The problem with the above code
We get Qinglong Yanyue Dao, Guan Yu, and set their dependencies
This is complicated, especially when there are more and more dependent objects
We hope to set up these complex dependencies within Spring
We can directly obtain Guan Yu who has set the dependency object and use it directly
This is dependency injection
Dependency injection: the process of successfully setting the dependencies of objects within the Spring container
Dependency injection (DI)
In the last lesson, we explained the concept of dependency and the definition of dependency injection
Dependency injection is the operation of setting the dependencies of objects with dependencies inside the Spring container
Implementation of dependency injection
It's the same as saving to the Spring container
Dependency injection can also be implemented by @ Bean and component scanning
@Bean implements dependency injection
First, create a bean package for writing code
Create a SkyLance class in the package
public class SkyLance {

    private String name="Fang Tianhua Halberd";

    // get\set omitted
    @Override
    public String toString() {
        return name;
    }
}
Create another LvBu class
public class LvBu {

    private String name="Lv Bu";

    private SkyLance skyLance;

    // get\set omitted

    public void fight(){
        System.out.println(name+"use"+skyLance+"battle");
    }
}
Finally, create a ConfigBean class in which @ Bean is used to implement dependency injection
@Configuration
public class ConfigBean {

    @Bean
    public SkyLance skyLance(){
        return new SkyLance();
    }

    // In the parameter list of the following method, we use parameters to represent the type required by the current method
    // Spring will automatically select the appropriate object from the spring container and assign the parameter value
    // That is, when this method runs, the parameter l is the SkyLance object saved to the Spring container above
    @Bean
    public LvBu lvBu(SkyLance l){
        LvBu lb=new LvBu();
        lb.setSkyLance(l);
        return lb;
    }
}
Create a bean package in the test folder for testing
The code is as follows
@Test
public void bean(){
    //Get Lv Bu
    LvBu lb=acac.getBean("lvBu",LvBu.class);
    lb.fight();
}
Now the test is successful because there is only one square halberd in the current Spring container
If there is no halberd object in the Spring container, an error will be reported
In addition, if there are more than two Fang Tianhua halberds in the Spring container, the parameter name of the method we save the Lubu object must match the id of the starting Fang Tianhua halberd, otherwise the operation will also report an error
The configuration code is as follows
@Configuration
public class ConfigBean {

    @Bean
    public SkyLance skyLance(){
        return new SkyLance();
    }
    @Bean
    public SkyLance lance(){
        return new SkyLance();
    }

    // The parameter name of the following method must be consistent with one of the IDS saved to the Spring container object above
    @Bean
    public LvBu lvBu(SkyLance lance){
        LvBu lb=new LvBu();
        lb.setSkyLance(lance);
        return lb;
    }
}
Component scanning to implement dependency injection
We can use the examples of Zhang Fei and Zhangba snake spear to realize the dependency injection of component scanning
First create the comp package, which creates the Zhangba snake spear class
@Component
public class SnakeLance {
    private String name="Zhangba snake spear";

   	//  .....
    @Override
    public String toString() {
        return name;
    }
}
Note the writing of @ Component annotation
Then create Zhang Fei class
@Component
public class ZhangFei {

    private String name="Zhang Yide";

    // Add @ Autowired annotation on the attribute (member variable) of the class
    // Indicates that the current property will automatically get the corresponding object from the Spring container
    @Autowired
    private SnakeLance snakeLance;

    //...

    public void fight(){
        System.out.println(name+"use"+snakeLance+"battle");
    }


}
Configuration class ConfigComp
@Configuration
@ComponentScan("comp")
public class ConfigComp {
}
Now you can test the class in this state
Create test class TestComp
@Test
public void comp(){
    // Get Zhang Fei
    ZhangFei zhangFei=acac.getBean("zhangFei",
                                    ZhangFei.class);
    zhangFei.fight();
}
If there are multiple objects of type Zhangba snake spear in the Spring container
For example, @ Bean has been added to the configuration class, which saves an object to the Spring container
@Configuration
@ComponentScan("comp")
public class ConfigComp {
    @Bean
    public SnakeLance lance(){
        return new SnakeLance();
    }

}
At this time, the attribute name of the member variable marked by @ Autowired annotation will be used as the basis for selecting the object by default, and the object with the same id and member variable name will be injected
However, if the id and member variable name are not consistent, the injection fails and an error is reported
At this time, modifying the member variable name will cause some column maintenance, which is inconvenient
It is recommended that you use @ Qualifier annotation to solve the problem
The code is as follows
// Add @ Autowired annotation on the attribute (member variable) of the class
// Indicates that the current property will automatically get the corresponding object from the Spring container
// If there are more than two objects of this type in the spring container,
// It automatically matches objects with the same id and attribute name
@Autowired
// @The Qualifier annotation can specify a name that matches the id in the Spring container
// Assign the matching object to the following properties,
// It is generally used when there are multiple objects in a Spring container of one type
@Qualifier("lance")
private SnakeLance snakeLance;
IOC\DI decoupling
What is decoupling
Decoupling means uncoupling
To understand decoupling, you need to know what coupling is
The so-called coupling refers to the difficulty of replacing components, objects and parts in the current program
If the replacement object brings less modification, that is, it is easy to replace, we call it loose coupling
If the change object brings many modifications, that is, it is difficult and easy to change, we call it tight coupling
In programs, loosely coupled programs are easier to cope with changes and better expand and maintain, so our programs pursue loose coupling
Back to the topic, the so-called decoupling is the process of reducing the coupling of programs and changing tightly coupled programs into loosely coupled programs
The programs we wrote above are tightly coupled. For example, Guan Yu can only rely on Qinglong Yanyue Dao to fight. If you want to decouple now, you must modify the dependency between Guan Yu and Qinglong Yanyue Dao,
The decoupled operation modifies the specific type of dependency to an interface type
The interface \ abstract class in java program does not belong to "concrete type", and its attribute is "abstract type"
Create a new package ou
Create a new interface in the package
The code is as follows
// For weapon interface, Guan Yu class relies on this interface type to realize decoupling
public interface Weapon {

    String getName();
}
Then create Qinglong Yanyue Dao and Zhangba snake spear
@Component
public class DragonBlade implements Weapon {

    private String name="falchion";

  	//...

    @Override
    public String toString() {
        return name;
    }
}
@Component
public class SnakeLance implements Weapon{

    private String name="Zhangba snake spear";

   //...

    @Override
    public String toString() {
        return name;
    }
}
Create Guan Yu class
@Component
public class GuanYu {

    private String name="Guan Yunchang";

    @Autowired
    // Previously, we relied on specific types, but now we rely on interfaces of this type to realize decoupling
    @Qualifier("snakeLance")
    private Weapon weapon;

    public void fight(){
        System.out.println(name+"use"+weapon+"battle");
    }
	//...
}
Configuration class
@Configuration
@ComponentScan("ou")
public class ConfigOu {
}
Finally, in the java test package
@Test
public void run(){
    // Get Guan Yu
    GuanYu guanYu=acac.getBean("guanYu",
                                        GuanYu.class);
    guanYu.fight();

}