Deploy a complete set of enterprise K8s clusters
1, Prepare the environment
Server requirements:
• recommended minimum hardware configuration: 4-core CPU, 4G memory, 50G hard disk
• it is better for the server to access the external network. There will be a need to pull the image from the Internet. If the server cannot access the Internet, it is necessary to download the corresponding image in advance and import it into the node
Software environment:
| Software | edition |
|---|---|
| operating system | CentOS7.8_x64 |
| Docker | 19+ |
| Kubernetes | 1.20 |
Overall server planning:
| role | IP | Other single assembly |
|---|---|---|
| k8s-master1 | 192.168.1.1 | docker,etcd,nginx,keepalived |
| k8s-master2 | 192.168.1.2 | docker,etcd,nginx,keepalived |
| k8s-master3 | 192.168.1.3 | docker,etcd,nginx,keepalived |
| k8s-node1 | 192.168.1.4 | docker |
| External IP of load balancer | 192.168.1.88 (VIP) |
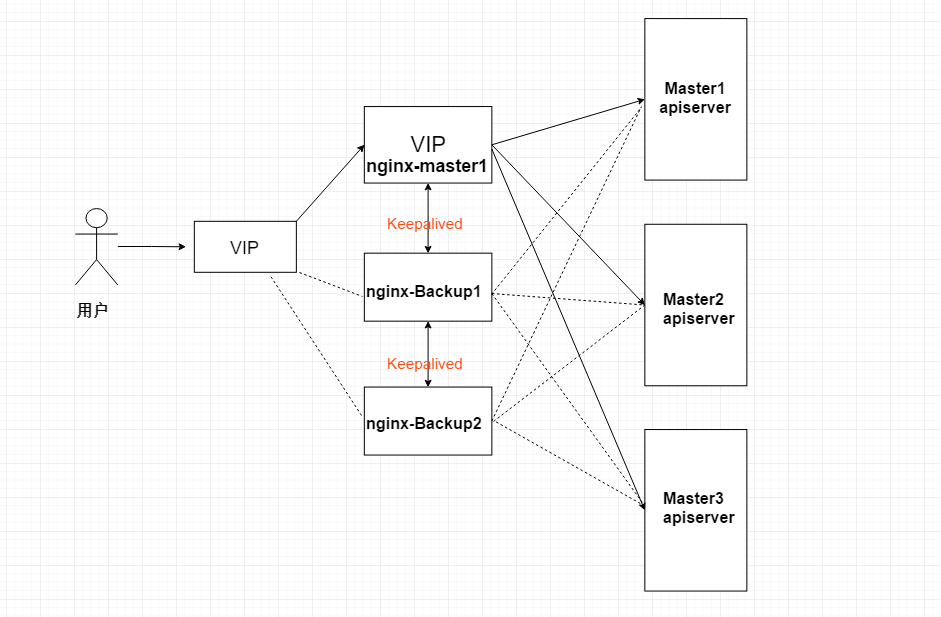
Architecture diagram:
Operating system initialization configuration:
#Turn off the firewall
systemctl stop firewalld
systemctl disable firewalld

#Close selinux
 Sed - I's / enforcing / disabled / '/ etc / SELinux / config # permanent
 Setenforce0 # temporary

#Close swap
 swapoff -a # temporary
 sed -ri 's/.* swap.*/#&/' / Etc / fstab # permanent

#Set the host name according to the plan
hostnamectl set-hostname <hostname>

#Add hosts in master
cat >> /etc/hosts << EOF
192.168.1.1 k8s-master1
192.168.1.2 k8s-master2
192.168.1.3 k8s-master3
192.168.1.4 k8s-node1
EOF

#The chain that passes bridged IPv4 traffic to iptables
cat > /etc/sysctl.d/k8s.conf << EOF
net.bridge.bridge-nf-call-ip6tables = 1
net.bridge.bridge-nf-call-iptables = 1
EOF
 sysctl --system # takes effect

#Time synchronization
yum install ntpdate -y
ntpdate time.windows.com
2, Deploy Nginx+Keepalived high availability load balancer
Architecture diagram:
2.1 installing software package (active / standby)
 yum install epel-release -y
 yum install nginx keepalived -y
2.2 Nginx configuration file (active / standby)
cat > /etc/nginx/nginx.conf << "EOF"
user nginx;
worker_processes auto;
error_log /var/log/nginx/error.log;
pid /run/nginx.pid;

include /usr/share/nginx/modules/*.conf;

events {
    worker_connections 1024;
}

# Four layer load balancing provides load balancing for two Master apiserver components
stream {

    log_format  main  '$remote_addr $upstream_addr - [$time_local] $status $upstream_bytes_sent';

    access_log  /var/log/nginx/k8s-access.log  main;

    upstream k8s-apiserver {
       server 192.168.1.1:6443;   # Master1 APISERVER IP:PORT
       server 192.168.1.2:6443;   # Master2 APISERVER IP:PORT
       server 192.168.1.3:6443;   # Master3 APISERVER IP:PORT
    }

    server {
       listen 16443;  # Because nginx is multiplexed with the master node, the listening port cannot be 6443, otherwise it will conflict
       proxy_pass k8s-apiserver;
    }
}

http {
    log_format  main  '$remote_addr - $remote_user [$time_local] "$request" '
                      '$status $body_bytes_sent "$http_referer" '
                      '"$http_user_agent" "$http_x_forwarded_for"';

    access_log  /var/log/nginx/access.log  main;

    sendfile            on;
    tcp_nopush          on;
    tcp_nodelay         on;
    keepalive_timeout   65;
    types_hash_max_size 2048;

    include             /etc/nginx/mime.types;
    default_type        application/octet-stream;

    server {
        listen       80 default_server;
        server_name  _;

        location / {
        }
    }
}
EOF
2.3 keepalived configuration file (Nginx Master)
cat > /etc/keepalived/keepalived.conf << EOF
global_defs {
   notification_email {
     acassen@firewall.loc
     failover@firewall.loc
     sysadmin@firewall.loc
   }
   notification_email_from Alexandre.Cassen@firewall.loc
   smtp_server 127.0.0.1
   smtp_connect_timeout 30
   router_id NGINX_MASTER
}

vrrp_script check_nginx {
    script "/etc/keepalived/check_nginx.sh"
}

vrrp_instance VI_1 {
    state MASTER
    interface eno16780032  # Change to actual network card name
    virtual_router_id 51 # VRRP routing ID instance. Each instance is unique
    priority 100    # Priority, standby server setting 90 80
    advert_int 1    # Specify the notification interval of VRRP heartbeat packet, which is 1 second by default
    authentication {
        auth_type PASS
        auth_pass 1111
    }
    # Virtual IP
    virtual_ipaddress {
        192.168.1.88/24
    }
    track_script {
        check_nginx
    }
}
EOF
Prepare the script to check the running status of nginx in the above configuration file:
cat > /etc/keepalived/check_nginx.sh << "EOF" #!/bin/bash count=$(ss -antp |grep 16443 |egrep -cv "grep|$$") if [ "$count" -eq 0 ];then exit 1 else exit 0 fi EOF
Authorization:
chmod +x /etc/keepalived/check_nginx.sh
2.4 keepalived configuration file (Nginx Backup)
cat > /etc/keepalived/keepalived.conf << EOF
global_defs {
   notification_email {
     acassen@firewall.loc
     failover@firewall.loc
     sysadmin@firewall.loc
   }
   notification_email_from Alexandre.Cassen@firewall.loc
   smtp_server 127.0.0.1
   smtp_connect_timeout 30
   router_id NGINX_BACKUP
}

vrrp_script check_nginx {
    script "/etc/keepalived/check_nginx.sh"
}

vrrp_instance VI_1 {
    state BACKUP
    interface eno16780032
    virtual_router_id 51
    priority 90  #Attention priority
    advert_int 1
    authentication {
        auth_type PASS
        auth_pass 1111
    }
    virtual_ipaddress {
        192.168.1.88/24
    }
    track_script {
        check_nginx
    }
}
EOF
Prepare the script to check the running status of nginx in the above configuration file:
cat > /etc/keepalived/check_nginx.sh << "EOF" #!/bin/bash count=$(ss -antp |grep 16443 |egrep -cv "grep|$$") if [ "$count" -eq 0 ];then exit 1 else exit 0 fi EOF
Authorization:
chmod +x /etc/keepalived/check_nginx.sh
Note: keepalived determines whether to fail over according to the status code returned by the script (0 is normal, non-0 is abnormal).
2.5 start and set startup
systemctl daemon-reload
systemctl start nginx ; systemctl enable nginx
systemctl status nginx
systemctl start keepalived ; systemctl enable keepalived
systemctl status keepalived
2.6 viewing the keepalived working status
ip addr
2: eno16780032: <BROADCAST,MULTICAST,UP,LOWER_UP> mtu 1500 qdisc pfifo_fast state UP group default qlen 1000
    link/ether 00:0c:29:04:f7:2c brd ff:ff:ff:ff:ff:ff
    inet 192.168.1.1/24 brd 192.168.1.255 scope global noprefixroute eno16780032
       valid_lft forever preferred_lft forever
    inet 192.168.1.88/24 scope global secondary eno16780032
       valid_lft forever preferred_lft forever
It can be seen that the eno16780032 network card is bound with 192.168.1.88 virtual IP, indicating that it works normally.
2.7 Nginx+Keepalived high availability test
Turn off the primary node Nginx and test whether the VIP drifts to the standby node server.
Execute pkill nginx on Nginx Master
In Nginx Backup, use the ip addr command to check that the VIP has been successfully bound.
3, Deploy Etcd cluster
Etcd is a distributed key value storage system. Kubernetes uses etcd for data storage. Kubedm is built. By default, only one Etcd Pod is started. There is a single point of failure. It is strongly not recommended in the production environment. Therefore, we use three servers to form a cluster, which can tolerate one machine failure. Of course, you can also use five servers to form a cluster, which can tolerate two machine failures.
| Node name | IP |
|---|---|
| etcd-1 | 192.168.1.1 |
| etcd-2 | 192.168.1.2 |
| etcd-3 | 192.168.1.3 |
Note: in order to save machines, it is reused with k8s node machines. It can also be deployed independently of the k8s cluster, as long as the apiserver can connect to it.
3.1 prepare cfssl certificate generation tool
cfssl is an open source certificate management tool. It uses json files to generate certificates, which is more convenient to use than openssl.
Find any server to operate. Here, use the Master node.
wget https://pkg.cfssl.org/R1.2/cfssl_linux-amd64
wget https://pkg.cfssl.org/R1.2/cfssljson_linux-amd64
wget https://pkg.cfssl.org/R1.2/cfssl-certinfo_linux-amd64
Download:
Link: https://pan.baidu.com/s/1HkVnrk1BIEtwUunDiRRy9Q
Extraction code: g6cx
chmod +x cfssl_linux-amd64 cfssljson_linux-amd64 cfssl-certinfo_linux-amd64
mv cfssl_linux-amd64 /usr/local/bin/cfssl
mv cfssljson_linux-amd64 /usr/local/bin/cfssljson
mv cfssl-certinfo_linux-amd64 /usr/bin/cfssl-certinfo
3.2 generating Etcd certificate
1. Self signed certification authority (CA)
Create working directory:
mkdir -p ~/etcd_tls
cd ~/etcd_tls
Self signed CA:
cat > ca-config.json << EOF
{
  "signing": {
    "default": {
      "expiry": "87600h"
    },
    "profiles": {
      "www": {
         "expiry": "87600h",
         "usages": [
            "signing",
            "key encipherment",
            "server auth",
            "client auth"
        ]
      }
    }
  }
}
EOF
cat > ca-csr.json << EOF
{
"CN": "etcd CA",
"key": {
"algo": "rsa",
"size": 2048
},
"names": [
{
"C": "CN",
"L": "Beijing",
"ST": "Beijing"
}
]
}
EOFGenerate certificate:
cfssl gencert -initca ca-csr.json | cfssljson -bare ca -
Will generate ca.pem and Ca key PEM file.
2. Issue Etcd HTTPS certificate using self signed CA
To create a certificate request file:
cat > server-csr.json << EOF
{
    "CN": "etcd",
    "hosts": [
    "192.168.1.1",
    "192.168.1.2",
    "192.168.1.3"
    ],
    "key": {
        "algo": "rsa",
        "size": 2048
    },
    "names": [
        {
            "C": "CN",
            "L": "BeiJing",
            "ST": "BeiJing"
        }
    ]
}
EOF
Note: the IP in the hosts field of the above file is the internal communication IP of the cluster of all etcd nodes, and none of them can be less! In order to facilitate the later expansion, you can write more reserved IP addresses.
Generate certificate:
cfssl gencert -ca=ca.pem -ca-key=ca-key.pem -config=ca-config.json -profile=www server-csr.json | cfssljson -bare server
Will generate server PEM and server key PEM file.
3.3 download binaries from Github
Download address: https://github.com/etcd-io/etcd/releases/download/v3.4.9/etcd-v3.4.9-linux-amd64.tar.gz
Link: https://pan.baidu.com/s/17taFEWgUqAT0E7DN7J-Blw
Extraction code: 44 v4
3.4 deploy Etcd cluster
The following operations are performed on node 1. To simplify the operation, all files generated by node 1 will be copied to node 2 and node 3 later.
1. Create the working directory and extract the binary package
mkdir /opt/etcd/{bin,cfg,ssl} -p
tar zxvf etcd-v3.4.9-linux-amd64.tar.gz
mv etcd-v3.4.9-linux-amd64/{etcd,etcdctl} /opt/etcd/bin/
2. Create etcd profile
cat > /opt/etcd/cfg/etcd.conf << EOF
#[Member]
ETCD_NAME="etcd-1"
ETCD_DATA_DIR="/var/lib/etcd/default.etcd"
ETCD_LISTEN_PEER_URLS="https://192.168.1.1:2380"
ETCD_LISTEN_CLIENT_URLS="https://192.168.1.1:2379"

#[Clustering]
ETCD_INITIAL_ADVERTISE_PEER_URLS="https://192.168.1.1:2380"
ETCD_ADVERTISE_CLIENT_URLS="https://192.168.1.1:2379"
ETCD_INITIAL_CLUSTER="etcd-1=https://192.168.1.1:2380,etcd-2=https://192.168.1.2:2380,etcd-3=https://192.168.1.3:2380"
ETCD_INITIAL_CLUSTER_TOKEN="etcd-cluster"
ETCD_INITIAL_CLUSTER_STATE="new"
EOF
3. Configure systemd management etcd
cat > /usr/lib/systemd/system/etcd.service << EOF [Unit] Description=Etcd Server After=network.target After=network-online.target Wants=network-online.target [Service] Type=notify EnvironmentFile=/opt/etcd/cfg/etcd.conf ExecStart=/opt/etcd/bin/etcd \ --cert-file=/opt/etcd/ssl/server.pem \ --key-file=/opt/etcd/ssl/server-key.pem \ --peer-cert-file=/opt/etcd/ssl/server.pem \ --peer-key-file=/opt/etcd/ssl/server-key.pem \ --trusted-ca-file=/opt/etcd/ssl/ca.pem \ --peer-trusted-ca-file=/opt/etcd/ssl/ca.pem \ --logger=zap Restart=on-failure LimitNOFILE=65536 [Install] WantedBy=multi-user.target EOF
4. Copy the certificate just generated
cp ~/etcd_tls/ca*pem ~/etcd_tls/server*pem /opt/etcd/ssl/
5. Start and set the startup (the three nodes can be started normally after being added)
systemctl daemon-reload
systemctl start etcd ; systemctl enable etcd
6. Copy all files generated by node 1 above to node 2 and node 3
scp -r /opt/etcd/ root@192.168.1.2:/opt/
scp /usr/lib/systemd/system/etcd.service root@192.168.1.2:/usr/lib/systemd/system/
scp -r /opt/etcd/ root@192.168.1.3:/opt/
scp /usr/lib/systemd/system/etcd.service root@192.168.1.3:/usr/lib/systemd/system/
Then modify etcd at node 2 and node 3 respectively IP name and conf in the current node configuration file:
vim /opt/etcd/cfg/etcd.conf
#[Member] ETCD_NAME="etcd-1" # modify here, node 2 is changed to etcd-2, and node 3 is changed to etcd-3 ETCD_DATA_DIR="/var/lib/etcd/default.etcd" ETCD_LISTEN_PEER_URLS="https://192.168.31.71:2380 "# modify here is the current server IP ETCD_LISTEN_CLIENT_URLS="https://192.168.31.71:2379 "# modify here is the current server IP #[Clustering] ETCD_INITIAL_ADVERTISE_PEER_URLS="https://192.168.31.71:2380 "# modify here is the current server IP ETCD_ADVERTISE_CLIENT_URLS="https://192.168.31.71:2379 "# modify here is the current server IP ETCD_INITIAL_CLUSTER="etcd-1=https://192.168.31.71:2380,etcd-2=https://192.168.31.72:2380,etcd-3=https://192.168.31.73:2380" ETCD_INITIAL_CLUSTER_TOKEN="etcd-cluster" ETCD_INITIAL_CLUSTER_STATE="new"
Start etcd and set boot.
systemctl daemon-reload
systemctl start etcd ; systemctl enable etcd
7. View cluster status
ETCDCTL_API=3 /opt/etcd/bin/etcdctl --cacert=/opt/etcd/ssl/ca.pem --cert=/opt/etcd/ssl/server.pem --key=/opt/etcd/ssl/server-key.pem --endpoints="https://192.168.1.1:2379,https://192.168.1.2:2379,https://192.168.1.3:2379" endpoint health --write-out=table
The results are shown as follows, indicating normal:
+----------------------------+--------+-------------+-------+
|          ENDPOINT    | HEALTH |    TOOK     | ERROR |
+----------------------------+--------+-------------+-------+
| https://192.168.1.1:2379 |   true | 10.301506ms |    |
| https://192.168.1.3:2379 |   true | 12.87467ms |     |
| https://192.168.1.2:2379 |   true | 13.225954ms |    |
+----------------------------+--------+-------------+-------+
If there is a problem, the first step is to look at the log: / var/log/message or journalctl -u etcd
4, Install docker / kubedm / kubelet [all nodes]
4.1 installing Docker
wget https://mirrors.aliyun.com/docker-ce/linux/centos/docker-ce.repo -O /etc/yum.repos.d/docker-ce.repo
yum -y install docker-ce
systemctl enable docker && systemctl start docker
To configure the image download accelerator:
cat > /etc/docker/daemon.json << EOF
{
  "registry-mirrors": ["https://b9pmyelo.mirror.aliyuncs.com"]
}
EOF
Restart docker:
systemctl daemon-reload
systemctl restart docker
docker info
4.2 add alicloud YUM software source
cat > /etc/yum.repos.d/kubernetes.repo << EOF
[kubernetes]
name=Kubernetes
baseurl=https://mirrors.aliyun.com/kubernetes/yum/repos/kubernetes-el7-x86_64
enabled=1
gpgcheck=0
repo_gpgcheck=0
gpgkey=https://mirrors.aliyun.com/kubernetes/yum/doc/yum-key.gpg https://mirrors.aliyun.com/kubernetes/yum/doc/rpm-package-key.gpg
EOF
4.3 install kubedm, kubelet and kubectl
Specify the version number deployment here:
yum install -y kubelet-1.20.4 kubeadm-1.20.4 kubectl-1.20.4
systemctl enable kubelet
5, Deploy Kubernetes Master
5.1 initialize Master1
Generate initialization profile:
cat > kubeadm-config.yaml << EOF
apiVersion: kubeadm.k8s.io/v1beta2
bootstrapTokens:
- groups:
  - system:bootstrappers:kubeadm:default-node-token
  token: 9037x2.tcaqnpaqkra9vsbw
  ttl: 24h0m0s
  usages:
  - signing
  - authentication
kind: InitConfiguration
localAPIEndpoint:
  advertiseAddress: 192.168.1.1
  bindPort: 6443
nodeRegistration:
  criSocket: /var/run/dockershim.sock
  name: k8s-master1
  taints:
  - effect: NoSchedule
    key: node-role.kubernetes.io/master
---
apiServer:
  certSANs:  # All Master/LB/VIP IP addresses are included, and none can be less! In order to facilitate the later expansion, you can write more reserved IP addresses.
  - k8s-master1
  - k8s-master2
  - k8s-master3
  - 192.168.1.1
  - 192.168.1.2
  - 192.168.1.3
  - 127.0.0.1
  extraArgs:
    authorization-mode: Node,RBAC
  timeoutForControlPlane: 4m0s
apiVersion: kubeadm.k8s.io/v1beta2
certificatesDir: /etc/kubernetes/pki
clusterName: kubernetes
controlPlaneEndpoint: 192.168.1.88:16443 # Load balancing virtual IP (VIP) and ports
controllerManager: {}
dns:
  type: CoreDNS
etcd:
  external:  # Use external etcd
    endpoints:
    - https://192.168.1.1:2379 # etcd cluster 3 nodes
    - https://192.168.1.2:2379
    - https://192.168.1.3:2379
    caFile: /opt/etcd/ssl/ca.pem # Certificate required to connect to etcd
    certFile: /opt/etcd/ssl/server.pem
    keyFile: /opt/etcd/ssl/server-key.pem
imageRepository: registry.aliyuncs.com/google_containers # Due to the default pull image address k8s gcr. IO cannot be accessed in China. Specify the address of Alibaba cloud image warehouse here
kind: ClusterConfiguration
kubernetesVersion: v1.20.4 # K8s version, consistent with the one installed above
networking:
  dnsDomain: cluster.local
  podSubnet: 10.244.0.0/16  # Pod network is consistent with the CNI network component yaml deployed below
  serviceSubnet: 10.96.0.0/12  # Cluster internal virtual network, Pod unified access portal
scheduler: {}
EOF
Initialization k8s:
kubeadm init --config kubeadm-config.yaml
You can now join any number of control-plane nodes by copying certificate authorities
and service account keys on each node and then running the following as root:

  kubeadm join 192.168.1.88:16443 --token 9037x2.tcaqnpaqkra9vsbw \
    --discovery-token-ca-cert-hash sha256:b1e726042cdd5df3ce62e60a2f86168cd2e64bff856e061e465df10cd36295b8 \
    --control-plane

Then you can join any number of worker nodes by running the following on each as root:

kubeadm join 192.168.1.88:16443 --token 9037x2.tcaqnpaqkra9vsbw \
    --discovery-token-ca-cert-hash sha256:b1e726042cdd5df3ce62e60a2f86168cd2e64bff856e061e465df10cd36295b8
After initialization, there will be two join commands. The command with -- control plane is used to join and form multiple master clusters, and the command without is used to join nodes.
Copy the connection k8s authentication file used by kubectl to the default path:
mkdir -p $HOME/.kube
sudo cp -i /etc/kubernetes/admin.conf $HOME/.kube/config
sudo chown $(id -u):$(id -g) $HOME/.kube/config
kubectl get node
NAME          STATUS     ROLES                  AGE     VERSION
k8s-master1   NotReady   control-plane,master   6m42s   v1.20.4
5.2 initialize Master2 and Master3
Copy the certificate generated by Master1 node to Master2 and Master3:
 scp -r /etc/kubernetes/pki/ 192.168.1.2:/etc/kubernetes/
 scp -r /etc/kubernetes/pki/ 192.168.1.3:/etc/kubernetes/
The copy join command is executed in master2 and master3:
  kubeadm join 192.168.1.88:16443 --token 9037x2.tcaqnpaqkra9vsbw \
    --discovery-token-ca-cert-hash sha256:b1e726042cdd5df3ce62e60a2f86168cd2e64bff856e061e465df10cd36295b8 \
    --control-plane
Copy the connection k8s authentication file used by kubectl to the default path:
mkdir -p $HOME/.kube
sudo cp -i /etc/kubernetes/admin.conf $HOME/.kube/config
sudo chown $(id -u):$(id -g) $HOME/.kube/config
kubectl get node
NAME          STATUS     ROLES                  AGE     VERSION
k8s-master1   NotReady   control-plane,master   28m     v1.20.4
k8s-master2   NotReady   control-plane,master   2m12s   v1.20.4
k8s-master3   NotReady   control-plane,master   2m10s   v1.20.4
Note: because the network plug-in has not been deployed, it is not ready NotReady
5.3 access load balancer test
Find any node in the K8s cluster, use curl to view the K8s version test, and use VIP to access:
curl -k https://192.168.1.88:16443/version
{
  "major": "1",
  "minor": "20",
  "gitVersion": "v1.20.4",
  "gitCommit": "e87da0bd6e03ec3fea7933c4b5263d151aafd07c",
  "gitTreeState": "clean",
  "buildDate": "2021-04-18T16:03:00Z",
  "goVersion": "go1.15.8",
  "compiler": "gc",
  "platform": "linux/amd64"
}
The K8s version information can be obtained correctly, indicating that the load balancer is set up normally. Data flow of the request: curl - > VIP (nginx) - > apiserver
You can also see the forwarding apiserver IP by viewing the Nginx log:
tail /var/log/nginx/k8s-access.log -f
192.168.1.1 192.168.1.1:6443 - [04/Apr/2021:19:17:57 +0800] 200 423
6, Join Kubernetes Node
Execute at 192.168.1.4 (Node).
Add a new node to the cluster and execute the kubedm join command output in kubedm init:
kubeadm join 192.168.1.88:16443 --token 9037x2.tcaqnpaqkra9vsbw \
    --discovery-token-ca-cert-hash sha256:e6a724bb7ef8bb363762fbaa088f6eb5975e0c654db038560199a7063735a697
Other subsequent nodes join in the same way.
Note: the default token is valid for 24 hours. When it expires, the token will not be available. At this time, you need to re create the token. You can directly use the command to quickly generate: kubedm token create -- print join command
7, Deploy network components
Calico is a pure three-tier data center network scheme, which is the mainstream network scheme of Kubernetes at present.
Deploy Calico:
Link: https://pan.baidu.com/s/1cRF0XRwOhaNfBe3OVKT79Q
Extraction code: otm5
kubectl apply -f calico.yaml kubectl get pods -n kube-system
When Calico Pod is Running, the node will be ready:
kubectl get node
NAME          STATUS   ROLES                  AGE   VERSION
k8s-master1    Ready    control-plane,master   50m   v1.20.4
k8s-master2    Ready    control-plane,master   24m   v1.20.4
k8s-master3    Ready    control-plane,master   24m   v1.20.4
k8s-node1     Ready    <none>            20m   v1.20.4
8, Deploy Dashboard
Dashboard is an officially provided UI that can be used to basically manage K8s resources.
Link: https://pan.baidu.com/s/1_6v6BuEkpN-DPoyvQjF_nA
Extraction code: 2 zh0
kubectl apply -f kubernetes-dashboard.yaml
#View deployment
kubectl get pods -n kubernetes-dashboard
Access address: https://NodeIP:30001
Create a service account and bind the default cluster admin administrator cluster role:
kubectl create serviceaccount dashboard-admin -n kube-system
kubectl create clusterrolebinding dashboard-admin --clusterrole=cluster-admin --serviceaccount=kube-system:dashboard-admin
kubectl describe secrets -n kube-system $(kubectl -n kube-system get secret | awk '/dashboard-admin/{print $1}')
Log in to the Dashboard using the output token.