Remember to turn off the firewall and selinux. The number of cpu cores should be at least 2
Configuration resolution
[root@k8s-master ~]# cat /etc/hosts
127.0.0.1   localhost localhost.localdomain localhost4 localhost4.localdomain4
::1         localhost localhost.localdomain localhost6 localhost6.localdomain6
192.168.153.148 k8s-master
192.168.153.147 k8s-node1
192.168.153.196 k8s-node2
Turn off firewall and selinux
Each node operates
Turn off the firewall and selinux, and both are set to boot without self startup
1.Turn off firewall
# systemctl stop firewalld
# systemctl disable firewalld
2.Disable SELinux:
# setenforce 0
3.Edit file/etc/selinux/config,take SELINUX Change to disabled,As follows:
# sed -i 's/SELINUX=permissive/SELINUX=disabled/' /etc/sysconfig/selinux
SELINUX=disabled
Install docker app
Each node operates
# yum install -y yum-utils device-mapper-persistent-data lvm2 git
# yum-config-manager --add-repo http://mirrors.aliyun.com/docker-ce/linux/centos/docker-ce.repo
# yum install docker-ce -y
 Boot and set boot
Close swap partition
Shut down system Swap: new regulations after 1.5
Kubernetes 1.8 requires the system's Swap to be turned off. If it is not turned off, kubelet will not start under the default configuration. Method 1: change this limit through the startup parameter of kubelet – fail Swap on = false. Method 2: close the Swap of the system.
Each node operates
# swapoff -a
 modify/etc/fstab File, comment out SWAP Auto mount, using free -m confirm swap Has been closed.
2.Comment out swap Partition:
[root@localhost /]# sed -i 's/.*swap.*/#&/' /etc/fstab
# free -m
              total        used        free      shared  buff/cache   available
Mem:           3935         144        3415           8         375        3518
Swap:             0           0           0
Pull docker image
Note: in fact, it is OK not to pull, because it will pull automatically during initialization, but the automatic pull uses the source address of the k8s official website, so we generally fail to pull. Here, we manually pull the aliyun image
Please note: the version of the docker image pulled must be consistent with the version of kubelet and kubectl
Each node operates
Here, I directly get two scripts to run the pull and modify the image tag; As for why I want to change to this version, this is my initialization later. When I see the error message, there must be an image of this version;
Although the image we pulled here is aliyun's image, we still need to change the tag to the image name that kobedm can recognize; Otherwise, when kobedm initializes, it will not be recognized due to the wrong image name;
# cat dockerPull.sh
docker pull registry.cn-hangzhou.aliyuncs.com/google_containers/kube-controller-manager:v1.22.2
docker pull registry.cn-hangzhou.aliyuncs.com/google_containers/kube-proxy:v1.22.2
docker pull registry.cn-hangzhou.aliyuncs.com/google_containers/kube-apiserver:v1.22.2
docker pull registry.cn-hangzhou.aliyuncs.com/google_containers/kube-scheduler:v1.22.2
docker pull registry.cn-hangzhou.aliyuncs.com/google_containers/coredns:1.8.4
docker pull registry.cn-hangzhou.aliyuncs.com/google_containers/etcd:3.5.0-0
docker pull registry.cn-hangzhou.aliyuncs.com/google_containers/pause:3.5
# cat dockerTag.sh
docker tag registry.cn-hangzhou.aliyuncs.com/google_containers/kube-controller-manager:v1.22.2 k8s.gcr.io/kube-controller-manager:v1.22.2
docker tag registry.cn-hangzhou.aliyuncs.com/google_containers/kube-proxy:v1.22.2 k8s.gcr.io/kube-proxy:v1.22.2
docker tag registry.cn-hangzhou.aliyuncs.com/google_containers/kube-apiserver:v1.22.2 k8s.gcr.io/kube-apiserver:v1.22.2
docker tag registry.cn-hangzhou.aliyuncs.com/google_containers/kube-scheduler:v1.22.2 k8s.gcr.io/kube-scheduler:v1.22.2
#docker tag registry.cn-hangzhou.aliyuncs.com/google_containers/coredns:1.8.4 k8s.gcr.io/coredns:1.8.4
docker tag registry.cn-hangzhou.aliyuncs.com/google_containers/coredns:1.8.4 k8s.gcr.io/coredns/coredns:v1.8.4
docker tag registry.cn-hangzhou.aliyuncs.com/google_containers/etcd:3.5.0-0 k8s.gcr.io/etcd:3.5.0-0
docker tag registry.cn-hangzhou.aliyuncs.com/google_containers/pause:3.5 k8s.gcr.io/pause:3.5
Install kubedm and kubelet
Configuration source
# cat <<EOF > /etc/yum.repos.d/kubernetes.repo
[kubernetes]
name=Kubernetes
baseurl=https://mirrors.aliyun.com/kubernetes/yum/repos/kubernetes-el7-x86_64
enabled=1
gpgcheck=1
repo_gpgcheck=1
gpgkey=https://mirrors.aliyun.com/kubernetes/yum/doc/yum-key.gpg https://mirrors.aliyun.com/kubernetes/yum/doc/rpm-package-key.gpg
EOF
1.install
# yum makecache fast
# yum install -y kubelet kubeadm kubectl ipvsadm  #Note that the default is to download the latest version v1.22.2
======================================================================
#If you want to download the old version, follow the specified version number.
[root@k8s-master ~]# yum install -y kubelet-1.17.4-0.x86_64 kubeadm-1.17.4-0.x86_64 kubectl-1.17.4-0.x86_64 ipvsadm

2.load ipvs Related kernel modules
 If you reboot, you need to reload (you can write in /etc/rc.local Medium power on (automatic loading)
# modprobe ip_vs
# modprobe ip_vs_rr
# modprobe ip_vs_wrr
# modprobe ip_vs_sh
# modprobe nf_conntrack_ipv4
3.Edit file add boot
# vim /etc/rc.local
# chmod +x /etc/rc.local

4.to configure:
Configure forwarding related parameters, otherwise errors may occur
# cat <<EOF >  /etc/sysctl.d/k8s.conf
net.bridge.bridge-nf-call-ip6tables = 1
net.bridge.bridge-nf-call-iptables = 1
vm.swappiness=0
EOF

5.Make configuration effective
# sysctl --system

6.If net.bridge.bridge-nf-call-iptables Error, loading br_netfilter modular
# modprobe br_netfilter
# sysctl -p /etc/sysctl.d/k8s.conf

7.Check whether the load is successful
# lsmod | grep ip_vs
ip_vs_sh               12688  0
ip_vs_wrr              12697  0
ip_vs_rr               12600  0
ip_vs                 141092  6 ip_vs_rr,ip_vs_sh,ip_vs_wrr
nf_conntrack          133387  2 ip_vs,nf_conntrack_ipv4
libcrc32c              12644  3 xfs,ip_vs,nf_conntrack

Configure launch kubelet
All nodes
1.to configure kubelet use pause image
 obtain docker of cgroups
# systemctl start docker && systemctl enable docker
# DOCKER_CGROUPS=$(docker info | grep 'Cgroup' | cut -d' ' -f4)
# echo $DOCKER_CGROUPS
=================================
Configuration variables:
[root@k8s-master ~]# DOCKER_CGROUPS=`docker info |grep 'Cgroup' | awk 'NR==1{print $3}'`
[root@k8s-master ~]# echo $DOCKER_CGROUPS
cgroupfs

This is a domestic source.-###Note that we use Google's image - operation 3 below
2.to configure kubelet of cgroups
# cat >/etc/sysconfig/kubelet<<EOF
KUBELET_EXTRA_ARGS="--cgroup-driver=$DOCKER_CGROUPS --pod-infra-container-image=registry.cn-hangzhou.aliyuncs.com/google_containers/pause-amd64:3.2"
EOF
#3.2.1.22 then 3.5 is required
3.to configure kubelet of cgroups
# cat >/etc/sysconfig/kubelet<<EOF
KUBELET_EXTRA_ARGS="--cgroup-driver=$DOCKER_CGROUPS --pod-infra-container-image=k8s.gcr.io/pause:3.5"
EOF

4.You can also write directly without using variables cgroupfs
# cat >/etc/sysconfig/kubelet<<EOF
KUBELET_EXTRA_ARGS="--cgroup-driver=cgroupfs --pod-infra-container-image=k8s.gcr.io/pause:3.5"
EOF
Start kubectl
All nodes operate
# systemctl daemon-reload
# systemctl enable kubelet && systemctl restart kubelet
 Use here # systemctl status kubelet, you will find an error message; (each node will report an error)

10 November 00:26:43 node1 systemd[1]: kubelet.service: main process exited, code=exited, status=255/n/a
10 November 00:26:43 node1 systemd[1]: Unit kubelet.service entered failed state.
10 November 00:26:43 node1 systemd[1]: kubelet.service failed.

function # The journalctl -xefu kubelet command checks the systemd log and finds that the real error is:
    unable to load client CA file /etc/kubernetes/pki/ca.crt: open /etc/kubernetes/pki/ca.crt: no such file or directory
#This error will be automatically resolved after running kubedm init to generate the CA certificate. You can ignore it here first.
#In short, kubelet will restart continuously before kubedm init.
Configure master node initialization
Run the initialization process as follows:
Before initialization, remember to turn off the firewall and selinux,cpu The number of cores must be at least 2
[root@master ~]# kubeadm init --kubernetes-version=v1.22.2 --pod-network-cidr=10.244.0.0/16 --apiserver-advertise-address=192.168.77.192 --ignore-preflight-errors=Swap

Note:
apiserver-advertise-address=192.168.153.148    ---master of ip Address.
--kubernetes-version=v1.22.2   --Modify according to the specific version
 Be careful to check swap Is the partition closed

Note: if initialization fails, don't panic and pay attention to its echo;
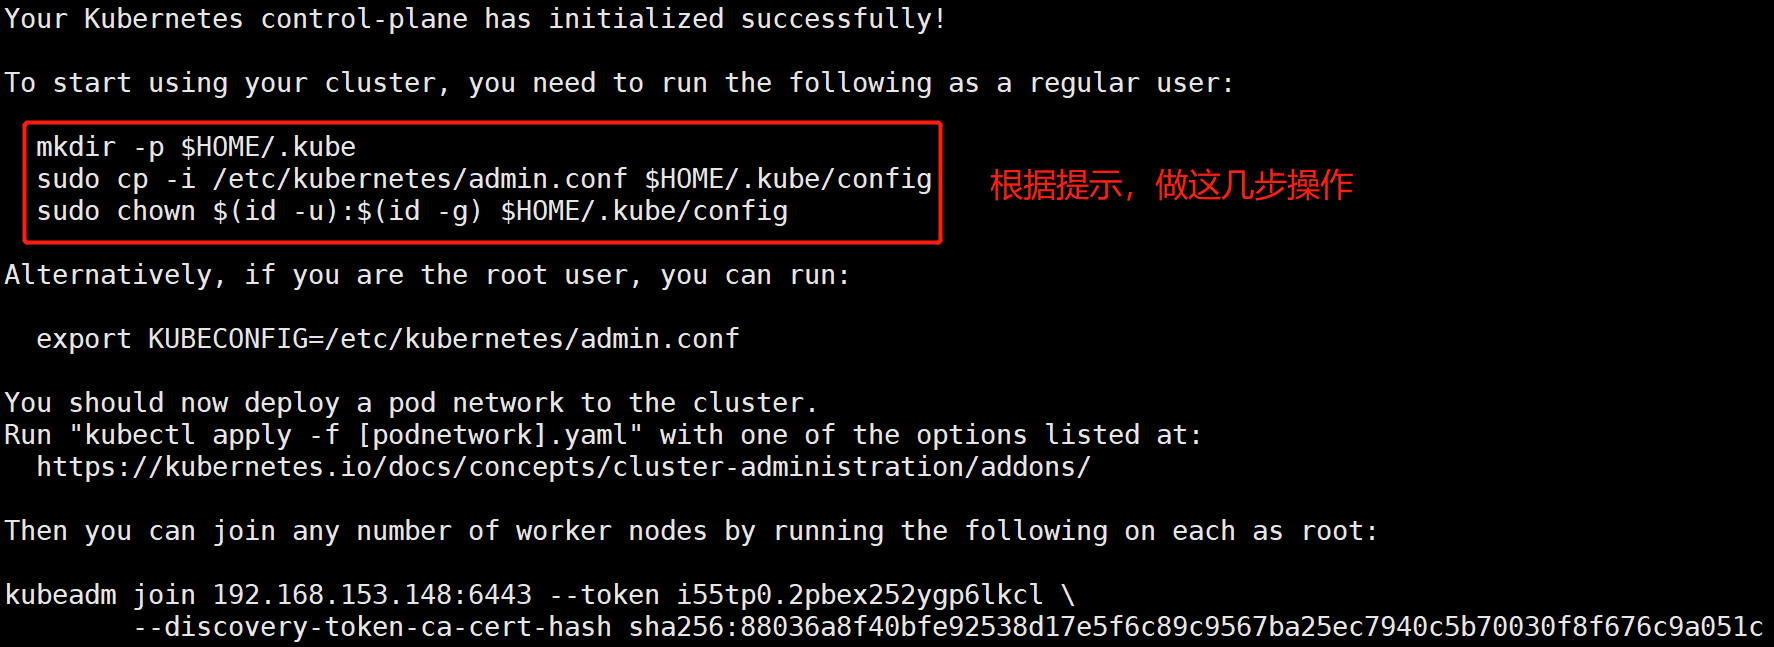
Configuration use kubectl
 The following operations are performed in master Node operation
[root@kub-k8s-master ~]# rm -rf $HOME/.kube
[root@kub-k8s-master ~]# mkdir -p $HOME/.kube
[root@kub-k8s-master ~]# cp -i /etc/kubernetes/admin.conf $HOME/.kube/config
[root@kub-k8s-master ~]# chown $(id -u):$(id -g) $HOME/.kube/config

see node node
[root@k8s-master ~]# kubectl get nodes
NAME         STATUS     ROLES    AGE     VERSION
k8s-master   NotReady   master   2m41s   v1.22.2
Configuring the flannel network plug-in
stay master Node operation
Download configuration
# cd ~ && mkdir flannel && cd flannel
# curl -O https://raw.githubusercontent.com/coreos/flannel/master/Documentation/kube-flannel.yml
Modify profile kube-flannel.yml:
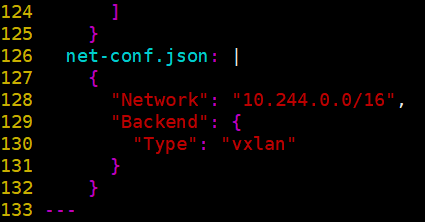
Here ip The configuration should be the same as above kubeadm of pod-network Consistent. It's consistent. There's no need to change it
net-conf.json: |
{
"Network": "10.244.0.0/16",
"Backend": {
"Type": "vxlan"
}
}
# Note that the image of flannel in kube-flannel.yml is 0.11.0, quay.io/coreos/flannel:v0.11.0-amd64
# The default image is quay.io/coreos/flannel:v0.11.0-amd64, which needs to be pull ed down in advance.
# If the Node has multiple network cards, refer to flannel issues 39701,
# https://github.com/kubernetes/kubernetes/issues/39701
# At present, you need to use the -- iface parameter in kube-flannel.yml to specify the name of the intranet card of the cluster host,
# Otherwise, dns may not be resolved. If the container cannot communicate, you need to download kube-flannel.yml locally,
# flanneld startup parameter plus -- Iface = < Iface name >
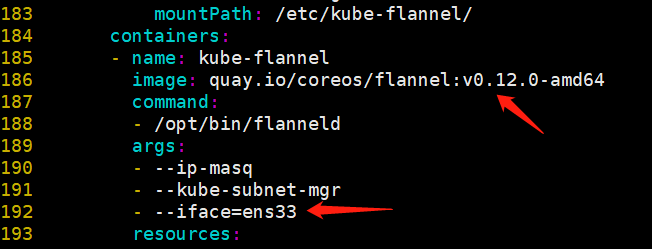
containers:
- name: kube-flannel
image: quay.io/coreos/flannel:v0.11.0-amd64
command:
- /opt/bin/flanneld
args:
- --ip-masq
- --kube-subnet-mgr
- --iface=ens33
- --iface=eth0
⚠️⚠️⚠️--iface=ens33 The value of is your current network card,Alternatively, you can specify multiple network cards
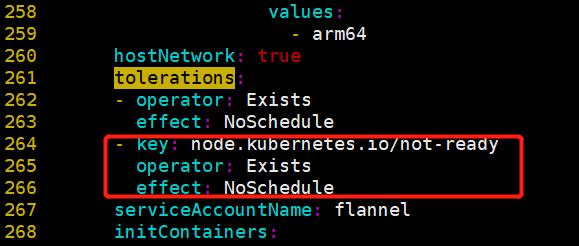
# Kubedm in version 1.12 additionally sets a taint for node1 node: node.kubernetes.io/not-ready:NoSchedule,
# It is easy to understand that if the node is not ready, it will not accept scheduling. However, if Kubernetes' network plug-in has not been deployed, the node will not enter the ready state.
# Therefore, modify the following contents of kube-flannel.yaml and add tolerance for the stain of node.kubernetes.io/not-ready:NoSchedule:
- key: beta.kubernetes.io/arch
operator: In
values:
- arm64
hostNetwork: true
tolerations:
- operator: Exists
effect: NoSchedule
- key: node.kubernetes.io/not-ready #Add the following three lines --- around 261
operator: Exists
effect: NoSchedule
serviceAccountName: flannel
The above image is a flannel image to solve network problems. Each node must pull
# docker pull quay.io/coreos/flannel:v0.12.0-arm64 #In fact, it will also pull automatically.
Start:
[root@k8s-master flannel]# kubectl apply -f kube-flannel.yml  #Wait for a while after startup
 View the specified in the file api Objects. Are they all created successfully
 Wrong v1 hinder beta delete
[root@k8s-master flannel]# kubectl get pod -n  kube-system
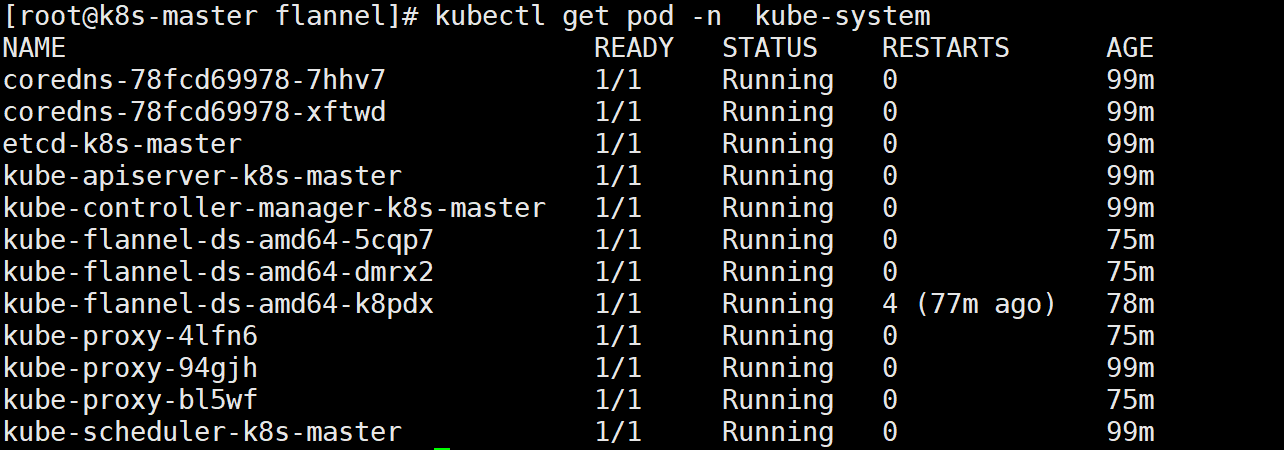
If the pod information is abnormal and fails all the time, you can delete the pod separately, and it will automatically generate the latest information
see:
# kubectl get pods --namespace kube-system
# kubectl get service
# kubectl get svc --namespace kube-system
 Only after the network plug-in is also installed and configured can it be displayed as ready state
All node nodes join k8s cluster
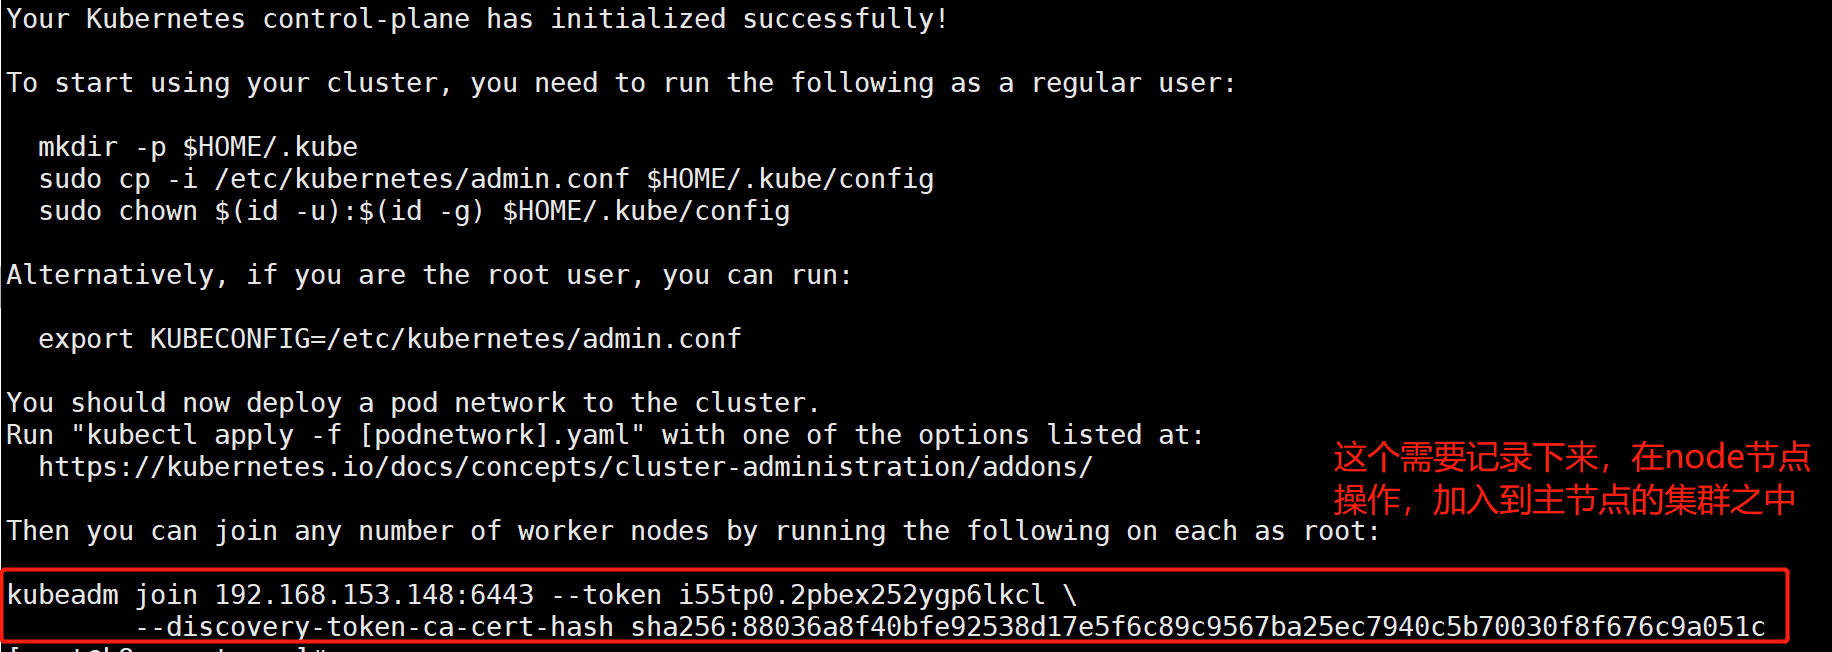
to configure node Node joining the cluster:
Open if an error is reported ip forward:
# sysctl -w net.ipv4.ip_forward=1
 At all node Node operation, this command is initialization master Results returned after success
[root@k8s-node1 ~]# kubeadm join 192.168.153.148:6443 --token i55tp0.2pbex252ygp6lkcl \
> --discovery-token-ca-cert-hash sha256:88036a8f40bfe92538d17e5f6c89c9567ba25ec7940c5b70030f8f676c9a051c
[root@k8s-node2 ~]# sysctl -w net.ipv4.ip_forward=1
net.ipv4.ip_forward = 1
[root@k8s-node2 ~]# kubeadm join 192.168.153.148:6443 --token i55tp0.2pbex252ygp6lkcl \
> --discovery-token-ca-cert-hash sha256:88036a8f40bfe92538d17e5f6c89c9567ba25ec7940c5b70030f8f676c9a051c
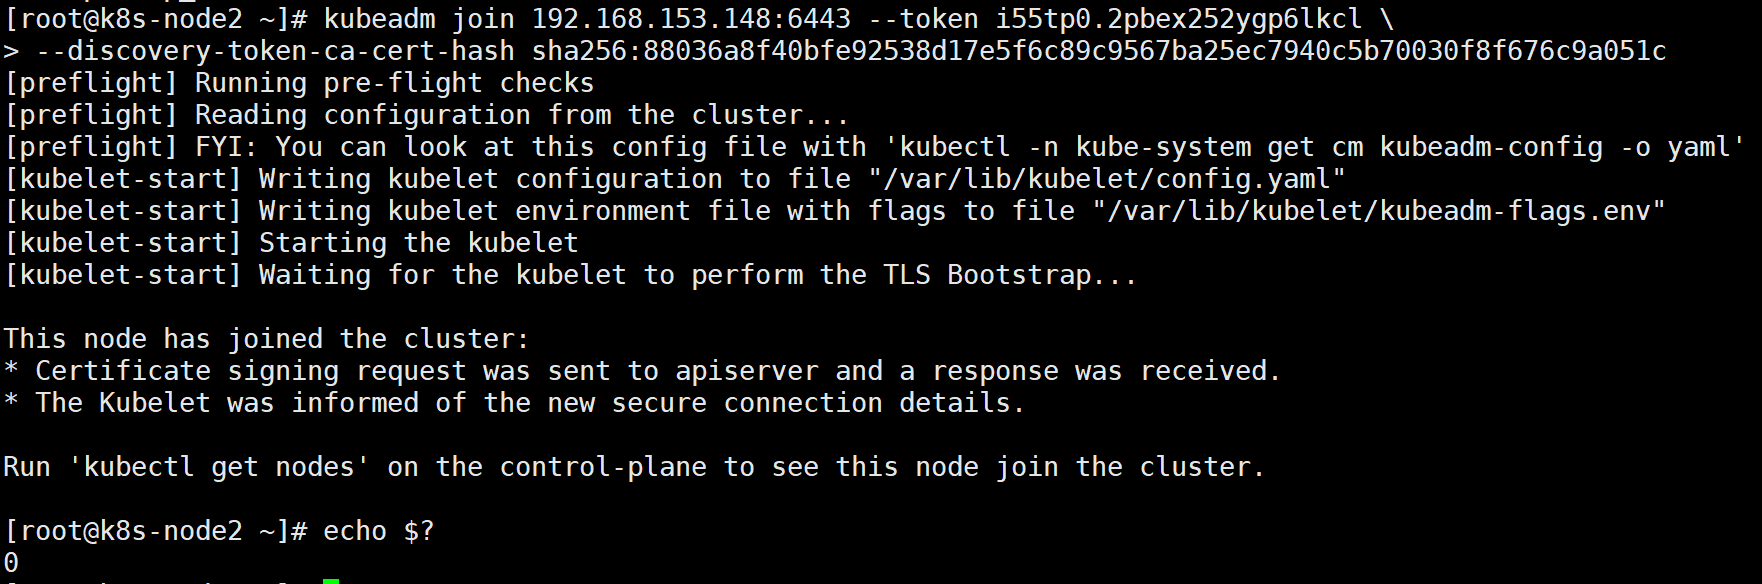
In the master operation:
[root@k8s-master flannel]# kubectl get nodes
NAME         STATUS   ROLES                  AGE    VERSION
k8s-master   Ready    control-plane,master   102m   v1.22.2
k8s-node1    Ready    <none>                 77m    v1.22.2
k8s-node2    Ready    <none>                 77m    v1.22.2
Error sorting
error
 Problem 1: an error will be reported if the server time is inconsistent
 View server time
=====================================
Question 2: kubeadm init Unsuccessful,The following prompt is found, and then an error is reported
[wait-control-plane] Waiting for the kubelet to boot up the control plane as static Pods from directory "/etc/kubernetes/manifests". This can take up to 4m0s

see kubelet The following error was found in the status, the host master Unable to find and image download failed, found pause Mirror is from aliyuncs Download, in fact, I have downloaded the official pause Mirror image, and reset the image according to the prompted image name pause Mirror play ali of tag,Last reset kubeadm The environment of is reinitialized and the error is resolved
[root@master manifests]# systemctl  status kubelet -l
● kubelet.service - kubelet: The Kubernetes Node Agent
   Loaded: loaded (/etc/systemd/system/kubelet.service; enabled; vendor preset: disabled)
  Drop-In: /etc/systemd/system/kubelet.service.d
           └─10-kubeadm.conf
   Active: active (running) since IV 2019-01-31 15:20:32 CST; 5min ago
     Docs: https://kubernetes.io/docs/
 Main PID: 23908 (kubelet)
    Tasks: 19
   Memory: 30.8M
   CGroup: /system.slice/kubelet.service
           └─23908 /usr/bin/kubelet --bootstrap-kubeconfig=/etc/kubernetes/bootstrap-kubelet.conf --kubeconfig=/etc/kubernetes/kubelet.conf --config=/var/lib/kubelet/config.yaml --cgroup-driver=cgroupfs --network-plugin=cni --pod-infra-container-image=k8s.gcr.io/pause:3.1 --cgroup-driver=cgroupfs --pod-infra-container-image=registry.cn-hangzhou.aliyuncs.com/google_containers/pause-amd64:3.1

1 31 / 15:25:41 master kubelet[23908]: E0131 15:25:41.432357   23908 kubelet.go:2266] node "master" not found
1 31 / 15:25:41 master kubelet[23908]: E0131 15:25:41.532928   23908 kubelet.go:2266] node "master" not found
1 31 / 15:25:41 master kubelet[23908]: E0131 15:25:41.633192   23908 kubelet.go:2266] node "master" not found
1 31 / 15:25:41 master kubelet[23908]: I0131 15:25:41.729296   23908 kubelet_node_status.go:278] Setting node annotation to enable volume controller attach/detach
1 31 / 15:25:41 master kubelet[23908]: E0131 15:25:41.733396   23908 kubelet.go:2266] node "master" not found
1 31 / 15:25:41 master kubelet[23908]: E0131 15:25:41.740110   23908 remote_runtime.go:96] RunPodSandbox from runtime service failed: rpc error: code = Unknown desc = failed pulling image "registry.cn-hangzhou.aliyuncs.com/google_containers/pause-amd64:3.1": Error response from daemon: Get https://registry.cn-hangzhou.aliyuncs.com/v2/: dial tcp 0.0.0.80:443: connect: invalid argument
1 31 / 15:25:41 master kubelet[23908]: E0131 15:25:41.740153   23908 kuberuntime_sandbox.go:68] CreatePodSandbox for pod "kube-controller-manager-master_kube-system(e8f43404e60ae844e375d50b1e39d91e)" failed: rpc error: code = Unknown desc = failed pulling image "registry.cn-hangzhou.aliyuncs.com/google_containers/pause-amd64:3.1": Error response from daemon: Get https://registry.cn-hangzhou.aliyuncs.com/v2/: dial tcp 0.0.0.80:443: connect: invalid argument
1 31 / 15:25:41 master kubelet[23908]: E0131 15:25:41.740166   23908 kuberuntime_manager.go:662] createPodSandbox for pod "kube-controller-manager-master_kube-system(e8f43404e60ae844e375d50b1e39d91e)" failed: rpc error: code = Unknown desc = failed pulling image "registry.cn-hangzhou.aliyuncs.com/google_containers/pause-amd64:3.1": Error response from daemon: Get https://registry.cn-hangzhou.aliyuncs.com/v2/: dial tcp 0.0.0.80:443: connect: invalid argument
1 31 / 15:25:41 master kubelet[23908]: E0131 15:25:41.740207   23908 pod_workers.go:190] Error syncing pod e8f43404e60ae844e375d50b1e39d91e ("kube-controller-manager-master_kube-system(e8f43404e60ae844e375d50b1e39d91e)"), skipping: failed to "CreatePodSandbox" for "kube-controller-manager-master_kube-system(e8f43404e60ae844e375d50b1e39d91e)" with CreatePodSandboxError: "CreatePodSandbox for pod \"kube-controller-manager-master_kube-system(e8f43404e60ae844e375d50b1e39d91e)\" failed: rpc error: code = Unknown desc = failed pulling image \"registry.cn-hangzhou.aliyuncs.com/google_containers/pause-amd64:3.1\": Error response from daemon: Get https://registry.cn-hangzhou.aliyuncs.com/v2/: dial tcp 0.0.0.80:443: connect: invalid argument"
1 31 / 15:25:41 master kubelet[23908]: E0131 15:25:41.833981   23908 kubelet.go:2266] node "master" not found
Solution
Reset kubeadm environment
 All nodes of the whole cluster(include master)Reset/Remove node
1.Drive away k8s-node-1 On node pod(master (top)
[root@kub-k8s-master ~]# kubectl drain kub-k8s-node1 --delete-local-data --force --ignore-daemonsets

2.Delete node( master (top)
[root@kub-k8s-master ~]# kubectl delete node kub-k8s-node1

3.Reset node(node upper-That is, on the deleted node)
[root@kub-k8s-node1 ~]# kubeadm reset

Note 1: it is necessary to master Also drive away, delete and reset. I'm dead here. I didn't drive away and delete for the first time master,The final result is to see that everything is normal, but coredns You can't live or die. You've been working for a whole day. Don't try

Note 2: master On reset After that, the following files need to be deleted
# rm -rf /var/lib/cni/ $HOME/.kube/config

###Note: if the entire k8s cluster has been reset, follow the above steps. If there is an error during initialization, only the third step is required
Regenerate token
kubeadm Generated token After expiration, the cluster adds nodes

adopt kubeadm After initialization, it will be provided node Joined token:
You should now deploy a pod network to the cluster.
Run "kubectl apply -f [podnetwork].yaml" with one of the options listed at:
  https://kubernetes.io/docs/concepts/cluster-administration/addons/

You can now join any number of machines by running the following on each node
as root:

  kubeadm join 192.168.246.166:6443 --token n38l80.y2icehgzsyuzkthi \
    --discovery-token-ca-cert-hash sha256:5fb6576ef82b5655dee285e0c93432aee54d38779bc8488c32f5cbbb90874bac
 default token The validity period of is 24 hours. When it expires, the token It's not available.

~~~~~~~~~~~~~~~~~~~~~~~~~~~~~~~~~

resolvent:
1. Regenerate new token:
[root@node1 flannel]# kubeadm  token create
kiyfhw.xiacqbch8o8fa8qj
[root@node1 flannel]# kubeadm  token list
TOKEN                     TTL         EXPIRES                     USAGES                   DESCRIPTION   EXTRA GROUPS
gvvqwk.hn56nlsgsv11mik6   <invalid>   2018-10-25T14:16:06+08:00   authentication,signing   <none>        system:bootstrappers:kubeadm:default-node-token
kiyfhw.xiacqbch8o8fa8qj   23h         2018-10-27T06:39:24+08:00   authentication,signing   <none>        system:bootstrappers:kubeadm:default-node-token

2. obtain ca certificate sha256 code hash value:
[root@node1 flannel]# openssl x509 -pubkey -in /etc/kubernetes/pki/ca.crt | openssl rsa -pubin -outform der 2>/dev/null | openssl dgst -sha256 -hex | sed 's/^.* //'
5417eb1b68bd4e7a4c82aded83abc55ec91bd601e45734d6aba85de8b1ebb057

3. Nodes join the cluster:
  kubeadm join 18.16.202.35:6443 --token kiyfhw.xiacqbch8o8fa8qj --discovery-token-ca-cert-hash sha256:5417eb1b68bd4e7a4c82aded83abc55ec91bd601e45734d6aba85de8b1ebb057
 After a few seconds, you should notice kubectl get nodes This node in the runtime output on the primary server.

The above method is cumbersome and can be achieved in one step:
kubeadm token create --print-join-command

The second method:
token=$(kubeadm token generate)
kubeadm token create $token --print-join-command --ttl=0