Deploy mysql Cluster with M-M architecture
The whole mysql5 7 database, and then do database master-slave synchronization, and then let the two database machines be master-slave to each other
Environment: CentOS 7, mysql5 7 (the version of MySQL used as the master and slave of the database must be consistent)
On the master database server
- Install mysql5 seven
yum install *.rpm -y
-Start mysqld first
systemctl start mysqld
- View mysql5 7 initial password
cat /var/log/mysql | grep password
- Run mysql_secure_installation
mysql_secure_installation
Enter the viewed initial command, and then enter yes to modify the root password. Next, enter no to leave the anonymous account. Next, enter yes to prohibit the remote login of the root account, and then enter yes to remove the test database. Next, enter yes to refresh the permission table to make the just modified content effective.
-
Log in to mysql with the root password you just modified
-
Create a database that needs to be synchronized
create database MM-test;
use MM-test;
create table T1(id int,name varchar(20));
exit
- Stop mysqld
- Modify profile
vim /etc/my.cnf
 Add the following
log-bin=mysql-bin-master	#Enable binary data
server-id=1							#Native database ID
binlog-do-db=MM-test			#Configure the libraries that are synchronized from the database
binlog-ignore-db=mysql       #Configure libraries that are not synchronized from the database
auto_increment_offset=1		 #Configure self incrementing primary keys from the beginning
auto_increment_increment=2		#Configure the self incrementing primary key to enter every other to prevent the conflict of self incrementing primary keys
- Restart mysqld service
systemctl restart mysqld
- Create an account for the slave library and authorize it
mysql -u root -p
grant replication slave on *.* to 'slave'@'192.168.33.%' identified by "yourpasswrod";
flush privileges;
- View master status information
show master status;
- View binary log
show binlog events\G
tips: before starting master-slave synchronization, ensure the consistency of database data!
- Export database
mysqldump -u root -p MM-test > MM-test.sql
- Copy the exported sql file to the slave database machine
On the slave database server:
- Install mysql5 seven
yum install *.rpm -y
- Start mysqld first
systemctl start mysqld
- View mysql5 7 initial password
cat /var/log/mysql | grep password
- function
mysql_secure_installation
Enter the viewed initial command, and then enter yes to modify the root password. Next, enter no to leave the anonymous account. Next, enter yes to prohibit the remote login of the root account, and then enter yes to remove the test database. Next, enter yes to refresh the permission table to make the content just modified effective.
- Log in to mysql with the root password you just modified
- Test whether you can connect to the master database:
mysql -h masterIP -u slave -p
After entering, I found that the slave account has only copy permission and can't see other databases.
- We import data exported from the primary database server
mysql -u root -p MM-test < MM-test.sql
- Modify the configuration file of the slave server: (the slave server does not need to open the bin log)
vim /etc/my.cnf
 Add the following
server-id = 2  #The slave server ID number cannot be the same as the master ID number. If multiple slave servers are set, each slave server must have a unique server ID value, which must be different from the ID of the master server and other slave servers.
log-bin=mysql-bin-slave
binlog-do-db=MM-test
binlog-ignore-db=mysql
auto_increment_offset=2		#The primary key increases automatically from two
auto_increment_increment=2		#The primary key is incremented every interval
- Restart mysqld service to make the configuration take effect
systemctl restart mysqld
- Configure slave
mysql -u root -p
stop slave;
change master to master_host="master_IP",master_user='slave',master_password="yourpassword";
start slave;
show slave status\G
notice
It means that the master-slave is set up. Next, set up the reverse master-slave, so that the library writing operation on the slave machine can also be synchronized to the master machine.
Configure a slave account on the slave for the master to connect to the slave
mysql -u root -p
grant replication slave on *.* to slave@'192.168.33.%' identified by 'yourpassword';
flush privileges;
Test whether you can log in to mysql on the slave machine with slave on the master host
mysql -h slaveIP -u slave -p
Configure slave on the master machine and synchronize the libraries on the slave machine
mysql -u root -p
change master to master_host='slaveIP',master_user='slave',master_password='yourpassword';
start slave;
View the slave status on the master machine
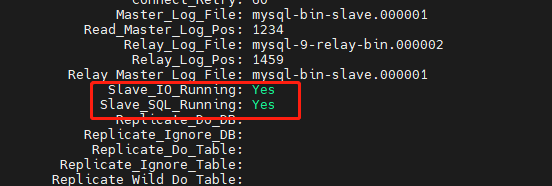
show slave status\G
View the slave status on the slave
show slave status\G
yes, in good condition, and the mysql Cluster of MM architecture is built
Remember: after installing mysql, be sure to start mysqld first, and then modify my CNF file, otherwise mysqld service cannot complete initialization, and an error is reported when starting!!!