- Reference document I: nvidia pytorch compiled for JETSON Tx2
- Reference document 2: Jetson package download
- Reference document 3: Use of Tx2 installation tool
- Reference document 4: Jetson burning tool
1, Upgrade TX2 version to the latest version
- The version of the board I got is too low. There will be many problems in the process of working, so I have to upgrade to the latest version
- download Reference document IV The burning tool in ubuntu18 Installation in 04
- After installation, use a non root user to start SDK Manger and log in to Nvidia account
- After shutdown, press and hold the power button (POWER BTN), then press the REC key, and then press the RST key to enter the recovery mode.
- Refer to the following figure for selection.
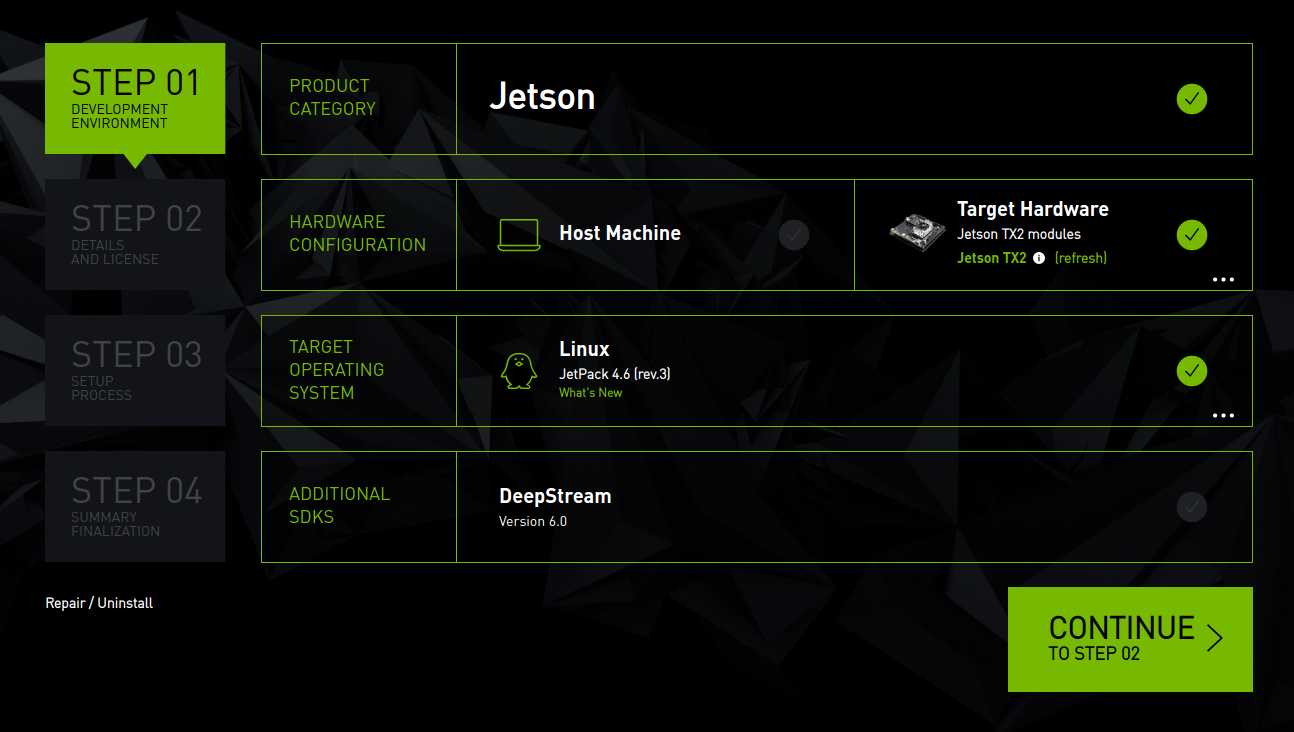
- After clicking, the system will be burned first, and the system will restart after burning. Please restart and replace the source in the system, and then execute sudo apt get update to upgrade
deb http://mirrors.tuna.tsinghua.edu.cn/ubuntu-ports/ bionic-updates main restricted universe multiverse
#deb-src http://mirrors.tuna.tsinghua.edu.cn/ubuntu-ports/ bionic-updates main restricted universe multiverse
deb http://mirrors.tuna.tsinghua.edu.cn/ubuntu-ports/ bionic-security main restricted universe multiverse
#deb-src http://mirrors.tuna.tsinghua.edu.cn/ubuntu-ports/ bionic-security main restricted universe multiverse
deb http://mirrors.tuna.tsinghua.edu.cn/ubuntu-ports/ bionic-backports main restricted universe multiverse
#deb-src http://mirrors.tuna.tsinghua.edu.cn/ubuntu-ports/ bionic-backports main restricted universe multiverse
deb http://mirrors.tuna.tsinghua.edu.cn/ubuntu-ports/ bionic main universe restricted
#deb-src http://mirrors.tuna.tsinghua.edu.cn/ubuntu-ports/ bionic main universe restricted
2, Installation of YoloV5
Note: this part is not successful, but keep a record
YoloV5's official requirements are Python > = 3.7.0, pytorch > = 1.7 But open Reference document I It is found that all python versions provided are 3.6, which does not meet the operation requirements of Yolo V5. Therefore, you are ready to use source code compilation for installation
1. Install conda
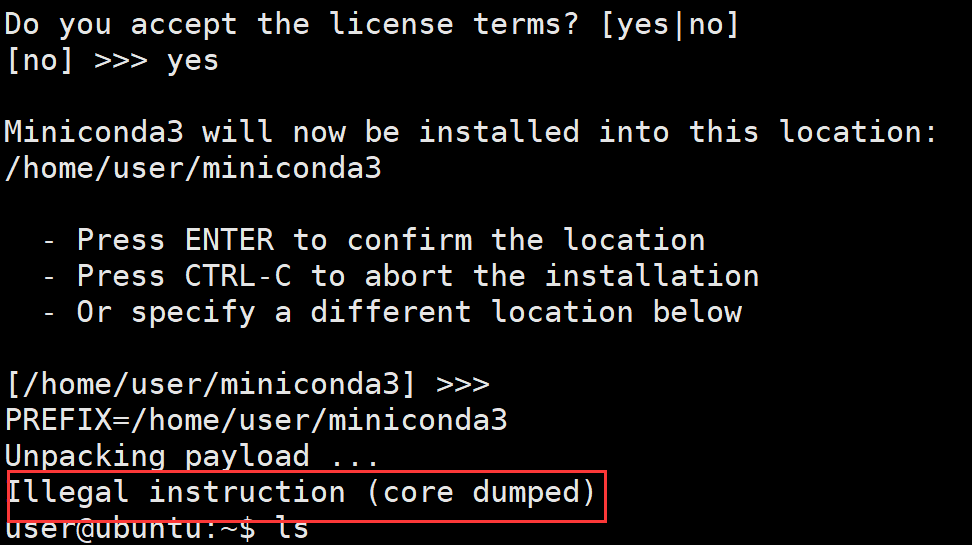
- conda has an aarch64 architecture since its release in April 2021, but its python version 3.9 is too new. The more new things are, the higher the problems that need to be solved. So we use miniconda To install. I choose Python 3 The miniconda3 Linux aarch64 64 bit file in 7 has only 100.9 MIB. But it can't be installed at all.
- After checking the architecture of a decompressed file, it is found that it is ARM aarch64 and TX2 aarch64. What's the difference?
- Finally, archiconda3 is installed, which is directly on the Official website Download and install it.
- After installation, close the current terminal, restart the new one, and then proceed to the next step.
2. Compile and install pytorch
2.1 source code pull v1 Version 7.1 and download the third-party library
#!/usr/bin/env bash

while [ 1 ]
do
    git clone --recursive --branch v1.7.1 https://github.com/pytorch/pytorch
    [ "$?" = "0" ] && break
done

echo "clone finished"
cd pytorch
while [ 1 ]
do
   echo "submodule"
   git submodule update --init --recursive
   [ "$?" = "0" ] && break
done
- Save the above command as a script file, and use chmod +x filename to add executable permissions
- First execute the command $sudo nvpmodel - M 0 & & sudo Jetson_ Clocks, and then use/ filename to run git script
- The script mainly works on two GITS. Since the domestic access to github is often disconnected, it is implemented in a loop. If it is successfully executed, it will exit the while loop
2.2 patching
diff --git a/aten/src/ATen/cpu/vec256/vec256_float_neon.h b/aten/src/ATen/cpu/vec256/vec256_float_neon.h
index cfe6b0ea0f..d1e75ab9af 100644
--- a/aten/src/ATen/cpu/vec256/vec256_float_neon.h
+++ b/aten/src/ATen/cpu/vec256/vec256_float_neon.h
@@ -25,6 +25,8 @@ namespace {
 //    https://bugs.llvm.org/show_bug.cgi?id=45824
 // Most likely we will do aarch32 support with inline asm.
 #if defined(__aarch64__)
+// See https://github.com/pytorch/pytorch/issues/47098
+#if defined(__clang__) || (__GNUC__ > 8 || (__GNUC__ == 8 && __GNUC_MINOR__ > 3))

 #ifdef __BIG_ENDIAN__
 #error "Big endian is not supported."
@@ -665,6 +667,7 @@ Vec256<float> inline fmadd(const Vec256<float>& a, const Vec256<float>& b, const
   return Vec256<float>(r0, r1);
 }

-#endif
+#endif /* defined(__clang__) || (__GNUC__ > 8 || (__GNUC__ == 8 && __GNUC_MINOR__ > 3)) */
+#endif /* defined(aarch64) */

 }}}
diff --git a/aten/src/ATen/cuda/CUDAContext.cpp b/aten/src/ATen/cuda/CUDAContext.cpp
index fd51cc45e7..e3be2fd3bc 100644
--- a/aten/src/ATen/cuda/CUDAContext.cpp
+++ b/aten/src/ATen/cuda/CUDAContext.cpp
@@ -24,6 +24,8 @@ void initCUDAContextVectors() {
 void initDeviceProperty(DeviceIndex device_index) {
   cudaDeviceProp device_prop;
   AT_CUDA_CHECK(cudaGetDeviceProperties(&device_prop, device_index));
+  // patch for "too many resources requested for launch"
+  device_prop.maxThreadsPerBlock = device_prop.maxThreadsPerBlock / 2;
   device_properties[device_index] = device_prop;
 }

diff --git a/aten/src/ATen/cuda/detail/KernelUtils.h b/aten/src/ATen/cuda/detail/KernelUtils.h
index 45056ab996..81a0246ceb 100644
--- a/aten/src/ATen/cuda/detail/KernelUtils.h
+++ b/aten/src/ATen/cuda/detail/KernelUtils.h
@@ -22,7 +22,10 @@ namespace at { namespace cuda { namespace detail {


 // Use 1024 threads per block, which requires cuda sm_2x or above
-constexpr int CUDA_NUM_THREADS = 1024;
+//constexpr int CUDA_NUM_THREADS = 1024;
+
+// patch for "too many resources requested for launch"
+constexpr int CUDA_NUM_THREADS = 512;

 // CUDA: number of blocks for threads.
 inline int GET_BLOCKS(const int64_t N) {
diff --git a/aten/src/THCUNN/common.h b/aten/src/THCUNN/common.h
index 69b7f3a4d3..85b0b1305f 100644
--- a/aten/src/THCUNN/common.h
+++ b/aten/src/THCUNN/common.h
@@ -5,7 +5,10 @@
   "Some of weight/gradient/input tensors are located on different GPUs. Please move them to a single one.")

 // Use 1024 threads per block, which requires cuda sm_2x or above
-const int CUDA_NUM_THREADS = 1024;
+//constexpr int CUDA_NUM_THREADS = 1024;
+
+// patch for "too many resources requested for launch"
+constexpr int CUDA_NUM_THREADS = 512;

 // CUDA: number of blocks for threads.
 inline int GET_BLOCKS(const int64_t N)
- Save the above file as The suffix of patch and put it in the same level folder as the downloaded pytorch project
- Execute the Command Patch - D pytorch / - P1 < XXX Patch patch
2.3 installation dependency
sudo apt-get install python3-pip cmake libopenblas-dev libopenmpi-dev
pip3 install -r requirements.txt
pip3 install scikit-build
pip3 install ninja
2.4 compilation
- Enter the downloaded pytorch directory and execute
USE_NCCL=0 USE_DISTRIBUTED=0 USE_QNNPACK=0 USE_PYTORCH_QNNPACK=0 TORCH_CUDA_ARCH_LIST="10.0;10.1" PYTORCH_BUILD_VERSION=1.7.1 PYTORCH_BUILD_NUMBER=1 python3 setup.py install
- Change the last install to bdist_wheel generates the installation file
- If you can only download third manually, as shown in the figure below_ The QNNPACK component under the party and put it into the corresponding directory.
- When downloading, pay attention to typing the pytorch tag to V1 seven point one

- The third of all prompts_ After placing the missing components under the party, re execute the above command
- Finally, an error will be reported
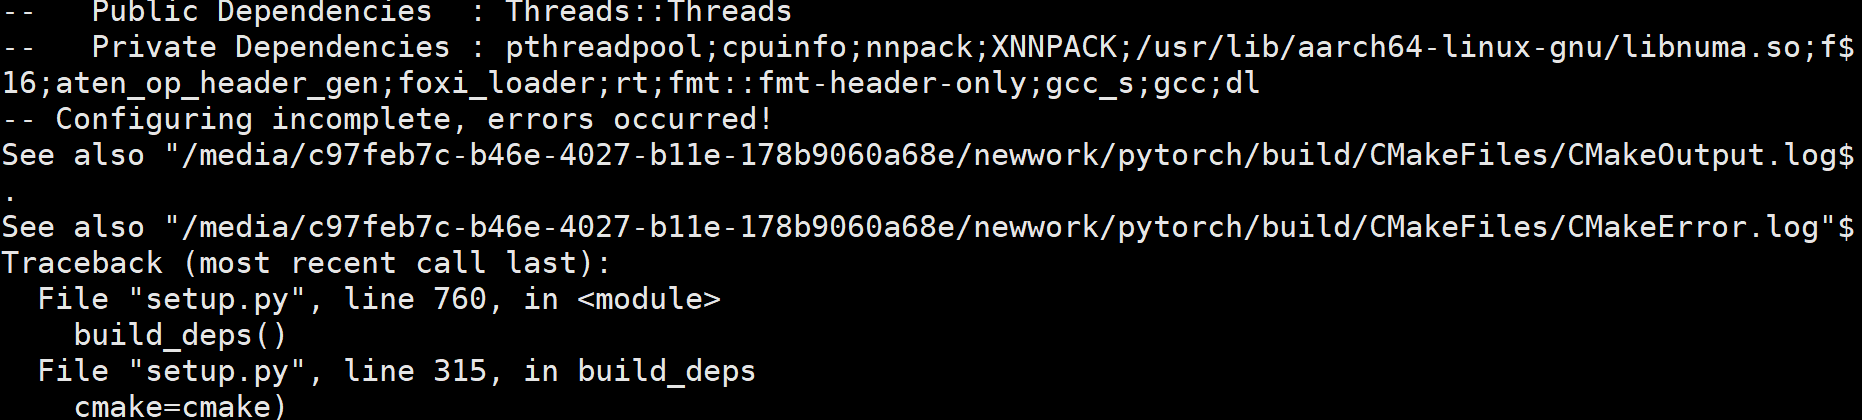
- Follow the prompts to open cmakeerror Log file and find the final error Src c: (. Text + 0x30): for 'vld1q'_ f32_ X2 'undefined reference
- The final query result is vld1q_f32_x2 is defined in gcc10, so you need to compile gcc10 first. This process is too complicated, so give up first
3. Install the official pytorch1 seven
The compiled and installed pytorch cannot run. Please install the officially compiled version 1.7 first and solve the problem when you encounter it
- download Reference document I torch-1.7.0-cp36-cp36m-linux_aarch64.whl file. Since the required Python version is 3.6, we use the python that comes with the system.
- Open ~ / bashrc file, comment out the last few lines added when installing Archiconda3.
- Follow the current terminal and restart one
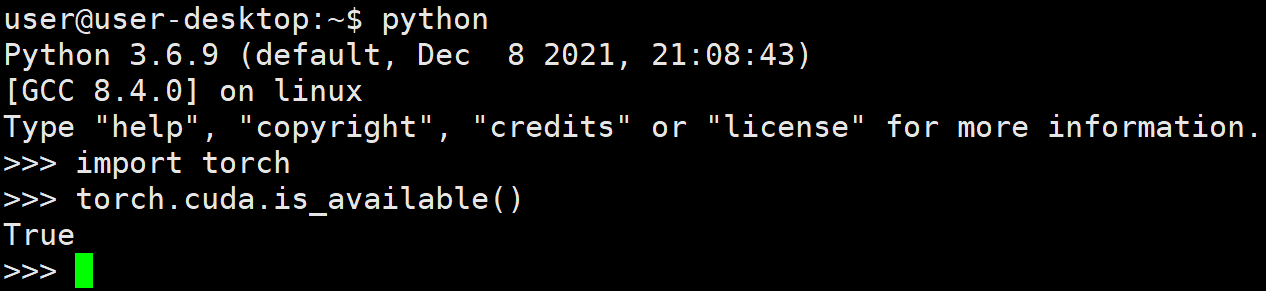
- Use PIP install -- user torch-1.7.0-cp36-cp36m-linux_ aarch64. Install the WHL command and test it after the installation is completed. It is found that torch can be loaded normally and cuda can also be used normally
4. Install YoloV5 dependency
- Set the source of pip3. Create directory MKDIR ~ / Pip, open the file ~ / pip/pip.conf and fill in the following
[global]
index-url=https://pypi.tuna.tsinghua.edu.cn/simple
- Execute command
pip3 install --upgrade pip
python -m pip install Cython scikit-build matplotlib numpy opencv-python PyYAML requests scipy tqdm tensorboard pandas seabornls
python -m pip install pillow --no-cache-dir
- Download and install the matching torchvision source code
#!/usr/bin/env bash
sudo apt-get install libavcodec-dev libavformat-dev libswscale-dev libfreetype6-dev
while [ 1 ]
do
   git clone -b v0.8.1 https://github.com/pytorch/vision torchvision
   [ "$?" = "0" ] && break
done
cd  torchvision
sudo python setup.py install
- Install the necessary library files at the beginning of the script, and then install torchvision
- The middle is realized by circulation to avoid the problem of disconnection
- After entering the torchvision directory, open setup Py file, change the version variable from 0.8.0a0 to 0.8.1
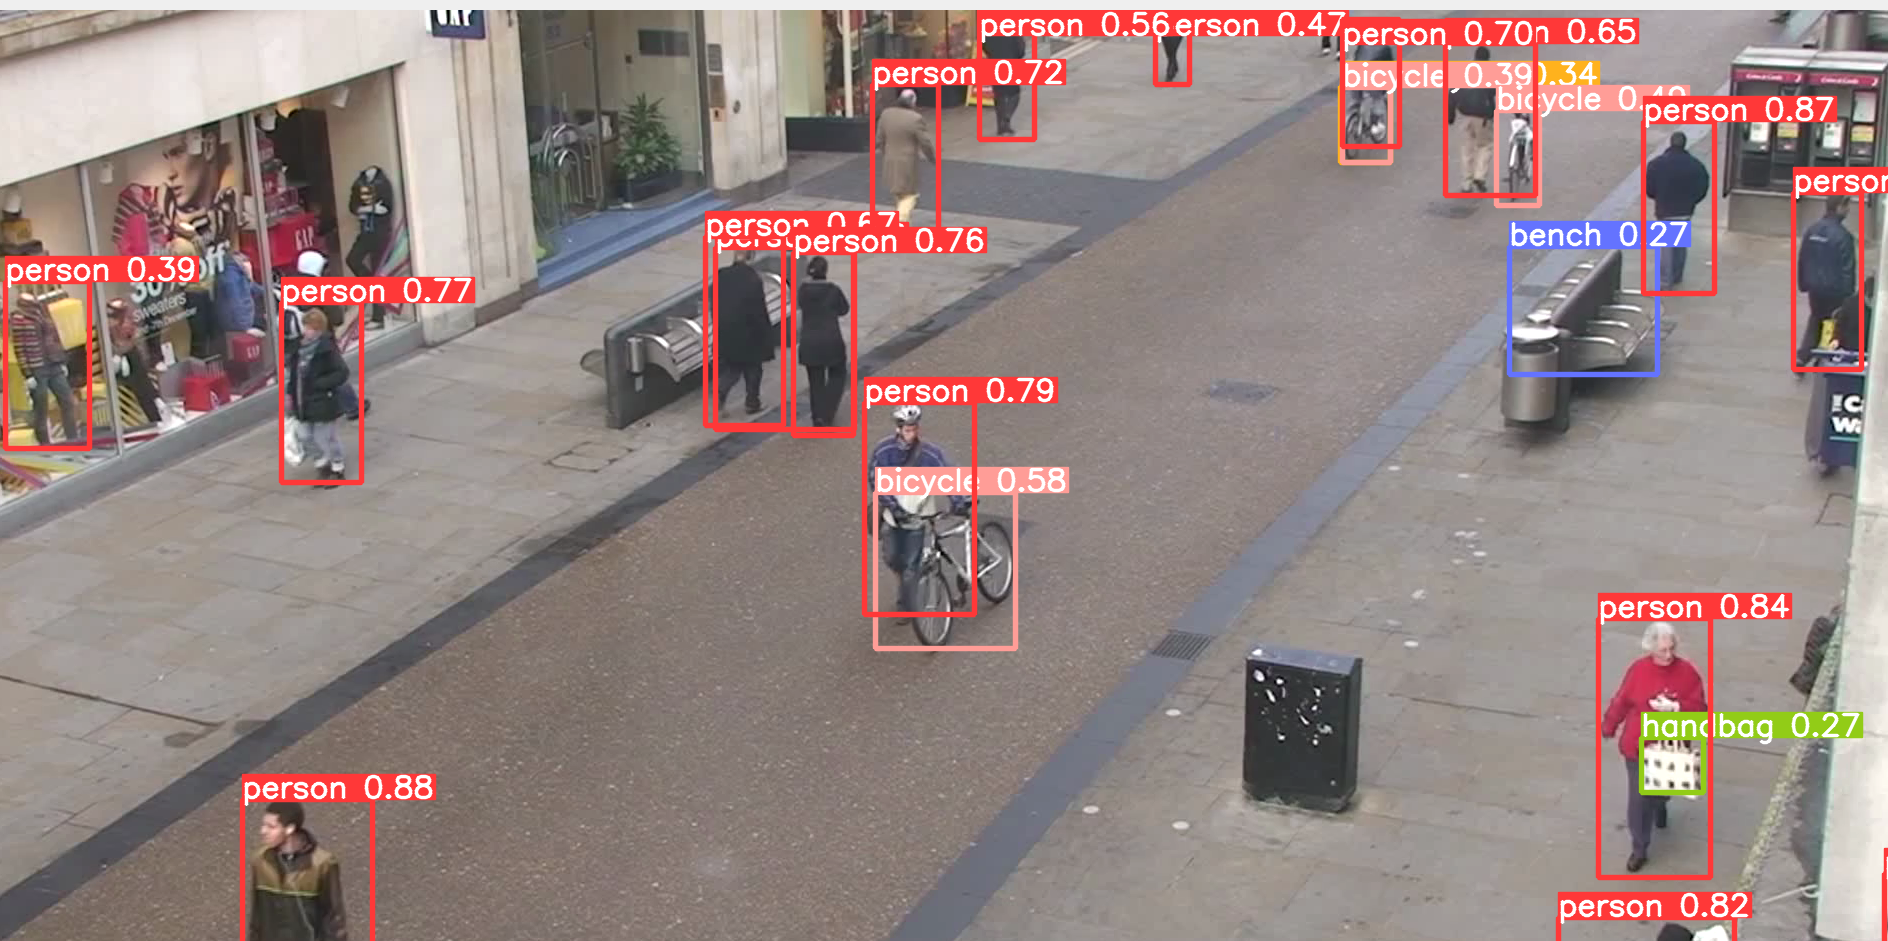
2, Run YoloV5 test
- A pedestrian video was downloaded at station b.
- Run command
python detect.py --view-img --source car.mp4