1. Server environment preparation

2. Server environment initialization (operates on all nodes)
1. Modify/etc/hosts file
[root@localhost ~]# cat >> /etc/hosts <<EOF
192.168.10.102    master
192.168.10.103    node1
192.168.10.104    node2
192.168.10.105    node3
192.168.10.106    node4
EOF
2. Close selinux
[root@localhost ~]# sed -i "s/SELINUX=enforcing/SELINUX=disabled/g" /etc/selinux/config
3. Turn off the system firewall
[root@master ~]# systemctl stop firewalld
[root@master ~]# systemctl disable firewalld
Removed symlink /etc/systemd/system/multi-user.target.wants/firewalld.service.
Removed symlink /etc/systemd/system/dbus-org.fedoraproject.FirewallD1.service.
[root@master ~]# systemctl mask firewalld
Created symlink from /etc/systemd/system/firewalld.service to /dev/null.
4. Configure the kubernetes yum source
[root@master ~]# cat <<EOF > /etc/yum.repos.d/kubernetes.repo
[kubernetes]
name=Kubernetes
baseurl=https://packages.cloud.google.com/yum/repos/kubernetes-el7-x86_64
enabled=1
gpgcheck=1
repo_gpgcheck=1
gpgkey=https://packages.cloud.google.com/yum/doc/yum-key.gpg https://packages.cloud.google.com/yum/doc/rpm-package-key.gpg
EOF
5. Shut down system swap (Kubernetes 1.8 start requirement)
[root@master ~]# swapoff -a
[root@master ~]# yes | cp /etc/fstab /etc/fstab_bak
[root@master ~]# cat /etc/fstab_bak |grep -v swap > /etc/fstab
6. Synchronization Time
[root@master ~]# ntpdate -u ntp.api.bz
7. Upgrade the system kernel to the latest
[root@master ~]# grub2-set-default 0 && grub2-mkconfig -o /etc/grub2.cfg
[root@master ~]# grubby --default-kernel
[root@master ~]# grubby --args="user_namespace.enable=1" --update-kernel="$(grubby --default-kernel)"
Confirm that the kernel is up-to-date after restarting the system, and turn on IPVS after confirming the kernel version (delete ip_vs_fo if the kernel is not upgraded)
[root@master ~]# uname -a
Linux master 3.10.0-957.21.3.el7.x86_64 #1 SMP Tue Jun 18 16:35:19 UTC 2019 x86_64 x86_64 x86_64 GNU/Linux
[root@master ~]# cat > /etc/sysconfig/modules/ipvs.modules <<EOF
#!/bin/bash
ipvs_modules="ip_vs ip_vs_lc ip_vs_wlc ip_vs_rr ip_vs_wrr ip_vs_lblc ip_vs_lblcr ip_vs_dh ip_vs_sh ip_vs_fo ip_vs_nq ip_vs_sed ip_vs_ftp nf_conntrack"
for kernel_module in \${ipvs_modules}; do
    /sbin/modinfo -F filename \${kernel_module} > /dev/null 2>&1
    if [ $? -eq 0 ]; then
        /sbin/modprobe \${kernel_module}
   fi
done
EOF
[root@master ~]# chmod 755 /etc/sysconfig/modules/ipvs.modules && bash /etc/sysconfig/modules/ipvs.modules && lsmod | grep ip_vs
[root@master ~]# sysctl -p
8. All servers configure k8s kernel parameters
[root@master ~]# cat <<EOF > /etc/sysctl.d/k8s.conf
net.ipv4.tcp_keepalive_time = 600
net.ipv4.tcp_keepalive_intvl = 30
net.ipv4.tcp_keepalive_probes = 10
net.ipv6.conf.all.disable_ipv6 = 1
net.ipv6.conf.default.disable_ipv6 = 1
net.ipv6.conf.lo.disable_ipv6 = 1
net.ipv4.neigh.default.gc_stale_time = 120
net.ipv4.conf.all.rp_filter = 0
net.ipv4.conf.default.rp_filter = 0
net.ipv4.conf.default.arp_announce = 2
net.ipv4.conf.lo.arp_announce = 2
net.ipv4.conf.all.arp_announce = 2
net.ipv4.ip_forward = 1
net.ipv4.tcp_max_tw_buckets = 5000
net.ipv4.tcp_syncookies = 1
net.ipv4.tcp_max_syn_backlog = 1024
net.ipv4.tcp_synack_retries = 2
net.bridge.bridge-nf-call-ip6tables = 1
net.bridge.bridge-nf-call-iptables = 1
net.netfilter.nf_conntrack_max = 2310720
fs.inotify.max_user_watches=89100
fs.may_detach_mounts = 1
fs.file-max = 52706963
fs.nr_open = 52706963
net.bridge.bridge-nf-call-arptables = 1
vm.swappiness = 0
vm.overcommit_memory=1
vm.panic_on_oom=0
EOF
[root@master ~]# sysctl --system
Note: If centos7 adds bridge-nf-call-ip6tables and No such file or directory appears, execute modprobe br_netfilter to solve the problem
9. Set yum cache path
[root@master ~]# mkdir -p /wdata/yum/cache
[root@master ~]# cat /etc/yum.conf
[main]
# cachedir=/var/cache/yum/$basearch/$releasever
cachedir=/wdata/yum/cache
keepcache=0
debuglevel=2
logfile=/var/log/yum.log
exactarch=1
obsoletes=1
gpgcheck=1
plugins=1
installonly_limit=5
bugtracker_url=http://bugs.centos.org/set_project.php?project_id=23&ref=http://bugs.centos.org/bug_report_page.php?category=yum
distroverpkg=centos-release


# This is the default, if you make this bigger yum won't see if the metadata
# is newer on the remote and so you'll "gain" the bandwidth of not having to
# download the new metadata and "pay" for it by yum not having correct
# information.
# It is esp. important, to have correct metadata, for distributions like
# Fedora which don't keep old packages around. If you don't like this checking
# interupting your command line usage, it's much better to have something
# manually check the metadata once an hour (yum-updatesd will do this).
# metadata_expire=90m

# PUT YOUR REPOS HERE OR IN separate files named file.repo
# in /etc/yum.repos.d
10. Install related tools
[root@master ~]# yum -y install net-tools ntpdate lrzsz socat ipvsadm wget
11. Configure Secret Login (executed on master)
[root@master ~]# ssh-keygen
[root@master ~]# for i in {103..106};do ssh-copy-id -i ~/.ssh/id_rsa.pub 192.168.10.$i;done
3. kubernetes Cluster Deployment
1. Configure docker yum source
[root@master ~]# yum install -y yum-utils device-mapper-persistent-data lvm2
[root@master ~]# yum-config-manager --add-repo https://download.docker.com/linux/centos/docker-ce.repo
[root@master ~]# yum clean all
[root@master ~]# yum makecache fast
2. View the docker version and install it
[root@master ~]# yum list docker-ce --showduplicates | sort -r
Plugins loaded: fastestmirror
Installable Packages
 * updates: mirrors.cn99.com
Loading mirror speeds from cached hostfile
 * extras: mirrors.nju.edu.cn
 * epel: fedora.cs.nctu.edu.tw
docker-ce.x86_64            3:19.03.1-3.el7                     docker-ce-stable
docker-ce.x86_64            3:19.03.0-3.el7                     docker-ce-stable
docker-ce.x86_64            3:18.09.8-3.el7                     docker-ce-stable
docker-ce.x86_64            3:18.09.7-3.el7                     docker-ce-stable
docker-ce.x86_64            3:18.09.6-3.el7                     docker-ce-stable
docker-ce.x86_64            3:18.09.5-3.el7                     docker-ce-stable
docker-ce.x86_64            3:18.09.4-3.el7                     docker-ce-stable
docker-ce.x86_64            3:18.09.3-3.el7                     docker-ce-stable
docker-ce.x86_64            3:18.09.2-3.el7                     docker-ce-stable
docker-ce.x86_64            3:18.09.1-3.el7                     docker-ce-stable
docker-ce.x86_64            3:18.09.0-3.el7                     docker-ce-stable
docker-ce.x86_64            18.06.3.ce-3.el7                    docker-ce-stable
docker-ce.x86_64            18.06.2.ce-3.el7                    docker-ce-stable
docker-ce.x86_64            18.06.1.ce-3.el7                    docker-ce-stable
docker-ce.x86_64            18.06.0.ce-3.el7                    docker-ce-stable
docker-ce.x86_64            18.03.1.ce-1.el7.centos             docker-ce-stable
docker-ce.x86_64            18.03.0.ce-1.el7.centos             docker-ce-stable
docker-ce.x86_64            17.12.1.ce-1.el7.centos             docker-ce-stable
docker-ce.x86_64            17.12.0.ce-1.el7.centos             docker-ce-stable
docker-ce.x86_64            17.09.1.ce-1.el7.centos             docker-ce-stable
docker-ce.x86_64            17.09.0.ce-1.el7.centos             docker-ce-stable
docker-ce.x86_64            17.06.2.ce-1.el7.centos             docker-ce-stable
docker-ce.x86_64            17.06.1.ce-1.el7.centos             docker-ce-stable
docker-ce.x86_64            17.06.0.ce-1.el7.centos             docker-ce-stable
docker-ce.x86_64            17.03.3.ce-1.el7                    docker-ce-stable
docker-ce.x86_64            17.03.2.ce-1.el7.centos             docker-ce-stable
docker-ce.x86_64            17.03.1.ce-1.el7.centos             docker-ce-stable
docker-ce.x86_64            17.03.0.ce-1.el7.centos             docker-ce-stable
 * base: mirror1.ku.ac.th
 [root@master ~]# yum -y install docker-ce-18.09.8-3.el7
 [root@master ~]# systemctl enable --now docker
 [root@master ~]# systemctl status docker
3. yum Install kubelet, kubeadm, kubectl
[root@master ~]# yum install -y kubelet kubeadm kubectl --disableexcludes=kubernetes
[root@master ~]# systemctl enable --now kubelet
4. Configure Cgroup Driver
[root@master ~]# mkdir /etc/docker
[root@master ~]# cat > /etc/docker/daemon.json <<EOF
{
  "exec-opts": ["native.cgroupdriver=systemd"],
  "log-driver": "json-file",
  "log-opts": {
    "max-size": "100m"
  },
  "storage-driver": "overlay2",
  "storage-opts": [
    "overlay2.override_kernel_check=true"
  ]
}
EOF
[root@master ~]# mkdir -p /etc/systemd/system/docker.service.d
[root@master ~]# systemctl daemon-reload
[root@master ~]# systemctl restart docker
5. Mirror Pull
[root@master ~]# kubeadm config images pull
[config/images] Pulled k8s.gcr.io/kube-apiserver:v1.15.1
[config/images] Pulled k8s.gcr.io/kube-controller-manager:v1.15.1
[config/images] Pulled k8s.gcr.io/kube-scheduler:v1.15.1
[config/images] Pulled k8s.gcr.io/kube-proxy:v1.15.1
[config/images] Pulled k8s.gcr.io/pause:3.1
[config/images] Pulled k8s.gcr.io/etcd:3.3.10
[config/images] Pulled k8s.gcr.io/coredns:1.3.1
6. Initializing the cluster
[root@master ~]# kubeadm init \
--apiserver-advertise-address=192.168.10.102 \
--kubernetes-version v1.15.0 \
--service-cidr=10.1.0.0/16 \
--pod-network-cidr=10.244.0.0/16
[init] Using Kubernetes version: v1.15.0
[preflight] Running pre-flight checks
[preflight] Pulling images required for setting up a Kubernetes cluster
[preflight] This might take a minute or two, depending on the speed of your internet connection
[preflight] You can also perform this action in beforehand using 'kubeadm config images pull'
[kubelet-start] Writing kubelet environment file with flags to file "/var/lib/kubelet/kubeadm-flags.env"
[kubelet-start] Writing kubelet configuration to file "/var/lib/kubelet/config.yaml"
[kubelet-start] Activating the kubelet service
[certs] Using certificateDir folder "/etc/kubernetes/pki"
[certs] Generating "ca" certificate and key
[certs] Generating "apiserver" certificate and key
[certs] apiserver serving cert is signed for DNS names [master kubernetes kubernetes.default kubernetes.default.svc kubernetes.default.svc.cluster.local] and IPs [10.1.0.1 192.168.10.102]
[certs] Generating "apiserver-kubelet-client" certificate and key
[certs] Generating "etcd/ca" certificate and key
[certs] Generating "etcd/peer" certificate and key
[certs] etcd/peer serving cert is signed for DNS names [master localhost] and IPs [192.168.10.102 127.0.0.1 ::1]
[certs] Generating "apiserver-etcd-client" certificate and key
[certs] Generating "etcd/server" certificate and key
[certs] etcd/server serving cert is signed for DNS names [master localhost] and IPs [192.168.10.102 127.0.0.1 ::1]
[certs] Generating "etcd/healthcheck-client" certificate and key
[certs] Generating "front-proxy-ca" certificate and key
[certs] Generating "front-proxy-client" certificate and key
[certs] Generating "sa" key and public key
[kubeconfig] Using kubeconfig folder "/etc/kubernetes"
[kubeconfig] Writing "admin.conf" kubeconfig file
[kubeconfig] Writing "kubelet.conf" kubeconfig file
[kubeconfig] Writing "controller-manager.conf" kubeconfig file
[kubeconfig] Writing "scheduler.conf" kubeconfig file
[control-plane] Using manifest folder "/etc/kubernetes/manifests"
[control-plane] Creating static Pod manifest for "kube-apiserver"
[control-plane] Creating static Pod manifest for "kube-controller-manager"
[control-plane] Creating static Pod manifest for "kube-scheduler"
[etcd] Creating static Pod manifest for local etcd in "/etc/kubernetes/manifests"
[wait-control-plane] Waiting for the kubelet to boot up the control plane as static Pods from directory "/etc/kubernetes/manifests". This can take up to 4m0s
[apiclient] All control plane components are healthy after 22.502507 seconds
[upload-config] Storing the configuration used in ConfigMap "kubeadm-config" in the "kube-system" Namespace
[kubelet] Creating a ConfigMap "kubelet-config-1.15" in namespace kube-system with the configuration for the kubelets in the cluster
[upload-certs] Skipping phase. Please see --upload-certs
[mark-control-plane] Marking the node master as control-plane by adding the label "node-role.kubernetes.io/master=''"
[mark-control-plane] Marking the node master as control-plane by adding the taints [node-role.kubernetes.io/master:NoSchedule]
[bootstrap-token] Using token: j63zfk.i6nkik0sxr8rncny
[bootstrap-token] Configuring bootstrap tokens, cluster-info ConfigMap, RBAC Roles
[bootstrap-token] configured RBAC rules to allow Node Bootstrap tokens to post CSRs in order for nodes to get long term certificate credentials
[bootstrap-token] configured RBAC rules to allow the csrapprover controller automatically approve CSRs from a Node Bootstrap Token
[bootstrap-token] configured RBAC rules to allow certificate rotation for all node client certificates in the cluster
[bootstrap-token] Creating the "cluster-info" ConfigMap in the "kube-public" namespace
[addons] Applied essential addon: CoreDNS
[addons] Applied essential addon: kube-proxy

Your Kubernetes control-plane has initialized successfully!

To start using your cluster, you need to run the following as a regular user:

  mkdir -p $HOME/.kube
  sudo cp -i /etc/kubernetes/admin.conf $HOME/.kube/config
  sudo chown $(id -u):$(id -g) $HOME/.kube/config

You should now deploy a pod network to the cluster.
Run "kubectl apply -f [podnetwork].yaml" with one of the options listed at:
  https://kubernetes.io/docs/concepts/cluster-administration/addons/

Then you can join any number of worker nodes by running the following on each as root:

kubeadm join 192.168.10.102:6443 --token j63zfk.i6nkik0sxr8rncny \
    --discovery-token-ca-cert-hash sha256:75ebf4f00fbd65dc6cb7d4c2af1fb6455c9daab700523a716626028c6ee63c87
From the above information output, we can see the following key points
[kubelet-start] Writing kubelet configuration to file'/var/lib/kubelet/config.yaml'* Generate kubelet configuration file
[certs] Using certificateDir folder'/etc/kubernetes/pki'* * Generating related certificate directories and certificate files
[kubeconfig] Using the kubeconfig folder'/etc/kubernetes'* Generating the kubeconfig directory and the kubeconfig file
[bootstrap-token] Using token: j63zfk.i6nkik0sxr8rncny]Generating token that adds nodes to the cluster
Configure commands for user access to the cluster
mkdir -p $HOME/.kube
sudo cp -i /etc/kubernetes/admin.conf $HOME/.kube/config
sudo chown $(id -u):$(id -g) $HOME/.kube/config
How nodes join the cluster
kubeadm join 192.168.10.102:6443 --token j63zfk.i6nkik0sxr8rncny \
    --discovery-token-ca-cert-hash sha256:75ebf4f00fbd65dc6cb7d4c2af1fb6455c9daab700523a716626028c6ee63c87
7. The other four nodes join the cluster and execute on the other nodes separately.
kubeadm join 192.168.10.102:6443 --token j63zfk.i6nkik0sxr8rncny \
    --discovery-token-ca-cert-hash sha256:75ebf4f00fbd65dc6cb7d4c2af1fb6455c9daab700523a716626028c6ee63c87
Check whether the node joined successfully
[root@master ~]# kubectl get nodes
NAME     STATUS    ROLES    AGE     VERSION
master    NotReady   master   37m     v1.15.1
node1    NotReady   <none>   9m11s    v1.15.1
node2    NotReady   <none>   9m8s    v1.15.1
node3    NotReady   <none>   8m46s    v1.15.1
node4    NotReady   <none>   8m58s    v1.15.1
8. Check cluster status
[root@master kubernetes]# kubectl get cs
NAME                STATUS    MESSAGE             ERROR
scheduler             Healthy    ok
controller-manager         Healthy    ok
etcd-0               Healthy    {"health":"true"}
Question Review:
If one of the above steps fails, you can clean up the cluster and initialize it with the following cleanup commands
kubeadm reset
ifconfig cni0 down
ip link delete cni0
ifconfig flannel.1 down
ip link delete flannel.1
rm -rf /var/lib/cni/
IV. Install Pod Network
1. Install flannel
[root@master ~]# mkdir /wdata/kubernetes && cd /wdata/kubernetes
[root@master kubernetes]# wget -c https://raw.githubusercontent.com/coreos/flannel/master/Documentation/kube-flannel.yml
2. Modify the kube-flannel.yml file and add the communication network card (if it is a multi-network card)
[root@master kubernetes]# vim kube-flannel.yml
      containers:
      - name: kube-flannel
        image: quay.io/coreos/flannel:v0.11.0-amd64
        command:
        - /opt/bin/flanneld
        args:
        - --ip-masq
        - --kube-subnet-mgr
        - --iface=ens33
3. Installation
[root@master kubernetes]# kubectl apply -f kube-flannel.yml
podsecuritypolicy.policy/psp.flannel.unprivileged created
clusterrole.rbac.authorization.k8s.io/flannel configured
clusterrolebinding.rbac.authorization.k8s.io/flannel unchanged
serviceaccount/flannel created
configmap/kube-flannel-cfg created
daemonset.apps/kube-flannel-ds-amd64 created
daemonset.apps/kube-flannel-ds-arm64 created
daemonset.apps/kube-flannel-ds-arm created
daemonset.apps/kube-flannel-ds-ppc64le created
daemonset.apps/kube-flannel-ds-s390x created
4. Validation
[root@master kubernetes]# kubectl get pod --all-namespaces -o wide
NAMESPACE     NAME                             READY     STATUS   RESTARTS        AGE     IP            NODE     NOMINATED NODE   READINESS GATES
kube-system   coredns-5c98db65d4-8zvl7                     1/1     Running   0          99m     10.244.1.3       node1    <none>           <none>
kube-system   coredns-5c98db65d4-j69dq                     1/1     Running   0          99m     10.244.1.2       node1    <none>           <none>
kube-system   etcd-master                           1/1     Running   0          99m     192.168.10.102     master    <none>           <none>
kube-system   kube-apiserver-master                      1/1     Running   0          99m     192.168.10.102     master    <none>           <none>
kube-system   kube-controller-manager-master                  1/1     Running   0          99m     192.168.10.102     master    <none>           <none>
kube-system   kube-flannel-ds-amd64-6w6jl                   1/1     Running   0          4m33s    192.168.10.105     node3    <none>           <none>
kube-system   kube-flannel-ds-amd64-d2mm2                   1/1     Running   0          3m53s    192.168.10.102     master    <none>           <none>
kube-system   kube-flannel-ds-amd64-s4wzt                   1/1     Running   0          3m9s    192.168.10.106     node4    <none>           <none>
kube-system   kube-flannel-ds-amd64-w5b42                   1/1     Running   0          5m44s    192.168.10.103     node1    <none>           <none>
kube-system   kube-flannel-ds-amd64-zs9kc                   1/1     Running   0          5m8s    192.168.10.104     node2    <none>           <none>
kube-system   kube-proxy-9j669                         1/1     Running   0          99m     192.168.10.102     master    <none>           <none>
kube-system   kube-proxy-qgxv8                         1/1     Running   0          71m     192.168.10.106     node4    <none>           <none>
kube-system   kube-proxy-r72vg                         1/1     Running   0          71m     192.168.10.105     node3    <none>           <none>
kube-system   kube-proxy-tvwwj                         1/1     Running   0          71m     192.168.10.103     node1    <none>           <none>
kube-system   kube-proxy-vg4l7                         1/1     Running   0          71m     192.168.10.104     node2    <none>           <none>
kube-system   kube-scheduler-master                      1/1     Running   0          99m     192.168.10.102     master    <none>           <none>
kube-system    kube-controller-manager-master                   1/1     Running   0          93m      192.168.10.102     master    <none>           <none>
Note: You need to ensure that all nodes are in Running state
If a pod status error is found, you can execute kubectl --namespace=kube-system describe pod <pod_name>to view the error information.For example:
[root@master kubernetes]# kubectl --namespace=kube-system describe pod coredns-5c98db65d4-8zvl7
Name:                 coredns-5c98db65d4-8zvl7
Namespace:            kube-system
Priority:             2000000000
Priority Class Name:  system-cluster-critical
Node:                 node1/192.168.10.103
Start Time:           Wed, 31 Jul 2019 18:25:31 +0800
Labels:               k8s-app=kube-dns
                      pod-template-hash=5c98db65d4
Annotations:          <none>
Status:               Running
IP:                   10.244.1.4
Controlled By:        ReplicaSet/coredns-5c98db65d4
Containers:
  coredns:
    Container ID:  docker://c6508701e1ee37481d0ebe05bbf3a1e466378394ca42361e219e0e4410841926
    Image:         k8s.gcr.io/coredns:1.3.1
    Image ID:      docker-pullable://k8s.gcr.io/coredns@sha256:02382353821b12c21b062c59184e227e001079bb13ebd01f9d3270ba0fcbf1e4
    Ports:         53/UDP, 53/TCP, 9153/TCP
    Host Ports:    0/UDP, 0/TCP, 0/TCP
    Args:
      -conf
      /etc/coredns/Corefile
    State:          Running
      Started:      Wed, 31 Jul 2019 20:34:24 +0800
    Last State:     Terminated
      Reason:       Completed
      Exit Code:    0
      Started:      Wed, 31 Jul 2019 18:25:41 +0800
      Finished:     Wed, 31 Jul 2019 20:33:20 +0800
    Ready:          True
    Restart Count:  1
    Limits:
      memory:  170Mi
    Requests:
      cpu:        100m
      memory:     70Mi
    Liveness:     http-get http://:8080/health delay=60s timeout=5s period=10s #success=1 #failure=5
    Readiness:    http-get http://:8080/health delay=0s timeout=1s period=10s #success=1 #failure=3
    Environment:  <none>
    Mounts:
      /etc/coredns from config-volume (ro)
      /var/run/secrets/kubernetes.io/serviceaccount from coredns-token-lj2p9 (ro)
Conditions:
  Type              Status
  Initialized       True
  Ready             True
  ContainersReady   True
  PodScheduled      True
Volumes:
  config-volume:
    Type:      ConfigMap (a volume populated by a ConfigMap)
    Name:      coredns
    Optional:  false
  coredns-token-lj2p9:
    Type:        Secret (a volume populated by a Secret)
    SecretName:  coredns-token-lj2p9
    Optional:    false
QoS Class:       Burstable
Node-Selectors:  beta.kubernetes.io/os=linux
Tolerations:     CriticalAddonsOnly
                 node-role.kubernetes.io/master:NoSchedule
                 node.kubernetes.io/not-ready:NoExecute for 300s
                 node.kubernetes.io/unreachable:NoExecute for 300s
Events:          <none>
5. Testing DNS
Execute kubectl run curl --image=radial/busyboxplus:curl-it to see if it resolves properly
[root@master kubernetes]# kubectl run curl --image=radial/busyboxplus:curl -it
kubectl run --generator=deployment/apps.v1 is DEPRECATED and will be removed in a future version. Use kubectl run --generator=run-pod/v1 or kubectl create instead.
If you don't see a command prompt, try pressing enter.
[ root@curl-6bf6db5c4f-q7vp7:/ ]$ nslookup kubernetes.default
Server:    10.1.0.10
Address 1: 10.1.0.10 kube-dns.kube-system.svc.cluster.local

Name:      kubernetes.default
Address 1: 10.1.0.1 kubernetes.default.svc.cluster.local
[ root@curl-6bf6db5c4f-q7vp7:/ ]$
As shown above, DNS is proven to be normal
5. kube-proxy Open IPVS
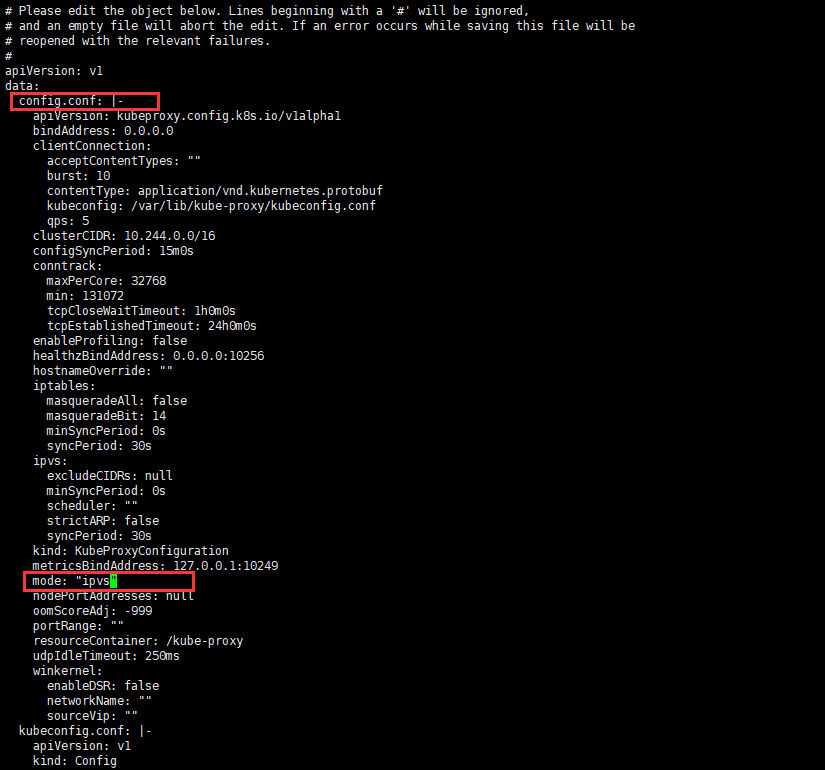
1. Modify config.conf, mode:'ipvs'in kube-system/kube-proxy of ConfigMap
[root@master kubernetes]# kubectl edit cm kube-proxy -n kube-system
2. Restart the kube-proxy pod for each node
[root@master kubernetes]# kubectl get pod -n kube-system | grep kube-proxy | awk '{system("kubectl delete pod "$1" -n kube-system")}'
pod "kube-proxy-9j669" deleted
pod "kube-proxy-qgxv8" deleted
pod "kube-proxy-r72vg" deleted
pod "kube-proxy-tvwwj" deleted
pod "kube-proxy-vg4l7" deleted
3. View the kube-proxy pod status of each node
[root@master kubernetes]# kubectl get pod -n kube-system | grep kube-proxy
kube-proxy-7hzkl                 1/1     Running   0          46s
kube-proxy-jtmc9                 1/1     Running   0          42s
kube-proxy-kzjjn                 1/1     Running   0          36s
kube-proxy-mbk7q                 1/1     Running   0          44s
kube-proxy-pp4ms                 1/1     Running   0          60s
4. Check if the ipvs module of any kube-proxy pod is on
[root@master ~]# kubectl logs kube-proxy-zwmlp -n kube-system
I0731 12:34:18.663297       1 server_others.go:170] Using ipvs Proxier.
W0731 12:34:18.663535       1 proxier.go:401] IPVS scheduler not specified, use rr by default
I0731 12:34:18.663688       1 server.go:534] Version: v1.15.0
I0731 12:34:18.673416       1 conntrack.go:100] Set sysctl 'net/netfilter/nf_conntrack_max' to 131072
I0731 12:34:18.673445       1 conntrack.go:52] Setting nf_conntrack_max to 131072
I0731 12:34:18.674576       1 conntrack.go:83] Setting conntrack hashsize to 32768
I0731 12:34:18.680325       1 conntrack.go:100] Set sysctl 'net/netfilter/nf_conntrack_tcp_timeout_established' to 86400
I0731 12:34:18.680387       1 conntrack.go:100] Set sysctl 'net/netfilter/nf_conntrack_tcp_timeout_close_wait' to 3600
I0731 12:34:18.681385       1 config.go:187] Starting service config controller
I0731 12:34:18.681407       1 controller_utils.go:1029] Waiting for caches to sync for service config controller
I0731 12:34:18.681473       1 config.go:96] Starting endpoints config controller
I0731 12:34:18.681483       1 controller_utils.go:1029] Waiting for caches to sync for endpoints config controller
I0731 12:34:18.781898       1 controller_utils.go:1036] Caches are synced for service config controller
I0731 12:34:18.781953       1 controller_utils.go:1036] Caches are synced for endpoints config controller
As shown above, the presence of Using ipvs Proxier indicates that the ipvs module was successfully opened.If the following error occurs, it is possible that the system did not restart after loading the ipvs module, and restarting the following servers can solve it.
[root@master kubernetes]# kubectl logs kube-proxy-zwmlp -n kube-system
W0731 12:31:04.233204       1 proxier.go:513] Failed to load kernel module ip_vs with modprobe. You can ignore this message when kube-proxy is running inside container without mounting /lib/modules
W0731 12:31:04.234176       1 proxier.go:513] Failed to load kernel module ip_vs_rr with modprobe. You can ignore this message when kube-proxy is running inside container without mounting /lib/modules
W0731 12:31:04.234956       1 proxier.go:513] Failed to load kernel module ip_vs_wrr with modprobe. You can ignore this message when kube-proxy is running inside container without mounting /lib/modules
W0731 12:31:04.235798       1 proxier.go:513] Failed to load kernel module ip_vs_sh with modprobe. You can ignore this message when kube-proxy is running inside container without mounting /lib/modules
W0731 12:31:04.243905       1 proxier.go:513] Failed to load kernel module ip_vs with modprobe. You can ignore this message when kube-proxy is running inside container without mounting /lib/modules
W0731 12:31:04.245174       1 proxier.go:513] Failed to load kernel module ip_vs_rr with modprobe. You can ignore this message when kube-proxy is running inside container without mounting /lib/modules
W0731 12:31:04.246018       1 proxier.go:513] Failed to load kernel module ip_vs_wrr with modprobe. You can ignore this message when kube-proxy is running inside container without mounting /lib/modules
W0731 12:31:04.246854       1 proxier.go:513] Failed to load kernel module ip_vs_sh with modprobe. You can ignore this message when kube-proxy is running inside container without mounting /lib/modules
E0731 12:31:04.249862       1 server_others.go:259] can't determine whether to use ipvs proxy, error: IPVS proxier will not be used because the following required kernel modules are not loaded: [ip_vs ip_vs_rr ip_vs_wrr ip_vs_sh]
I0731 12:31:04.258287       1 server_others.go:143] Using iptables Proxier.
I0731 12:31:04.260120       1 server.go:534] Version: v1.15.0
I0731 12:31:04.267653       1 conntrack.go:52] Setting nf_conntrack_max to 131072
I0731 12:31:04.267812       1 config.go:96] Starting endpoints config controller
I0731 12:31:04.267831       1 controller_utils.go:1029] Waiting for caches to sync for endpoints config controller
I0731 12:31:04.267901       1 config.go:187] Starting service config controller
I0731 12:31:04.267909       1 controller_utils.go:1029] Waiting for caches to sync for service config controller
I0731 12:31:04.368357       1 controller_utils.go:1036] Caches are synced for endpoints config controller
I0731 12:31:04.368416       1 controller_utils.go:1036] Caches are synced for service config controller
5. View ipvs rules
[root@master ~]# ipvsadm -ln
IP Virtual Server version 1.2.1 (size=4096)
Prot LocalAddress:Port Scheduler Flags
  -> RemoteAddress:Port           Forward Weight ActiveConn InActConn
TCP  10.1.0.1:443 rr
  -> 192.168.10.102:6443          Masq    1      1          0
TCP  10.1.0.10:53 rr
  -> 10.244.1.4:53                Masq    1      0          0
  -> 10.244.1.5:53                Masq    1      0          0
TCP  10.1.0.10:9153 rr
  -> 10.244.1.4:9153              Masq    1      0          0
  -> 10.244.1.5:9153              Masq    1      0          0
UDP  10.1.0.10:53 rr
  -> 10.244.1.4:53                Masq    1      0          0
  -> 10.244.1.5:53                Masq    1      0          0
6. Deploy the Kubernetes package manager component Helm
1. Helm Installation
[root@master ~]# cd /wdata/kubernetes
[root@master ~]# wget https://storage.googleapis.com/kubernetes-helm/helm-v2.14.0-linux-amd64.tar.gz
[root@master kubernetes]# tar -zxvf helm-v2.14.0-linux-amd64.tar.gz && cd linux-amd64
linux-amd64/
linux-amd64/tiller
linux-amd64/README.md
linux-amd64/LICENSE
linux-amd64/helm
[root@master linux-amd64]# cp helm /usr/local/bin
In order to install the server-side tiller, you also need to configure the kubectl tool and the kubeconfig file on the server to ensure that the kubectl tool can access the apiserver on this machine and work properly.Kubectl is already configured on the master node.
2. Write tiller.yaml file
[root@master kubernetes]# vim tiller.yaml
apiVersion: v1
kind: ServiceAccount
metadata:
  name: tiller
  namespace: kube-system
---
apiVersion: rbac.authorization.k8s.io/v1beta1
kind: ClusterRoleBinding
metadata:
  name: tiller
roleRef:
  apiGroup: rbac.authorization.k8s.io
  kind: ClusterRole
  name: cluster-admin
subjects:
  - kind: ServiceAccount
    name: tiller
    namespace: kube-system
3. Execute the following command to install Helm
[root@master kubernetes]# kubectl create -f tiller.yaml
serviceaccount/tiller created
clusterrolebinding.rbac.authorization.k8s.io/tiller created
4. Deploy tiller using Helm
[root@master kubernetes]# helm init --service-account tiller --skip-refresh
Creating /root/.helm
Creating /root/.helm/repository
Creating /root/.helm/repository/cache
Creating /root/.helm/repository/local
Creating /root/.helm/plugins
Creating /root/.helm/starters
Creating /root/.helm/cache/archive
Creating /root/.helm/repository/repositories.yaml
Adding stable repo with URL: https://kubernetes-charts.storage.googleapis.com
Adding local repo with URL: http://127.0.0.1:8879/charts
$HELM_HOME has been configured at /root/.helm.

Tiller (the Helm server-side component) has been installed into your Kubernetes Cluster.

Please note: by default, Tiller is deployed with an insecure 'allow unauthenticated users' policy.
To prevent this, run `helm init` with the --tiller-tls-verify flag.
For more information on securing your installation see: https://docs.helm.sh/using_helm/#securing-your-helm-installation
By default, the tiller is deployed in the kubernetes cluster under the namespace kube-system to view the tiller status:
[root@master kubernetes]# kubectl get pod -n kube-system -l app=helm
NAME                             READY   STATUS    RESTARTS   AGE
tiller-deploy-5744948f4b-8rfgr   1/1     Running   0          54s
5. View Helm version:
[root@master kubernetes]# helm version
Client: &version.Version{SemVer:"v2.14.0", GitCommit:"05811b84a3f93603dd6c2fcfe57944dfa7ab7fd0", GitTreeState:"clean"}
Server: &version.Version{SemVer:"v2.14.0", GitCommit:"05811b84a3f93603dd6c2fcfe57944dfa7ab7fd0", GitTreeState:"clean"}
As shown, both client and server versions are 2.14.0
Note: For some reason, the network is required to have access to gcr.io and kubernetes-charts.storage.googleapis.com. If not, tiller-image <your-docker-registry>/tiller:v2.14.0-skip-refresh can use tiller mirroring in the private mirror warehouse
7. Deploying Nginx Ingress using Helm
To facilitate exposing services in a cluster to and accessing them from outside the cluster, Helm is then used to deploy Nginx Ingress to Kubernetes.Nginx Ingress Controller is deployed on the edge nodes of Kubernetes. For information about the high availability of Kubernetes edge nodes, see Kubernetes Ingress Actual Warfare (V): High Availability of Kubernetes Ingress Edge Nodes in Bare metal Environment (IPVS-based).
1. We use Noe3 and Noe4 as edge nodes and Label them
[root@master kubernetes]# kubectl label node node3 node-role.kubernetes.io/edge=
node/node3 labeled
[root@master kubernetes]# kubectl label node node4 node-role.kubernetes.io/edge=
node/node4 labeled
[root@master kubernetes]# kubectl get nodes
NAME     STATUS    ROLES    AGE    VERSION
master    Ready    master    4h17m   v1.15.1
node1    Ready    <none>    3h49m   v1.15.1
node2    Ready    <none>    3h49m   v1.15.1
node3    Ready    edge     3h49m   v1.15.1
node4    Ready    edge     3h49m   v1.15.1
2. Create the value file ingress-nginx.yaml for stable/nginx-ingress chart
[root@master kubernetes]# vim ingress-nginx.yaml
controller:
  replicaCount: 2
  service:
    externalIPs:
      - 192.168.10.101
  nodeSelector:
    node-role.kubernetes.io/edge: ''
  affinity:
    podAntiAffinity:
        requiredDuringSchedulingIgnoredDuringExecution:
        - labelSelector:
            matchExpressions:
            - key: app
              operator: In
              values:
              - nginx-ingress
            - key: component
              operator: In
              values:
              - controller
          topologyKey: kubernetes.io/hostname
  tolerations:
      - key: node-role.kubernetes.io/master
        operator: Exists
        effect: NoSchedule

defaultBackend:
  nodeSelector:
    node-role.kubernetes.io/edge: ''
  tolerations:
      - key: node-role.kubernetes.io/master
        operator: Exists
        effect: NoSchedule
The number of copies of nginx ingress controller, replicaCount, is 2 and will be dispatched to two edge nodes, node3 and node4.The 192.168.10.101 specified by externalIPs is a VIP and will be bound to the kube-proxy kube-ipvs0 network card.
3. Update local chart information from available chart databases
[root@master kubernetes]# helm repo update
Hang tight while we grab the latest from your chart repositories...
...Skip local chart repository
...Successfully got an update from the "stable" chart repository
Update Complete.
4. Install nginx-ingress
[root@master kubernetes]# helm install stable/nginx-ingress \
> -n nginx-ingress \
> --namespace ingress-nginx  \
> -f ingress-nginx.yaml
NAME:   nginx-ingress
LAST DEPLOYED: Wed Jul 31 21:46:58 2019
NAMESPACE: ingress-nginx
STATUS: DEPLOYED

RESOURCES:
==> v1/Pod(related)
NAME                                            READY  STATUS             RESTARTS  AGE
nginx-ingress-controller-578b5f54b5-gcf4s       0/1    ContainerCreating  0         0s
nginx-ingress-controller-578b5f54b5-lfkfw       0/1    ContainerCreating  0         0s
nginx-ingress-default-backend-85d99989c9-7jtzj  0/1    ContainerCreating  0         0s

==> v1/Service
NAME                           TYPE          CLUSTER-IP    EXTERNAL-IP     PORT(S)                     AGE
nginx-ingress-controller       LoadBalancer  10.1.151.211  192.168.10.101  80:30877/TCP,443:32129/TCP  0s
nginx-ingress-default-backend  ClusterIP     10.1.76.40    <none>          80/TCP                      0s

==> v1/ServiceAccount
NAME           SECRETS  AGE
nginx-ingress  1        0s

==> v1beta1/ClusterRole
NAME           AGE
nginx-ingress  0s

==> v1beta1/ClusterRoleBinding
NAME           AGE
nginx-ingress  0s

==> v1beta1/Deployment
NAME                           READY  UP-TO-DATE  AVAILABLE  AGE
nginx-ingress-controller       0/2    2           0          0s
nginx-ingress-default-backend  0/1    1           0          0s

==> v1beta1/PodDisruptionBudget
NAME                      MIN AVAILABLE  MAX UNAVAILABLE  ALLOWED DISRUPTIONS  AGE
nginx-ingress-controller  1              N/A              0                    0s

==> v1beta1/Role
NAME           AGE
nginx-ingress  0s

==> v1beta1/RoleBinding
NAME           AGE
nginx-ingress  0s


NOTES:
The nginx-ingress controller has been installed.
It may take a few minutes for the LoadBalancer IP to be available.
You can watch the status by running 'kubectl --namespace ingress-nginx get services -o wide -w nginx-ingress-controller'

An example Ingress that makes use of the controller:

  apiVersion: extensions/v1beta1
  kind: Ingress
  metadata:
    annotations:
      kubernetes.io/ingress.class: nginx
    name: example
    namespace: foo
  spec:
    rules:
      - host: www.example.com
        http:
          paths:
            - backend:
                serviceName: exampleService
                servicePort: 80
              path: /
    # This section is only required if TLS is to be enabled for the Ingress
    tls:
        - hosts:
            - www.example.com
          secretName: example-tls

If TLS is enabled for the Ingress, a Secret containing the certificate and key must also be provided:

  apiVersion: v1
  kind: Secret
  metadata:
    name: example-tls
    namespace: foo
  data:
    tls.crt: <base64 encoded cert>
    tls.key: <base64 encoded key>
  type: kubernetes.io/tls
5. View the running status of ingress-nginx
[root@master kubernetes]# kubectl get pod -n ingress-nginx -o wide
NAME                                             READY   STATUS    RESTARTS   AGE    IP           NODE    NOMINATED NODE   READINESS GATES
nginx-ingress-controller-578b5f54b5-gcf4s        1/1     Running   0          3m9s   10.244.4.3   node3   <none>           <none>
nginx-ingress-controller-578b5f54b5-lfkfw        1/1     Running   0          3m9s   10.244.3.2   node4   <none>           <none>
nginx-ingress-default-backend-85d99989c9-7jtzj   1/1     Running   0          3m9s   10.244.3.4   node4   <none>           <none>
[root@master kubernetes]# kubectl get pod --all-namespaces -o wide
NAMESPACE       NAME                                             READY   STATUS    RESTARTS   AGE     IP               NODE     NOMINATED NODE   READINESS GATES
default         curl-6bf6db5c4f-q7vp7                            1/1     Running   2          116m    10.244.2.3       node2    <none>           <none>
ingress-nginx   nginx-ingress-controller-578b5f54b5-gcf4s        1/1     Running   0          8m11s   10.244.4.3       node3    <none>           <none>
ingress-nginx   nginx-ingress-controller-578b5f54b5-lfkfw        1/1     Running   0          8m11s   10.244.3.2       node4    <none>           <none>
ingress-nginx   nginx-ingress-default-backend-85d99989c9-7jtzj   1/1     Running   0          8m11s   10.244.3.4       node4    <none>           <none>
kube-system     coredns-5c98db65d4-8zvl7                         1/1     Running   1          4h37m   10.244.1.4       node1    <none>           <none>
kube-system     coredns-5c98db65d4-j69dq                         1/1     Running   1          4h37m   10.244.1.5       node1    <none>           <none>
kube-system     etcd-master                                      1/1     Running   1          4h36m   192.168.10.102   master   <none>           <none>
kube-system     kube-apiserver-master                            1/1     Running   1          4h36m   192.168.10.102   master   <none>           <none>
kube-system     kube-controller-manager-master                   1/1     Running   1          4h36m   192.168.10.102   master   <none>           <none>
kube-system     kube-flannel-ds-amd64-6w6jl                      1/1     Running   1          3h1m    192.168.10.105   node3    <none>           <none>
kube-system     kube-flannel-ds-amd64-d2mm2                      1/1     Running   1          3h1m    192.168.10.102   master   <none>           <none>
kube-system     kube-flannel-ds-amd64-s4wzt                      1/1     Running   1          3h      192.168.10.106   node4    <none>           <none>
kube-system     kube-flannel-ds-amd64-w5b42                      1/1     Running   1          3h2m    192.168.10.103   node1    <none>           <none>
kube-system     kube-flannel-ds-amd64-zs9kc                      1/1     Running   1          3h2m    192.168.10.104   node2    <none>           <none>
kube-system     kube-proxy-7bgqf                                 1/1     Running   1          84m     192.168.10.106   node4    <none>           <none>
kube-system     kube-proxy-7r5vp                                 1/1     Running   1          84m     192.168.10.104   node2    <none>           <none>
kube-system     kube-proxy-n6ln7                                 1/1     Running   1          84m     192.168.10.103   node1    <none>           <none>
kube-system     kube-proxy-zgl4x                                 1/1     Running   1          84m     192.168.10.102   master   <none>           <none>
kube-system     kube-proxy-zwmlp                                 1/1     Running   1          84m     192.168.10.105   node3    <none>           <none>
kube-system     kube-scheduler-master                            1/1     Running   1          4h36m   192.168.10.102   master   <none>           <none>
kube-system     tiller-deploy-5744948f4b-8rfgr                   1/1     Running   0          37m     10.244.4.2       node3    <none>           <none>
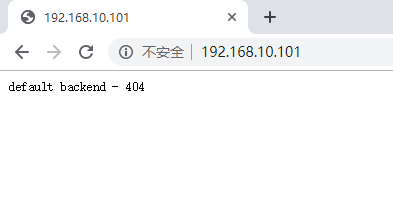
If access to http://192.168.10.101 returns default backend, deployment is complete, as shown in the following figure:
6. Start a test instance
[root@master kubernetes]# kubectl run nginx --image=nginx --replicas=3
kubectl run --generator=deployment/apps.v1 is DEPRECATED and will be removed in a future version. Use kubectl run --generator=run-pod/v1 or kubectl create instead.
deployment.apps/nginx created
[root@master kubernetes]# kubectl get pod
NAME             READY     STATUS     RESTARTS          AGE
curl-6bf6db5c4f-q7vp7     1/1     Running   2          15h
nginx-7bb7cd8db5-kmc4g   1/1     Running   0          2m50s
nginx-7bb7cd8db5-qrqsv   1/1     Running   0          2m50s
nginx-7bb7cd8db5-s6frr   1/1     Running   0          2m50s
[root@master kubernetes]# kubectl expose deployment nginx --port=88 --target-port=80 --type=NodePort
service/nginx exposed
[root@master kubernetes]# kubectl get svc nginx
NAME    TYPE       CLUSTER-IP     EXTERNAL-IP   PORT(S)        AGE
nginx   NodePort        10.1.233.149     <none>      88:32229/TCP        15s
[root@master kubernetes]# kubectl get all
NAME               READY     STATUS     RESTARTS          AGE
pod/curl-6bf6db5c4f-q7vp7     1/1     Running   2          15h
pod/nginx-7bb7cd8db5-kmc4g   1/1     Running   0          4m12s
pod/nginx-7bb7cd8db5-qrqsv   1/1     Running   0          4m12s
pod/nginx-7bb7cd8db5-s6frr   1/1     Running   0          4m12s


NAME           TYPE       CLUSTER-IP       EXTERNAL-IP        PORT(S)        AGE
service/kubernetes   ClusterIP    10.1.0.1       <none>        443/TCP        18h
service/nginx      NodePort    10.1.233.149       <none>        88:32229/TCP        25s


NAME            READY     UP-TO-DATE   AVAILABLE               AGE
deployment.apps/curl     1/1     1          1           15h
deployment.apps/nginx   3/3     3          3           4m12s

NAME                  DESIRED      CURRENT           READY        AGE
replicaset.apps/curl-6bf6db5c4f    1         1         1       15h
replicaset.apps/nginx-7bb7cd8db5    3         3         3       4m12s
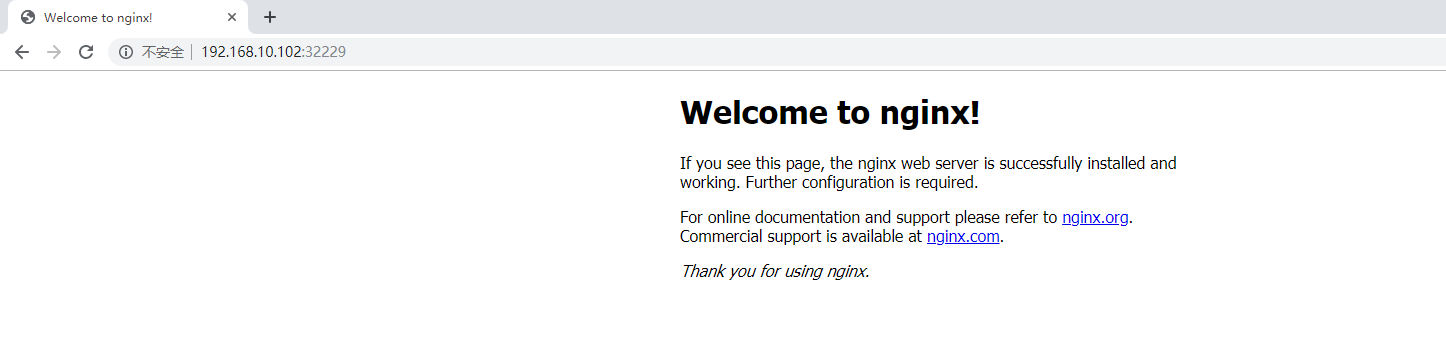
As you can see from the above output, the instance of nginx has an external port of 322229, and we access http://192.168.10.102:32229/ in our browser, as shown below:
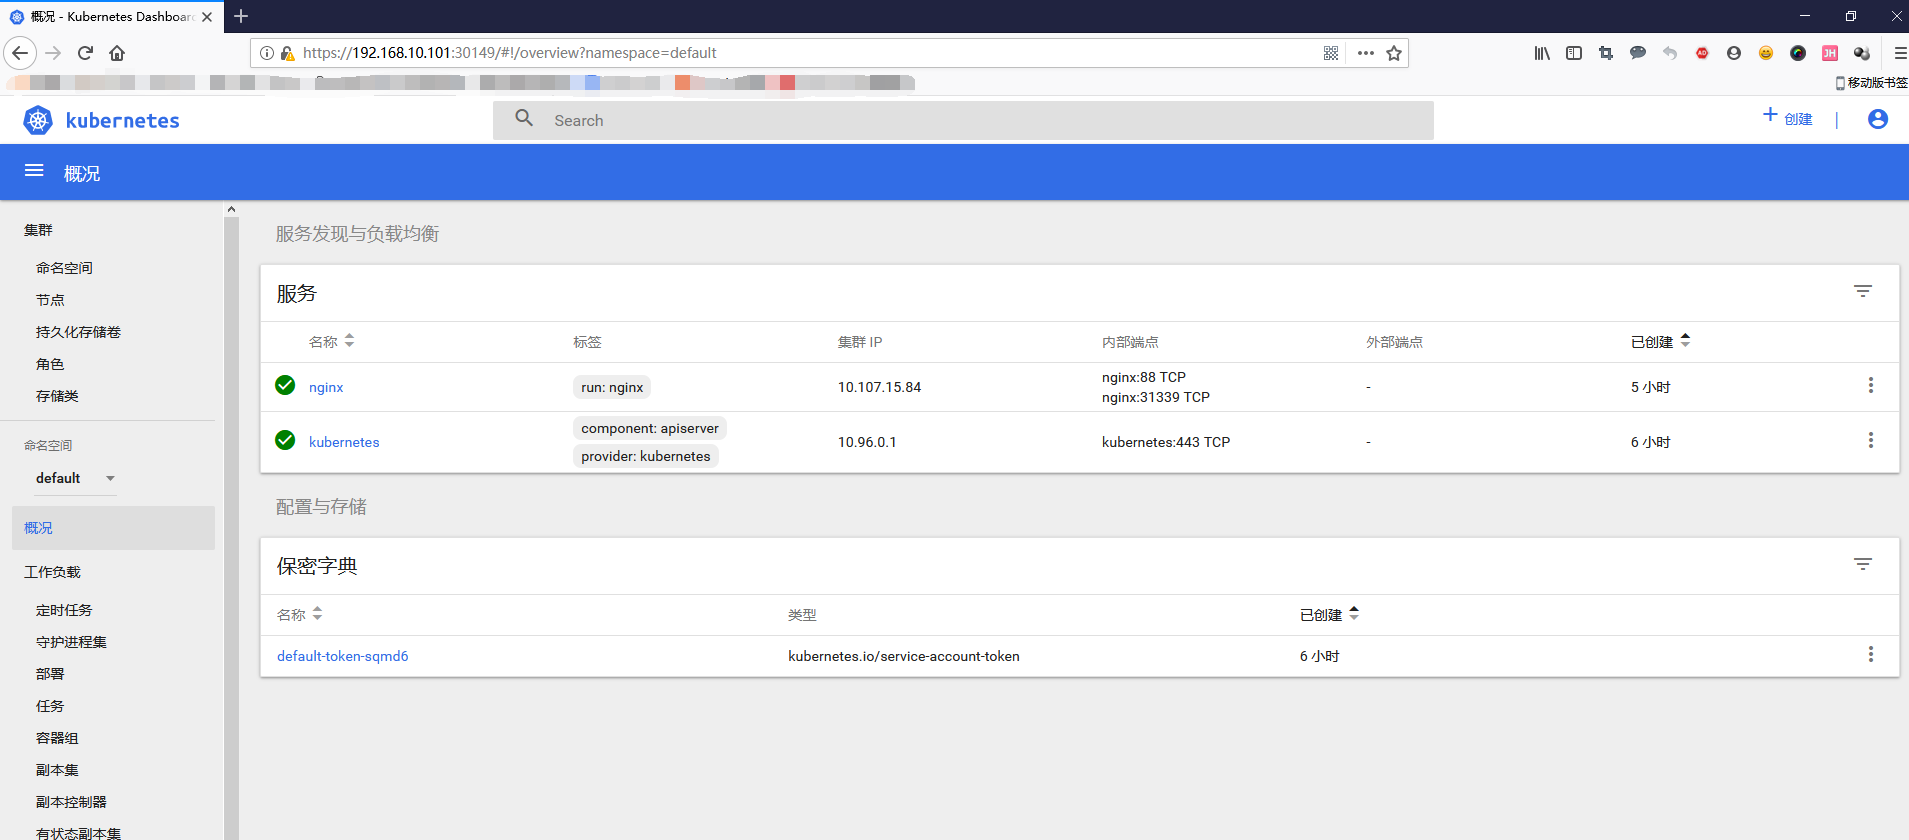
7. Install the kubernetes UI interface
Download the kubernetes-dashboard.yaml file
[root@master kubernetes]# wget https://raw.githubusercontent.com/kubernetes/dashboard/v1.10.1/src/deploy/recommended/kubernetes-dashboard.yaml
--2019-08-01 12:20:21--  https://raw.githubusercontent.com/kubernetes/dashboard/v1.10.1/src/deploy/recommended/kubernetes-dashboard.yaml
Resolving Host raw.githubusercontent.com (raw.githubusercontent.com)... 151.101.0.133, 151.101.64.133, 151.101.128.133, ...
on connection raw.githubusercontent.com (raw.githubusercontent.com)|151.101.0.133|:443... Connected.
Sent HTTP Request, awaiting response... 200 OK
Length: 4577 (4.5K) [text/plain]
Saving to: "kubernetes-dashboard.yaml"

100%[====================================================================================================================================================================================================================================>] 4,577       --.-K/s Time-consuming 0s

2019-08-01 12:20:27 (79.7 MB/s) - Saved "kubernetes-dashboard.yaml" [4577/4577])
Edit the kubernetes-dashboard.yaml file and modify the apiserver address to your own server IP address
[root@master kubernetes]# vim kubernetes-dashboard.yaml
        args:
          - --auto-generate-certificates
          # Uncomment the following line to manually specify Kubernetes API server Host
          # If not specified, Dashboard will attempt to auto discover the API server and connect
          # to it. Uncomment only if the default does not work.
          - --apiserver-host=https://192,168.10.102:6443
        volumeMounts:
        - name: kubernetes-dashboard-certs
          mountPath: /certs
          # Create on-disk volume to store exec logs
        - mountPath: /tmp
          name: tmp-volume
Install kubernetes-dashboard.yaml
[root@master kubernetes]# kubectl apply -f kubernetes-dashboard.yaml
secret/kubernetes-dashboard-certs created
serviceaccount/kubernetes-dashboard created
role.rbac.authorization.k8s.io/kubernetes-dashboard-minimal created
rolebinding.rbac.authorization.k8s.io/kubernetes-dashboard-minimal created
deployment.apps/kubernetes-dashboard created
service/kubernetes-dashboard created
Check to see if the installation was successful
[root@master kubernetes]# kubectl get -f kubernetes-dashboard.yaml
NAME                  TYPE     DATA      AGE
secret/kubernetes-dashboard-certs   Opaque     0      7m6s

NAME                   SECRETS         AGE
serviceaccount/kubernetes-dashboard   1         7m6s

NAME                               AGE
role.rbac.authorization.k8s.io/kubernetes-dashboard-minimal   7m6s

NAME                                   AGE
rolebinding.rbac.authorization.k8s.io/kubernetes-dashboard-minimal   7m6s

NAME                   READY   UP-TO-DATE               AVAILABLE           AGE
deployment.apps/kubernetes-dashboard   1/1     1            1           7m6s

NAME                TYPE      CLUSTER-IP     EXTERNAL-IP        PORT(S)   AGE
service/kubernetes-dashboard   ClusterIP   10.1.133.139     <none>        443/TCP   7m6s
View pod status
    [root@master kubernetes]# kubectl get pods --all-namespaces
NAMESPACE       NAME                                     READY   STATUS             RESTARTS        AGE
default        curl-6bf6db5c4f-q7vp7                            1/1     Running            2          16h
default        nginx-7bb7cd8db5-kmc4g                            1/1     Running            0          34m
default        nginx-7bb7cd8db5-qrqsv                            1/1     Running            0          34m
default        nginx-7bb7cd8db5-s6frr                            1/1     Running            0          34m
ingress-nginx     nginx-ingress-controller-578b5f54b5-gcf4s                 1/1     Running            0          14h
ingress-nginx     nginx-ingress-controller-578b5f54b5-lfkfw                 1/1     Running            0          14h
ingress-nginx     nginx-ingress-default-backend-85d99989c9-7jtzj                1/1     Running            0          14h
kube-system      coredns-5c98db65d4-8zvl7                           1/1     Running            1          19h
kube-system      coredns-5c98db65d4-j69dq                           1/1     Running            1          19h
kube-system      etcd-master                                 1/1     Running            1          19h
kube-system      kube-apiserver-master                            1/1     Running            1          19h
kube-system      kube-controller-manager-master                        1/1     Running            1          19h
kube-system      kube-flannel-ds-amd64-6w6jl                        1/1     Running            1          17h
kube-system      kube-flannel-ds-amd64-d2mm2                        1/1     Running            1          17h
kube-system      kube-flannel-ds-amd64-s4wzt                        1/1     Running            1          17h
kube-system      kube-flannel-ds-amd64-w5b42                        1/1     Running            1          17h
kube-system      kube-flannel-ds-amd64-zs9kc                        1/1     Running            1          17h
kube-system      kube-proxy-7bgqf                               1/1     Running            1          15h
kube-system      kube-proxy-7r5vp                              1/1     Running            1          15h
kube-system      kube-proxy-n6ln7                              1/1     Running            1          15h
kube-system      kube-proxy-zgl4x                              1/1     Running            1          15h
kube-system      kube-proxy-zwmlp                              1/1     Running            1          15h
kube-system      kube-scheduler-master                            1/1     Running            1          19h
kube-system      kubernetes-dashboard-7b89455d8-zf4jk                     0/1     CrashLoopBackOff         5          4m56s
kube-system      kubernetes-dashboard-7d75c474bb-wstl9                   1/1     Running            0          11m
kube-system      tiller-deploy-5744948f4b-8rfgr                        1/1     Running            0          15h
Find that kubernetes-dashboard-7b89455d8-zf4jk is always in CrashLoopBackOff state, view the log of the namespace with the following commands
[root@master kubernetes]# kubectl describe pod kubernetes-dashboard-7b89455d8-zf4jk --namespace=kube-system
Name:         kubernetes-dashboard-7b89455d8-zf4jk
Namespace:      kube-system
Priority:        0
Node:          node4/192.168.10.106
Start Time:     Thu, 01 Aug 2019 12:22:43 +0800
Labels:        k8s-app=kubernetes-dashboard
            pod-template-hash=7b89455d8
Annotations:    <none>
Status:       Running
IP:           10.244.3.6
Controlled By:   ReplicaSet/kubernetes-dashboard-7b89455d8
Containers:
  kubernetes-dashboard:
    Container ID:      docker://984f622e19baf8bd7ecd0b6c0ac5439282ebd91e44e84fb74ea525e11c75a326
    Image:         k8s.gcr.io/kubernetes-dashboard-amd64:v1.10.1
    Image ID:      docker-pullable://k8s.gcr.io/kubernetes-dashboard-amd64@sha256:0ae6b69432e78069c5ce2bcde0fe409c5c4d6f0f4d9cd50a17974fea38898747
    Port:         8443/TCP
    Host Port:      0/TCP
    Args:
      --auto-generate-certificates
      --apiserver-host=https://192,168.10.102:6443
     State:          Waiting
     Reason:            CrashLoopBackOff
    Last State:         Terminated
      Reason:        Error
      Exit Code:    1
      Started:       Thu, 01 Aug 2019 12:26:00 +0800
      Finished:     Thu, 01 Aug 2019 12:26:00 +0800
    Ready:         False
    Restart Count:  5
    Liveness:      http-get https://:8443/ delay=30s timeout=30s period=10s #success=1 #failure=3
    Environment:     <none>
    Mounts:
      /certs from kubernetes-dashboard-certs (rw)
      /tmp from tmp-volume (rw)
      /var/run/secrets/kubernetes.io/serviceaccount from kubernetes-dashboard-token-zqthw (ro)
Conditions:
  Type           Status
  Initialized       True
  Ready           False
  ContainersReady       False
  PodScheduled       True
Volumes:
  kubernetes-dashboard-certs:
    Type:      Secret (a volume populated by a Secret)
    SecretName:  kubernetes-dashboard-certs
    Optional:    false
  tmp-volume:
    Type:      EmptyDir (a temporary directory that shares a pod's lifetime)
    Medium:
    SizeLimit:  <unset>
  kubernetes-dashboard-token-zqthw:
    Type:      Secret (a volume populated by a Secret)
    SecretName:  kubernetes-dashboard-token-zqthw
    Optional:    false
QoS Class:       BestEffort
Node-Selectors:      <none>
Tolerations:      node-role.kubernetes.io/master:NoSchedule
            node.kubernetes.io/not-ready:NoExecute for 300s
            node.kubernetes.io/unreachable:NoExecute for 300s
Events:
  Type     Reason     Age             From           Message
  ----     ------     ----            ----          -------
  Normal     Scheduled    5m47s             default-scheduler   Successfully assigned kube-system/kubernetes-dashboard-7b89455d8-zf4jk to node4
  Normal     Pulling    5m46s             kubelet, localhost  Pulling image "k8s.gcr.io/kubernetes-dashboard-amd64:v1.10.1"
  Normal     Pulled      5m29s             kubelet, localhost  Successfully pulled image "k8s.gcr.io/kubernetes-dashboard-amd64:v1.10.1"
  Normal     Started    4m43s (x4 over 5m29s)  kubelet, localhost  Started container kubernetes-dashboard
  Normal     Created    3m55s (x5 over 5m29s)  kubelet, localhost  Created container kubernetes-dashboard
  Normal     Pulled      3m55s (x4 over 5m29s)  kubelet, localhost  Container image "k8s.gcr.io/kubernetes-dashboard-amd64:v1.10.1" already present on machine
  Warning     BackOff    35s (x28 over 5m28s)    kubelet, localhost  Back-off restarting failed container
[root@master kubernetes]# kubectl logs kubernetes-dashboard-7b89455d8-zf4jk --namespace=kube-system
2019/08/01 04:33:50 Starting overwatch
2019/08/01 04:33:50 Using apiserver-host location: https://192,168.10.102:6443
2019/08/01 04:33:50 Skipping in-cluster config
2019/08/01 04:33:50 Using random key for csrf signing
2019/08/01 04:33:50 Error while initializing connection to Kubernetes apiserver. This most likely means that the cluster is misconfigured (e.g., it has invalid apiserver certificates or service account's configuration) or the --apiserver-host param points to a server that does not exist. Reason: Get https://192,168.10.102:6443/version: dial tcp: lookup 192,168.10.102: no such host
Refer to our FAQ and wiki pages for more information: https://github.com/kubernetes/dashboard/wiki/FAQ
From the log above, we know that when we modify the apiserver address in the kubernetes-dashboard.yaml file, the IP address was written incorrectly, so we can change it again.
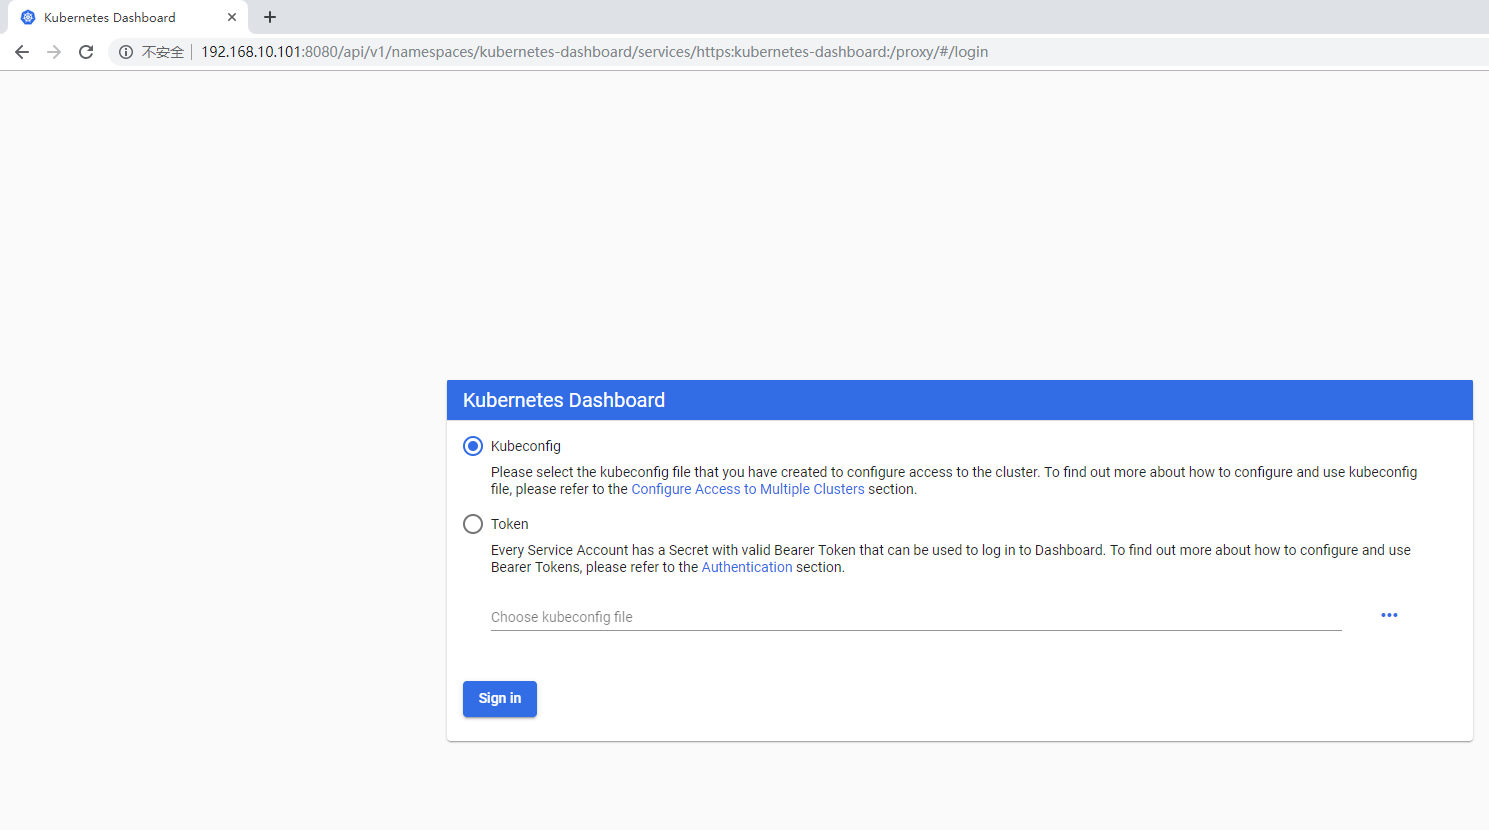
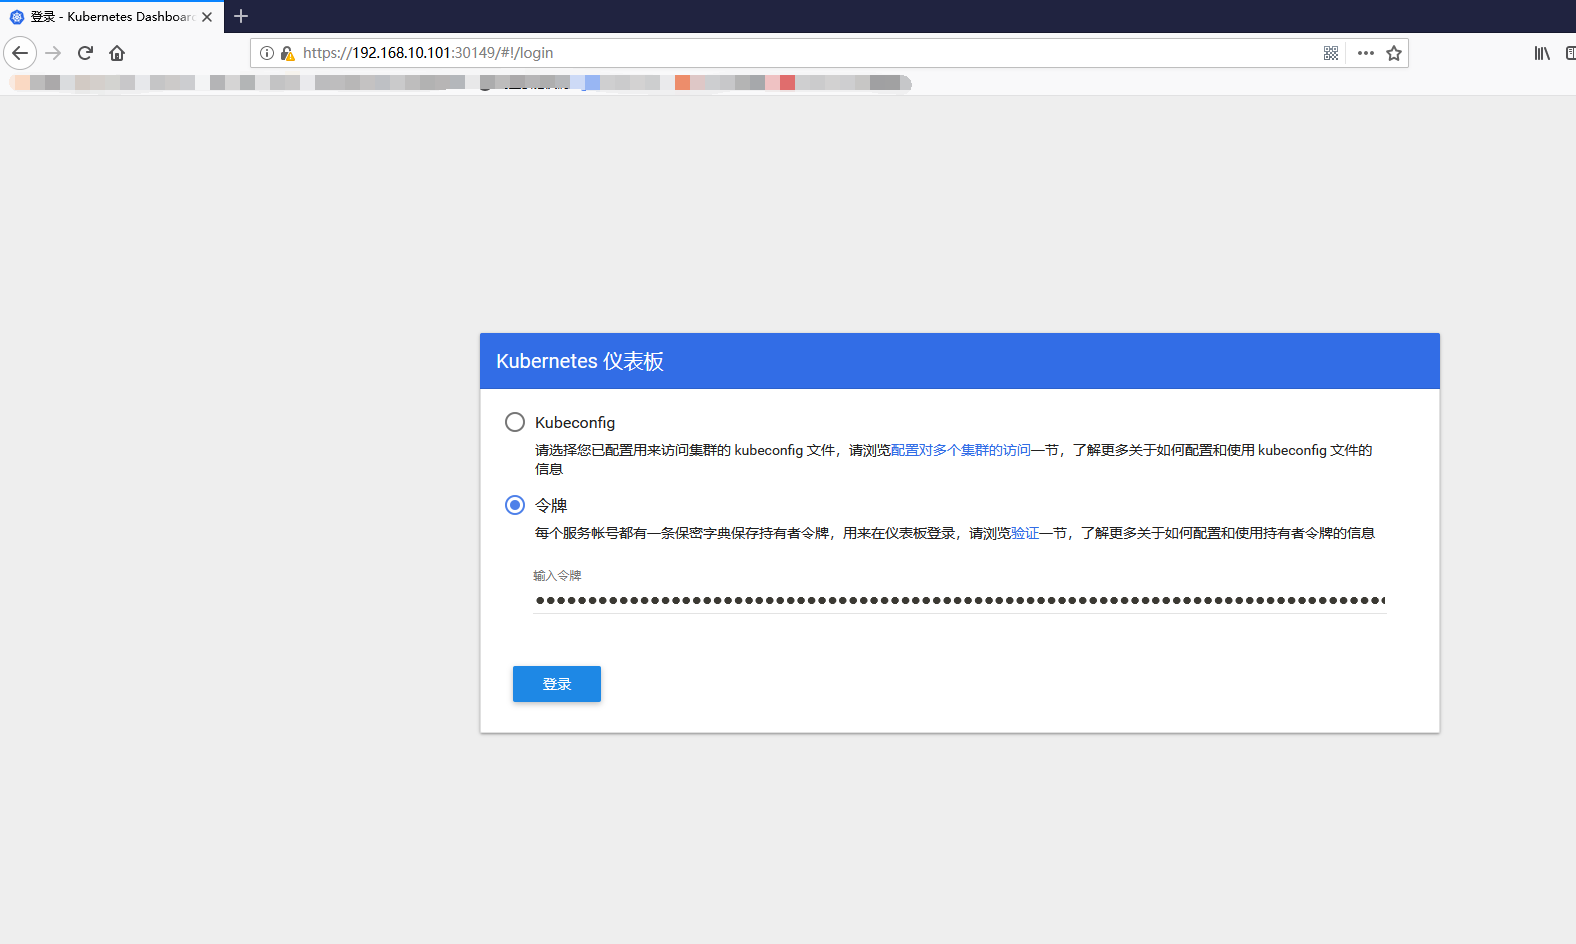
8. Log on to the kubernetes UI
http://192.168.10.101:8080/api/v1/namespaces/kubernetes-dashboard/services/https:kubernetes-dashboard:/proxy/#/login
9. Get logon token
[root@master1 kubernetes]# kubectl -n kube-system get secret | grep kubernetes-dashboard-token
kubernetes-dashboard-token-5sfkz                 kubernetes.io/service-account-token   3      2m37s
[root@master1 kubernetes]# kubectl describe -n kube-system secret/kubernetes-dashboard-token-5sfkz
Name:         kubernetes-dashboard-token-5sfkz
Namespace:    kube-system
Labels:       <none>
Annotations:  kubernetes.io/service-account.name: kubernetes-dashboard
              kubernetes.io/service-account.uid: 035b148d-0fd1-4d6d-9ae5-95cf9d57eb3f

Type:  kubernetes.io/service-account-token

Data
====
ca.crt:     1025 bytes
namespace:  11 bytes
token:      eyJhbGciOiJSUzI1NiIsImtpZCI6IiJ9.eyJpc3MiOiJrdWJlcm5ldGVzL3NlcnZpY2VhY2NvdW50Iiwia3ViZXJuZXRlcy5pby9zZXJ2aWNlYWNjb3VudC9uYW1lc3BhY2UiOiJrdWJlLXN5c3RlbSIsImt1YmVybmV0ZXMuaW8vc2VydmljZWFjY291bnQvc2VjcmV0Lm5hbWUiOiJrdWJlcm5ldGVzLWRhc2hib2FyZC10b2tlbi01c2ZreiIsImt1YmVybmV0ZXMuaW8vc2VydmljZWFjY291bnQvc2VydmljZS1hY2NvdW50Lm5hbWUiOiJrdWJlcm5ldGVzLWRhc2hib2FyZCIsImt1YmVybmV0ZXMuaW8vc2VydmljZWFjY291bnQvc2VydmljZS1hY2NvdW50LnVpZCI6IjAzNWIxNDhkLTBmZDEtNGQ2ZC05YWU1LTk1Y2Y5ZDU3ZWIzZiIsInN1YiI6InN5c3RlbTpzZXJ2aWNlYWNjb3VudDprdWJlLXN5c3RlbTprdWJlcm5ldGVzLWRhc2hib2FyZCJ9.IL-JOSmQTUjGcVDQ2zWu7O4olsFtme_11XQu3hoezwxS03NM-BNILgRfeJHGSheKsKb-ZlgfCsswKynLLLFzzWPK2wYixnE2osdmadKba7kV7-fhvH1LseMSBZeSwhdOGor73JXd2xc2KyEFo3HdhhFly-q4I2rzq73uUaz010iFM9s2dCnxGgzu4JcLhmFKBeenrYJMVCE1NuazG69C5vugpvY1FCT5w4Y0XFUk5uzYYfSi7bbNKWq7U7iAZwX6Z76CoicqeAy-9MCUwFdVNNOIOcWh287PHmM4gIeyXOzeX3IfR8IHfNilljxmOzcOUwjxDg375k3UsIy9WE4LIA
The token field above is the login token, copy it, paste it under the token in the browser, and log in normally
8. Summary of Problems
1. Accessing apiserver is an error forbidden: User "system:anonymous" cannot get path "/", as shown in the following figure:

This problem occurs because Kubernetes API Server adds the--anonymous-auth option, which allows anonymous requests to access secure port s.Requests that are not rejected by other authentication methods are Anonymous requests, where the username of an anonymous request is system:anonymous and the group to which it belongs is system:unauthenticated.And this selection is the default.As a result, when accessing dashboard UI or apiserver using chrome browser, it is likely that the username and password entry dialog box will not pop up, causing subsequent authorization s to fail.To ensure that the user name and password entry dialog box pops up, you need to set --anonymous-auth to false.
If apiserver is installed manually, modify the / etc/kubernetes/apiserver file to include in KUBE_API_ARGS="--anonymous-auth=false
vim /etc/kubernetes/apiserver
KUBE_API_ARGS="--anonymous-auth=false"
If apiserver is installed through kubeadm, modify the / etc/kubernetes/manifests/kube-apiserver.yaml file and add - -anonymous-auth=false under command
[root@master ~]# vim /etc/kubernetes/manifests/kube-apiserver.yaml
apiVersion: v1
kind: Pod
metadata:
  creationTimestamp: null
  labels:
    component: kube-apiserver
    tier: control-plane
  name: kube-apiserver
  namespace: kube-system
spec:
  containers:
  - command:
    - kube-apiserver
    - --advertise-address=192.168.10.102
    - --allow-privileged=true
    - --authorization-mode=Node,RBAC
    - --client-ca-file=/etc/kubernetes/pki/ca.crt
    - --enable-admission-plugins=NodeRestriction
    - --enable-bootstrap-token-auth=true
    - --etcd-cafile=/etc/kubernetes/pki/etcd/ca.crt
    - --etcd-certfile=/etc/kubernetes/pki/apiserver-etcd-client.crt
    - --etcd-keyfile=/etc/kubernetes/pki/apiserver-etcd-client.key
    - --etcd-servers=https://127.0.0.1:2379
    - --insecure-port=0
    - --kubelet-client-certificate=/etc/kubernetes/pki/apiserver-kubelet-client.crt
    - --kubelet-client-key=/etc/kubernetes/pki/apiserver-kubelet-client.key
    - --kubelet-preferred-address-types=InternalIP,ExternalIP,Hostname
    - --proxy-client-cert-file=/etc/kubernetes/pki/front-proxy-client.crt
    - --proxy-client-key-file=/etc/kubernetes/pki/front-proxy-client.key
    - --requestheader-allowed-names=front-proxy-client
    - --requestheader-client-ca-file=/etc/kubernetes/pki/front-proxy-ca.crt
    - --requestheader-extra-headers-prefix=X-Remote-Extra-
    - --requestheader-group-headers=X-Remote-Group
    - --requestheader-username-headers=X-Remote-User
    - --secure-port=6443
    - --service-account-key-file=/etc/kubernetes/pki/sa.pub
    - --service-cluster-ip-range=10.1.0.0/16
    - --tls-cert-file=/etc/kubernetes/pki/apiserver.crt
    - --tls-private-key-file=/etc/kubernetes/pki/apiserver.key
    - --anonymous-auth=false
    image: k8s.gcr.io/kube-apiserver:v1.15.0
    imagePullPolicy: IfNotPresent
Restart apiserver after doing the above to return to normal.