adopt LAMP Platform Deployment and Application The LAMP platform can already be deployed to meet client requests, but since these components are installed on one server, problems can paralyze the LAMP platform.In practice, it is not possible to deploy all LAMP platforms on the same server, which requires the use of LAMP dynamic and static separation technology.
Blog Outline:
1. Concepts related to dynamic and static separation of LAMP
1. The working mode of PHP
2. Working mechanism of FastCGI mode
2. Implement LAMP static and dynamic separation
1.FastCGI-style compilation and installation php
2. Set up Apache and configure php calls through the fastcgi protocol
- Set up Mysql database
4.ab Pressure Test Tool
5. Install the php acceleration software Xcache
3. Deployment of Discuz Forum
1. Concepts related to dynamic and static separation of LAMP
To achieve LAMP static and dynamic separation, the most important thing is PHP, because we need to use the PHP interpreter to parse dynamic pages, and then transfer the parsed site content to the Web server.Let's focus on PHP below.
1. The working mode of PHP
PHP operates in three modes in a LAMP environment:
- CGI mode: PHP is not very good when running in this mode;
- apache module: run PHP in this mode, and LAMP Platform Deployment and Application This is the pattern used, using apache to call php to do the work;
- FastCGI mode: Run PHP in this mode, PHP is a separate process, all PHP sub-processes are managed by a component called php-fpm of PHP.
2. Working mechanism of FastCGI mode
The preferred client initiates a request, which is typically divided into two types: a static request that can be directly returned by Apache in response to the client's requirements; and a dynamic request that contains a script-interpreted language such as PHP or Perl, which is executed by the Apache server through the fastcgi protocol and returned to Apache by calling the PHP server to return the client's requirements from Apache to the clientResource, if the operation on the data is involved in this process, then the PHP server will also call the mysql server through the mysql protocol.Figure: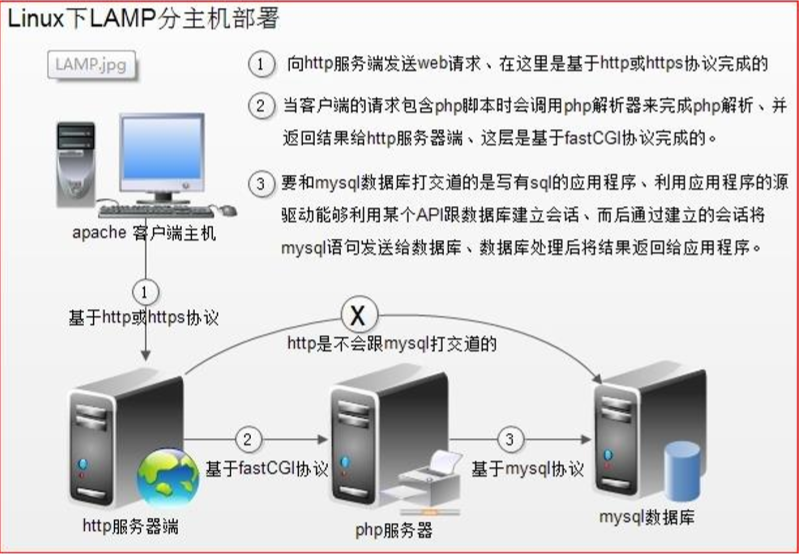
2. Implement LAMP static and dynamic separation
Case requirements:
- An httpd server (192.168.1.1) compiles and installs httpd services;
- A mysql server (192.168.1.2) compiles and installs the mysql service;
- A php server (192.168.1.3) compiles and installs php services;
1.FastCGI-style compilation and installation php
Obtain PHP Required Packages
1) Resolve Dependencies
[root@localhost ~]#  yum -y install libxml2-devel lzip2-devel libcurl-devel \
libmcrypt-devel openssl-devel bzip2-devel
//Dependent packages required to install PHP programs
[root@localhost ~]# tar zxf libmcrypt-2.5.7.tar.gz -C /usr/src
[root@localhost ~]# cd /usr/src/libmcrypt-2.5.7/
[root@localhost libmcrypt-2.5.7]#  ./configure --prefix=/usr/local/libmcrypt && make && make install
//Compile and install libmcrypt package
2) Compile and install php
[root@localhost ~]# tar zxf php-5.6.27.tar.gz -C /usr/src
[root@localhost ~]# cd /usr/src/php-5.6.27/
[root@localhost php-5.6.27]#  ./configure --prefix=/usr/local/php5.6 --with-mysql=mysqlnd \
--with-pdo-mysql=mysqlnd --with-mysqli=mysqlnd --with-openssl --enable-fpm --enable-sockets \
--enable-sysvshm --enable-mbstring --with-freetype-dir --with-jpeg-dir --with-png-dir --with-zlib \
--with-libxml-dir=/usr --enable-xml --with-mhash --with-mcrypt=/usr/local/libmcrypt  \
--with-config-file-path=/etc --with-config-file-scan-dir=/etc/php.d \
--with-bz2 --enable-maintainer-zts && make && make install
Explanation of configuration options:
- --prefix=/usr/local/php5.6//Specify installation location;
- --with-mysql=mysqlnd //Install the connection MySQL tool to support mysql;
- --with-pdo-mysql=mysqlnd //Support Mysql pdo module
- --with-mysqli=mysqlnd //supports mysqli modules
Note: The functions of the above three options: Database and php are not on the same server, specify this method to install the database connection driver; - --with-openssl //supports OpenSSL modules;
- --enable-fpm //support FPM mode;
- --enable-sockets //enable socket support;
- --enable-sysvshm //enable system shared memory support;
- --enable-mbstring //multibyte string, like our Chinese is a multibyte string;
- --with-freetype-dir //support for freetype, install freetype-devel, font-related, font parsing tool--with-jpeg-dir--with-png-dir;
Note: The function of the above two options: processing jpeg, png pictures, php can generate JPEG pictures dynamically; - --with-zlib //is a compression library used to compress transmission over the Internet;
- --with-libxml-dir=/usr //This libxml is used to parse xml;
- --enable-xml //support xml;
- --with-mhash //support mhash;
- --with-mcrypt=/usr/local/libmcrypt //libmcrypt-devel as specified by this package;
- --with-config-file-path=/etc//Specify the path to store the configuration file;
- --with-config-file-scan-dir=/etc/php.d//profile scan path;
- --with-bz2 //support BZip2 In order to support apache's worker or event MPM s, the--enable-maintainer-zts option was used at compile time
If you are using PHP5.3 or above, you can specify mysqlnd in order to link to the MySQL database so that you do not need to install MySQL or MySQL development packages locally.Mysqlnd is available starting with php 5.3 and can be bound to it at compile time (instead of relying on specific MySQL client library bindings), but it is the default starting with PHP 5.4
3) Provide a php profile
[root@localhost ~]# cp /usr/src/php-5.6.27/php.ini-production /etc/php.ini
//Copy the configuration file under the source package to generate the php configuration file
4) Create php-fpm scripts
[root@localhost ~]# cp /usr/src/php-5.6.27/sapi/fpm/init.d.php-fpm /etc/init.d/php-fpm
//Copy startup script under source package
[root@localhost ~]# chmod +x /etc/init.d/php-fpm
[root@localhost ~]# chkconfig --add php-fpm
//Added as a system service, cannot start yet because php server configuration file has not been generated
5) Provide php-fpm configuration and edit
[root@localhost ~]# cd /usr/local/php5.6/etc/
[root@localhost etc]# cp php-fpm.conf.default php-fpm.conf
//The configuration file after the original installation is complete is not valid, so it needs to be renamed (this is the php-fpm configuration file)
[root@localhost etc]# sed -i 's#;pid = run/php-fpm.pid#pid = run/php-fpm.pid#g' php-fpm.conf
//Specify where to store pid files
[root@localhost etc]# sed -i 's/listen = 127.0.0.1:9000/listen = 0.0.0.0:9000/g' php-fpm.conf
//Modify listen address to all listens
[root@localhost etc]# sed -i 's/pm.max_children = 5/pm.max_children = 50/g' php-fpm.conf
//Modify the maximum number of started subprocesses to 50
[root@localhost etc]# sed -i 's/pm.start_servers = 2/pm.start_servers = 5/g' php-fpm.conf
//Modify the initial number of startup processes to 5
[root@localhost etc]# sed -i 's/pm.min_spare_servers = 1/pm.min_spare_servers = 5/g' php-fpm.conf
//Modify the minimum number of idle subprocesses to 5
[root@localhost etc]# sed -i 's/pm.max_spare_servers = 3/pm.max_spare_servers = 35/g' php-fpm.conf
//Modify maximum idle child process to 35
[root@localhost ~]# systemctl start php-fpm //start PHP service
[root@localhost ~]# Netstat-anpt | grep 9000 //Make sure 9000 is listening
tcp        0      0 0.0.0.0:9000            0.0.0.0:*               LISTEN      45563/php-fpm: mast
If the firewall is open, the following actions are required:
[root@localhost ~]#  firewall-cmd --permanent --add-port=9000/tcp
[root@localhost ~]# firewall-cmd --reload
//Allow TCP9000 access, overload for immediate effect
[root@localhost ~]# mkdir -p /var/www/benet
//The new key virtual host directory on this host is used to store web page files
2. Set up Apache and configure php calls through the fastcgi protocol
Reference resources Install Apache Install Apache, which is skipped here. After the Apache installation is complete, you need to do the following!
Since Apache 2.4, there has been a module dedicated to FastCGI implementation, mod_proxy_fcgi.so, which is actually an extension of the mod_proxy.so module, so the following two modules need to be loaded:
LoadModule proxy_fcgi_module modules/mod_proxy_fcgi.so
LoadModule proxy_module modules/mod_proxy.so
The operation is as follows:
[root@localhost ~]# vim /usr/local/http-2.4.23/conf/httpd.conf
//Edit the httpd master profile
........................                 //Omit some content
# LoadModule proxy_fcgi_module modules/mod_proxy_fcgi.so
# LoadModule proxy_module modules/mod_proxy.so
//Remove the'#'sign in front of the module to enable it
#Include conf/extra/httpd-vhosts.conf         //Remove'#'and enable virtual host profiles
//Locate AddType: Add the following line:
AddType  application/x-httpd-php .php
//Allow apache to recognize php-formatted pages
//Locate the following:
<IfModule dir_module>
    DirectoryIndex index.php index.html         //Add index.php before index.html
</IfModule>
[root@localhost ~]# vim /usr/local/http-2.4.23/conf/extra/httpd-vhosts.conf
//Edit Apache's virtual host configuration file and modify it to the following:
<VirtualHost *:80>
    ServerAdmin admin@admin.com
    DocumentRoot "/var/www/benet"
    ServerName www.benet.com
    ServerAlias www.benet.com
    ErrorLog "logs/benet-error_log"
    CustomLog "logs/benet-access_log" common
    ProxyRequests Off                                         //Close Forward Agent
        ProxyPassMatch  ^/(.*\.php(/.*)?)$  fcgi://192.168.1.3:9000/var/www/benet/$1
<Directory "/var/www/benet">
 Options  FollowSymLinks          //Disable directory traversal
 AllowOverride None        //Allow empty requests
 Require all granted                 //Allow all clients access
</Directory>
</VirtualHost>
[root@localhost ~]# mkdir -p /var/www/benet
[root@localhost ~]# systemctl restart httpd
//After creating the virtual directory, restart the httpd service
ProxyPassMatch ^/(.*\.php(/.*)?)$ fcgi://192.168.1.3:9000/var/www/benet/$1 //Php-fpm needs to know at least the running directory and URI when sending a file request ending in.Php to the php-fpm process, so these two parameters are specified directly after fcgi://192.168.1.3:9000. Other parameters are encapsulated by mod_proxy_fcgi.so and do not need to be specified manually.It is important to note that the directory path behind the IP address needs to be the same as that behind the DocumentRoot in <VirtualHost>.ProxyPassMatch matches and enforces this rule only if it satisfies a specific regular pattern of content, where the pattern is ^/(. *\php(/. *)?)$Start from the root directory of the Web site (virtual host <VirtualHost>), match any path ending in.Php, or follow one/more paths following.Php.The ^ (caret) and $(dollar) brackets that mark the beginning and end of the path to be matched can be expressed as $1 for easy reference.Fcgi://192.168.1.3:9000 Proxy forwarded via mod_proxy_fcgi, using the fastCGI protocol, to the port on which PHP-FPM listens./path/to/your/documentroot/very important!It must match the path of the virtual host, and it must be the absolute path of the corresponding PHP file in the operating system.Otherwise, the file will not be found. $1 A variable that can be extended from the original request to the entire request path, where the previous( ) Which path matches inside ( uri)
Note: In versions prior to Apache httpd 2.4, either PHP was run as Apache's module or a third-party module was added to support the PHP-FPM implementation.
Create a test page on the php server:
[root@localhost ~]# cat /var/www/benet/index.php
<?php
phpinfo();
?>
The results are as follows: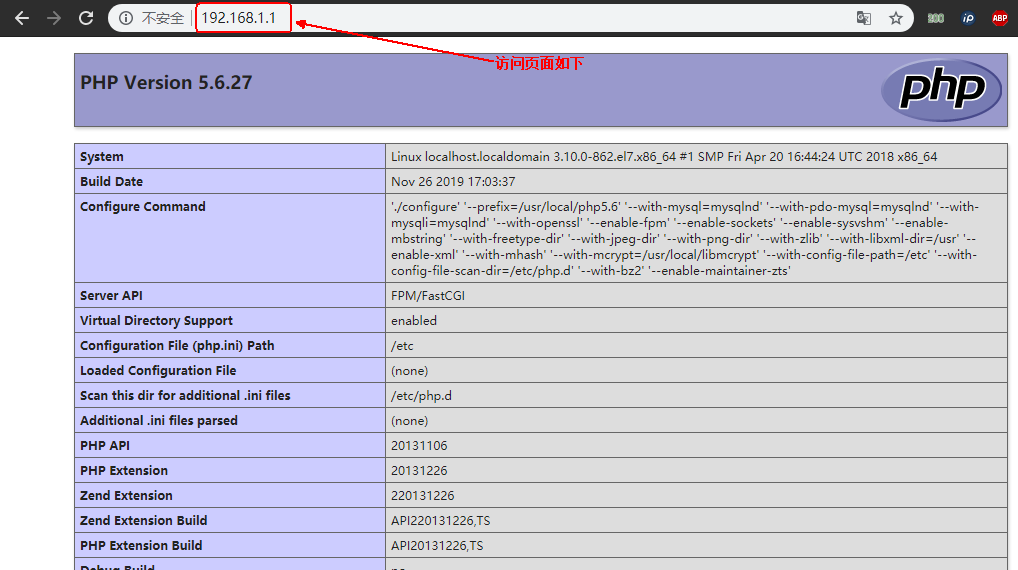
Installing this page means Apache can work with php
This is using Apache's virtual host to call php-fpm to work. In fact, Apache itself can call php-fpm without creating a virtual host.
3. Set up Mysql database
Since it takes a long time to compile and install the Mysql database, I provide Mysql installation script and required software Install in one minute (mysql database account root default password is 123)!
After installation, do the following:
[root@localhost ~]# mysql -u root -p123
mysql> grant all on *.* to 'lzj'@'192.168.1.%' identified by '123456';
//Create and authorize database users
mysql> exit
Fill in the test script on the php server:
[root@localhost ~]# cat /var/www/benet/test.php
<?php
$link=mysql_connect('192.168.1.2','lzj','123456');
if($link) echo "Congratulations, database connection is successful!!!"; else echo "connect shibai";
mysql_close($link);
?>
Access for testing:
Seeing this page means Apache, PHP, Mysql can work together!
4.ab Pressure Test Tool
Network performance stress testing is an indispensable part of the performance tuning process of server websites.Only when the server is under high pressure can it reflect the problems exposed by improper settings such as software and hardware.
The most common performance testing tools are ab, http_load, webbench, siege.This post only describes the ab tool.
ab is Apache's own pressure test tool.ab is very useful for not only testing Apache servers for site access stress, but also other types of servers.For example: Nginx, Tomcat, IIS, etc.
(1) Principle of ab pressure test tool
The ab command creates multiple concurrent access threads that simulate multiple visitors accessing a URL address at the same time.Its testing goal is URL-based, so it can test both Apache's load pressure and the pressure on other Web servers such as Nginx, Tomcat, IIS, and so on.
The ab command requires very little on the machine that is issuing the load, and it does not consume much CPU or memory.However, it can cause a huge load on the target server.When testing, you need to be careful, otherwise you may test too much load at one time, which may cause the target server to run out of resources and cause serious crashes.
(2) Installation of ab pressure test tools
The installation of ab is very simple. If the source package installs Apache, after Apache is installed, ab is stored in the bin directory of the Apache installation directory.
If Apache is installed using yum, the ab command is stored in the / usr/bin directory by default;
Note: If you do not want to install Apache and want to use the ab command, you need to install httpd-tools using yum.
To see if ab was successfully installed, you can do the following tests:
This is due to an error in the library location specified when installing openssl.
If this happens, the solution is as follows:
[root@localhost ~]# Export LD_LIBRARY_PATH=/usr/local/openssl/lib//Export the path of the required module as an environment variable
[root@localhost ~]# /usr/local/http-2.4.23/bin/ab-V //This will allow normal use
This is ApacheBench, Version 2.3 <$Revision: 1748469 $>
Copyright 1996 Adam Twiss, Zeus Technology Ltd, http://www.zeustech.net/
Licensed to The Apache Software Foundation, http://www.apache.org/
(3) parameters of ab pressure test command
There are two common parameters for the ab command:
- -n: Number of requests executed in the test session (total requests);
- -c: the number of requests generated at one time (i.e. concurrent users);
[root@localhost ~]# cat /var/www/benet/index.html
iiiiiiiiiiiiiiiiiiiiiiiiiiiiiiiii
//Create Apache Home Page File
[root@localhost ~]# ab -c 500 -n 10000 http://192.168.1.1/index.html
//Testing the Web server 192.168.1.1
This is ApacheBench, Version 2.3 <$Revision: 1748469 $>
Copyright 1996 Adam Twiss, Zeus Technology Ltd, http://www.zeustech.net/
Licensed to The Apache Software Foundation, http://www.apache.org/

Benchmarking 192.168.1.1 (be patient)
Completed 1000 requests
Completed 2000 requests
Completed 3000 requests
Completed 4000 requests
Completed 5000 requests
Completed 6000 requests
Completed 7000 requests
Completed 8000 requests
Completed 9000 requests
Completed 10000 requests
Finished 10000 requests

Server Software:        Apache/2.4.23
Server Hostname:        192.168.1.1
Server Port:            80

Document Path:          /index.html                  //Requested resource name
Document Length:        34 bytes                  //Body length of response data

Concurrency Level:      500                   //Number of concurrencies
Time taken for tests:   1.727 seconds       //Time spent processing these requests
Complete requests:      10000               //Number of successful requests completed
Failed requests:        0                          //Number of failed requests
Total transferred:      2780000 bytes      //Sum of response data lengths for all requests
HTML transferred:       340000 bytes         //Sum of body data requested
Requests per second:    5788.87 [#/sec] (mean) //throughput - Number of requests per second (calculation formula: number of requests / user wait time) Throughput is as high as possible
Time per request:       86.373 [ms] (mean)        //Average user wait time (calculated as user wait time/(number of requests/concurrency))
Time per request:       0.173 [ms] (mean, across all concurrent requests)       //Average server wait time (calculated as user wait time/number of requests completed)
Transfer rate:          1571.59 [Kbytes/sec] received   //Size of data requested by the user (calculated as total data length/user wait time)

Connection Times (ms)
              min  mean[+/-sd] median   max
Connect:        0   24 138.0      4    1034
Processing:     8   50  93.8     16     822
Waiting:        0   47  93.2     13     816
Total:         12   74 168.7     20    1255

Percentage of the requests served within a certain time (ms)
  50%     20
  66%     25
  75%     31
  80%     39
  90%    222
  95%    250
  98%    832
  99%   1050
 100%   1255 (longest request)
 //This part of the data describes the distribution of processing time for each request
(4) Important performance indicators of ab pressure testing tools
Several indicators are important in performance testing:
1. Throughput: A quantitative description of the concurrent processing capacity of the server.Refers to the number of requests processed per unit time under a number of concurrent users.The maximum number of requests that can be processed per unit time under a number of concurrent users is called maximum throughput.
Note: Throughput is based on the number of concurrent users.What this sentence means:
- Throughput is related to the number of concurrent users;
- Throughput varies with the number of concurrent users.
Calculating formula: Total number of requests / Time spent processing to complete these requests.
2. Number of concurrent connections: The number of concurrent connections refers to the number of requests received by the server at a given time, simply a session.
3. Number of concurrent users: A user can generate one or more sessions simultaneously, that is, the number of connections;
4. Average user wait time: Calculate formula: Time spent processing all requests/ (total requests/ concurrent users);
5. Average server wait time: Calculate formula: The time it takes to process how many requests are completed/the total number of requests.This is the reciprocal of throughput.This is also the average wait time/number of concurrent users.
5. Install the php acceleration software Xcache
The following are done on the php server.
download Xcache Software
(1) Install xcache
[root@localhost ~]# tar zxf xcache-3.2.0.tar.gz -C /usr/src
[root@localhost ~]# cd /usr/src/xcache-3.2.0/
[root@localhost xcache-3.2.0]#  /usr/local/php5.6/bin/phpize
Configuring for:
//The phpize command is required to generate the configure configuration file
PHP Api Version:         20131106
Zend Module Api No:      20131226
Zend Extension Api No:   220131226
[root@localhost xcache-3.2.0]# ./configure --enable-xcache --enable-xcache-coverager \
--enable-xcache-optimizer --with-php-config=/usr/local/php5.6/bin/php-config && make && make install
//After compiling and installing, this path is critical:
Installing shared extensions:     /usr/local/php5.6/lib/php/extensions/no-debug-zts-20131226/
Compile configuration parameters in detail:
- --enable-xcache: Enable Xcache functionality;
- --enable-xcache-coverager: Used to test the effectiveness and additivity of accelerators;
- --enable-xcache-optimizer: Operational code optimization;
(2) Create xcache cache cache file
[root@localhost ~]# touch /tmp/xcache
[root@localhost ~]# chmod 777 /tmp/xcache
(3) Copy the background manager of xcache to the site directory
[root@localhost ~]# cp -r /usr/src/xcache-3.2.0/htdocs/ /var/www/benet/xcache
//To use web pages to access and see the results
(4) Modify php's configuration file to support xcache
[root@localhost ~]# Vim/etc/php.ini //Edit PHP configuration file
//Add the following at the end
[xcache-common]
extension = /usr/local/php5.6/lib/php/extensions/no-debug-zts-20131226/xcache.so
//Enable xcache extensions for php
[xcache.admin]
xcache.admin.enable_auth = Off         //Turn off xcache authentication
[xcache]
xcache.shm_scheme ="mmap"            //Decide how xcache shares memory from the system
//nmap is a memory-mapped file method
xcache.size=60M              //The size of the shared cache used, if set to 0, will not be available
xcache.count =1                  //How many chunks will the cache be divided into, it is recommended to set to cpu number
xcache.slots =8K                //Reference value for the number of hash slots
xcache.ttl=0                      //File lifetime, set to 0 to cache infinitely
xcache.gc_interval =0          //Time interval to trigger garbage collection, default to 0 seconds
xcache.var_size=64M           //Caching for variables
xcache.var_count =1
xcache.var_slots =8K
xcache.var_ttl=0
xcache.var_maxttl=0
xcache.var_gc_interval =300
xcache.test =Off                   //Turn off test functionality
xcache.readonly_protection = Off           //Startup reduces performance, but slightly improves security
xcache.mmap_path ="/tmp/xcache"          //For read-only file paths
xcache.coredump_directory =""
//In the event of a failure, the core dump function must be placed in a php writable directory and left blank to disable
xcache.cacher =On            //Invalid when xcache.size=0 using opcode cache
xcache.stat=On                 //Check script updates using stat discovery
xcache.optimizer =Off                 //Disable optimization
[xcache.coverager]
xcache.coverager =On           //Enable Code Coverage Information Collector
xcache.coveragedump_directory =""
//Directory location where data collection information is placed, using directory/tmp/pcovis by default
[root@localhost ~]# scp -r /var/www/benet/xcache/  192.168.1.1:/var/www/benet
//Copy xcache web page files to the Apache server web page root directory
[root@localhost ~]# systemctl restart php-fpm
//Restart php
Customers use browsers for access testing: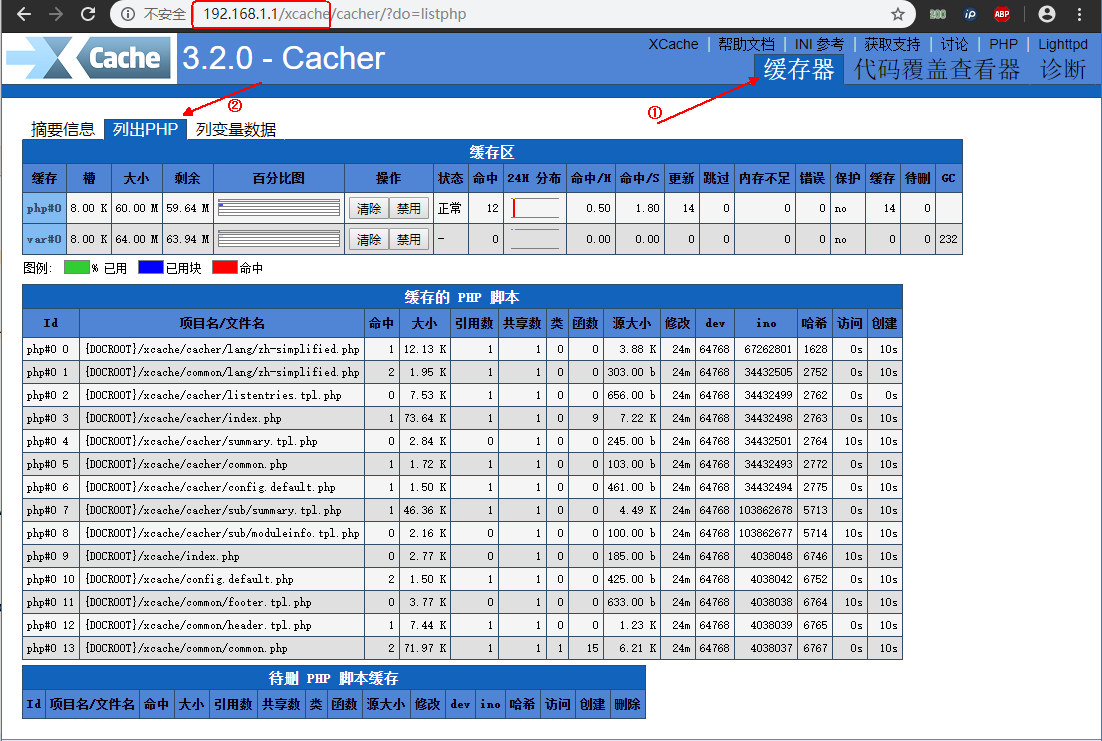
If you stress test dynamic pages now, xcache caches dynamic page information, which is not commonly used in real-world environments, so this is skipped.
3. Deployment of Discuz Forum
download Discuz Forum Program
The php server does the following:
[root@localhost ~]# unzip Discuz_7.0.0_FULL_SC_UTF8.zip -d discus
//Unzip the Discuz software program into the discus directory
[root@localhost ~]# mv discus/Discuz_7.0.0_FULL_SC_UTF8/upload/ /var/www/benet/bbs
//Move upload from Discuz program to website and directory
[root@localhost ~]# chown -R nobody:nobody /var/www/benet/bbs/
[root@localhost ~]# chmod -R 777 /var/www/benet/bbs/
//Set permissions on directories (test environment gives maximum permissions)
[root@localhost ~]# sed -i 's/short_open_tag = Off/short_open_tag = On/g' /etc/php.ini
//Modify the configuration file of the php server
[root@localhost ~]# systemctl restart php-fpm //restart php-fpm
[root@localhost ~]# echo "/var/www/benet  192.168.1.0/24(rw,sec=sys,sync,no_root_squash)" >> /etc/exports
[root@localhost ~]# systemctl restart nfs
[root@localhost ~]# showmount -e
Export list for localhost.localdomain:
/var/www/benet 192.168.1.0/24
//Configure the nfs service and restart the nfs service
The Mysql server does the following:
[root@localhost ~]# Mysql-u root-p123 //Log on to Mysql server
mysql> create database bbs;                //Create bbs database
The Apache server does the following:
[root@localhost ~]# mount -t nfs 192.168.1.3:/var/www/benet/ /var/www/benet
//Copy the page root directory of the php server to the Apache server page root directory
Client Access Test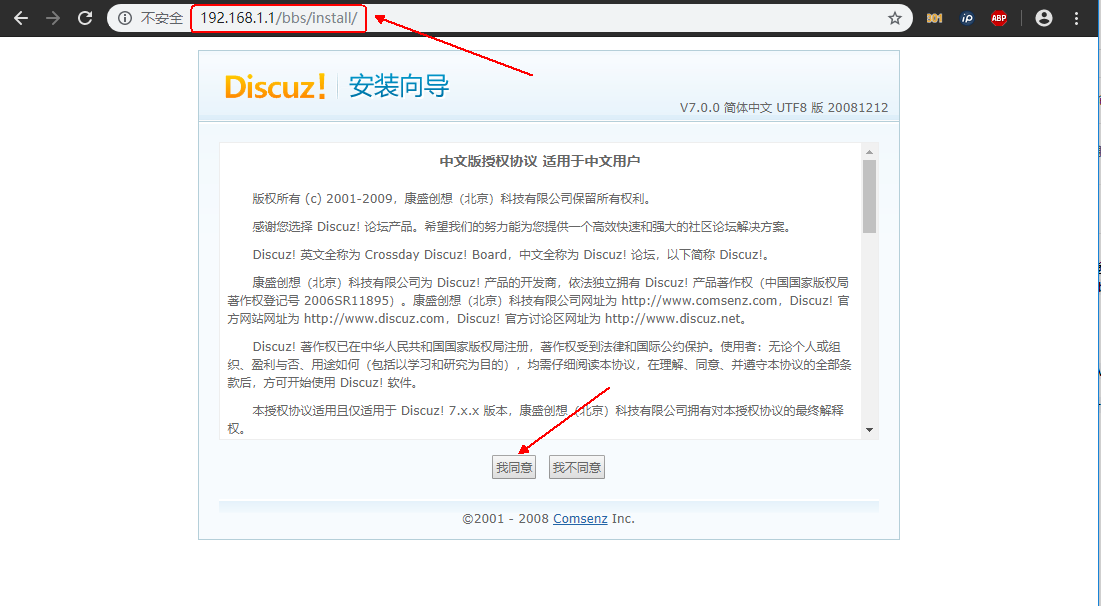
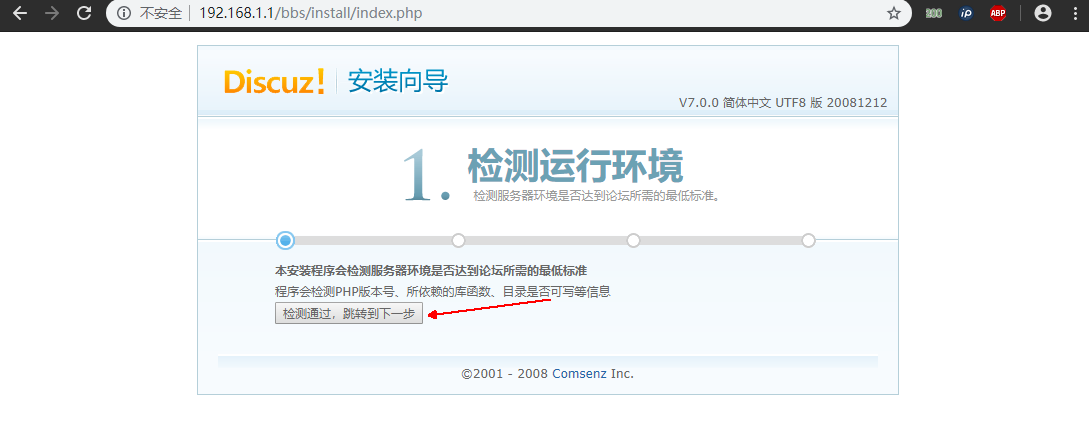
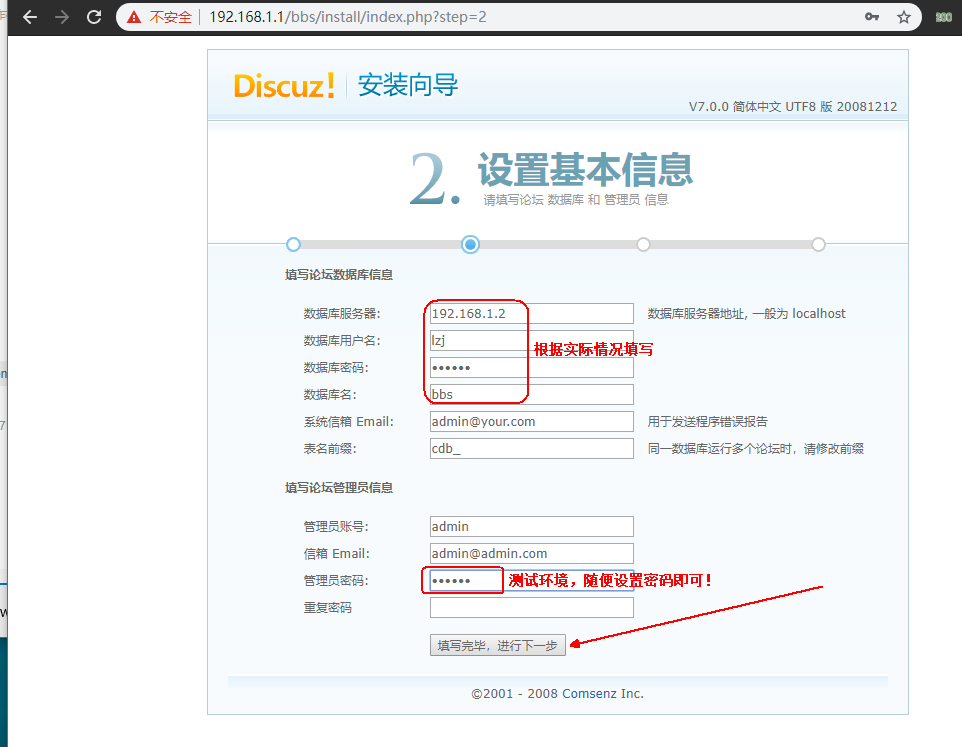
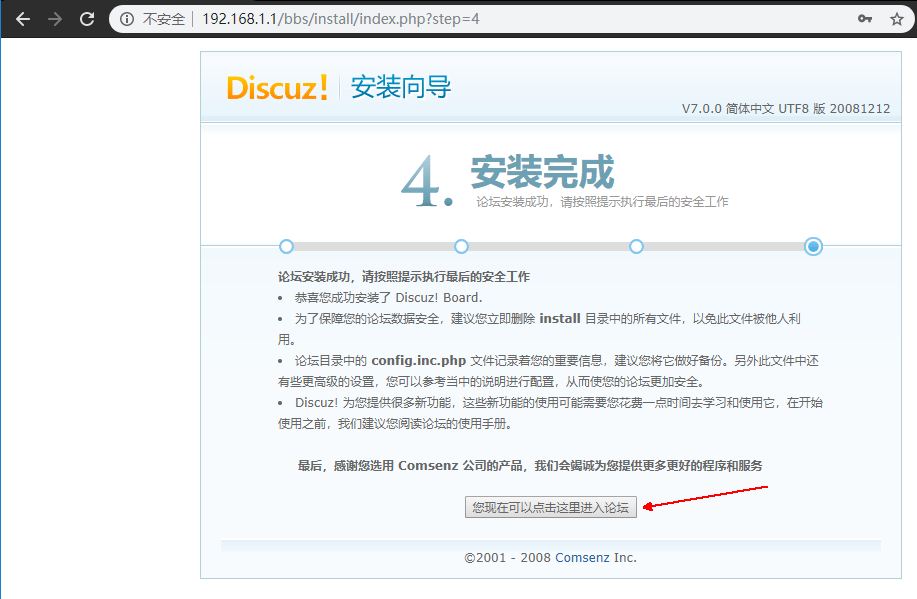
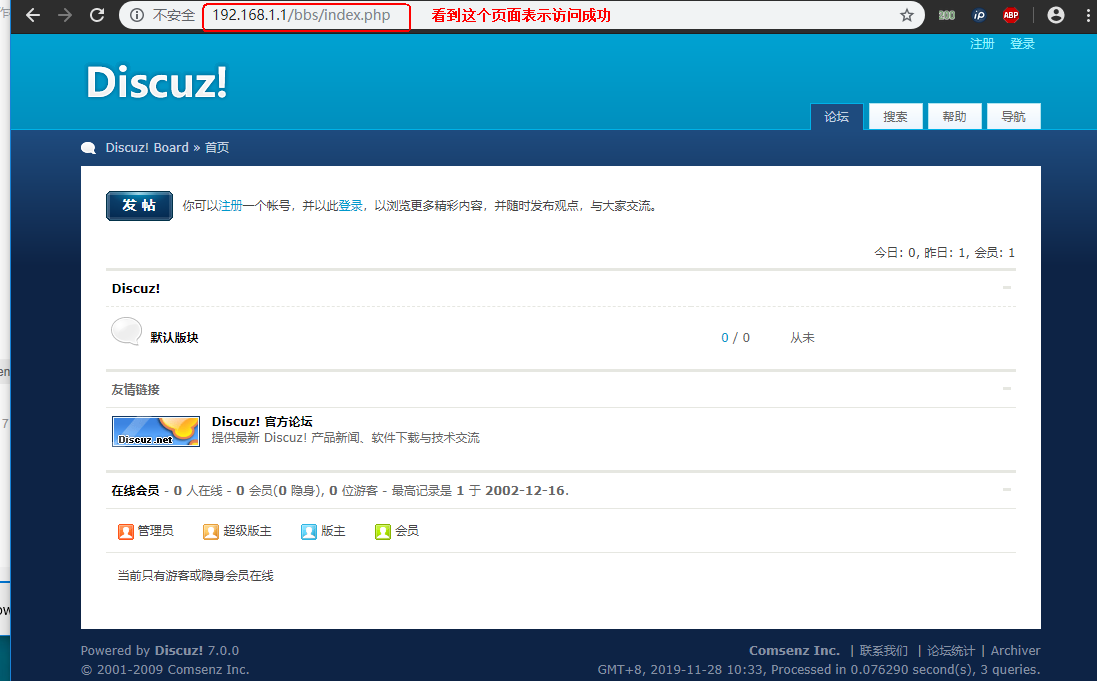
Visit Forum Success!
_________