In this article, you will learn how to run Spring Boot microservices, which communicate with each other on Knative. I also showed you how to use GraalVM to prepare a native image of a Spring Boot application. We will then run it on Kubernetes using the Skaffold and jibsave plug-ins.
On Knative, you can run any type of application, not just functions. In this article, when I write "microservices", I actually think about service to service communication.
As a microservice example in this article, I used two applications, call service and caller service. They both expose an endpoint that prints the name of the application pod. The caller service application also calls the endpoint exposed by the call me service application.
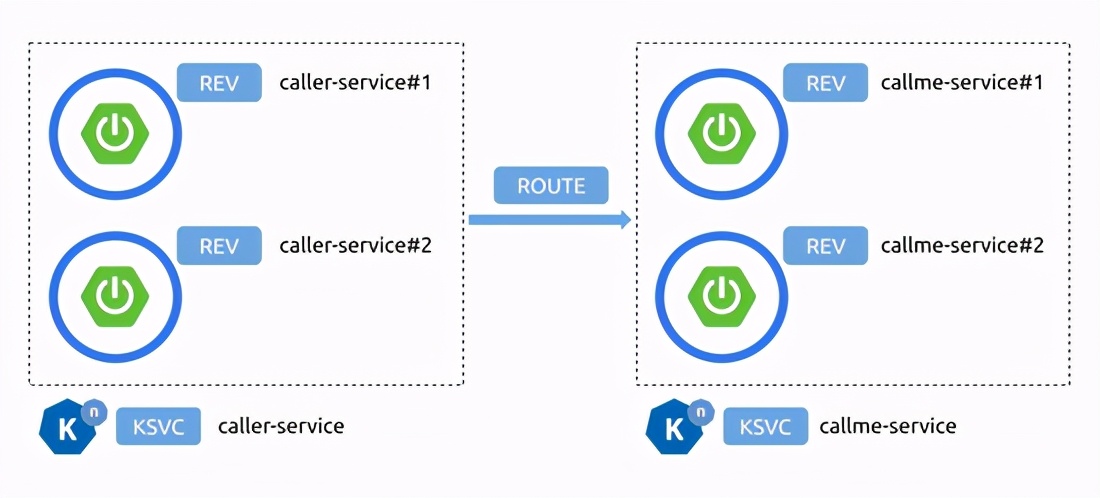
On Kubernetes, both applications will be deployed in multiple versions as Knative services. We will also use Knative routing to distribute traffic in these revisions. The following figure illustrates the architecture of our example system.
Prepare Spring Boot microservice
We have two simple Spring Boot applications that expose a REST endpoint, health checks, and run an in memory H2 database. We use Hibernate and Lombok. Therefore, we need to be in Maven POM XML} contains the following list of dependencies.
<dependency>
    <groupId>org.springframework.boot</groupId>
    <artifactId>spring-boot-starter-web</artifactId>
</dependency>
<dependency>
    <groupId>org.springframework.boot</groupId>
    <artifactId>spring-boot-starter-actuator</artifactId>
</dependency>
<dependency>
    <groupId>org.springframework.boot</groupId>
    <artifactId>spring-boot-starter-data-jpa</artifactId>
</dependency>
<dependency>
    <groupId>com.h2database</groupId>
    <artifactId>h2</artifactId>
    <scope>runtime</scope>
</dependency>
<dependency>
    <groupId>org.projectlombok</groupId>
    <artifactId>lombok</artifactId>
    <version>1.18.16</version>
</dependency>
Each time the ping endpoint is called, it creates an event and stores it in the H2 database. The REST endpoint returns the name of the pod and namespace in Kubernetes and the id of the event. This method is very useful in our manual testing of clusters.
@RestController
@RequestMapping("/callme")
public class CallmeController {

    @Value("${spring.application.name}")
    private String appName;
    @Value("${POD_NAME}")
    private String podName;
    @Value("${POD_NAMESPACE}")
    private String podNamespace;
    @Autowired
    private CallmeRepository repository;

    @GetMapping("/ping")
    public String ping() {
        Callme c = repository.save(new Callme(new Date(), podName));
        return appName + "(id=" + c.getId() + "): " + podName + " in " + podNamespace;
    }

}
This is our model class - Callme. The model classes in the caller service application are very similar.
@Entity
@Getter
@Setter
@NoArgsConstructor
@RequiredArgsConstructor
public class Callme {

    @Id
    @GeneratedValue
    private Integer id;
    @Temporal(TemporalType.TIMESTAMP)
    @NonNull
    private Date addDate;
    @NonNull
    private String podName;

}
In addition, let's take a look at the first version of the {Ping} method in {CallerController}. We will modify it later when we discuss communication and tracking. Now, it is important to understand that this method also calls the ping method exposed by the call me service and returns the entire response.
@GetMapping("/ping")
public String ping() {
    Caller c = repository.save(new Caller(new Date(), podName));
    String callme = callme();
    return appName + "(id=" + c.getId() + "): " + podName + " in " + podNamespace
            + " is calling " + callme;
}
Preparing Spring Boot native images using GraalVM
Spring Native supports compiling spring applications into native executables using the GraalVM native compiler. For more details about this project, refer to its documentation:
https://docs.spring.io/spring-native/docs/current/reference/htmlsingle/
This is the main class of our application.
@SpringBootApplication
public class CallmeApplication {

   public static void main(String[] args) {
      SpringApplication.run(CallmeApplication.class, args);
   }

}
Hibernate does a lot of dynamic things at runtime. Therefore, we need to use hibernate to enhance the entities in the application at build time. We need to add the following Maven plug-ins to our build.
<plugin>
   <groupId>org.hibernate.orm.tooling</groupId>
   <artifactId>hibernate-enhance-maven-plugin</artifactId>
   <version>${hibernate.version}</version>
   <executions>
      <execution>
         <configuration>
            <failOnError>true</failOnError>
            <enableLazyInitialization>true</enableLazyInitialization>
            <enableDirtyTracking>true</enableDirtyTracking>
            <enableExtendedEnhancement>false</enableExtendedEnhancement>
         </configuration>
         <goals>
            <goal>enhance</goal>
         </goals>
      </execution>
   </executions>
</plugin>
In this article, I use the latest version of Spring Native – 0.9 0 Because Spring Native is actively developed, there are great changes between subsequent versions. If you compare it with other articles based on earlier versions, we don't have to disable proxybeans methods and exclude
SpringDataWebAutoConfiguration, add a spring context indexer to a dependency, or create hibernate properties . Cool! I can also use Buildpacks to build native images.
So now we just need to add the following dependencies.
<dependency>
   <groupId>org.springframework.experimental</groupId>
   <artifactId>spring-native</artifactId>
   <version>0.9.0</version>
</dependency>
The Spring AOT plug-in performs the advanced transformations needed to improve native image compatibility and footprint.
<plugin>
    <groupId>org.springframework.experimental</groupId>
    <artifactId>spring-aot-maven-plugin</artifactId>
    <version>${spring.native.version}</version>
    <executions>
        <execution>
            <id>test-generate</id>
            <goals>
                <goal>test-generate</goal>
            </goals>
        </execution>
        <execution>
            <id>generate</id>
            <goals>
                <goal>generate</goal>
            </goals>
        </execution>
    </executions>
</plugin>
Using Buildpacks to run a native image on Knative
Using Builpacks to create native images is our primary choice. Although it requires a Docker daemon, it works on every operating system. However, we need to use the latest stable version of springboot. In this case, it is 2.4 3. You can also use the spring bootsave plug-in in Maven POM Configure Buildpacks in XML}. Because we need to build and deploy applications on Kubernetes in one step, I prefer the configuration in Skaffold. We use
PakeToBuildPack/builder:tiny . BP is also required_ BOOT_ NATIVE_ The image} environment variable enables the native build option.
apiVersion: skaffold/v2beta11
kind: Config
metadata:
  name: callme-service
build:
  artifacts:
  - image: piomin/callme-service
    buildpacks:
      builder: paketobuildpacks/builder:tiny
      env:
        - BP_BOOT_NATIVE_IMAGE=true
deploy:
  kubectl:
    manifests:
      - k8s/ksvc.yaml
The Skaffold configuration references our Knative service list. This is very atypical because we need to inject pod and namespace names into the container. We also allow up to 10 concurrent requests per pod. If you exceed this value, you can zoom in on many running instances.
apiVersion: serving.knative.dev/v1
kind: Service
metadata:
  name: callme-service
spec:
  template:
    spec:
      containerConcurrency: 10
      containers:
      - name: callme
        image: piomin/callme-service
        ports:
          - containerPort: 8080
        env:
          - name: POD_NAME
            valueFrom:
              fieldRef:
                fieldPath: metadata.name
          - name: POD_NAMESPACE
            valueFrom:
              fieldRef:
                fieldPath: metadata.namespace
By default, knative does not allow the Kubernetes fieldRef attribute. To enable it, we need to update the knative features ConfigMap in the knative service namespace. The required property name is
kubernetes.podspec-fieldref .
kind: ConfigMap
apiVersion: v1
metadata:
  annotations:
  namespace: knative-serving
  labels:
    serving.knative.dev/release: v0.16.0
data:
  kubernetes.podspec-fieldref: enabled
Finally, we can build and deploy spring boot microservices on Knative using the following commands.
$ skaffold run
Running a native image on Knative using Jib
As in my last article on Knative, we will use Skaffold and Jib to build and run our application on Kubernetes. Fortunately, the jibsave plug-in has introduced support for GraalVM "native images". The Jib GraalVM native image extension expects the native image maven plug-in to complete the generation of "native image" (using native image: native image) The extension then simply copies the binary into the container image and sets it as an executable.
Of course, unlike Java bytecode, native images are not portable, but platform specific. The native image Maven plug-in does not support cross compilation, so the native image should be built on the same operating system as the runtime architecture. Because I'm in Ubuntu 20 10, so I should use the same basic Docker image to run containerized microservices. In this case, I chose the image ubuntu:20.10 as shown below.
<plugin>
   <groupId>com.google.cloud.tools</groupId>
   <artifactId>jib-maven-plugin</artifactId>
   <version>2.8.0</version>
   <dependencies>
      <dependency>
         <groupId>com.google.cloud.tools</groupId>
         <artifactId>jib-native-image-extension-maven</artifactId>
         <version>0.1.0</version>
      </dependency>
   </dependencies>
   <configuration>
      <from>
         <image>ubuntu:20.10</image>
      </from>
      <pluginExtensions>
         <pluginExtension>
            <implementation>com.google.cloud.tools.jib.maven.extension.nativeimage.JibNativeImageExtension</implementation>
         </pluginExtension>
      </pluginExtensions>
   </configuration>
</plugin>
If you use the jibsave plug-in, you first need to build a native image. In order to build a native image of the application, we also need to include a native image maven plug-in. Of course, you need to build our application using the graalvmjdk.
<plugin>
   <groupId>org.graalvm.nativeimage</groupId>
   <artifactId>native-image-maven-plugin</artifactId>
   <version>21.0.0.2</version>
   <executions>
      <execution>
         <goals>
            <goal>native-image</goal>
         </goals>
         <phase>package</phase>
      </execution>
   </executions>
</plugin>
Therefore, the last part of this section just runs the Maven build. In my configuration, you need to activate the native image Maven plug-in under the native image configuration file.
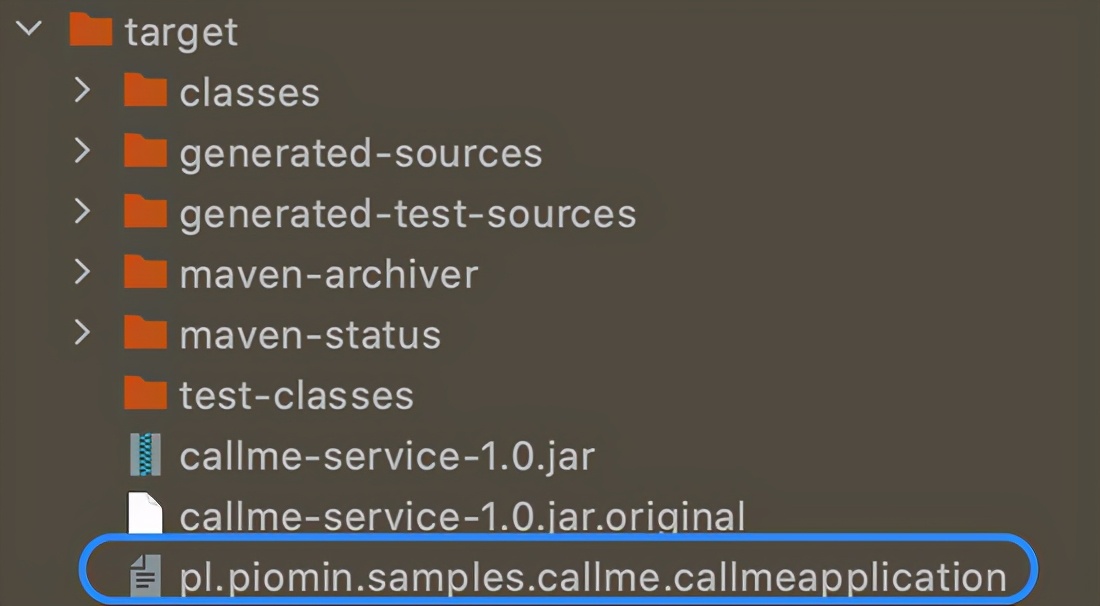
$ mvn clean package -Pnative-image
After generation, the native image of the call me service is visible in the target directory.
The configuration of skafold is typical. We just need to enable Jib as the build tool.
apiVersion: skaffold/v2beta11
kind: Config
metadata:
  name: callme-service
build:
  artifacts:
  - image: piomin/callme-service
    jib: {}
deploy:
  kubectl:
    manifests:
      - k8s/ksvc.yaml
Finally, we can build and deploy spring boot microservices on Knative using the following commands.
$ skaffold run
Communication between microservices on Network
I deployed two revisions of each application on Knative. For comparison, the first version of the deployed application was compiled with OpenJDK. Only the latest version is based on the GraalVM local image. Therefore, we can compare the startup times of the two versions.
Let's look at the list of revisions after deploying two versions of the application. Traffic is divided into 60% to the latest version and 40% to the previous version of each application.

Behind the scenes, Knative created Kubernetes services and multiple deployments. Each revision has a deployment. In addition, there are multiple services, but each revision has one service. The service is an ExternalName service type. Assuming that you still want to split traffic between multiple revisions, you should fully use the service in your communication. The name of the service is call service. However, we should use SVC. XML with namespace names cluster. FQDN name with local suffix.
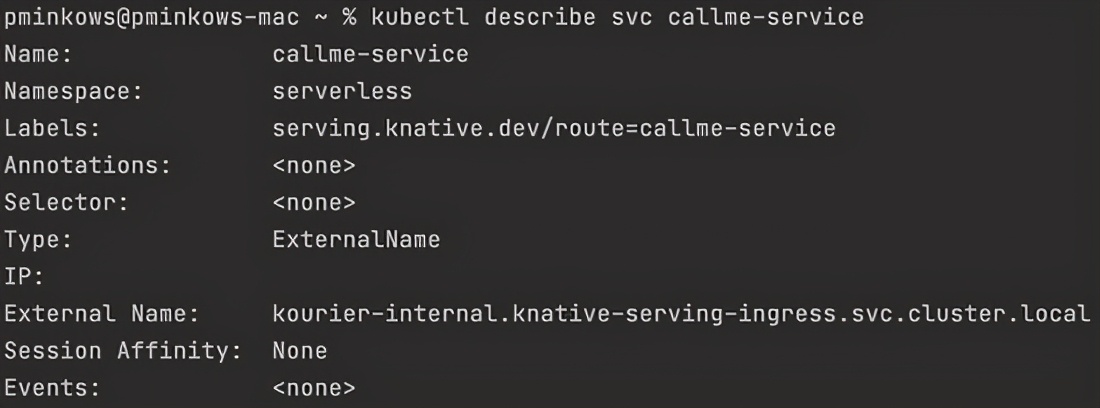
We can use Spring RestTemplate to call the endpoint exposed by callme service. To ensure the tracking of the entire request path, we need to propagate the Zipkin header between subsequent calls. For communication, we will use a service with a fully qualified internal domain name (call me)
service.serverless.svc.cluster.local), as previously described.
@RestController
@RequestMapping("/caller")
public class CallerController {

   private RestTemplate restTemplate;

   CallerController(RestTemplate restTemplate) {
      this.restTemplate = restTemplate;
   }

   @Value("${spring.application.name}")
   private String appName;
   @Value("${POD_NAME}")
   private String podName;
   @Value("${POD_NAMESPACE}")
   private String podNamespace;
   @Autowired
   private CallerRepository repository;

   @GetMapping("/ping")
   public String ping(@RequestHeader HttpHeaders headers) {
      Caller c = repository.save(new Caller(new Date(), podName));
      String callme = callme(headers);
      return appName + "(id=" + c.getId() + "): " + podName + " in " + podNamespace
                     + " is calling " + callme;
   }

   private String callme(HttpHeaders headers) {
      MultiValueMap<String, String> map = new LinkedMultiValueMap<>();
      Set<String> headerNames = headers.keySet();
      headerNames.forEach(it -> map.put(it, headers.get(it)));
      HttpEntity httpEntity = new HttpEntity(map);
      ResponseEntity<String> entity = restTemplate
         .exchange("http://callme-service.serverless.svc.cluster.local/callme/ping",
                  HttpMethod.GET, httpEntity, String.class);
      return entity.getBody();
   }

}
In order to test the communication between microservices, we only need to call the caller's service through the Knative route.

Let's make some test calls to the caller service GET/caller/ping endpoint. We should use the website
http://caller-service-serverless.apps.cluster-d556.d556.sandbox262.opentlc.com/caller/ping

In the first to requests caller service, the latest version of callme services (compiled by GraalVM) is invoked. In the third request, it communicates with the old version of callme service (OpenJDK compilation). Let's compare the boot time between the two versions of the same application.

For GraalVM, we have 0.3 seconds instead of 5.9 seconds. We should also remember that our application starts an embedded H2 database in memory.

Configuring tracing with Jaeger
To enable the tracing of Knative, we need to update the Knative tracing ConfigMap in the Knative service namespace. Of course, we first need to install Jaeger in the cluster.
apiVersion: operator.knative.dev/v1alpha1
kind: KnativeServing
metadata:
  name: knative-tracing
  namespace: knative-serving
spec:
  sample-rate: "1"
  backend: zipkin
  zipkin-endpoint: http://jaeger-collector.knative-serving.svc.cluster.local:9411/api/v2/spans
  debug: "false"
You can also use Helm to install Jaeger. To use this option, you need to execute the following Helm command.
$ helm repo add jaegertracing https://jaegertracing.github.io/helm-charts
$ helm install jaeger jaegertracing/jaeger
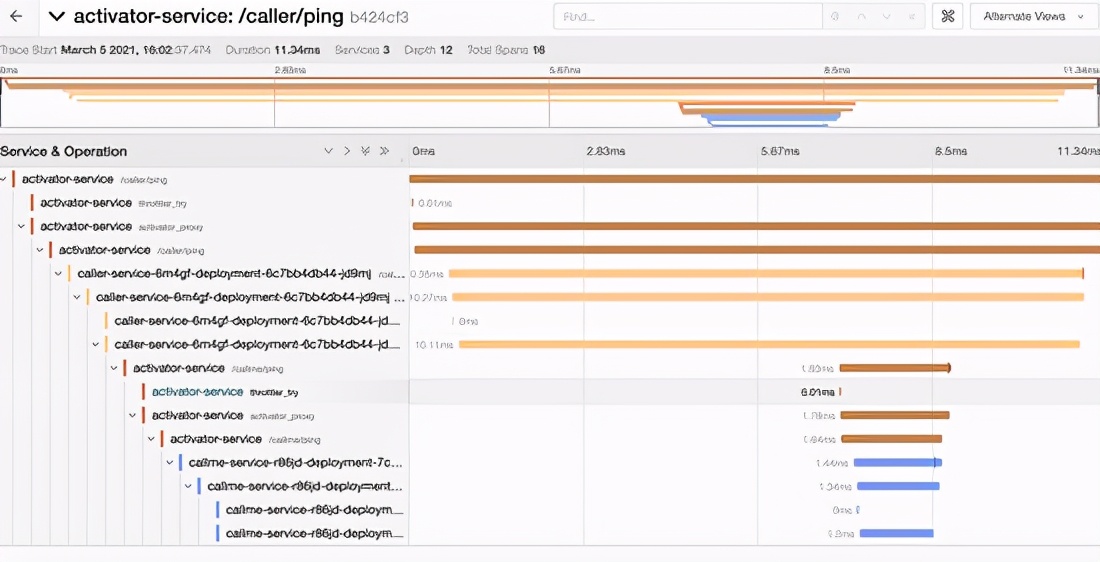
Knative automatically creates the Zipkin span header. Our only goal is to propagate HTTP headers between the caller service and the call me service application. In my configuration, knative sends 100% tracking to Jaeger. Let's look at some traces of the GET/caller/ping endpoint in the knative microservice grid.
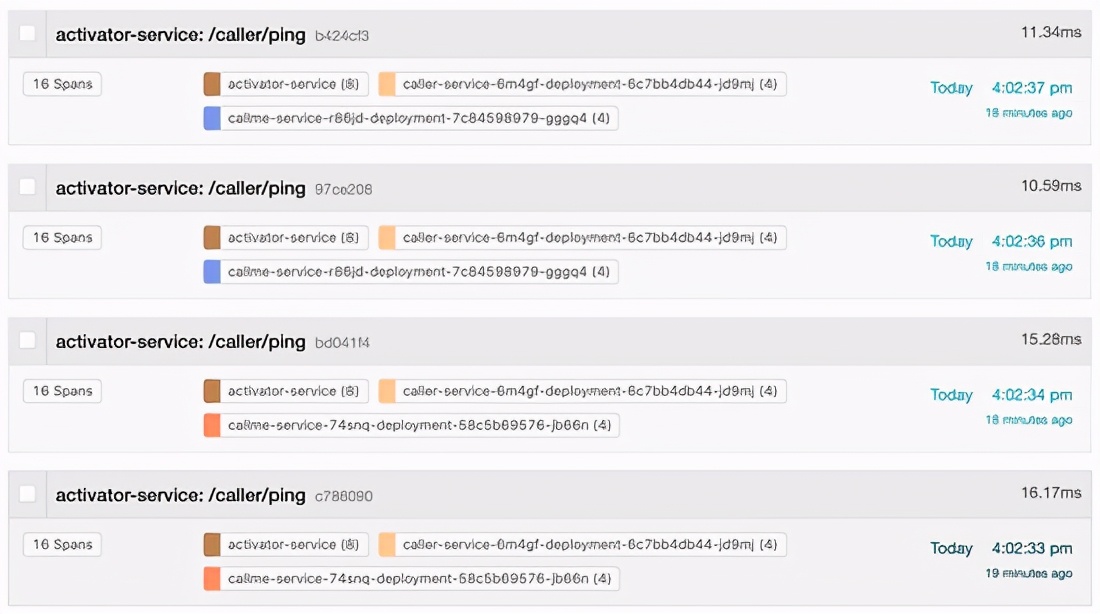
We can also view a detailed view of each request.
conclusion
When running microservices on Knative, you need to consider the following points. I focus on aspects related to communication and tracking. I also showed that spring boot does not need to start in a few seconds. With GraalVM, it can start in milliseconds, so you can definitely think of it as a serverless framework.
Original link:
https://piotrminkowski.com/2021/03/05/microservices-on-knative-with-spring-boot-and-graalvm/
If you think this article is helpful to you, please praise it, pay attention to it and support it