Server environment: centos7 + nginx + uwsgi + Python 3 + Django
Database: MySQL 8.0
Project framework: Django 3.7 + Vue + ElementUI
Note: This is a link to someone else's blog. The original link is https://blog.csdn.net/qq_32244493/article/details/109179782. I made some modifications according to my project and recorded my deployment process.
1. Server deployment
1. Update system software package
yum update -y
2. Install the software management package and possible dependencies
yum -y groupinstall "Development tools"
yum install openssl-devel bzip2-devel expat-devel gdbm-devel readline-devel sqlite-devel psmisc libffi-devel
1.1 Python installation
python version: 3.7
1. Download Pyhton3 to the / usr/local directory
cd /usr/local
wget https://www.python.org/ftp/python/3.7.3/Python-3.7.3.tgz
2. Decompression
tar -zxvf Python-3.7.3.tgz
3. Enter Python-3.7.3 path
cd Python-3.7.3
4. Compile and install to the specified path. (/ usr/local/python3 path can be specified by yourself. Just remember it. It will be used below.)
./configure --prefix=/usr/local/python3
5. Install python3
make
make install
6. After installation, establish a soft link and add variables to facilitate the direct use of Python 3 in the terminal
ln -s /usr/local/python3/bin/python3.7 /usr/bin/python3
7. After the installation of Python 3, pip3 is also installed together. There is no need to install it separately. Similarly, a soft link is established for pip3
ln -s /usr/local/python3/bin/pip3.7 /usr/bin/pip3
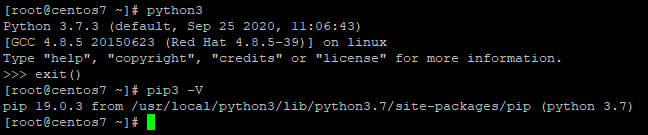
8. Check the installation of Python 3 and pip3
1.2 installation and use of virtualenv
1. Install virtualenv to facilitate project management of different versions
pip3 install virtualenv
2. Establish soft links
ln -s /usr/local/python3/bin/virtualenv /usr/bin/virtualenv
3. The installation is successful. Two folders are established in the root directory, which are mainly used to store env and website files.
mkdir -p /data/env
mkdir -p /data/wwwroot
4. Switch to / data/env / to create the specified version of virtual environment
- Virtual environment name: pyweb
- Specify the python version python3, otherwise the system's own python2 will be used by default
virtualenv --python=/usr/bin/python3 pyweb
5. Then enter / data/env/pyweb/bin to start the virtual environment
cd /data/env/pyweb/bin
source activate
- After successful startup, the virtual environment name will appear at the red line, indicating successful startup.
6. Exit the virtual environment
- Exit the virtual environment without entering the specified directory. Execute the following command under any path.
deactivate
1.3 installation of django and uwsgi
1. Install uwsgi in a non virtual environment
pip3 install uwsgi
2. Establish a soft link for uwsgi, which is convenient to use. It can be installed once. This operation is not required for installation in the virtual environment.
ln -s /usr/local/python3/bin/uwsgi /usr/bin/uwsgi
3. Enter the bin directory of the virtual environment pyweb and activate the virtual environment
- Why enter the virtual environment? Because we may deploy more than one project, the configuration of each project to the environment is different, and a virtual environment is equivalent to an independent space.
cd /data/env/pyweb/bin
source activate
Install django and uwsgi django version: 2.2
uwsgi needs to be installed twice, first in the system, and then in the corresponding virtual environment.
pip3 install django==2.2
pip3 install uwsgi
1.4 nginx installation
1. Enter the home directory and execute the following command
cd /home/
wget http://nginx.org/download/nginx-1.13.7.tar.gz
2. After downloading, execute the decompression command
tar -zxvf nginx-1.13.7.tar.gz
3. Enter the extracted nginx-1.13.7 folder and execute the following commands in sequence
./configure
make
make install
1.5. Mysql8.0 installation
1. Before installation, we can check whether MySQL is installed in the system
rpm -qa | grep mysql
2. If your system is installed, you can choose to uninstall
rpm -e mysql  // Normal delete mode
rpm -e --nodeps mysql  // Strong deletion mode: if you use the above command to delete and prompt other dependent files, you can use this command to delete them
3. Next, we use the yum command to install MySQL on the CentOS 7 system. It should be noted that the MySQL database in the CentOS 7 version has been removed from the default program list, so we need to download the yum resource package on the official website before installation. The download address is:
https://dev.mysql.com/downloads/repo/yum/
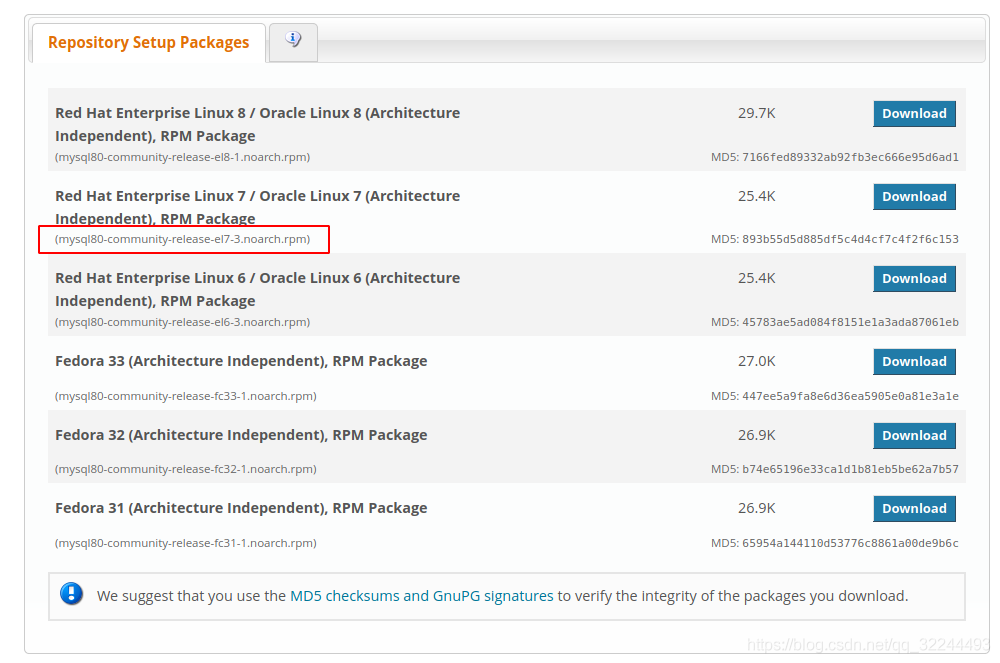
wget https://repo.mysql.com//mysql80-community-release-el7-3.noarch.rpm
rpm -ivh mysql80-community-release-el7-3.noarch.rpm
yum update
yum install mysql-server
4. Permission setting
chown mysql:mysql -R /var/lib/mysql
5. Initialize MySQL
mysqld --initialize
6. Start MySQL
systemctl start mysqld
7. View MySQL running status
systemctl status mysqld
8. After MySQL is successfully installed, the default root user password is empty. You can use the following command to create the root user password
[root@host]# mysqladmin -u root password "new_password";
2. Code preparation
2.1 Django code
1. In the project directory, use the following command to export the current environment dependency package to the requirements.txt file
pip freeze > requirements.txt
2.django project integration vue, modify django's setting.py file
TEMPLATES = [
	{
		'DIRS': [os.path.join(BASE_DIR, 'vue/dist')],  # First amendment
	},
]
# Second amendment
DEBUG = False
ALLOWED_HOSTS = ['*']
# Third modification - add static file
STATICFILES_DIRS = [
	os.path.join(BASE_DIR, 'vue/dist/static'),
]
3. Modify the url.py file of django
from django.views.generic.base import TemplateView
urlpatterns = [
	path(r'', TemplateView.as_view(template_name='index.html')),  # Point the path to the index page in vue
]
4. File upload
-
The linux system can package the code files locally into zip format or other formats into a compressed package, and upload the service to the / data/wwwroot / directory
-
windows system graphical interface can be compressed
zip -r temp.zip temp # Compression command
- Unzip, using the command:
unzip temp.zip # Decompression command
- The project file name is temp.
5. Enter the virtual environment and then enter the project path to install the dependent package in requirements.txt
cd /data/env/pyweb/bin/  # If you have entered the virtual environment, you do not need this step
source activate  # activation
cd /data/wwwroot/temp/  # Project root directory
pip3 install -r requirements.txt  # For the installation dependency, see the above for the generation steps of requirements.txt
2.2 vue code
1. Enter the vue project path, find and open the file where the baseURL is stored, and modify the baseURL
baseURL: 'http://127.0.0.1:8080 / ', / / original
baseURL: 'http://Domain name / ', / / fill in the domain name if there is a domain name. Enter the domain name to access the website
baseURL: 'http://ip / ', / / if there is no domain name, fill in the ip address, and enter the ip address to access the website
baseURL: 'http://ip:8080 / ', / / specify port 80, and enter ip:80 for the web address
2. Modify the configuration code and add the following code to vue.config.js to prevent the packaged dist file from having no sattic folder, opening the page, finding no path and reporting an error when it is blank.
publicPath: './',
assetsDir: 'static',
productionSourceMap: false,
3.build project
- Enter the root directory of vue code and execute the command. This command will generate dist files and package dist files
npm run build
zip -r dist.zip dist
4. Create a vue folder under the root directory of django project, upload dist.zip here and unzip it. The directory structure is: / data/wwwroot/temp/vue/dist
2.3 database files
1. Export the database file locally in sql format and upload it to the server.
mysqldump -uroot -ppassword qiantai>qiantai.sql
2. Open the terminal and run the command:
mysql -uroot -pxxx # xxx is the password
use Database name;
source /path/to/your/qiantai.sql;
exit;
3. Run configuration
- Enter the corresponding virtual environment, enter the django directory, and run the project through the following command. If it can be started normally, proceed to the next step. If it can't run normally, check up.
python3 manage.py runserver
3.1 uwsgi configuration file
1. Create a uwsgi configuration file in the root directory of django project: / data/wwwroot/zzbceping /: uwsgi.ini # add configuration selection
[uwsgi]
#Configure socket connection with nginx
socket=0:8081
#Configure the project path and the directory where the project is located
chdir=/data/wwwroot/temp
#Configure the file path of the WSGI interface module, that is, the directory name of the file wsgi.py
wsgi-file=temp/wsgi.py
#Configure the number of processes started according to the computer configuration
processes=9
#Configure the number of threads for each process according to the computer configuration
threads=30
#Configure start management main process
master=True
#Configure the process number file where the main process is stored
pidfile=uwsgi.pid
#Configure dump logging
daemonize=uwsgi.log`
2. Start and run uwsgi with the following command
uwsgi --ini uwsgi.ini # Displaying [uWSGI] getting INI configuration from uwsgi.ini indicates that uwsgi is running successfully
ps -ef|grep uwsgi  # Check to confirm whether uwsgi start
uwsgi --stop uwsgi.pid  # Stop running uwsgi and stop the project by setting the file containing the main process number
uwsgi --reload uwsgi.pid  # Restart uwsgi
killall -9 uwsgi  # Terminate all uwsgi processes
netstat -tunpl|grep 8080 #Query specified port
kill -9 1321#This 1321 is the process number
3.2 nginx configuration
1. Enter nginx directory
cd /usr/local/nginx/conf/
2. Back up nginx.conf
cp nginx.conf nginx.conf.bak
3. Edit nginx.conf
vi nginx.conf
 Press Ins Key to start editing
---------------------------------
# Edit as follows
events {
    worker_connections  1024;
}
http {
    include       mime.types;
    default_type  application/octet-stream;
    sendfile        on;
    keepalive_timeout  65;
    include /usr/local/nginx/conf/vhost/*.conf;  # Directly put each project to the configuration file in vhost, which can deal with the situation of configuring multiple projects to the same server.
}
4. Save and exit
Press Esc Press to exit editing
:wq  # Save and exit
:q  # immediate withdrawal
5. Create the folder vhost
mkdir vhost
cd vhost
6. Create the file temp.conf and edit it
mkdir temp.conf
vi temp.conf
 Press Ins Key to start editing
----------------------------------
# Edit content
server {
	listen 8080;  # The project runs on port 8080, which is the same as the port address in the baseurl in the front-end vue, and the interaction address between the front-end project and the back-end project
    server_name 47.100.98.223:8080;  #Change to your own domain name. If you don't have a domain name, change to the Internet address plus port
    charset utf-8;
    location / {
    	include uwsgi_params;
        uwsgi_pass 127.0.0.1:8081;  #The port should be the same as that configured in uwsgi
    }
    location /static/ {
    alias /data/wwwroot/temp/vue/dist/static/; #Static resource path
    }
    location /media/ {
    alias /data/wwwroot/temp/media/; #Configure the static miedia path in the django project
    }
    access_log    /data/wwwroot/temp/access.log;#Store error log file
    error_log    /data/wwwroot/temp/error.log
}
7. If multiple projects are deployed on the same server, just create another virtual environment, perform the same operation, and create another project's conf file in vhost.
8. Enter the / usr/local/nginx/sbin / directory
cd /usr/local/nginx/sbin/
9. Check the configuration file for errors
./nginx -t
10. Run nginx
./nginx
#Some nginx instructions
ps -ef|grep nginx  # Check whether nginx is started
killall -9 nginx #Terminate all nginx processes
3.3 precautions
- Most of the above operations operate in a virtual environment
- After modifying related files, restart nginx and uwsgi
- A collection of common operations is attached
uwsgi
------------------
# Enter the django project root directory and execute
uwsgi --ini uwsgi.ini  # start-up
uwsgi --stop uwsgi.pid  # stop it
uwsgi --reload uwsgi.pid  # restart
killall -9 uwsgi  # Terminate all uwsgi
ps -ef|grep uwsgi  # Check to see if it starts

nginx
------------------
cd /usr/local/nginx/sbin/  # Enter directory
./nginx  # start-up
./nginx -s reload  # nginx restart
./nginx -s quit  # termination
ps -ef|grep nginx  # Check whether nginx is started
killall -9 nginx #Terminate all nginx processes
--------
Copyright notice: This is a link to someone else's blog. The original link is: https://blog.csdn.net/qq_32244493/article/details/109179782
reference resources
- https://www.django.cn/article/show-4.html
- https://www.runoob.com/mysql/mysql-install.html
- https://blog.csdn.net/cungudafa/article/details/100163676