1, Network configuration:
| Database server name | db0 (host) | db1 (standby) | dmm (monitor) |
| Business service name | dm_server | ||
| Service IP | 192.168.222.129 | 192.168.222.128 | |
| Heartbeat IP | 10.10.1.115 | 10.10.1.116 | 10.10.1.117 |
| PORT_NUM | 5236 | ||
| MAL_PORT | 7336 | ||
| MAL_DW_PORT | 7536 | ||
| MAL_INST_DW_PORT | 7436 | ||
| MAL_INST_PORT (consistent with PORT_NUM) | 5236 | ||
2, Specific installation steps:
1. Check before installation: # premise: the installed version of DM8 database must match the server system.
cat /proc/cupinfo 			#View CPU information;
getconf LONG_BIT		    #View the number of digits of the system;
cat /proc/version			#View the system version;
uname -a		    		#View the kernel;
cat /proc/meminfo			#View memory information;
df -h						#View disk information;
2. Create user: put the installation directory into this user
Under root
groupadd dinstall #Create a group;
useradd -g dinstall -m -d /home/dmdba -s /bin/bash dmdba #Create a user;
Parameter resolution: - g: specify the group to which the user belongs;
- m: automatically create user login directory;
- d: specify the starting directory of user login;
- s: Specifies the shell used by the user;
passwd dmdba #Set the password after entering;
3. Create directory
(1) Under dmdba user:
mkdir dmdbms					# Database installation path;
mkdir dmdata                    # Data file directory;
mkdir dmarch                    # Archive directory;
mkdir dmbak                     # Database backup directory;
mkdir coredump                  # System core directory;
mkdir sqllog                    # sql log;
(2) Change the owner permission to dmdba user: if the directory owner permission is root, change to dmdba;
chown dmdba:dinstall -R dmdbms
chown dmdba:dinstall -R dmdata
chown dmdba:dinstall -R dmarch
chown dmdba:dinstall -R dmbak
chown dmdba:dinstall -R coredump
chown dmdba:dinstall -R sqllog
4. Modify dmdba user resource limit:
(1) Switch back to root
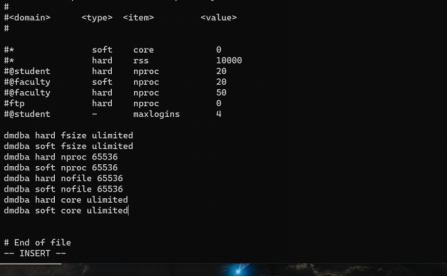
vi /etc/security/limits.conf
Edit limits Conf file, add the following statement at the end of the file: as shown in the figure
dmdba hard fsize ulimited
dmdba soft fsize ulimited
dmdba hard nproc 65536
dmdba soft nproc 65536
dmdba hard nofile 65536
dmdba soft nofile 65536
dmdba hard core ulimited
dmdba soft core ulimited
Switch to dmdba user
ulimit -a # Check whether the execution is successful;
If the words open files (- n) 65536 are displayed, it indicates that it has taken effect;
(2) In / etc / security / limits D / directory, if there are other resource restricted files, these statements also need to be added; cat /proc/36/limits view resource limit information;
5. Environmental preparation before installation:
(1) Turn off the firewall, set the boot to not start automatically, and turn off selinux;
systemctl stop firewalld         # Close the firewall;
systemctl disable firewalld      # Set it to start without self starting;
vim /etc/sysconfig/selinux
Enter the edit file and add at the end:
SELINUX=disabled
Then restart the machine: reboot
(2) Edit network card information:
vi /etc/sysconfig/network-scripts/ifcfg-ens33
Edit the variable to ONBOOT=yes
/etc/init.d/network restart # Restart the network
6. Install DM8 database
(1) Switch to root user; mkdir dmiso creates a directory where ISO image files are placed; Use tools such as XShell or WinSCP to transfer ISO files into dmiso directory;
(2) Enter dmiso directory
mount -o loop dm8_20200930_x86_rh6_64_ent_8.1.1.134.iso /dmiso #Mount the ISO image file;
(3) In the dmiso mount directory, start the installation script:
./DMInstall.bin -i
After entering, the system prompts the current installation mode and installation path;

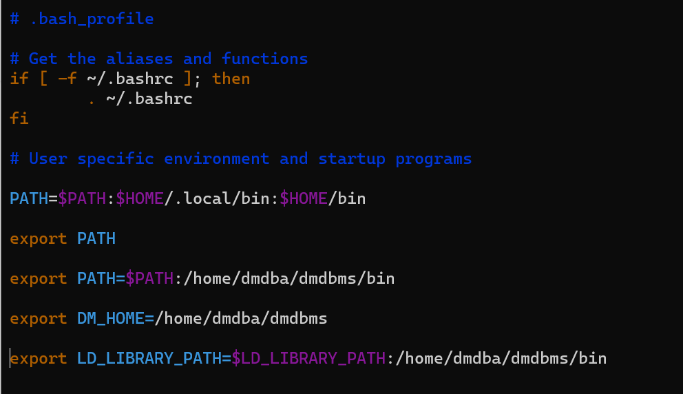
(4) configure environment variables:
vim /home/dmdba/.bash_profile
Add at the end
export PATH=$PATH:/home/dmdba/dmdbms/bin
export DM_HOME=/home/dmdba/dmdbms
export LD_LIBRARY_PATH=$LD_LIBRARY_PATH:/home/dmdba/dmdbms/bin
7. Initialize instance
(1) Host DW0 (execute in bin directory)
./dminit path=/home/dmdba/dmdbms/data PAGE_SIZE=16 CHARSET=0 LOG_SIZE=2048 DB_NAME=DAMENG INSTANCE_NAME=DW0
(2) Standby machine DW1 (executed under bin directory)
./dminit path=/home/dmdba/dmdbms/data PAGE_SIZE=16 CHARSET=0 LOG_SIZE=2048 DB_NAME=DAMENG INSTANCE_NAME=DW1
8. Offline database backup
(1) Main library backup:
Start the DMAP service under the bin directory of the installation path of the main library:
./DmAPService start # Start DMAP service;
ps -ef|grep dmap # Check whether the DMAP service is started;
./dmrman # Enter RMAN tool;
backup database '/home/dmdba/dmdbms/data/DAMENG/dm.ini' backupset '/home/dmdba/dmbakup/dbfull'; # Perform full database backup;
(2) Restore primary Library:
Copy the backup file / home/dmdba/dmbakup/dbfull to the standby database. After starting the DMAP service, enter the RMAN tool and execute the following steps in turn:
restore database '/home/dmdba/dmdbms/data/DAMENG/dm.ini' from backupset '/home/dmdba/dmbakup/dbfull';		# Execute the restore statement;
recover database '/home/dmdba/dmdbms/data/DAMENG/dm.ini' from 	backupset '/home/dmdba/dmbakup/dbfull';		# Execute the recover statement;
recover database '/home/dmdba/dmdbms/data/DAMENG/dm.ini' update db_magic;				                    # Execute recover update db_magic statement;
9. Modify the configuration file
(1) Both the active and standby machines are modified respectively:
vim /home/dmdba/dmdbms/data/DAMENG/dm.ini
The parameter in the edit file is changed to:
ALTER_MODE_STATUS = 0
ENABLE_OFFLINE_TS = 2
MAL_INI = 1
ARCH_INI = 1
(2) Configuration archive profile: create a new dmarch INI file (main)
vim /home/dmdba/dmdbms/data/DAMENG/dmarch.ini
Add content:
[ARCHIVE_REALTIME1]
	ARCH_TYPE	     = REALTIME
    ARCH_DEST	     = dw1

[ARCHIVE_LOCAL1]
	ARCH_TYPE	     = LOCAL
	ARCH_DEST	     = /dmarch
    ARCH_FILE_SIZE	 = 2048
	ARCH_SPACE_LIMIT = 102400
(3) Configure MAL system configuration file: create dmmal ini
vim /home/dmdba/dmdbms/data/DAMENG/dmmal.ini
Add content:
MAL_CHECK_INTERVAL     = 5
MAL_CONN_FAIL_INTERVAL = 15

[MAL_INST1]
  	MAL_INST_NAME      = dw0
  	MAL_HOST           = 10.10.1.115
  	MAL_PORT           = 7336
  	MAL_INST_HOST      = 192.168.222.129
  	MAL_INST_PORT      = 5236
  	MAL_DW_PORT        = 7536
  	MAL_INST_DW_PORT   = 7436
	[MAL_INST2]

MAL_INST_NAME          = dw1
  	MAL_HOST           = 10.10.1.116
  	MAL_PORT           = 7336
  	MAL_INST_HOST      = 192.168.222.128
  	MAL_INST_PORT      = 5236
  	MAL_DW_PORT        = 7536
  	MAL_INST_DW_PORT   = 7436
(4) Configure the daemon configuration file dmwatcher ini
vim /home/dmdba/dmdbms/data/DAMENG/dmwatcher.ini
Add content:
[GRP_DW]
	DW_TYPE            = GLOBAL
	DW_MODE            = MANUAL
	DW_ERROR_TIME      = 30
	INST_RECOVER_TIME  = 60
	INST_ERROR_TIME    = 20
    INST_OGUID     	   = 453331
	INST_INI           = /home/dmdba/dmdbms/data/DAMENG/dm.ini
	INST_AUTO_RESTART  = 1
	INST_STARTUP_CMD   = /home/dmdba/dmdbms/data/bin/dmserver
(5) Dmarch ini,dmmal.ini,dmwatcher.ini file scp to the standby machine:
scp dmarch.ini dmmal.ini dmwatcher.ini root@192.168.222.128:/home/dmdba/dmdbms/data/DAMENG
(6) Dmarch ini,dmmal.ini,dmwatcher.ini file owner permission changed to dmdba user
chown dmdba:dinstall -R /home/dmdba/dmdbms/data/DAMENG/dmarch.ini
chown dmdba:dinstall -R /home/dmdba/dmdbms/data/DAMENG/dmmal.ini
chown dmdba:dinstall -R/home/dmdba/dmdbms/data/DAMENG/dmwatcher.ini
Then the dmarch of the standby database Arch in INI file_ Dest changed to ARCH_DEST=DW0
(7) Modify the status and oguid of the primary and standby databases
On the main library, add the directory / home / dmdba / dmdbms / bin / service_ Copy the DmService in template to the bin directory:
cp DmService /home/dmdba/dmdbms/bin # Add DmService Copy to bin directory;
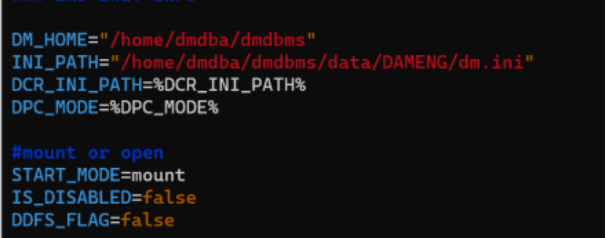
vim DmService # Enter DmService to edit;
Modify ini in DmService file_ The value of path is DM. Of the main library Ini path; The mode of starting the main library is mount;
(8) Background startup database (main database):
./DmService start #Start the database service in the background;
./disql SYSDBA/SYSDBA@192.168.129:5236 #Connect the main database with disql;
SP_SET_OGUID(453331);        # Modify oguid;
alter database primary;      # Change the database to primary mode;
In the same step, configure the standby database and change the database mode to standby;
./DmService start #Start the database service in the background;
./disql SYSDBA/SYSDBA@192.168.128:5236 #Connect the main database with disql;
SP_SET_OGUID(453331);        # Modify oguid;
alter database standby;      # Change the database into standby mode;
10. Modify background startup script
(1) Modify daemon background startup script:
On the host machine and standby machine, set the directory / home / dmdba / dmdbms / bin / service_ Copy the DmWatcherService in template to Bin:
cp DmWatcherService /home/dmdba/dmdbms/bin
Then edit vim DmWatcherService and modify the parameter dmwatcher of the primary and standby machine INI file directory:
INI_PATH=/home/dmdba/dmdbms/data/DAMENG/dmwatcher.ini
(2) To modify the monitor background startup process script:
First set the monitor server in the directory / home / dmdba / dmdbms / bin / service_ Copy the DmMonitorService in templat to the bin directory, and then create a new monitor configuration file dmmonitor ini:
vim /home/dmdba/dmdbms/data/DAMENG/dmmonitor.ini
Add content:
MON_DW_CONFIRM      = 0                       #Normal monitor mode
MON_LOG_PATH        = /home/dmdba/dmdbms/log  #Storage path of monitor log file
MON_LOG_INTERVAL    = 60                      #Regularly record the system information to the log file every 60 s
MON_LOG_FILE_SIZE   = 200                     #Maximum 32 MB per log file
MON_LOG_SPACE_LIMIT = 1024                    #Unlimited total log file space

[GRP_DW]
MON_INST_OGUID      = 453331                  #Group GRP_ Unique OGUID value for DW
MON_DW_IP           = 10.10.1.115:7536
MON_DW_IP           = 10.10.1.116:7536
After that, vim DmMonitorService modifies the parameter to:
INI_PATH=/home/dmdba/dmdbms/data/DAMENG/dmmonitor.ini
(3) Configure sql log
The primary and standby computers are switched to / home/dmdba/dmdbms/data/DAMENG directory respectively
vim sqllog.ini
The revised content is:
BUF_TOTAL_SIZE 	= 10240
BUF_SIZE 		= 1024
BUF_KEEP_CNT	= 6

[SLOG_ALL]
FILE_PATH 		=/home/dmdba/dmdbms/sqllog
PART_STOR 		= 1
SWITCH_MODE 	= 2
SWITCH_LIMIT 	= 512
ASYNC_FLUSH 	= 1
FILE_NUM 	    = 10
ITEMS           = 0
SQL_TRACE_MASK  = 7:14:15:22:24:25:26:27:28
MIN_EXEC_TIME 	= 1500
USER_MODE 		= 0
USERS 			=
11. Start the daemon / monitor process
(1) Start daemon: (both active and standby machines execute)
Switch su - dmdba and enter the directory / home/dmdba/dmdbms/bin
./DmWatcherService satrt # Start the daemon;
./DmMonitorService start # Turn on the monitor in the background;
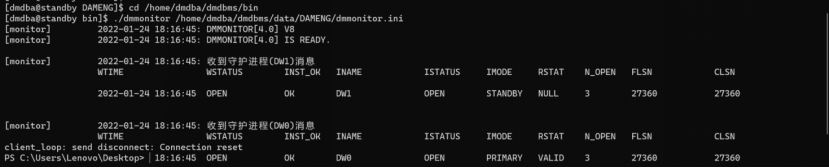
./dmmonitor /home/dmdba/dmdbms/data/DAMENG/dmmonitor.ini # Foreground start monitor
Enter the show command to view the cluster status:
The daemon status wsstatus is OPEN, the instance status ISTATUS is OPEN, the archive type RTYPE is time, and the archive status RSTAT is VALID.
(2) log in to the main database:
./disql SYSDBA/SYSDBA@192.168.222.129:5236
Create a new test table and insert data:
create table test(id int);
insert into test values(1);
commit;
(3) Log in to the standby database to view the synchronization:
./disql SYSDBA/SYSDBA@192.168.222.128:5236
select * from test;
3, Precautions:
Modify the resource limit of open files. If the number is less than 65536, the system will show that the number of open files is too small when installing the database. At least set it to 65536 or more. If you set the number of open files to be less than 65536 and continue the installation, the system will automatically change the planned installation directory.

