1. Project overview
Implement a mobile App that can control home devices and obtain relevant temperature and humidity information.
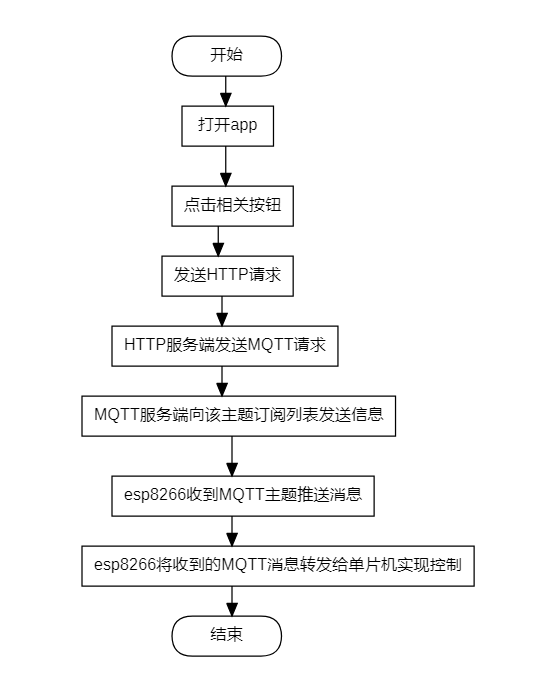
App calls HTTP service on ECs; HTTP service encapsulates MQTT subscription and push requests to update the MQTT server;
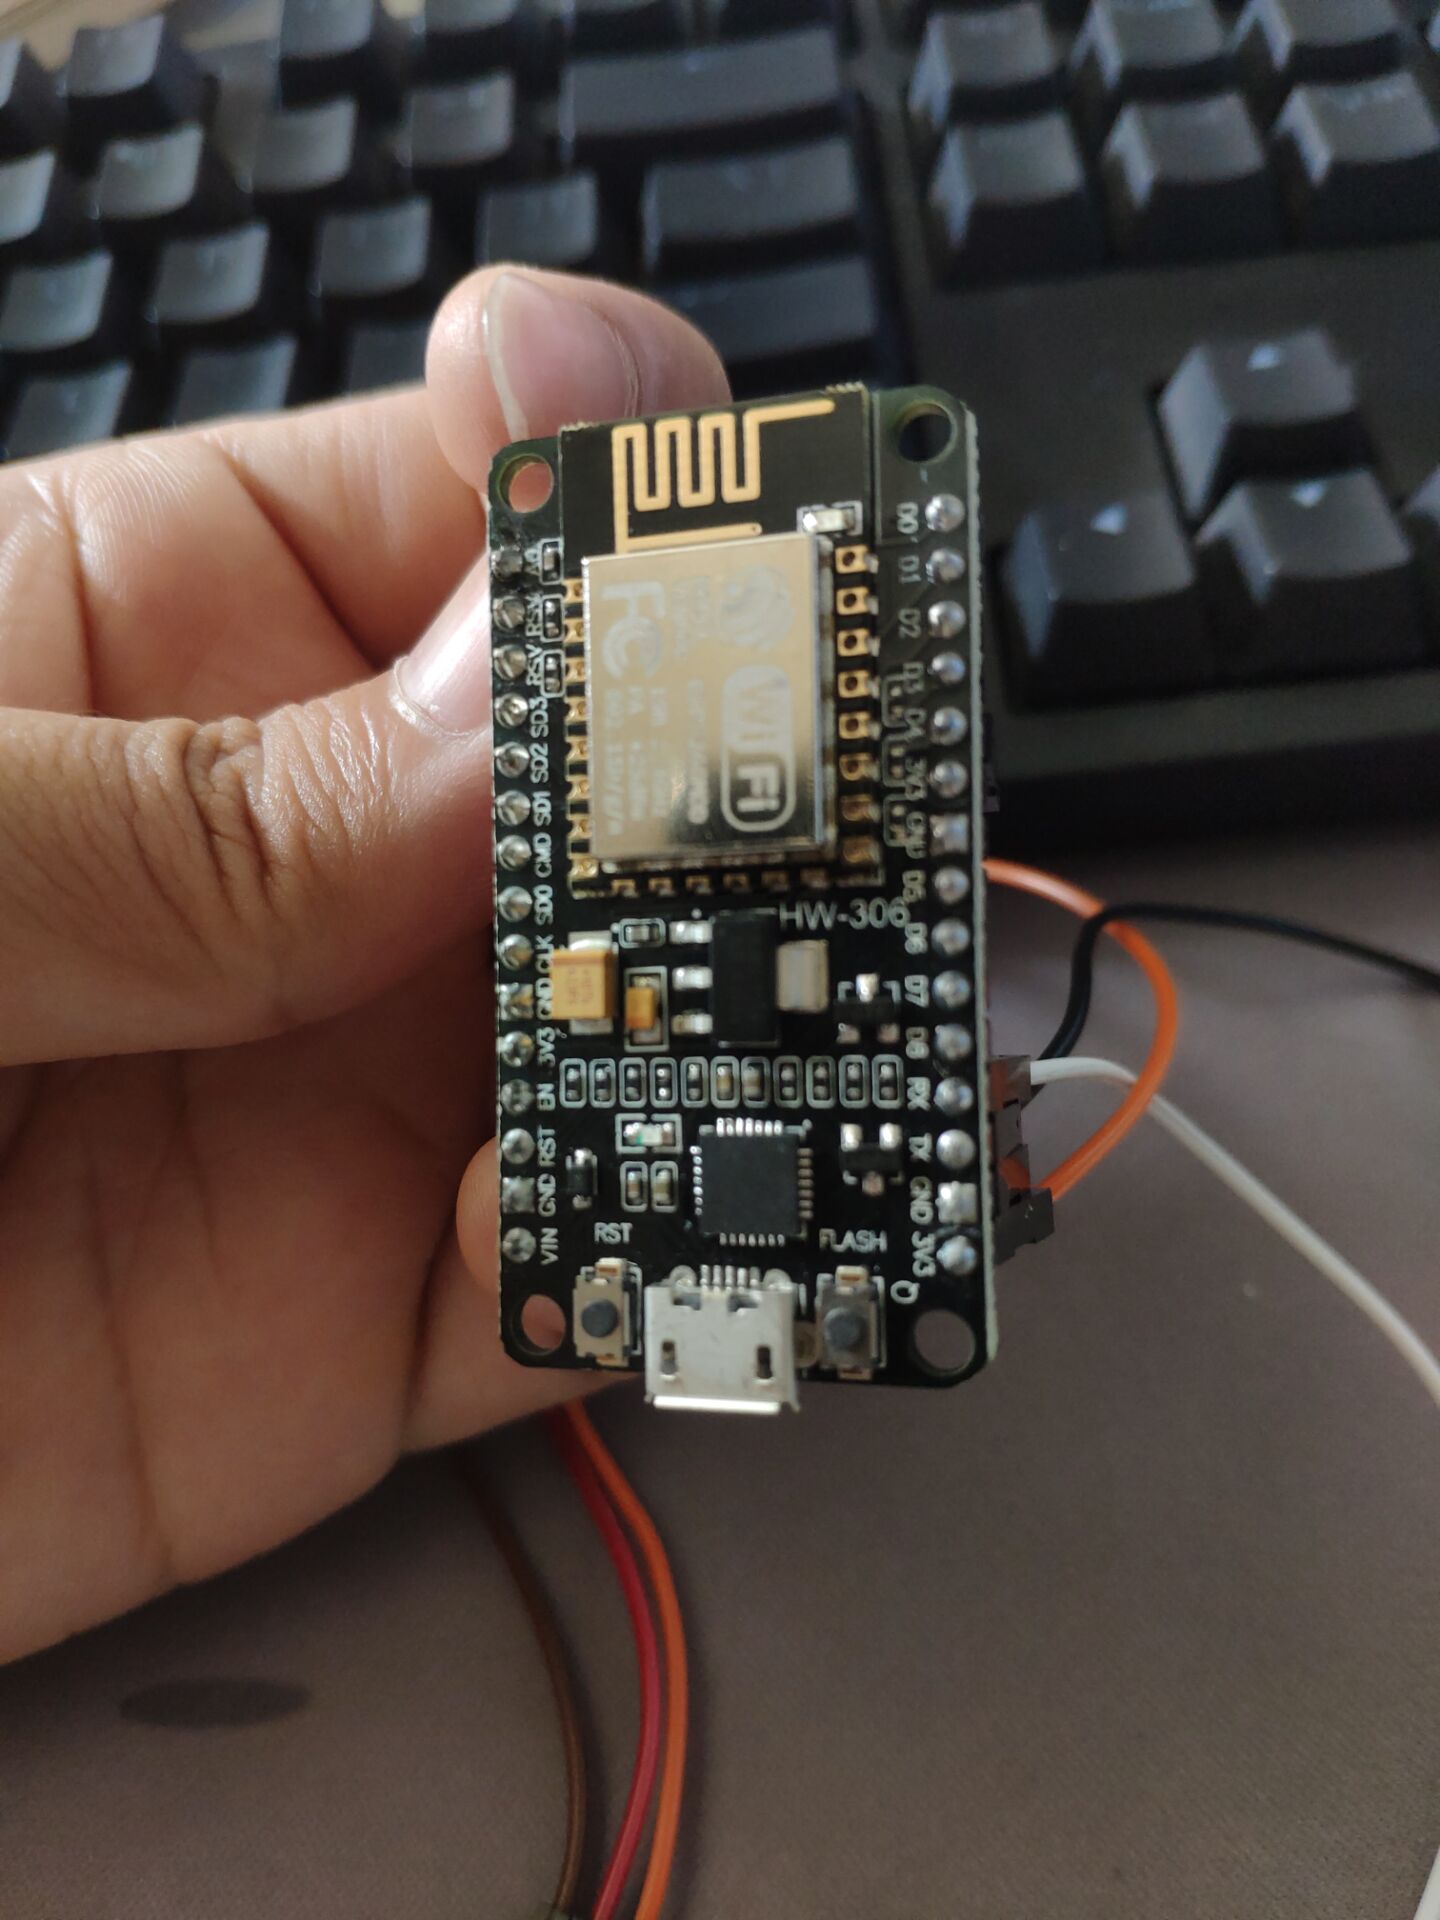
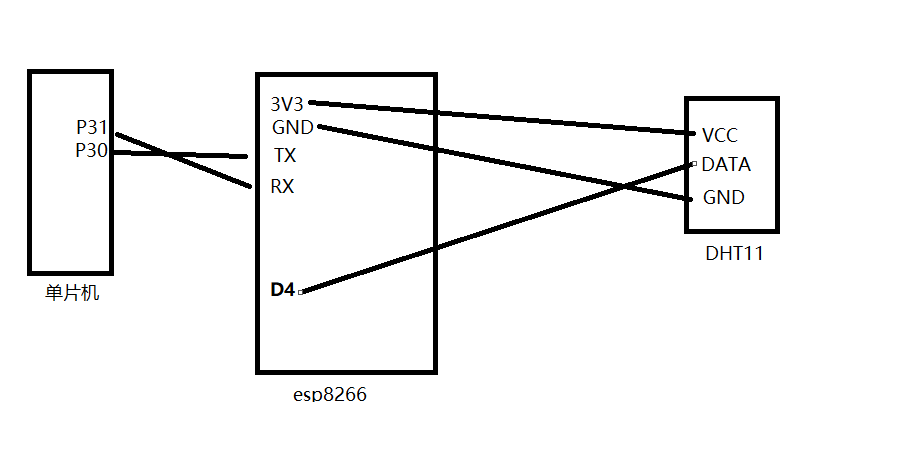
The esp8266 module is connected to the MQTT server through networking, sends the data transmitted from the server to the 51 single chip microcomputer for control, and sends the temperature and humidity information collected by DHT11 to the MQTT server.
2. Reference blog
arduino downloads and tutorials
The server runs the MQTT server
3. Development environment
1. IDEA (developing Java Web Applications)
2. Android studio (developing mobile App)
3. arduino (developing esp8266 program)
4. keil5 (development of single chip microcomputer program)
5. Serial port debugging tool
4. Prepare equipment
-
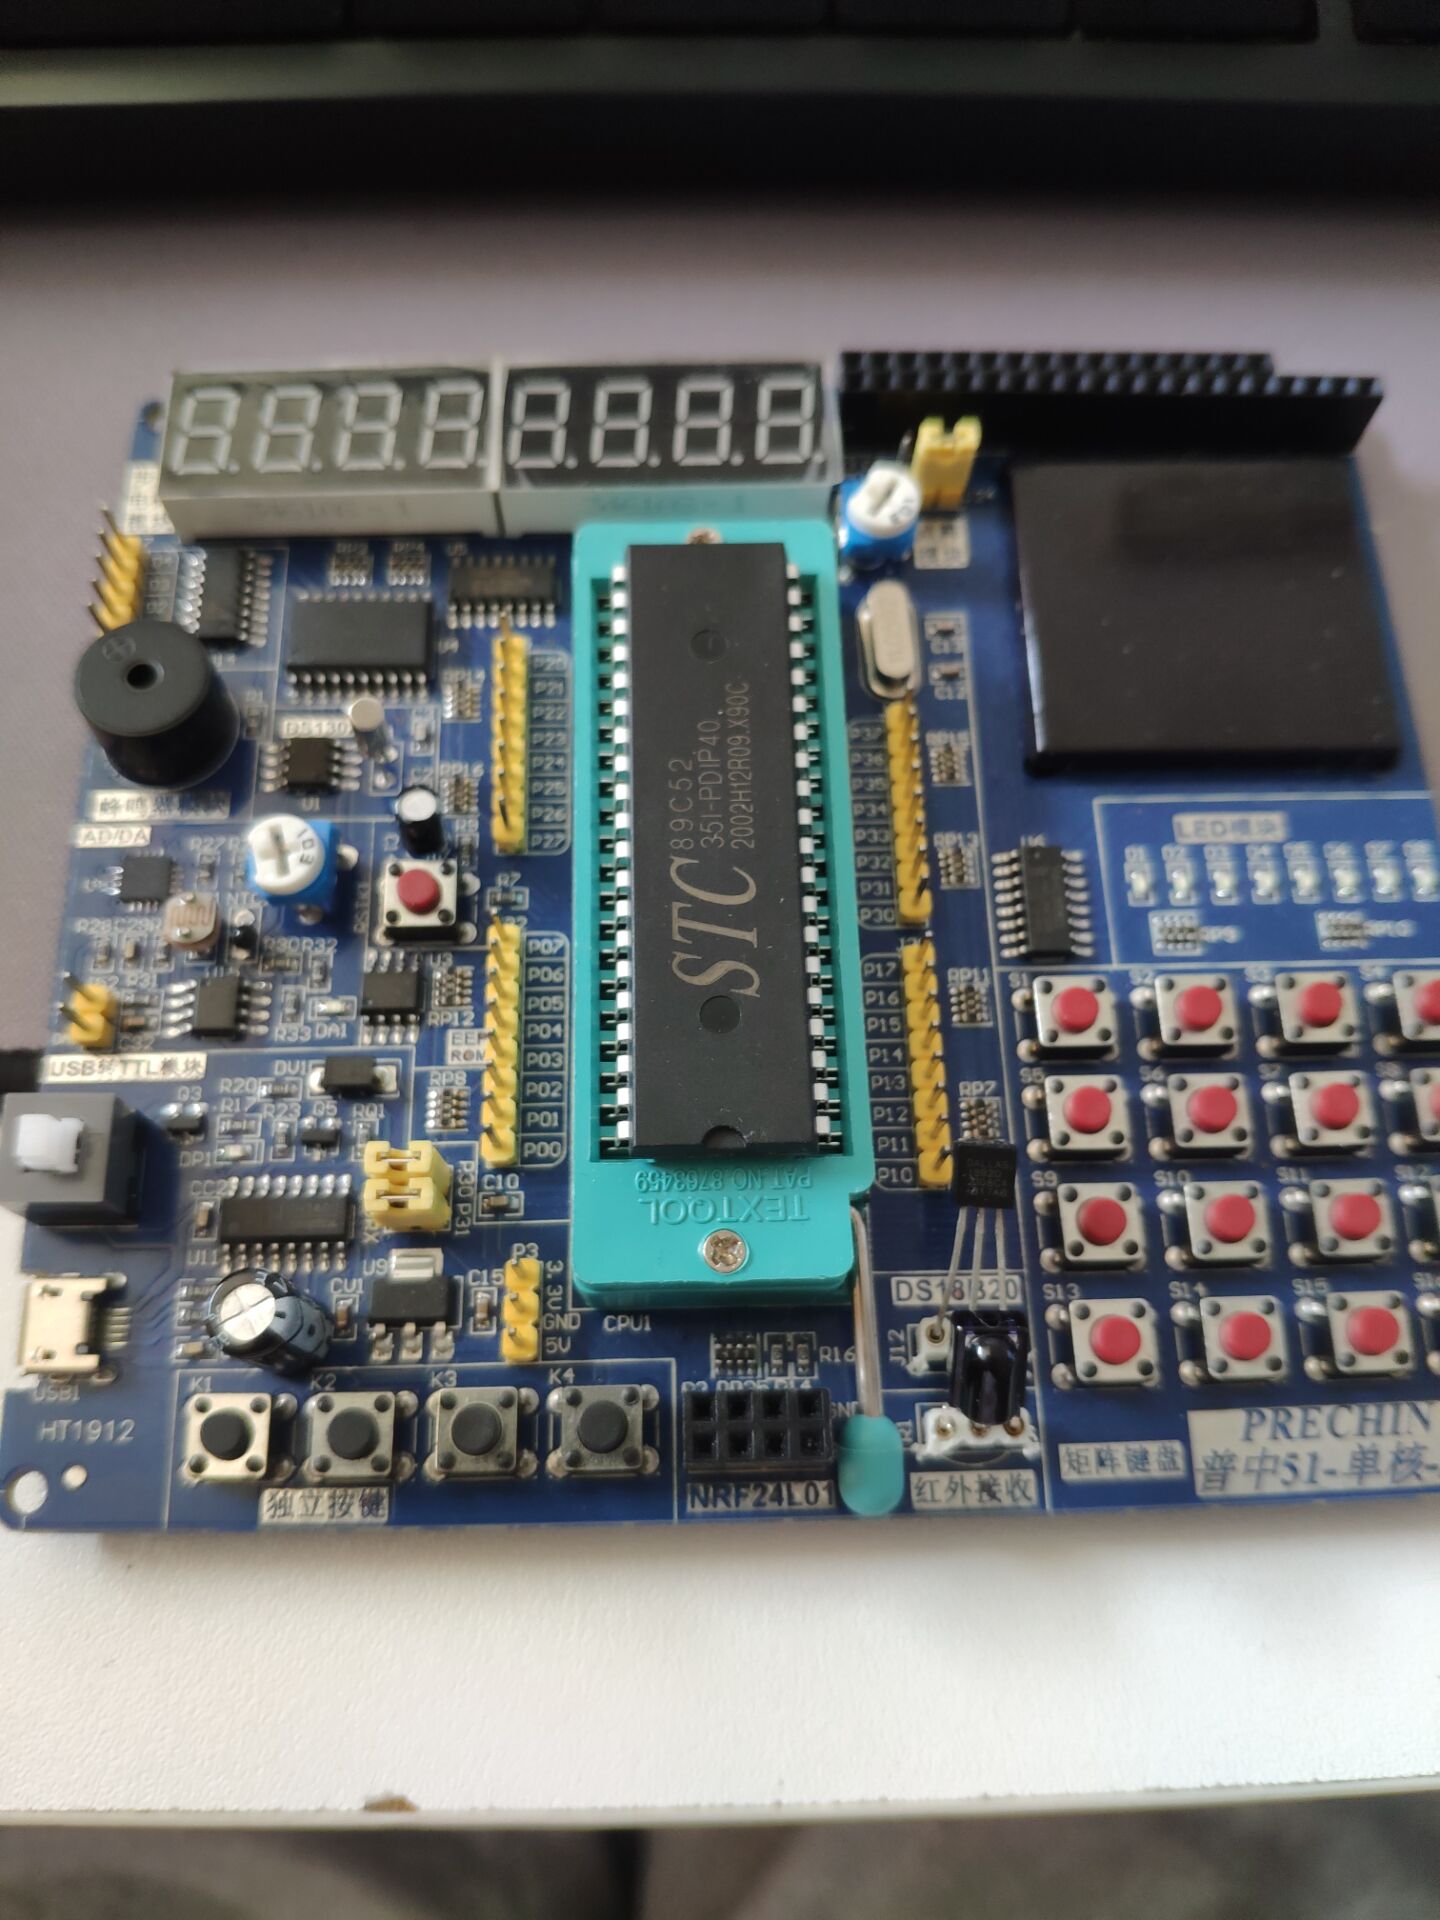
1. 51 single chip microcomputer (used to manage household equipment)
-
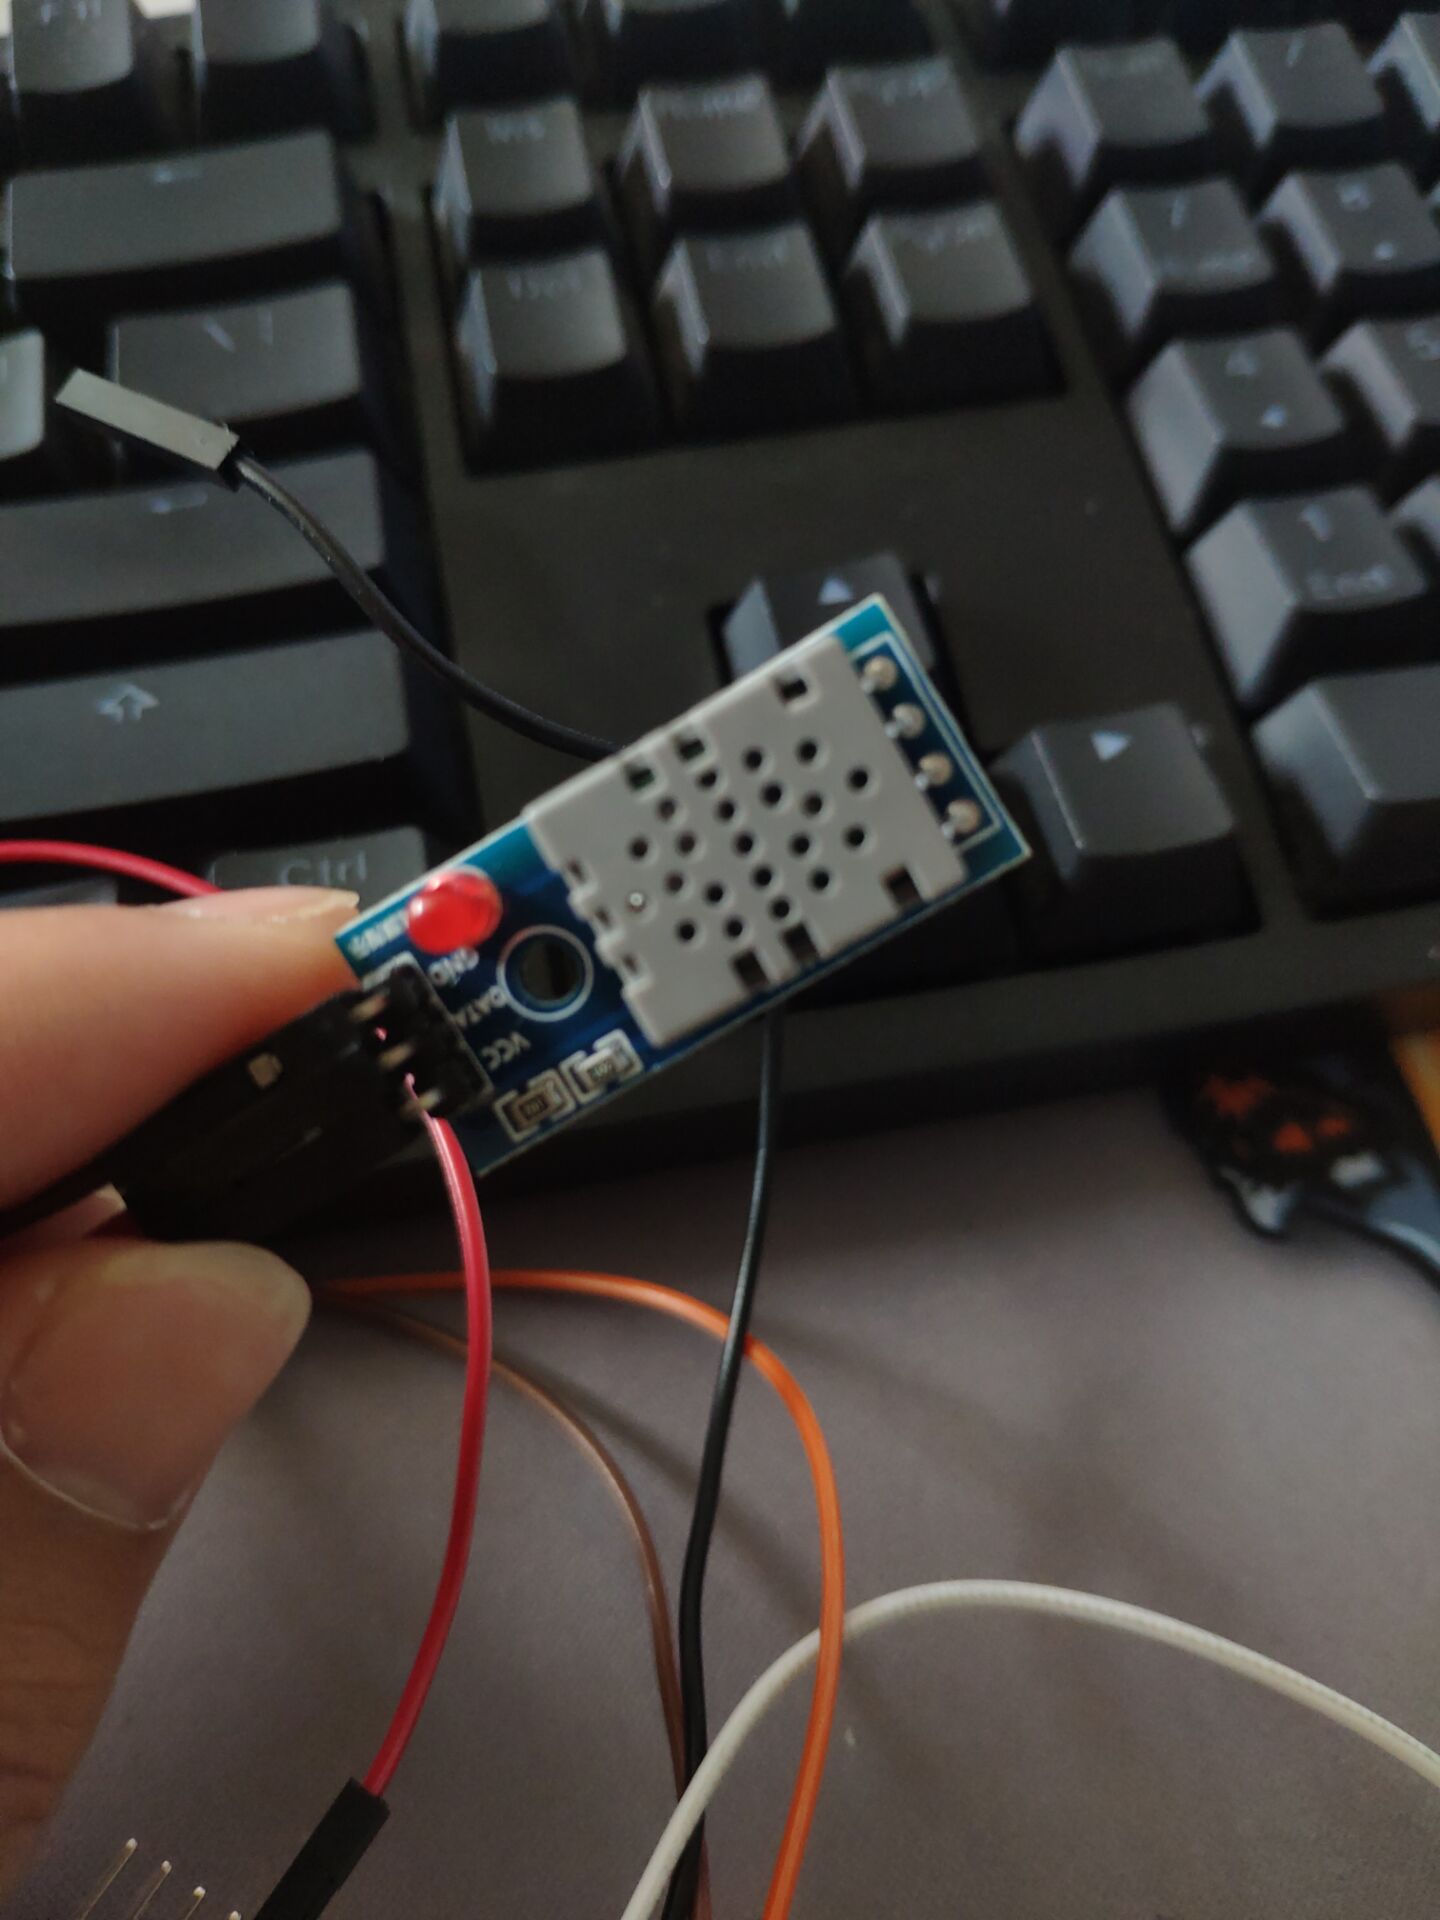
2. DHT11 (used to obtain temperature and humidity information)
-
3. esp8266-12e (connect to mqtt server on external network)
-
4. ECS (deploy mqtt server and http service)
5. System design
Overall design flow chart
5.1 hardware
The esp8266 module connects the mobile phone hotspot to the Internet, then connects to the MQTT server, pushes the relevant temperature and humidity information, and subscribes to the control topic.
After receiving the subscription information, esp8266 sends it directly to the serial port.
51 single chip microcomputer obtains information through serial port interrupt, and then carries out relevant processing.
5.2 software
On the server side, first deploy an MQTT server, and then encapsulate an Http service for its related operations.
Finally, the mobile App only needs to send an http request to operate the relevant hardware.
6. System implementation
6.1 deployment of MQTT server on ECS
This scheme uses Docker to deploy EMQ.
Pull the official website image locally, and then run the image.
docker pull emqx/emqx:4.3.4
docker run -d --name emqx -p 1883:1883 -p 8081:8081 -p 8083:8083 -p 8084:8084 -p 8883:8883 -p 18083:18083 emqx/emqx:4.3.4
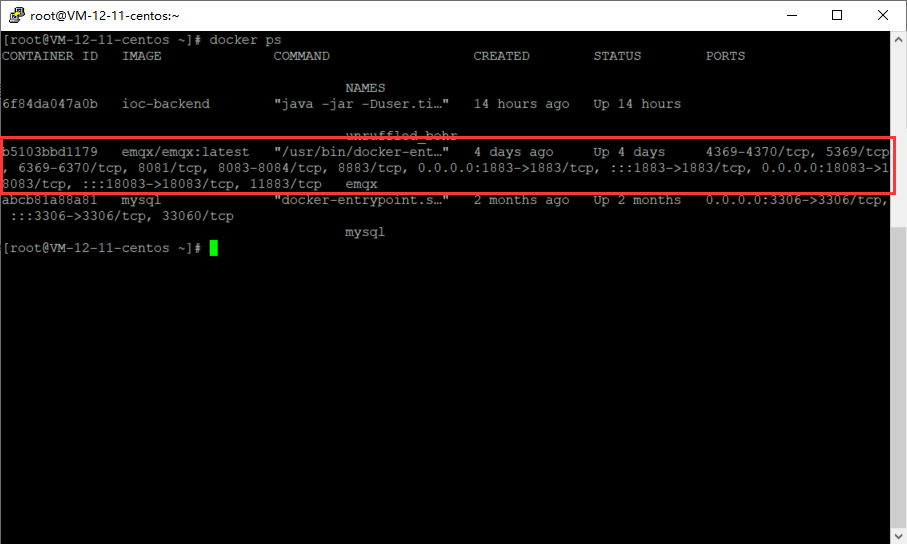
After successful startup, docker ps will have relevant container information as follows.
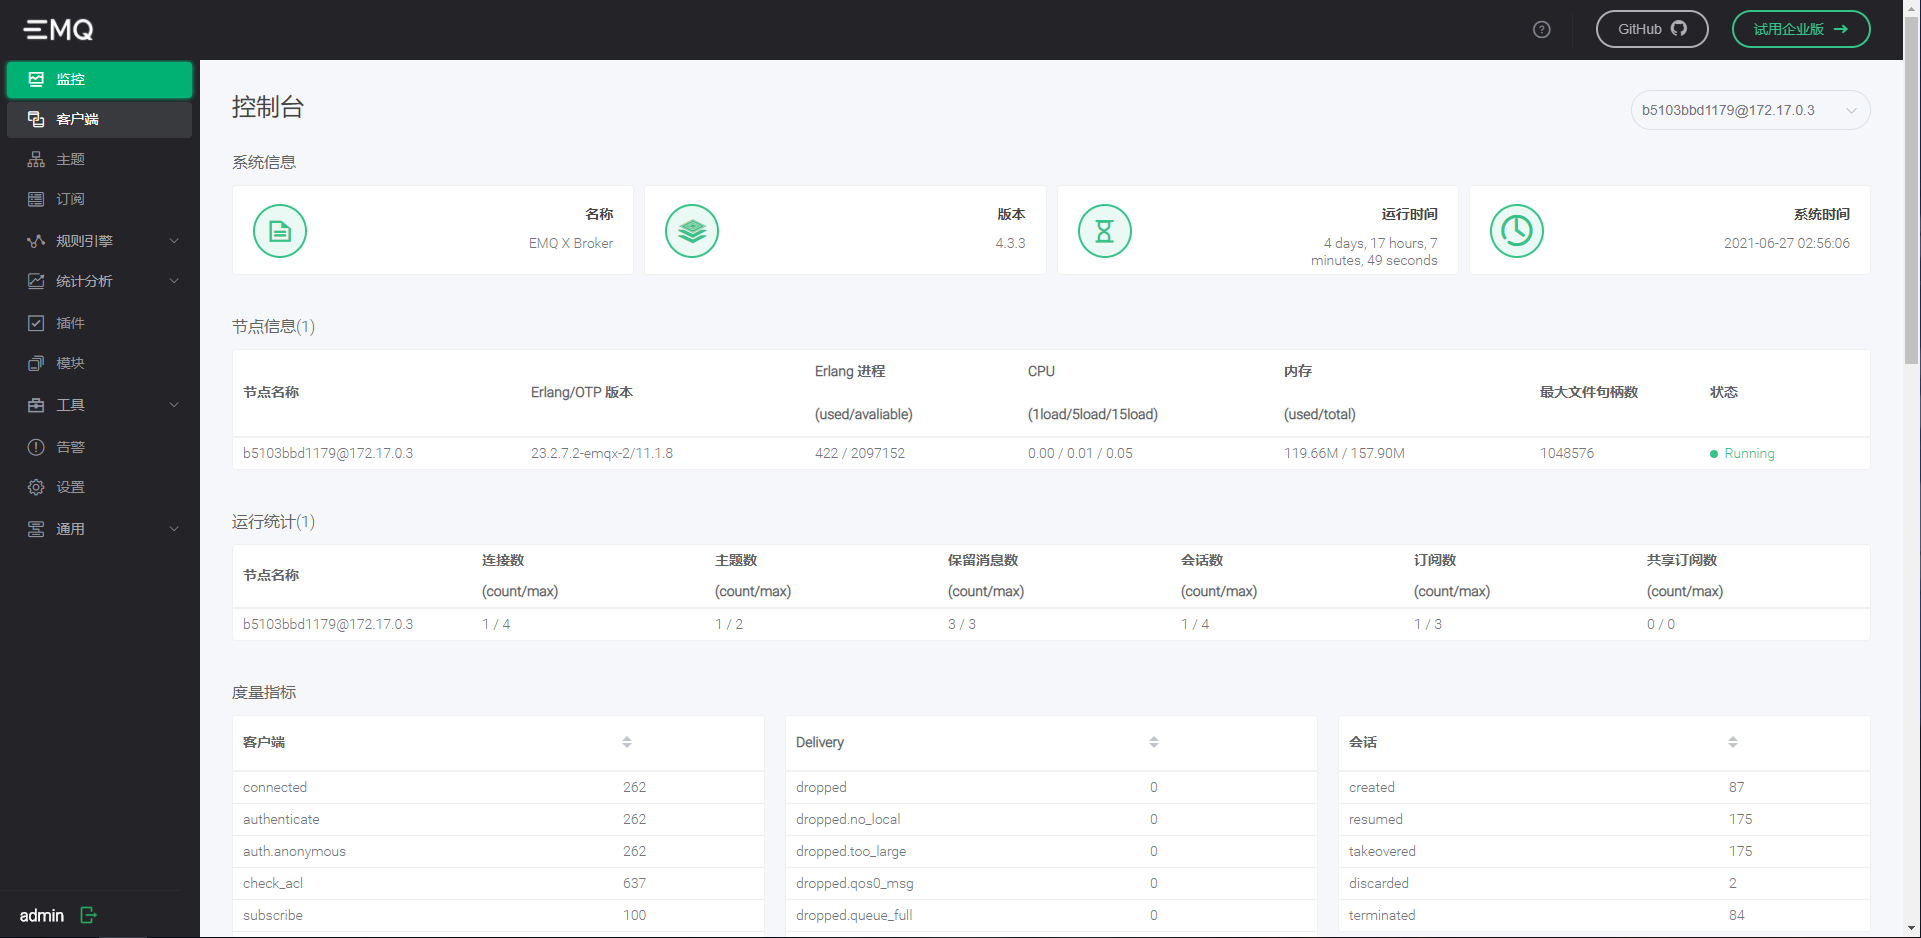
Visit port 18083 of the server and you can see the following page to indicate that the deployment is successful (account: admin, password: public)
6.2. Connect the MQTT server with ESP8266
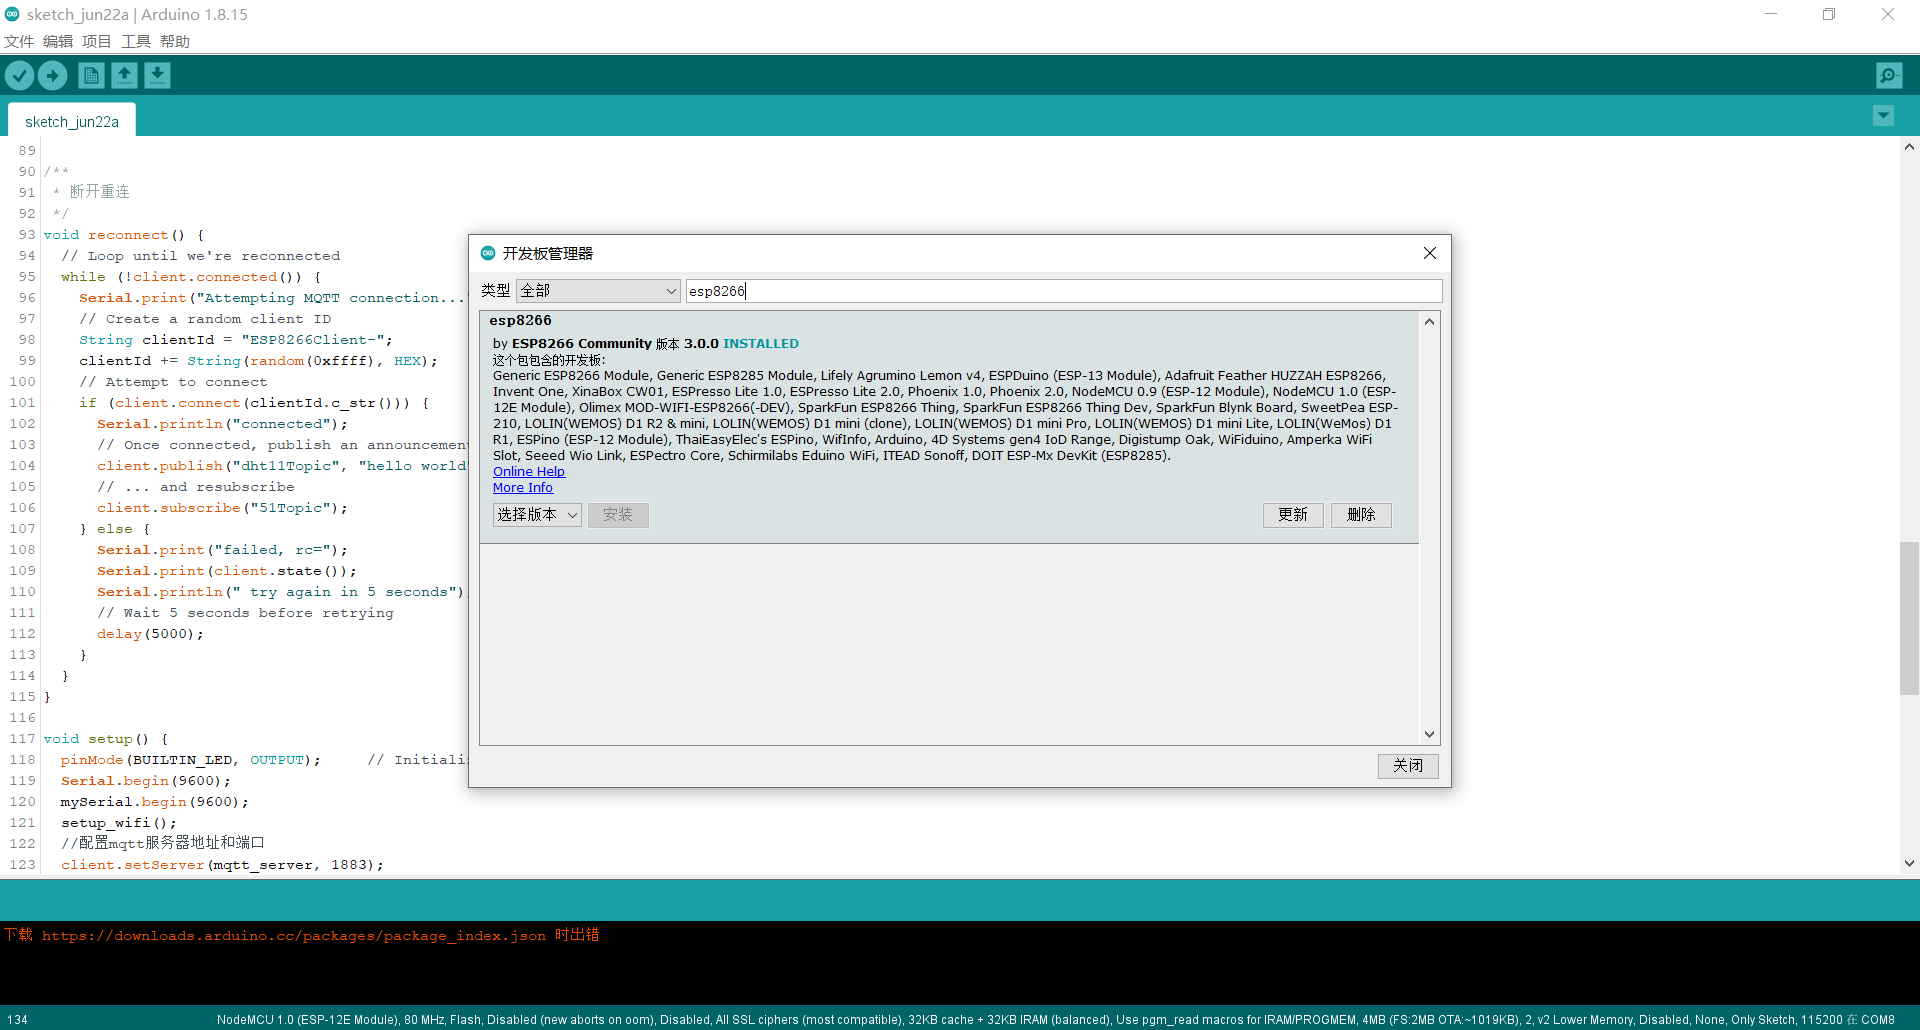
6.2.1 download the related component library of esp12e in arduino.
Download relevant libraries in toolbar > Tools > development board > development board manager > search esp8266 (there are detailed tutorials in the blog link of this article).
6.2.2 import other libraries
Import relevant third-party libraries (if any in the project).
Then toolbar > Project > Load Library > Add ZIP libraries add the following libraries.

6.2.3 code
Esp8266 must be connected to the Internet before MQTT communication. Therefore, esp8266 must first connect to WiFi, and then push and subscribe to MQTT related information.
Use DHT11 module to directly read the temperature and humidity information of DHT11 module, and then use pubsubclient module for MQTT communication.
The source code of arduino project is as follows
#include <ESP8266WiFi.h>
#include <SoftwareSerial.h>
#include <PubSubClient.h>
#include <dht11. h> / / import DHT11 Library
SoftwareSerial mySerial(13, 12); // RX, TX
/********************###Definition###********************/
dht11 DHT11;//Define sensor type
#define DHT11PIN 2 / / define the sensor connection pin. PIN2 here corresponds to D4 on the NodeMcu8266 development board
/********************###Subfunction###********************/
double Fahrenheit(double celsius)
{
return 1.8 * celsius + 32; //The temperature from Celsius to Fahrenheit
}
double Kelvin(double celsius)
{
return celsius + 273.15; //Conversion of Celsius temperature to Kelvin temperature
}
// Update these with values suitable for your network.
const char* ssid = "1122";//wifi account
const char* password = "11111111";//wifi secret
const char* mqtt_server = "159.75.88.181";//mqtt server
WiFiClient espClient;
PubSubClient client(espClient);
long lastMsg = 0;
char msg[50];
int value = 0;
void setup_wifi() {
delay(10);
// We start by connecting to a WiFi network
Serial.println();
Serial.print("Connecting to ");
Serial.println(ssid);
WiFi.begin(ssid, password);
while (WiFi.status() != WL_CONNECTED) {
delay(500);
Serial.print(".");
}
randomSeed(micros());
Serial.println("");
Serial.println("WiFi connected");
Serial.println("IP address: ");
Serial.println(WiFi.localIP());
}
/**
* Message callback
*/
void callback(char* topic, byte* payload, unsigned int length) {
Serial.print((char)payload[0]);
}
/**
* Disconnect and reconnect
*/
void reconnect() {
// Loop until we're reconnected
while (!client.connected()) {
Serial.print("Attempting MQTT connection...");
// Create a random client ID
String clientId = "ESP8266Client-";
clientId += String(random(0xffff), HEX);
// Attempt to connect
if (client.connect(clientId.c_str())) {
Serial.println("connected");
// Once connected, publish an announcement...
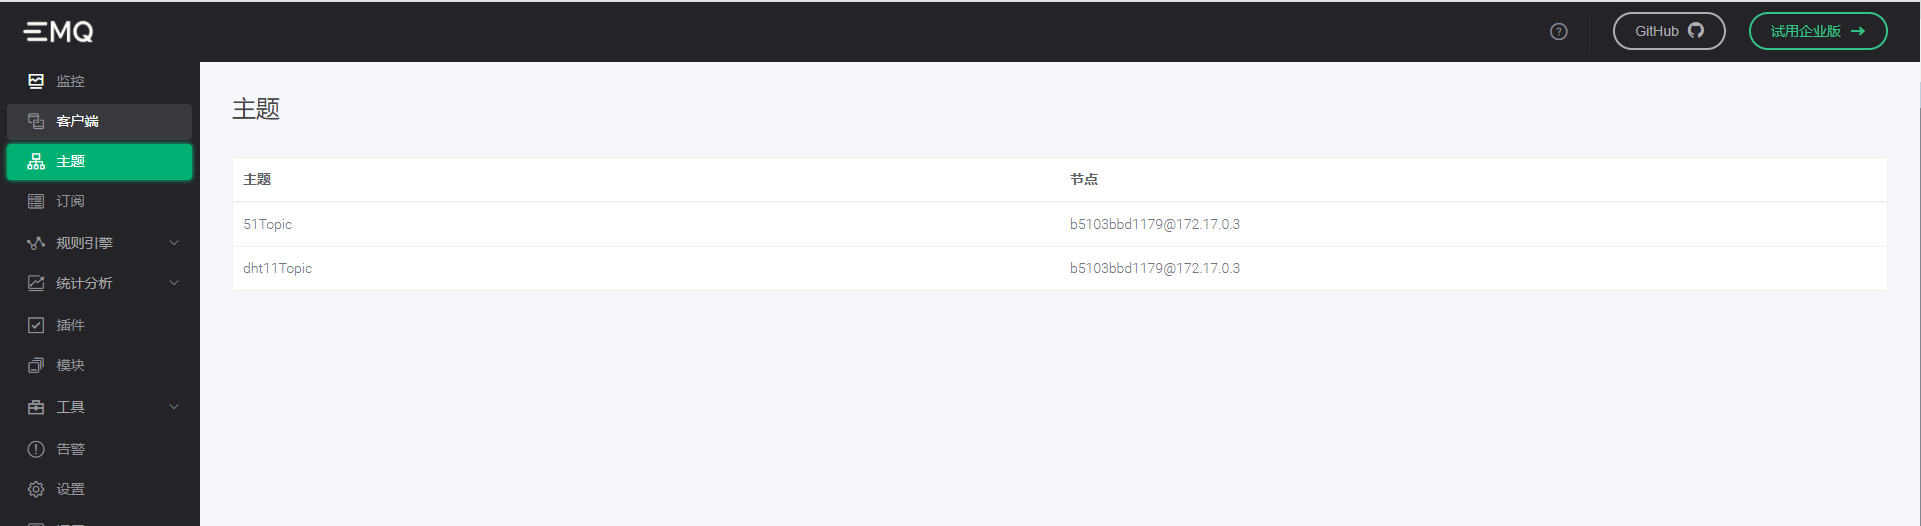
client.publish("dht11Topic", "hello world");
// ... and resubscribe
client.subscribe("51Topic");
} else {
Serial.print("failed, rc=");
Serial.print(client.state());
Serial.println(" try again in 5 seconds");
// Wait 5 seconds before retrying
delay(5000);
}
}
}
void setup() {
pinMode(BUILTIN_LED, OUTPUT); // Initialize the BUILTIN_LED pin as an output
Serial.begin(9600);
mySerial.begin(9600);
setup_wifi();
//Configure mqtt server address and port
client.setServer(mqtt_server, 1883);
//Set subscription message callback
client.setCallback(callback);
}
void loop() {
//Reconnection mechanism
if (!client.connected()) {
reconnect();
}
//Constantly listening for information
client.loop();
long now = millis();
if (now - lastMsg > 5000) {
DHT11.read(DHT11PIN); //Update all sensor information
//Publish information every 5s
lastMsg = now;
++value;
snprintf (msg, 50, "temperature: %f,humidity: %f", (float)DHT11.temperature, (float)DHT11.humidity);
// Serial.print("Publish message: ");
// Serial.println(msg);
client.publish("dht11Topic", msg);
}
}
6.3 single chip microcomputer implementation
Turn on the serial port interrupt, and then connect the single chip microcomputer RXD, TXD and esp8266 to directly obtain the serial port information of 8266.
Then the corresponding operation implementation of relevant instructions is directly set in the serial port interrupt.
The following codes are for operation only. Different pins of different microcontrollers may be different.
#include<reg52.h>
typedef unsigned char u8;
typedef unsigned int u16;
sbit LED = P2^3;
sbit MOTO = P1^0;
u8 dat;
void Init(void)
{
	TMOD = 0x20;
	TL1 = 0xfd;
	TH1 = 0xfd;
	TR1 = 1;
	REN=1;
	SM0=0;
	SM1=1;
	EA = 1;
	ES=1;
}

void main()
{
    Init();
    while(1);
}

void InterruptUART() interrupt 4
{
      RI = 0;
      dat = SBUF;
	  {
         if(dat=='o')
		 {
			 LED =0;
		 }
		 if(dat=='f')
		 {
		     LED =1;
		 }
		 if (dat == 'a')
			 MOTO = 1;
		 if (dat == 'b')
			 MOTO = 0;
	  }
}
6.4. HTTP service implementation
Encapsulate an HTTP service, mask the service call of MQTT, and let the APP directly send HTTP requests to operate the hardware.
The core class MqttChannel encapsulates the MQTT protocol. Maintain a subscription information Map internally. When new information is pushed, you can modify the information of the Map.
package cn.wen233.iocdemo.infrustructure.util;

import cn.wen233.iocdemo.domain.enums.LedState;
import cn.wen233.iocdemo.domain.enums.MotorState;
import org.eclipse.paho.client.mqttv3.*;
import org.eclipse.paho.client.mqttv3.persist.MemoryPersistence;
import org.slf4j.Logger;
import org.slf4j.LoggerFactory;

import java.nio.charset.StandardCharsets;
import java.text.SimpleDateFormat;
import java.util.*;
import java.util.concurrent.CompletableFuture;

/**
 * mqtt Protocol processing tool class
 *
 * @author wenei
 * @date 2021-06-23 10:08
 */
public class MqttChannel implements AutoCloseable {

    private static final Logger log = LoggerFactory.getLogger(MqttChannel.class);

    /**
     * Client id
     */
    private static final String clientId = "http-consumer";

    /**
     * Service quality
     */
    private static final int qos = 1;

    private static String ip = IocUtil.getBean(MQTTProperties.class).getIp();

    private static int port = IocUtil.getBean(MQTTProperties.class).getPort();

    private static final String serviceUrl = String.format("tcp://%s:%d", ip, port);

    private static final Map<String, String> topicMap = new HashMap<>();

    /**
     * Topics for default subscriptions
     */
    private static final List<String> defaultSubscribeTopic = Collections.singletonList("dht11Topic");

    private static final Map<String, String> defaultTopicStatus = new HashMap<>();

    static {
        final String topic = "51Topic";
        defaultTopicStatus.put(topic, LedState.OFF.getCommand());
        defaultTopicStatus.put(topic, MotorState.OFF.getCommand());
    }

    private static MqttClient mqttClient = null;

    static {
        // Memory storage
        MemoryPersistence persistence = new MemoryPersistence();
        // Create client
        try {
            mqttClient = new MqttClient(serviceUrl, clientId, persistence);
            // Create link parameters
            MqttConnectOptions connOpts = new MqttConnectOptions();
            // Remember status when restarting and reconnecting
            connOpts.setCleanSession(false);
            // Set the user name for the connection
//            connOpts.setUserName(userName);
//            connOpts.setPassword(password.toCharArray());
            // Establish connection
            mqttClient.connect(connOpts);
            // Set callback function
            mqttClient.setCallback(new MqttCallback() {

                @Override
                public void connectionLost(Throwable cause) {
                    log.info("Lost connection");
                }

                @Override
                public void messageArrived(String topic, MqttMessage message) throws Exception {
                    log.info("Time: {}, Topic:{}, Message:{}",
                            new SimpleDateFormat("yyyy-MM-dd HH:mm:ss").format(new Date()), topic, message);
                    topicMap.put(topic, new String(message.getPayload()));
                }

                @Override
                public void deliveryComplete(IMqttDeliveryToken token) {
                    log.info("Update subscription:" + token.isComplete());
                }

            });
            // Topics for default subscriptions
            defaultSubscribeTopic.forEach(x -> {
                try {
                    mqttClient.subscribe(x, qos);
                } catch (MqttException e) {
                    e.printStackTrace();
                }
                topicMap.put(x, "temperature:-99.00000, humidity:-99.00000");
            });
            // Default 51 control topic status setting
            defaultTopicStatus.forEach(MqttChannel::publish);
        } catch (MqttException mqttException) {
            mqttException.printStackTrace();
        }
    }

    /**
     * Asynchronous call push method
     */
    public static void asyncPublish(String topic, String sendData) {
        CompletableFuture.supplyAsync(() -> {
            publish(topic, sendData);
            return null;
        });
    }

    public static void publish(String topic, String sendData) {
        try {
            // Create message
            MqttMessage message = new MqttMessage(sendData.getBytes(StandardCharsets.UTF_8));
            // Set the quality of service of the message
            message.setQos(qos);
            // Release news
            mqttClient.publish(topic, message);
            log.info("towards {} of {} Subject sending:{}", serviceUrl, topic, sendData);
        } catch (MqttPersistenceException e) {
            e.printStackTrace();
        } catch (MqttSecurityException e) {
            e.printStackTrace();
        } catch (MqttException e) {
            e.printStackTrace();
        }

    }

    public static String subscribe(String topic) {
        return topicMap.get(topic);
    }

    @Override
    public void close() throws Exception {
        mqttClient.disconnect();
        mqttClient.close();
    }
}
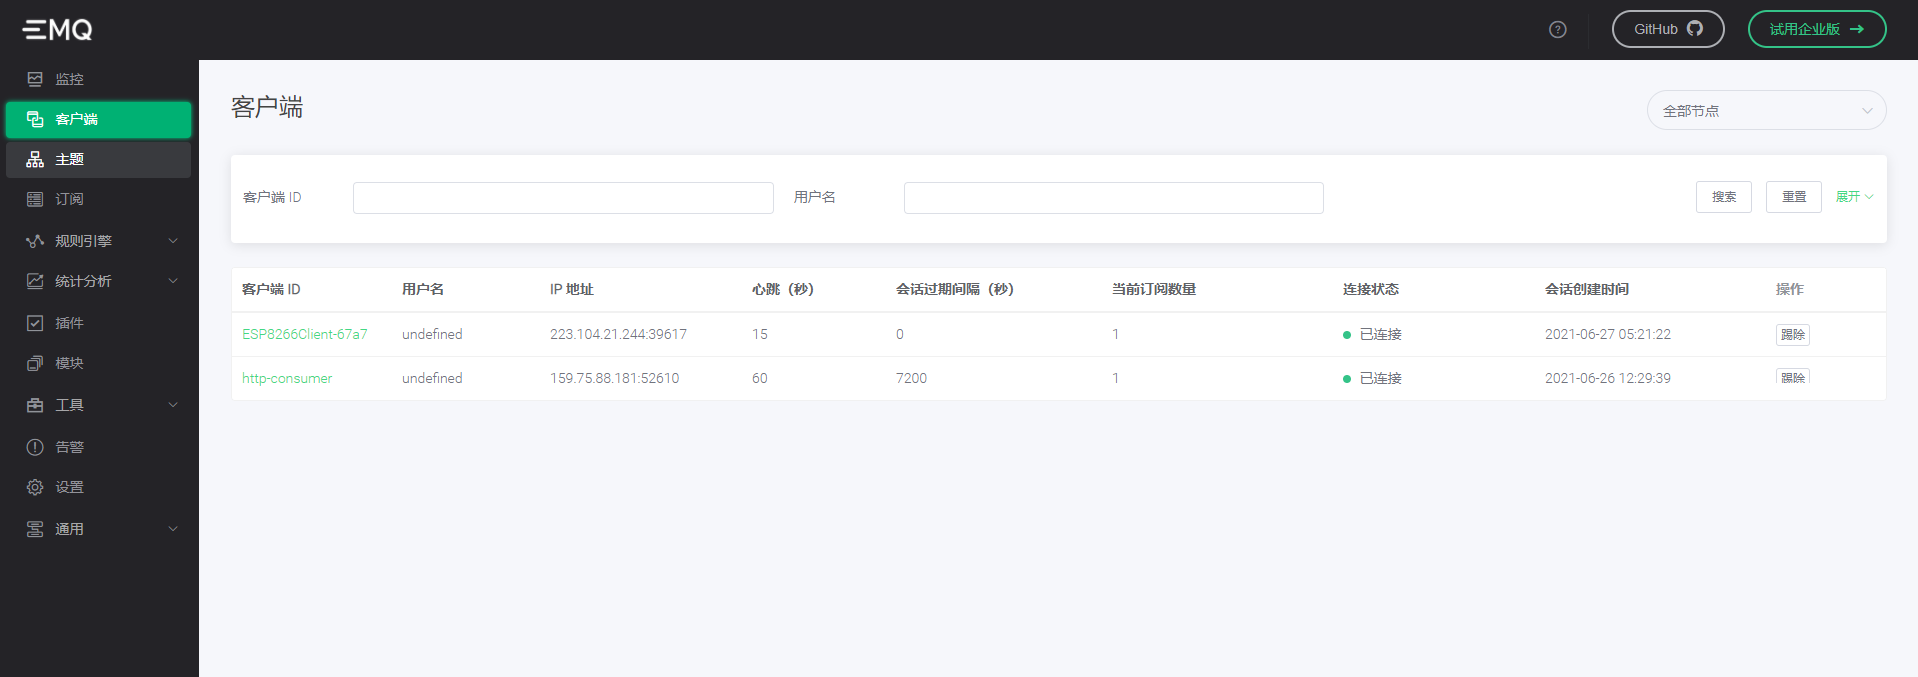
After successful operation, MQTT information has been pushed out as follows.
Then package the SpringBoot application and deploy it to the ECS (so that subsequent apps can send Http requests).
Connect the esp8266 and 51 MCU in 6.1, 6.2 and 6.3 above, then supply power and wait for WiFi connection. After connecting to WiFi, the http service can directly control the MCU.
6.5 App implementation
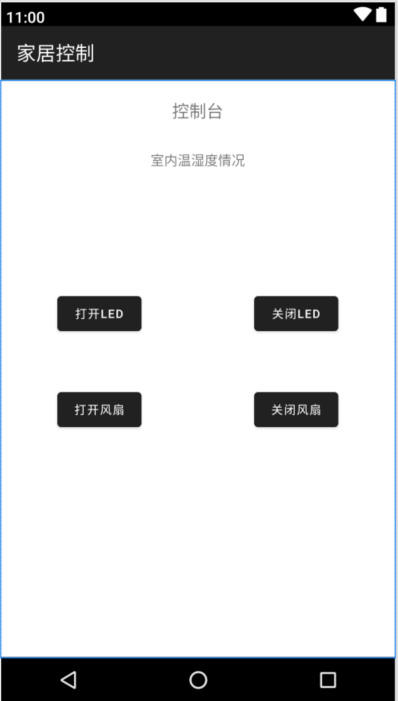
The App page is as follows (the project path should not have Chinese)
Receive relevant temperature and humidity information and display it in real time, and then control relevant LED and fan status.
7. System test
After burning the MCU and esp8266 programs, deploy the MQTT server on the ECS and set the relevant WiFi and server information of esp8266.
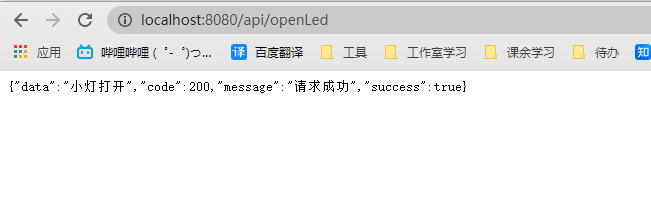
Then enable the http service and you will have the following information
Call the relevant HTTP interface to operate the MCU

8. Systematic review
The system is essentially a system that esp8266 serves as an MQTT client to connect to an external MQTT server.
After the connection is completed, the serial port of 51 single chip microcomputer can transmit transparently with the theme of MQTT. The received information of the subject can be completely sent to the single chip microcomputer.
Therefore, if you need to develop again, you only need to modify the relevant operation instructions sent by the MCU and HTTP service.