Structural pattern mainly involves how to combine various objects in order to obtain a better and more flexible structure. Although the object-oriented inheritance mechanism provides the most basic function of subclass extending the parent class, the structural pattern not only uses inheritance simply, but also realizes more flexible functions through the dynamic combination of composition and runtime.
Structural modes include:
- Adapter
- bridging
- combination
- Decorator
- appearance
- Enjoy yuan
- agent
Adapter
Convert the interface of a class into another interface desired by the customer, so that those classes that cannot work together due to incompatible interfaces can work together.
The Adapter mode is Adapter, also known as Wrapper. It means that if an interface needs interface B, but the object to be passed in is interface A, what should I do?
Let's take an example. If we go to the United States, the electrical appliances we take with us cannot be used directly. Because the socket standard in the United States is different from that in China, we need an adapter:
For example, we originally had a callable interface inherited by Task, but Thread does not accept the callable interface. How can we make this work normally?
public class Task implements Callable<Long> {
    private long num;
    public Task(long num) {
        this.num = num;
    }
    public Long call() throws Exception {
        long r = 0;
        for (long n = 1; n <= this.num; n++) {
            r = r + n;
        }
        System.out.println("Result: " + r);
        return r;
    }
}
We can use adapter to implement it
public class RunnableAdapter implements Runnable {
    // Reference the interface to be converted:
    private Callable<?> callable;
    public RunnableAdapter(Callable<?> callable) {
        this.callable = callable;
    }
    // Implement the specified interface:
    public void run() {
        // Delegate the specified interface call to the transformation interface call:
        try {
            callable.call();
        } catch (Exception e) {
            throw new RuntimeException(e);
        }
    }
}
The steps of writing an Adapter are as follows:
- Implement the target interface, here is Runnable;
- Callable is an internal field to be held through the interface to be converted;
- Inside the implementation method of the target interface, call the method of the interface to be converted.
In this way, the thread can receive the RunnableAdapter because it implements the Runnable interface. Thread, as the caller, will call the run() method of RunnableAdapter. Within this run() method, it also calls the call() method of Callable, which is equivalent to that thread indirectly calls the call() method of Callable through a layer of transformation.
Adapter pattern is widely used in Java standard library. For example, when the data type is String [], but the List interface is required, we can use an adapter:
String[] exist = new String[] {"Good", "morning", "Bob", "and", "Alice"};
Set<String> set = new HashSet<>(Arrays.asList(exist));
Notice List < T > arrays Aslist (t []) is equivalent to a converter, which can convert an array into a List.
Summary
The Adapter pattern can convert an A interface into A B interface, making the new object conform to the B interface specification.
Writing an Adapter is actually writing A class that implements the B interface and internally holds the A interface:
public BAdapter implements B {
    private A a;
    public BAdapter(A a) {
        this.a = a;
    }
    public void b() {
        a.a();
    }
}
"Convert" the call of interface B to the call of interface A within the Adapter.
Only when both A and B interfaces are abstract interfaces can the Adapter pattern be implemented very simply.
Bridging mode Barage
Separate the abstract part from its implementation part so that they can change independently.
The definition of bridge mode is very mysterious, and it is not easy to understand it directly, so we still give examples.
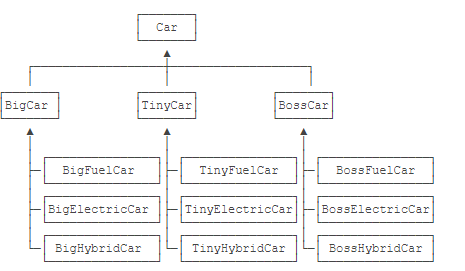
Suppose an automobile manufacturer produces three brands of cars: Big, Tiny and Boss. Each brand can choose fuel, pure electric and hybrid. If each final model is represented by traditional inheritance, there are three abstract classes and nine final subclasses:

If you want to add a brand or a new engine (such as nuclear power), the number of sub categories will grow faster. Therefore, bridging mode is to avoid subclass explosion caused by direct inheritance.
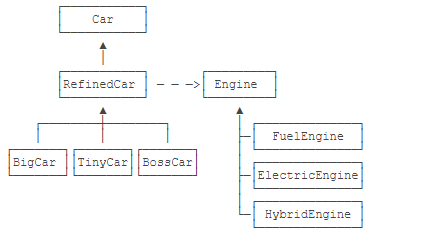
In the bridging mode, Car is first subclassed by brand. However, what Engine each brand chooses is no longer extended by subclass, but introduced in the form of combination through an abstract "correction" class. Let's take a look at the specific implementation. First, define the abstract class Car, which refers to an Engine:
public abstract class Car {
    // Reference Engine:
    protected Engine engine;

    public Car(Engine engine) {
        this.engine = engine;
    }
    public abstract void drive();
}
Engine is defined as follows:
public interface Engine {
    void start();
}
Next, define some additional operations in a "modified" abstract class RefinedCar:
public abstract class RefinedCar extends Car {
    public RefinedCar(Engine engine) {
        super(engine);
    }

    public void drive() {
        this.engine.start();
        System.out.println("Drive " + getBrand() + " car...");
    }

    public abstract String getBrand();
}
In this way, the final different brands are inherited from RefinedCar, such as boscar:
public class BossCar extends RefinedCar {
    public BossCar(Engine engine) {
        super(engine);
    }

    public String getBrand() {
        return "Boss";
    }
}
For each Engine, it is inherited from the Engine, such as HybridEngine:
public class HybridEngine implements Engine {
    public void start() {
        System.out.println("Start Hybrid Engine...");
    }
}
The client chooses a brand by itself and then cooperates with an engine to get the final Car:
RefinedCar car = new BossCar(new HybridEngine());
car.drive();
The advantage of using bridge mode is that if you want to add an Engine, you only need to derive a new subclass from Engine. If you want to add a brand, you only need to derive a subclass from RefinedCar. Any subclass of RefinedCar can be freely combined with any Engine, that is, the two dimensions of a car: brand and Engine can change independently.

The implementation of bridge mode is complex and its practical application is very few, but the design idea it provides is worth learning from, that is, do not overuse inheritance, but give priority to splitting some components and using combination to expand functions.
Composite
The objects are combined into a tree structure to represent the hierarchical structure of "part whole", so that users have consistency in the use of single objects and combined objects.
Composite mode is often used in tree structure. In order to simplify the code, a leaf node and a parent node can be unified by using composite.
Let's take a concrete example. In XML or HTML, starting from the root node, each node may contain any other nodes. These nested nodes form a tree.
To represent XML in a tree structure, we can first abstract the Node type Node:
public interface Node {
    // Add a node as a child node:
    Node add(Node node);
    // Get child nodes:
    List<Node> children();
    // Output as XML:
    String toXml();
}
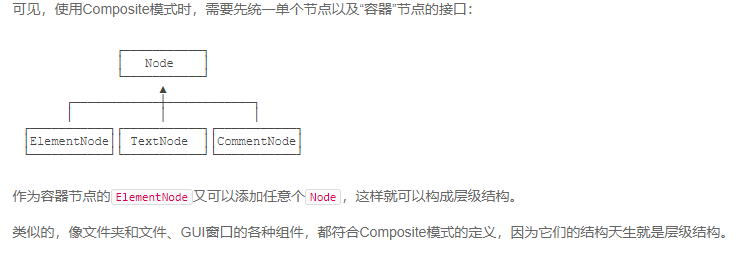
For example, we define three types of nodes according to this requirement, one is ElementNode, one is TextNode, and one is CommentNode
These three nodes are defined according to the following requirements
public class ElementNode implements Node {
    private String name;
    private List<Node> list = new ArrayList<>();
    public ElementNode(String name) {
        this.name = name;
    }
    public Node add(Node node) {
        list.add(node);
        return this;
    }
    public List<Node> children() {
        return list;
    }
    public String toXml() {
        String start = "<" + name + ">\n";
        String end = "</" + name + ">\n";
        StringJoiner sj = new StringJoiner("", start, end);
        list.forEach(node -> {
            sj.add(node.toXml() + "\n");
        });
        return sj.toString();
    }
}
public class TextNode implements Node {
	private String text;
	public TextNode(String text) {
		this.text = text;
	}
	public Node add(Node node) {
		throw new UnsupportedOperationException();
	}
	public List<Node> children() {
		return List.of();
	}
	public String toXml() {
		return text;
	}
}
public class CommentNode implements Node {
	private String text;
	public CommentNode(String text) {
		this.text = text;
	}
	public Node add(Node node) {
		throw new UnsupportedOperationException();
	}
	public List<Node> children() {
		return List.of();
	}
	public String toXml() {
		return "<!-- " + text + " -->";
	}
}
Through ElementNode, TextNode and CommentNode, we can construct a tree:
Node root = new ElementNode("school");
root.add(new ElementNode("classA")
        .add(new TextNode("Tom"))
        .add(new TextNode("Alice")));
root.add(new ElementNode("classB")
        .add(new TextNode("Bob"))
        .add(new TextNode("Grace"))
        .add(new CommentNode("comment...")));
System.out.println(root.toXml());
Final output result
<school>
    <classA>
        Tom
        Alice
    </classA>
    <classB>
        Bob
        Grace
    	<!-- comment... -->
    </classB>
</school>

Summary
The Composite pattern makes leaf objects and container objects consistent, so as to form a unified tree structure and deal with them in a consistent way.
Decorator
Dynamically add some additional responsibilities to an object. In terms of adding functions, it is more flexible than generating subclasses.
Decorator pattern is a method of dynamically adding functions to an instance of an object at run time. We're in IO Filter mode In fact, the decorator mode has been discussed in the section. In the Java standard library, InputStream is an abstract class, including FileInputStream, ServletInputStream and socket Getinputstream () these inputstreams are the final data sources.
Now, if you want to add buffer function, calculation signature function and encryption and decryption function to different final data sources, a total of 9 subclasses are required for three final data sources and three functions. If you continue to add the final data source or add new functions, the subclass will grow explosively. This design method is obviously not desirable. The purpose of Decorator mode is to add additional functions one by one to the original data source layer by layer in the way of Decorator, and finally obtain the functions we want through combination.
// Create original data source:
InputStream fis = new FileInputStream("test.gz");
// Add buffer function:
InputStream bis = new BufferedInputStream(fis);
// Add decompression function:
InputStream gis = new GZIPInputStream(bis);
Or write it like this at one time:
InputStream input = new GZIPInputStream( // Second floor decoration
                        new BufferedInputStream( // First floor decoration
                            new FileInputStream("test.gz") // Core functions
                        ));
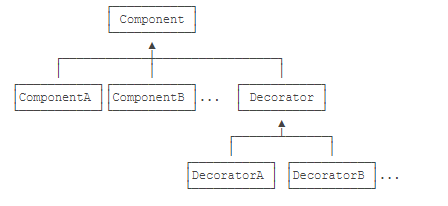
Observe BufferedInputStream and GZIPInputStream. They are actually inherited from FilterInputStream, which is an abstract Decorator. We draw the Decorator pattern as follows:

What are the benefits of Decorator mode? It actually separates core functions from additional functions. The core function refers to the source of real read data such as FileInputStream, and the additional function refers to the functions of buffering, compression and decryption. If we want to add core functions, we need to add subclasses of Component, such as ByteInputStream. If we want to add additional functions, we need to add subclasses of Decorator, such as CipherInputStream. Both parts can be extended independently, and how to add functions is freely combined by the caller, which greatly enhances the flexibility.
Practical examples
We also define a TextNode
public interface TextNode {
    // Setting text:
    void setText(String text);
    // Get text:
    String getText();
}
For core nodes, such as < span >, it needs to inherit directly from TextNode:
public class SpanNode implements TextNode {
    private String text;
    public void setText(String text) {
        this.text = text;
    }
    public String getText() {
        return "<span>" + text + "</span>";
    }
}
Next, in order to implement the Decorator pattern, you need to have an abstract Decorator class:
public abstract class NodeDecorator implements TextNode {
    protected final TextNode target;
    protected NodeDecorator(TextNode target) {
        this.target = target;
    }
    public void setText(String text) {
        this.target.setText(text);
    }
}
The core of this NodeDecorator class is to hold a TextNode, which is the TextNode instance to which the function is to be attached. Next, you can write a bold function:
public class BoldDecorator extends NodeDecorator {
    public BoldDecorator(TextNode target) {
        super(target);
    }
    public String getText() {
        return "<b>" + target.getText() + "</b>";
    }
}
Similarly, ItalicDecorator and UnderlineDecorator can be added. Decorator can freely combine these clients:
TextNode n1 = new SpanNode();
TextNode n2 = new BoldDecorator(new UnderlineDecorator(new SpanNode()));
TextNode n3 = new ItalicDecorator(new BoldDecorator(new SpanNode()));
n1.setText("Hello");
n2.setText("Decorated");
n3.setText("World");
System.out.println(n1.getText());
// Output < span > hello</span>

System.out.println(n2.getText());
// Output < b > < U > < span > decorated < / span > < / u ></b>

System.out.println(n3.getText());
// Output < I > < b > < span > World < / span > < / b > < / I >
Summary
Using Decorator mode, you can add core functions or additional functions independently, and the two do not affect each other;
You can dynamically add any additional functions to the core functions during the run-time.
Appearance Facade
Provide a consistent interface for a set of interfaces in the subsystem. The Facade pattern defines a high-level interface that makes this subsystem easier to use.
Facade is a relatively simple pattern. Its basic idea is as follows:
If the client has to deal with many subsystems, the client needs to understand the interfaces of each subsystem, which is more troublesome. If there is a unified "intermediary", let the client only deal with the intermediary, and then deal with each subsystem, it is relatively simple for the client. So the Facade is equivalent to an intermediary.
Taking the registered company as an example, we assume that the registered company needs three steps:
- Apply to the Administration for Industry and Commerce for the company's business license;
- Opening an account with a bank;
- Open a tax number in the tax bureau.
The following are the interfaces of the three systems:
// Industrial and commercial registration:
public class AdminOfIndustry {
    public Company register(String name) {
        ...
    }
}
// bank account:
public class Bank {
    public String openAccount(String companyId) {
        ...
    }
}
// Tax registration:
public class Taxation {
    public String applyTaxCode(String companyId) {
        ...
    }
}
If the subsystem is complex and the customer is not familiar with the process, entrust all these processes to the intermediary:
public class Facade {
    public Company openCompany(String name) {
        Company c = this.admin.register(name);
        String bankAccount = this.bank.openAccount(c.getId());
        c.setBankAccount(bankAccount);
        String taxCode = this.taxation.applyTaxCode(c.getId());
        c.setTaxCode(taxCode);
        return c;
    }
}
In this way, the client only deals with the Facade and completes all the cumbersome processes of company registration at one time:
Company c = facade.openCompany("Facade Software Ltd.");
Many Web programs have multiple internal subsystems to provide services, and often use a unified Facade entry, such as a RestApiController, so that when external users call, they only care about the interface provided by the Facade, regardless of which internal subsystem handles it.
More complex Web programs will have multiple Web services. At this time, a unified Gateway entrance is often used to automatically forward to different Web services. This Gateway providing a unified entrance is the Gateway. In essence, it is also a Facade, but some additional services such as user authentication and flow and speed limit can be attached.
Summary
The Facade mode is to provide a unified entrance for the client and shield the call details of the internal subsystem.
Enjoy Flyweight
Using sharing technology to effectively support a large number of fine-grained objects.
The core idea of Flyweight is very simple: if an object instance is immutable once it is created, it is not necessary to create the same instance repeatedly. Just return a shared instance to the caller directly, which not only saves memory, but also reduces the process of creating objects and improves the running speed.
The meta pattern has many applications in the Java standard library. We know that wrapper types such as Byte and Integer are invariant classes. Therefore, it is not necessary to create the same wrapper type with the same value repeatedly. Take Integer as an example, if we pass Integer Valueof() is a static factory method that creates an Integer instance. When the incoming int range is between - 128 ~ + 127, it will directly return the cached Integer instance:
For Byte, because it has only 256 states in total, it passes Byte All Byte instances created by valueof () are cache objects. Therefore, the meta sharing mode is to create objects through the factory method. Within the factory method, it is likely to return cached instances instead of newly created instances, so as to realize the reuse of immutable instances. Always use the factory method instead of the new operator to create instances, which can benefit from the meta pattern.
In practical application, the meta sharing mode is mainly used for caching, that is, if the client repeatedly requests some objects, it does not have to query the database or read files every time, but directly return the cached data in memory. Taking Student as an example, we design a static factory method, which can return cached objects internally:
public class Student {
    // Hold cache:
    private static final Map<String, Student> cache = new HashMap<>();
    // Static factory method:
    public static Student create(int id, String name) {
        String key = id + "\n" + name;
        // Find cache first:
        Student std = cache.get(key);
        if (std == null) {
            // Not found, create new object:
            System.out.println(String.format("create new Student(%s, %s)", id, name));
            std = new Student(id, name);
            // Put in cache:
            cache.put(key, std);
        } else {
            // In cache:
            System.out.println(String.format("return cached Student(%s, %s)", std.id, std.name));
        }
        return std;
    }
    private final int id;
    private final String name;

    public Student(int id, String name) {
        this.id = id;
        this.name = name;
    }
}
In practical applications, we often use mature cache libraries, such as Guava of Cache , because it provides practical functions such as maximum cache limit and timed expiration.
Summary
The design idea of shared meta pattern is to reuse the created objects as much as possible, which is often used for internal optimization of factory methods.
Proxy
Provide a proxy for other objects to control access to this object.
The Proxy mode, or Proxy, is very similar to the Adapter mode. Let's first review the Adapter mode, which is used to convert the A interface to the B interface:
public BAdapter implements B {
    private A a;
    public BAdapter(A a) {
        this.a = a;
    }
    public void b() {
        a.a();
    }
}
The code of Proxy mode is as follows
public AProxy implements A {
    private A a;
    public AProxy(A a) {
        this.a = a;
    }
    public void a() {
        this.a.a();
    }
}
It looks like the same, but the different place is here a.a();, It seems that we haven't done anything, but we can add permission check function to the code, so we can realize permission check:
public void a() {
    if (getCurrentUser().isRoot()) {
        this.a.a();
    } else {
        throw new SecurityException("Forbidden");
    }
}
Some children's shoes will ask, why not write the permission check function directly into the interior of target instance A?
Because we write code according to the following principles:
- Clear responsibilities: a class is only responsible for one thing;
- Easy to test: test only one function at a time.
Using Proxy to implement this permission check, we can get clearer and more concise code:
- A interface: only interfaces are defined;
- ABusiness class: only implement the business logic of interface A;
- APermissionProxy class: it only implements the permission check proxy of interface A.
If we want to write other types of proxies, we can continue to add similar ALogProxy without modifying the existing A interface and ABusiness class.
In fact, permission checking is only an application of proxy mode. Proxy is also widely used in:
Remote agent
The Remote Proxy is the Remote Proxy. The interface held by the local caller is actually a proxy. This proxy is responsible for converting the method access to the interface into a remote call, and then returning the result. The RMI mechanism built in Java is a complete Remote Proxy mode.
Virtual agent
Virtual Proxy is Virtual Proxy, which allows the caller to hold a proxy object first, but the real object has not been created yet. If it is not necessary, the real object will not be created until the client needs to call it. The JDBC Connection (Connection object) returned by the JDBC Connection pool can be a virtual agent, that is, there is no actual database Connection when obtaining the Connection. The actual JDBC Connection is not really created until the first JDBC query or update operation is executed.
Protection agent
Protection Proxy is Protection Proxy, which uses proxy object to control access to original object, and is often used for authentication.
Smart reference
Smart Reference is also a proxy object. If many clients access it, it can be automatically released after the external callers do not use it through the internal counter.
Summary
By encapsulating an existing interface and returning the same interface type to the caller, the proxy mode enables the caller to enhance some functions (such as authentication, delayed loading, connection pool reuse, etc.) without changing any code.
Using Proxy mode requires the caller to hold the interface, and the class as Proxy must also implement the same interface type.