I. Demand
The update speed of Nagios is very fast. The company adopts the latest stable version nagios-4.0.8 and the plug-in is nagios-plugins-2.0.3. After using and testing the new version, it is found that the speed and alarm speed are much faster than before.
Moreover, it occupies little operating system resources and has a clean interface in time, as shown in the following figure:

Due to the instability of online download packages, I arranged them and put them on the disks. All the download packages are listed in the address of 360 disks as follows:
http://yunpan.cn/cHjtN2f9Kz3FM Access Password f9af
2. Construction of PHP Environment
The company uses lamp environment as the basic environment of nagios, of course mysql can be installed as long as the PHP environment.
1. Installation of apr
The purpose of APR(Apache portable Run-time libraries, Apache portable runtime) is, as its name implies, to provide an underlying support interface library for upper-level applications that can be used across multiple operating system platforms.
In the early version of Apache, the application itself must be able to handle the details of various specific operating system platforms and call different processing functions for different platforms. With the further development of Apache, the Apache organization decided to separate these common functions and develop them into a new project. In this way, APR development is separated from Apache, which only uses APR.
In general, APR development kits are easy to understand as just a development kit, but they are not. At present, the complete APR actually contains three development packages: apr, apr-util and apr-iconv, each of which is developed independently and has its own version.
Now the apr in the new version of http is integrated into a package like httpd-2.4.9-deps.tar. The decompressed results are as follows:

Installation and management are much easier after integration, so there is no need to worry about the relationship between apache version and apr.
Installation is as follows:
./configure--prefix=/mnt/cellar/httpd/apr     //This catalogue must be well planned and managed.
make
make install
2. apr-utils installation
  ./configure --prefix=/mnt/cellar/httpd/apr-util --with-apr=/mnt/cellar/httpd/apr
   //Specify the installation directory of the apr
 make
  makeinstall
After the installation of apr and api-utils, the directory is as follows:

3. Installation of PCR E
./configure  --prefix=/mnt/cellar/httpd/pcre
make
make install
If the following error is reported:
configure: error: You need a C++ compiler for C++ support
You need to install Yum install-y GCC gcc-c++.
4. Installation of apache
apache version 2.4.9
./configure--prefix=/mnt/cellar/httpd/apache --with-apr=/mnt/cellar/httpd/apr--with-apr-util=/mnt/cellar/httpd/apr-util/bin/apu-1-config--with-pcre=/mnt/cellar/httpd/pcre/ --enable-so --enable-rewrite
//To specify the directories that you installed earlier (apr,apr-utils,pcre)

make
make install
apache starts as follows
[root@kaifabin]# ./apachectl start
Explain that apache is working properly
Since Apache is installed in the source package, it is difficult to start and close apache, so I wrote a startup script for Apache as follows:
#!/bin/bash
#Startup script for the Apache2.0.X Web Server
# chkconfig:- 85 15
# Sourcefunction library.
./etc/rc.d/init.d/functions
if [ -f/etc/sysconfig/httpd ]; then
./etc/sysconfig/httpd
fi
INITLOG_ARGS=""
apachectl=/mnt/cellar/httpd/apache/bin/apachectl
httpd=${HTTPD-/mnt/cellar/httpd/apache/bin/httpd}
prog=httpd
RETVAL=0
start(){
echo -n$"Starting $prog: "
daemon$httpd $OPTIONS
RETVAL=$?
echo
[$RETVAL = 0 ] && touch /var/lock/subsys/httpd
return$RETVAL
}
stop() {
echo -n$"Stopping $prog: "
killproc$httpd
RETVAL=$?
echo
[$RETVAL = 0 ] && rm -f /var/lock/subsys/httpd /var/run/httpd.pid
}
reload(){
echo -n$"Reloading $prog: "
killproc$httpd -HUP
RETVAL=$?
echo
}
case"$1" in
start)
start
 ;;
stop)
stop
 ;;
status)
status$httpd
RETVAL=$?
 ;;
restart)
stop
start
 ;;
condrestart)
if [ -f/var/run/httpd.pid ] ; then
stop
start
fi
 ;;
reload)
reload
 ;;
graceful|help|configtest|fullstatus)
$apachectl$@
RETVAL=$?
 ;;
*)
echo$"Usage: $prog
{start|stop|restart|condrestart|reload|status|fullstatus|graceful|help|configtest}"
exit 1
esac
exit$RETVAL
The above script only needs to modify the red part if necessary (the installation directory of apache)
5. PHP Installation
5.1 PHP version is php-5.6.4
./configure  --prefix=/mnt/cellar/httpd/php--with-libdir=/usr/lib64 --with-config-file-path=/mnt/cellar/httpd/php/etc --with-config-file-scan-dir=/mnt/cellar/httpd/php/etc/php.d --with-apxs2=/mnt/cellar/httpd/apache/bin/apxs
make
make install
Unfined reference to `libiconv'
The solutions are as follows:
Makefile about 77 rows:
EXTRA_LIBS = ..... -lcrypt
At the end, add - liconv, for example:
EXTRA_LIBS = ..... -lcrypt -liconv
Verification is valid!
5.2 PHP environment configuration is as follows:
Copy php.ini to the following directory

Then add it to apache's httpd.conf
AddType application/x-httpd-php .php
Then restart apache and visit again as follows:
So far, the basic environment configuration has been completed.
If you do not know the parameters when configure, you can use the following commands to view:
View the nginx compilation parameters: / usr/local/nginx/sbin/nginx-V
Check Apache compilation parameters: cat/usr/local/apache2/build/config.nice
View the MySQL compilation parameters: cat/usr/local/mysql/bin/mysqlbug | grep CONFIGURE_LINE
View the php compilation parameters: / usr / local / php / bin / php - I | grep configure
III. Installation of nagios
1. Creating Users
useradd -M -s/sbin/nologin nagios //No login, no home directory
2. Installation of nagios main program
cd nagios-4.0.8
./configure   --prefix=/mnt/cellar/nagios   --with-command-group=nagios  --with-nagios-group=nagios
makeall
makeinstall
makeinstall-init  //Generate init startup script
makeinstall-config  //Generate some module configuration files
makeinstall-commandmode  //Setting up corresponding permissions
makeinstall-webconf
Installation completed
cp -R contrib/eventhandlers/ /mnt/cellar/nagios/libexec/
chown-R nagios.nagios eventhandlers/ //Copy events are handled in the libexec directory of the nagios installation directory.
3. Start nagios
. / nagios-v/mnt/cellar/nagios/etc/nagios.cfg
The following boot, as shown below, starts correctly

4. apache-related configuration
./htpasswd -c /mnt/cellar/nagios/etc/htpasswd letang //Adding web login user letang
Add the following at the end of apache's httpd.conf:
#setting for nagios
ScriptAlias /nagios/cgi-bin"/mnt/cellar/nagios/sbin"
<Directory"/mnt/cellar/nagios/sbin">
    AuthType Basic
    Options ExecCGI
    AllowOverride None
    Order allow,deny
    Allow from all
    AuthName "Nagios Access"
    AuthUserFile /mnt/cellar/nagios/etc/htpasswd
    Require valid-user
</Directory>
Alias /nagios"/mnt/cellar/nagios/share"
<Directory "/mnt/cellar/nagios/share">
    AuthType Basic
    Options None
    AllowOverride None
    Order allow,deny
    Allow from all
    AuthName "nagios Access"
    AuthUserFile /mnt/cellar/nagios/etc/htpasswd
    Require valid-user
</Directory>
Then find out.
user apache
group apache
Amend to read
user nagios
group nagios
Finally, restart apache login validation as follows:
5. Error Elimination
After entering the username and password, click services and the following scrambling occurs as follows:
The reason for this is that apache did not open the cgi script
Enter apache's main configuration file httpd.conf
#LoadModule cgid_module modules/mod_cgid.so
#LoadModule actions_module modules/mod_actions.so
Remove the # in line 2 above, restart apache and OK, then turn off the browser and log in again as follows:
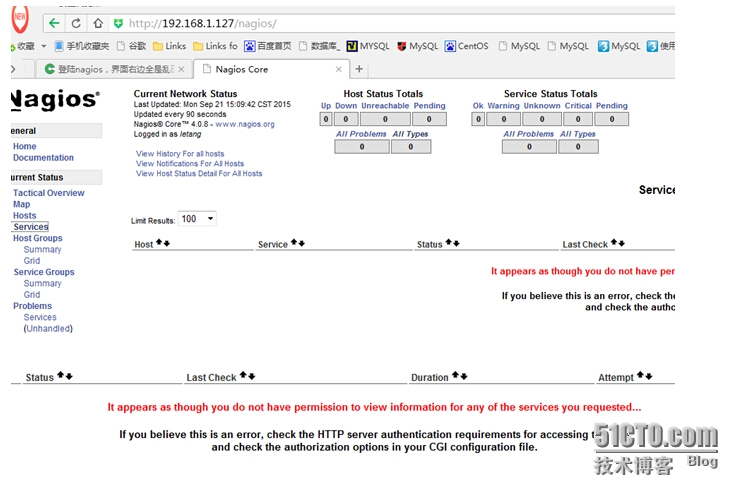
Seems like nothing? And there's an error message
This is the issue of certification. Amend it as follows
Change use_authentication=1 to use_authentication=0 and restart nagios

Then you can see that there are monitoring items in the following description, but there are red tips:
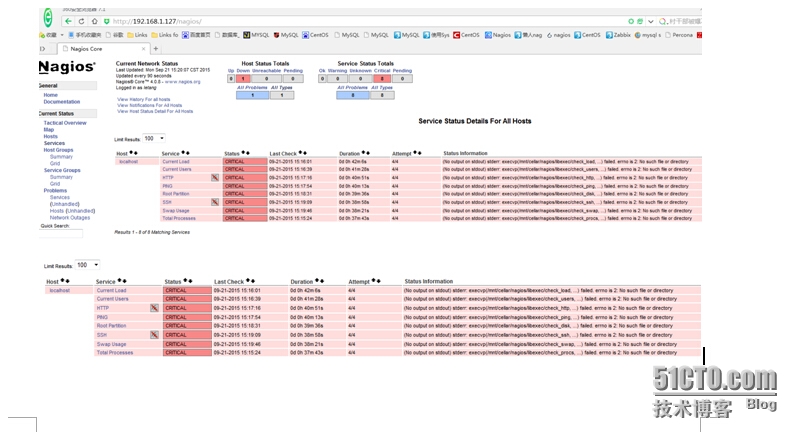
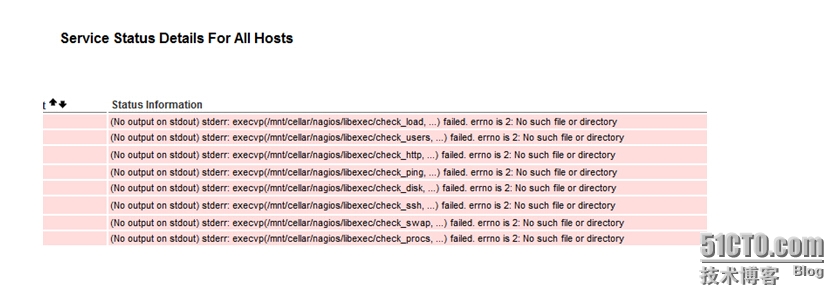
Looking at the above error, it is obvious that the prompt for the command is found because the plug-in is not installed.
6. Installation of nagios plug-ins
nagios is powerful because of powerful plug-ins
tar
-zxvf nagios-plugins-2.0.3.tar.gz
cd
nagios-plugins-2.
cd
nagios-plugins-2.0.3
./configure  --prefix=/mnt/cellar/nagios/  --with-nagios-user=nagios
--with-nagios-group=nagios --with-command-user=nagios --with-command-group=nagios
make
After installation, there will be many commands under this / mnt/cellar/nagios/libexec

Then restart nagios and observe as follows:
Of course, this is the monitoring of local host.
7. Monitoring Windows Machines
windows machine monitoring depends on

If it is monitored through snmp, it is not necessary
Our company adopts the first way to monitor by installing plug-ins.
Installation is as follows:
Here allowed host is the client's IP and the server's nagios'IP password should be empty. Otherwise, it would be very troublesome to choose it in the ellipse.
It's started.
Then define the project to be monitored on the nagios side
localhost.cfg monitors nagios itself. To facilitate management, we have created several directories
Directories such as database,fdfs,linux,widows
The following figure shows the monitoring project in the windows directory
Naming rules are as follows: use + ip address

The following is a windows machine app_server_10.129.102.53.cfg
#define hostgroup{
#
hostgroup_name
windows-servers
#
alias           Windows
Servers
#
}


define host{
       use             windows-server
       host_name       app-server
       alias
testapp-server
       address         10.129.102.53
 }


########## nsclient++ version
define service{
       use
generic-service
       host_name               app-server
       service_description     NSClient++
version
       check_command
check_nt!CLIENTVERSION
       }
######### uptime
define service{
       use
generic-service
       host_name               app-server
       service_description     uptime
       check_command
check_nt!UPTIME
       }


######### ping

define service{
       use
generic-service
       host_name               app-server
       service_description     ping
       check_command
check_ping!100.0,20%!500.0,60%
       }

#########IIS
define service{
       use                     generic-service
       host_name               app-server
       service_description     IIS
       check_command
check_nt!SERVICESTATE!-d SHOWALL -l W3SVC
       }

########## cpu load

define service{
       use                     generic-service
       host_name               app-server
       service_description     cpu_load
       check_command
check_nt!CPULOAD!-l 5,80,90
       }
########## memory


define service{
       use
generic-service
       host_name               app-server
       service_description     memory
       check_command
check_nt!MEMUSE!-w 80 -c 90
       }
########## C:\ space

define service{

       use
generic-service
       host_name
app-server

       service_description
C:\space
       check_command
check_nt!USEDDISKSPACE!-l c -w 80 -c 90
}

########## D:\ space

define service{
       use                     generic-service
       host_name               app-server
       service_description     D:\space
       check_command
check_nt!USEDDISKSPACE!-l d -w 80 -c 90
}

##########


define service{
       use
generic-service
       host_name               app-server
       service_description
Explorer.exe
       check_command
check_nt!PROCSTATE!-d SHOWALL -l explorer.exe
       }
Once defined, define the location of the file to monitor the host in nagios.cfg as shown in the second figure below.
Then restart nagios and observe as follows:
windows machines are working.

8. Monitoring linux machines
Operating on the client
Adding users as follows:
useradd -M -s /sbin/nologin nagios
Install the nagios-plugins plug-in
cd nagios-plugins-2.0.3
/configure --prefix=/mnt/cellar/nagios-plus --with-nagios-user=nagios--with-nagios-group=nagios
make all
make install
Install nrpe service
cd nrpe-2.15
./configure--prefix=/mnt/cellar/nrpe --with-nrpe-user=nagios --with-nrpe-group=nagios  --with-nagios-user=nagios --with-nagios-group=nagios
# make all
# make install-plugin
# make install-daemon
# make install-daemon-config
After successful installation, the directory is as follows:

Then go under etc and modify the nrpe.cfg configuration file
log_facility=daemon
pid_file=/var/run/nrpe.pid
server_port=5666      //Port number
nrpe_user=nagios      //Users are just created
nrpe_group=nagios     //Group
allowed_hosts=127.0.0.1,192.168.1.127 //nagios IP should be added later

dont_blame_nrpe=0
allow_bash_command_substitution=0
debug=0
command_timeout=60
connection_timeout=300
command[check_users]=/mnt/cellar/nagios-plus/libexec/check_users -w 5-c 10
// Here we should pay attention to the path. This path is the file under libexec generated after installation of nagios-plus. Of course, it can also be copied to the directory you want. The-w and-c represent WARNING, CRITICAL, that is, alarm status. The specific theory can be viewed on the official website.
ommand[check_load]=/mnt/cellar/nagios-plus/libexec/check_load -w15,10,5 -c 30,25,20
command[check_hda1]=/mnt/cellar/nrpe/libexec/check_disk -w 20% -c 10%-p /dev/hda1
command[check_zombie_procs]=/mnt/cellar/nrpe/libexec/check_procs -w 5-c 10 -s Z
command[check_total_procs]=/mnt/cellar/nrpe/libexec/check_procs -w 150-c 200
Of course, the client also needs to start the nrpe server. Of course, for convenience, here we write a startup script, put it under / etc/init.d. Don't forget to give the execution authority (chmod+x nrpe), also can start nrpe through xinit. Of course, I think it's more convenient to start nrpe independently.
#!/bin/bash
# chkconfig: 2345 88 12
# description: NRPE DAEMON
NRPE=/mnt/cellar/nrpe/bin/nrpe
NRPECONF=/mnt/cellar/nrpe/etc/nrpe.cfg
case "$1" in
        start)
                echo -n"Staring NRPE daemon...."
                $NRPE -c$NRPECONF -d
                echo "done.."
                ;;
        stop)
                echo -n"Stopping NRPE daemon...."
                pkill -u nagiosnrpe
                echo"done.."
                ;;
        restart)
                $0  stop
                sleep 1
                $0 start
                ;;
        *)
                echo "Usage:$0 start|stop|restart"
        esac
exit 0
Finally, if the firewall opens, don't forget to release port 5666.
After the client is configured, it is necessary to configure the relevant files on the server side.
Here is the configuration of nagios
Since the linux client is monitored through nrpe, nrpe is also installed in principle on nagios, but it has been proved that it is not necessary to install, as long as it is from the client

As shown above, copy check_nrpe to the lower path of nagios.

The main configuration files for nagios are in the following directories:
Because nrpe is just a plug-in, nagios can't recognize this command, so to define this command in commands.cfg, edit command.cfg and add the following at the bottom, which is why you want to copy the check_nrpe command to the nagios side.
############
# 'check_nrpe ' command definition
define command{
       command_name check_nrpe
       command_line $USER1$/check_nrpe -H $HOSTADDRESS$ -c $ARG1$
       }
Then define the project to be monitored in the following path, and the linux directory is created by itself

Specific configuration is as follows: more specific can see the configuration file in the network disk.
##########define hostname and ipaddress
define host{
       use                    linux-server
       host_name              linux1-server
       alias                    linux1-server
       address                192.168.1.109
       }


########## ping
define service{
       use                    generic-service
       host_name              linux1-server
       service_description        ping
       check_command          check_ping!100.0,20%!500.0,60%

}

########## check_users

define service{
       use                    generic-service
       host_name               linux1-server
       service_description     login_user
       check_command          check_nrpe!check_users

}

########## check_cpu_load

define service{
       use                    generic-service
       host_name              linux1-server
       service_description     CPU_load
       check_command          check_nrpe!check_load
}
Finally, of course, you need to configure the nagios.cfg file to let Nagios know which path to go to find the project to monitor.
Finally, restart the nagios service. If the configuration is wrong, it will not start successfully.
Of course, you can verify on nagios as follows:

If the result can be returned, the configuration is successful
In a few minutes you will see the results:

So far, the monitoring of windows and linux is basically like this, some complex, to be monitored through scripts, specific can see the network disk.
9. Short Message Alarm and Mail Alarm
This function is the most powerful function of nagios, and the alarm function is very fast.
Of course, for the sake of system security, it is recommended to install sendmail service
yum -yinstall sendmail

Then edit / etc/mail.rc to add at the end
set from=cheng7223@163.comsmtp=smtp.163.com

setsmtp-auth-user=cheng7223@163.com smtp-auth-password=*******

set smtp-auth=login
Here is the definition of which mailbox to send an alarm message
Finally, the recipient is defined as the recipient.
edit
definecontact{
        contact_name                    nagiosadmin             ; Short name of user
        use                            generic-contact         ; Inheritdefault values from generic-contact template (defined above)
        alias                           Nagios Admin            ; Full name of user

        email                           chengjian@114995.com    ; <<***** CHANGE THIS TO YOUR EMAILADDRESS ******
        }
The red one above is the recipient's mailbox. If there are more than one person, it is necessary to separate them by commas.
Zhengzhou infertility hospital ranking: http://jbk.39.net/yiyuanzaixian/zztjyy/
After configuring, be sure to restart sendmail and nagios servers
Now stop the client's nrpe service to verify the function of the mail

Red has been displayed, indicating that there is a problem, and then check the mailbox, the speed is very fast.

This is a problematic alarm. Verify again that the alarm after recovery

So far, OK. As for the function of image display, I will not introduce it here, because zabbix is enough to display the image.