Original link: https://www.cnblogs.com
1: Understand factory model
The factory model is similar to the factory in real life, which can produce a large number of similar goods, do the same things and achieve the same effect; You need to use factory mode at this time.
A simple factory model can be understood as solving multiple similar problems; This is also her advantage; For example, the following code:
function CreatePerson(name,age,sex) {
    var obj = new Object();
    obj.name = name;
    obj.age = age;
    obj.sex = sex;
    obj.sayName = function(){
        return this.name;
    }
    return obj;
}
var p1 = new CreatePerson("longen",'28','male');
var p2 = new CreatePerson("tugenhua",'27','female');
console.log(p1.name); // longen
console.log(p1.age);  // 28
console.log(p1.sex);  // male
console.log(p1.sayName()); // longen

console.log(p2.name);  // tugenhua
console.log(p2.age);   // 27
console.log(p2.sex);   // female
console.log(p2.sayName()); // tugenhua

// The returned objects are the types of objects that the object cannot recognize. I don't know which object they are
console.log(typeof p1);  // object
console.log(typeof p2);  // object
console.log(p1 instanceof Object); // true
The above code: the function CreatePerson can accept three parameters, such as name,age,sex, etc. this function can be called countless times. Each return will contain three properties and a method object.
Factory pattern is to solve the problem of multiple similar object declarations; That is to solve the problem of repetition of materialized objects.
Advantages: it can solve multiple similar problems.
Disadvantages: the problem of object recognition cannot be known (the type of object is not known).
The definition of complex factory pattern is to postpone the materialization of its member objects to subclasses. Subclasses can override the parent class interface methods to specify their own object types when they are created.
The parent class only handles the general problems in the creation process, which will be inherited by the subclasses. The subclasses are independent of each other, and the specific business logic will be written in the subclasses.
The parent class becomes an abstract class, but the parent class can execute the same and similar methods in the child class, and the specific business logic needs to be implemented in the child class; For example, I now open several bicycle stores, so each store has several models of bicycles for sale. Let's now write this code using the factory pattern;
The constructor of the parent class is as follows:
// Defines the constructor for the bicycle
var BicycleShop = function(){};
BicycleShop.prototype = {
    constructor: BicycleShop,
    /*
    * The way to buy a bike
    * @param {model} Bicycle model
    */
    sellBicycle: function(model){
        var bicycle = this.createBicycle(mode);
        // Execute A business logic
        bicycle.A();

        // Execute B business logic
        bicycle.B();

        return bicycle;
    },
    createBicycle: function(model){
        throw new Error("The parent class is an abstract class and cannot be called directly. The method needs to be overridden by the child class");
    }
};
The above defines a bicycle abstract class to write the real column of the factory pattern, and defines the createpolicy method. However, if you directly instantiate the parent class and call the createpolicy method in the parent class, an error will be thrown, because the parent class is an abstract class and cannot be materialized. You can only implement this method through subclasses to realize your own business logic, Next, let's define subclasses. We learn how to rewrite this method using the factory pattern. First, we need to inherit the members in the parent class, and then write subclasses; The following code:
// Defines the constructor for the bicycle
var BicycleShop = function(name){
this.name = name;
this.method = function(){
return this.name;
}
};
BicycleShop.prototype = {
constructor: BicycleShop,
/*
* The way to buy a bike
* @param {model} Bicycle model
*/
sellBicycle: function(model){
var bicycle = this.createBicycle(model);
// Execute A business logic
bicycle.A();
// Execute B business logic
bicycle.B();
return bicycle;
},
createBicycle: function(model){
throw new Error("The parent class is an abstract class and cannot be called directly. The method needs to be overridden by the child class");
}
};
// Implement prototype inheritance
function extend(Sub,Sup) {
//Sub represents subclass and Sup represents superclass
// First, define an empty function
var F = function(){};
// Set the prototype of the empty function to the prototype of the superclass
F.prototype = Sup.prototype;
// Instantiate the empty function and pass the superclass prototype reference to the subclass
Sub.prototype = new F();
// Reset the constructor of the subclass prototype to the subclass itself
Sub.prototype.constructor = Sub;
// Save the prototype of superclass in subclass to avoid the coupling between subclass and superclass
Sub.sup = Sup.prototype;
if(Sup.prototype.constructor === Object.prototype.constructor) {
// Detect whether the constructor of the superclass prototype is the prototype itself
Sup.prototype.constructor = Sup;
}
}
var BicycleChild = function(name){
this.name = name;
// Inherit properties and methods from the constructor's parent class
BicycleShop.call(this,name);
};
// The subclass inherits the prototype method of the parent class
extend(BicycleChild,BicycleShop);
// The subclass of BicycleChild overrides the method of the parent class
BicycleChild.prototype.createBicycle = function(){
var A = function(){
console.log("implement A Business operation");
};
var B = function(){
console.log("implement B Business operation");
};
return {
A: A,
B: B
}
}
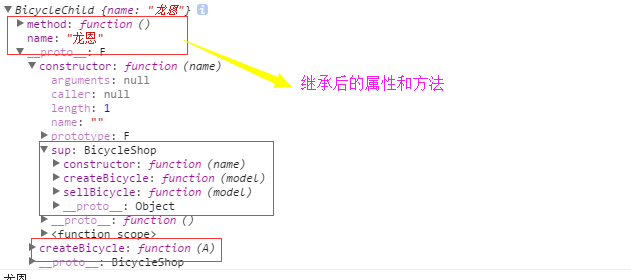
var childClass = new BicycleChild("Long en");
console.log(childClass);Instantiate the subclass and print the instance, as shown in the following screenshot:
console.log(childClass.name); / / long en
//The following is the sellcycle in the parent class after instantiation. After this method is executed, A in the parent class will be called in turn
//And method B; Method A and method B write specific business logic in subclasses in turn.
childClass.sellBicycle("mode"); / / print out A business operation and B business operation
The above is only a model of "long en" bicycle. If you need to generate other models of bicycles, you can write other subclasses. The most important advantage of factory mode is that you can implement some of the same methods. We can write code in the parent class, so you need to implement specific business logic, Then you can override the method of the parent class in a subclass to implement your own business logic; In professional terms, there are two points: first, weaken the coupling between objects and prevent code duplication. Instantiating a class in a method can eliminate repetitive code. Second: repetitive code can be written in the parent class. Subclasses inherit all member properties and methods of the parent class. Subclasses only focus on implementing their own business logic.
2: Understand monomer mode
Monomer mode provides a means to organize code into a logical unit, in which the code can be accessed through a single variable.
The advantages of monomer mode are:
- It can be used to divide namespaces and reduce the number of global variables.
- Using monomer mode can make the code organization more consistent and make the code easy to read and maintain.
- Can be instantiated and instantiated once.
What is monomer mode? Monomer pattern is an object used to divide namespaces and organize a group of attributes and methods together. If it can be instantiated, it can only be instantiated once.
However, not all object literals are monomeric. For example, if you simulate an array or hold data, it is not monomeric. However, if you organize a group of related attributes and methods together, it may be monomeric mode, so it depends on the developer's intention to write code;
Let's take a look at the basic structure of defining an object literal (the structure is similar to the monomer mode):
// Object Literal
var Singleton = {
    attr1: 1,
    attr2: 2,
    method1: function(){
        return this.attr1;
    },
    method2: function(){
        return this.attr2;
    }
};
For example, the above is only a simple literal structure. All member variables above are accessed through Singleton, but it is not a monomer mode; A more important feature of monomer mode is that it can be instantiated only once. The above class is only a class that cannot be instantiated, so it is not a monomer mode; Object literals are one of the methods used to create monomer patterns;
The structure of using monomer mode is as follows: demo
What we understand is that if a monomer pattern is instantiated, it is instantiated only once. To implement a monomer pattern, we simply use a variable to identify whether the class is instantiated. If it is not instantiated, we can instantiate it once. Otherwise, we directly return the instantiated object.
The following code is the basic structure of monomer mode:
// Monomer mode
var Singleton = function(name){
    this.name = name;
    this.instance = null;
};
Singleton.prototype.getName = function(){
    return this.name;
}
// Get instance object
function getInstance(name) {
    if(!this.instance) {
        this.instance = new Singleton(name);
    }
    return this.instance;
}
// Example of testing monomer mode
var a = getInstance("aa");
var b = getInstance("bb");
/Because the monomer pattern is instantiated only once, the following examples are equal
console.log(a === b); // true
Since the monomer mode is instantiated only once, the first call returns the instance object of a. when we continue to call, the instance of b is the instance of a. therefore, aa is printed below;
console.log(a.getName());// aa
console.log(b.getName());// aa
The above encapsulation monomer mode can also be changed to the following structure:
// Monomer mode
var Singleton = function(name){
    this.name = name;
};
Singleton.prototype.getName = function(){
    return this.name;
}
// Get instance object
var getInstance = (function() {
    var instance = null;
    return function(name) {
        if(!instance) {
            instance = new Singleton(name);
        }
        return instance;
    }
})();
// Example of testing monomer mode
var a = getInstance("aa");
var b = getInstance("bb");
//Because the monomer pattern is instantiated only once, the following examples are equal
console.log(a === b); // true
console.log(a.getName());// aa
console.log(b.getName());// aa
Understand the benefits of using proxies to implement single column patterns
For example, if I need to create a div element on the page now, we certainly need a function to create a div, but now I only need this function to be responsible for creating a div element. It doesn't want to care about others, that is, it wants to implement the single responsibility principle, just like kissy on Taobao. At the beginning, they defined kissy to do only one thing and do it well, The instantiation class in the specific monomer mode is handled by the agent function. The advantage of this is that the specific business logic is separated. The agent only cares about the business logic of the agent. Here, the role of the agent is to instantiate the object and instantiate it only once; When creating div code, just create div and ignore others; The following code:
// Monomer mode
var CreateDiv = function(html) {
    this.html = html;
    this.init();
}
CreateDiv.prototype.init = function(){
    var div = document.createElement("div");
    div.innerHTML = this.html;
    document.body.appendChild(div);
};
// Agent implementation monomer mode
var ProxyMode = (function(){
    var instance;
    return function(html) {
        if(!instance) {
            instance = new CreateDiv("Let me test it");
        }
        return instance;
    }
})();
var a = new ProxyMode("aaa");
var b = new ProxyMode("bbb");
console.log(a===b);// true
Understand the basic principle of using monomer mode to realize pop-up window
Next, let's continue to use monomer mode to implement a pop-up demo; Let's not discuss the use of monomer mode. Let's think about how we usually write code to achieve pop-up effect; For example, we have a pop-up window, which must be hidden by default. When I click, it needs to be displayed; Write the code as follows:
// Realize pop-up window
var createWindow = function(){
    var div = document.createElement("div");
    div.innerHTML = "I'm the pop-up content";
    div.style.display = 'none';
    document.body.appendChild('div');
    return div;
};
document.getElementById("Id").onclick = function(){
    // Click to create a div element first
    var win = createWindow();
    win.style.display = "block";
}
The above code; You can see that there are obvious disadvantages. For example, if I click an element, I need to create a div, and if I click the second element, I will create a div again. If we click so and so frequently, they will frequently create div elements. Although we can remove the pop-up code when we click close, our frequent creation and deletion are not good, In particular, it will have a great impact on performance. Frequent operations on DOM will cause redrawing, which will affect performance; So this is a very bad habit; We can now use the monomer mode to achieve the pop-up effect. We can only instantiate it once; The following code:
// Realize single mode pop-up window
var createWindow = (function(){
    var div;
    return function(){
        if(!div) {
            div = document.createElement("div");
            div.innerHTML = "I'm the pop-up content";
            div.style.display = 'none';
            document.body.appendChild(div);
        }
        return div;
    }
})();
document.getElementById("Id").onclick = function(){
    // Click to create a div element first
    var win = createWindow();
    win.style.display = "block";
}
Understand and write common monomer patterns
Although the above pop-up code completes the use of monomer mode to create pop-up effect, the code is not universal. For example, the above is the code to complete pop-up. What if we need an iframe in the page in the future? Do we need to rewrite a set of code to create iframe? For example, create iframe as follows:
var createIframe = (function(){
    var iframe;
    return function(){
        if(!iframe) {
            iframe = document.createElement("iframe");
            iframe.style.display = 'none';
            document.body.appendChild(iframe);
        }
        return iframe;
    };
})();
We can see the above code. The code for creating div is very similar to the code for creating iframe. Now we can consider separating the general code to make the code completely abstract. Now we can write a set of code encapsulated in getInstance function, as follows:
var getInstance = function(fn) {
    var result;
    return function(){
        return result || (result = fn.call(this,arguments));
    }
};
The above code: we use a parameter fn to pass it in. If there is an instance of result, it will be returned directly. Otherwise, the current getInstance function calls the fn function, and the this pointer points to the fn function; After that, the return is saved in the result; Now we can pass a function in, whether it is creating div or iframe. In short, if this is the case, we can use getInstance to obtain their instance objects;
The code for creating iframe and div is as follows:
// Create div
var createWindow = function(){
    var div = document.createElement("div");
    div.innerHTML = "I'm the pop-up content";
    div.style.display = 'none';
    document.body.appendChild(div);
    return div;
};
// Create iframe
var createIframe = function(){
    var iframe = document.createElement("iframe");
    document.body.appendChild(iframe);
    return iframe;
};
// Get the encapsulation code of the instance
var getInstance = function(fn) {
    var result;
    return function(){
        return result || (result = fn.call(this,arguments));
    }
};
// Test create div
var createSingleDiv = getInstance(createWindow);
document.getElementById("Id").onclick = function(){
    var win = createSingleDiv();
    win.style.display = "block";
};
// Test create iframe
var createSingleIframe = getInstance(createIframe);
document.getElementById("Id").onclick = function(){
    var win = createSingleIframe();
    win.src = "http://cnblogs.com";
};
3: Understanding module mode
We understand that monomer patterns are created in the way of object literals through monomer patterns; For example, the method code of the following object literal is as follows:
var singleMode = {
    name: value,
    method: function(){

    }
};
The idea of module mode is to add private variables and private methods to monomer mode, which can reduce the use of global variables; The following is the code structure of a module mode:
var singleMode = (function(){
    // Create private variable
    var privateNum = 112;
    // Create private function
    function privateFunc(){
        // Implement your own business logic code
    }
    // Returns an object containing public methods and properties
    return {
        publicMethod1: publicMethod1,
        publicMethod2: publicMethod1
    };
})();
Module mode uses an anonymous function that returns an object. Inside this anonymous function, private variables and functions are defined for internal functions, and then an object literal is returned as the value of the function. The returned object literal contains only properties and methods that can be exposed. In this way, external use of the method can be provided; Since the public method in the return object is defined inside the anonymous function, it can access the internal private variables and functions.
When do we use module mode?
If we have to create an object and initialize it with some data, and expose some methods that can access these private data, we can use the module mode at this time.
Understanding enhanced module patterns
The enhanced module mode is used when a single column must be an instance of a certain type, and some attributes or methods must be added to enhance it. For example, the following code:
function CustomType() {
    this.name = "tugenhua";
};
CustomType.prototype.getName = function(){
    return this.name;
}
var application = (function(){
    // Define private
    var privateA = "aa";
    // Define private functions
    function A(){};

    // After instantiating an object, return the instance, and then add some public properties and methods to the instance
    var object = new CustomType();

    // Add public attribute
    object.A = "aa";
    // Add public method
    object.B = function(){
        return privateA;
    }
    // Returns the object
    return object;
})();
Next, let's print the application object; As follows:
console.log(application);
Continue printing the public attribute and method as follows:
console.log(application.A);// aa
console.log(application.B()); // aa
console.log(application.name); // tugenhua
console.log(application.getName());// tugenhua
4: Understanding agent patterns
Management is an object that can be used to control access to ontology objects. It implements the same interface as ontology objects. Proxy objects will pass all calling methods to ontology objects; The most basic form of proxy mode is to control access, and the ontology object is responsible for executing the function or class of the assigned object. In short, the local object focuses on executing the code on the page, and the proxy controls when the local object is instantiated and used; We have used some proxy patterns in the monomer pattern above, that is, we use the proxy pattern to instantiate the monomer pattern, and leave other things to the ontology object to deal with;
Advantages of agent:
- Proxy object can be instantiated instead of ontology and can be accessed remotely;
- It can also postpone ontology instantiation until it is really needed; For ontologies that are time-consuming to instantiate, or ontologies that are too large to be saved in memory when not in use, we can delay instantiating the object;
Let's first understand that the proxy object is instantiated instead of the ontology object; For example, now JD ceo wants to give a gift to the milk tea girl, but if the ceo is embarrassed to give it, or has no time to give it due to busy work, he wants to entrust his agent to do it at this time, so we can use the agent mode to write the following code:
// First declare a milk tea girl object
var TeaAndMilkGirl = function(name) {
    this.name = name;
};
// This is Mr. Jingdong ceo
var Ceo = function(girl) {
    this.girl = girl;
    // Send wedding gifts to tea girl
    this.sendMarriageRing = function(ring) {
        console.log("Hi " + this.girl.name + ", ceo A gift for you:" + ring);
    }
};
// Jingdong ceo's agent is an agent to replace the delivery
var ProxyObj = function(girl){
    this.girl = girl;
    // The agent sent gifts to the tea girl
    this.sendGift = function(gift) {
        // The proxy pattern is responsible for ontology object instantiation
        (new Ceo(this.girl)).sendMarriageRing(gift);
    }
};
// initialization
var proxy = new ProxyObj(new TeaAndMilkGirl("Milk tea sister"));
proxy.sendGift("Wedding ring"); // Hi, the ceo gives you a gift: wedding ring
According to the basic structure of the code above, TeaAndMilkGirl is a sent object (here is the milk tea girl); CEO , is the object of giving gifts. He saves the attribute of milk tea girl and has his own privileged method sendMarriageRing , which is the method of giving gifts to milk tea girl; Then, he wants to finish this through his agent, so he needs to create an agent model of economic man, named ProxyObj; His main task is to give the CEO's gift to his lover. Therefore, the object also needs to save the CEO's lover's object as its own attribute. At the same time, it also needs a privileged method sendGift, which is to give gifts. Therefore, the ontology object can be instantiated in this method. The ontology object here is the CEO's flower giving, Therefore, you need to instantiate the ontology object and call the method of the ontology object (sendMarriageRing)
Finally, we need the proxy object ProxyObj for initialization; Call the flower sending method (sendGift) of ProxyObj# object;
For the advantages we mentioned, the second point is that we can understand the virtual agent. The virtual agent is used to control the access to the ontology with high creation cost. It will delay the instantiation of the ontology until a method is called; For example, if the instantiation of an object is very slow and cannot be completed immediately when the web page is loaded, we can create a virtual agent for it to delay the instance of the object until it is needed.
Understand the use of virtual agents to preload images
In web page development, image preloading is a commonly used technology. If you directly set src attribute to img tag node, if the image is large or the network speed is relatively slow, the image will be blank for a period of time before the image is loaded, which is not good for user experience, At this time, we can use a loading image as a placeholder to prompt the user that the image is loading before the image is loaded. After the image is loaded, we can directly assign a value to the image; Below, we do not need the proxy mode to realize the preloading of pictures. The code is as follows:
The first scheme: the preload image function without agent is as follows
// The preload picture function without proxy is as follows
var myImage = (function(){
    var imgNode = document.createElement("img");
    document.body.appendChild(imgNode);
    var img = new Image();
    img.onload = function(){
        imgNode.src = this.src;
    };
    return {
        setSrc: function(src) {
            imgNode.src = "http://img.lanrentuku.com/img/allimg/1212/5-121204193Q9-50.gif";
            img.src = src;
        }
    }
})();
// Call mode
myImage.setSrc("https://img.alicdn.com/tps/i4/TB1b_neLXXXXXcoXFXXc8PZ9XXX-130-200.png");
The above code is implemented without using the proxy mode;
The second scheme: use the proxy mode to write the code of preloaded pictures as follows:
var myImage = (function(){
    var imgNode = document.createElement("img");
    document.body.appendChild(imgNode);
    return {
        setSrc: function(src) {
            imgNode.src = src;
        }
    }
})();
// proxy pattern
var ProxyImage = (function(){
    var img = new Image();
    img.onload = function(){
        myImage.setSrc(this.src);
    };
    return {
        setSrc: function(src) {
                         myImage.setSrc("http://img.lanrentuku.com/img/allimg/1212/5-121204193Q9-50.gif");
        img.src = src;
        }
    }
})();
// Call mode
ProxyImage.setSrc("https://img.alicdn.com/tps/i4/TB1b_neLXXXXXcoXFXXc8PZ9XXX-130-200.png");
The first is to use the general encoding method to realize the preloading technology of the picture. First, create the imgNode element, then call myImage.. When using the setsrc method, first give the picture a preloaded picture, and then assign a value to the img element when the picture is loaded. The second scheme is implemented using the proxy mode. The myimage function is only responsible for creating the img element, and the proxy function ProxyImage is responsible for setting the loading picture for the picture. When the picture is really loaded, call myimage in myimage The setsrc method sets the path of the picture; Their advantages and disadvantages are as follows:
- In the first scheme, the coupling of the general method code is too high. A function is responsible for several things, such as creating img elements and setting the loading state before completing the loading of unloaded images, which does not meet the single responsibility principle in the object-oriented design principle; And when you don't need an agent at some time, you need to delete the code from the myImage} function, so the code coupling is too high.
- The second scheme uses the proxy mode, in which the myImage # function is only responsible for doing one thing, creating an img element and adding it to the page. The loading picture is handed over to the proxy function ProxyImage # to do. When the picture is loaded successfully, the proxy function ProxyImage # will notify and execute the method of the myImage # function. At the same time, if the proxy object is not needed in the future, We can directly call the methods of ontology objects;
From the above proxy mode, we can see that the proxy mode and ontology object have the same method setSrc, which has the following two advantages:
- Users can safely request agents. They only care about whether they can get the desired results. If we don't need a proxy object, we can directly call the method instead of an ontology object.
- Wherever ontology objects are used, proxies can be used instead.
Of course, if both proxy objects and ontology objects return an anonymous function, they can also be considered to have a constant interface; For example, the following code:
var myImage = (function(){
    var imgNode = document.createElement("img");
    document.body.appendChild(imgNode);
    return function(src){
        imgNode.src = src;
    }
})();
// proxy pattern
var ProxyImage = (function(){
    var img = new Image();
    img.onload = function(){
        myImage(this.src);
    };
    return function(src) {
                myImage("http://img.lanrentuku.com/img/allimg/1212/5-121204193Q9-50.gif");
        img.src = src;
    }
})();
// Call mode
ProxyImage("https://img.alicdn.com/tps/i4/TB1b_neLXXXXXcoXFXXc8PZ9XXX-130-200.png");
Understanding of virtual proxy merging http requests:
For example, in the back-end system, there is table data, and there is a check box button in front of each piece of data. When you click the check box button, you need to obtain the id and pass it to the server to send an ajax request. The server needs to record this data and make a request. If we click every time to send an http request to the server, For the server, the pressure is high and the network requests are frequent. However, if the real-time data of the system is not very high, we can collect all IDS within a period of time (for example, 2-3 seconds) through a proxy function and send ajax requests to the server at one time. Relatively speaking, the network requests are reduced and the server pressure is reduced;
// First, the html structure is as follows:
<p>
    <label>Selection box</label>
    <input type="checkbox" class="j-input" data-id="1"/>
</p>
<p>
    <label>Selection box</label>
    <input type="checkbox" class="j-input" data-id = "2"/>
</p>
<p>
    <label>Selection box</label>
    <input type="checkbox" class="j-input" data-id="3"/>
</p>
<p>
    <label>Selection box</label>
    <input type="checkbox" class="j-input" data-id = "4"/>
</p>
In general, JS is written as follows:
<script>
    var checkboxs = document.getElementsByClassName("j-input");
    for(var i = 0,ilen = checkboxs.length; i < ilen; i+=1) {
        (function(i){
            checkboxs[i].onclick = function(){
                if(this.checked) {
                    var id = this.getAttribute("data-id");
                    // Here are the ajax requests
                }
            }
        })(i);
    }
</script>
Next, we use the virtual agent to delay for 2 seconds, obtain the button IDs of all the selected check boxes after 2 seconds, and send a request to the server at one time.
Click the check box on the page, add an attribute isflag when it is selected, delete the attribute isflag when it is not selected, and then delay for 2 seconds. After 2 seconds, re judge the id on the attribute of isflag in all check boxes on the page, store it in the array, and then the proxy function calls the method of the ontology function to send all IDS delayed for 2 seconds to the ontology method at one time, The ontology method can obtain all IDs and send ajax requests to the server. In this way, the request pressure of the server is relatively reduced.
The code is as follows:
// Ontology function
var mainFunc = function(ids) {
    console.log(ids); // You can print all the selected IDs
    // Then send ajax requests to the server for all IDS at one time
};
// The proxy function obtains all IDS through the proxy function and passes them to the ontology function for execution
var proxyFunc = (function(){
    var cache = [],  // Save id for a period of time
        timer = null; // timer
    return function(checkboxs) {
        // Judge that if there is a timer, the override operation will not be carried out
        if(timer) {
            return;
        }
        timer = setTimeout(function(){
            // Obtain all selected IDS within 2 seconds and judge whether they are selected through the attribute isflag
            for(var i = 0,ilen = checkboxs.length; i < ilen; i++) {
                if(checkboxs[i].hasAttribute("isflag")) {
                    var id = checkboxs[i].getAttribute("data-id");
                    cache[cache.length] = id;
                }
            }
            mainFunc(cache.join(',')); // After 2 seconds, you need to pass all IDs to the ontology function
            // Clear timer
            clearTimeout(timer);
            timer = null;
            cache = [];
        },2000);
    }
})();
var checkboxs = document.getElementsByClassName("j-input");
for(var i = 0,ilen = checkboxs.length; i < ilen; i+=1) {
    (function(i){
        checkboxs[i].onclick = function(){
            if(this.checked) {
                // Add an attribute to the current
                this.setAttribute("isflag",1);
            }else {
                this.removeAttribute('isflag');
            }
            // Call proxy function
            proxyFunc(checkboxs);
        }
    })(i);
}
Understand cache proxy:
The meaning of cache agent is to cache the first run. When the same is run again, it is taken directly from the cache. The advantage of this is to avoid repeating the operation function. If the operation is very complex and expensive, using cache objects can improve the performance; We can first understand a simple cache column, which is the common addition and multiplication operations on the Internet. The code is as follows:
// Calculate multiplication
var mult = function(){
    var a = 1;
    for(var i = 0,ilen = arguments.length; i < ilen; i+=1) {
        a = a*arguments[i];
    }
    return a;
};
// Computational addition
var plus = function(){
    var a = 0;
    for(var i = 0,ilen = arguments.length; i < ilen; i+=1) {
        a += arguments[i];
    }
    return a;
}
// Surrogate function
var proxyFunc = function(fn) {
    var cache = {};  // Cache object
    return function(){
        var args = Array.prototype.join.call(arguments,',');
        if(args in cache) {
            return cache[args];   // Using cache proxy
        }
        return cache[args] = fn.apply(this,arguments);
    }
};
var proxyMult = proxyFunc(mult);
console.log(proxyMult(1,2,3,4)); // 24
console.log(proxyMult(1,2,3,4)); // Cache fetch 24

var proxyPlus = proxyFunc(plus);
console.log(proxyPlus(1,2,3,4));  // 10
console.log(proxyPlus(1,2,3,4));  // Cache fetch 10
5: Understand the responsibility chain model
The advantage is to eliminate the coupling between the sender and receiver of the request.
The responsibility company is composed of several different objects. The sender is the object that sends the request, and the receiver is the object in the chain that receives the request and processes or transmits it. Sometimes the request itself can also be an object, which encapsulates all data related to the operation. The basic implementation process is as follows:
1. The sender knows the first receiver in the chain and sends the request to this receiver.
2. Each receiver analyzes the request and either processes it or passes it down.
3. Each receiver knows that there is only one other object, that is, its success in the chain.
4. If no receiver processes the request, the request will leave the chain.
We can understand that the responsibility chain pattern is A chain composed of processing requests. Requests are passed between these objects in turn until an object that can process them is encountered. We call these objects nodes in the chain. For example, object A sends A request to object B. if object B does not process it, it will give the request to C. If Object C does not process it, it will give the request to D, and so on until an object can process the request. Of course, if no object processes the request, the request will leave the chain.
For example, if some outsourcing companies receive a project, it may be the person in charge of the project or the person at the manager level. After receiving the project, the manager does not develop it by himself, but directly hands it over to the project manager for development. The project manager is certainly not happy to develop it by himself. It will hand over the project to the following code farmers, Therefore, the coder will deal with it. If the coder does not deal with it, the project may die directly. However, after the final completion, the outsourcing company does not know who developed that part of these projects, and it does not know or care, What it cares about is that the project has been handed over to the outsourcing company and has been developed without any bug s; Therefore, the advantages of the responsibility chain model are here:
Eliminate the coupling between the sender of the request (the company that needs to outsource the project) and the receiver (the outsourcing company).
The following list illustrates the benefits of the responsibility chain:
Tmall will do lottery every year, for example, Alibaba wants to increase the payment of Bora, if each user recharges 500 yuan to Alipay, then 100% won 100 yuan in 11 Alipay.
Recharge 200 yuan to Alipay, then 100% can win 20 yuan of red packets, of course, if not recharge, then also can draw, but the probability is very low, basically can not be, of course, it is possible to get.
We can analyze several field values in the following code to judge:
1. Ordertype (recharge type): if the value is 1, it means that it is a user with a recharge of 500 yuan; if it is 2, it means that it is a user with a recharge of 200 yuan; if it is 3, it means that it is a user without a recharge.
2. Ispay (whether it has been successfully recharged): if the value is true, it indicates that it has been successfully recharged; otherwise,) it indicates that it has not been successfully recharged; Just buy it as an ordinary user.
3. Count (quantity); Ordinary users can get the coupon if they have a certain number of Raffles. Otherwise, they can't get the coupon.
// We usually write code to handle the following operations
var order =  function(orderType,isPay,count) {
    if(orderType == 1) {  // User recharge $500 to Alipay
        if(isPay == true) { // If the recharge is successful, 100% will win the prize
            console.log("Dear user, you have won a red envelope of 100 yuan");
        }else {
            // If the recharge fails, it will be treated as an ordinary user to process the winning information
            if(count > 0) {
                console.log("Dear user, you have drawn a 10 yuan coupon");
            }else {
                console.log("Dear users, please make persistent efforts");
            }
        }
    }else if(orderType == 2) {  // User recharge $200 to Alipay
        if(isPay == true) {     // If the recharge is successful, 100% will win the prize
            console.log("Dear user, you have won a red envelope of 20 yuan");
        }else {
            // If the recharge fails, it will be treated as an ordinary user to process the winning information
            if(count > 0) {
                console.log("Dear user, you have drawn a 10 yuan coupon");
            }else {
                console.log("Dear users, please make persistent efforts");
            }
        }
    }else if(orderType == 3) {
        // Ordinary users to process the winning information
        if(count > 0) {
            console.log("Dear user, you have drawn a 10 yuan coupon");
        }else {
            console.log("Dear users, please make persistent efforts");
        }
    }
};
Although the above code can meet the requirements, the code is not easy to expand and difficult to read. If I want one or two conditions in the future and I want to recharge 300 yuan successfully, I can win a red envelope of 150 yuan. At this time, I have to change the code inside. In this way, the coupling between business logic and code is relatively high, and I accidentally change the wrong code; At this time, we try to use the responsibility chain pattern to transfer objects in turn;
The following code:
function order500(orderType,isPay,count){
    if(orderType == 1 && isPay == true)    {
        console.log("Dear user, you have won a red envelope of 100 yuan");
    }else {
        // If you don't handle it yourself, pass it to the next object order200 for processing
        order200(orderType,isPay,count);
    }
};
function order200(orderType,isPay,count) {
    if(orderType == 2 && isPay == true) {
        console.log("Dear user, you have won a red envelope of 20 yuan");
    }else {
        // If you don't handle it yourself, pass it to the next object ordinary user for processing
        orderNormal(orderType,isPay,count);
    }
};
function orderNormal(orderType,isPay,count){
    // Ordinary users to process the winning information
    if(count > 0) {
        console.log("Dear user, you have drawn a 10 yuan coupon");
    }else {
        console.log("Dear users, please make persistent efforts");
    }
}
In the above code, we use three functions order500, order200 and orderNormal to handle our own business logic respectively. If the current self function cannot handle things, we pass them to the following functions for processing, and so on until a function can handle them. Otherwise, the responsibility chain mode directly leaves the chain and tells us that it cannot be handled, Throw an error message. Although the above code can be used as the responsibility chain mode, we can see from the above code that the order500 function relies on a function such as order200, so there must be this function, which also violates the {open closed principle in object-oriented. Let's continue to understand the flexible and separable responsibility chain nodes.
function order500(orderType,isPay,count){
    if(orderType == 1 && isPay == true)    {
        console.log("Dear user, you have won a red envelope of 100 yuan");
    }else {
        //I don't know who the next node is. Anyway, I pass the request back
        return "nextSuccessor";
    }
};
function order200(orderType,isPay,count) {
    if(orderType == 2 && isPay == true) {
        console.log("Dear user, you have won a red envelope of 20 yuan");
    }else {
        //I don't know who the next node is. Anyway, I pass the request back
        return "nextSuccessor";
    }
};
function orderNormal(orderType,isPay,count){
    // Ordinary users to process the winning information
    if(count > 0) {
        console.log("Dear user, you have drawn a 10 yuan coupon");
    }else {
        console.log("Dear users, please make persistent efforts");
    }
}
// Next, you need to write the encapsulated constructor method of the responsibility chain pattern
var Chain = function(fn){
    this.fn = fn;
    this.successor = null;
};
Chain.prototype.setNextSuccessor = function(successor){
    return this.successor = successor;
}
// Pass the request down
Chain.prototype.passRequest = function(){
    var ret = this.fn.apply(this,arguments);
    if(ret === 'nextSuccessor') {
        return this.successor && this.successor.passRequest.apply(this.successor,arguments);
    }
    return ret;
}
//Now we wrap the three functions into responsibility chain nodes:
var chainOrder500 = new Chain(order500);
var chainOrder200 = new Chain(order200);
var chainOrderNormal = new Chain(orderNormal);

// Then specify the order of nodes in the responsibility chain
chainOrder500.setNextSuccessor(chainOrder200);
chainOrder200.setNextSuccessor(chainOrderNormal);

//Finally, pass the request to the first node:
chainOrder500.passRequest(1,true,500);  // Dear user, you have won a red envelope of 100 yuan
chainOrder500.passRequest(2,true,500);  // Dear user, you have won a red envelope of 20 yuan
chainOrder500.passRequest(3,true,500);  // Dear user, you have drawn a 10 yuan coupon
chainOrder500.passRequest(1,false,0);   // Dear users, please make persistent efforts
Above code; Write three functions order500, order200 and orderNormal respectively, and process their own business logic in the function. If their own function cannot handle it, return the string nextSuccessor , and pass it later. Then encapsulate the chain constructor, pass in an fn object, and have their own attribute success, There are two methods on the prototype: setnextsuccessor and passRequest;setNextSuccessor , this method specifies the order of nodes in the responsibility chain and saves the corresponding methods to this On the attribute success, chainorder500 setNextSuccessor(chainOrder200); chainOrder200. setNextSuccessor(chainOrderNormal); Specifies the order in the chain, so this The successor refers to the order200 method and the orderNormal method, so it is chainorder500 for the first time If passrequest (1, true, 500) is called, the order500 method is called to output directly, and chainorder500 is called for the second time passRequest(2,true,500); This method starts from the first node order500 in the chain. If it does not comply, it returns the success string, and then this successor && this.successor.passRequest.apply(this.successor,arguments); Execute this code; We said this above The attribute success refers to two methods {order200 and orderNormal respectively. Therefore, the method order200 is called, so the value is returned. This principle is followed by analogy. If we want to recharge the red envelope of 300 yuan in the future, we can write the order300 function, then list the chain chain and wrap it, and specify the order in the responsibility chain. There is no need to deal with the business logic inside;
Understand asynchronous responsibility chain
The above is only the synchronization responsibility Chain. We let each node function synchronously return a specific value "nextSuccessor" to indicate whether to pass the request to the next node. We often encounter ajax asynchronous requests in our development. After the request is successful, we need to do something. At this time, if we apply the above synchronization request again, it will not take effect, Let's understand how to use asynchronous responsibility Chain to solve this problem; We add a prototype method to the Chain class prototype. Next means to manually pass the request to the next node in the responsibility Chain.
The following code:
function Fn1() {
    console.log(1);
    return "nextSuccessor";
}
function Fn2() {
    console.log(2);
    var self = this;
    setTimeout(function(){
        self.next();
    },1000);
}
function Fn3() {
    console.log(3);
}
// Next, you need to write the encapsulated constructor method of the responsibility chain pattern
var Chain = function(fn){
    this.fn = fn;
    this.successor = null;
};
Chain.prototype.setNextSuccessor = function(successor){
    return this.successor = successor;
}
// Pass the request down
Chain.prototype.passRequest = function(){
    var ret = this.fn.apply(this,arguments);
    if(ret === 'nextSuccessor') {
        return this.successor && this.successor.passRequest.apply(this.successor,arguments);
    }
    return ret;
}
Chain.prototype.next = function(){
    return this.successor && this.successor.passRequest.apply(this.successor,arguments);
}
//Now we wrap the three functions into responsibility chain nodes:
var chainFn1 = new Chain(Fn1);
var chainFn2 = new Chain(Fn2);
var chainFn3 = new Chain(Fn3);

// Then specify the order of nodes in the responsibility chain
chainFn1.setNextSuccessor(chainFn2);
chainFn2.setNextSuccessor(chainFn3);

chainFn1.passRequest();  // Print out 1, 2, and print out 3 after 1 second
Call the function {chainfn1 passRequest(); After that, the sender Fn1 function will be executed to print out 1, and then the string "nextSuccessor" will be returned;
Then execute return this successor && this.successor.passRequest.apply(this.successor,arguments); This function to Fn2, print 2, and then there is a setTimeout timer asynchronous function, which needs to send the request to the next node in the responsibility chain, so 3 will be printed after one second;
The advantages of the responsibility chain model are:
1. It decouples the complex relationship between the request sender and N receivers. You don't need to know which node in the chain can handle your request, so you
Just pass the request to the first node.
2. The node objects in the chain can be flexibly split and reorganized. It is very simple to add or delete a node, or change the position of the node.
3. We can also manually specify the starting position of the node, which does not mean that we have to start from the actual node
Disadvantages: there are a little more node objects in the responsibility chain mode. Most nodes may not play a substantive role in a request process, and their role is to make
The request is passed down. In terms of performance, avoid too long responsibility chain and improve performance.
6: Understanding of command patterns
A command in command mode refers to an instruction that performs certain things.
The usage scenarios of the command mode are: sometimes it is necessary to send a request to some objects, but you do not know who the receiver of the request is or what the operation of the request is. At this time, you want to design the program code in a loosely coupled way; Make the request sender and the request receiver eliminate the coupling relationship in each other's code.
Let's first list a list in our life to illustrate the command mode: for example, we often buy things on tmall and then place orders. After placing an order, I want to receive the goods and hope that the goods are true. For users, it doesn't care how the seller delivers after placing an order. Of course, the seller also has time to deliver goods, such as within 24 hours, Users don't care who the express is sent to. Of course, some people will care about what the express delivery is; For users, as long as they deliver the goods within the specified time and generally receive the goods within a considerable time, of course, the command mode also includes cancellation orders and redo orders. For example, after we place an order, I suddenly don't want to buy it. I can cancel the order or re order before delivery (that is, redo orders); For example, my clothes are taken in the wrong size. I cancel the order and take a large one again.
1. Columns of command mode
I remember when I first worked as a front-end, that is, the first company I just graduated from, and entered a company that did outsourcing projects. The company generally outsourced Taobao activity pages and Tencent game pages. At that time, we should call cutting the front-end of the page and be responsible for doing some html and css work. Therefore, when I worked as Tencent game pages, I often helped them make static pages, For example, when we put a few buttons on the page, we just help Tencent make the style of the game according to the design draft, such as the buttons on the page, such as how to operate the specific buttons and what will happen after clicking the buttons. We don't know. We don't know what their business is. Of course, we know that there will be click events, We don't know what business to deal with. Here we can use the command mode: after clicking the button, we must send a request to some objects responsible for specific behavior, and these objects are the recipients of the request. However, at present, we do not know what the receiver is or what the receiver will do. At this time, we can use the command mode to eliminate the code coupling relationship between the sender and the receiver.
We first use the traditional object-oriented pattern to design the code:
hypothesis html The structure is as follows:
<button id="button1">Refresh menu directory</button>
<button id="button2">Add submenu</button>
<button id="button3">Delete submenu</button>
JS code is as follows:
var b1 = document.getElementById("button1"),
     b2 = document.getElementById("button2"),
     b3 = document.getElementById("button3");

 // Define the setCommand function, which is responsible for installing commands on the button. After clicking the button, the execute() method of the command object is executed.
 var setCommand = function(button,command){
    button.onclick = function(){
        command.execute();
    }
 };
 // Let's define each object to complete our business operations
 var MenuBar = {
    refersh: function(){
        alert("Refresh menu directory");
    }
 };
 var SubMenu = {
    add: function(){
        alert("Add submenu");
    },
    del: function(){
        alert("Delete submenu");
    }
 };
 // The following is the writing command class
 var RefreshMenuBarCommand = function(receiver){
    this.receiver = receiver;
 };
 RefreshMenuBarCommand.prototype.execute = function(){
    this.receiver.refersh();
 }
 // Add command operation
 var AddSubMenuCommand = function(receiver) {
    this.receiver = receiver;
 };
 AddSubMenuCommand.prototype.execute = function() {
    this.receiver.add();
 }
 // Delete command action
 var DelSubMenuCommand = function(receiver) {
    this.receiver = receiver;
 };
 DelSubMenuCommand.prototype.execute = function(){
    this.receiver.del();
 }
 // Finally, the command receiver is passed into the command object, and the command object is installed on the button
 var refershBtn = new RefreshMenuBarCommand(MenuBar);
 var addBtn = new AddSubMenuCommand(SubMenu);
 var delBtn = new DelSubMenuCommand(SubMenu);

 setCommand(b1,refershBtn);
 setCommand(b2,addBtn);
 setCommand(b3,delBtn);
From the above command class code, we can see that any operation has an execute method to execute the operation; The above code uses the traditional object-oriented programming to realize the command mode. The procedural request call of the command mode is encapsulated in the execute method of the command object. Did we find the above code a little cumbersome? We can use the callback function in javascript to do these things. In object-oriented, the receiver of command mode is saved as the attribute of command object, and the operation of executing command is agreed to call command Execute method, but if we use the callback function, the receiver will be enclosed in the environment where the callback function is generated, and the operation will be easier. Just execute the callback function. Let's see the code below:
The code is as follows:
var setCommand = function(button,func) {
    button.onclick = function(){
        func();
    }
 };
 var MenuBar = {
    refersh: function(){
        alert("Refresh menu interface");
    }
 };
 var SubMenu = {
    add: function(){
        alert("Add menu");
    }
 };
 // Refresh menu
 var RefreshMenuBarCommand = function(receiver) {
    return function(){
        receiver.refersh();
    };
 };
 // Add menu
 var AddSubMenuCommand = function(receiver) {
    return function(){
        receiver.add();
    };
 };
 var refershMenuBarCommand = RefreshMenuBarCommand(MenuBar);
 // Add menu
 var addSubMenuCommand = AddSubMenuCommand(SubMenu);
 setCommand(b1,refershMenuBarCommand);

 setCommand(b2,addSubMenuCommand);
We can also use javascript callback functions to code as follows:
// Four button click events on the following code
var b1 = document.getElementById("button1"),
    b2 = document.getElementById("button2"),
    b3 = document.getElementById("button3"),
    b4 = document.getElementById("button4");
/*
 bindEnv The function is responsible for installing the click command on the button. After clicking the button, it will call
 function
 */
var bindEnv = function(button,func) {
    button.onclick = function(){
        func();
    }
};
// Now let's write the code to deal with the business logic
var Todo1 = {
    test1: function(){
        alert("I'm here for the first test");
    }
};
// Add, delete and modify operations in business
var Menu = {
    add: function(){
        alert("I'm here to handle some adding operations");
    },
    del: function(){
        alert("I'm here to handle some deletion operations");
    },
    update: function(){
        alert("I'm here to handle some update operations");
    }
};
// Call function
bindEnv(b1,Todo1.test1);
// Add button
bindEnv(b2,Menu.add);
// Delete button
bindEnv(b3,Menu.del);
// change button
bindEnv(b4,Menu.update);
2. Understand macro commands:
A macro command is a set of commands. By executing macro commands, you can execute a batch of commands at a time.
In fact, it is similar to putting all the functions and methods of the page in an array, and then traversing the array in turn
To execute the method.
The code is as follows:
var command1 = {
    execute: function(){
        console.log(1);
    }
};
var command2 = {
    execute: function(){
        console.log(2);
    }
};
var command3 = {
    execute: function(){
        console.log(3);
    }
};
// Define macro commands, command The add method adds a subcommand to the macro command object,
// When the execute method of the macro command object is called, this group of command objects will be iterated,
// And execute their execute methods in turn.
var command = function(){
    return {
        commandsList: [],
        add: function(command){
            this.commandsList.push(command);
        },
        execute: function(){
            for(var i = 0,commands = this.commandsList.length; i < commands; i+=1) {
                this.commandsList[i].execute();
            }
        }
    }
};
// Initialize macro command
var c = command();
c.add(command1);
c.add(command2);
c.add(command3);
c.execute();  // 1,2,3
7: Understanding policy patterns in javascript
1. Understand the policy pattern in javascript
The definition of policy pattern is to define a series of algorithms, encapsulate them one by one, and make them replace each other.
The advantages of using policy mode are as follows:
Advantages: 1 The strategy pattern uses combination, delegation and other technologies and ideas to effectively avoid many if conditional statements.
2. The policy pattern provides the open close principle, which makes the code easier to understand and extend.
3. The code in the policy pattern can be reused.
1: Use the strategy mode to calculate the bonus;
The following demo is what I saw in the book, but it doesn't matter. We just want to understand the use of the strategy mode. We can use the strategy mode to calculate the bonus problem;
For example, the company's year-end bonus is assessed according to the employee's salary and performance. For those with performance A, the year-end bonus is 4 times the salary, for those with performance B, the year-end bonus is 3 times the salary, and for those with performance C, the year-end bonus is 2 times the salary; Now we use the general coding method to write the code as follows:
var calculateBouns = function(salary,level) {
    if(level === 'A') {
        return salary * 4;
    }
    if(level === 'B') {
        return salary * 3;
    }
    if(level === 'C') {
        return salary * 2;
    }
};
// Call as follows:
console.log(calculateBouns(4000,'A')); // 16000
console.log(calculateBouns(2500,'B')); // 7500
The first parameter is salary and the second parameter is grade;
The disadvantages of the code are as follows:
The calculatebounds() function contains many if else statements.
The calculatesprings , function is inflexible. if there is a level D, we need to add an if statement to judge level D in the calculatesprings , function;
The reusability of the algorithm is poor. If there are similar algorithms in other places, but the rules are different, our codes can not be universal.
2. Refactoring code with composite functions
Combinatorial function encapsulates various algorithms into small functions. For example, if the level is A, it encapsulates A small function. If the level is B, it also encapsulates A small function, and so on; The following code:
var performanceA = function(salary) {
    return salary * 4;
};
var performanceB = function(salary) {
    return salary * 3;
};

var performanceC = function(salary) {
    return salary * 2
};
var calculateBouns = function(level,salary) {
    if(level === 'A') {
        return performanceA(salary);
    }
    if(level === 'B') {
        return performanceB(salary);
    }
    if(level === 'C') {
        return performanceC(salary);
    }
};
// Call as follows
console.log(calculateBouns('A',4500)); // 18000
The code looks a little better, but it still has the following disadvantages:
The calculatebounds} function may become larger and larger, for example, when increasing the D level, and it lacks elasticity.
3. Refactor the code using the policy pattern
Policy pattern refers to} defining a series of algorithms, encapsulating them one by one, and separating the unchanged part from the changed part. In fact, it is to separate the use and implementation of the algorithm; The usage of the algorithm is unchanged. The calculated bonus is obtained according to an algorithm, and the implementation of the algorithm corresponds to different performance rules according to performance;
A program based on policy pattern consists of at least two parts. The first part is a group of policy classes, which encapsulates the specific algorithm and is responsible for the specific calculation process. The second part is the environment class Context, which receives the client's request and then delegates the request to a policy class. We first use the traditional object-oriented to implement;
The following code:
var performanceA = function(){};
performanceA.prototype.calculate = function(salary) {
    return salary * 4;
};
var performanceB = function(){};
performanceB.prototype.calculate = function(salary) {
    return salary * 3;
};
var performanceC = function(){};
performanceC.prototype.calculate = function(salary) {
    return salary * 2;
};
// Bonus category
var Bouns = function(){
    this.salary = null;    // Original salary
    this.levelObj = null;  // Policy object corresponding to performance level
};
Bouns.prototype.setSalary = function(salary) {
    this.salary = salary;  // Save employee's original salary
};
Bouns.prototype.setlevelObj = function(levelObj){
    this.levelObj = levelObj;  // Set the policy object corresponding to employee performance level
};
// Amount of bonus obtained
Bouns.prototype.getBouns = function(){
    // Delegate the bonus calculation operation to the corresponding policy object
    return this.levelObj.calculate(this.salary);
};
var bouns = new Bouns();
bouns.setSalary(10000);
bouns.setlevelObj(new performanceA()); // Set policy object
console.log(bouns.getBouns());  // 40000

bouns.setlevelObj(new performanceB()); // Set policy object
console.log(bouns.getBouns());  // 30000
The above code uses the policy pattern to reconstruct the code. You can see that the code responsibilities are updated clearly and the code becomes clearer.
4. Policy mode of Javascript version
//The code is as follows:
var obj = {
        "A": function(salary) {
            return salary * 4;
        },
        "B" : function(salary) {
            return salary * 3;
        },
        "C" : function(salary) {
            return salary * 2;
        }
};
var calculateBouns =function(level,salary) {
    return obj[level](salary);
};
console.log(calculateBouns('A',10000)); // 40000
You can see that the code is simpler and clearer;
Policy pattern refers to defining a series of algorithms and encapsulating them. However, policy pattern not only encapsulates algorithms, but also encapsulates a series of business rules. As long as these business rules have the same objectives, we can use policy pattern to encapsulate them;
Form validation
For example, we often perform form verification, such as registering the login dialog box. We need to perform verification before logging in: for example, there are the following logic:
User name cannot be empty
The password length cannot be less than 6 digits.
The mobile phone number must conform to the format.
For example, the HTML code is as follows:
<form action = "http://www.baidu.com" id="registerForm" method = "post">
        <p>
            <label>Please enter user name:</label>
            <input type="text" name="userName"/>
        </p>
        <p>
            <label>Please input a password:</label>
            <input type="text" name="password"/>
        </p>
        <p>
            <label>Please enter your mobile phone number:</label>
            <input type="text" name="phoneNumber"/>
        </p>
</form>
We normally write the form verification code as follows:
var registerForm = document.getElementById("registerForm");
registerForm.onsubmit = function(){
    if(registerForm.userName.value === '') {
        alert('User name cannot be empty');
        return;
    }
    if(registerForm.password.value.length < 6) {
        alert("The length of the password cannot be less than 6 digits");
        return;
    }
    if(!/(^1[3|5|8][0-9]{9}$)/.test(registerForm.phoneNumber.value)) {
        alert("Incorrect mobile phone number format");
        return;
    }
}
However, writing code in this way has the following disadvantages:
1.registerForm. The onsubmit function is relatively large, and the code contains many if statements;
2.registerForm. The onsubmit function lacks flexibility. If a new validation rule is added, or if we want to change the password length validation from 6 to 8, we must change registerform The code inside the onsubmit function. Violation of the open closed principle.
3. The reusability of the algorithm is poor. If another form is added to the program and this form also needs some similar validation, we may need to copy the code again;
Next, we can use the policy pattern to reconstruct the form validation;
The first step is to encapsulate the policy object; The following code:
var strategy = {
    isNotEmpty: function(value,errorMsg) {
        if(value === '') {
            return errorMsg;
        }
    },
    // Limit minimum length
    minLength: function(value,length,errorMsg) {
        if(value.length < length) {
            return errorMsg;
        }
    },
    // Mobile number format
    mobileFormat: function(value,errorMsg) {
        if(!/(^1[3|5|8][0-9]{9}$)/.test(value)) {
            return errorMsg;
        }
    }
};
Next, we are going to implement the Validator class. Here, the Validator class is used as the Context to receive the user's request and delegate it to the strategy} object, as shown in the following code:
var Validator = function(){
    this.cache = [];  // Preservation validation rules
};
Validator.prototype.add = function(dom,rule,errorMsg) {
    var str = rule.split(":");
    this.cache.push(function(){
        // str returns minLength:6
        var strategy = str.shift();
        str.unshift(dom.value); // Add the value of input to the parameter list
        str.push(errorMsg);  // Add errorMsg to the parameter list
        return strategys[strategy].apply(dom,str);
    });
};
Validator.prototype.start = function(){
    for(var i = 0, validatorFunc; validatorFunc = this.cache[i++]; ) {
        var msg = validatorFunc(); // Start validation and obtain the returned information after validation
        if(msg) {
            return msg;
        }
    }
};
Here, the validator class acts as a Context, which is responsible for receiving the user's request and delegating it to the strategys object. In the above code, we first create a validator object, and then use validator The add method adds some validation rules to the validator object, validator The add method receives three parameters, as shown in the following code:
validator.add(registerForm.password,'minLength:6', 'password length cannot be less than 6 digits');
registerForm.password is the dom node of the valid input box;
minLength:6: a string separated by a colon. minLength in front of the colon represents the strategys object selected by the customer. The number 6 after the colon represents the parameters that must be verified in the validation process. minLength:6 means validate registerform Password , the minimum length of value in the text input box is 6 bits; If the string does not contain a colon, it indicates that no additional validation information is required in the validation process;
The third parameter is the error information returned when the validation fails;
After adding a series of validation rules to the validator object, we will call validator Start () method to start validation. If validator Start() returns an errorMsg string as the return value, indicating that the validation failed. At this time, registerform is required The onsubmit method returns false to prevent form submission. Let's take a look at the initialization code as follows:
var validateFunc = function(){
    var validator = new Validator(); // Create a Validator object
    /* Add some validation rules */
    validator.add(registerForm.userName,'isNotEmpty','User name cannot be empty');
    validator.add(registerForm.password,'minLength:6','Password length cannot be less than 6 digits');
    validator.add(registerForm.userName,'mobileFormat','Incorrect mobile phone number format');

    var errorMsg = validator.start(); // Obtain valid results
    return errorMsg; // Return validation results
};
var registerForm = document.getElementById("registerForm");
registerForm.onsubmit = function(){
    var errorMsg = validateFunc();
    if(errorMsg){
        alert(errorMsg);
        return false;
    }
}
Here are all the codes:
var strategys = {
    isNotEmpty: function(value,errorMsg) {
        if(value === '') {
            return errorMsg;
        }
    },
    // Limit minimum length
    minLength: function(value,length,errorMsg) {
        if(value.length < length) {
            return errorMsg;
        }
    },
    // Mobile number format
    mobileFormat: function(value,errorMsg) {
        if(!/(^1[3|5|8][0-9]{9}$)/.test(value)) {
            return errorMsg;
        }
    }
};
var Validator = function(){
    this.cache = [];  // Preservation validation rules
};
Validator.prototype.add = function(dom,rule,errorMsg) {
    var str = rule.split(":");
    this.cache.push(function(){
        // str returns minLength:6
        var strategy = str.shift();
        str.unshift(dom.value); // Add the value of input to the parameter list
        str.push(errorMsg);  // Add errorMsg to the parameter list
        return strategys[strategy].apply(dom,str);
    });
};
Validator.prototype.start = function(){
    for(var i = 0, validatorFunc; validatorFunc = this.cache[i++]; ) {
        var msg = validatorFunc(); // Start validation and obtain the returned information after validation
        if(msg) {
            return msg;
        }
    }
};

var validateFunc = function(){
    var validator = new Validator(); // Create a Validator object
    /* Add some validation rules */
    validator.add(registerForm.userName,'isNotEmpty','User name cannot be empty');
    validator.add(registerForm.password,'minLength:6','Password length cannot be less than 6 digits');
    validator.add(registerForm.userName,'mobileFormat','Incorrect mobile phone number format');

    var errorMsg = validator.start(); // Obtain valid results
    return errorMsg; // Return validation results
};
var registerForm = document.getElementById("registerForm");
registerForm.onsubmit = function(){
    var errorMsg = validateFunc();
    if(errorMsg){
        alert(errorMsg);
        return false;
    }
};
As mentioned above, we can see the benefits of using the policy mode to write the form validation code. We have completed the validation of a form through add configuration; In this way, the code can be used as a component and can be called at any time. It is also very convenient when modifying the form verification rules. It can be called by passing parameters;
Add multiple validation rules to a text input box. We can see from the above code that we can only correspond to one validation rule for the input box. For example, we can only verify whether the input box is empty, validator Add (registerform. Username, 'isnotempty', 'username cannot be empty'); However, if we want to verify whether the input box is empty and the length of the input box is not less than 10 bits, we expect to pass parameters as follows:
validator.add(registerForm.userName,[{strategy: 'isNotEmpty', errorMsg: 'user name cannot be empty'}, {strategy: 'minLength:6',errorMsg: 'user name length cannot be less than 6 bits'}])
We can write the following code:
// Policy object
var strategys = {
    isNotEmpty: function(value,errorMsg) {
        if(value === '') {
            return errorMsg;
        }
    },
    // Limit minimum length
    minLength: function(value,length,errorMsg) {
        if(value.length < length) {
            return errorMsg;
        }
    },
    // Mobile number format
    mobileFormat: function(value,errorMsg) {
        if(!/(^1[3|5|8][0-9]{9}$)/.test(value)) {
            return errorMsg;
        }
    }
};
var Validator = function(){
    this.cache = [];  // Preservation validation rules
};
Validator.prototype.add = function(dom,rules) {
    var self = this;
    for(var i = 0, rule; rule = rules[i++]; ){
        (function(rule){
            var strategyAry = rule.strategy.split(":");
            var errorMsg = rule.errorMsg;
            self.cache.push(function(){
                var strategy = strategyAry.shift();
                strategyAry.unshift(dom.value);
                strategyAry.push(errorMsg);
                return strategys[strategy].apply(dom,strategyAry);
            });
        })(rule);
    }
};
Validator.prototype.start = function(){
    for(var i = 0, validatorFunc; validatorFunc = this.cache[i++]; ) {
    var msg = validatorFunc(); // Start validation and obtain the returned information after validation
    if(msg) {
        return msg;
    }
    }
};
// Code call
var registerForm = document.getElementById("registerForm");
var validateFunc = function(){
    var validator = new Validator(); // Create a Validator object
    /* Add some validation rules */
    validator.add(registerForm.userName,[
        {strategy: 'isNotEmpty',errorMsg:'User name cannot be empty'},
        {strategy: 'minLength:6',errorMsg:'The length of user name cannot be less than 6 characters'}
    ]);
    validator.add(registerForm.password,[
        {strategy: 'minLength:6',errorMsg:'Password length cannot be less than 6 digits'},
    ]);
    validator.add(registerForm.phoneNumber,[
        {strategy: 'mobileFormat',errorMsg:'Incorrect mobile phone number format'},
    ]);
    var errorMsg = validator.start(); // Obtain valid results
    return errorMsg; // Return validation results
};
// Click OK to submit
registerForm.onsubmit = function(){
    var errorMsg = validateFunc();
    if(errorMsg){
        alert(errorMsg);
        return false;
    }
}
Note: the above codes are all written according to the book. They are all the codes for reading the book. The most important thing is that we understand the implementation of the strategy mode. For example, the form verification function above is encapsulated in this way. We usually use the jquery plug-in to encapsulate the form verification code in this way. Therefore, we can also use this way to encapsulate forms and other learning in the future;
8: Understanding publish subscribe mode in Javascript
1. Introduction to publish subscribe mode
Publish subscribe mode is also called observer mode. It defines a one to many relationship between objects, allowing multiple observer objects to listen to a topic object at the same time. When an object changes, all objects that depend on it will be notified.
Publish subscribe mode in real life;
For example, Xiaohong recently saw a pair of shoes on Taobao. However, after contacting the seller, she found that the shoes were sold out, but Xiaohong liked the shoes very much. Therefore, she contacted the seller and asked when the seller would have the goods. The seller told her that it would take a week to have the goods. The seller told Xiaohong that if you like, you can collect our store, I'll let you know when the goods are available, so Xiaohong collects the shop, but at the same time, Xiaoming and Xiaohua also like the shoes and collect the shop; They will be notified in turn when the goods arrive;
In the above story, we can see that it is a typical publish and subscribe mode. The seller belongs to the publisher, and Xiaohong, Xiaoming, etc. belong to the subscriber. Subscribe to the store. The seller, as the publisher, will notify Xiaoming, Xiaohong, etc. in turn when the shoes arrive, and use Wangwang and other tools to publish messages to them in turn;
Advantages of publish subscribe mode:
1. It supports simple broadcast communication. When the object state changes, it will automatically notify the subscribed objects.
For example, Liezi, Xiaoming and Xiaohong above do not need to visit Taobao every day to see if the shoes have arrived. At the appropriate time point, the publisher (seller) will notify the subscriber (Xiaohong, Xiaoming, etc.).
2. The coupling between the publisher and the subscriber is reduced. The publisher only publishes a message. It doesn't care how the message is used by the subscriber. At the same time, the subscriber only listens to the publisher's event name. As long as the publisher's event name remains unchanged, it doesn't care how the publisher changes; Similarly, the seller (publisher) only needs to tell the subscriber (buyer) about the arrival of shoes. He doesn't care whether the buyer buys or not, or buys from other sellers. As long as the shoes arrive, you can notify the subscriber.
For the first point, we often use it in our daily work. For example, our ajax requests have success and error callback functions. We can subscribe to ajax success and error events. We don't care about the state of objects running asynchronously. We only care about success or error. We need to do our own things~
Disadvantages of publish subscribe mode:
Creating subscribers takes time and memory.
Although it can weaken the relationship between objects, if overused, it will make the code difficult to understand and maintain.
2. How to implement publish subscribe mode?
1. First, think about who is the publisher (such as the seller above).
2. Then add a cache list to the publisher to store the callback function to notify the subscriber (for example, the buyer above collects the seller's store, and the seller collects a list of the store).
3. Finally, publish the message. The publisher traverses the cache list and triggers the subscriber callback function stored in it in turn.
We can also add some parameters to the callback function, such as shoe color, shoe size and other information;
Let's first implement a simple publish subscribe mode; The code is as follows:
var shoeObj = {}; // Define publisher
shoeObj.list = []; // The cache list stores the subscriber callback function

// Add subscriber
shoeObj.listen = function(fn) {
    shoeObj.list.push(fn);  // Add subscription message to cache list
}

// Release news
shoeObj.trigger = function(){
    for(var i = 0,fn; fn = this.list[i++];) {
        fn.apply(this,arguments);
    }
}
// Xiao Hong subscribes to the following message
shoeObj.listen(function(color,size){
    console.log("The color is:"+color);
    console.log("Size:"+size);
});

// Xiaohua subscribes to the following message
shoeObj.listen(function(color,size){
    console.log("The color to print again is:"+color);
    console.log("Print the size again:"+size);
});
shoeObj.trigger("gules",40);
shoeObj.trigger("black",42);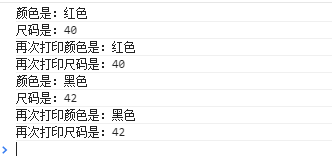
Print the screenshot above. We can see that the subscriber receives every message from the publisher. However, for Xiaohong, she only wants to receive messages with red color and does not want to receive messages with black color. Therefore, we need to make the following modifications to the code. We can first add a key to make the subscriber subscribe to only messages of interest to herself. The code is as follows:
var shoeObj = {}; // Define publisher
shoeObj.list = []; // The cache list stores the subscriber callback function

// Add subscriber
shoeObj.listen = function(key,fn) {
    if(!this.list[key]) {
        // If you have not subscribed to such messages, create a cache list for such messages
        this.list[key] = [];
    }
    this.list[key].push(fn);  // Add subscription message to cache list
}

// Release news
shoeObj.trigger = function(){
    var key = Array.prototype.shift.call(arguments); // Fetch message type name
    var fns = this.list[key];  // Get the collection of callback functions corresponding to the message

    // If you have not subscribed to the message, return
    if(!fns || fns.length === 0) {
        return;
    }
    for(var i = 0,fn; fn = fns[i++]; ) {
        fn.apply(this,arguments); // arguments is the parameter attached when publishing the message
    }
};

// Xiao Hong subscribes to the following message
shoeObj.listen('red',function(size){
    console.log("Size:"+size);
});

// Xiaohua subscribes to the following message
shoeObj.listen('block',function(size){
    console.log("Print the size again:"+size);
});
shoeObj.trigger("red",40);
shoeObj.trigger("block",42);
Let's run the above code and print it as follows:
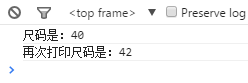
You can see that subscribers only subscribe to the messages they are interested in;
3. Code encapsulation of publish subscribe mode
We know that for the above code, Xiao Hong subscribes to the shoeObj object such as buying shoes, but if we need to subscribe to buying a house or other objects in the future, we need to copy the above code and change the object code again; Therefore, we need code encapsulation;
The following code packages:
var event = {
    list: [],
    listen: function(key,fn) {
        if(!this.list[key]) {
            this.list[key] = [];
        }
        // Add subscribed messages to the cache list
        this.list[key].push(fn);
    },
    trigger: function(){
        var key = Array.prototype.shift.call(arguments);
        var fns = this.list[key];
        // If you have not subscribed to the message, return
        if(!fns || fns.length === 0) {
            return;
        }
        for(var i = 0,fn; fn = fns[i++];) {
            fn.apply(this,arguments);
        }
    }
};
We define another initEvent function, which enables all ordinary objects to have publish and subscribe functions, as shown in the following code:
var initEvent = function(obj) {
    for(var i in event) {
        obj[i] = event[i];
    }
};
// Let's test again. We still add the publish subscribe function to the shoeObj object;
var shoeObj = {};
initEvent(shoeObj);

// Xiao Hong subscribes to the following message
shoeObj.listen('red',function(size){
    console.log("Size:"+size);
});

// Xiaohua subscribes to the following message
shoeObj.listen('block',function(size){
    console.log("Print the size again:"+size);
});
shoeObj.trigger("red",40);
shoeObj.trigger("block",42);
4. How to unsubscribe from events?
For example, in the above Liezi, Xiao Hong suddenly doesn't want to buy shoes, so for the seller's store, he doesn't want to accept the news of the store, so Xiao Hong can cancel the subscription of the store.
The following code:
event.remove = function(key,fn){
    var fns = this.list[key];
    // If the message corresponding to the key has not been subscribed, the
    if(!fns) {
        return false;
    }
    // If no specific callback function is passed in, it means that all subscriptions to the message corresponding to the key need to be cancelled
    if(!fn) {
        fn && (fns.length = 0);
    }else {
        for(var i = fns.length - 1; i >= 0; i--) {
            var _fn = fns[i];
            if(_fn === fn) {
                fns.splice(i,1); // Delete subscriber's callback function
            }
        }
    }
};
// The test code is as follows:
var initEvent = function(obj) {
    for(var i in event) {
        obj[i] = event[i];
    }
};
var shoeObj = {};
initEvent(shoeObj);

// Xiao Hong subscribes to the following message
shoeObj.listen('red',fn1 = function(size){
    console.log("Size:"+size);
});

// Xiaohua subscribes to the following message
shoeObj.listen('red',fn2 = function(size){
    console.log("Print the size again:"+size);
});
shoeObj.remove("red",fn1);
shoeObj.trigger("red",42);
The operation results are as follows:
5. Global -- publish subscribe object code encapsulation
Let's take another look at our traditional ajax requests, such as our traditional ajax requests. After the request is successful, we need to do the following:
1. Render data.
2. Use the data to make an animation.
Then we must have written the code as follows:
$.ajax("http://127.0.0.1/index.php",function(data){
    rendedData(data);  // Render data
    doAnimate(data);  // Realize animation
});
If we need to do something in the future, we also need to write the calling method in it; In this way, the code is highly coupled. Now let's use the publish subscribe mode to see how to reconstruct the above business requirements code;
Copy code
$.ajax("http://127.0.0.1/index.php",function(data){
    Obj.trigger('success',data);  // Message after successful publishing request
});
// Let's subscribe to this message. For example, I subscribe to the message of rendering data now;
Obj.listen("success",function(data){
   renderData(data);
});
// Subscribe to this message
Obj.listen("success",function(data){
   doAnimate(data);
});
Therefore, we can encapsulate a global publish subscribe pattern object; The following code:
var Event = (function(){
    var list = {},
          listen,
          trigger,
          remove;
          listen = function(key,fn){
            if(!list[key]) {
                list[key] = [];
            }
            list[key].push(fn);
        };
        trigger = function(){
            var key = Array.prototype.shift.call(arguments),
                 fns = list[key];
            if(!fns || fns.length === 0) {
                return false;
            }
            for(var i = 0, fn; fn = fns[i++];) {
                fn.apply(this,arguments);
            }
        };
        remove = function(key,fn){
            var fns = list[key];
            if(!fns) {
                return false;
            }
            if(!fn) {
                fns && (fns.length = 0);
            }else {
                for(var i = fns.length - 1; i >= 0; i--){
                    var _fn = fns[i];
                    if(_fn === fn) {
                        fns.splice(i,1);
                    }
                }
            }
        };
        return {
            listen: listen,
            trigger: trigger,
            remove: remove
        }
})();
// The test code is as follows:
Event.listen("color",function(size) {
    console.log("Size:"+size); // Print out size 42
});
Event.trigger("color",42);
6. Understand inter module communication
We use the global publish subscribe object encapsulated above to realize the communication between the two modules; For example, there is a button on a page. After clicking this button every time, the total number of clicks of this button will be displayed in the div; The following code:
< button id = "count" > Click me < / button >
<div id="showcount"></div>
a.js among us is responsible for handling click operations and publishing messages; The following JS code:
var a = (function(){
    var count = 0;
    var button = document.getElementById("count");
    button.onclick = function(){
        Event.trigger("add",count++);
    }
})();
b.js is responsible for listening to the add message and displaying the total number of clicks on the page; The following code:
var b = (function(){
    var div = document.getElementById("showcount");
    Event.listen('add',function(count){
        div.innerHTML = count;
    });
})();
The following is the html code. JS can be referenced as follows:
<!doctype html>
<html lang="en">
 <head>
  <meta charset="UTF-8">
  <title>Document</title>
  <script src="global.js"></script>
 </head>
 <body>
    <button id="count">Point me</button>
    <div id="showcount"></div>
    <script src = "a.js"></script>
    <script src = "b.js"></script>
 </body>
</html>
In the above code, after clicking the button once, the div of showcount will automatically add 1. The above demonstrates how to use the publish subscribe mode for communication between the two modules;
Including global JS is the encapsulation code of the global publish subscribe mode object encapsulated above;
9: Understanding the mediator model
Let's first understand the problem. If the demand received by our front-end development is the demand given to us by the demand side, maybe one front-end development will deal with multiple demand parties, so it will maintain the contact of multiple demand parties. Then in the program, it means to maintain the reference of multiple objects. When the program is larger, there will be more and more objects, The relationship between them will become more and more complex. Now, if there is an intermediary (if it is our supervisor) to meet the needs of multiple demanders, the demander only needs to give all the requirements to our supervisor, and the supervisor will assign tasks to us according to our workload in turn. In this way, our front-end development does not need to contact multiple business parties, We only need to contact our supervisor (that is, intermediary), which weakens the coupling between objects.
Liezi in daily life:
The intermediary model is often encountered in our daily life. For example, we go to the housing intermediary to rent a house, and the housing intermediary forms an intermediary between the renter and the landlord lessor; The renter does not care who rents the house, and the landlord does not care who rents it to. Because there is an intermediary, it needs an intermediary to complete the transaction.
The role of the mediator mode is to decouple objects from each other. After adding a mediation object, all related objects communicate through the mediator object instead of referencing each other. Therefore, when an object sends changes, you only need to notify the mediator object. Mediators loose the coupling between objects and can change their interaction independently.
The following is the list of Intermediaries:
I don't know if you have ever played the game of hero killing. At the earliest time, heroes killed two people (the enemy and themselves respectively); For this game, we first use ordinary functions to realize the following:
For example, first define a function, which has three methods: win, lose, and die; As long as a player dies, the game is over and its opponent needs to be notified of victory; The code needs to be written as follows:
function Hero(name) {
    this.name = name;
    this.enemy = null;
}
Hero.prototype.win = function(){
    console.log(this.name + 'Won');
}
Hero.prototype.lose = function(){
    console.log(this.name + 'lose');
}
Hero.prototype.die = function(){
    this.lose();
    this.enemy.win();
}
// Initialize 2 objects
var h1 = new Hero("Zhu Yuanzhang");
var h2 = new Hero("Bo Wen Liu");
// Set enemies for players
h1.enemy = h2;
h2.enemy = h1;
// Zhu Yuanzhang lost when he died
h1.die();  // Output Zhu Yuanzhang lose Liu Bowen Won
Now let's add teammates to the game
For example, now let's add teammates to the game. For example, if the hero kills a group of 6 people, there will be teammates and 3 enemies in this case; Therefore, we need to distinguish whether the enemy or teammates need the color of the team. If the color of the team is the same, it is the same team, otherwise it is the enemy;
We can first define an array of players to save all players. After creating players, cycle players to set teammates or enemies for each player;
var players = [];
Then we'll write the Hero function; The code is as follows:
var players = []; // Define an array to hold all players
function Hero(name,teamColor) {
    this.friends = [];    //Save teammate list
    this.enemies = [];    // Save enemy list
    this.state = 'live';  // Player status
    this.name = name;     // Role name
    this.teamColor = teamColor; // Team color
}
Hero.prototype.win = function(){
    // Win
    console.log("win:" + this.name);
};
Hero.prototype.lose = function(){
    // Lost
    console.log("lose:" + this.name);
};
Hero.prototype.die = function(){
    // All teammate deaths are alive by default
    var all_dead = true;
    this.state = 'dead'; // Set player status to death
    for(var i = 0,ilen = this.friends.length; i < ilen; i+=1) {
        // Traversal, if there is a teammate who is not dead, the game is not over
        if(this.friends[i].state !== 'dead') {
            all_dead = false;
            break;
        }
    }
    if(all_dead) {
        this.lose();  // All teammates die, the game is over
        // Circular notification to all players of game failure
        for(var j = 0,jlen = this.friends.length; j < jlen; j+=1) {
            this.friends[j].lose();
        }
        // Notify all enemies of game victory
        for(var j = 0,jlen = this.enemies.length; j < jlen; j+=1) {
            this.enemies[j].win();
        }
    }
}
// Define a factory class to create players
var heroFactory = function(name,teamColor) {
    var newPlayer = new Hero(name,teamColor);
    for(var i = 0,ilen = players.length; i < ilen; i+=1) {
        // If you're on the same team
        if(players[i].teamColor === newPlayer.teamColor) {
            // Add teammate list to each other
            players[i].friends.push(newPlayer);
            newPlayer.friends.push(players[i]);
        }else {
            // Add each other to the enemy list
            players[i].enemies.push(newPlayer);
            newPlayer.enemies.push(players[i]);
        }
    }
    players.push(newPlayer);
    return newPlayer;
};
        // Red team
var p1 = heroFactory("aa",'red'),
    p2 = heroFactory("bb",'red'),
    p3 = heroFactory("cc",'red'),
    p4 = heroFactory("dd",'red');

// Blue team
var p5 = heroFactory("ee",'blue'),
    p6 = heroFactory("ff",'blue'),
    p7 = heroFactory("gg",'blue'),
    p8 = heroFactory("hh",'blue');
// Let all red team players die
p1.die();
p2.die();
p3.die();
p4.die();
// lose:dd lose:aa lose:bb lose:cc
// win:ee win:ff win:gg win:hh
The above code: the Hero function has two parameters: name (player name) and teamcolor (team color),
First of all, we can judge whether it is a teammate or an enemy according to the color of the team; There are also three methods: win, lose, and die; If each time a person dies, whether all the dead teammates die in the cycle. If all the teammates die, they lose. Therefore, it is necessary to cycle their teammates and tell the members of each teammate that they lose. At the same time, it is necessary to cycle their enemies and tell their enemies that they win; Therefore, every time a person dies, it needs to cycle to judge whether all his teammates are dead; Therefore, each player is tightly coupled with other players.
Next, we can use the mediator pattern to improve the above demo;
First, we still define the Hero constructor and Hero object prototype methods. In these prototype methods of Hero object, we are no longer responsible for the specific execution logic, but transfer the operation to the mediator object, which is responsible for doing specific things. We can name the mediator object playerDirector;
When the playerDirector opens an externally exposed interface ReceiveMessage, it is responsible for receiving messages sent by the player object. When the player object sends messages, it always sends its own this as a parameter to the playerDirector, so that the playerDirector # identifies which player object the message comes from.
The code is as follows:
var players = []; // Define an array to hold all players
function Hero(name,teamColor) {
    this.state = 'live';  // Player status
    this.name = name;     // Role name
    this.teamColor = teamColor; // Team color
}
Hero.prototype.win = function(){
    // Win
    console.log("win:" + this.name);
};
Hero.prototype.lose = function(){
    // Lost
    console.log("lose:" + this.name);
};
// death
Hero.prototype.die = function(){
    this.state = 'dead';
    // Send a message to the intermediary and the player dies
    playerDirector.ReceiveMessage('playerDead',this);
}
// Remove player
Hero.prototype.remove = function(){
    // Send a message to the mediator to remove a player
    playerDirector.ReceiveMessage('removePlayer',this);
};
// Players change teams
Hero.prototype.changeTeam = function(color) {
    // Send a message to the intermediary and players change teams
    playerDirector.ReceiveMessage('changeTeam',this,color);
};
// Define a factory class to create players
var heroFactory = function(name,teamColor) {
    // Create a new player object
    var newHero = new Hero(name,teamColor);
    // Send messages to intermediaries to add players
    playerDirector.ReceiveMessage('addPlayer',newHero);
    return newHero;
};
var playerDirector = (function(){
    var players = {},  // Save all players
        operations = {}; // Actions that intermediaries can perform
    // Add a player action
    operations.addPlayer = function(player) {
        // Get the color of player teammates
        var teamColor = player.teamColor;
        // If the player of this color does not have a team, a new team will be established
        players[teamColor] = players[teamColor] || [];
        // Add players to the team
        players[teamColor].push(player);
     };
    // Remove a player
    operations.removePlayer = function(player){
        // Get the color of the team
        var teamColor = player.teamColor,
        // Get all members of the team
        teamPlayers = players[teamColor] || [];
        // ergodic
        for(var i = teamPlayers.length - 1; i>=0; i--) {
            if(teamPlayers[i] === player) {
                teamPlayers.splice(i,1);
            }
        }
    };
    // Players change teams
    operations.changeTeam = function(player,newTeamColor){
        // First, delete from the original team
        operations.removePlayer(player);
        // Then change the color of the team
        player.teamColor = newTeamColor;
        // Add to team
        operations.addPlayer(player);
    };
    // Player death
operations.playerDead = function(player) {
    var teamColor = player.teamColor,
    // Player's team
    teamPlayers = players[teamColor];

    var all_dead = true;
    //ergodic
    for(var i = 0,player; player = teamPlayers[i++]; ) {
        if(player.state !== 'dead') {
            all_dead = false;
            break;
        }
    }
    // If all_ If dead is true, it means all are dead
    if(all_dead) {
        for(var i = 0, player; player = teamPlayers[i++]; ) {
            // All players of our team lose
            player.lose();
        }
        for(var color in players) {
            if(color !== teamColor) {
                // It means this is another team
                // Get the players of this team
                var teamPlayers = players[color];
                for(var i = 0,player; player = teamPlayers[i++]; ) {
                    player.win(); // Traversal notifies other players of win
                }
            }
        }
    }
};
var ReceiveMessage = function(){
    // The first parameter of arguments gets the first parameter for the message name
    var message = Array.prototype.shift.call(arguments);
    operations[message].apply(this,arguments);
};
return {
    ReceiveMessage : ReceiveMessage
};
})();
// Red team
var p1 = heroFactory("aa",'red'),
    p2 = heroFactory("bb",'red'),
    p3 = heroFactory("cc",'red'),
        p4 = heroFactory("dd",'red');

    // Blue team
    var p5 = heroFactory("ee",'blue'),
        p6 = heroFactory("ff",'blue'),
        p7 = heroFactory("gg",'blue'),
        p8 = heroFactory("hh",'blue');
    // Let all red team players die
    p1.die();
    p2.die();
    p3.die();
    p4.die();
    // lose:aa lose:bb lose:cc lose:dd
   // win:ee win:ff win:gg win:hh
We can see the above code; The coupling code between players has been removed, and all logical operations are processed in the intermediary object. Any operation of a player does not need to traverse to notify other players, but just need to send a message to the intermediary, and the intermediary will process it after receiving the message, After processing the message, it will feed back the processing results to other player objects. Using the mediator pattern to decouple the code between objects; Make the program more flexible
The intermediary mode implements the list of purchased goods
The following Liezi are Liezi in the book. For example, Liezi in Taobao or tmall is not implemented in this way. It doesn't matter. We can change it. We'll mainly learn the idea of using the intermediary mode.
First, let's introduce the business: in the purchase process, you can select the color of the mobile phone and enter the purchase quantity. At the same time, there are two display areas in the page to display the color and quantity just selected by the user. There is also a button to dynamically display the next operation. We need to query the inventory corresponding to the color mobile phone. If the inventory quantity is less than the purchase quantity this time, the button will be disabled and the copy with insufficient inventory will be displayed. On the contrary, the button will be highlighted and can be clicked and the shopping cart will be displayed.
The HTML code is as follows:
Select color:
    <select id="colorSelect">
        <option value="">Please select</option>
        <option value="red">gules</option>
        <option value="blue">blue</option>
    </select>
    <p>Enter the quantity purchased: <input type="text" id="numberInput"/></p>
    Color you selected:<div id="colorInfo"></div>
    <p>Quantity you entered: <div id="numberInfo"></div> </p>
    <button id="nextBtn" disabled="true">Please select phone color and purchase quantity</button>
First, there is a select selection box on the page, then there is the input box of the entered purchase quantity, and there are two display areas, which are the display areas of the selected color and the entered quantity, as well as the next button operation;
Let's define:
Suppose we get the inventory of all color mobile phones from the background in advance
var goods = {
    // Mobile phone inventory
    "red": 6,
    "blue": 8
};
Next, {let's listen to the onchange event in the drop-down box of colorSelect and the oninput event in the input box of numberInput respectively, and then deal with them accordingly
The general JS code is as follows:
// Suppose we get the inventory of all color mobile phones from the background in advance
var goods = {
    // Mobile phone inventory
    "red": 6,
    "blue": 8
};
/*
Let's listen to the onchange event in the drop-down box of colorSelect and the oninput event in the input box of numberInput,
Then make corresponding handling in these two events
*/
var colorSelect = document.getElementById("colorSelect"),
    numberInput = document.getElementById("numberInput"),
    colorInfo = document.getElementById("colorInfo"),
    numberInfo = document.getElementById("numberInfo"),
    nextBtn = document.getElementById("nextBtn");

// Listen for change events
colorSelect.onchange = function(e){
    select();
};
numberInput.oninput = function(){
    select();
};
function select(){
    var color = colorSelect.value,   // colour
        number = numberInput.value,  // quantity
        stock = goods[color];  // The current stock corresponding to the mobile phone of this color

    colorInfo.innerHTML = color;
    numberInfo.innerHTML = number;

    // If the user does not select a color, disable the button
    if(!color) {
        nextBtn.disabled = true;
        nextBtn.innerHTML = "Please select the phone color";
            return;
    }
    // Judge whether the purchase quantity entered by the user is a positive integer
    var reg = /^\d+$/g;
    if(!reg.test(number)) {
        nextBtn.disabled = true;
        nextBtn.innerHTML = "Please enter the correct purchase quantity";
        return;
    }
    // If the currently selected quantity is greater than the current inventory quantity, the inventory shortage will be displayed
    if(number > stock) {
        nextBtn.disabled = true;
        nextBtn.innerHTML = "Insufficient inventory";
        return;
    }
    nextBtn.disabled = false;
    nextBtn.innerHTML = "Put in shopping cart";
}
Although the above code completes the requirements on the page, our codes are coupled together. At present, although there are not many problems, if there are more and more SKU attributes with the change of requirements in the future, for example, when one or more drop-down boxes are added to the page, it represents the selection of mobile phone memory. Now we need to calculate the color, memory and purchase quantity, To determine whether nextBtn shows insufficient inventory or put it into the shopping cart; The code is as follows:
The HTML code is as follows:
Select color:
    <select id="colorSelect">
        <option value="">Please select</option>
        <option value="red">gules</option>
        <option value="blue">blue</option>
    </select>
    <br/>
    <br/>
    Select memory:
    <select id="memorySelect">
        <option value="">Please select</option>
        <option value="32G">32G</option>
        <option value="64G">64G</option>
    </select>
    <p>Enter the quantity purchased: <input type="text" id="numberInput"/></p>
    Color you selected:<div id="colorInfo"></div>
    You have selected memory:<div id="memoryInfo"></div>
    <p>Quantity you entered: <div id="numberInfo"></div> </p>
    <button id="nextBtn" disabled="true">Please select phone color and purchase quantity</button>
The JS code becomes as follows:
// Suppose we get the inventory of all color mobile phones from the background in advance
var goods = {
    // Mobile phone inventory
    "red|32G": 6,
    "red|64G": 16,
    "blue|32G": 8,
    "blue|64G": 18
};
/*
Let's listen to the onchange event in the drop-down box of colorSelect and the oninput event in the input box of numberInput,
Then make corresponding handling in these two events
 */
var colorSelect = document.getElementById("colorSelect"),
    memorySelect = document.getElementById("memorySelect"),
    numberInput = document.getElementById("numberInput"),
    colorInfo = document.getElementById("colorInfo"),
    numberInfo = document.getElementById("numberInfo"),
    memoryInfo = document.getElementById("memoryInfo"),
    nextBtn = document.getElementById("nextBtn");

// Listen for change events
colorSelect.onchange = function(){
    select();
};
numberInput.oninput = function(){
    select();
};
memorySelect.onchange = function(){
    select();
};
function select(){
    var color = colorSelect.value,   // colour
        number = numberInput.value,  // quantity
        memory = memorySelect.value, // Memory
        stock = goods[color + '|' +memory];  // The current stock corresponding to the mobile phone of this color

    colorInfo.innerHTML = color;
    numberInfo.innerHTML = number;
    memoryInfo.innerHTML = memory;
    // If the user does not select a color, disable the button
    if(!color) {
        nextBtn.disabled = true;
        nextBtn.innerHTML = "Please select the phone color";
            return;
        }
        // Judge whether the purchase quantity entered by the user is a positive integer
        var reg = /^\d+$/g;
        if(!reg.test(number)) {
            nextBtn.disabled = true;
            nextBtn.innerHTML = "Please enter the correct purchase quantity";
            return;
        }
        // If the currently selected quantity is greater than the current inventory quantity, the inventory shortage will be displayed
        if(number > stock) {
            nextBtn.disabled = true;
            nextBtn.innerHTML = "Insufficient inventory";
            return;
        }
        nextBtn.disabled = false;
        nextBtn.innerHTML = "Put in shopping cart";
    }