Welcome to my GitHub
Here we classify and summarize all the original works of Xinchen (including supporting source code): https://github.com/zq2599/blog_demos
Overview of this article
- If you've seen it Three minute experience: face detection in Java You should be interested in the technical details behind it. To develop such an application, we need to do the following three things:
- Prepare docker basic image
- Developing java applications
- Package the java application into a package file and integrate it into the basic image to get the final java application image
- For the work of preparing docker basic image, let's talk about it earlier Detailed explanation of face detection in Java version part I: Docker image of running environment (CentOS+JDK+OpenCV) It has been completed. The next thing to do is to develop java applications and make them into docker images
Version information
- The version information involved in this java application is as follows:
- springboot: 2.4.8
- javacpp: 1.4.3
- javacv: 1.4.3
Source download
- The complete source code in this actual combat can be downloaded from GitHub. The address and link information are shown in the table below( https://github.com/zq2599/blog_demos):
| name | link | remarks |
|---|---|---|
| Project Home | https://github.com/zq2599/blog_demos | The project is on the GitHub home page |
| git warehouse address (https) | https://github.com/zq2599/blog_demos.git | The warehouse address of the source code of the project, https protocol |
| git warehouse address (ssh) | git@github.com:zq2599/blog_demos.git | The project source code warehouse address, ssh protocol |
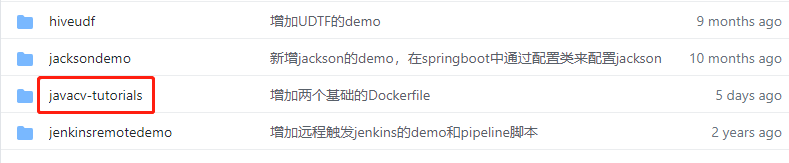
- There are multiple folders in the git project. The source code of this article is in the javacv tutorials folder, as shown in the red box below:
code
- In order to uniformly manage the source code and jar dependency, the project adopts maven parent-child structure. The parent project is named javacv tutorials, and its POM The XML is as follows. It can be seen that some jar versions are defined:
<?xml version="1.0" encoding="UTF-8"?>
<project xmlns="http://maven.apache.org/POM/4.0.0"
         xmlns:xsi="http://www.w3.org/2001/XMLSchema-instance"
         xsi:schemaLocation="http://maven.apache.org/POM/4.0.0 http://maven.apache.org/xsd/maven-4.0.0.xsd">
    <modelVersion>4.0.0</modelVersion>

    <groupId>com.bolingcavalry</groupId>
    <artifactId>javacv-tutorials</artifactId>
    <packaging>pom</packaging>
    <version>1.0-SNAPSHOT</version>
    <modules>
        <module>face-detect-demo</module>
    </modules>

    <properties>
        <java.version>1.8</java.version>
        <maven.compiler.source>8</maven.compiler.source>
        <maven.compiler.target>8</maven.compiler.target>
        <maven-compiler-plugin.version>3.6.1</maven-compiler-plugin.version>
        <springboot.version>2.4.8</springboot.version>

        <!-- javacpp current version -->
        <javacpp.version>1.4.3</javacpp.version>
        <!-- opencv edition -->
        <opencv.version>3.4.3</opencv.version>
        <!-- ffmpeg edition -->
        <ffmpeg.version>4.0.2</ffmpeg.version>
    </properties>

    <dependencyManagement>
        <dependencies>
            <dependency>
                <groupId>org.projectlombok</groupId>
                <artifactId>lombok</artifactId>
                <version>1.18.18</version>
            </dependency>

            <dependency>
                <groupId>org.bytedeco</groupId>
                <artifactId>javacv-platform</artifactId>
                <version>${javacpp.version}</version>
            </dependency>
            <dependency>
                <groupId>org.bytedeco</groupId>
                <artifactId>javacv</artifactId>
                <version>${javacpp.version}</version>
            </dependency>
            <!-- javacpp -->
            <dependency>
                <groupId>org.bytedeco</groupId>
                <artifactId>javacpp</artifactId>
                <version>${javacpp.version}</version>
            </dependency>
            <!-- ffmpeg -->
            <dependency>
                <groupId>org.bytedeco.javacpp-presets</groupId>
                <artifactId>ffmpeg-platform</artifactId>
                <version>${ffmpeg.version}-${javacpp.version}</version>
            </dependency>
            <dependency>
                <groupId>org.bytedeco.javacpp-presets</groupId>
                <artifactId>ffmpeg</artifactId>
                <version>${ffmpeg.version}-${javacpp.version}</version>
            </dependency>
        </dependencies>

    </dependencyManagement>
</project>
- Create a new sub project named face detect demo under javacv tutorials, which is the application we are going to develop today, its POM The XML is as follows:
<?xml version="1.0" encoding="UTF-8"?>
<project xmlns="http://maven.apache.org/POM/4.0.0"
         xmlns:xsi="http://www.w3.org/2001/XMLSchema-instance"
         xsi:schemaLocation="http://maven.apache.org/POM/4.0.0 http://maven.apache.org/xsd/maven-4.0.0.xsd">
    <parent>
        <artifactId>javacv-tutorials</artifactId>
        <groupId>com.bolingcavalry</groupId>
        <version>1.0-SNAPSHOT</version>
    </parent>
    <modelVersion>4.0.0</modelVersion>

    <artifactId>face-detect-demo</artifactId>
    <packaging>jar</packaging>

    <dependencyManagement>
        <dependencies>
            <dependency>
                <groupId>org.springframework.boot</groupId>
                <artifactId>spring-boot-dependencies</artifactId>
                <version>${springboot.version}</version>
                <type>pom</type>
                <scope>import</scope>
            </dependency>
        </dependencies>
    </dependencyManagement>

    <dependencies>
        <!--FreeMarker Template view dependency-->
        <dependency>
            <groupId>org.springframework.boot</groupId>
            <artifactId>spring-boot-starter-freemarker</artifactId>
        </dependency>

        <dependency>
            <groupId>org.springframework.boot</groupId>
            <artifactId>spring-boot-starter-web</artifactId>
        </dependency>

        <dependency>
            <groupId>org.projectlombok</groupId>
            <artifactId>lombok</artifactId>
        </dependency>

        <dependency>
            <groupId>org.springframework.boot</groupId>
            <artifactId>spring-boot-starter-test</artifactId>
            <scope>test</scope>
        </dependency>

        <dependency>
            <groupId>org.bytedeco</groupId>
            <artifactId>javacv-platform</artifactId>
        </dependency>
        <dependency>
            <groupId>org.bytedeco</groupId>
            <artifactId>javacv</artifactId>
        </dependency>
        <!-- javacpp -->
        <dependency>
            <groupId>org.bytedeco</groupId>
            <artifactId>javacpp</artifactId>
        </dependency>
        <!-- ffmpeg -->
        <dependency>
            <groupId>org.bytedeco.javacpp-presets</groupId>
            <artifactId>ffmpeg-platform</artifactId>
        </dependency>
        <dependency>
            <groupId>org.bytedeco.javacpp-presets</groupId>
            <artifactId>ffmpeg</artifactId>
        </dependency>
    </dependencies>

    <build>
        <plugins>
            <!-- If the parent project is not springboot,You need to use the plug-in in the following ways to generate a normal plug-in jar -->
            <plugin>
                <groupId>org.springframework.boot</groupId>
                <artifactId>spring-boot-maven-plugin</artifactId>
                <configuration>
                    <mainClass>com.bolingcavalry.facedetect.FaceDetectApplication</mainClass>
                </configuration>
                <executions>
                    <execution>
                        <goals>
                            <goal>repackage</goal>
                        </goals>
                    </execution>
                </executions>
            </plugin>
        </plugins>
    </build>
</project>
- The configuration files are as follows. Focus on the configuration of the front section template, file upload size, model file directory and so on:
### FreeMarker configuration
spring.freemarker.allow-request-override=false
#Enable template caching. Enable template caching.
spring.freemarker.cache=false
spring.freemarker.check-template-location=true
spring.freemarker.charset=UTF-8
spring.freemarker.content-type=text/html
spring.freemarker.expose-request-attributes=false
spring.freemarker.expose-session-attributes=false
spring.freemarker.expose-spring-macro-helpers=false
#Set panel suffix
spring.freemarker.suffix=.ftl

# Set the maximum memory for a single file
spring.servlet.multipart.max-file-size=100MB
# Set maximum memory for all files
spring.servlet.multipart.max-request-size=1000MB
# User defined file upload path
web.upload-path=/app/images
# Model path
opencv.model-path=/app/model/haarcascade_frontalface_default.xml
- The front-end page file has only one index FTL, please forgive Xinchen for not entering the front-end level of the flow. There is only one page in the front-end, which can submit pages and display processing results:
<!DOCTYPE html>
<head>
    <meta charset="UTF-8" />
    <title>Picture upload Demo</title>
</head>
<body>
<h1 >Picture upload Demo</h1>
<form action="fileUpload" method="post" enctype="multipart/form-data">
    <p>Select test file: <input type="file" name="fileName"/></p>
    <p>Number of surrounding tests: <input type="number" value="32" name="minneighbors"/></p>
    <p><input type="submit" value="Submit"/></p>
</form>
<#--Determine whether to upload files -- >
<#if msg??>
    <span>${msg}</span><br><br>
<#else >
    <span>${msg!("File not uploaded")}</span><br>
</#if>
<#--When displaying an image, you must send a request to the controller in src in img, otherwise the direct jump is garbled -- >
<#if fileName??>
<#--<img src="/show?fileName=${fileName}" style="width: 100px"/>-->
<img src="/show?fileName=${fileName}"/>
<#else>
<#--<img src="/show" style="width: 200px"/>-->
</#if>
</body>
</html>
- Let's look at the background code. First, the most common application startup class:
package com.bolingcavalry.facedetect;

import org.springframework.boot.SpringApplication;
import org.springframework.boot.autoconfigure.SpringBootApplication;

@SpringBootApplication
public class FaceDetectApplication {

    public static void main(String[] args) {
        SpringApplication.run(FaceDetectApplication.class, args);
    }
}
-
After the front end uploads pictures, what should the back end do? Without posting the code, let's go through the back-end tasks, as shown in the following figure:
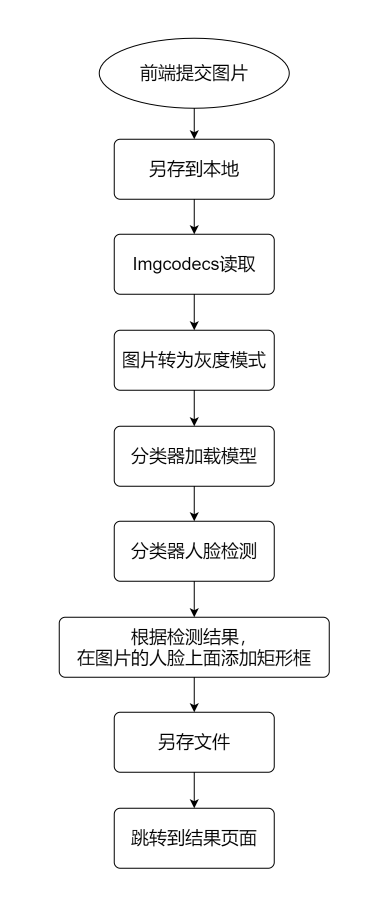
-
Next is the core business class uploadcontroller Java, web interface and business logic processing are all in this. They are executed according to the process sequence in the figure above. There are several points to pay attention to, which will be mentioned later:
package com.bolingcavalry.facedetect.controller;

import lombok.extern.slf4j.Slf4j;
import org.springframework.beans.factory.annotation.Autowired;
import org.springframework.beans.factory.annotation.Value;
import org.springframework.core.io.ResourceLoader;
import org.springframework.http.ResponseEntity;
import org.springframework.stereotype.Controller;
import org.springframework.web.bind.annotation.RequestMapping;
import org.springframework.web.bind.annotation.RequestParam;
import org.springframework.web.multipart.MultipartFile;

import java.io.File;
import java.io.IOException;
import java.util.Map;
import org.opencv.core.*;
import org.opencv.imgcodecs.Imgcodecs;
import org.opencv.imgproc.Imgproc;
import org.opencv.objdetect.CascadeClassifier;

import java.util.UUID;

import static org.bytedeco.javacpp.opencv_objdetect.CV_HAAR_DO_CANNY_PRUNING;

@Controller
@Slf4j
public class UploadController {

    static {
        // Load dynamic link library
        System.loadLibrary(Core.NATIVE_LIBRARY_NAME);
    }

    private final ResourceLoader resourceLoader;

    @Autowired
    public UploadController(ResourceLoader resourceLoader) {
        this.resourceLoader = resourceLoader;
    }

    @Value("${web.upload-path}")
    private String uploadPath;

    @Value("${opencv.model-path}")
    private String modelPath;

    /**
     * Jump to file upload page
     * @return
     */
    @RequestMapping("index")
    public String toUpload(){
        return "index";
    }

    /**
     * Last file to specified directory
     * @param file file
     * @param path File storage path
     * @param fileName Source file name
     * @return
     */
    private static boolean upload(MultipartFile file, String path, String fileName){
        //Use original file name
        String realPath = path + "/" + fileName;

        File dest = new File(realPath);

        //Determine whether the file parent directory exists
        if(!dest.getParentFile().exists()){
            dest.getParentFile().mkdir();
        }

        try {
            //Save file
            file.transferTo(dest);
            return true;
        } catch (IllegalStateException e) {
            // TODO Auto-generated catch block
            e.printStackTrace();
            return false;
        } catch (IOException e) {
            // TODO Auto-generated catch block
            e.printStackTrace();
            return false;
        }
    }

    /**
     *
     * @param file Files to upload
     * @return
     */
    @RequestMapping("fileUpload")
    public String upload(@RequestParam("fileName") MultipartFile file, @RequestParam("minneighbors") int minneighbors, Map<String, Object> map){
        log.info("file [{}], size [{}], minneighbors [{}]", file.getOriginalFilename(), file.getSize(), minneighbors);

        String originalFileName = file.getOriginalFilename();
        if (!upload(file, uploadPath, originalFileName)){
            map.put("msg", "Upload failed!");
            return "forward:/index";
        }

        String realPath = uploadPath + "/" + originalFileName;

        Mat srcImg = Imgcodecs.imread(realPath);

        // Target gray image
        Mat dstGrayImg = new Mat();
        // Convert gray
        Imgproc.cvtColor(srcImg, dstGrayImg, Imgproc.COLOR_BGR2GRAY);
        // OpenCv face recognition classifier
        CascadeClassifier classifier = new CascadeClassifier(modelPath);
        // Rectangle used to store faces
        MatOfRect faceRect = new MatOfRect();

        // Minimum size of feature detection point
        Size minSize = new Size(32, 32);
        // The image scaling scale can be understood as the X-Power mirror of the camera
        double scaleFactor = 1.2;
        // Perform face detection
        classifier.detectMultiScale(dstGrayImg, faceRect, scaleFactor, minneighbors, CV_HAAR_DO_CANNY_PRUNING, minSize);
        //Traverse the rectangle and draw it on top of the original image
        // Define paint color
        Scalar color = new Scalar(0, 0, 255);

        Rect[] rects = faceRect.toArray();

        // Not detected
        if (null==rects || rects.length<1) {
            // display picture
            map.put("msg", "No face detected");
            // file name
            map.put("fileName", originalFileName);

            return "forward:/index";
        }

        // Process one by one
        for(Rect rect: rects) {
            int x = rect.x;
            int y = rect.y;
            int w = rect.width;
            int h = rect.height;
            // Frame each face separately
            Imgproc.rectangle(srcImg, new Point(x, y), new Point(x + w, y + w), color, 2);
        }

        // The name of the picture after adding the face box
        String newFileName = UUID.randomUUID().toString() + ".png";

        // preservation
        Imgcodecs.imwrite(uploadPath + "/" + newFileName, srcImg);

        // display picture
        map.put("msg", "Total detected" + rects.length + "Personal face");
        // file name
        map.put("fileName", newFileName);

        return "forward:/index";
    }
    /**
     * Show single picture
     * @return
     */
    @RequestMapping("show")
    public ResponseEntity showPhotos(String fileName){
        if (null==fileName) {
            return ResponseEntity.notFound().build();
        }

        try {
            // Since it is necessary to read the local file, file must be added, and path is the path in the application configuration file
            return ResponseEntity.ok(resourceLoader.getResource("file:" + uploadPath + "/" + fileName));
        } catch (Exception e) {
            return ResponseEntity.notFound().build();
        }
    }
}
- UploadController.java code, there are the following points to pay attention to:
- In static methods, through system Loadlibrary loads local library functions. In the actual development process, this is the easiest place to report errors. Make sure - DJava library. The local library in the path configured by the path parameter is normally available, Above These local libraries are better than those in the basic image, so just ensure - DJava library. The path parameter can be configured correctly. This configuration will be mentioned later in the Dockerfile
- The public String upload method is the code entry for processing face detection, which is executed in the order of the process analyzed above
- The new cascade classifier (modelpath) instantiates the classifier according to the specified model. The model file is downloaded from GitHub. The model is officially trained in advance by OpenCV. The address is: https://github.com/opencv/opencv/tree/master/data/haarcascades
- The seemingly magical face detection function actually requires only one line of code classifier Detectmultiscale, we can get the rectangular position of each face in the original image. Next, we just need to add a rectangular box on the original image according to the position
- Now that the code has been written, let's make it a docker image
docker image making
- First, write Dockerfile:
# The basic image integrates openjdk8 and opencv3 four point three
FROM bolingcavalry/opencv3.4.3:0.0.3

# Create directory
RUN mkdir -p /app/images && mkdir -p /app/model

# Specifies the source location of the mirrored content
ARG DEPENDENCY=target/dependency

# Copy content to mirror
COPY ${DEPENDENCY}/BOOT-INF/lib /app/lib
COPY ${DEPENDENCY}/META-INF /app/META-INF
COPY ${DEPENDENCY}/BOOT-INF/classes /app

# Specify start command
ENTRYPOINT ["java","-Djava.library.path=/opencv-3.4.3/build/lib","-cp","app:app/lib/*","com.bolingcavalry.facedetect.FaceDetectApplication"]
- The Dockerfile above is very simple, which is the processing of some copied files. There is only one thing to pay special attention to: there is a parameter - DJava. In the startup command library. Path = / opencv-3.4.3/build/lib, which specifies the location of the local so library. In the previous java code, system The local library loaded by loadlibrary is loaded from this location. The basic image we use is bolingcavalry / opencv3 4.3:0.0.3, all local libraries of OpenCV have been prepared at this location
- Execute mvn clean package -U in the parent project directory. This is a pure maven operation and has nothing to do with docker
- Enter the face detect demo directory and execute the following command to extract class, configuration file, dependency library and other contents from the jar file to the target/dependency Directory:
mkdir -p target/dependency && (cd target/dependency; jar -xf ../*.jar)
- Finally, execute the command docker build -t bolingcavalry/facedetect:0.0.1 in the directory where the Dockerfile file is located (there is a point at the end of the command, don't miss it), and then the image production can be completed
- If you have hub docker. Com account, you can also push the image to the central warehouse through the docker push command, so that more people can use it:
- Finally, let's review Three minute experience: face detection in Java The command to start the docker container in the article is as follows. Through the two - v parameters, the directory of the host computer is mapped to the container. Therefore, the / app/images and / app/model in the container can remain unchanged as long as the directory mapping of the host computer can be ensured to be correct:
docker run \
--rm \
-p 18080:8080 \
-v /root/temp/202107/17/images:/app/images \
-v /root/temp/202107/17/model:/app/model \
bolingcavalry/facedetect:0.0.1
- For more information about docker image production officially recommended by SpringBoot, please refer to Making Docker image with SpringBoot(2.4) application (official scheme of Gradle version)
Key points
-
Please pay attention to POM The versions of several libraries related to XML and javacv cannot be matched casually. It is recommended to follow the text. Even if you want to change them, please check whether the version you need exists in maven central warehouse;
-
So far, the Java version of face detection has been completed from experience to development. The small functions involve many knowledge points, and also let us experience the convenience and power of javacv. With the help of docker, the environment configuration and application development are separated, which reduces the difficulty of application development and deployment (no more time is spent on the deployment of jdk and opencv), If you are looking for a simple and easy-to-use javacv development and deployment scheme, I hope this article can provide you with a reference;