iTerm2 introduction
iTerm2 is a powerful Terminal tool. It can also be said to be a substitute for Terminal or a successor product of iTerm. It applies to macOS 10.12 or later.
It supports window operation, automatic supplement, paste history, playback function, full screen and other functions. It is a very powerful and recommended terminal tool.
Install iTerm2
- Can go iTerm2 official website , download and install$ brew cask install iterm2
- You can install directly using Homebrew:
be careful:
If the brew command is not installed on your Mac, please execute the following command to install it:
$ /usr/bin/ruby -e "$(curl -fsSL https://raw.githubusercontent.com/Homebrew/install/master/install)"
Configure iTerm2 theme
The most commonly used theme of iTerm2 is Solarized Dark theme. Download address: https://ethanschoonover.com/solarized
The downloaded file is a compressed file. First unzip it, then open iTerm2, press [Command +,] to open the Preferences configuration interface, then profiles - > colors - > Color presets - > import, and select the extracted solarized - > Item2 colors solarized - > Solarized Dark The itermcolors file is imported successfully. Finally, select the Solarized Dark theme, as shown below:

The tool has many themes, which can be selected according to your hobbies.
Configure oh my Zsh
Oh my Zsh is a further extension of the topic. Github address: https://github.com/ohmyzsh/ohmyzsh
You can install by curl or wget command:
- curl installation
sh -c "$(curl -fsSL https://raw.githubusercontent.com/ohmyzsh/ohmyzsh/master/tools/install.sh)"
- wget installation
sh -c "$(wget -O- https://raw.githubusercontent.com/ohmyzsh/ohmyzsh/master/tools/install.sh)"
For example, I use the curl command to install:
$ sh -c "$(curl -fsSL https://raw.github.com/robbyrussell/oh-my-zsh/master/tools/install.sh)"
Cloning Oh My Zsh...
xcode-select: note: no developer tools were found at '/Applications/Xcode.app', requesting install. Choose an option in the dialog to download the command line developer tools.
Error: git clone of oh-my-zsh repo failed
Eason:Library linan$ sh -c "$(curl -fsSL https://raw.github.com/robbyrussell/oh-my-zsh/master/tools/install.sh)"
Cloning Oh My Zsh...
Cloning into '/Users/linan/.oh-my-zsh'...
remote: Enumerating objects: 1089, done.
remote: Counting objects: 100% (1089/1089), done.
remote: Compressing objects: 100% (1030/1030), done.
remote: Total 1089 (delta 23), reused 874 (delta 19), pack-reused 0
Receiving objects: 100% (1089/1089), 716.00 KiB | 65.00 KiB/s, done.
Resolving deltas: 100% (23/23), done.

Looking for an existing zsh config...
Using the Oh My Zsh template file and adding it to ~/.zshrc.

Time to change your default shell to zsh:
Do you want to change your default shell to zsh? [Y/n] y
Changing the shell...
Changing shell for linan.
Password for linan:
Shell successfully changed to '/bin/zsh'.

         __                                     __
  ____  / /_     ____ ___  __  __   ____  _____/ /_
 / __ \/ __ \   / __ `__ \/ / / /  /_  / / ___/ __ \
/ /_/ / / / /  / / / / / / /_/ /    / /_(__  ) / / /
\____/_/ /_/  /_/ /_/ /_/\__, /    /___/____/_/ /_/
                        /____/                       ....is now installed!


Please look over the ~/.zshrc file to select plugins, themes, and options.

p.s. Follow us on https://twitter.com/ohmyzsh

p.p.s. Get stickers, shirts, and coffee mugs at https://shop.planetargon.com/collections/oh-my-zsh
After installation, you need to set zsh as the default shell of the current user (so that zsh can be used when creating a new command):
$ chsh -s /bin/zsh
```

Then we use vim Command editing ~/.zshrc File, modify the theme configuration to ZSH_THEME="agnoster".
```javascript
$ vim ~/.zshrc

# If you come from bash you might have to change your $PATH.
# export PATH=$HOME/bin:/usr/local/bin:$PATH

# Path to your oh-my-zsh installation.
export ZSH="/Users/linan/.oh-my-zsh"

# Set name of the theme to load --- if set to "random", it will
# load a random theme each time oh-my-zsh is loaded, in which case,
# to know which specific one was loaded, run: echo $RANDOM_THEME
# See https://github.com/robbyrussell/oh-my-zsh/wiki/Themes
ZSH_THEME="agnoster"       // Modify theme
agnoster is one of the most commonly used zsh topics. You can choose your favorite topics. List of zsh topics: https://github.com/ohmyzsh/ohmyzsh/wiki/themes
Configure Meslo fonts
Using the above topic requires Meslo font support, otherwise there will be garbled code. Font download address: Meslo LG M Regular for Powerline.ttf
After downloading, double-click install directly in macOS.
Then open iTerm2, press [Command +,] to open the Preferences configuration interface, then profiles - > text - > font - > chanage font, and select Meslo LG M Regular for Powerline font.

Of course, if you think the default 12px font size is inappropriate, you can modify it yourself.
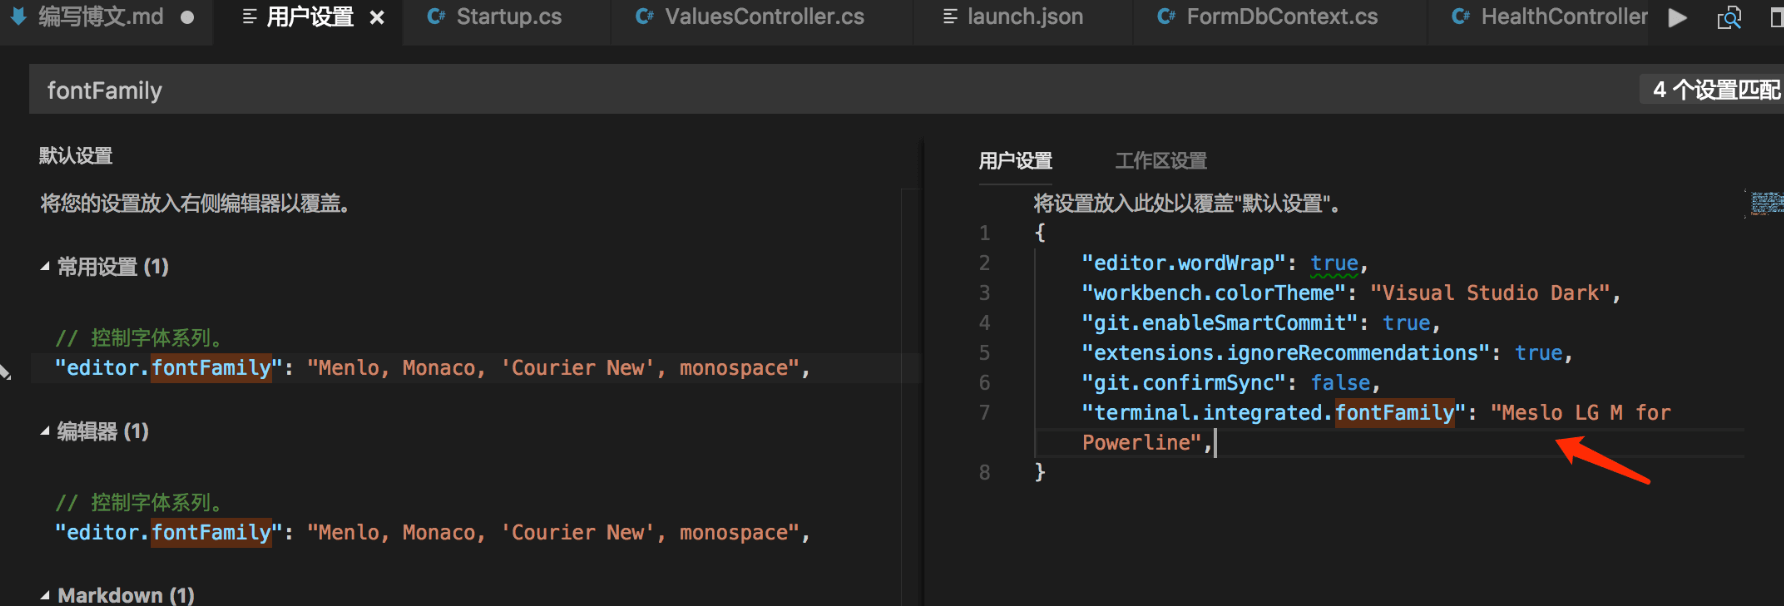
In addition, the terminal font of VS Code also needs to be configured. Open VS Code, press Command +, open user configuration, search fontFamily, and then add "terminal.integrated.fontFamily": "Meslo LG M for Powerline" to the configuration on the right. Example:
Declaration highlighting
The effect is as shown in the screenshot above. Special commands and error commands will be highlighted.
Install using Homebrew:
$ brew install zsh-syntax-highlighting
After successful installation, edit ~ /. With vim command zshrc file, add the following configuration in the last line:
...................
# Compilation flags
# export ARCHFLAGS="-arch x86_64"

# Set personal aliases, overriding those provided by oh-my-zsh libs,
# plugins, and themes. Aliases can be placed here, though oh-my-zsh
# users are encouraged to define aliases within the ZSH_CUSTOM folder.
# For a full list of active aliases, run `alias`.
#
# Example aliases
# alias zshconfig="mate ~/.zshrc"
# alias ohmyzsh="mate ~/.oh-my-zsh"
source /usr/local/share/zsh-syntax-highlighting/zsh-syntax-highlighting.zsh
After saving, execute the variable effective command:
source /etc/profile
Automatic replenishment
This function is very practical and can facilitate us to type commands quickly.
In the configuration step, first clone the Zsh autosuggestions project to the specified directory:
$ git clone https://github.com/zsh-users/zsh-autosuggestions ~/.oh-my-zsh/custom/plugins/zsh-autosuggestions
Then, edit ~ /. With the vim command zshrc file, find the plugins configuration, and add the Zsh autosuggestions plug-in:
# Would you like to use another custom folder than $ZSH/custom?
# ZSH_CUSTOM=/path/to/new-custom-folder

# Which plugins would you like to load?
# Standard plugins can be found in $ZSH/plugins/
# Custom plugins may be added to $ZSH_CUSTOM/plugins/
# Example format: plugins=(rails git textmate ruby lighthouse)
# Add wisely, as too many plugins slow down shell startup.
plugins=(git zsh-autosuggestions)
>Note:
The above statement highlights that if the configuration does not take effect, you can configure it in plugins and add a Zsh syntax highlighting plug-in.
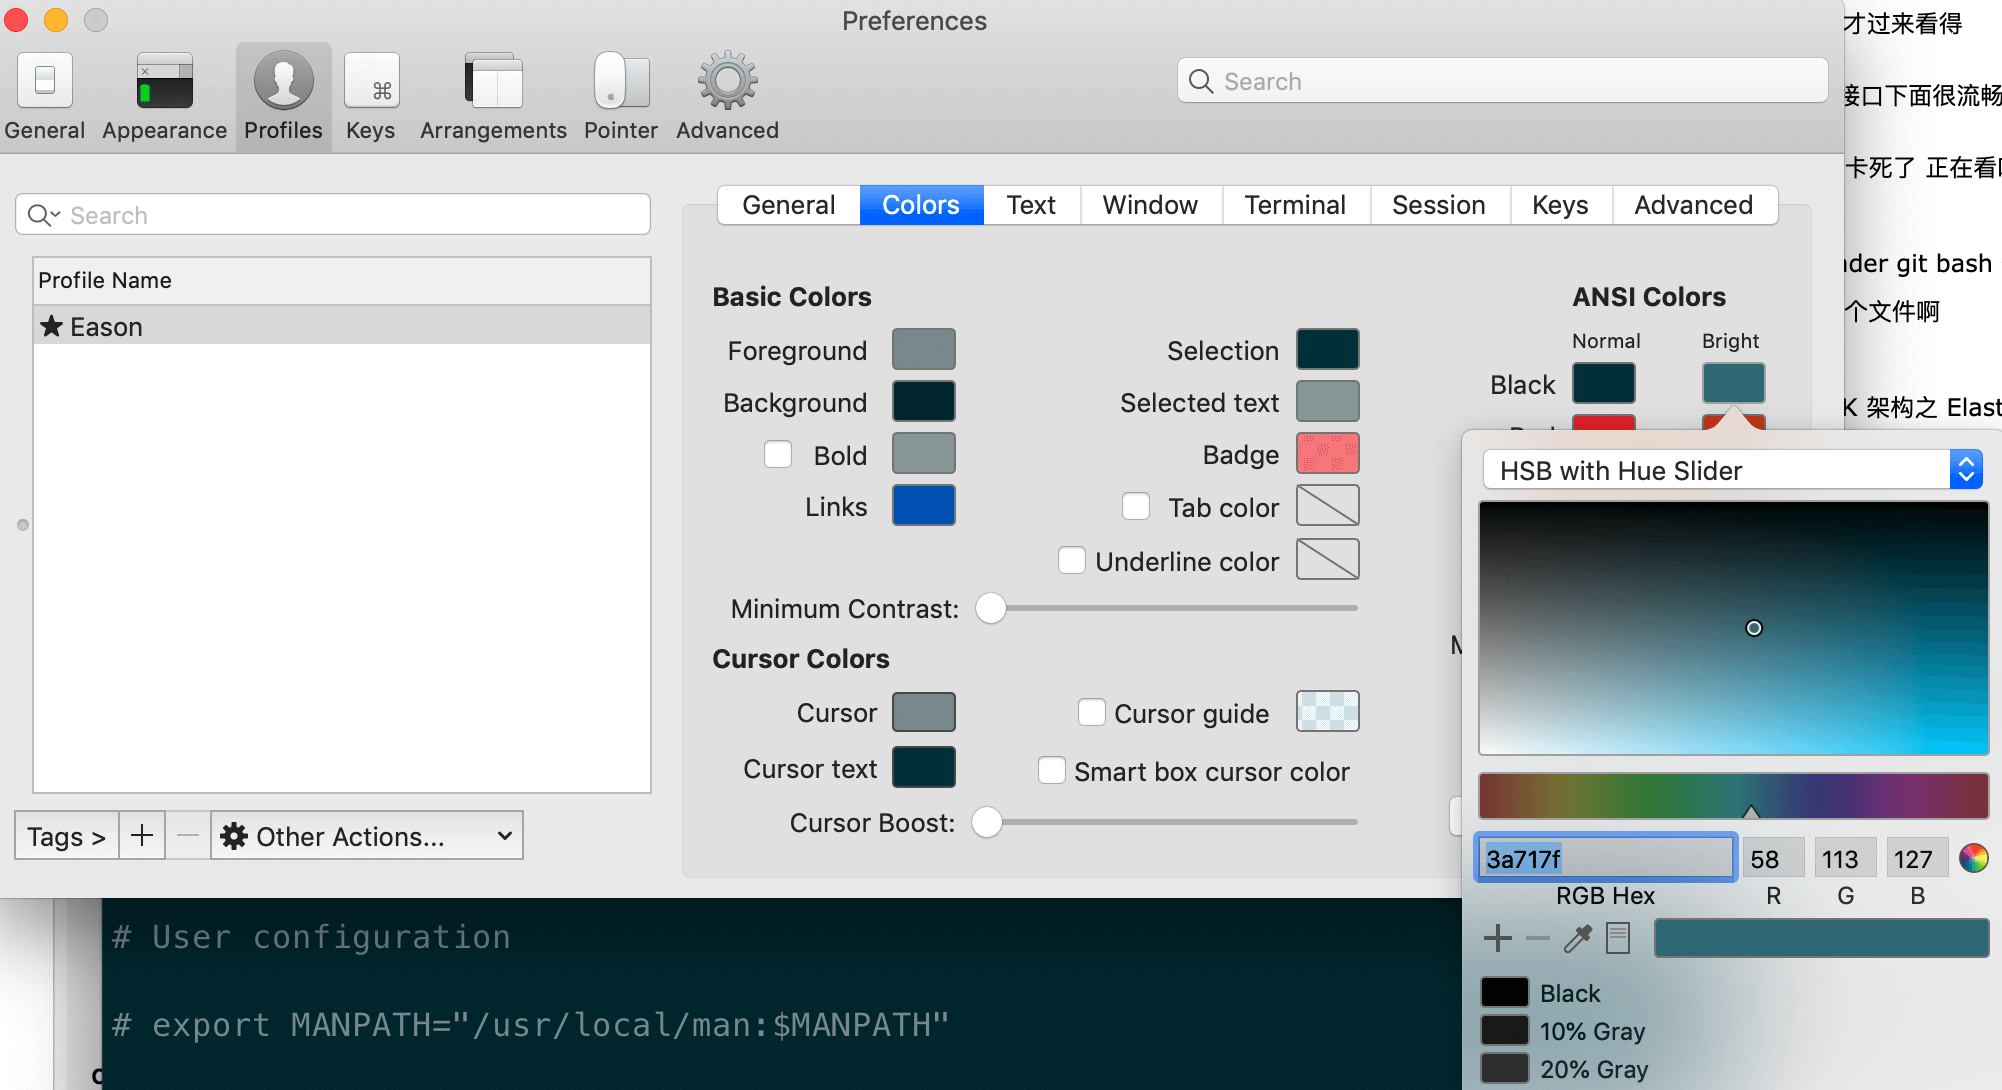
Sometimes, because the color of auto fill is very similar to the background color, auto fill has no effect. We can manually change the color configuration of auto fill. The color value I modified is: 3a717f, example:
Left and right key jump
It is mainly to press and hold the option + → or ← key to jump and switch at the beginning and end of the command. It was not effective originally and needs to be started manually.
Open iTerm2, press Command +, open the Preferences configuration interface, and then Profiles → Keys → Load Preset → Natural Text Editing.
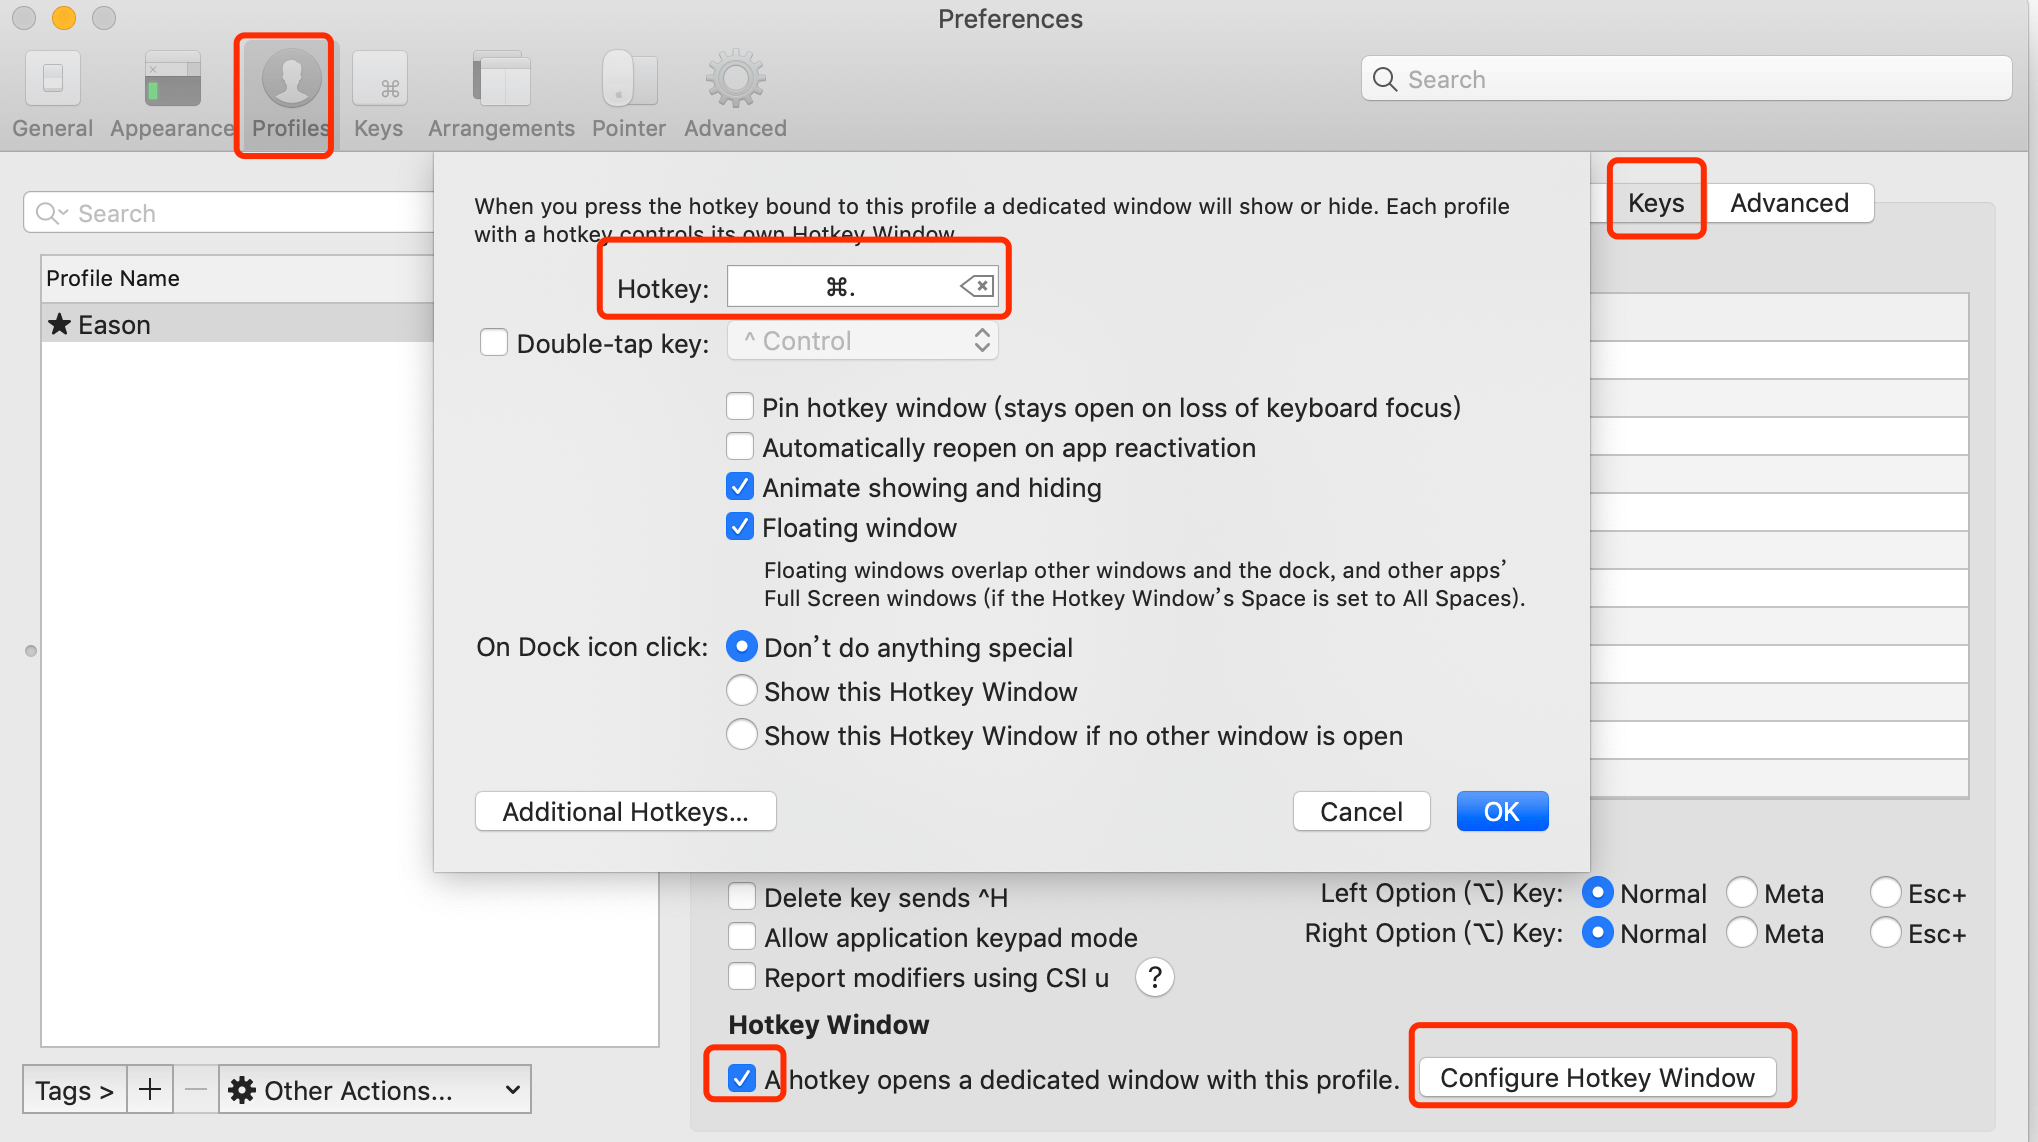
iTerm2 quick hide and show
This function is also very useful. You can quickly hide and open iTerm2 through shortcut keys. For example, configure shortcut keys: (common +):
iTerm2 hide username and hostname
Sometimes our user name and host name are too long, such as mine pengzhenjin@MacBook-Pro, the terminal display will be very ugly. We can remove it manually. Edit ~ /. With vim command zshrc file, add DEFAULT_USER="pengzhenjin" configuration, such as:
# If you come from bash you might have to change your $PATH.
# export PATH=$HOME/bin:/usr/local/bin:$PATH

# Path to your oh-my-zsh installation.
export ZSH="/Users/user/.oh-my-zsh"

# Set name of the theme to load --- if set to "random", it will
# load a random theme each time oh-my-zsh is loaded, in which case,
# to know which specific one was loaded, run: echo $RANDOM_THEME
# See https://github.com/ohmyzsh/ohmyzsh/wiki/Themes
ZSH_THEME="agnoster"
DEFAULT_USER="pengzhenjin"
iTerm2 configuration agent
Edit ~ /. With vim command zshrc file, add the following configuration (shadowlocks used):
# proxy list
alias proxy='export all_proxy=socks5://127.0.0.1:1086'
alias unproxy='unset all_proxy'
iTerm2 needs a new tab to be effective:
$ proxy
$ curl ip.cn
 current IP: 185.225.14.5 From: USA

$ unproxy
$ curl ip.cn
 current IP: 115.236.186.130 From: Hangzhou Telecom, Zhejiang Province
We can test:
$ curl https://packages.cloud.google.com/yum/repos/kubernetes-el7-x86_64

<html>
  <head>
    <title>Directory listing for /yum/repos/kubernetes-el7-x86_64/</title>
  </head>
  <body>
    <h2>Index of /yum/repos/kubernetes-el7-x86_64/</h2>
    <p></p>
    <a href="/yum/repos/kubernetes-el7-x86_64/repodata">repodata</a><br />
  </body>
</html>
iTerm2 common command shortcuts
- New command window: command + t
- Close the command window: command + w
- Switch command window: Command + left and right arrow keys
- Find: command + f
- Vertical split screen: command + d
- Horizontal split screen: command + shift + d
- Automatic replenishment: command +;
- Command history: command + shift + h
- Command playback: command + alt + b
- Move the cursor to the beginning of the line: ctrl + a
- Move the cursor to the end of the line: ctrl + e
- Move one character forward: ctrl + f
- Back one character: ctrl + b
- Clear screen: ctrl + l
- Display history command: ctrl + p
- Delete current character: ctrl + d
- Delete previous character: ctrl + h
- Delete the character before the cursor: ctrl + w
- Delete the entire line before the cursor: ctrl + n
- Delete the entire line after the cursor: ctrl + k
reference material
Detailed explanation of the use of iTerm2 terminal tool on Mac OS