Introduction to Kubernetes Pod
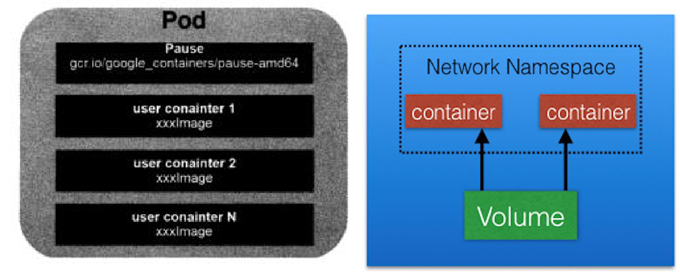
Pod literally translates as a pod. You can think of the container as the beans in the pod. Wrapping one or more closely related beans together is a pod. In k8s, we will not directly operate containers, but package containers into pods for management.
Introduction and principle of Pod
Is the smallest API object in the Kubernetes project. To put it more professionally, we can describe it as follows:
Pod is the atomic scheduling unit of Kubernetes project.
Pod is the foundation of running services
The base container is pause
Every time a Pod is started, a container will be attached. Its function is to simply wait and set the network of the Pod.
Application containers in a Pod share the same set of resources:
(1) PID namespace: different applications in Pod can see the process ID of other applications
(2) Network namespace: multiple containers in Pod can access the same IP and port range
(3) IPC namespace: multiple containers in Pod can communicate using SystemV IPC or POSIX message queue.
(4) UTS namespace: multiple containers in Pod share a host name
(5) Volumes: individual containers in the Pod can access volumes defined at the Pod level
The image of containers in each pod should be different (different applications) to avoid port duplication
POD operation practice
Creation and deletion of POD
Create an nginx pod
kubectl run ng --image=nginx:1.9 --port=80
Status check
kubectl  get pod name
kubectl  describe pod name
kubectl  logs name
Create a pod through yaml and generate a yaml file through – dry run
kubectl run ng --image=nginx:1.9 --port=80 --dry-run=client -o yaml >ng.yaml
apiVersion: v1
kind: Pod
metadata:
  creationTimestamp: null
  labels:
    run: ng
  name: ng
spec:
  containers:
  - image: nginx:1.9
    name: ng
    ports:
    - containerPort: 80
    resources: {}
  dnsPolicy: ClusterFirst
  restartPolicy: Always
status: {}
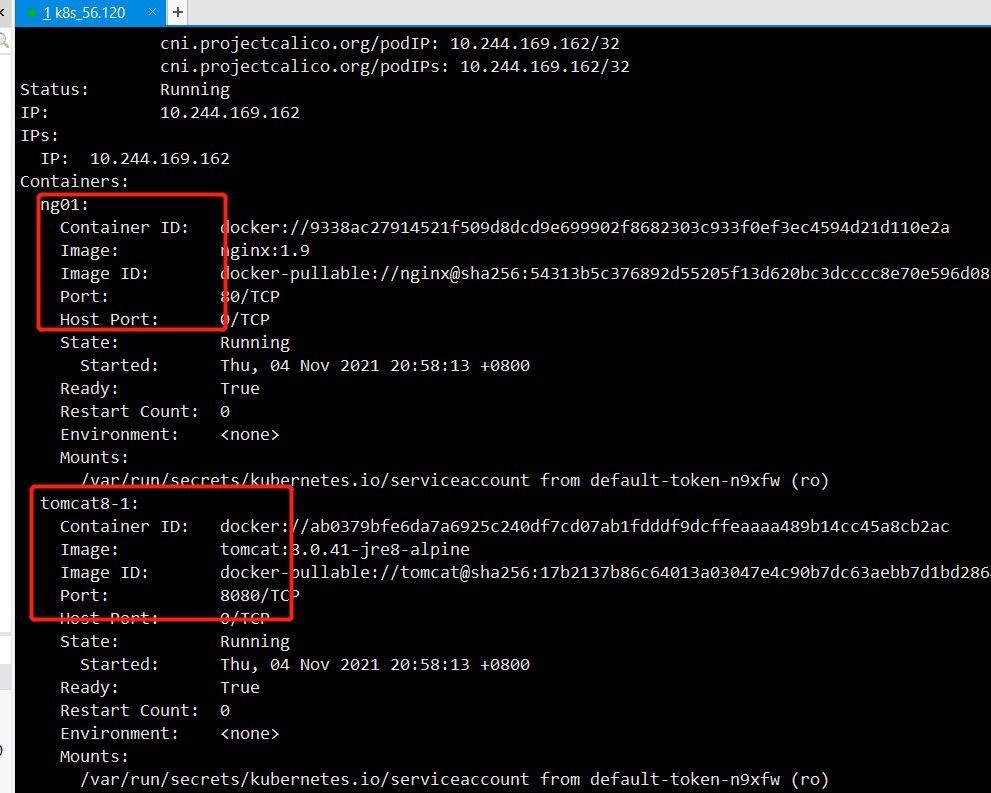
One pod runs multiple containers
apiVersion: v1
kind: Pod
metadata:
  creationTimestamp: null
  labels:
    run: ng01
  name: multi-pod
spec:
  containers:
    - image: nginx:1.9
      name: ng01
      ports:
        - containerPort: 80
      resources: { }
    - image: tomcat:8.0.41-jre8-alpine
      name: tomcat8-1
      ports:
        - containerPort: 8080
      resources: { }
  dnsPolicy: ClusterFirst
  restartPolicy: Always
status: { }
This container runs two containers, nginx and tomcat, when kubectl apply - f multi After yaml, check the pod as follows:
 Delete pod
k delete pod ng
Life cycle management of pod
The change of Pod life cycle is mainly reflected in the Status part of Pod API object, which is in addition to
The third important field besides Metadata and Spec. Among them, Pod status. Phase is the current state of Pod
State, it has the following possible situations:
Pending: this status means that the YAML file of Pod has been submitted to Kubernetes, and the API object has been created and saved in Etcd. However, some containers in this Pod cannot be created successfully for some reason. For example, the scheduling is unsuccessful.
Running: in this state, the Pod has been successfully scheduled and bound to a specific node. It contains containers that have been created successfully and at least one is running.
Succeeded: this status means that all containers in the Pod have completed normal operation and have exited. This is most common when running a one-time task.
Failed: in this state, at least one container in the Pod exits in an abnormal state (non-zero return code). The appearance of this state means that you have to find a way to Debug the application of this container, such as checking the Events and logs of Pod.
Unknown: This is an abnormal state, which means that the status of Pod cannot be continuously reported by Kubelet to Kube apiserver. It is likely that there is a problem in the communication between Master and slave nodes (Master and Kubelet).
Furthermore, the Status field of the Pod object can be subdivided into a group of Conditions. These subdivisions
Status values include: PodScheduled, Ready, Initialized, and unscheduled. Status describes what causes them.
Restart policy
Restart policy for all containers within the pod. One of Always, OnFailure, Never.
Default to Always
If it is deployment, its status is Always. When the pod disappears and hangs up, it will restart automatically
Quotas and restrictions on resources
apiVersion: v1
kind: Pod
metadata:
  creationTimestamp: null
  labels:
    run: ng
  name: ng
spec:
  containers:
  - image: nginx:1.9
    name: ng
    ports:
    - containerPort: 80
    resources:
     limits:
      memory: "200Mi"
      cpu: "700m"
     requests:
      memory: "200Mi"
      cpu: "700m"
  dnsPolicy: ClusterFirst
  restartPolicy: Always
status: {}
We add limits and requests, but the memory is 200Mi and the cpu is 700m (the cpu usage is 1024, which means 700m)
After applying this yaml file, let's look at it through the description:
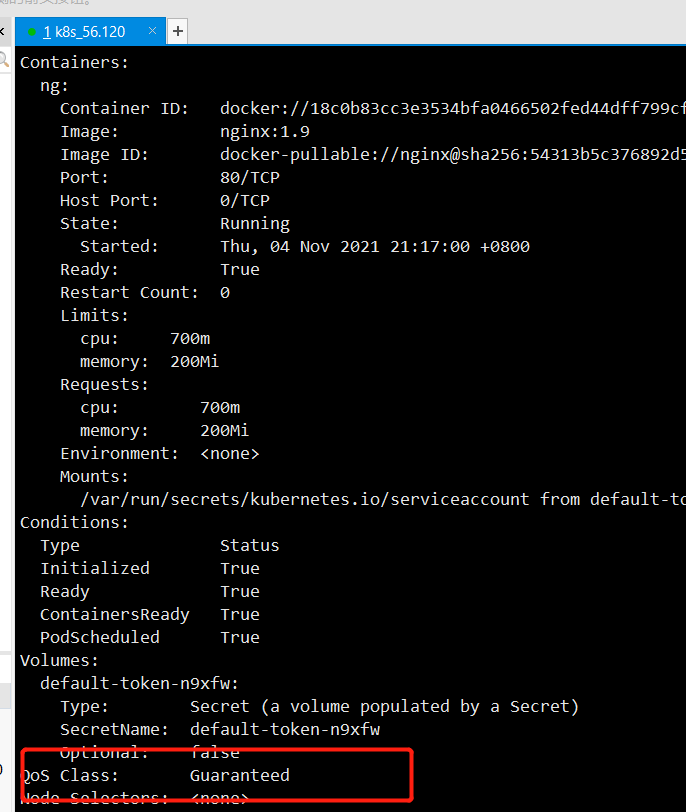
QoS Class: Guaranteed
When requests < limits, the following is obtained when there are no requests:
apiVersion: v1
kind: Pod
metadata:
  creationTimestamp: null
  labels:
    run: ng
  name: ng
spec:
  containers:
  - image: nginx:1.9
    name: ng
    ports:
    - containerPort: 80
    resources:
     limits:
      memory: "200Mi"
      cpu: "700m"
     requests:
      memory: "100Mi"
      cpu: "600m"
  dnsPolicy: ClusterFirst
  restartPolicy: Always
status: {}
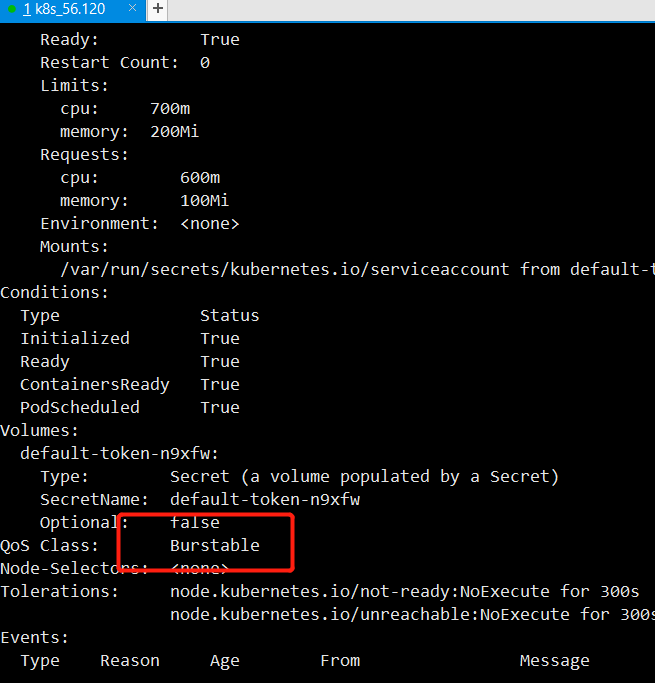
QoS Class: Burstable
When resource limits and requests are not configured, the following is true:
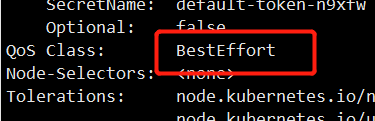
QoS Class: BestEffort
The summary is as follows:
limits=requests -->Guaranteed
limits > requests -->Burstable
Limitis, requests is null – > besteffort
What do these three stand for? That is, when there are many pods running on the k8s server, these pods have the attribute of Qos Class. When one of the server resources is insufficient, the pod will be driven away at this time, that is, delete the pod and find the server with the least load in the k8s cluster for restart. Therefore, the parameter of QosClass is used to judge those who are driven away first, As can be seen from the above example, when you do not configure limits and requests, you are driven away first, followed by limits < requests, and the pod configured with limits equal to requests is reserved. Therefore, the order of expulsion:
BestEffort > Burstable > Guaranteed
Static pod
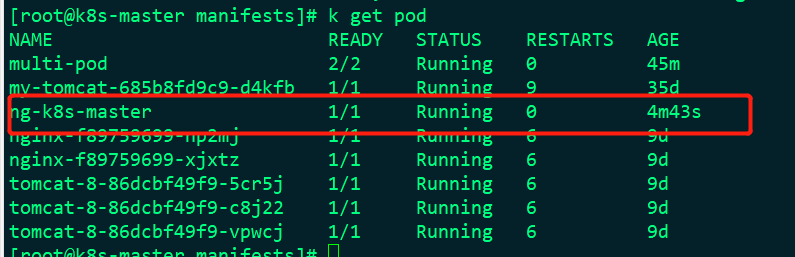
What is a static pod? We associate static variables in java. Static variables only exist in the whole system, so static variables are shared by all objects; The static pod in k8s means that the static pod is stored in the specified directory. When you put a yaml file in the directory where the static pod is located, k8s will automatically apply the yaml file, that is, you don't need to apply it manually;
Static pod is a pod managed by kubectl and only exists on a specific Node. They cannot be managed through API Server, cannot be associated with ReplicationController, Deployment or DaemonSet, and kubelet cannot perform health checks on them. The static pod is always created by kubectl and always runs on the Node where kubelet is located. There are two ways to create a Pod: configuration file or HTTP. Only the common configuration file methods are mentioned here:
Profile mode
Write ng. In the directory / etc / kubernetes / manifest Yaml file, as follows:
apiVersion: v1
kind: Pod
metadata:
  creationTimestamp: null
  labels:
    run: ng
  name: ng
spec:
  containers:
  - image: nginx:1.9
    name: ng
    ports:
    - containerPort: 80
    resources:
     limits:
      memory: "200Mi"
      cpu: "700m"
     requests:
      memory: "100Mi"
      cpu: "600m"
  dnsPolicy: ClusterFirst
  restartPolicy: Always
status: {}
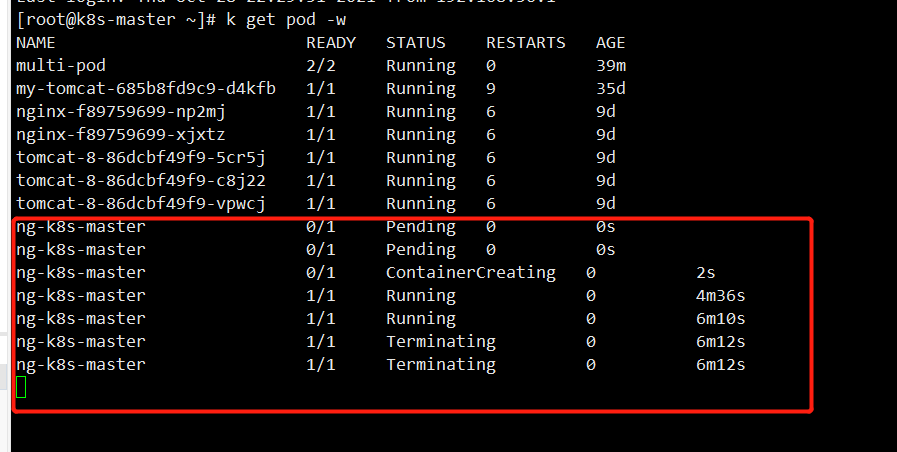
First, we monitor the pod as follows:

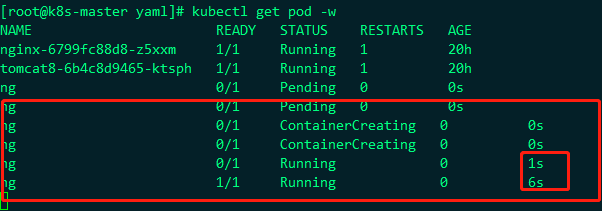
Then we put ng in / etc / kubernetes / manifest, and then watch the change of this pod
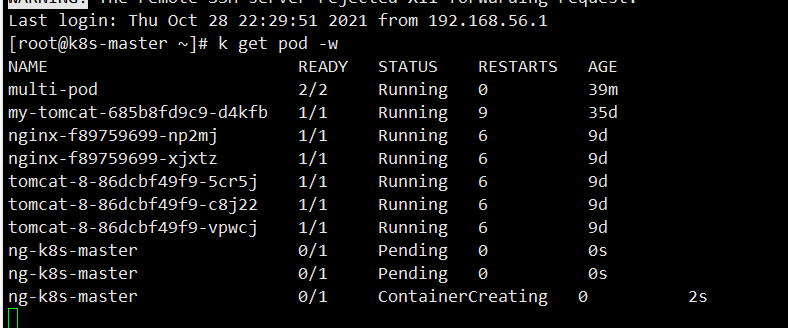
You can see that it will be put right away, and the monitoring here is starting to be created, so this is the role of static pod
There are many pods in k8s. These pods are from the Kube system namespace, as follows:
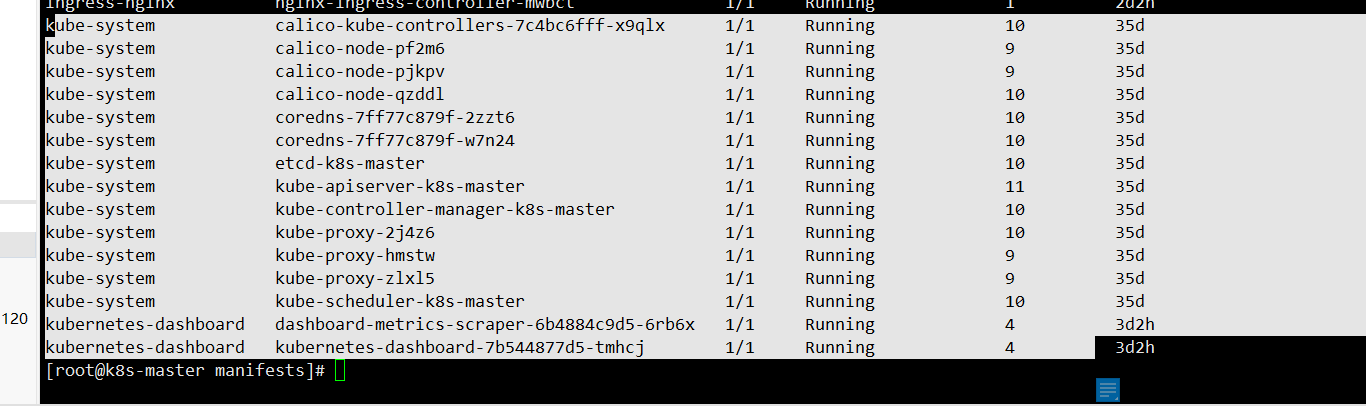
In fact, such as the scheduler, these are static pod s, which are created in the specified directory. Let's look at this directory:
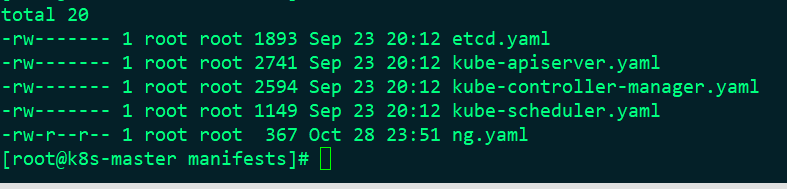
It's normal now
When we delete the file from this directory, the pod will also be removed
Init Containers
Initialization container: as the name suggests, when the container is started, one or more containers will be started first. If there are multiple containers, these init containers will be executed in the defined order. The main container will not be started until all init containers are executed. Since the storage volume in a Pod is shared, the data generated in Init Container can be used by the main container.
In the final analysis, a variety of tasks can be performed in the main container, such as init and deploy. In the final analysis, a variety of tasks can be performed in the main container, such as init and deploy.
Application scenario:
The first scenario: wait for other modules to be Ready. For example, we have an application with two container services, one is Web Server and the other is database. The Web Server needs to access the database. However, when we start this application, we cannot guarantee that the database service will be started first, so there may be database connection errors in the Web Server for a period of time. To solve this problem, we can use an InitContainer in the Pod running the Web Server service to check whether the database is Ready. The InitContainer does not exit until the database can be connected, and then the Web Server container is started to initiate a formal database connection request.
The second scenario: initialize the configuration. For example, detect all existing member nodes in the cluster, and prepare the configuration information of the cluster for the main container, so that the main container can join the cluster with this configuration information after it gets up. Other usage scenarios: such as registering the pod to a central database, downloading application dependencies, etc
apiVersion: v1
kind: Pod
metadata:
  creationTimestamp: null
  labels:
    run: initcontainer
  name: initcontainer
spec:
  containers:
  - image: nginx:1.9
    name: nginx
    volumeMounts:
    - name: task-pv-storage
      mountPath: "/usr/share/nginx/html"
    resources: {}
  initContainers:
  - image: centos
    name: centos
    imagePullPolicy: IfNotPresent
    command:
    - bin/sh
    - -c
    - echo "this is one initContainers test">>/pod-data/index.html
    volumeMounts:
    - name: task-pv-storage
      mountPath: "/pod-data"
    resources: {}
  volumes:
  - name: task-pv-storage
    emptyDir: {}
  dnsPolicy: ClusterFirst
  restartPolicy: Never
status: {}
k8s health examination
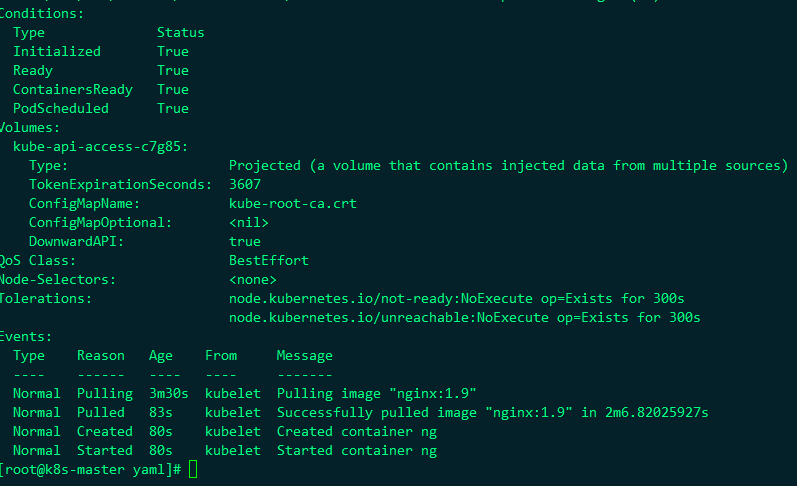
The probe is a periodic diagnosis of the container performed by kubelet. To perform diagnostics, kubelet calls the Handler implemented by the container. There are three types of probes: Exec probe: where the process is executed, and the status of the container is confirmed by the exit status code of the process; HTTP GET probe: send an HTTP GET request to the container, and judge whether the container is ready through the HTTP status code of the response; If the response status code is greater than or equal to 200 and less than 400, the diagnosis is considered as a successful Tcp socket probe: it opens a TCP connection to the specified port of the container. If the connection has been established, it is considered that the container is ready.
kubernetes calls the probe periodically and takes action based on the results of the ready probe. If a pod reports that it is not ready, it is removed from the service. If the pod is ready again, add the pod again; Each probe will get one of the following three results:
Success: the container passed the diagnosis.
Failed: container failed diagnostics.
Unknown: diagnosis failed, so no action will be taken
livenessProbe: indicates whether the container is running. If the survival probe fails, kubelet will kill the container and the container will be affected by its restart strategy. If the container does not provide a survival probe, the default state is Success
readinessProbe: indicates whether the container is ready for Service requests. If the ready probe fails, the endpoint controller will delete the IP address of the pod from the endpoints of all services matching the pod. The ready state before the initial delay defaults to Failure. If the container does not provide a ready probe, the default state is Success. As long as the tag of the pod matches the pod selector of the Service, the pod can be used as the back end of the Service. However, if the pod is not ready, it cannot process the request. At this time, a ready probe is needed to check whether the pod is ready, If the check is successful, the message can be processed as the back-end of the Service;
1. Add detection probe to pod - survival detection
#Detect / tmp/live and it will be deleted every 10 seconds. liveness detects that if it is deleted, it will return failure and restart pod. Trapped in an infinite loop.
apiVersion: v1
kind: Pod
metadata:
  name: liveness-exec-pod
  namespace: default
spec:
  containers:
    - name: liveness-exec-container
      image: centos:7
      imagePullPolicy: IfNotPresent
      command: [ "/bin/sh","-c","touch /tmp/live ; sleep 10; rm -rf /tmp/live; sleep 10" ]
      livenessProbe:
        exec:
          command: [ "test","-e","/tmp/live" ]
        initialDelaySeconds: 1
        periodSeconds: 3
#Detect / tmp/live and it will be deleted every 10 seconds. liveness detects that if it is deleted, it will return failure and restart pod. Fall into an infinite loop, as shown in the figure: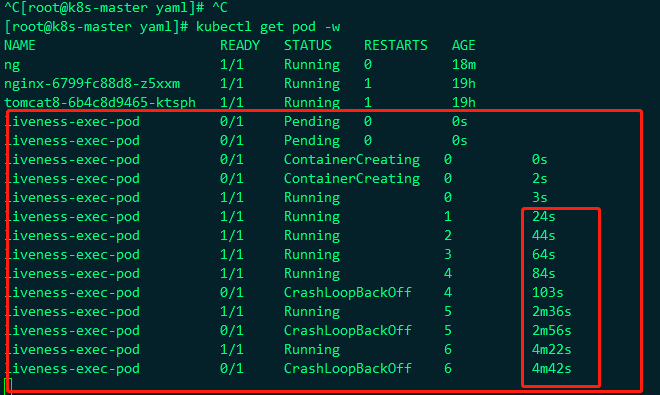
Basically, the probe is restarted in less than 10s, so the probe is effective
2. Add ready probe to pod
apiVersion: v1
kind: Pod
metadata:
  creationTimestamp: null
  labels:
    run: ng
  name: ng
spec:
  containers:
    - image: nginx:1.9
      name: ng
      ports:
        - containerPort: 80
      resources: { }
      readinessProbe:
        exec:
          command:
            - ls
            - /var/ready
  dnsPolicy: ClusterFirst
  restartPolicy: Always
status: { }
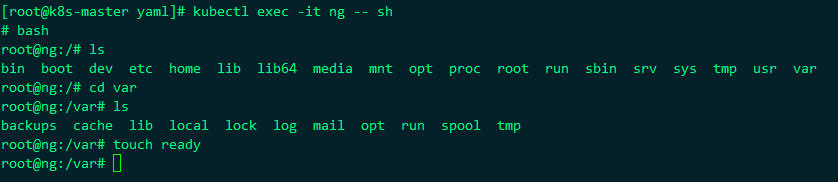
After the yaml file is applied, the ng pod will be created in the container, but the status of the pod is running, but the ready status always returns 0, because there is no ready file under / var / in the container, because I wrote that the ready probe is to succeed in ls /var/ready, and it will not succeed without this file
At this time, we enter the container and add a ready file under var, then the ready state of pod will become 1
kubectl exec it ng -- sh or
kubectl exec -it ng /bin/bash
You can see that it's really good. This is a ready probe, but generally, it's better to use http for this probe. It's impossible to enter the container to add files every time, so modify the ng yaml file
apiVersion: v1
kind: Pod
metadata:
  creationTimestamp: null
  labels:
    run: ng
  name: ng
spec:
  containers:
    - image: nginx:1.9
      name: ng
      ports:
        - containerPort: 80
      resources: { }
      readinessProbe:
        httpGet:
          path: /
          port: 80
        initialDelaySeconds: 3
        periodSeconds: 3
  dnsPolicy: ClusterFirst
  restartPolicy: Always
status: { }
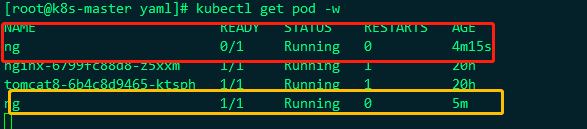
This means that the ready probe is executed for 3s after the container is started. It is executed every 3s. The http request is executed. The requested path is /, and the requested port is 80, which means whether the nginx of the current path is normal. If the request is normal, the pod returned to k8s represents normal, and the ready is modified to 1, indicating normal, Let's take a look at the status changes of the monitored Pod:
It can be seen that it is executed according to our expectation. pod changes from ready=0 to 1, which is executed according to the configured scheduling time.
POD image upgrade
Three ways:
K edit pod name
K set image pod pod-name container-name=new image
K apply -f yaml file
Checking upgrading status
K describe pod pod-name # check image name
K get events
K get pod # check restart times.
Not after POD dies. Can only be deleted and recreated.
Possible reasons why pod cannot start
a) The name of the existing pod is in the same namespace. The container name can be the same, but the content in a pod
Device names cannot be the same.
b) Is the image name correct and exists locally
c) Whether process 1 is running.
d) Whether the corresponding PVC, configmap and secret have been established.
e) Are there sufficient resources
f) Dispatch to the corresponding node
g) Probe configuration error.
h) Errors in the image itself.
POD scheduling process
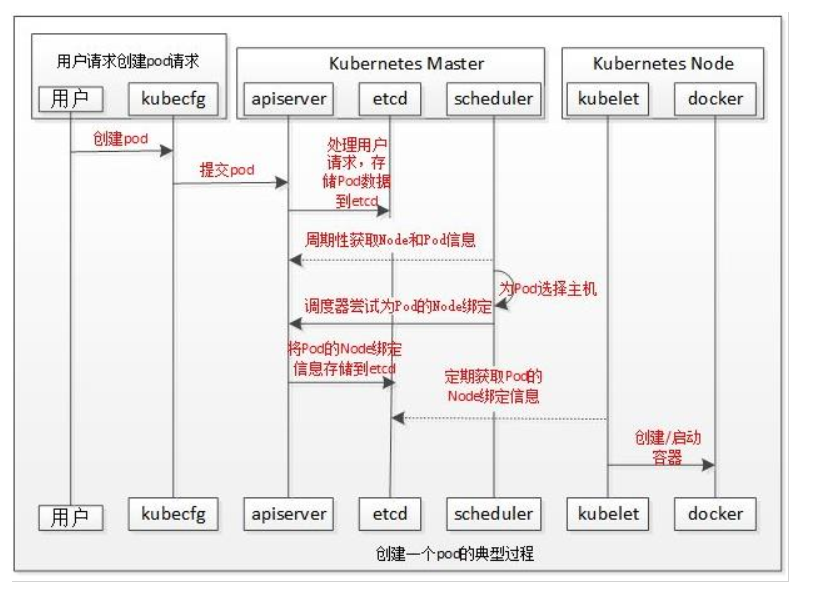
- The user submits a pod and APIServer records it in etcd;
- The scheduler periodically queries APIServer to obtain unbound pods and tries to allocate nodes to the pods;
- scheduler scheduling: first filter hosts that do not meet the requirements of pod resources. Then consider the overall optimization strategy
Score the host, such as using the lowest load, using distributed hosts, etc. Finally, select the host storage server with the highest score
Setting information into etcd; - kubelet periodically queries the binding object, obtains the pod that needs to be started locally, and starts it through docker.
Scheduling example
nodeSelector
nodeSelector is the simplest recommended form of node selection constraint. nodeSelector is a field of PodSpec. It contains the mapping of key value pairs. In order for pod to run on a node, the label of the node must contain each key value pair here (it can also have other labels). The most common usage is a pair of key value pairs.
apiVersion: v1
kind: Pod
metadata:
  name: nginx8
  labels:
    env: test
spec:
  containers:
    - name: nginx
      image: nginx:1.7.9
      imagePullPolicy: IfNotPresent
  nodeSelector:
    disktype: ssy
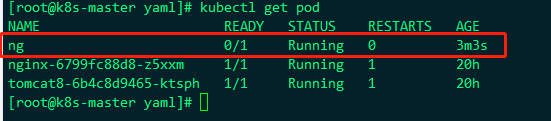
After applying this pod at this time, the following status is:
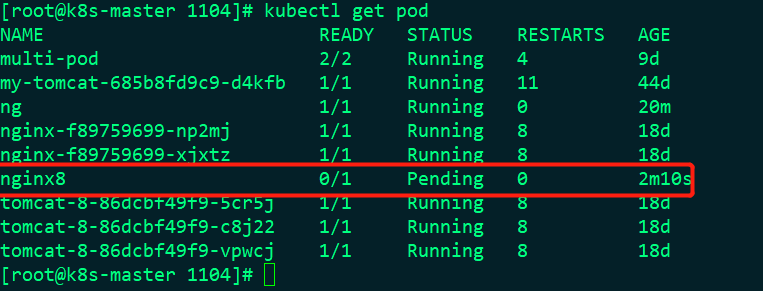
Is abnormal, so let's look at the details:
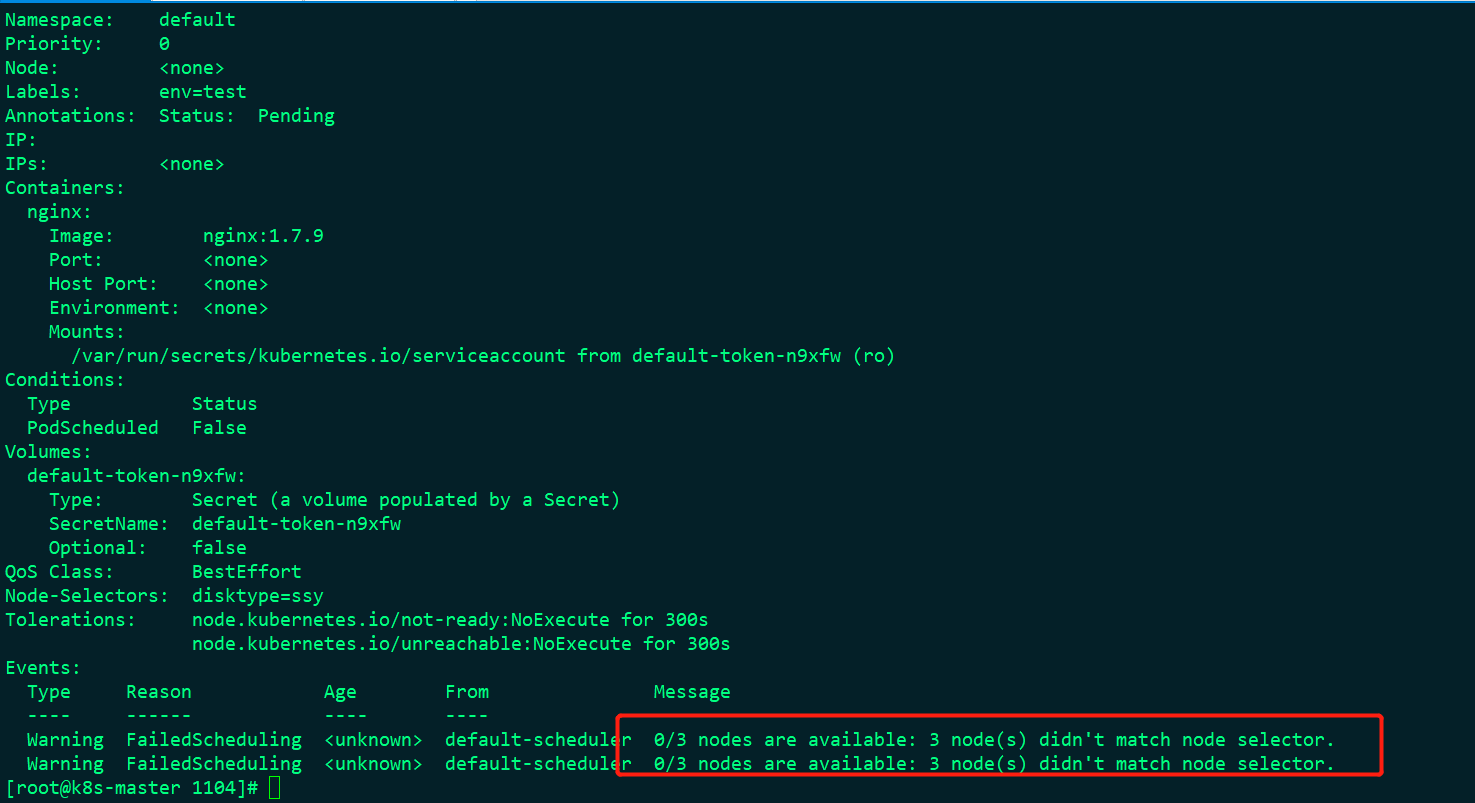
This means that there are no available nodes matching seelctor among the three nodes, because we set disktype=ssy in nodeSelector in pod, but these three nodes are not set at present. Now let's set:
kubectl label node k8s-node2 disktype=ssy
This means setting a label of node2 node to disktype=ssy
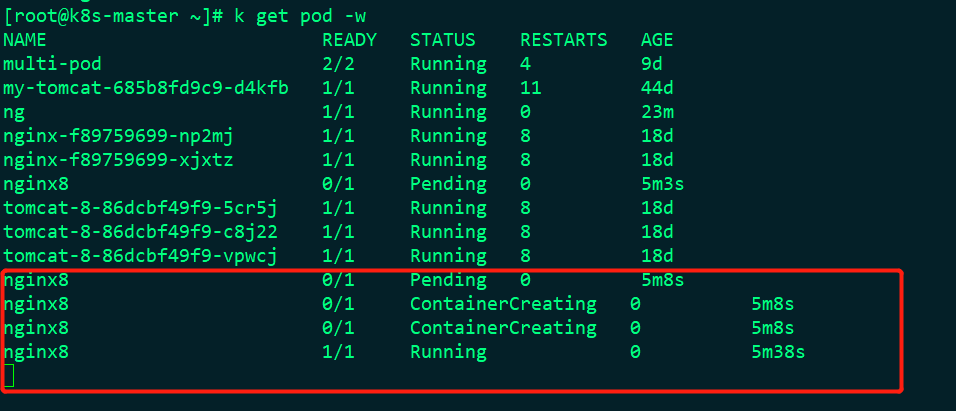
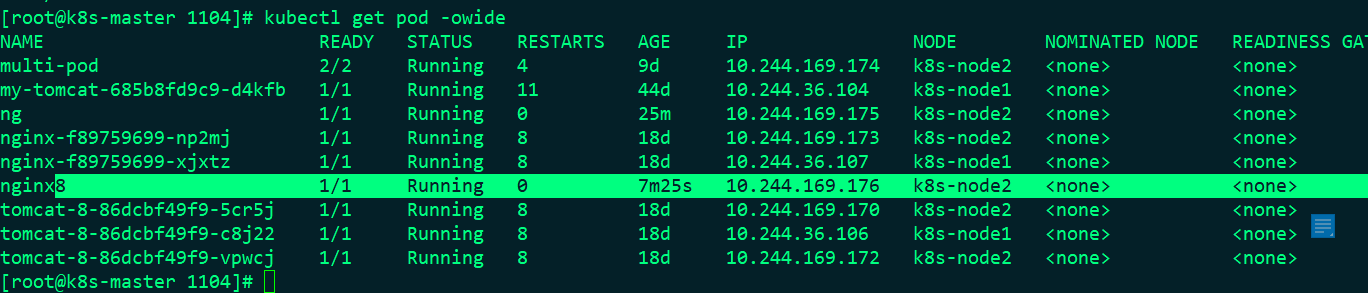
At this time, the nginx8 can be changed from pending to running and ready to 1, but the nginx8 must be on the k8s-node2 node. Let's see:
So this is to make node deployment, not k8s to automatically calculate the node for me.
nodeName
NodeName is the simplest method of node selection constraint, but it is usually not used due to its own limitations. NodeName is a field of PodSpec. If it is not empty, the scheduler ignores the Pod and the kubelet process running at a given point attempts to execute the Pod. Therefore, if nodeName is specified in PodSpec, it takes precedence over the node selection method above.
Some restrictions of using nodeName to select nodes: if the specified node does not exist, if the specified node does not have resources to accommodate Pod, Pod scheduling will fail, and the reason will be displayed as, for example, OutOfmemory or outofcopu. Node names in cloud environments are not always predictable or stable.
NodeName has the highest priority. Even if you stain the specified nodeName, the stain will become invalid and will be deployed and started on it;
apiVersion: v1
kind: Pod
metadata:
  creationTimestamp: null
  labels:
    run: ng
  name: ng
spec:
  containers:
  - image: nginx:1.9
    name: ng
    ports:
    - containerPort: 80
    resources: {}
  dnsPolicy: ClusterFirst
  restartPolicy: Always
  nodeName: k8s-node1
status: {}
I specified ng here to deploy the pod to k8s-node1

taint and Tolerance
Node affinity is an attribute of Pod, which makes Pod attracted to a specific class of nodes (this may be a preference or a hard requirement). Taint is the opposite -- it enables nodes to reject a specific class of pods. Tolerance is applied to Pod, which allows (but does not require) Pod scheduling to nodes with matching stains. The combination of stain and tolerance can be used to prevent Pod from being assigned to inappropriate nodes. One or more stains can be applied to each node, which means that pods that cannot tolerate these stains will not be accepted by the node.
In short, if a node is stained, it will not be installed on the node if you do not specify nodeName. If a node is stained but you specify nodeName, it will also be installed on it. When our k8s master is installed using kubadm, it will be stained automatically, That is, if nodeName is not specified, the default dispatching room will not be dispatched to the k8s master. Let's see the automatic stains on the k8s master:

In this way, let's put the nodeName specified by the node just now on the k8s master
apiVersion: v1
kind: Pod
metadata:
  creationTimestamp: null
  labels:
    run: ng
  name: ng
spec:
  containers:
  - image: nginx:1.9
    name: ng
    ports:
    - containerPort: 80
    resources: {}
  dnsPolicy: ClusterFirst
  restartPolicy: Always
  nodeName: k8s-master
status: {}
Under execution:

Therefore, after you specify nodeName, even if there are stains on the node, it will be deployed on it, that is, nodeName has a very high priority. Let's see the node information:
It was successfully deployed to the master
Stain the node:
kubectl taint node k8s-node1 key1=value1:NoSchedule

Now k8s-node1 has a stain. Let's deploy the ng just now to see if it's OK
apiVersion: v1
kind: Pod
metadata:
  creationTimestamp: null
  labels:
    run: ng
  name: ng
spec:
  containers:
  - image: nginx:1.9
    name: ng
    ports:
    - containerPort: 80
    resources: {}
  dnsPolicy: ClusterFirst
  restartPolicy: Always
  nodeSelector:
   disktype: ssy
status: {}
We deploy ng to the node where the label has disktype=ssy. At this time, we create a label with disktype=ssy on k8s-node1
 Create label as:
kubectl label node k8s-node1 disktype=ssy
Delete label as
kubectl label node k8s-node1 disktype-
Node1 is added with a label of disktype=ssy, and nodeSelector selects the node of disktype=ssy, so ng will be deployed to node1, but node1 is stained. Let's see if it can succeed?

The status is Pending. Let's see the following information:

Is unsuccessful, the information is as follows:
default-scheduler 0/3 nodes are available: 1 node(s) didn't match Pod's node affinity/selector, 1 node(s) had taint {key1: value1}, that the pod didn't tolerate, 1 node(s) had taint {node-role.kubernetes.io/master: }, that the pod didn't tolerate.
All three node nodes are unavailable
One node does not match the pod, because ng this pod specifies a selector;
One node has a stain key1: value1, and then the ng of pod does not specify the tolerance tolerance tolerance configuration, which is not satisfied;
One node is configured with a stain role kubernetes. io/master:(k8s-master)
That's what it means. It can be seen from the above that if you can stain, you need to mark a tolerance tolerance tolerance on the stain, so let's modify the ng yaml file
apiVersion: v1
kind: Pod
metadata:
  creationTimestamp: null
  labels:
    run: ng
  name: ng
spec:
  containers:
  - image: nginx:1.9
    name: ng
    ports:
    - containerPort: 80
    resources: {}
  dnsPolicy: ClusterFirst
  restartPolicy: Always
  tolerations:
   - key: "key1"
     operator: "Equal"
     value: "value1"
     effect: "NoSchedule"
  nodeSelector:
   disktype: ssy
status: {}
The tolerance of tolerance is added, that is, when tolerance is configured on the node, it is OK. The tolerant configuration:
tolerations:
   - key: "key1"
     operator: "Equal"
     value: "value1"
     effect: "NoSchedule"
Stains are tolerated, that is, the information of tolerating stains is configured, that is, it is OK. The corresponding stains are:

- Key: the configured key is a tainted key
opeator: configured is a tainted operation. Equal is "=" and Exists stands for existence. For example, k8smaster is configured Exists
Value: the value after "="
errect: the effect is the value NoSchedule after ":"
After configuration, see if it's OK:

Obviously, we can. Let's take a look at the information of ng this pod:
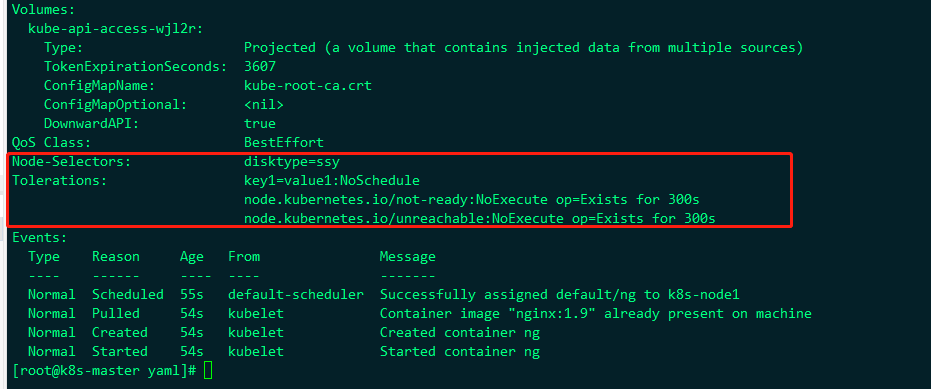
Indicates that nodeSelector is a node with the label disktype=ssy and
The tolerance stain configured is key1=value1:NoSchedule
Remove stains as:
kubectl taint nodes k8s-node1 key1=value1:NoSchedule-
Label common commands
View labels:
View all
kubectl get resources(pod/node/rs/rc/deploy/svc  --shwo-labels)
View specific resources:
kubectl get resources(pod/node/rs/rc/deploy/svc Resource name  --shwo-labels)
as
kubectl get pod --show-labels(pod (all labels)
kubectl get pod ng --show-labels(pod by ng (label of)
Set label
kubectl label Resources( pod/node/rs/deploy/svc Resource name label key=Tag value
 as
kubectl label pod ng  testlabel=1111
Delete label:
kubectl label Resources( pod/node/rs/deploy/svc Resource name label key-
as
kubectl label pod ng  testlabel-
Filter resources according to label:
kubectl get resources(pod/node/rs/rc/deploy/svc -l key=value
 Such as screening rs
kubectl get rs -l tier=nginx-rs