explain
- Kubernetes kubectl command table [Chinese website]
Kubernetes kubectl command table
- The most common and direct way to use and maintain Kubernetes clusters is to use the built-in command-line tool Kubectl.
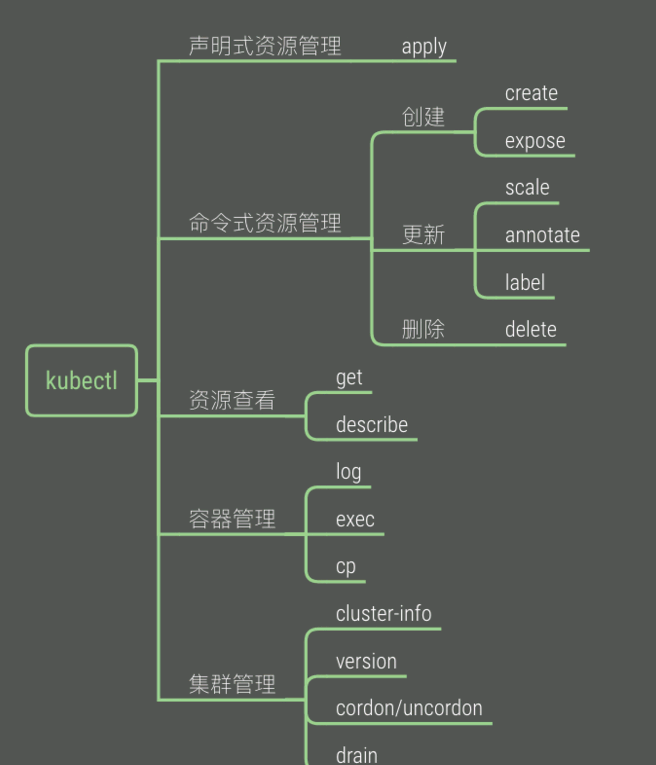
- The following picture is an overview, which can be used to recall memory after familiarity.
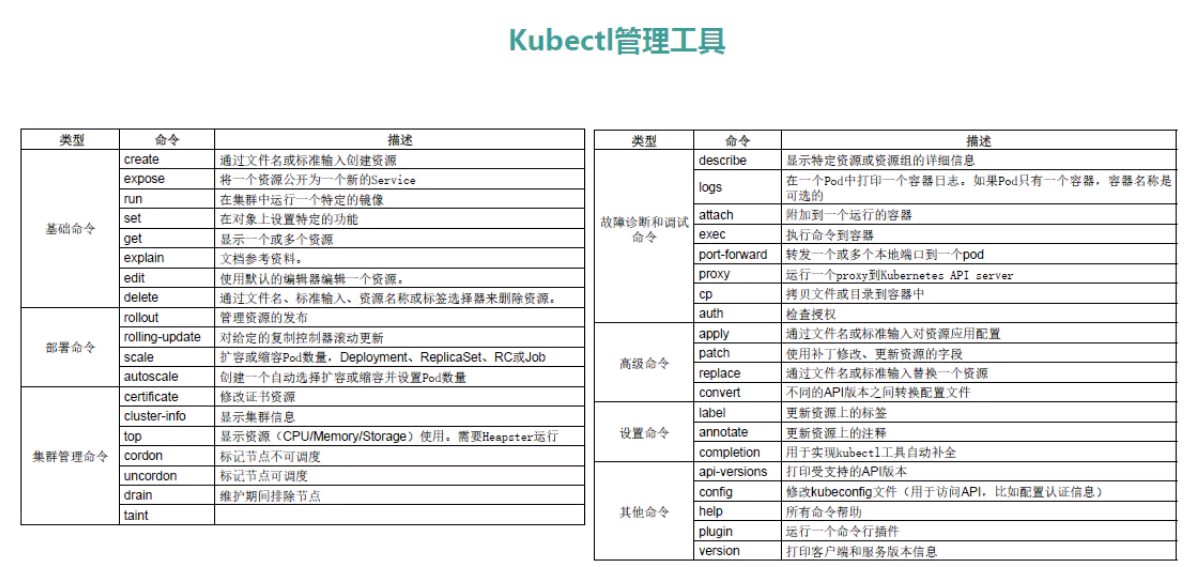
Note: Although the following commands are relatively complete, knowing these commands does not mean knowing the use of kucectl. It is still necessary to systematically learn k8s and be familiar with the whole process. The following commands are more suitable for use as a manual. You know what you want to do and can't remember the commands. ok is no problem. Just search for the keyword ctrl+f here or review it, Deepen the role of commands.
Details of basic commands: create, delete, get, run, expose, set, explain, edit
Create command: create resources based on files or input
Create Deployment and Service resources
[root@master ~]# kubectl create -f demo-deployment.yaml
[root@master ~]# kubectl create -f demo-service.yaml
Delete command: delete resources
Delete the corresponding resources according to the yaml file, but the yaml file will not be deleted, which is more efficient
[root@master ~]# kubectl delete -f demo-deployment.yaml
[root@master ~]# kubectl delete -f demo-service.yaml
You can also delete resources by specific resource names. Use this to delete resources and delete deployment and service resources at the same time
[root@master ~]# kubectl delete specific resource name
Get command: get resource information
View all resource information
[root@master ~]# kubectl get all
[root@master ~]# kubectl get pod --all-namespaces
View the list of specified namespace pod s
- View all namespaces
[root@master ~]# kubectl get ns
NAME              STATUS   AGE
default           Active   4d6h
kube-node-lease   Active   4d6h
kube-public       Active   4d6h
kube-system       Active   4d6h
[root@master ~]#
- Follow the namespace in - n [if you don't know why you want to specify it, then look down]
[root@master ~]# kubectl get pod -n kube-system
NAME                                       READY   STATUS    RESTARTS   AGE
...
kube-scheduler-master                      1/1     Running   12         4d6h
metrics-server-bcfb98c76-w87q9             1/1     Running   0          35m
[root@master ~]#
View pod list
- The default name of this command is Kube public
[root@master ~]# kubectl get pod
- However, if the pod is not running on Kube public, you need to specify a name to view it. Otherwise, an error is reported.
No resources found in Kube public namespace
- Let's talk about the command to check which namespace the pod runs in: kubectl get pod -- all namespaces - O wide
In the result, NAMESPACE is.
[root@master ~]# kubectl get pod  --all-namespaces -o wide
NAMESPACE     NAME                                       READY   STATUS    RESTARTS   AGE    IP               NODE     NOMINATED NODE   READINESS GATES
kube-system   calico-kube-controllers-78d6f96c7b-p4svs   1/1     Running   0          4d5h   10.244.219.67    master   <none>           <none>
...
- As mentioned above, if the running space of pod is not Kube public, an error will be reported if you directly execute kubectl get pod. At this time, you need to add - n and keep up with the naming name [this name is the NAMESPACE seen above]
[root@master ~]# kubectl get ns # This command is to view all namespaces
NAME              STATUS   AGE
default           Active   4d6h
kube-node-lease   Active   4d6h
kube-public       Active   4d6h
kube-system       Active   4d6h
[root@master ~]#
[root@master ~]# kubectl get pod
No resources found in default namespace.
[root@master ~]#
[root@master ~]# kubectl get pod -n kube-system
NAME                                       READY   STATUS    RESTARTS   AGE
calico-kube-controllers-78d6f96c7b-p4svs   1/1     Running   0          4d5h
calico-node-cc4fc                          1/1     Running   18         4d4h
calico-node-stdfj                          1/1     Running   20         4d5h
calico-node-zhhz7                          1/1     Running   1          4d5h
coredns-545d6fc579-6kb9x                   1/1     Running   0          4d6h
coredns-545d6fc579-v74hg                   1/1     Running   0          4d6h
etcd-master                                1/1     Running   1          4d6h
kube-apiserver-master                      1/1     Running   1          4d6h
kube-controller-manager-master             1/1     Running   11         4d6h
kube-proxy-45qgd                           1/1     Running   1          4d4h
kube-proxy-fdhpw                           1/1     Running   1          4d6h
kube-proxy-zf6nt                           1/1     Running   1          4d6h
kube-scheduler-master                      1/1     Running   12         4d6h
metrics-server-bcfb98c76-w87q9             1/1     Running   0          25m
[root@master ~]#
Displays the label information of the pod node
[root@master ~]# kubectl get pod --show-labels
Match to the specific pod according to the specified tag
[root@master ~]# kubectl get pods -l app=example
View node list
[root@master ~]# kubectl get node
[root@master ~]# kubectl get nodes
Displays label information for node nodes
[root@master ~]# kubectl get node --show-labels
View the details of the pod, that is, you can view which node the pod is running on (ip address information)
[root@master ~]# kubectl get pod -o wide
View the details of the service, showing the service name, type, cluster ip, port, time and other information
[root@master ~]# kubectl get svc
[root@master ~]# kubectl get svc -n kube-system
View all namespaces
[root@master ~]# kubectl get ns
[root@master ~]# kubectl get namespaces
View the namespace to which all pod s belong
[root@master ~]# kubectl get pod --all-namespaces
View the namespace to which all pod s belong and see which nodes are running on
[root@master ~]# kubectl get pod --all-namespaces -o wide
View all current replica set s, and display the number of replicas of all pod s, their available quantity, status and other information
[root@master ~]# kubectl get rs
View all the deployed applications to see the container and the image, label and other information used by the container
[root@master ~]# kubectl get deploy -o wide
[root@master ~]# kubectl get deployments -o wide
Run command: create and run one or more container images in the cluster.
Syntax:
run NAME --image=image [--env="key=value"] [--port=port] [--replicas=replicas] [--dry-run=bool] [--overrides=inline-json] [--command] -- [COMMAND] [args...]
# For example, run a container instance with the name of nginx, the number of copies is 3, the label is app=example, the image is nginx:1.10 and the port is 80

[root@master ~]# kubectl run nginx --replicas=3 --labels="app=example" --image=nginx:1.10 --port=80

# For example, run a container instance with the name of nginx, the number of copies is 3, the label is app=example, the image is nginx:1.10 and the port is 80, and bind it to k8s-node1
[root@master ~]# kubectl run nginx --image=nginx:1.10 --replicas=3 --labels="app=example" --port=80 --overrides='{"apiVersion":"apps/v1","spec":{"template":{"spec":{"nodeSelector":{"kubernetes.io/hostname":"k8s-node1"}}}}}'
For more detailed usage, see: http://docs.kubernetes.org.cn/468.html
Expose command: create a service and expose the port for external access
# Create an nginx service and expose the port so that the outside world can access it

[root@master ~]# kubectl expose deployment nginx --port=88 --type=NodePort --target-port=80 --name=nginx-service
For more detailed usage of expose, see: http://docs.kubernetes.org.cn/475.html
set command: configure some specific resources of the application, or modify the existing resources of the application
- grammar
[root@master ~]# set SUBCOMMAND
-
Use kubectl set --help to view
-
Its subcommands
- env
- image
- resources
- selector
- serviceaccount
- subject.
-
For details of the set command, see: http://docs.kubernetes.org.cn/669.html
kubectl set resources command
- Syntax:
resources (-f FILENAME | TYPE NAME) ([--limits=LIMITS & --requests=REQUESTS]
-
This command is used to set some range limits for resources.
-
The Pod in the resource object can specify the calculation resource requirements (CPU unit m, memory unit Mi), that is, the minimum resource Requests used and the maximum resource requirements limited. The Pod will ensure that it is used within the set resource quantity range.
-
For each Pod resource, if the Limits value is specified and Requests is omitted, Requests defaults to the Limits value.
-
Available resource objects include (support case): replicationcontroller, deployment, daemon, job, replicaset.
-
For example:
# Limit the cpu of nginx container of deployment to "200m" and set the memory to "512Mi"
[root@master ~]# kubectl set resources deployment nginx -c=nginx --limits=cpu=200m,memory=512Mi

# Set Requests and Limits in all nginx containers
[root@master ~]# kubectl set resources deployment nginx --limits=cpu=200m,memory=512Mi --requests=cpu=100m,memory=256Mi

# Delete the calculated resource value of the container in nginx
[root@master ~]# kubectl set resources deployment nginx --limits=cpu=0,memory=0 --requests=cpu=0,memory=0
kubectl set selector command
-
Set the selector for the resource. If a selector already exists before calling the "set selector" command, the newly created selector overwrites the original selector.
-
The selector must start with a letter or number and contain up to 63 characters. You can use letters, numbers, hyphens "-", dots "." and underscores "". If – resource version is specified, the update will use this resource version, otherwise the existing resource version will be used.
-
Note: Currently, the selector command can only be used for Service objects.
-
Syntax:
selector (-f FILENAME | TYPE NAME) EXPRESSIONS [--resource-version=version]
kubectl set image command
-
Container image used to update existing resources.
-
Available resource objects include pod (po), replication controller (RC), deployment (deploy), daemon set (DS), job, and replicaset (rs).
-
Syntax:
image (-f FILENAME | TYPE NAME) CONTAINER_NAME_1=CONTAINER_IMAGE_1 ... CONTAINER_NAME_N=CONTAINER_IMAGE_N
# Set the nginx container image in deployment to "nginx: 1.9.1"
[root@master ~]# kubectl set image deployment/nginx busybox=busybox nginx=nginx:1.9.1

# The nginx container image of all deployment s and rc is updated to "nginx: 1.9.1"
[root@master ~]# kubectl set image deployments,rc nginx=nginx:1.9.1 --all

# Update all container images of daemon ABC to "nginx: 1.9.1"
[root@master ~]# kubectl set image daemonset abc *=nginx:1.9.1

# Update nginx container image from local file
[root@master ~]# kubectl set image -f path/to/file.yaml nginx=nginx:1.9.1 --local -o yaml
explain command: used to display resource document information
[root@master ~]# kubectl explain rs
Edit command: used to edit resource information
Edit some information of Deployment nginx
[root@master ~]# kubectl edit deployment nginx
Edit some information of nginx of service type
[root@master ~]# kubectl edit service/nginx
Set command description label, annotate, completion
label command: used to update (add, modify, or delete) labels on resources
- label must start with a letter or number. Letters, numbers, hyphens, dots and underscores can be used. The maximum length is 63 characters.
If -- overwrite is true, you can overwrite the existing label, otherwise an error will be reported if you try to overwrite the label.
If -- resource version is specified, the update will use this resource version, otherwise the existing resource version will be used. - Syntax:
label [--overwrite] (-f FILENAME | TYPE NAME) KEY_1=VAL_1 ... KEY_N=VAL_N [--resource-version=version]
Add label unhealthy=true to the Pod named foo
[root@master ~]# kubectl label pods foo unhealthy=true
Modify the label of Pod named foo to 'status' / value' unhealthy ', and overwrite the existing value
[root@master ~]# kubectl label --overwrite pods foo status=unhealthy
Add label s to all pod s in the namespace
[root@master ~]# kubectl label pods --all status=unhealthy
The label on the Pod named foo is updated only when resource version = 1
[root@master ~]# kubectl label pods foo status=unhealthy --resource-version=1
Delete the label named "bar". (connected with "-" minus sign)
[root@master ~]# kubectl label pods foo bar-
annotate command: updates the Annotations information for one or more resources. That is, annotation information. You can easily view what operations have been done.
- Annotations consist of key/value.
- The purpose of Annotations is to store auxiliary data, especially the data operated through tools and system expansion. More information is introduced here.
If – overwrite is true, existing annotations can be overwritten. Otherwise, an error will be reported when attempting to overwrite annotations.
If – resource version is set, the update will use this resource version, otherwise the original resource version will be used. - Syntax:
annotate [--overwrite] (-f FILENAME | TYPE NAME) KEY_1=VAL_1 ... KEY_N=VAL_N [--resource-version=version]
Update the Pod "foo" and set the value "my frontend" of the annotation "description". If the same annotation is set multiple times, only the last set value will be used
[root@master ~]# kubectl annotate pods foo description='my frontend'
Update the annotation of pod according to the type and name in "pod.json"
[root@master ~]# kubectl annotate -f pod.json description='my frontend'
Update the Pod"foo", set the value "my frontend running nginx" of the annotation "description", and overwrite the existing value
[root@master ~]# kubectl annotate --overwrite pods foo description='my frontend running nginx'
Update all pod s in the namespace
[root@master ~]# kubectl annotate pods --all description='my frontend running nginx'
Update pod 'foo' only when resource version is 1
[root@master ~]# kubectl annotate pods foo description='my frontend running nginx' --resource-version=1
Update pod 'foo' by deleting annotations named "description". - overwrite flag is not required.
[root@master ~]# kubectl annotate pods foo description-
Completion command: used to set automatic completion of kubectl command
BASH
# To set the automatic completion of the current shell in Bash, install bash completion package first
[root@master ~]# source <(kubectl completion bash)

# Permanently add auto completion in your bash shell
[root@master ~]# echo "source <(kubectl completion bash)" >> ~/.bashrc
ZSH
# Set auto completion of the current shell in zsh
[root@master ~]# source <(kubectl completion zsh)

# Permanently add auto completion in your zsh shell
[root@master ~]# echo "if [ [root@master ~]#commands[kubectl] ]; then source <(kubectl completion zsh); fi" >> ~/.zshrc
kubectl deployment commands: rollback, rolling update, scale, autoscale
rollout command: used to manage resources
-
Available resources include deployments and daemonsets.
-
Subcommand:
- history (view historical version)
- Pause (pause resource)
- Resume (resume paused resource)
- Status (view resource status)
- undo (rollback version)
-
grammar
[root@master ~]# kubectl rollout SUBCOMMAND
Rollback to previous deployment
[root@master ~]# kubectl rollout undo deployment/abc
View the status of the daemon
[root@master ~]# kubectl rollout status daemonset/foo
Rolling update command: executes the rolling update of the specified ReplicationController.
-
This command creates a new RC, then updates one pod at a time, gradually uses the new PodTemplate, and finally realizes the rolling update of pod, new controller JSON needs to be in the same namespace as the previous RC.
-
Syntax:
rolling-update OLD_CONTROLLER_NAME ([NEW_CONTROLLER_NAME] --image=NEW_CONTAINER_IMAGE | -f NEW_CONTROLLER_SPEC)
Use frontend-v2 The new RC data in JSON updates the pod of frontend-v1
[root@master ~]# kubectl rolling-update frontend-v1 -f frontend-v2.json
Update the pod of frontend-v1 with JSON data
[root@master ~]# cat frontend-v2.json | kubectl rolling-update frontend-v1 -f -
Some other rolling updates
[root@master ~]# kubectl rolling-update frontend-v1 frontend-v2 --image=image:v2

[root@master ~]# kubectl rolling-update frontend --image=image:v2

[root@master ~]# kubectl rolling-update frontend-v1 frontend-v2 --rollback
scale command: expand or shrink the number of pods in a Deployment, ReplicaSet, Replication Controller, or Job
-
scale can also specify multiple preconditions, such as the current number of replicas or -- resource version. Before setting the scaling ratio, the system will verify whether the preconditions are valid. This is the elastic scaling strategy.
-
Syntax:
kubectl scale [--resource-version=version] [--current-replicas=count] --replicas=COUNT (-f FILENAME | TYPE NAME)
Set the number of pod copies named foo to 3.
[root@master ~]# kubectl scale --replicas=3 rs/foo
kubectl scale deploy/nginx --replicas=30
Set the Pod resource copy identified by the resource object and name specified in the "foo.yaml" configuration file to 3
[root@master ~]# kubectl scale --replicas=3 -f foo.yaml
If the current number of replicas is 2, expand it to 3.
[root@master ~]# kubectl scale --current-replicas=2 --replicas=3 deployment/mysql
Set the number of Pod copies in multiple RC
[root@master ~]# kubectl scale --replicas=5 rc/foo rc/bar rc/baz
autoscale command: This is more powerful than scale. It is also an elastic scaling strategy. It automatically expands or shrinks according to the amount of traffic.
-
Specify Deployment, ReplicaSet, or ReplicationController, and create an autoscaler with resources already defined. Using the autoscaler, you can automatically increase or decrease the number of pod s deployed in the system as needed.
-
Syntax:
kubectl autoscale (-f FILENAME | TYPE NAME | TYPE/NAME) [--min=MINPODS] --max=MAXPODS [--cpu-percent=CPU] [flags]
Use the Deployment "foo" setting and the default auto scaling policy to specify the target CPU utilization so that the number of pods is between 2 and 10
[root@master ~]# kubectl autoscale deployment foo --min=2 --max=10
Use the RC "foo" setting to make the number of pods between 1 and 5, and maintain the CPU utilization at 80%
[root@master ~]# kubectl autoscale rc foo --max=5 --cpu-percent=80
Cluster management commands: certificate, cluster info, top, cordon, uncordon, drain, taint
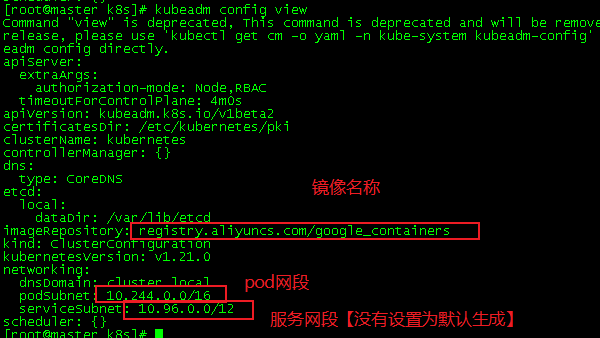
View cluster initialization information [pod uses image, network segment, etc.]
[root@master ~]# kubeadm config view
Certificate command: used for certificate resource management, authorization, etc
- For example, if a node wants to request from the master, the master node must be authorized
[root@master ~]# kubectl certificate approve node-csr-81F5uBehyEyLWco5qavBsxc1GzFcZk3aFM3XW5rT3mw node-csr-Ed0kbFhc_q7qx14H3QpqLIUs0uKo036O2SnFpIheM18
Cluster info command: displays cluster information
[root@master ~]# kubectl cluster-info
top command: used to view the utilization of resources such as cpu, memory and disk
- heapster was required before, and then replaced with metrics server [if this service is not installed, an error will be reported]

- After installing metrics, the error report will show the usage rate
One article in my blog category is: k8s install metric server and understand ns. If you want to know, you can see and learn by yourself.

View the usage of pod
-
View all
[root@master ~]# kubectl top pod --all-namespaces -
View the specified pod
[ root@master ~]#Kubectl top Pod - N name [name view: kubectl get ns]
View node usage
[root@master ~]# kubectl top nodes
cordon command: used to mark that a node is not schedulable
- Mark my node as unscheduled to prevent pod from being scheduled. Note that the existing pod will continue to run and will not be expelled.
[root@master ~]# kubectl cordon my-node
uncordon command: used to label nodes that can be scheduled
- In contrast to cordon, mark my node to allow scheduling.
[root@master ~]# kubectl uncordon my-node
drain command: used to exclude nodes during maintenance.
-
drain literally means drainage. In fact, it is to smoothly switch the pod of my node to other nodes, and mark the pod as unscheduled, that is, it contains the cordon command.
[root@master ~]# kubectl drain my-node -
However, it is generally unsuccessful to use the command directly. It is recommended to add the following parameters when maintaining nodes:
kubectl drain my-node --ignore-daemonsets --force --delete-local-data- --Ignore daemonsets ignore the pod s deployed by daemonset
- --force directly deletes pod s that are not managed by workload objects (Deployment, Job, etc.)
- --Delete local data directly deletes the pod with the local directory attached (empty dir mode)
taint command: used to set a stain on a Node
1. Composition of Taint
-
The kubectl taint command can be used to set a stain on a Node. After the stain is set, there is a mutually exclusive relationship between the Node and the Pod. The Node can refuse the scheduling execution of the Pod, and even expel the existing Pod of the Node
-
The composition of each stain is as follows:
key=value:effect
Each stain has a key and value as the label of the stain, where value can be empty, and e "ect" describes the function of the stain. -
Currently, taint e "ect supports the following three options:
- NoSchedule: indicates that k8s the Pod will not be scheduled to the Node with this stain
- PreferNoSchedule: indicates that k8s it will try to avoid scheduling the Pod to the Node with this stain
- NoExecute: indicates that k8s the Pod will not be scheduled to the Node with the stain, and the existing Pod on the Node will be expelled
2. Setting, viewing and removal of stains
- Set stain
kubectl taint nodes k8s-node2 check=yuanzhang:NoExecute
In the node description, look for the Taints field
kubectl describe nodes k8s-node2 - Remove stains
kubectl taint nodes k8s-node2 check:NoExecute-
Cluster troubleshooting and debugging commands: describe, logs, exec, attach, port forward, proxy, cp, auth
describe command: displays the details of a specific pod resource
- You should know all the namespaces first. Your pod may not be in the default
[root@master ~]# kubectl get ns
NAME              STATUS   AGE
ccx               Active   15h
ccxhero           Active   15h
default           Active   5d
kube-node-lease   Active   5d
kube-public       Active   5d
kube-system       Active   5d
ns1               Active   16h
[root@master ~]#
- At this time, you need to get the pod name in the specified namespace, for example, I get the pod under ccx
[root@master ~]# kubectl get pods -n ccx
NAME                          READY   STATUS             RESTARTS   AGE
nginx-test-795d659f45-j9m9b   0/1     ImagePullBackOff   0          26m
nginx-test-795d659f45-txf8l   0/1     ImagePullBackOff   0          26m
[root@master ~]#
View the detailed status of a pod
- After obtaining the above pod name, add - n followed by the namespace. If you do not add - N, the default namespace will be used and an error will be reported.
- Syntax: kubectl describe pod -n pod's ns podNAME
as follows
[root@master ~]# kubectl describe pod -n ccx nginx-test-795d659f45-j9m9b
...
Logs command: used to print the logs of a container in a pod. If there is only one container in the pod, the container name can be omitted
- Syntax:
kubectl logs [-f] [-p] POD [-c CONTAINER]
Returns a log snapshot of pod nginx that contains only one container
[root@master ~]# kubectl logs nginx
Returns the log snapshot of the stopped container web-1 in pod ruby
[root@master ~]# kubectl logs -p -c ruby web-1
Continuously output the log of web-1 container in pod ruby
[root@master ~]# kubectl logs -f -c ruby web-1
Only the last 20 logs in pod nginx are output
[root@master ~]# kubectl logs --tail=20 nginx
Output all logs generated in the last hour in pod nginx
[root@master ~]# kubectl logs --since=1h nginx
Parameter options:
-c. -- container = "": container name.
-f. -- follow [= false]: Specifies whether to continuously output logs (real-time logs).
--interactive[=true]: if true, prompt the user for input when necessary. The default is true.
--Limit bytes = 0: the maximum number of bytes of the output log. The default is unlimited.
-p. -- previous [= false]: if true, output the log of the container that has been run in the pod but has been terminated.
--since=0: only logs within the relative time range, such as 5s, 2m or 3h, are returned. All logs are returned by default. Only one of since and since time can be used at the same time.
--Since time = "": only logs after the specified time (RFC3339 format) are returned. All logs are returned by default. Only one of since and since time can be used at the same time.
--tail=-1: the latest number of log entries to display. The default value is - 1. All logs are displayed.
--timestamps[=false]: include timestamps in the log.
exec command: enter the container for interaction and execute the command in the container
- Syntax:
kubectl exec POD [-c CONTAINER] -- COMMAND [args...]
- Command options:
- -c. -- container = "": container name. If not specified, use one of the containers in the pod.
- -p. -- pod = "": pod name.
- -i. -- stdin [= false]: send console input to container.
- -t. -- TTY [= false]: take the standard input console as the console input of the container.
- Enter the nginx container and execute some commands
[root@master ~]# kubectl exec -it nginx-deployment-58d6d6ccb8-lc5fp bash
attach command: connect to a running container.
- Syntax:
kubectl attach POD -c CONTAINER
Parameter options:
- `-c, --container=""`: Container name. If omitted, the first is selected by default pod.
- `-i, --stdin[=false]`: Send console input to the container.
- `-t, --tty[=false]`: Use the standard input console as the console input for the container.
Get the output of the running pod 123456-7890, which is connected to the first container by default
[root@master ~]# kubectl attach 123456-7890
Get the output of ruby container in pod 123456-7890
[root@master ~]# kubectl attach 123456-7890 -c ruby-container
Switch to the terminal mode, send the console input to the "bash" command of the ruby container of pod 123456-7890, and output the result to the console
Error console information is sent back to the client.
[root@master ~]# kubectl attach 123456-7890 -c ruby-container -i -t
cp command: copy files or directories to the pod container
-
It is used for pod and external file exchange, similar to docker's cp, which is to exchange the content in the container with the external content.
-
Syntax:
kubectl cp <file-spec-src> <file-spec-dest> [options]
Copy host local folder to pod
[root@master ~]# kubectl cp /tmp/foo_dir <some-pod>:/tmp/bar_dir
Copy the pod file of the specified namespace to the local directory of the host
[root@master ~]# kubectl cp <some-namespace>/<some-pod>:/tmp/foo /tmp/bar
For multi container pod, specify the container name with - c
[root@master ~]# kubectl cp /tmp/foo <some-pod>:/tmp/bar -c <specific-container>
Other commands: API services, config, help, plugin, version
api services command: print supported api version information
- Print the api version supported by the current cluster
[root@master ~]# kubectl api-versions
Help command: used to view command help
-
Displays all command help prompts
[root@master ~]# kubectl --help -
Specific subcommand help, such as
[root@master ~]# kubectl create --help
config command: used to modify kubeconfig configuration file (used to access api, such as configuring authentication information)
- Set which Kubernetes cluster kubectl communicates with and modify the configuration information. View the cross cluster authorization access document using kubeconfig for detailed configuration file information.
Displays the merged kubeconfig configuration information
The reason for adding a merge is that if multiple clusters are configured, there are a lot of configuration information. As follows, I configured the config file of two clusters, and the content is as follows [an article in my blog is: [Kubernetes] k8s multi cluster switching [including detailed explanation of context function], which describes how to configure multiple clusters. If you are interested, you can go and have a look.
[root@master ~]# kubectl config view
[root@master ~]# kubectl config view
apiVersion: v1
clusters:
- cluster:
    certificate-authority-data: DATA+OMITTED
    server: https://192.168.59.142:6443
  name: master
- cluster:
    certificate-authority-data: DATA+OMITTED
    server: https://192.168.59.151:6443
  name: master1
contexts:
- context:
    cluster: master
    namespace: default
    user: ccx
  name: context
- context:
    cluster: master1
    namespace: default
    user: ccx1
  name: context1
current-context: context
kind: Config
preferences: {}
users:
- name: ccx
  user:
    client-certificate-data: REDACTED
    client-key-data: REDACTED
- name: ccx1
  user:
    client-certificate-data: REDACTED
    client-key-data: REDACTED
[root@master ~]#
Use multiple kubeconfig files at the same time and view the merged configuration
[root@master ~]# KUBECONFIG=~/.kube/config:~/.kube/kubconfig2 kubectl config view
Get e2e user's password
[root@master ~]# kubectl config view -o jsonpath='{.users[?(@.name == "e2e")].user.password}'
View the current context
[root@master ~]# kubectl config current-context
View information such as multi Cluster Context
CURRENT is the CURRENT cluster
[root@master ~]# kubectl config get-contexts
CURRENT   NAME       CLUSTER   AUTHINFO   NAMESPACE
*         context    master    ccx        default
          context1   master1   ccx1       default
[root@master ~]#
Set the default context [multi cluster switching]
- Use: kubectl config get contexts to view the existing context [generally, switching is required for multiple clusters]
- grammar
kubectl config use-context Context name[ NAME]
- For example, when I am in the context, I switch to the context of context1 [I will switch to another cluster]
[root@master ~]# kubectl config get-contexts
CURRENT   NAME       CLUSTER   AUTHINFO   NAMESPACE
*         context    master    ccx        default
          context1   master1   ccx1       default
[root@master ~]#
[root@master ~]# kubectl config use-context context1
Switched to context "context1".
[root@master ~]#
[root@master ~]# kubectl config get-contexts
CURRENT   NAME       CLUSTER   AUTHINFO   NAMESPACE
          context    master    ccx        default
*         context1   master1   ccx1       default
[root@master ~]#
Add a new cluster configuration to kubeconf and use basic auth for authentication
[root@master ~]# kubectl config set-credentials kubeuser/foo.kubernetes.com --username=kubeuser --password=kubepassword
Set the context with a specific user name and namespace.
[root@master ~]# kubectl config set-context gce --user=cluster-admin --namespace=foo \
  && kubectl config use-context gce
Version command: print client and server version information
- Print client and server version information [detailed version]
[root@master ~]# kubectl version - Compact version [display version number only]
[root@master ~]# kubectl version --short
plugin command: run a command line plug-in
- The docker plugin command is used to manage plug-ins.
- usage
docker plugin COMMAND
- Shell
| number | command | describe |
|---|---|---|
| 1 | docker plugin create | Create a plug-in from rootfs and configuration. The plug-in data directory must contain config JSON and rootfs directories. |
| 2 | docker plugin disable | Disable plug-ins |
| 3 | docker plugin enable | Enable plug-ins |
| 4 | docker plugin inspect | Displays the details of one or more plug-ins |
| 5 | docker plugin install | Install a plug-in |
| 6 | docker plugin ls | List all plug-ins |
| 7 | docker plugin push | Push plug-in to registry |
| 8 | docker plugin rm | Delete one or more plug-ins |
| 9 | docker plugin set | Change plug-in settings |
| 10 | docker plugin upgrade | Upgrade existing plug-ins |
Advanced commands: apply, patch, replace, convert
Apply command: apply configuration to resources by file name or standard input
-
Configure resources by file name or console input. If the resource does not exist, a new one will be created. You can use JSON or YAML format.
-
Syntax:
kubectl apply -f FILENAME
Add pod The configuration in JSON is applied to the pod
[root@master ~]# kubectl apply -f ./pod.json
Apply the JSON configuration entered by the console to the Pod
[root@master ~]# cat pod.json | kubectl apply -f -
Parameter options:
- Syntax: kubectl patch (-f FILENAME | TYPE NAME) -p PATCH
- -f. -- filename = []: file name, directory name or URL containing configuration information.
- --include-extended-apis[=true]: If true, include definitions of new APIs via calls to the API server. [default true]
- -o. -- output = "": output mode. "- o name" is quick output (resource / name)
- --record[=false]: record the current kubectl command in the resource comment.
- -R, --recursive[=false]: Process the directory used in -f, --filename recursively. Useful when you want to manage related manifests organized within the same directory.
- --Schema cache dir = "~ /. Kube / schema": if it is not empty, the API schema will be cached as the specified file, and it will be cached to 'by default[ root@master ~]#HOME/.kube/schema’
- --validate[=true]: if true, use schema to validate the input before sending it to the server.
Patch command: use patch modification to update the fields of resources, that is, modify some contents of resources
Partially update a node using strategic merge patch
[root@master ~]# kubectl patch node k8s-node-1 -p '{"spec":{"unschedulable":true}}'
Update a container's image; spec.containers[*].name is required because it's a merge key
[root@master ~]# kubectl patch pod valid-pod -p '{"spec":{"containers":[{"name":"kubernetes-serve-hostname","image":"new image"}]}}'
Replace command: replace the original resource through file or standard input
- Syntax:
kubectl replace -f FILENAME
Replace a pod using the data in pod.json.
[root@master ~]# kubectl replace -f ./pod.json
Replace a pod based on the JSON passed into stdin.
[root@master ~]# cat pod.json | kubectl replace -f -
Update a single-container pod's image version (tag) to v4
[root@master ~]# kubectl get pod mypod -o yaml | sed 's/\(image: myimage\):.*[root@master ~]#/\1:v4/' | kubectl replace -f -
Force replace, delete and then re-create the resource
[root@master ~]# kubectl replace --force -f ./pod.json
Convert command: convert configuration files between different versions
- Syntax:
kubectl convert -f FILENAME
Convert 'pod.yaml' to latest version and print to stdout.
[root@master ~]# kubectl convert -f pod.yaml
Convert the live state of the resource specified by 'pod.yaml' to the latest version and print to stdout in json format.
[root@master ~]# kubectl convert -f pod.yaml --local -o json
Convert all files under current directory to latest version and create them all.
[root@master ~]# kubectl convert -f . | kubectl create -f -
Format output
- To output details to a terminal window in a specific format, you can add the - o or -- output parameter to the supported kubectl command.

Kubectl log output detail level and debugging
- The detail level of Kubectl log output is controlled by - v or -- v. the parameter followed by a number indicates the log level.
- Kubernetes' general logging habits and related logging levels are described here.
