Detailed explanation of Spring transaction principle
1, II. Principle analysis and summary
1, Use
spring transactions are easy to start and use. You need to have a data source and transaction manager, then start the transaction on the startup facade class, and add annotations where transactions need to be used. Let's review briefly.
1. Configure data source
spring.datasource.driverClassName=com.mysql.jdbc.Driver
spring.datasource.url=jdbc:mysql://host:3306/test?useUnicode=true&characterEncoding=utf8&autoReconnect=true&useSSL=true
spring.datasource.username=aaa
spring.datasource.password=bbb
2. Enable transaction capability
@SpringBootApplication(exclude = {DataSourceAutoConfiguration.class},scanBasePackages = "xxx")
@EnableTransactionManagement
public class Application {

    public static void main(String[] args) {
        SpringApplication.run(Application.class, args);
    }
}
3. Use transactions
@Transactional
public void evaluateSatisfaction(Req req) {
  //do business
}
So we can use transactions in our business.
Then we have to think about why we can easily use transactions through simple configuration and two annotations, and what capability support has been made at the spring framework level. Next, we will analyze the transaction principle of spring from the perspective of principle and source code.
2, Principle analysis
First of all, the reason why spring transaction management can take effect is that there must be a database, a data source and a transaction manager. Let's take a look at spring's processing and configuration of data sources and transaction managers.
1. Data source and transaction manager
Let's first look at a configuration class, DataSourceConfiguration:
abstract class DataSourceConfiguration {
  /**
   *  Tomcat/Hikari/DBCP DataSource configuration.
   */
  /**
   * Generic DataSource configuration.
   */
  @ConditionalOnMissingBean(DataSource.class)
  @ConditionalOnProperty(name = "spring.datasource.type")
  static class Generic {
    @Bean
    public DataSource dataSource(DataSourceProperties properties) {
      return properties.initializeDataSourceBuilder().build();
    }
  }
}
The Tomcat, Hikari, DBCP data source configuration and Druid with the highest utilization rate in China are omitted Data source through spring datasource. Type specifies the type and customizes the configuration, then constructs using DataSourceProperties and DataSourceBuilder.
Then let's look at another configuration class, DataSourceAutoConfiguration:
@Configuration
@ConditionalOnClass({ DataSource.class, EmbeddedDatabaseType.class })
@EnableConfigurationProperties(DataSourceProperties.class)
@Import({ DataSourcePoolMetadataProvidersConfiguration.class,
    DataSourceInitializationConfiguration.class })
public class DataSourceAutoConfiguration {

  //... ellipsis

  @Configuration
  @Conditional(PooledDataSourceCondition.class)
  @ConditionalOnMissingBean({ DataSource.class, XADataSource.class })
  @Import({ DataSourceConfiguration.Hikari.class, DataSourceConfiguration.Tomcat.class,
      DataSourceConfiguration.Dbcp2.class, DataSourceConfiguration.Generic.class,
      DataSourceJmxConfiguration.class })
  protected static class PooledDataSourceConfiguration {
  }
}
PooledDataSourceConfiguration imports the supported data source Configuration through the @ Import annotation. When the application starts, ConfigurationClassPostProcessor will scan @ Configuration and register BeanDefinition according to the configured data source type for subsequent instantiation. Here, we understand that the DataSource has been configured for the time being.
Look at another configuration class DataSourceTransactionManagerAutoConfiguration:
@Configuration
@ConditionalOnClass({ JdbcTemplate.class, PlatformTransactionManager.class })
@AutoConfigureOrder(Ordered.LOWEST_PRECEDENCE)
@EnableConfigurationProperties(DataSourceProperties.class)
public class DataSourceTransactionManagerAutoConfiguration {

  @Configuration
  @ConditionalOnSingleCandidate(DataSource.class)
  static class DataSourceTransactionManagerConfiguration {

    private final DataSource dataSource;

    private final TransactionManagerCustomizers transactionManagerCustomizers;

    DataSourceTransactionManagerConfiguration(DataSource dataSource,
        ObjectProvider<TransactionManagerCustomizers> transactionManagerCustomizers) {
      this.dataSource = dataSource;
      this.transactionManagerCustomizers = transactionManagerCustomizers
          .getIfAvailable();
    }
    @Bean
    @ConditionalOnMissingBean(PlatformTransactionManager.class)
    public DataSourceTransactionManager transactionManager(
        DataSourceProperties properties) {
      DataSourceTransactionManager transactionManager = new DataSourceTransactionManager(
          this.dataSource);
      if (this.transactionManagerCustomizers != null) {
        this.transactionManagerCustomizers.customize(transactionManager);
      }
      return transactionManager;
    }
  }
}
This class is a data source transaction management configuration class, which creates a transaction manager based on the previous data source DataSourceTransactionManager, as can be seen from the inheritance relationship, is a Platformtransactionmanager (this concept will be used later):
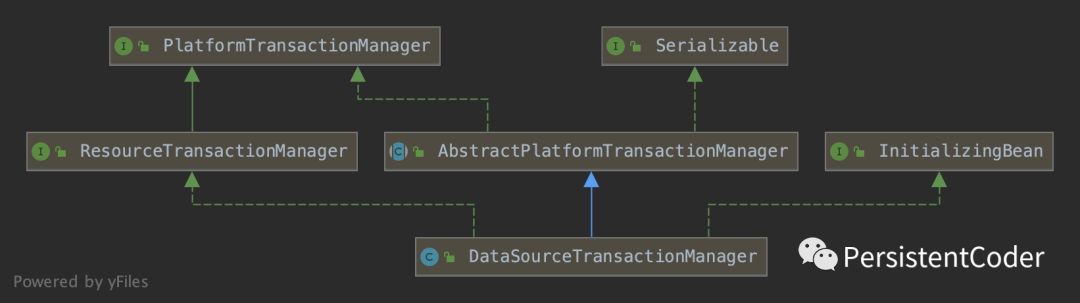
spring's transaction management is to use the transaction manager to open, commit and rollback operations through data sources and connections.
2. Enable transaction capability
Enable spring transaction capability through @ EnableTransactionManagement:
@Target(ElementType.TYPE)
@Retention(RetentionPolicy.RUNTIME)
@Documented
@Import(TransactionManagementConfigurationSelector.class)
public @interface EnableTransactionManagement {

  boolean proxyTargetClass() default false;

  AdviceMode mode() default AdviceMode.PROXY;

  int order() default Ordered.LOWEST_PRECEDENCE;

}
Annotations have three properties
- proxyTargetClass:true means to create an agent based on CGLIB, and false means to use jdk dynamic agent. The default value is false. Applicable only if mode() is set to AdviceMode.
- Mode: indicates the implementation method of transaction notification. Proxy indicates that transactions are intercepted and processed through the proxy at that time. Method calls at the same level will not be intercepted; aspectj indicates that aspectj weaving is used to intercept and process transactions, which is more powerful than proxy mode.
- order: there are multiple notifications in the call chain. The execution priority of transaction notifications is the lowest by default.
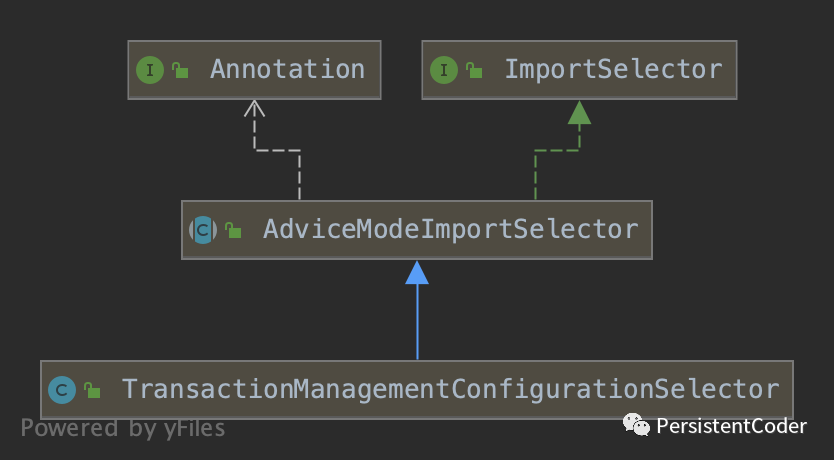
@The ability to enable transaction management is delegated to
TransactionManagementConfigurationSelector to implement:
public class TransactionManagementConfigurationSelector extends AdviceModeImportSelector<EnableTransactionManagement> {
  @Override
  protected String[] selectImports(AdviceMode adviceMode) {
    switch (adviceMode) {
      case PROXY:
        return new String[] {AutoProxyRegistrar.class.getName(),
            ProxyTransactionManagementConfiguration.class.getName()};
      case ASPECTJ:
        return new String[] {determineTransactionAspectClass()};
      default:
        return null;
    }
  }
  private String determineTransactionAspectClass() {
    return (ClassUtils.isPresent("javax.transaction.Transactional", getClass().getClassLoader()) ?
        TransactionManagementConfigUtils.JTA_TRANSACTION_ASPECT_CONFIGURATION_CLASS_NAME :
        TransactionManagementConfigUtils.TRANSACTION_ASPECT_CONFIGURATION_CLASS_NAME);
  }
}
It is an importselector. The configurationclasspostprocessor initializes it, registers the class column returned by selectImports with BeanDefinition, and then instantiates it (see Detailed explanation of the principle of ConfigurationClassPostProcessor The selectImports method of the parent class AdviceModeImportSelector parse the EnableTransactionManagement annotation property, and then call the subclass selectImports method to return the import class list. Our analysis is for mode=proxy expansion. We can see that TransactionManagementConfigurationSelector imported two classes, AutoProxyRegistrar and ProxyTransactionManagementConfiguration, and analyzed them one by one. Look at autoproxyregister first.
It is an ImportBeanDefinitionRegistrar. After instantiation, its registerBeanDefinitions method is called:
@Override
public void registerBeanDefinitions(AnnotationMetadata importingClassMetadata, BeanDefinitionRegistry registry) {
  boolean candidateFound = false;
  Set<String> annoTypes = importingClassMetadata.getAnnotationTypes();
  for (String annoType : annoTypes) {
    AnnotationAttributes candidate = AnnotationConfigUtils.attributesFor(importingClassMetadata, annoType);
    if (candidate == null) {
      continue;
    }
    Object mode = candidate.get("mode");
    Object proxyTargetClass = candidate.get("proxyTargetClass");
    if (mode != null && proxyTargetClass != null && AdviceMode.class == mode.getClass() &&
        Boolean.class == proxyTargetClass.getClass()) {
      candidateFound = true;
      if (mode == AdviceMode.PROXY) {
        AopConfigUtils.registerAutoProxyCreatorIfNecessary(registry);
        if ((Boolean) proxyTargetClass) {
          AopConfigUtils.forceAutoProxyCreatorToUseClassProxying(registry);
          return;
        }
      }
    }
  }
}
AopConfigUtils will be called to register a class infrastructureasuggestorautoproxycreator. It should be noted that if there are multiple calls, as long as proxyTargetClass is true any time, this attribute will be set to true. The impact is global. For example, transaction and asynchronous capabilities are enabled in the application at the same time, If @ EnableAsync sets proxyTargetClass to true, transactions and other aop capabilities will also be affected.
@Nullable
public static BeanDefinition registerAutoProxyCreatorIfNecessary(
    BeanDefinitionRegistry registry, @Nullable Object source) {

  return registerOrEscalateApcAsRequired(InfrastructureAdvisorAutoProxyCreator.class, registry, source);
}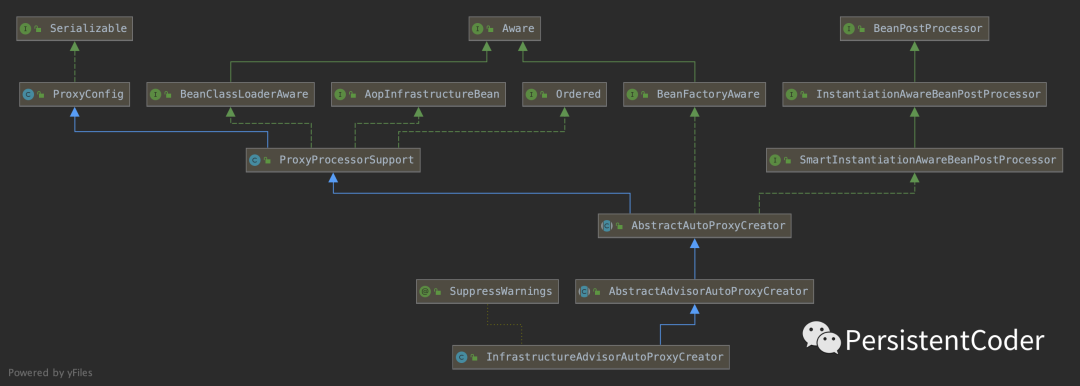
This class is very important. It is the core component to realize the agent and AOP capabilities. It has the ability to process agent logic. In essence, it is a BeanPostProcessor. Its implementation is relatively simple. The core logic is in its parent classes abstractadvisor autoproxycreator and AbstractAutoProxyCreator. The parent class implements the instantiawarebeanpostprocessor interface, The postProcessBeforeInstantiation method will be called before the bean initialization. If the return is not null, then the initialization of bean will not be performed. The purpose of the frame design is to extend the capability to do some agents and bean instantiation of the short-circuit. From the perspective of spring transaction scenario, it is to use the transaction class as a proxy implementation and add transaction capabilities. Let's take a look at the postprocessbeforeinstance implementation of AbstractAutoProxyCreator:
@Override
public Object postProcessBeforeInstantiation(Class<?> beanClass, String beanName) {
  Object cacheKey = getCacheKey(beanClass, beanName);

  //... ellipsis

  // Create proxy here if we have a custom TargetSource.
  // Suppresses unnecessary default instantiation of the target bean:
  // The TargetSource will handle target instances in a custom fashion.
  TargetSource targetSource = getCustomTargetSource(beanClass, beanName);
  if (targetSource != null) {
    if (StringUtils.hasLength(beanName)) {
      this.targetSourcedBeans.add(beanName);
    }
    Object[] specificInterceptors = getAdvicesAndAdvisorsForBean(beanClass, beanName, targetSource);
    Object proxy = createProxy(beanClass, beanName, specificInterceptors, targetSource);
    this.proxyTypes.put(cacheKey, proxy.getClass());
    return proxy;
  }

  return null;
}
First create the TargetSource, then get the notification applicable to the current bean, then create the proxy and return. Because TargetSource is a complex proxy of the spring framework, the proxy can only be extended by a single class proxy. We do not use this capability for the time being, so TargetSource here is null and the proxy creation operation will not be performed here. From AbstractAutoProxyCreator, we can see a method postProcessAfterInitialization that rewrites the BeanPostProcessor. This method is used to align, wrap, or even replace the target bean during initialization after the target bean is instantiated. For transactions, you can wrap the transaction capability in, or replace the original with a bean instance with transaction capability. See the implementation:
@Override
public Object postProcessAfterInitialization(@Nullable Object bean, String beanName) {
  if (bean != null) {
    Object cacheKey = getCacheKey(bean.getClass(), beanName);
    if (this.earlyProxyReferences.remove(cacheKey) != bean) {
      return wrapIfNecessary(bean, beanName, cacheKey);
    }
  }
  return bean;
}
If the given bean is qualified to be proxied, call wrapIfNecessary wrapper and return:
protected Object wrapIfNecessary(Object bean, String beanName, Object cacheKey) {
  //... ellipsis
    // Create proxy if we have advice.
  Object[] specificInterceptors = getAdvicesAndAdvisorsForBean(bean.getClass(), beanName, null);
  if (specificInterceptors != DO_NOT_PROXY) {
    this.advisedBeans.put(cacheKey, Boolean.TRUE);
    Object proxy = createProxy(
        bean.getClass(), beanName, specificInterceptors, new SingletonTargetSource(bean));
    this.proxyTypes.put(cacheKey, proxy.getClass());
    return proxy;
  }
  this.advisedBeans.put(cacheKey, Boolean.FALSE);
  return bean;
}
Get the notification used by the bean, then create a proxy and weave the notification capability into it. Because obtaining the notification applicable to the current bean involves another configuration class ProxyTransactionManagementConfiguration imported by selectImports, we only analyze the creation of agents, obtaining notifications and notification interception logic later. Let's take a look at the agent creation logic:
protected Object createProxy(Class<?> beanClass, @Nullable String beanName,
    @Nullable Object[] specificInterceptors, TargetSource targetSource) {
  ProxyFactory proxyFactory = new ProxyFactory();
  proxyFactory.copyFrom(this);
  if (!proxyFactory.isProxyTargetClass()) {
    if (shouldProxyTargetClass(beanClass, beanName)) {
      proxyFactory.setProxyTargetClass(true);
    }
    else {
      evaluateProxyInterfaces(beanClass, proxyFactory);
    }
  }
  Advisor[] advisors = buildAdvisors(beanName, specificInterceptors);
  proxyFactory.addAdvisors(advisors);
  proxyFactory.setTargetSource(targetSource);
  customizeProxyFactory(proxyFactory);
  proxyFactory.setFrozen(this.freezeProxy);
  if (advisorsPreFiltered()) {
    proxyFactory.setPreFiltered(true);
  }
  return proxyFactory.getProxy(getProxyClassLoader());
}
First create the agent factory, then populate the notifier, set the target class to be represented, and then create the agent.
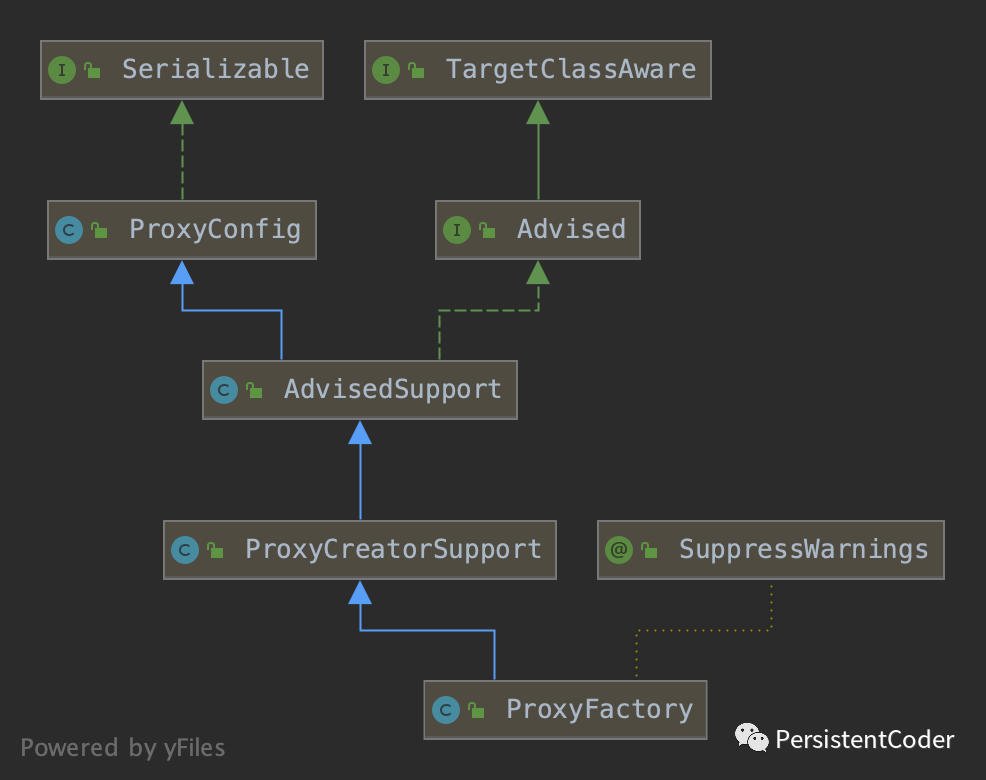
From the inheritance relationship of the agent factory, we can see that it implements the Advised interface and has the ability to create agents. When creating an agent factory, the default parameterless constructor is used, and the parameterless constructor of the parent class proxycreator support will be called:
public ProxyCreatorSupport() {
  this.aopProxyFactory = new DefaultAopProxyFactory();
}
The task of creating an agent will be delegated to DefaultAopProxyFactory. First, the createAopProxy tool will be called to create and generate the agent:
@Override
public AopProxy createAopProxy(AdvisedSupport config) throws AopConfigException {
  if (config.isOptimize() || config.isProxyTargetClass() || hasNoUserSuppliedProxyInterfaces(config)) {
    Class<?> targetClass = config.getTargetClass();
    if (targetClass.isInterface() || Proxy.isProxyClass(targetClass)) {
      return new JdkDynamicAopProxy(config);
    }
    return new ObjenesisCglibAopProxy(config);
  }
  else {
    return new JdkDynamicAopProxy(config);
  }
}
According to the proxyTargetClass and interface characteristics, it is decided to use the dynamic proxy of jdk JdkDynamicAopProxy is also the dynamic proxy ObjenesisCglibAopProxy of cglib. Both implement the AopProxy interface to create proxy, and the jdk dynamic proxy also implements the InvocationHandler interface, which defines itself as a proxy executor, and calls its invoke method when the proxy target class logic executes. The generation logic of jdk dynamic agent is as follows:
@Override
public Object getProxy(@Nullable ClassLoader classLoader) {
  if (logger.isTraceEnabled()) {
    logger.trace("Creating JDK dynamic proxy: " + this.advised.getTargetSource());
  }
  Class<?>[] proxiedInterfaces = AopProxyUtils.completeProxiedInterfaces(this.advised, true);
  findDefinedEqualsAndHashCodeMethods(proxiedInterfaces);
  return Proxy.newProxyInstance(classLoader, proxiedInterfaces, this);
}
cglib generates enhanced classes according to the target class and embeds interception logic. This article can be understood as embedding transaction capabilities:
@Override
public Object getProxy(@Nullable ClassLoader classLoader) {
  try {
    Class<?> rootClass = this.advised.getTargetClass();
    Class<?> proxySuperClass = rootClass;
    if (ClassUtils.isCglibProxyClass(rootClass)) {
      proxySuperClass = rootClass.getSuperclass();
      Class<?>[] additionalInterfaces = rootClass.getInterfaces();
      for (Class<?> additionalInterface : additionalInterfaces) {
        this.advised.addInterface(additionalInterface);
      }
    }
    // Configure CGLIB Enhancer...
    Enhancer enhancer = createEnhancer();
    if (classLoader != null) {
      enhancer.setClassLoader(classLoader);
      if (classLoader instanceof SmartClassLoader &&
          ((SmartClassLoader) classLoader).isClassReloadable(proxySuperClass)) {
        enhancer.setUseCache(false);
      }
    }
    enhancer.setSuperclass(proxySuperClass);
    enhancer.setInterfaces(AopProxyUtils.completeProxiedInterfaces(this.advised));
    enhancer.setNamingPolicy(SpringNamingPolicy.INSTANCE);
    enhancer.setStrategy(new ClassLoaderAwareUndeclaredThrowableStrategy(classLoader));

    Callback[] callbacks = getCallbacks(rootClass);
    Class<?>[] types = new Class<?>[callbacks.length];
    for (int x = 0; x < types.length; x++) {
      types[x] = callbacks[x].getClass();
    }
    // fixedInterceptorMap only populated at this point, after getCallbacks call above
    enhancer.setCallbackFilter(new ProxyCallbackFilter(
        this.advised.getConfigurationOnlyCopy(), this.fixedInterceptorMap, this.fixedInterceptorOffset));
    enhancer.setCallbackTypes(types);

    // Generate the proxy class and create a proxy instance.
    return createProxyClassAndInstance(enhancer, callbacks);
  }
  catch (CodeGenerationException | IllegalArgumentException ex) {
    throw new AopConfigException("Could not generate CGLIB subclass of " + this.advised.getTargetClass() +
        ": Common causes of this problem include using a final class or a non-visible class",
        ex);
  }
  catch (Throwable ex) {
    // TargetSource.getTarget() failed
    throw new AopConfigException("Unexpected AOP exception", ex);
  }
}
The logical execution of the two proxy methods is not analyzed here, but when the transaction capability is executed later. As mentioned earlier, another configuration class ProxyTransactionManagementConfiguration will be used to find appropriate notifications when generating agents. We also analyze what it does.

@Configuration
public class ProxyTransactionManagementConfiguration extends AbstractTransactionManagementConfiguration {

  @Bean(name = TransactionManagementConfigUtils.TRANSACTION_ADVISOR_BEAN_NAME)
  @Role(BeanDefinition.ROLE_INFRASTRUCTURE)
  public BeanFactoryTransactionAttributeSourceAdvisor transactionAdvisor() {
    BeanFactoryTransactionAttributeSourceAdvisor advisor = new BeanFactoryTransactionAttributeSourceAdvisor();
    advisor.setTransactionAttributeSource(transactionAttributeSource());
    advisor.setAdvice(transactionInterceptor());
    if (this.enableTx != null) {
      advisor.setOrder(this.enableTx.<Integer>getNumber("order"));
    }
    return advisor;
  }
  @Bean
  @Role(BeanDefinition.ROLE_INFRASTRUCTURE)
  public TransactionAttributeSource transactionAttributeSource() {
    return new AnnotationTransactionAttributeSource();
  }
  @Bean
  @Role(BeanDefinition.ROLE_INFRASTRUCTURE)
  public TransactionInterceptor transactionInterceptor() {
    TransactionInterceptor interceptor = new TransactionInterceptor();
    interceptor.setTransactionAttributeSource(transactionAttributeSource());
    if (this.txManager != null) {
      interceptor.setTransactionManager(this.txManager);
    }
    return interceptor;
  }
}
It defines three bean s: transaction attribute, transaction interceptor and transaction notifier, and injects the transaction manager (or it may not be injected at the moment). The important thing here is
BeanFactoryTransactionAttributeSourceAdvisor and TransactionInterceptor.
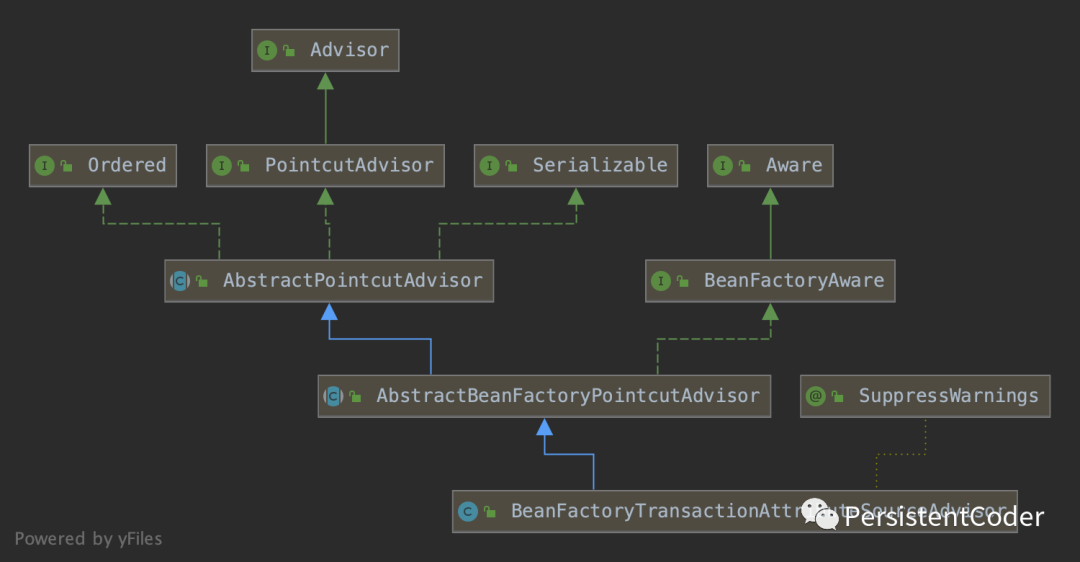
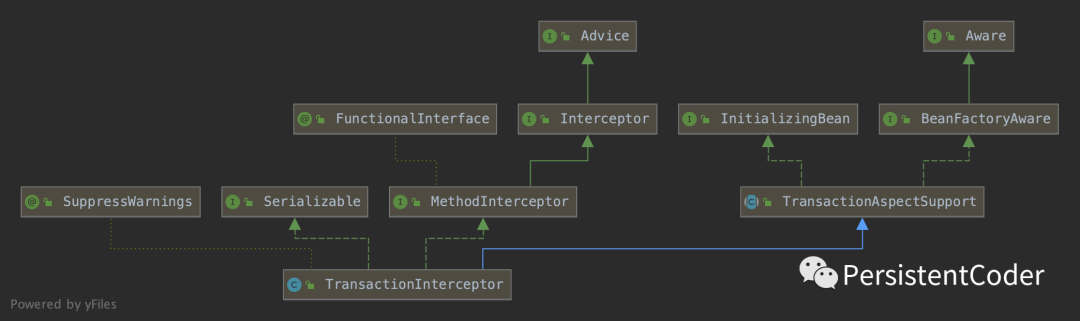
It is an Advisor that holds transaction attributesourcepointcut, transaction attributes, and interceptors. The interception logic is implemented by the TransactionInterceptor.
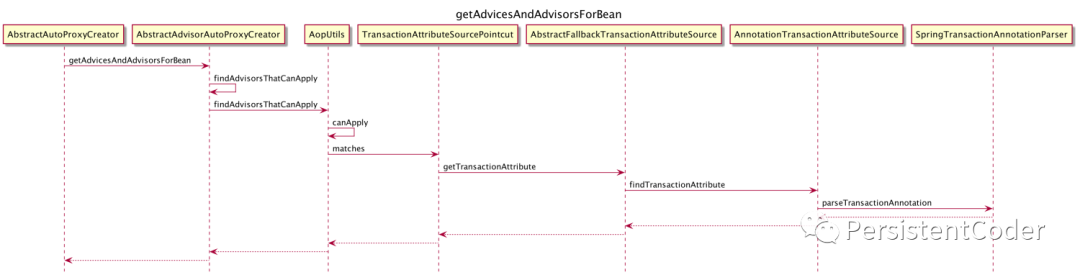
Combined with the logic of the previous generation agent, we can preliminarily guess whether the pointcut in the notifier matches the method of the interception class. If so, the interceptor logic will be embedded into the generated agent class. Let's take a look at the above mentioned. Before creating the proxy, we call the getAdvicesAndAdvisorsForBean method to obtain the notification applicable to the target bean, and the implementation of the subclass AbstractAdvisorAutoProxyCreator will be called:
@Override
@Nullable
protected Object[] getAdvicesAndAdvisorsForBean(
    Class<?> beanClass, String beanName, @Nullable TargetSource targetSource) {

  List<Advisor> advisors = findEligibleAdvisors(beanClass, beanName);
  if (advisors.isEmpty()) {
    return DO_NOT_PROXY;
  }
  return advisors.toArray();
}
The call chain is relatively long. The intermediate steps are omitted. Finally, the canApply method of AopUtils is called for filtering:
public static boolean canApply(Pointcut pc, Class<?> targetClass, boolean hasIntroductions) {
  if (!pc.getClassFilter().matches(targetClass)) {
    return false;
  }
    //... ellipsis
  Set<Class<?>> classes = new LinkedHashSet<>();
  classes.addAll(ClassUtils.getAllInterfacesForClassAsSet(targetClass));
  for (Class<?> clazz : classes) {
    Method[] methods = ReflectionUtils.getAllDeclaredMethods(clazz);
    for (Method method : methods) {
      if (introductionAwareMethodMatcher != null ?
          introductionAwareMethodMatcher.matches(method, targetClass, hasIntroductions) :
          methodMatcher.matches(method, targetClass)) {
        return true;
      }
    }
  }
  return false;
}
Since our notifier is not of type Introduction, it will then be used Filter the TransactionAttributeSourcePointcut held by BeanFactoryTransactionAttributeSourceAdvisor:
@Override
public boolean matches(Method method, Class<?> targetClass) {
  if (TransactionalProxy.class.isAssignableFrom(targetClass) ||
      PlatformTransactionManager.class.isAssignableFrom(targetClass) ||
      PersistenceExceptionTranslator.class.isAssignableFrom(targetClass)) {
    return false;
  }
  TransactionAttributeSource tas = getTransactionAttributeSource();
  return (tas == null || tas.getTransactionAttribute(method, targetClass) != null);
}
Then delegate to TransactionAttributeSource to extract whether the target method and class have transaction annotation. If there is @ Transactional, it is considered applicable. In fact, use the Pointcut of the notifier to compare with the method whether it matches and applies. The above method will call the method of SpringTransactionAnnotationParser:
@Override
@Nullable
public TransactionAttribute parseTransactionAnnotation(AnnotatedElement element) {
AnnotationAttributes attributes = AnnotatedElementUtils.findMergedAnnotationAttributes(
element, Transactional.class, false, false);
if (attributes != null) {
return parseTransactionAnnotation(attributes);
}
else {
return null;
}
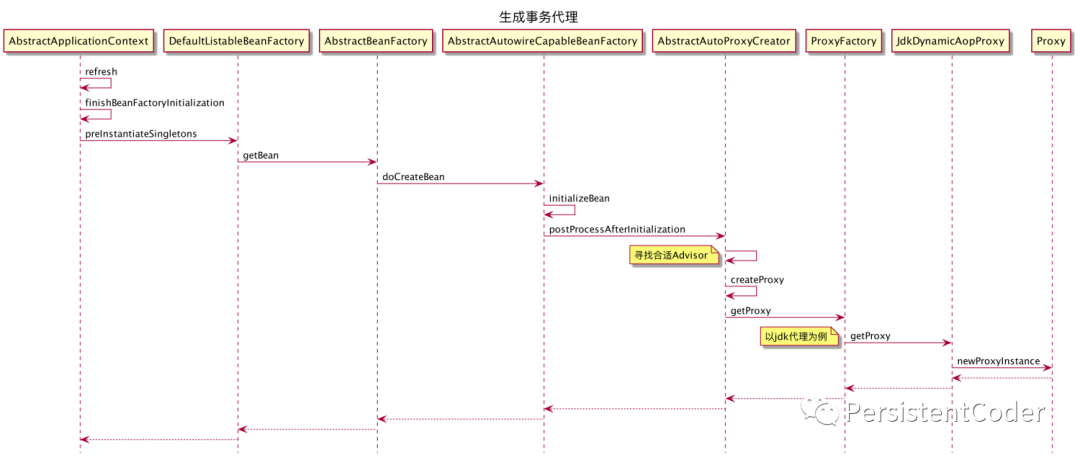
}In fact, it is to extract whether there are Transactional annotations on the method. Let's take a look at the sequence diagram for finding the appropriate notifier:
Infrastructure advisor autoproxycreator processor registration and instantiation:
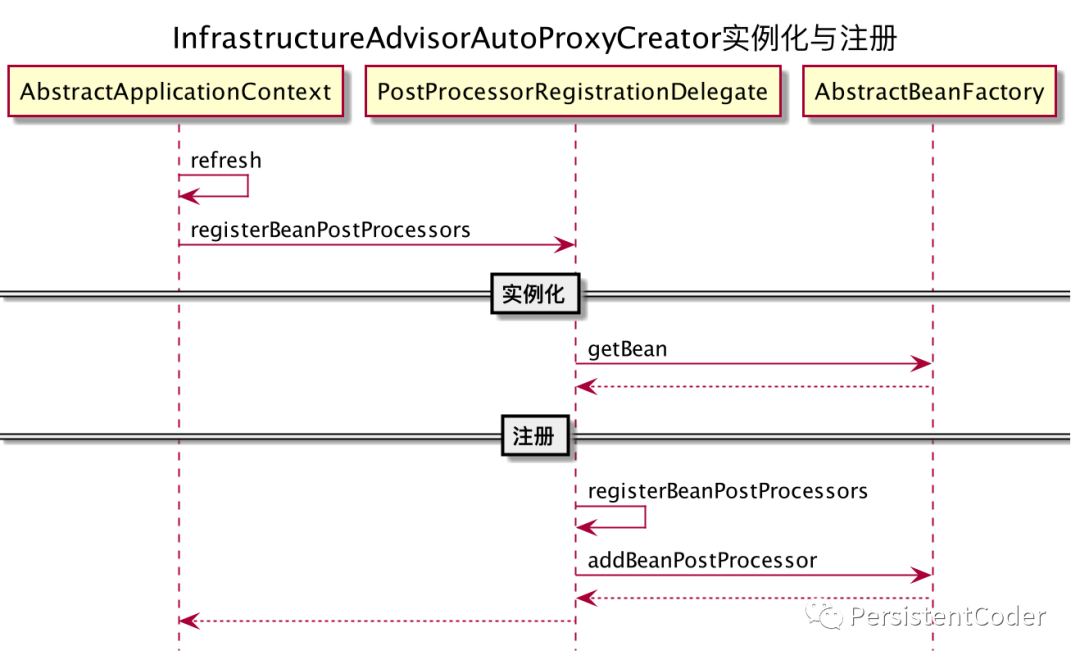
The sequence diagram of generating an agent for the target class using the transaction is as follows:
3. Execute transaction logic
According to the previous analysis, based on @ EnableTransactionManagement And @ Transactional annotation. After the application is started, the target class will generate an agent and weave the transaction capability into it. There are two ways to generate an agent, namely jdk dynamic agent and cglib dynamic agent. Because most of the classes of the methods for writing transaction logic do not implement interfaces, the way to generate an agent for transactions is cglib.
cglib generates proxy classes by inheriting the target class, rewriting the target method, and then embedding the interceptor logic. For transaction capabilities, it will call the invoke method of the TransactionInterceptor Interceptor:
@Override
@Nullable
public Object invoke(MethodInvocation invocation) throws Throwable {
  // Work out the target class: may be {@code null}.
  // The TransactionAttributeSource should be passed the target class
  // as well as the method, which may be from an interface.
  Class<?> targetClass = (invocation.getThis() != null ? AopUtils.getTargetClass(invocation.getThis()) : null);

  // Adapt to TransactionAspectSupport's invokeWithinTransaction...
  return invokeWithinTransaction(invocation.getMethod(), targetClass, invocation::proceed);
}
Find the target class, then execute the transaction and call invokeWithinTransaction:
@Nullable
protected Object invokeWithinTransaction(Method method, @Nullable Class<?> targetClass,
    final InvocationCallback invocation) throws Throwable {

  // If the transaction attribute is null, the method is non-transactional.
  TransactionAttributeSource tas = getTransactionAttributeSource();
  final TransactionAttribute txAttr = (tas != null ? tas.getTransactionAttribute(method, targetClass) : null);
  final PlatformTransactionManager tm = determineTransactionManager(txAttr);
  final String joinpointIdentification = methodIdentification(method, targetClass, txAttr);

  if (txAttr == null || !(tm instanceof CallbackPreferringPlatformTransactionManager)) {
    // Standard transaction demarcation with getTransaction and commit/rollback calls.
    TransactionInfo txInfo = createTransactionIfNecessary(tm, txAttr, joinpointIdentification);
    Object retVal = null;
    try {
      // This is an around advice: Invoke the next interceptor in the chain.
      // This will normally result in a target object being invoked.
      retVal = invocation.proceedWithInvocation();
    }
    catch (Throwable ex) {
      // target invocation exception
      completeTransactionAfterThrowing(txInfo, ex);
      throw ex;
    }
    finally {
      cleanupTransactionInfo(txInfo);
    }
    commitTransactionAfterReturning(txInfo);
    return retVal;
  }

  else {
    //... ellipsis
  }
}
As mentioned earlier, the created transaction manager DataSourceTransactionManager is of PlatformTransactionManager type, and txAttr is the transaction annotation attribute extracted from the method, so it meets the if branch. The logic roughly means that if necessary, create a transaction, and then execute the logical call of the target method of the agent class. Then, if there is an exception, rollback the exception and throw it, If there are no exceptions, commit the transaction. Let's first look at creating a transaction createtransaction ifnecessary
protected TransactionInfo createTransactionIfNecessary(@Nullable PlatformTransactionManager tm,
    @Nullable TransactionAttribute txAttr, final String joinpointIdentification) {
    //... ellipsis
  TransactionStatus status = null;
  if (txAttr != null) {
    if (tm != null) {
      status = tm.getTransaction(txAttr);
    }
  }
  return prepareTransactionInfo(tm, txAttr, joinpointIdentification, status);
}
Obtain the transaction status from the transaction manager, and then prepare the transaction information to obtain the transaction status Override the method getTransaction using the parent class of DataSourceTransactionManager:
@Override
public final TransactionStatus getTransaction(@Nullable TransactionDefinition definition) throws TransactionException {
  Object transaction = doGetTransaction();

  if (isExistingTransaction(transaction)) {
    // Existing transaction found -> check propagation behavior to find out how to behave.
    return handleExistingTransaction(definition, transaction, debugEnabled);
  }

  // Check definition settings for new transaction.
  if (definition.getTimeout() < TransactionDefinition.TIMEOUT_DEFAULT) {
    throw new InvalidTimeoutException("Invalid transaction timeout", definition.getTimeout());
  }

  // No existing transaction found -> check propagation behavior to find out how to proceed.
  if (definition.getPropagationBehavior() == TransactionDefinition.PROPAGATION_MANDATORY) {
    throw new IllegalTransactionStateException(
        "No existing transaction found for transaction marked with propagation 'mandatory'");
  }
  else if (definition.getPropagationBehavior() == TransactionDefinition.PROPAGATION_REQUIRED ||
      definition.getPropagationBehavior() == TransactionDefinition.PROPAGATION_REQUIRES_NEW ||
      definition.getPropagationBehavior() == TransactionDefinition.PROPAGATION_NESTED) {
    SuspendedResourcesHolder suspendedResources = suspend(null);
    if (debugEnabled) {
      logger.debug("Creating new transaction with name [" + definition.getName() + "]: " + definition);
    }
    try {
      boolean newSynchronization = (getTransactionSynchronization() != SYNCHRONIZATION_NEVER);
      DefaultTransactionStatus status = newTransactionStatus(
          definition, transaction, true, newSynchronization, debugEnabled, suspendedResources);
      doBegin(transaction, definition);
      prepareSynchronization(status, definition);
      return status;
    }
    catch (RuntimeException | Error ex) {
      resume(null, suspendedResources);
      throw ex;
    }
  }
  else {
    // Create "empty" transaction: no actual transaction, but potentially synchronization.
    boolean newSynchronization = (getTransactionSynchronization() == SYNCHRONIZATION_ALWAYS);
    return prepareTransactionStatus(definition, null, true, newSynchronization, debugEnabled, null);
  }
}
First check whether the current thread call is in a transaction. If so, process thread propagation and return; Then check the transaction timeout attribute if the transaction propagation configuration is propagation_ If mandatory and there is no transaction at present, an error is reported and returned; If the transaction propagation level is PROPAGATION_REQUIRED,PROPAGATION_REQUIRES_NEW or promotion_ Nested starts the transaction and returns the transaction status. Add the concept of transaction propagation level:
PROPAGATION_REQUIRED: supports the current transaction; If it does not exist, a new one is created. Default PROPAGATION_SUPPORTS: supports the current transaction; If it does not exist, execute the deployment in a non transactional manner_ Mandatory: supports the current transaction; Exception propagation if no transaction currently exists_ REQUIRES_ New: create a new transaction. If the current transaction exists, suspend the current transaction deployment_ NOT_ Supported: current transaction is not supported; Always perform the deployment in a non transactional manner_ Never: transaction is not supported; Exception propagation if the current transaction exists_ Nested: if there is a current transaction, it is executed in a nested transaction
Let's take a look at the implementation of opening transactions:
@Override
protected void doBegin(Object transaction, TransactionDefinition definition) {
  DataSourceTransactionObject txObject = (DataSourceTransactionObject) transaction;
  Connection con = null;
  try {
    if (!txObject.hasConnectionHolder() ||
        txObject.getConnectionHolder().isSynchronizedWithTransaction()) {
      Connection newCon = obtainDataSource().getConnection();
      txObject.setConnectionHolder(new ConnectionHolder(newCon), true);
    }
    txObject.getConnectionHolder().setSynchronizedWithTransaction(true);
    con = txObject.getConnectionHolder().getConnection();
    Integer previousIsolationLevel = DataSourceUtils.prepareConnectionForTransaction(con, definition);
    txObject.setPreviousIsolationLevel(previousIsolationLevel);

    if (con.getAutoCommit()) {
      txObject.setMustRestoreAutoCommit(true);
      con.setAutoCommit(false);
    }
    prepareTransactionalConnection(con, definition);
    txObject.getConnectionHolder().setTransactionActive(true);

    int timeout = determineTimeout(definition);
    if (timeout != TransactionDefinition.TIMEOUT_DEFAULT) {
      txObject.getConnectionHolder().setTimeoutInSeconds(timeout);
    }
    if (txObject.isNewConnectionHolder()) {
      TransactionSynchronizationManager.bindResource(obtainDataSource(), txObject.getConnectionHolder());
    }
  }
  catch (Throwable ex) {
    if (txObject.isNewConnectionHolder()) {
      DataSourceUtils.releaseConnection(con, obtainDataSource());
      txObject.setConnectionHolder(null, false);
    }
    throw new CannotCreateTransactionException("Could not open JDBC Connection for transaction", ex);
  }
}
If there is no database connection, first obtain the connection, set the isolation level, then automatically submit, set false, configure the timeout, and then bind the database connection to the thread.
Return to the invokeWithinTransaction method of the transaction interceptor. After obtaining the transaction information, execute the business logic. If an exception occurs, call the execution rollback and subsequent logic. If the execution is successful, commit the transaction.
Take a look at the exception execution logic:
protected void completeTransactionAfterThrowing(@Nullable TransactionInfo txInfo, Throwable ex) {
  if (txInfo != null && txInfo.getTransactionStatus() != null) {
    if (txInfo.transactionAttribute != null && txInfo.transactionAttribute.rollbackOn(ex)) {
      try {
        txInfo.getTransactionManager().rollback(txInfo.getTransactionStatus());
      }
      catch (TransactionSystemException ex2) {
        ex2.initApplicationException(ex);
        throw ex2;
      }
      catch (RuntimeException | Error ex2) {
        throw ex2;
      }
    }
    else {
      try {
        txInfo.getTransactionManager().commit(txInfo.getTransactionStatus());
      }
      catch (TransactionSystemException ex2) {
        ex2.initApplicationException(ex);
        throw ex2;
      }
      catch (RuntimeException | Error ex2) {
        throw ex2;
      }
    }
  }
}
If there is a transaction and the exception type complies with the rollback rules, the rollback logic of the transaction manager is called, otherwise the commit is executed. Rollback will eventually call the rollback method of the database connection:
protected void doRollback(DefaultTransactionStatus status) {
DataSourceTransactionObject txObject = (DataSourceTransactionObject) status.getTransaction();
Connection con = txObject.getConnectionHolder().getConnection();
try {
con.rollback();
}
catch (SQLException ex) {
throw new TransactionSystemException("Could not roll back JDBC transaction", ex);
}
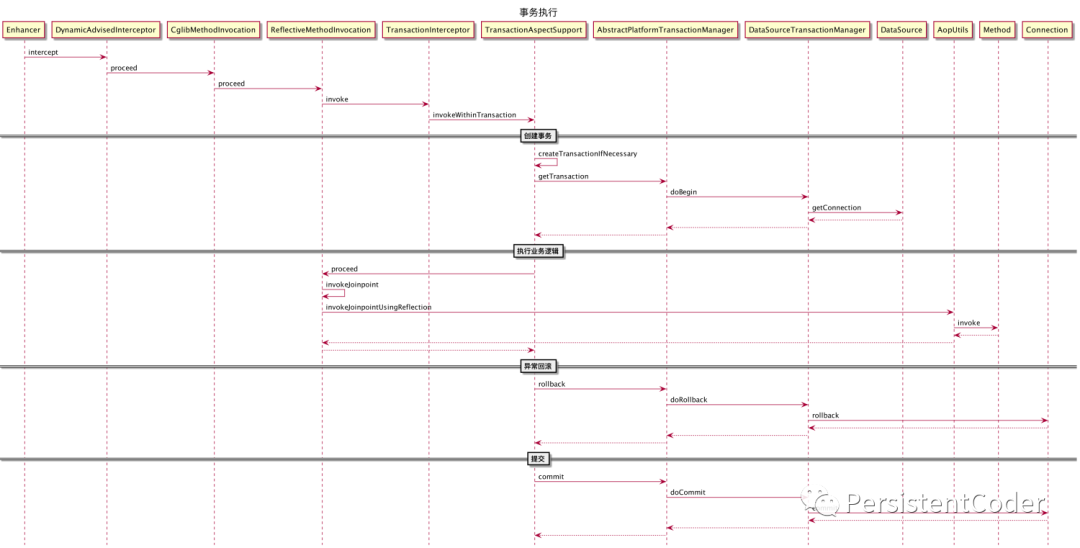
}Then some subsequent operations will be called, such as those we analyzed before Usage scenario and principle analysis of TransactionalEventListener . If the business is executed successfully, the transaction submission is executed. The transaction manager finally delegates the transaction submission to the database connection operation, and some operations that depend on the transaction execution status will also be triggered. For example, the TransactionalEventListener depends on the transaction submission. Now that the transaction execution logic has been analyzed, let's take a look at the execution sequence diagram:
summary
The support of spring transaction capability uses a lot of knowledge, such as dynamic agent, AOP, reflection, post processor, etc. in general, it is to generate agent classes for the classes that need to use transactions at application startup, weave the transaction capability (interception logic), call the logic of the post processor when instantiating, instantiate the agent class instead of the target class, and put it into the context container, When actually calling the transaction method of the target class, it is intercepted by the reflective methodinvocation in the proxy class, then call the transaction logic in the interceptor, then call the business logic of the target class, and finally handle exception rollback and submission. It seems relatively simple, but the framework level provides a very large basic component to support and realize the transaction capability, Of course, most of these basic components will be reused, such as AOP and dynamic proxy, which will be used in asynchronous and cache scenarios, including when we extend some capabilities ourselves.