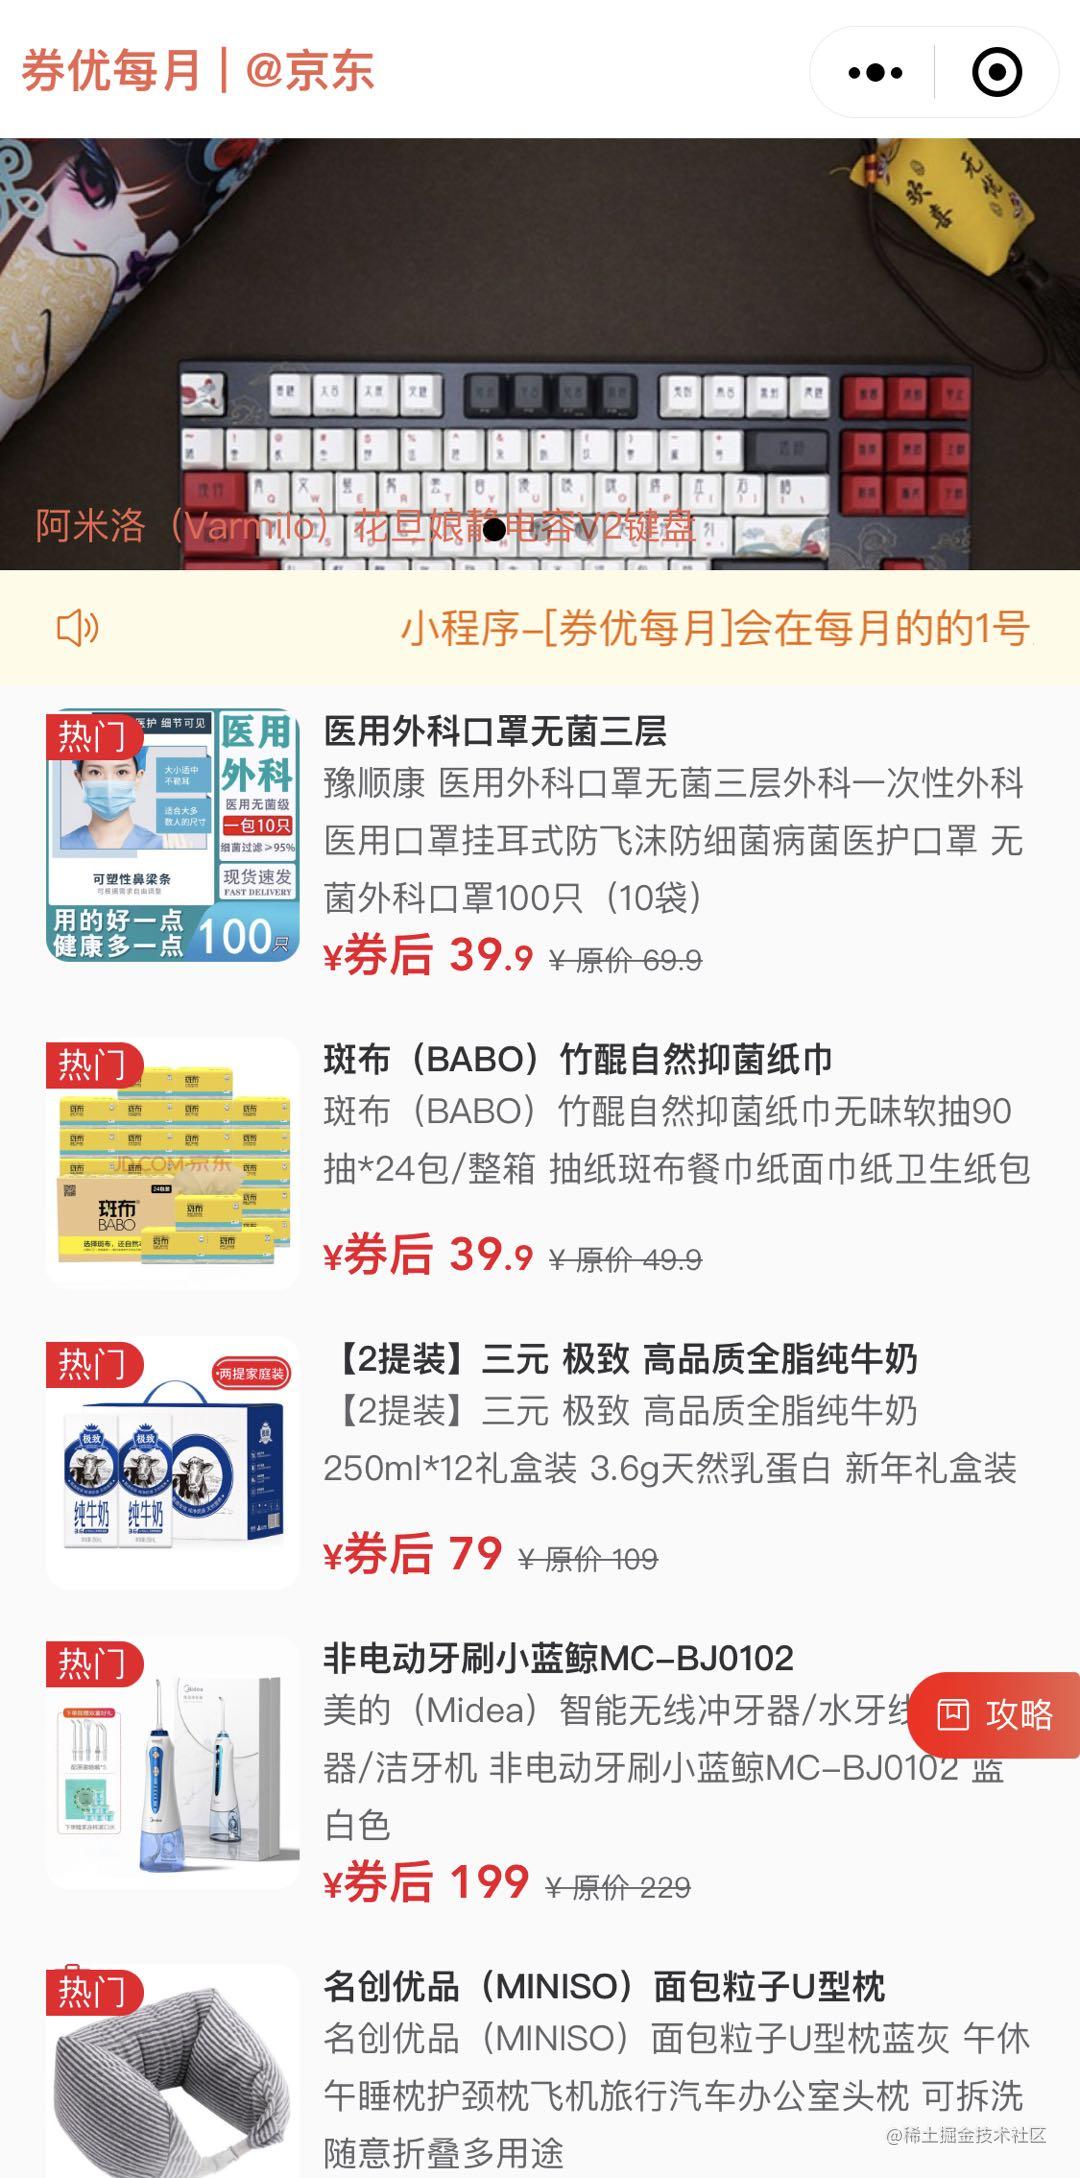
One day, on a whim, I wanted to play wechat applet and try the cloud development function of wechat, so I had the following simple finished products:

This applet contains three functions:
- Display of product banner pictures
- Display of product list
- 2.1 display of popular products
- 2.2 display of ordinary goods
- Instructions for applets
Interested people can experience by themselves through the above small program code~
OK, let's go directly to the development process~
Initialize project
adopt Wechat developer tools Create a new project.
Click the oversized + sign - > enter the appid of the applet you applied for - > check 'applet' for back-end service 'cloud development'
According to the above simple operation, you can enter your new applet, which is simple and fast.
Code directory structure of the project after initialization:
├── cloudfunctions # Cloud function
├── miniprogram # Applet foreground part
├── README.md # Code document description
└── project.config.json # Project profile
PS: you need to apply for your own applet. Oh, the AppId tested does not support cloud development
Then click cloud development to enter your cloud development console:

Hey, in the next month, you can use resource balanced basic version 1 for free.

Write a part of the page that looks past
The UI framework used here is Vant Weapp . Can quickly develop good-looking UI.
The structure code of the home page is as follows:
<!--index.wxml-->
<view class="index-page">
  <view class="navigation" style="{{navStyle}}">
    <view class="nav-text" style="{{navTextStyle}}">{{navTitle}}</view>
  </view>
  <view style="{{navStyle}}"></view>

  <view style="width: 100%; height: 300rpx; overflow: hidden;">
    <swiper
      class="swiper"
      indicator-dots="true"
      autoplay="true" interval="5000" duration="500">
      <block wx:for="{{bannerList}}" wx:key="index">
        <swiper-item class="swiper-item" bindtap="previewGoods" data-item="{{item}}">
          <image class="swiper-img" src="{{item.url}}" mode="widthFix"></image>
          <text class="swiper-title">{{item.title}}</text>
        </swiper-item>
      </block>
    </swiper>
  </view>

  <view style="width: 100%;">
    <van-notice-bar
      left-icon="volume-o"
      text="{{notice}}"
    />
  </view>

  <view class="hot-list">
    <view wx:for="{{hotList}}" wx:key="index">
      <van-card
        tag="Hot"
        origin-price="original price {{item.origin}}"
        price="After coupon {{item.current}}"
        desc="{{item.desc}}"
        title="{{item.title}}"
        thumb="{{ item.url }}"
        bindtap="previewGoods"
        data-item="{{item}}"
        />
    </view>
  </view>

  <view class="goods-list" wx:if="{{goodsList.length > 0}}">
    <view wx:for="{{goodsList}}" wx:key="index">
      <van-card
        origin-price="original price {{item.origin}}"
        price="After coupon {{item.current}}"
        desc="{{item.desc}}"
        title="{{item.title}}"
        thumb="{{ item.url }}"
        bindtap="previewGoods"
        data-item="{{item}}"
        />
    </view>
    <view class="no-more-data">
      <van-icon name="smile-comment-o" style="margin-right: 10rpx;"/>No more data...
    </view>
  </view>

  <van-popup round show="{{showPopup}}" wx:if="{{isLoaded}}" close-on-click-overlay="{{false}}">
    <guide-modal wx:if="{{popupType===1}}" bind:closeGuide="onCloseGuide" courseList="{{courseList}}" goodsItem="{{toGuideItem}}"></guide-modal>
  </van-popup>

  <view bindtap="openGuide" class="strategy-btn">
    <van-button
      size="small"
      color="linear-gradient(to right, #f00, #EC644E)"
      icon="send-gift-o">
      Strategy
    </van-button>
  </view>

</view>
The obtained renderings are as follows:

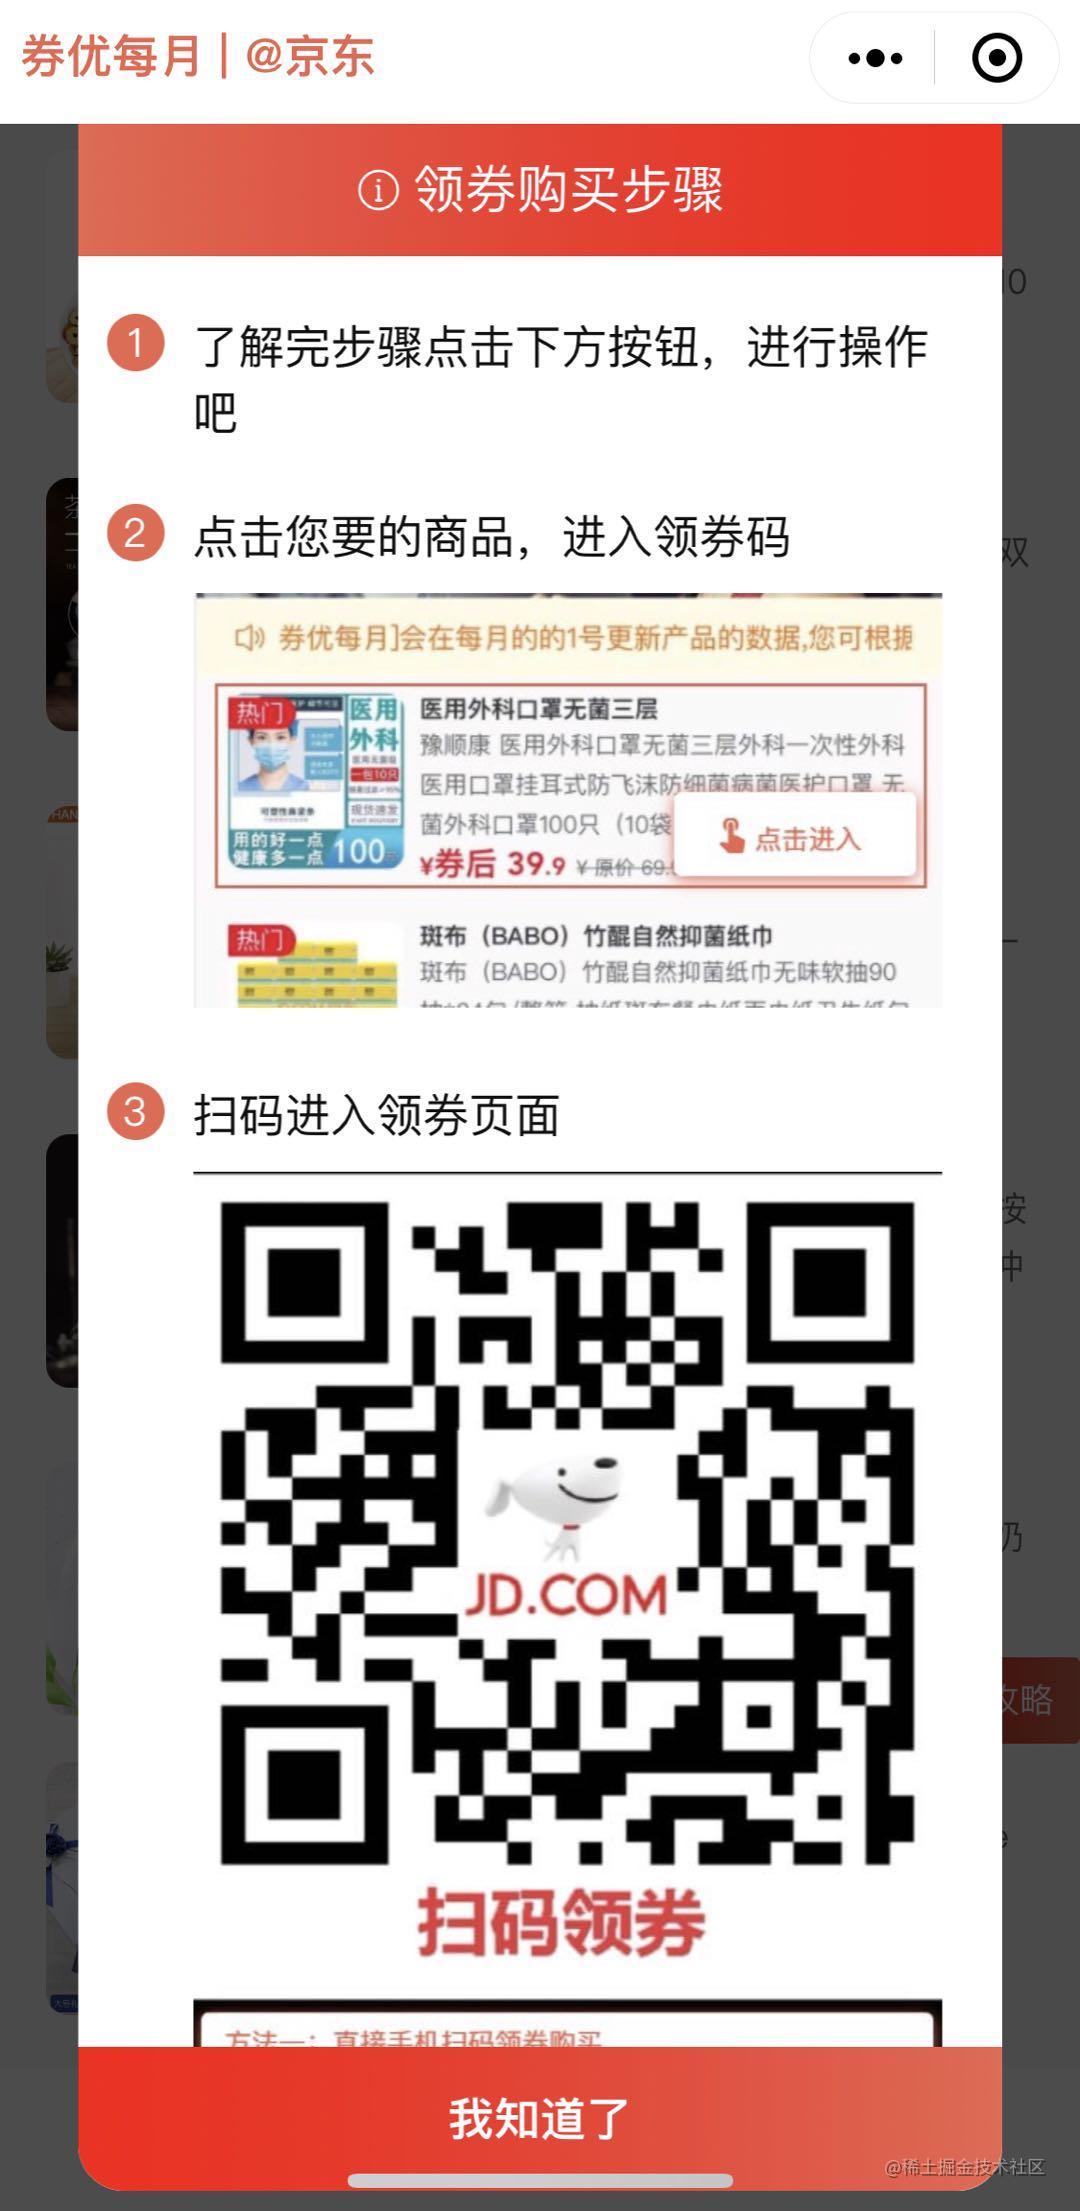
HMM ~ in order to make a simple but complete small program, I specially configured the guidance plate of the next strategy.
Relevant guide The wxml page structure code is as follows:
<!--guide.wxml-->
<view class="guideModal" style="margin-top: {{mgTop}}px">
  <view class="guideModal-head">
    <van-icon customStyle="display: block;margin-right: 4px;" name="info-o" size="16"></van-icon>
    <text>Purchase steps of collecting coupons</text>
  </view>
  <view class="guideModal-body">
    <view class="guide-item">
      <view class="guide-item-num">1</view>
      <view class="guide-item-content">
        <text>After understanding the steps, click the button below to operate</text>
      </view>
    </view>
    <view class="guide-item" wx:for="{{courseList}}" wx:for-item="course" wx:key="index">
      <view class="guide-item-num">{{course.step+1}}</view>
      <view class="guide-item-content">
        <text>{{course.title}}</text>
        <image class="image" mode="widthFix" src="{{course.img}}"></image>
      </view>
    </view>
  </view>
  <view class="guideModal-footer">
    <view class="footer-btn" bindtap="iKnow">I got it!</view>
  </view>
</view>
The effect is as follows:

Write a tunable api interface
For the interface called here, I use guide Take the data courseList in wxml as an example - it is the data described in one step. The required data structure is:
data: [{
  step: 1,
  title: 'this is step1',
  img: 'step 1 image note'
}]
Operate on the cloud development console of the applet.
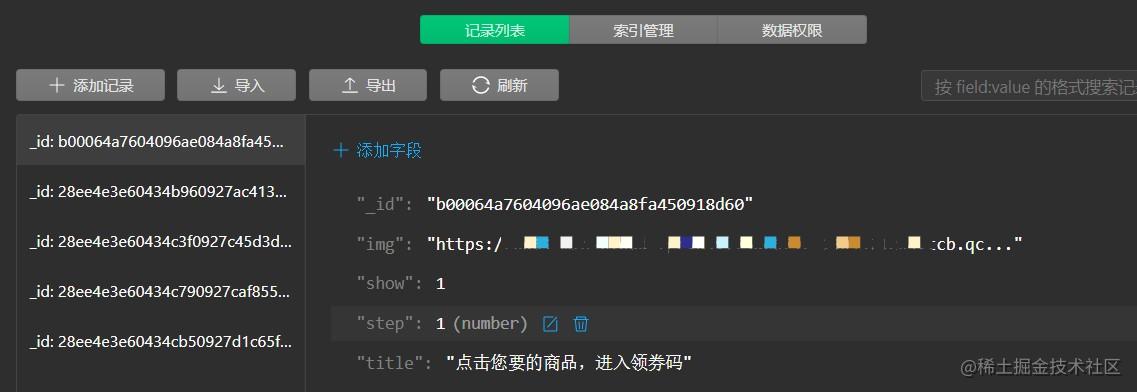
Create a new set on the database. Here I name it course, and then add records to this set. I have five steps to explain here, so I have created five pieces of data, as follows:

After that, you can create a new query in the relevant JS file.
onGetCourse: function() {
  const db = wx.cloud.database();
  db.collection('course')
      .where({
        show: 1
      })
      .get({
        success: res => {
          this.setData({
            courseList: res.data || []
          })
        },
        fail: err => {}
      })
}
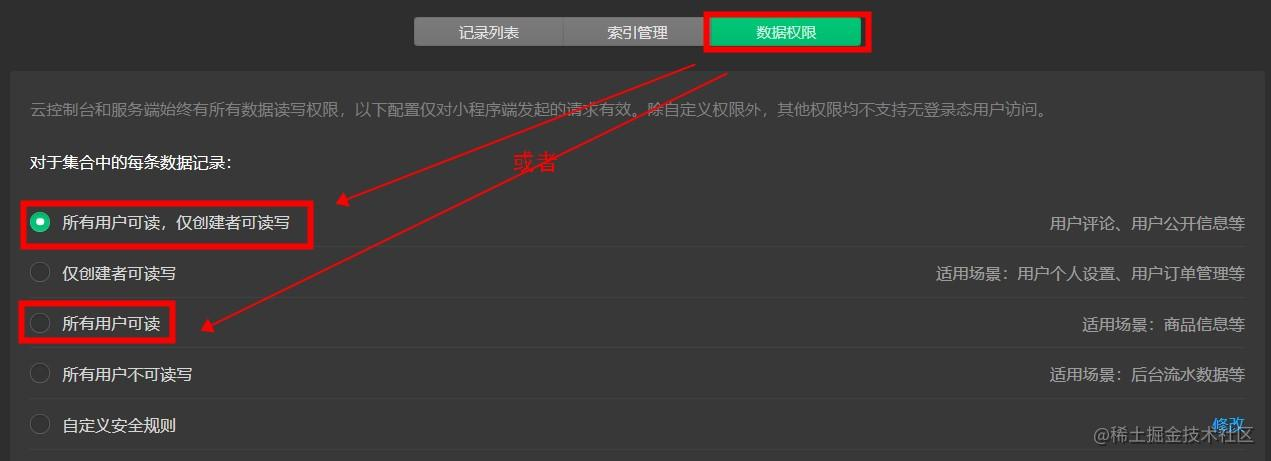
Just through the above functions, we can't get the data. We have to set the data permission:

After that, upload the code and put it on line. Here, you can have a good time, as follows:

If this article is helpful for you to develop small programs, praise and encourage~
Later words
- First article: https://github.com/reng99/blogs/issues/85
- More: https://github.com/reng99/blogs