As the front-end, you may have written more or less wechat h5 web pages developed in combination with wechat j sdk. The authorized login and some SDKs may be called through the background interface. Have you ever thought about how to write these background interfaces? So today's article will take you to understand how to write!
1, Prepare
- Registered wechat subscription number
- Register applet test number
- Sunny ngrok tool installation and account registration
Note: the prototype of sunny ngrok is ngrok, but ngrok is foreign. Sunny ngrok is a domestic private server with faster speed. Its main function is domain name forwarding, simulating public network ip and port, and even configuring customers to display projects on the public network. Address: http://www.ngrok.cc/ , register to open the tunnel after you go in. It's free. Remember: a wechat can only register one wechat product, but it can manage multiple.
This is my tunnel: (free. If you can't start it, just use this)  Try forwarding with sunny ngrok: download the tool, start the tool, enter the tunnel id, and enter
 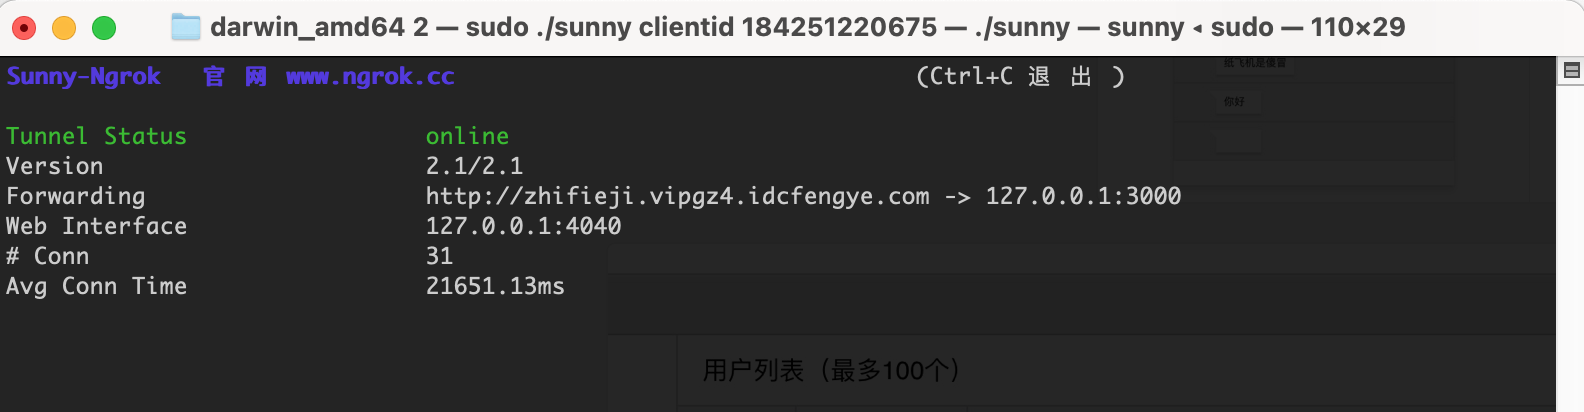 Note 127.0.0.1:3000 has been forwarded to the public ip address of zhifieji.vipgz4.idcfengye.com.
Create a weixin directory and npm initialize:
npm init -y
Copy the following contents into package.json:
{
  "name": "weixin-lesson",
  "version": "1.0.0",
  "description": "Wechat development",
  "main": "index.js",
  "directories": {
    "doc": "doc"
  },
  "scripts": {
    "sunny": "./bin/sunny clientid 62d16df91a118fd3",
    "ngrok": "./bin/ngrok http 3000",
    "test": "echo \"Error: no test specified\" && exit 1"
  },
  "repository": {
    "type": "git",
    "url": "git@gitlab.kaikeba.com:web_dev/weixin-lesson.git"
  },
  "author": "",
  "license": "ISC",
  "dependencies": {
    "axios": "^0.18.0",
    "co-wechat": "^2.3.0",
    "co-wechat-oauth": "^2.0.1",
    "crypto": "^1.0.1",
    "express": "^4.16.4",
    "jsonwebtoken": "^8.4.0",
    "koa": "^2.6.2",
    "koa-bodyparser": "^4.2.1",
    "koa-compress": "^3.0.0",
    "koa-jwt": "^3.5.1",
    "koa-route": "^3.2.0",
    "koa-router": "^7.4.0",
    "koa-socket": "^4.4.0",
    "koa-static": "^5.0.0",
    "koa-views": "^6.1.5",
    "koa-websocket": "^5.0.1",
    "koa-xml-body": "^2.1.0",
    "moment": "^2.23.0",
    "mongoose": "^5.4.4",
    "promise-redis": "0.0.5",
    "pug": "^2.0.3",
    "redis": "^2.8.0",
    "request": "^2.88.0",
    "request-promise": "^4.2.2",
    "socket.io": "^2.2.0",
    "watch": "^1.0.2",
    "wechat": "^2.1.0",
    "wechat-oauth": "^1.5.0",
    "xml2js": "^0.4.19"
  }
}
Then install the dependencies
npm install
# or
yarn
Then establish the seed directory under the weixin directory, and index.js and index.html under the seed directory.
index.js:
const Koa = require('koa')
const Router = require('koa-router')
const static = require('koa-static')
const bodyParser = require('koa-bodyparser');
const app = new Koa()
app.use(bodyParser())
const router = new Router()
app.use(static(__dirname + '/'))

app.use(router.routes()); /*Start routing*/
app.use(router.allowedMethods());
app.listen(3000);
index.html:
<!DOCTYPE html>
<html>

<head>
    <title>WeChat official account for full stack development</title>
    <meta charset="UTF-8">
    <meta name="viewport" content="width=device-width,initial-scale=1,user-scalable=0">
    <script src="https://unpkg.com/vue@2.1.10/dist/vue.min.js"></script>
    <script src="https://unpkg.com/axios/dist/axios.min.js"></script>
    <script src="https://unpkg.com/cube-ui/lib/cube.min.js"></script>
    <script src="https://cdn.bootcss.com/qs/6.6.0/qs.js"></script>
    <script src="http://res.wx.qq.com/open/js/jweixin-1.4.0.js"></script>
    <link rel="stylesheet" href="https://unpkg.com/cube-ui/lib/cube.min.css">
    <style>
        /* .cube-btn {
            margin: 10px 0;
        } */
    </style>
</head>

<body>
    <div id="app">
        <cube-input v-model="value"></cube-input>
        <cube-button @click='click'>Click</cube-button>
    </div>
    <script>
        var app = new Vue({
            el: '#app',
            data: {
                value: 'input'
            },

            methods: {
                click: function () {
                    console.log('click')
                }
            },
            mounted: function () {

            },
        });
    </script>
</body>

</html>
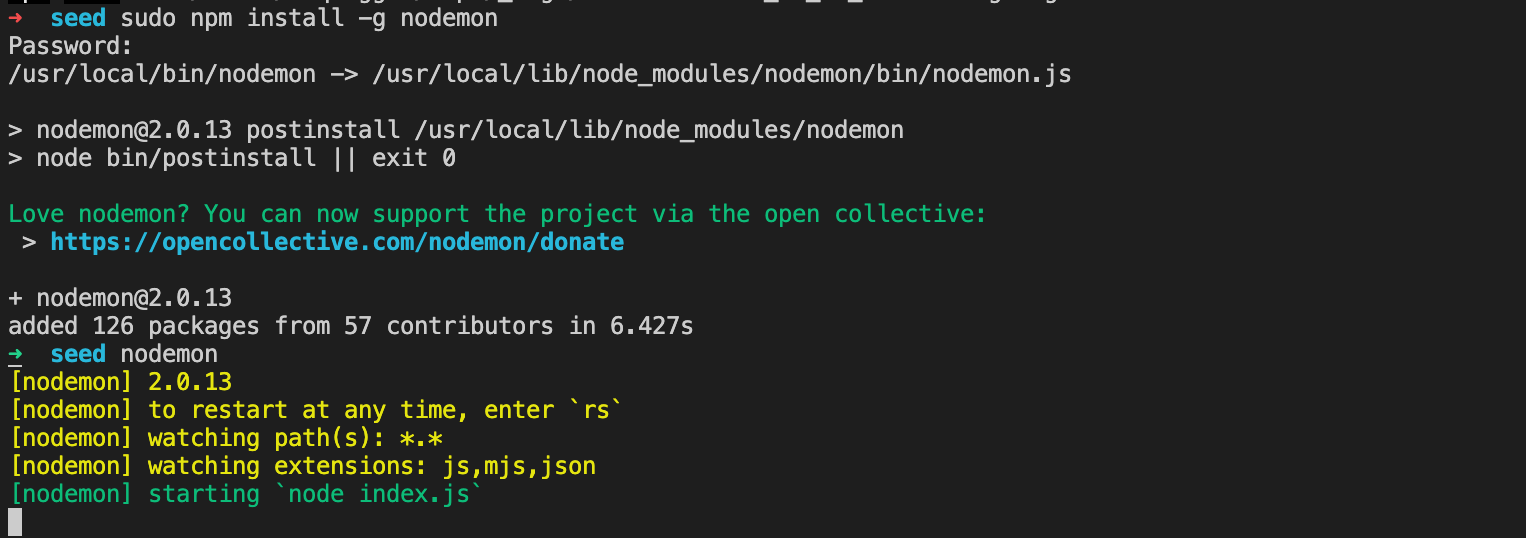
Open the terminal in the seed directory, execute nodemon (installation required), and open port 3000 127.0.0.1
npm install -g nodemon
nodemon
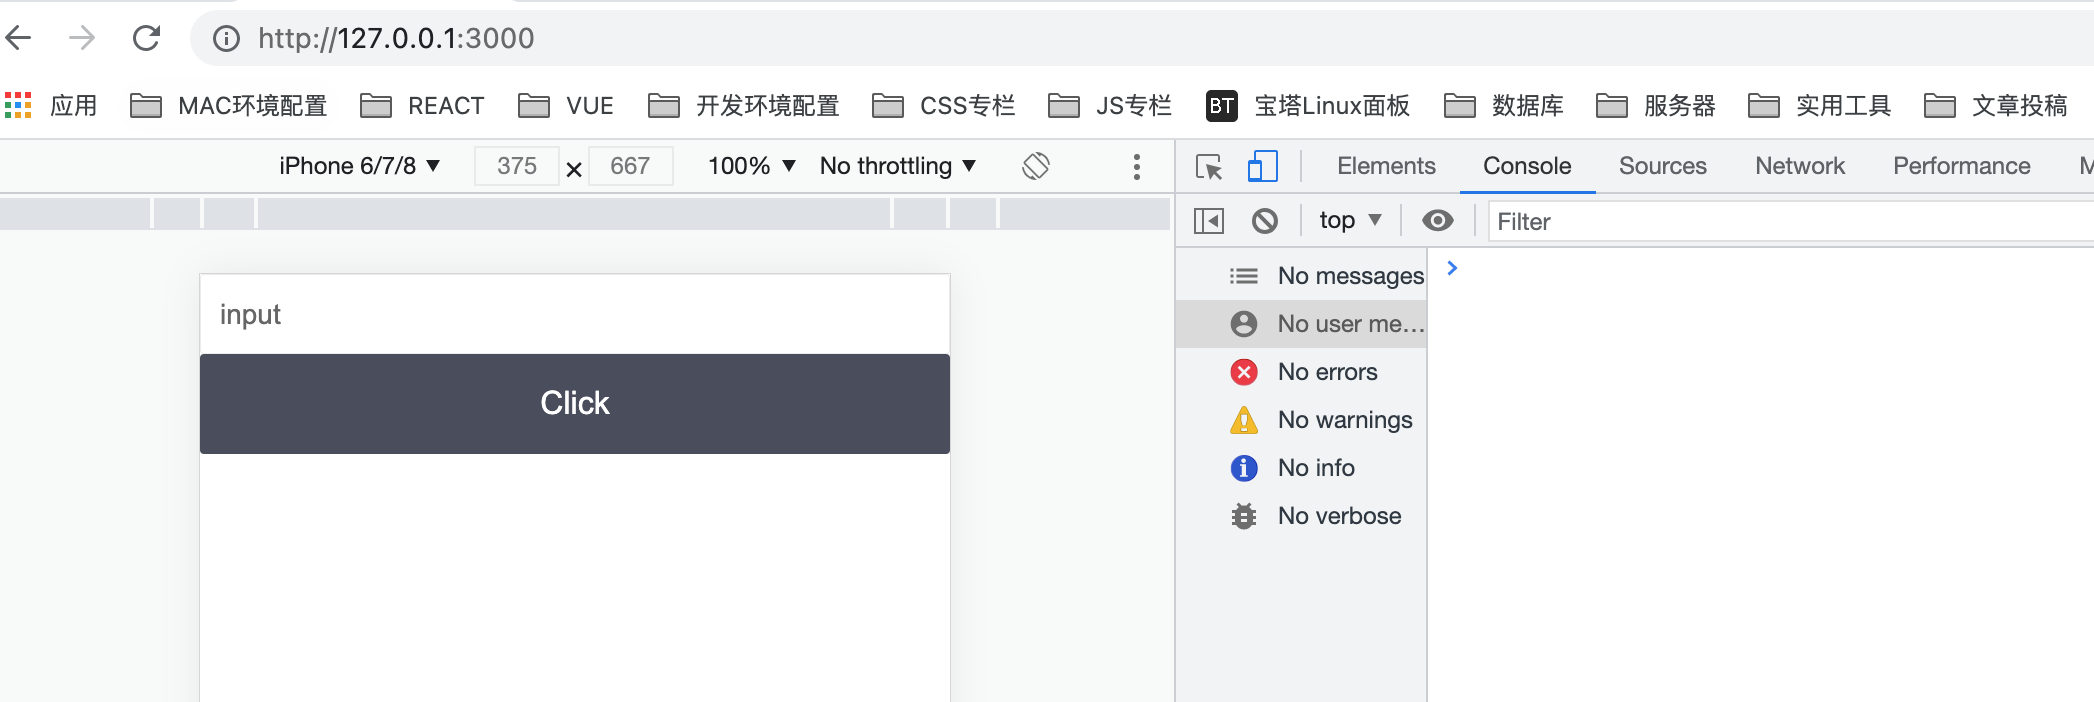 As mentioned earlier, we forwarded the 3000 port to zhifieji.vipgz4.idcfengye.com through ngrok. Let's open this website and try:
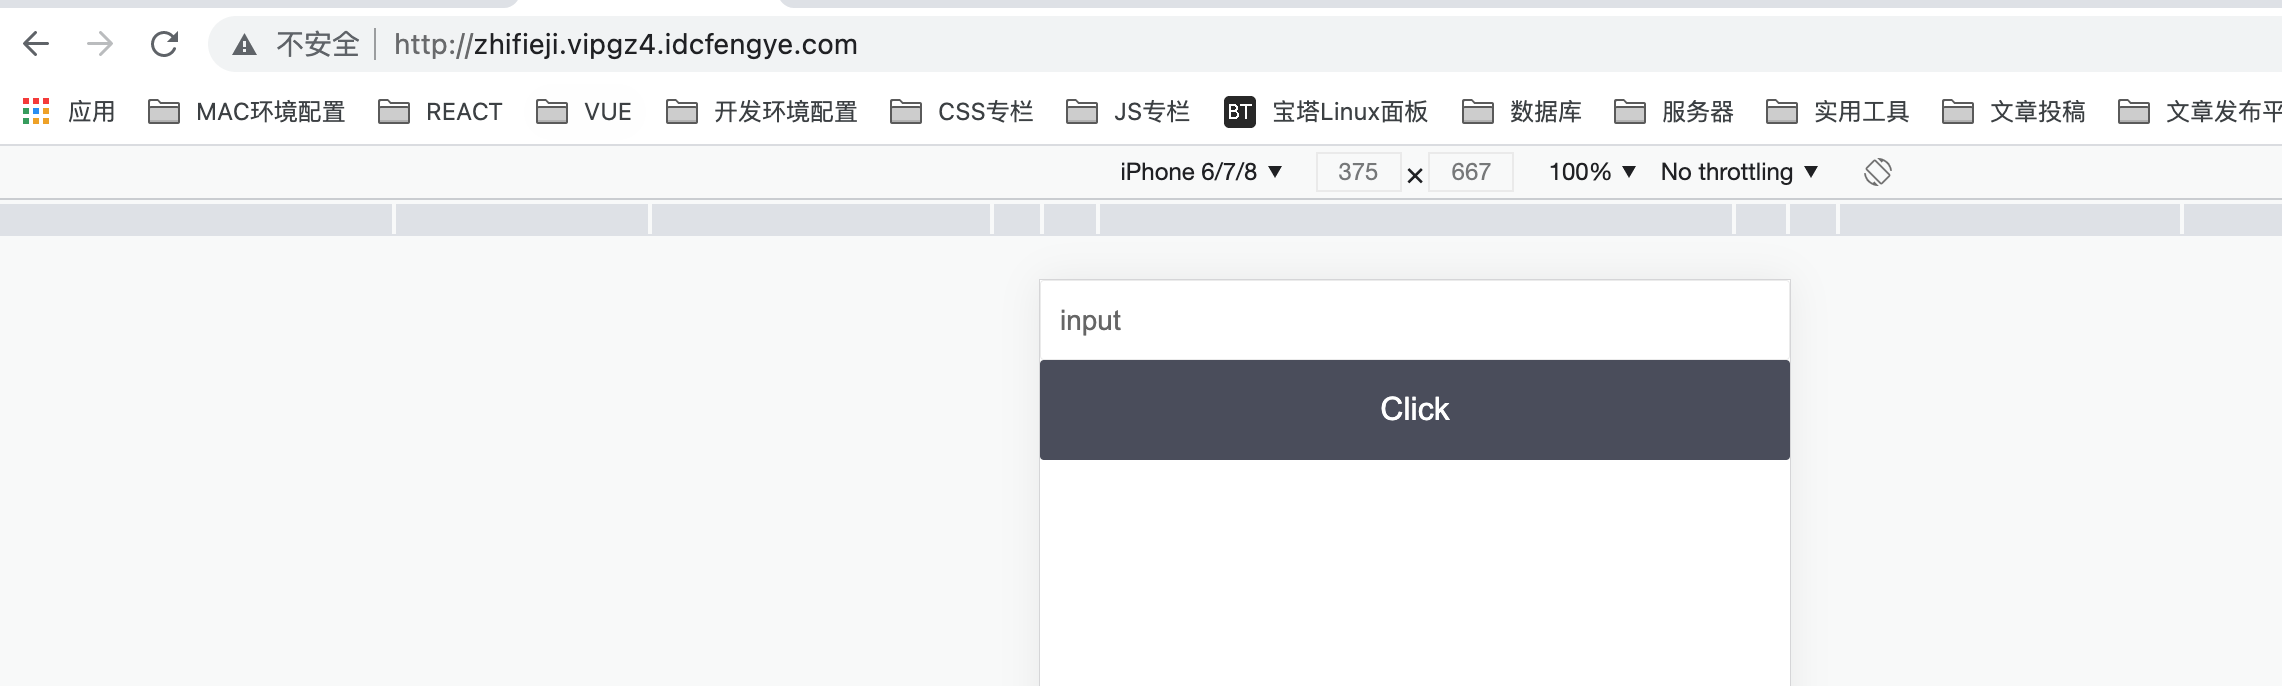
2, Use message interface
Wechat has its own automatic message reply function, which can be set on the public platform, but it is very rigid and cannot reply to messages dynamically
Enter wechat developer tool and apply for public platform test account 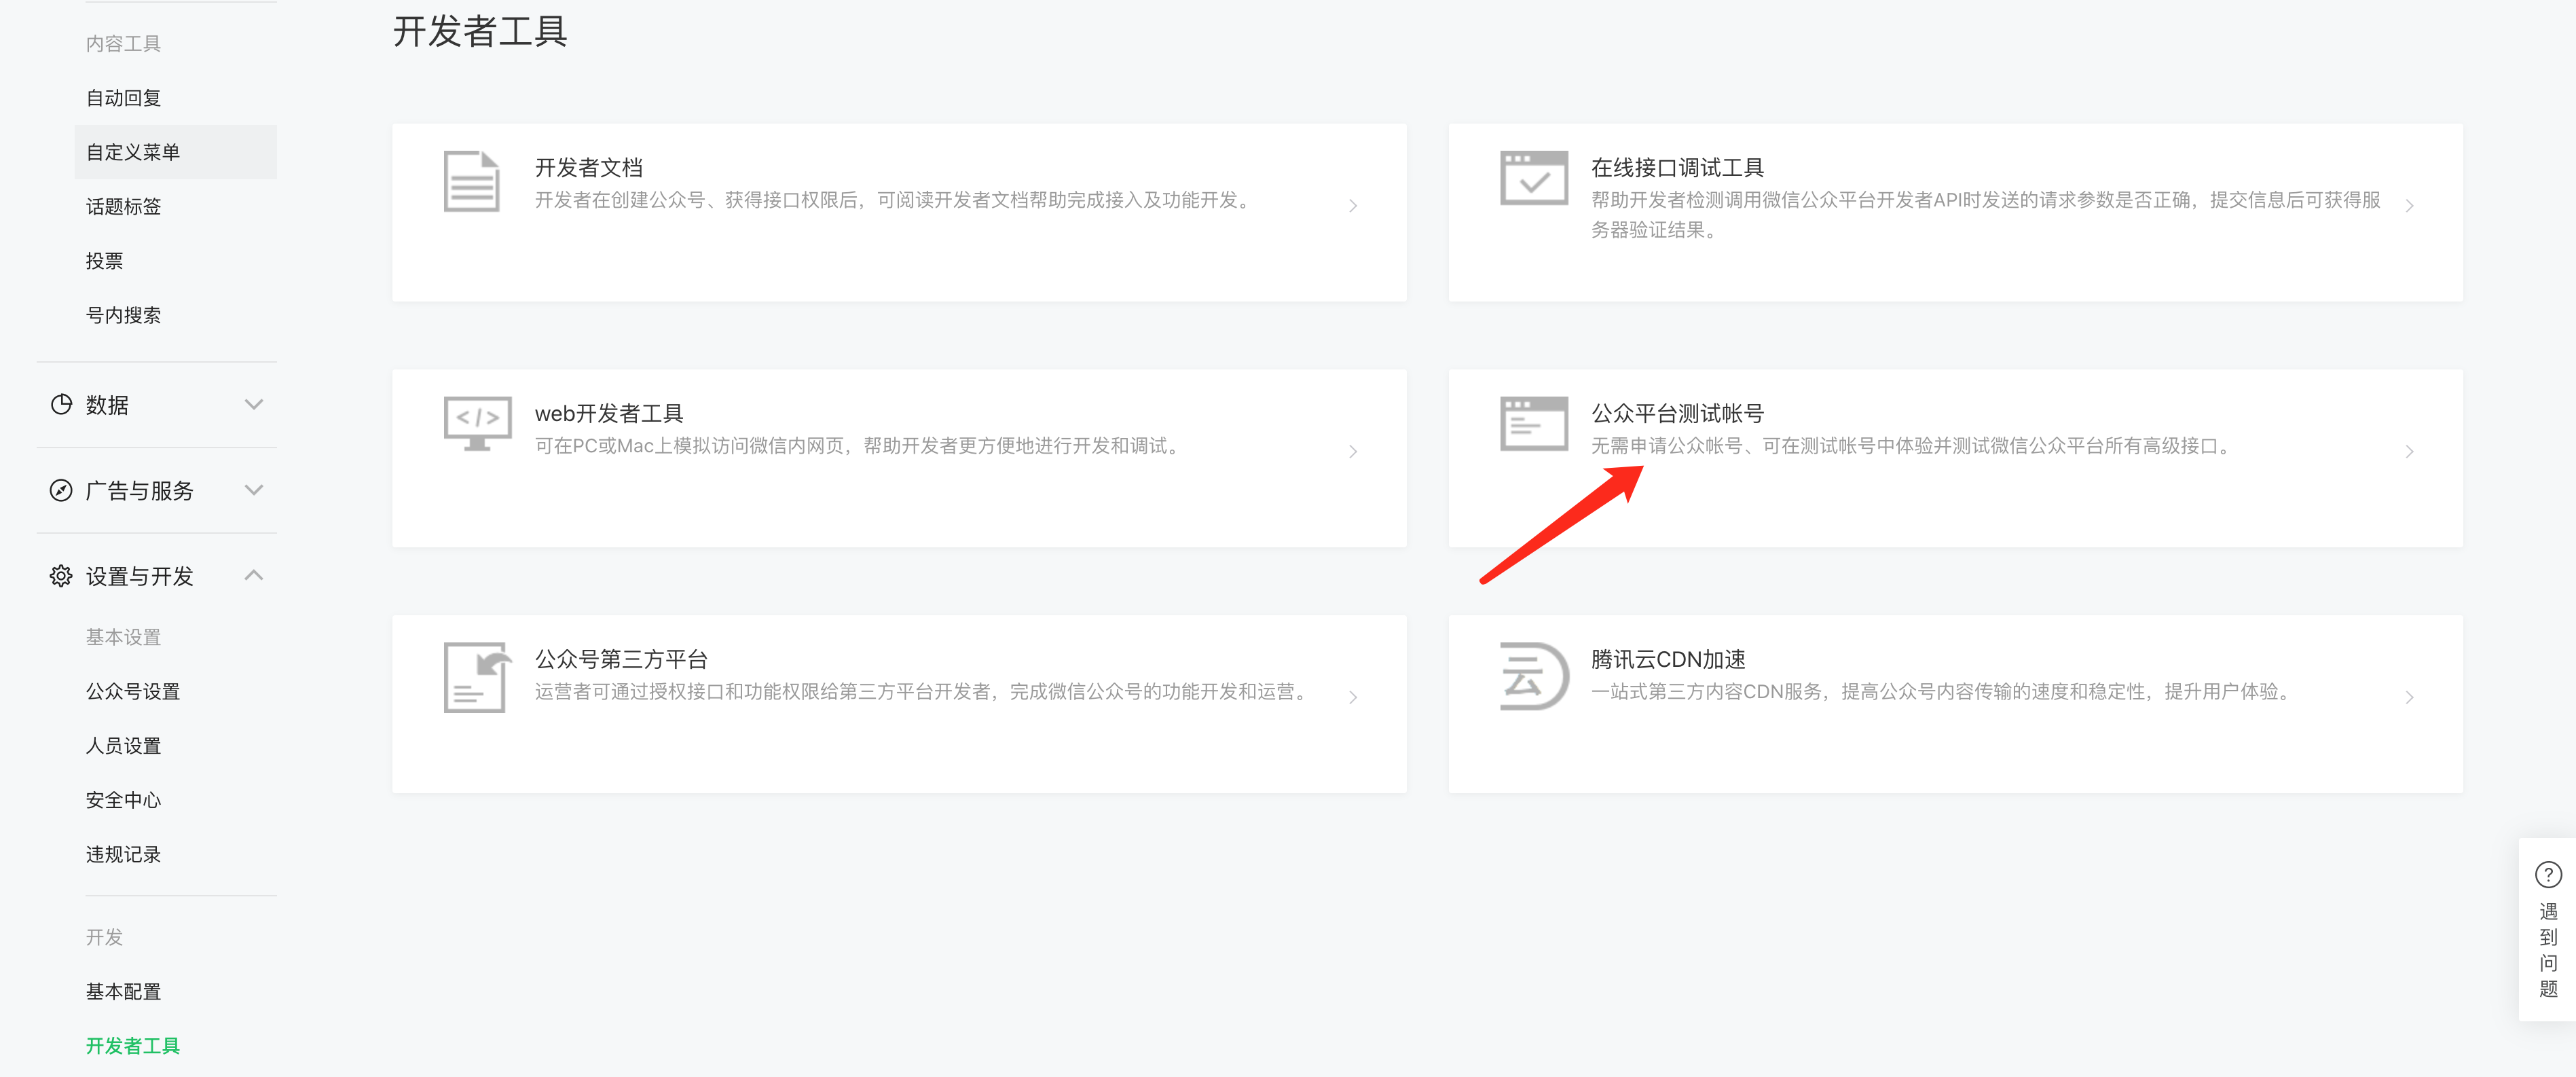 There are some configurations. Fill in the domain name of the forwarding, and the token is optional. It should be the same as that of the server
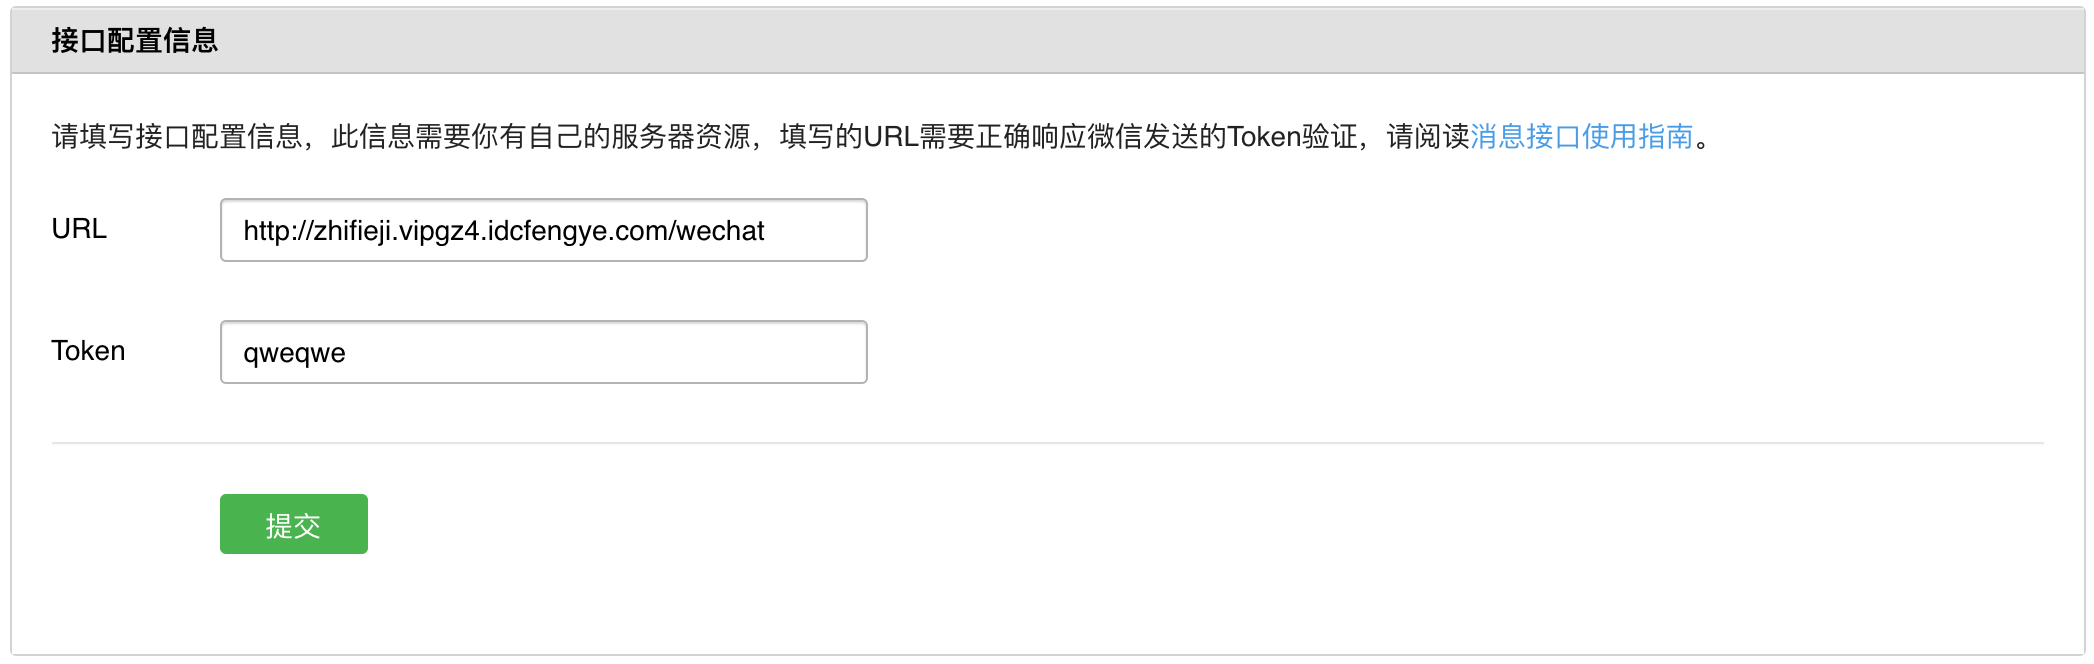 The URL of the interface configuration is the forwarded URL. Add / wechat, and then submit the interface configuration information (try more to submit successfully).
Then, configure in the project seed directory, create a new conf.js, and bring the previous appid, appsecret and token:
module.exports={
    appid: 'wx77f481fc8a9113a4',
    appsecret: '2b84470b9fb0f8166a8518c5b40edaf9',
    token: 'qweqwe'
}
It is introduced in index.js and uses a library Co wechat, so index.js will become as follows:
const Koa = require('koa')
const Router = require('koa-router')
const static = require('koa-static')
const bodyParser = require('koa-bodyparser');
const app = new Koa()
const conf = require('./conf')//Introducing conf
app.use(bodyParser())
const router = new Router()
app.use(static(__dirname + '/'))

const wechat = require('co-wechat')//Using the CO wechat Library
router.all('/wechat', wechat(conf).middleware(
    async message => {
        console.log('wechat:', message)
        return 'Hello World ' + message.Content
    }
))

app.use(router.routes()); /*Start routing*/
app.use(router.allowedMethods());
app.listen(3000);
Knowledge point: the library beginning with co - represents the library that meets the asynchronous requirements
After success, at this time, you can pay attention to the following two-dimensional code of the test number
If you send 1, you will reply to Hello World 1 (if it is set, there is no method to obtain the information sent by the user, so sometimes you need api), as shown in the following figure:! []( https://img-blog.csdnimg.cn/4426106b3d8841c086340b3b908ea3b9.png?x-oss-process=image/watermark,type_ZHJvaWRzYW5zZmFsbGJhY2s,shadow_50,text_Q1NETiBA5YmN56uv57q46aOe5py6,size_20,color_FFFFFF,t_70,g_se,x_16 =300x600)
3, Some api calls of wechat
Related documents: https://developers.weixin.qq.com/doc/offiaccount/Basic_Information/Get_access_token.html
Get token:
const axios = require('axios')
const tokenCache = {
    access_token:'',
    updateTime:Date.now(),
    expires_in:7200
}

router.get('/getTokens',async ctx => {//Get token
    const wxDomain =  `https://api.weixin.qq.com`
    const path = `/cgi-bin/token`
    const param = `?grant_type=client_credential&appid={conf.appid}&secret={conf.appsecret}`
    const url = wxDomain + path + param
    const res = await axios.get(url)
    Object.assign(tokenCache,res.data,{
        updateTime:Date.now()
    })
    ctx.body = res.data
})
Get user information
router.get('/getFollowers',async ctx => {//Get user information
    const url = `https://api.weixin.qq.com/cgi-bin/user/get?access_token=${tokenCache.access_token}`
    const res = await axios.get(url)
    console.log('getFollowers:',res)
    ctx.body = res.data
})
The above is the original writing method. In fact, we have ten libraries to use.
Using the CO wechat API
yarn add co-wechat-api
const WechatAPI = require('co-wechat-api')
const api = new WechatAPI(
conf.appid,
conf.appsecret,
// //Get Token
// async () => await ServerToken.findOne(),
// //Save Token
// async token => await ServerToken.updateOne({}, token, { upsert: true })
)
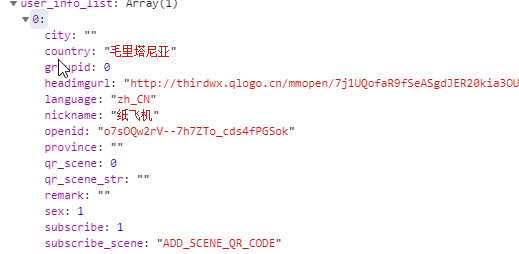
router.get('/getFollowers', async ctx => {
let res = await api.getFollowers()
res = await api.batchGetUsers(res.data.openid, 'zh_CN')//Details will be returned after adding
ctx.body = res
})
4, Global ticket
Global bills need to be based on mongodb or redirects. We use mongodb to create a new mongoose.js
const mongoose = require('mongoose')
const {
    Schema
} = mongoose
mongoose.connect('mongodb://localhost:27017/weixin', {
    useNewUrlParser: true
}, () => {
    console.log('Mongodb connected..')
})
exports.ServerToken = mongoose.model('ServerToken', {
    accessToken: String
});
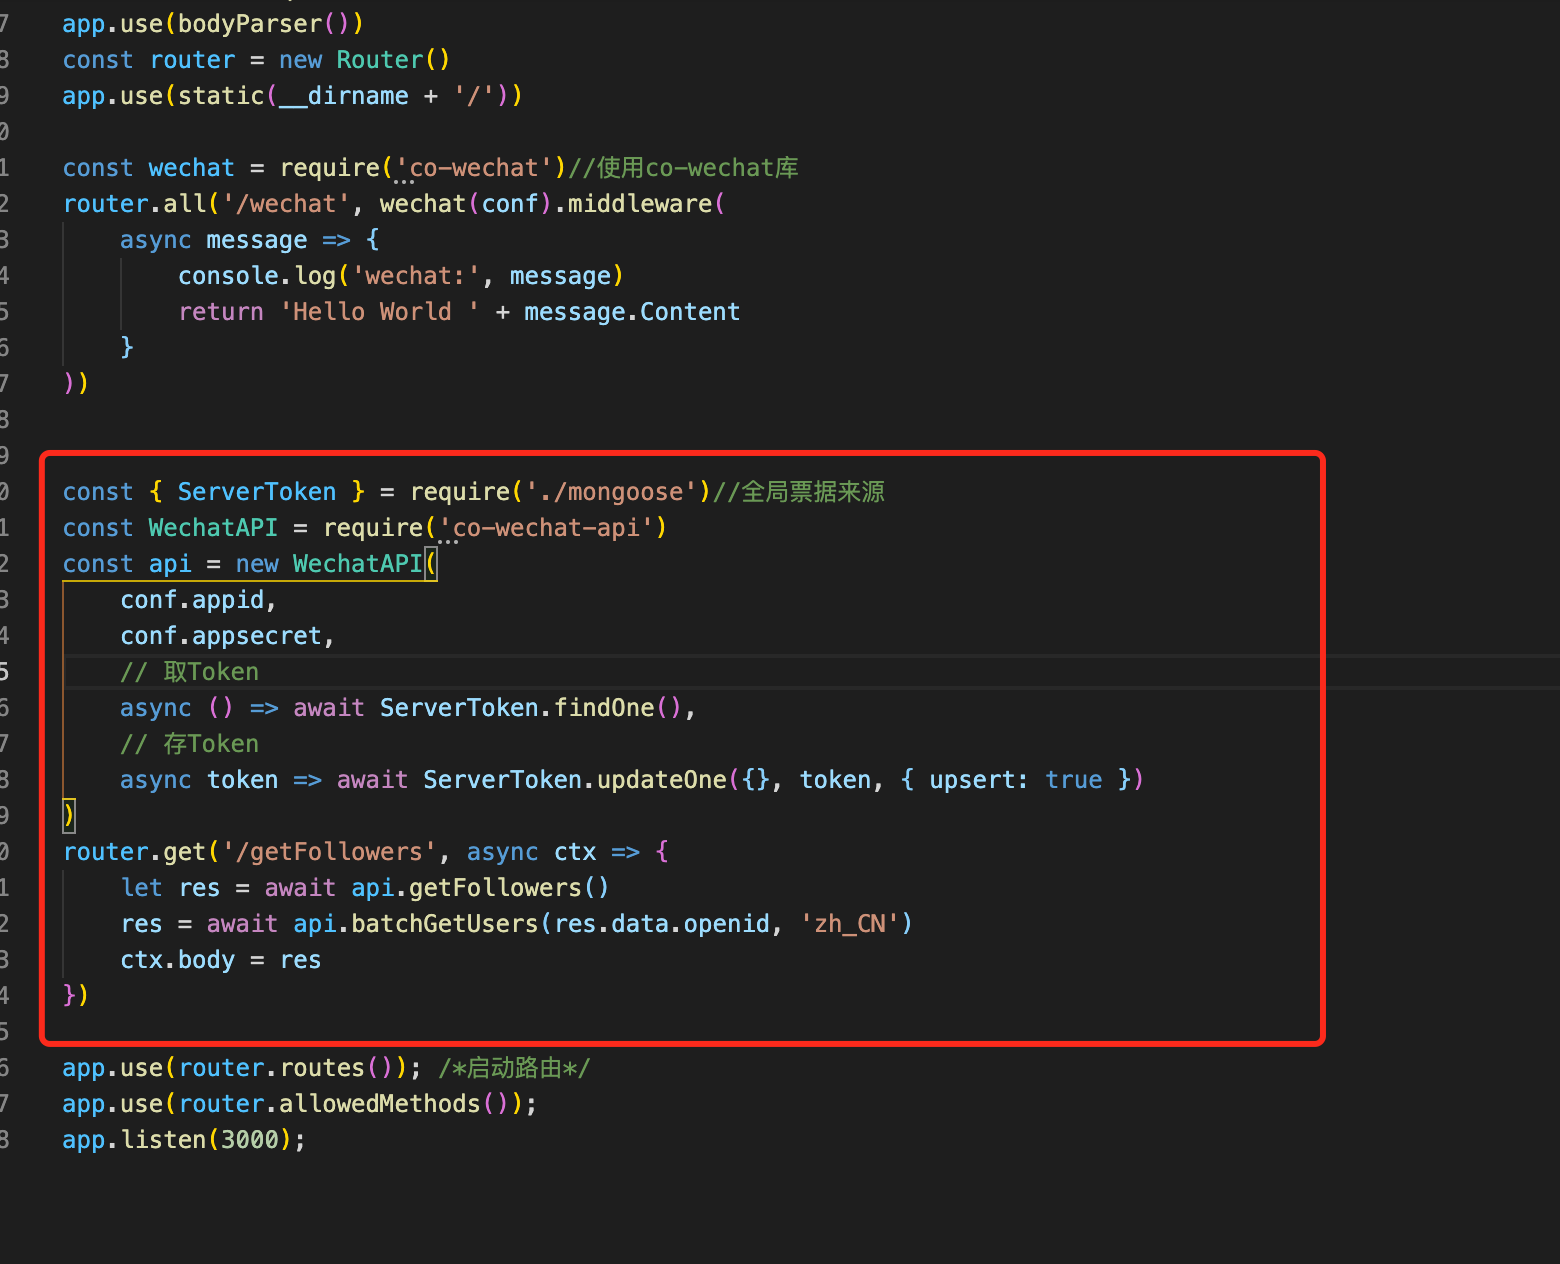
The CO wechat API used above is modified in index.js:
const { ServerToken } = require('./mongoose')//Global bill source
const WechatAPI = require('co-wechat-api')
const api = new WechatAPI(
    conf.appid,
    conf.appsecret,
    // Get Token
    async () => await ServerToken.findOne(),
    // Save Token
    async token => await ServerToken.updateOne({}, token, { upsert: true })
)
router.get('/getFollowers', async ctx => {
    let res = await api.getFollowers()
    res = await api.batchGetUsers(res.data.openid, 'zh_CN')
    ctx.body = res
})
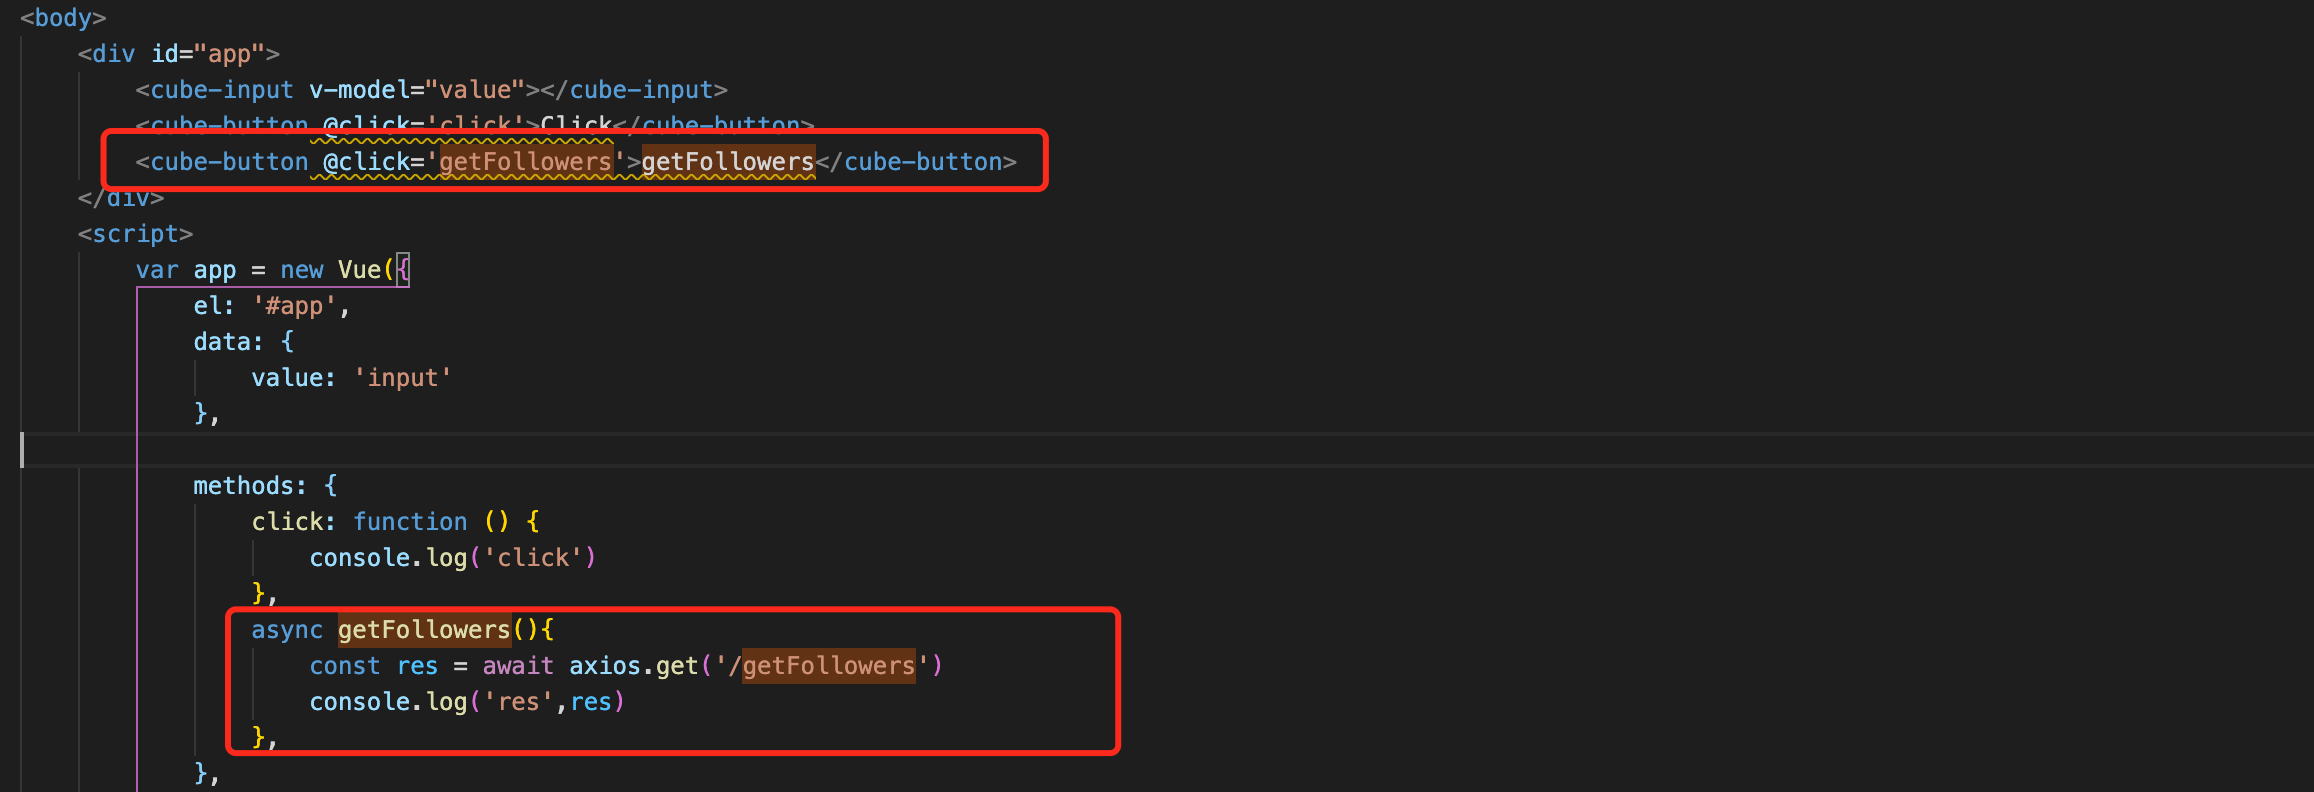
 Add a button and a button click method in index.html:
<cube-button @click='getFollowers'>getFollowers</cube-button>
 async getFollowers(){
      const res = await axios.get('/getFollowers')
      console.log('res',res)
},
 Click with a small hand: (this getFollwers gets the data)
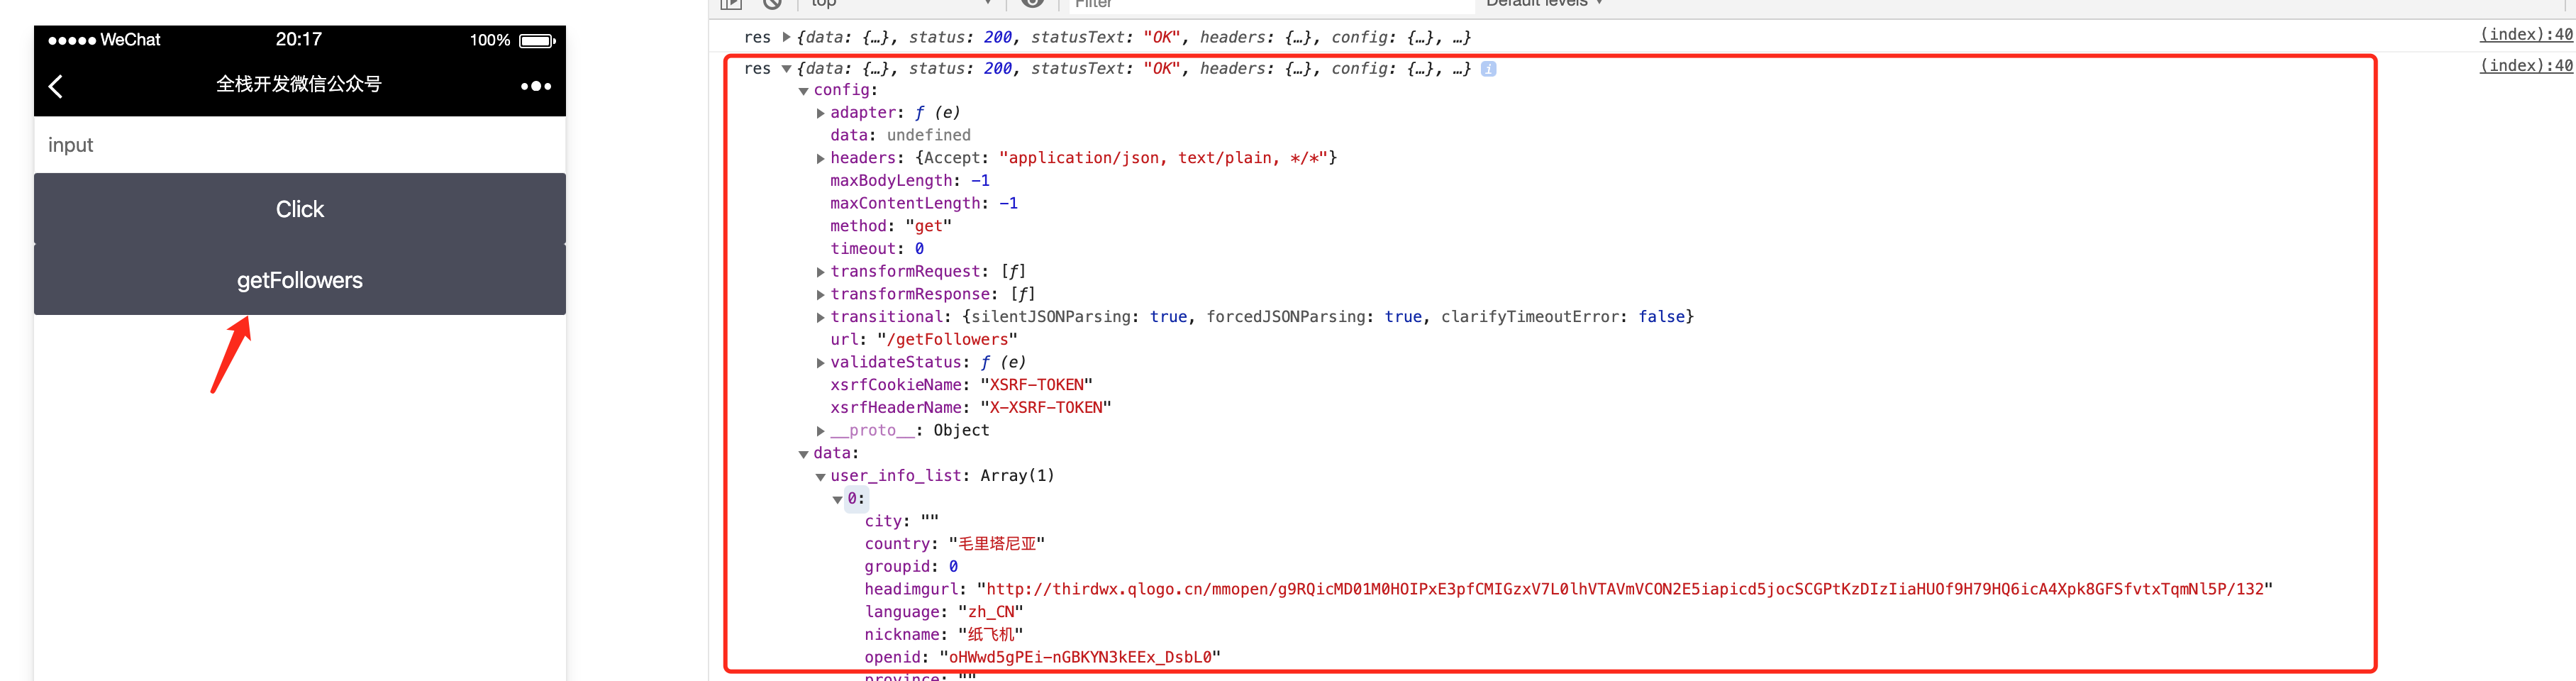
5, Message push
Just like this, the mobile wechat code scanning wechat public platform sends 1 or 2 to the front desk, and the pie chart automatically counts the times of sending 1 and 2.! []( https://img-blog.csdnimg.cn/c25b0480ca824e13a6865de7b207b0c9.png?x-oss-process=image/watermark,type_ZHJvaWRzYW5zZmFsbGJhY2s,shadow_50,text_Q1NETiBA5YmN56uv57q46aOe5py6,size_20,color_FFFFFF,t_70,g_se,x_16 =400x400) the background (simulator) will display the push of the foreground (mobile wechat in the test subscription number), and update echart. The code is the vote part below, and the code will be released later. 
6, Oauth2 certification process
First of all, you should know that there are three terminals, browser, server and wechat server. 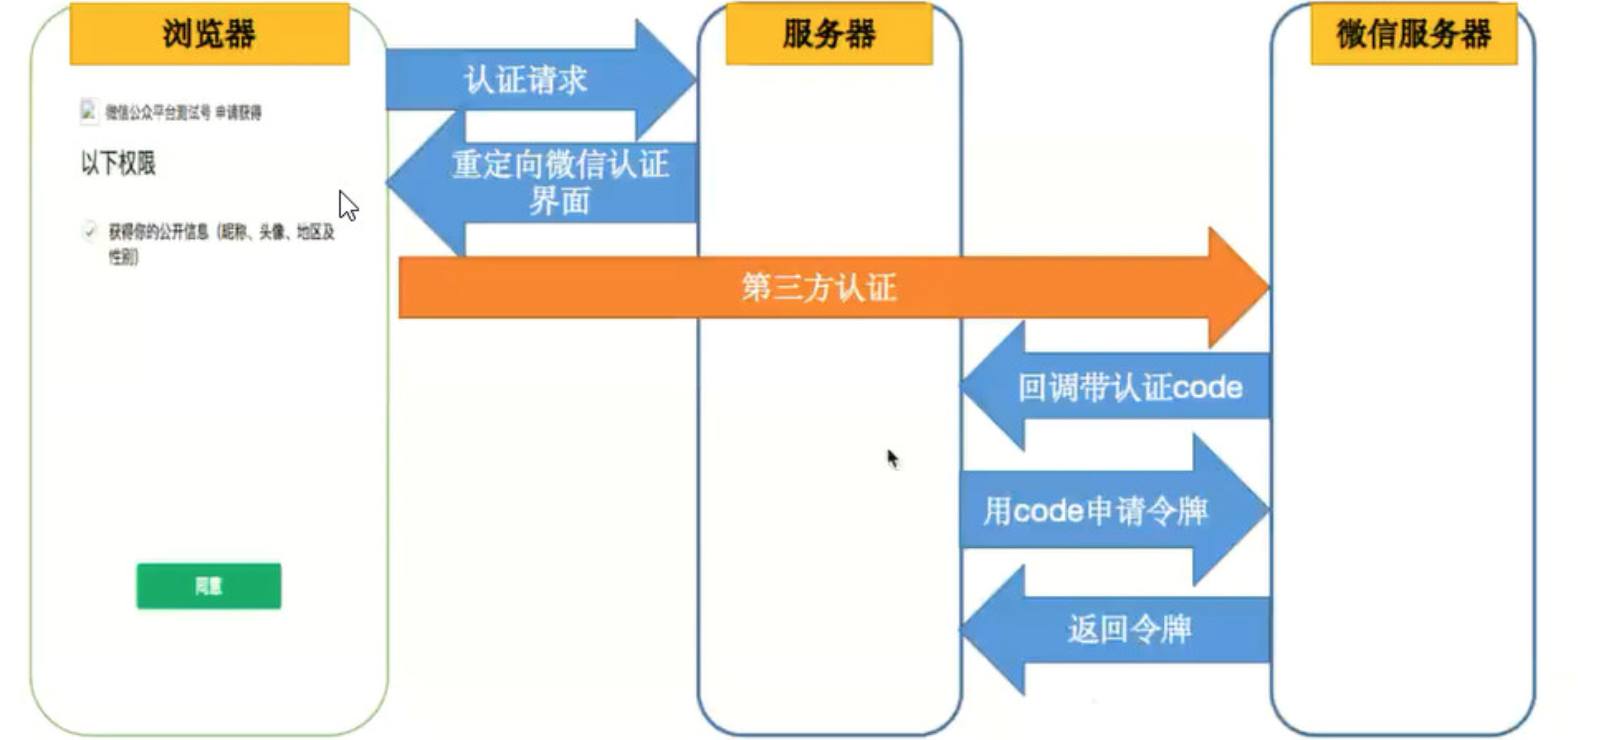
1. The browser sends an authentication request to the server
2. The server allows the browser to redirect the wechat authentication interface
3. The browser requests third-party authentication (wechat authentication) from the wechat server
4. The wechat server sends an authentication code to the server
5. The server uses code to apply for authentication token from wechat server
6. The wechat server returns a token to the server
Finally, when the server gets the token authentication successfully, it sends an instruction to the browser to refresh the interface 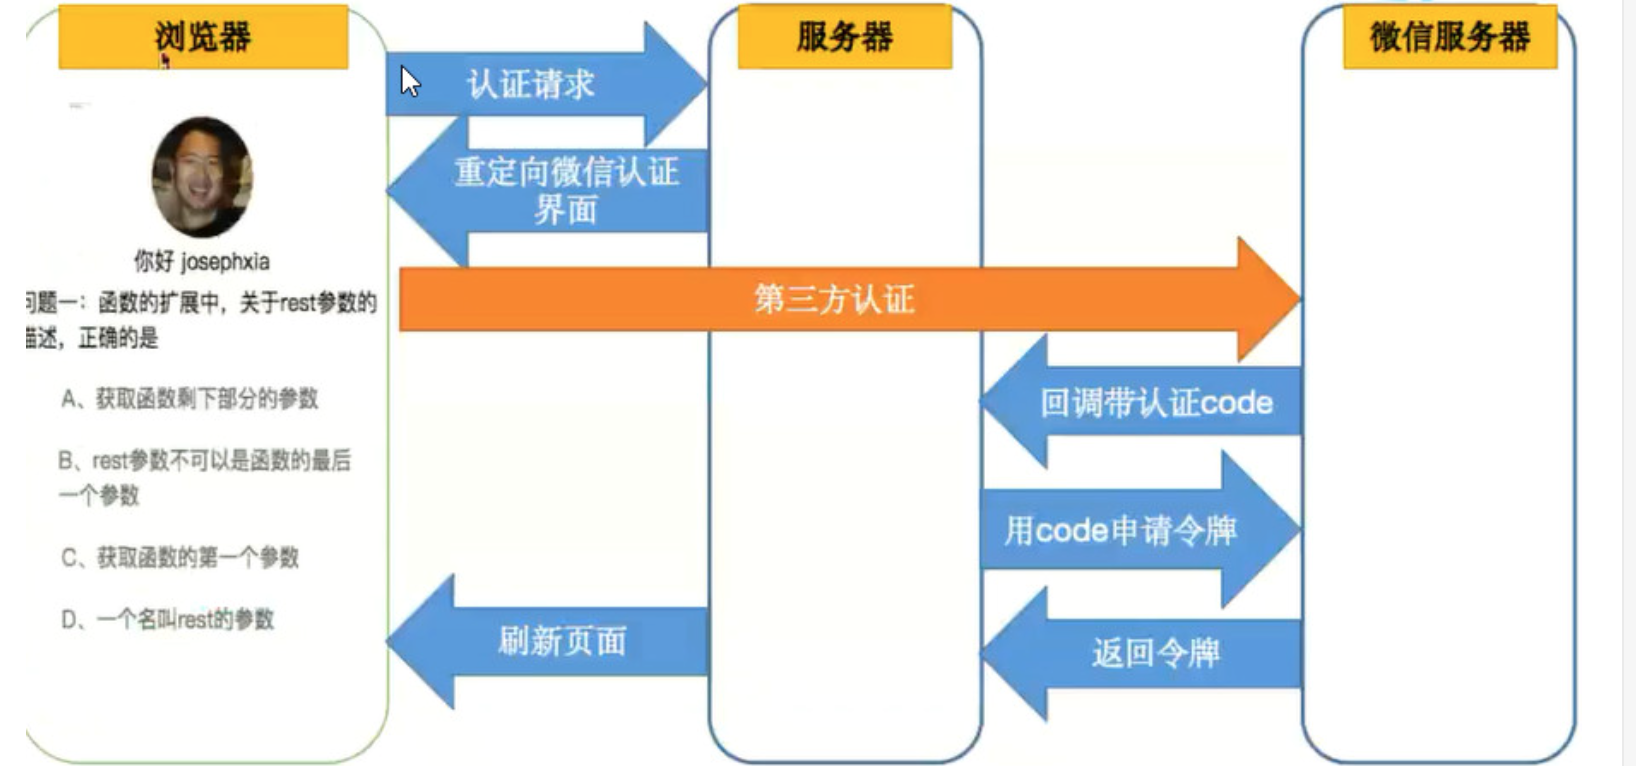
After refreshing, there will be a user information
Use WeChat developer tools to select official account pages for previewing.
PS: in the above code
- The message pushed me to put it in the vote directory
- The remaining api call methods are placed in the seed directory
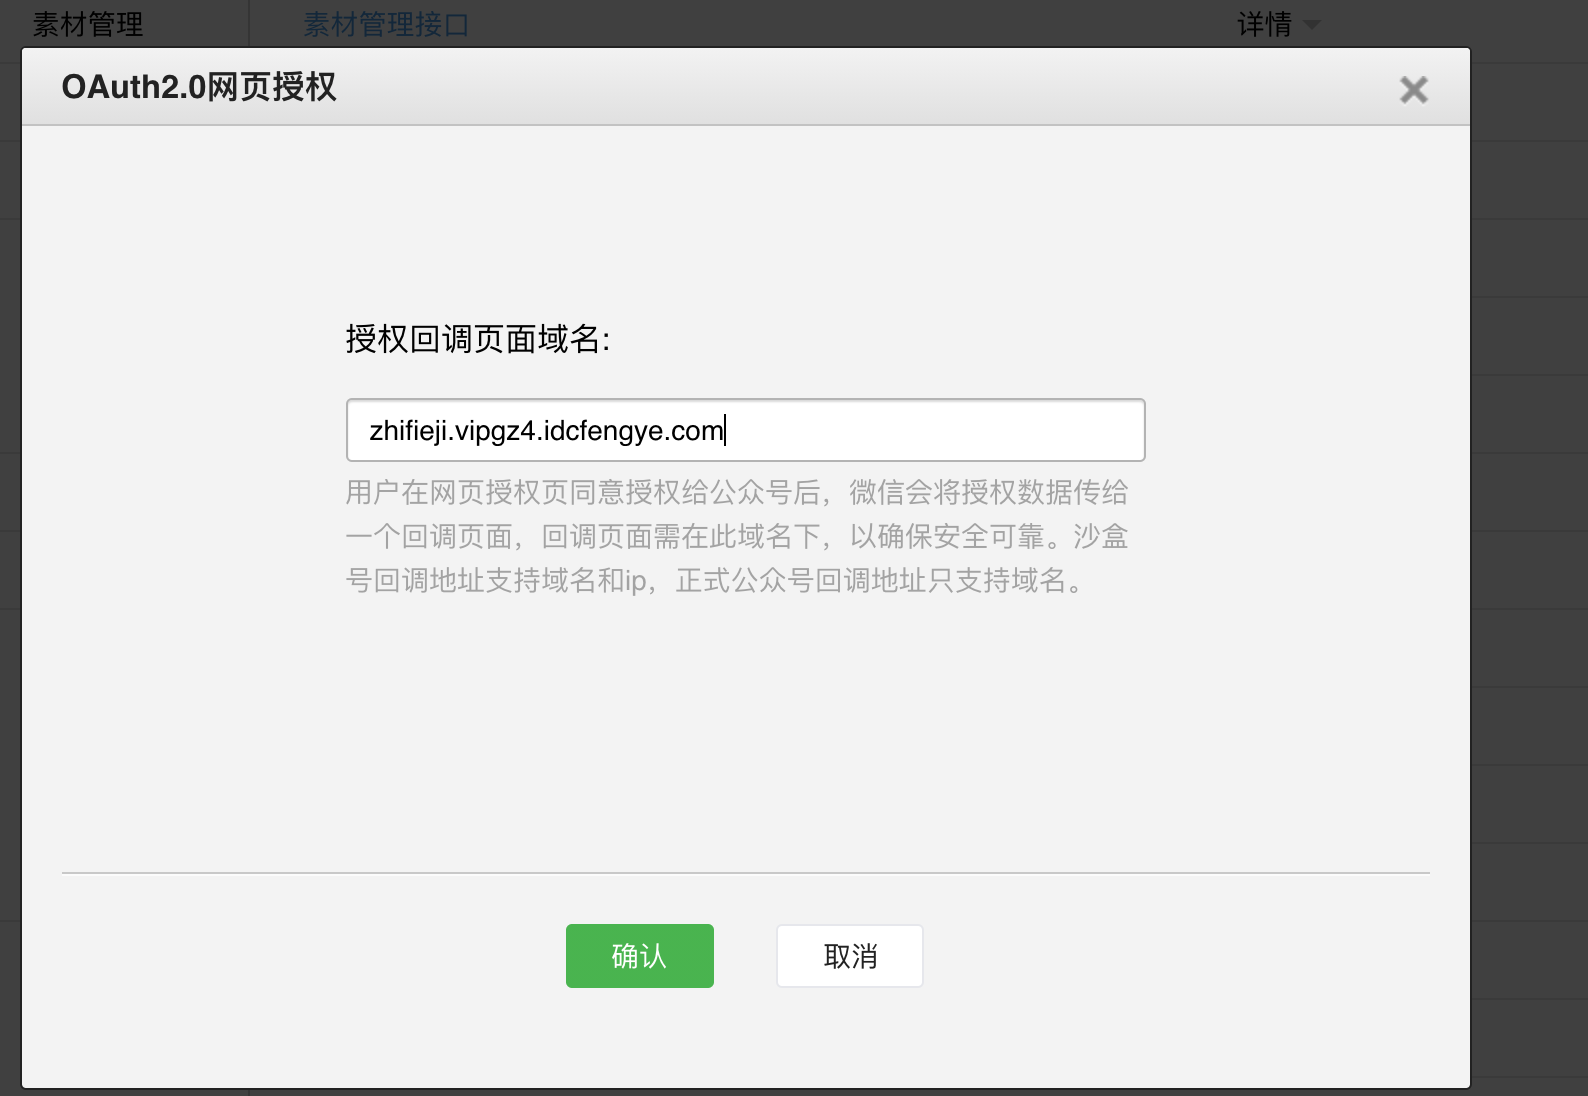
7, Implement a wechat authentication login
Configure the js interface security domain name, which is the public domain name we forward (without protocol): zhifieji.vipgz4.idcfengye.com  Furthermore, each wechat interface api should also authorize the domain name, that is, the modification location in the figure below, which is the same as the above: (zhifieji.vipgz4.idcfengye.com)
 Make a copy of the seed directory in the previous project, which is called seed_up. We give the previous to continue working in seed_up! index.js;
const OAuth = require('co-wechat-oauth')//Introduce an oauth Library
const oauth = new OAuth(conf.appid,conf.appsecret)

/**
 * Generate user URL
 */
router.get('/wxAuthorize', async (ctx, next) => {
    const state = ctx.query.id
    console.log('ctx...' + ctx.href)
    let redirectUrl = ctx.href
    redirectUrl = redirectUrl.replace('wxAuthorize', 'wxCallback')
    const scope = 'snsapi_userinfo'
    const url = oauth.getAuthorizeURL(redirectUrl, state, scope)
    console.log('url' + url)
    ctx.redirect(url)
})
/**
 * User callback method
 */
router.get('/wxCallback', async ctx => {
    const code = ctx.query.code
    console.log('wxCallback code', code)
    const token = await oauth.getAccessToken(code)
    const accessToken = token.data.access_token
    const openid = token.data.openid
    console.log('accessToken', accessToken)
    console.log('openid', openid)
    ctx.redirect('/?openid=' + openid)
})
/**
 * Get user information
 */
router.get('/getUser', async ctx => {
    const openid = ctx.query.openid
    const userInfo = await oauth.getUser(openid)
    console.log('userInfo:', userInfo)
    ctx.body = userInfo
})
index.html:
<!DOCTYPE html>
<html>

<head>
    <title>WeChat official account for full stack development</title>
    <meta charset="UTF-8">
    <meta name="viewport" content="width=device-width,initial-scale=1,user-scalable=0">
    <script src="https://unpkg.com/vue@2.1.10/dist/vue.min.js"></script>
    <script src="https://unpkg.com/axios/dist/axios.min.js"></script>
    <script src="https://unpkg.com/cube-ui/lib/cube.min.js"></script>
    <script src="https://cdn.bootcss.com/qs/6.6.0/qs.js"></script>
    <script src="http://res.wx.qq.com/open/js/jweixin-1.4.0.js"></script>
    <link rel="stylesheet" href="https://unpkg.com/cube-ui/lib/cube.min.css">
    <style>
        /* .cube-btn {
            margin: 10px 0;
        } */
    </style>
</head>

<body>
    <div id="app">
        <cube-input v-model="value"></cube-input>
        <cube-button @click='click'>Click</cube-button>
        <cube-button @click='getTokens'>getTokens</cube-button>
        <cube-button @click='getFollowers'>getFollowers</cube-button>
        <cube-button @click='auth'>Wechat login</cube-button>
        <cube-button @click='getUser'>Get user information</cube-button>
    </div>
    <script>
        var app = new Vue({
            el: '#app',
            data: {
                value: 'input'
            },

            methods: {
                click: function () {
                    console.log('click')
                },
                async getTokens(){
                    const res = await axios.get('/getTokens')
                    console.log('res:',res)
                },
                async getFollowers(){
                    const res = await axios.get('/getFollowers')
                    console.log('res',res)
                },
                async auth(){
                    window.location.href = '/wxAuthorize'
                },
                async getUser(){
                    const qs = Qs.parse(window.location.search.substr(1))
                    const openid= qs.openid
                    const res = await axios.get('/getUser',{
                        params:{
                            openid
                        }
                    })
                    console.log('res',res)
                }
            },
            mounted: function () {

            },
        });
    </script>
</body>

</html>
Global bill (same as Mongoose, modified from last time) mongoose.js:
const mongoose = require('mongoose')
const {
    Schema
} = mongoose
mongoose.connect('mongodb://localhost:27017/weixin', {
    useNewUrlParser: true
}, () => {
    console.log('Mongodb connected..')
})
exports.ServerToken = mongoose.model('ServerToken', {
    accessToken: String
});

//The following is a new version of seed_up

schema = new Schema({
    access_token: String,
    expires_in: Number,
    refresh_token: String,
    openid: String,
    scope: String,
    create_at: String
});
// Custom getToken method
schema.statics.getToken = async function (openid) {
    return await this.findOne({
        openid: openid
    });
};
schema.statics.setToken = async function (openid, token) {
    // Update if any, add if none
    const query = {
        openid: openid
    };
    const options = {
        upsert: true
    };
    return await this.updateOne(query, token, options);
};

exports.ClientToken = mongoose.model('ClientToken', schema);
Continue to change index.js:
const { ServerToken,ClientToken } = require('./mongoose')//Global bill source
const oauth = new OAuth(conf.appid, conf.appsecret,
    async function (openid) {
        return await ClientToken.getToken(openid)
    },
    async function (openid, token) {
        return await ClientToken.setToken(openid, token)
    }
)
The effect is as follows: perfect
[video(video-KTwIIMGP-1632587503822)(type-tencent)(url-https://v.qq.com/txp/iframe/player.html?vid=e3278ajafl6)(image-http://puui.qpic.cn/vpic/0/e3278ajafl6.png/0)(title-)]
8, Call wechat jssdk
get ready:
1. Get jsconfig
index.html:
<cube-button @click='getJSConfig'>obtain jsconfig</cube-button>
async getJSConfig(){
  console.log('wx',wx)
  const res = await axios.get('/getJSConfig',{
      params:{
          url:window.location.href
      }
  })
  console.log('config',res)
  res.data.jsApiList = ['onMenuShareTimeline']
  wx.config(res.data)
  wx.ready(function () {
      console.log('wx.ready......')
  })
}
index.js:
/**
 * Get JSConfig
 */
router.get('/getJsConfig',async ctx => {
    console.log('getJSSDK...',ctx.query)
    const res = await api.getJsConfig(ctx.query)
    ctx.body = res
})
If you can go to wx.ready(), it means that other functions and APIs can be used at this time. 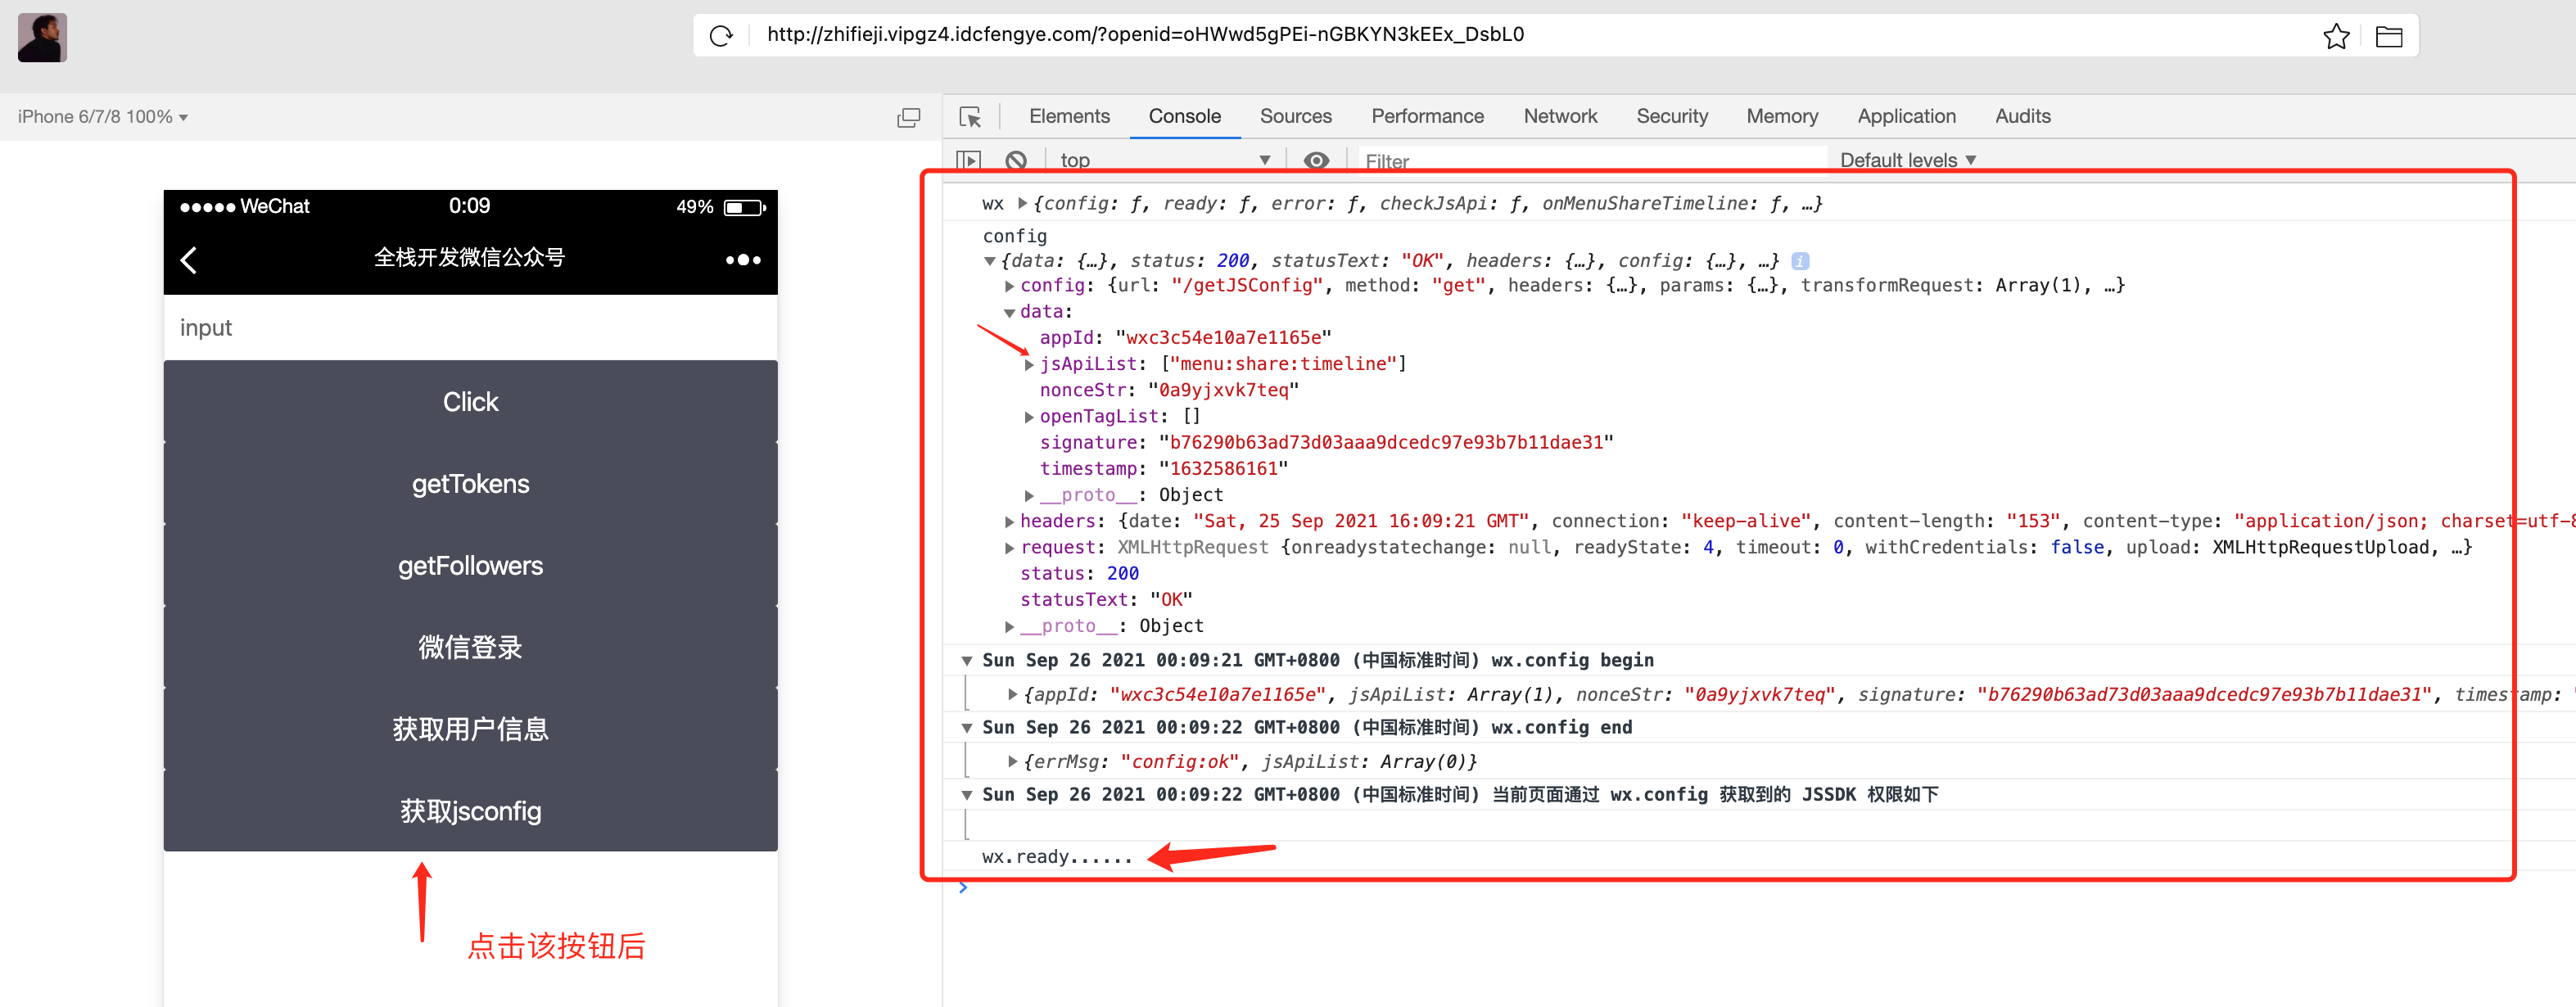
2. Get network status
After wx.ready(), of course, it is most reasonable to add in ready():
//Get network status
wx.getNetworkType({
     success: function (res) {
         // Return network type 2g, 3g, 4g, wifi
         const networkType = res.networkType
         console.log('getNetworkType...', networkType)
     }
})
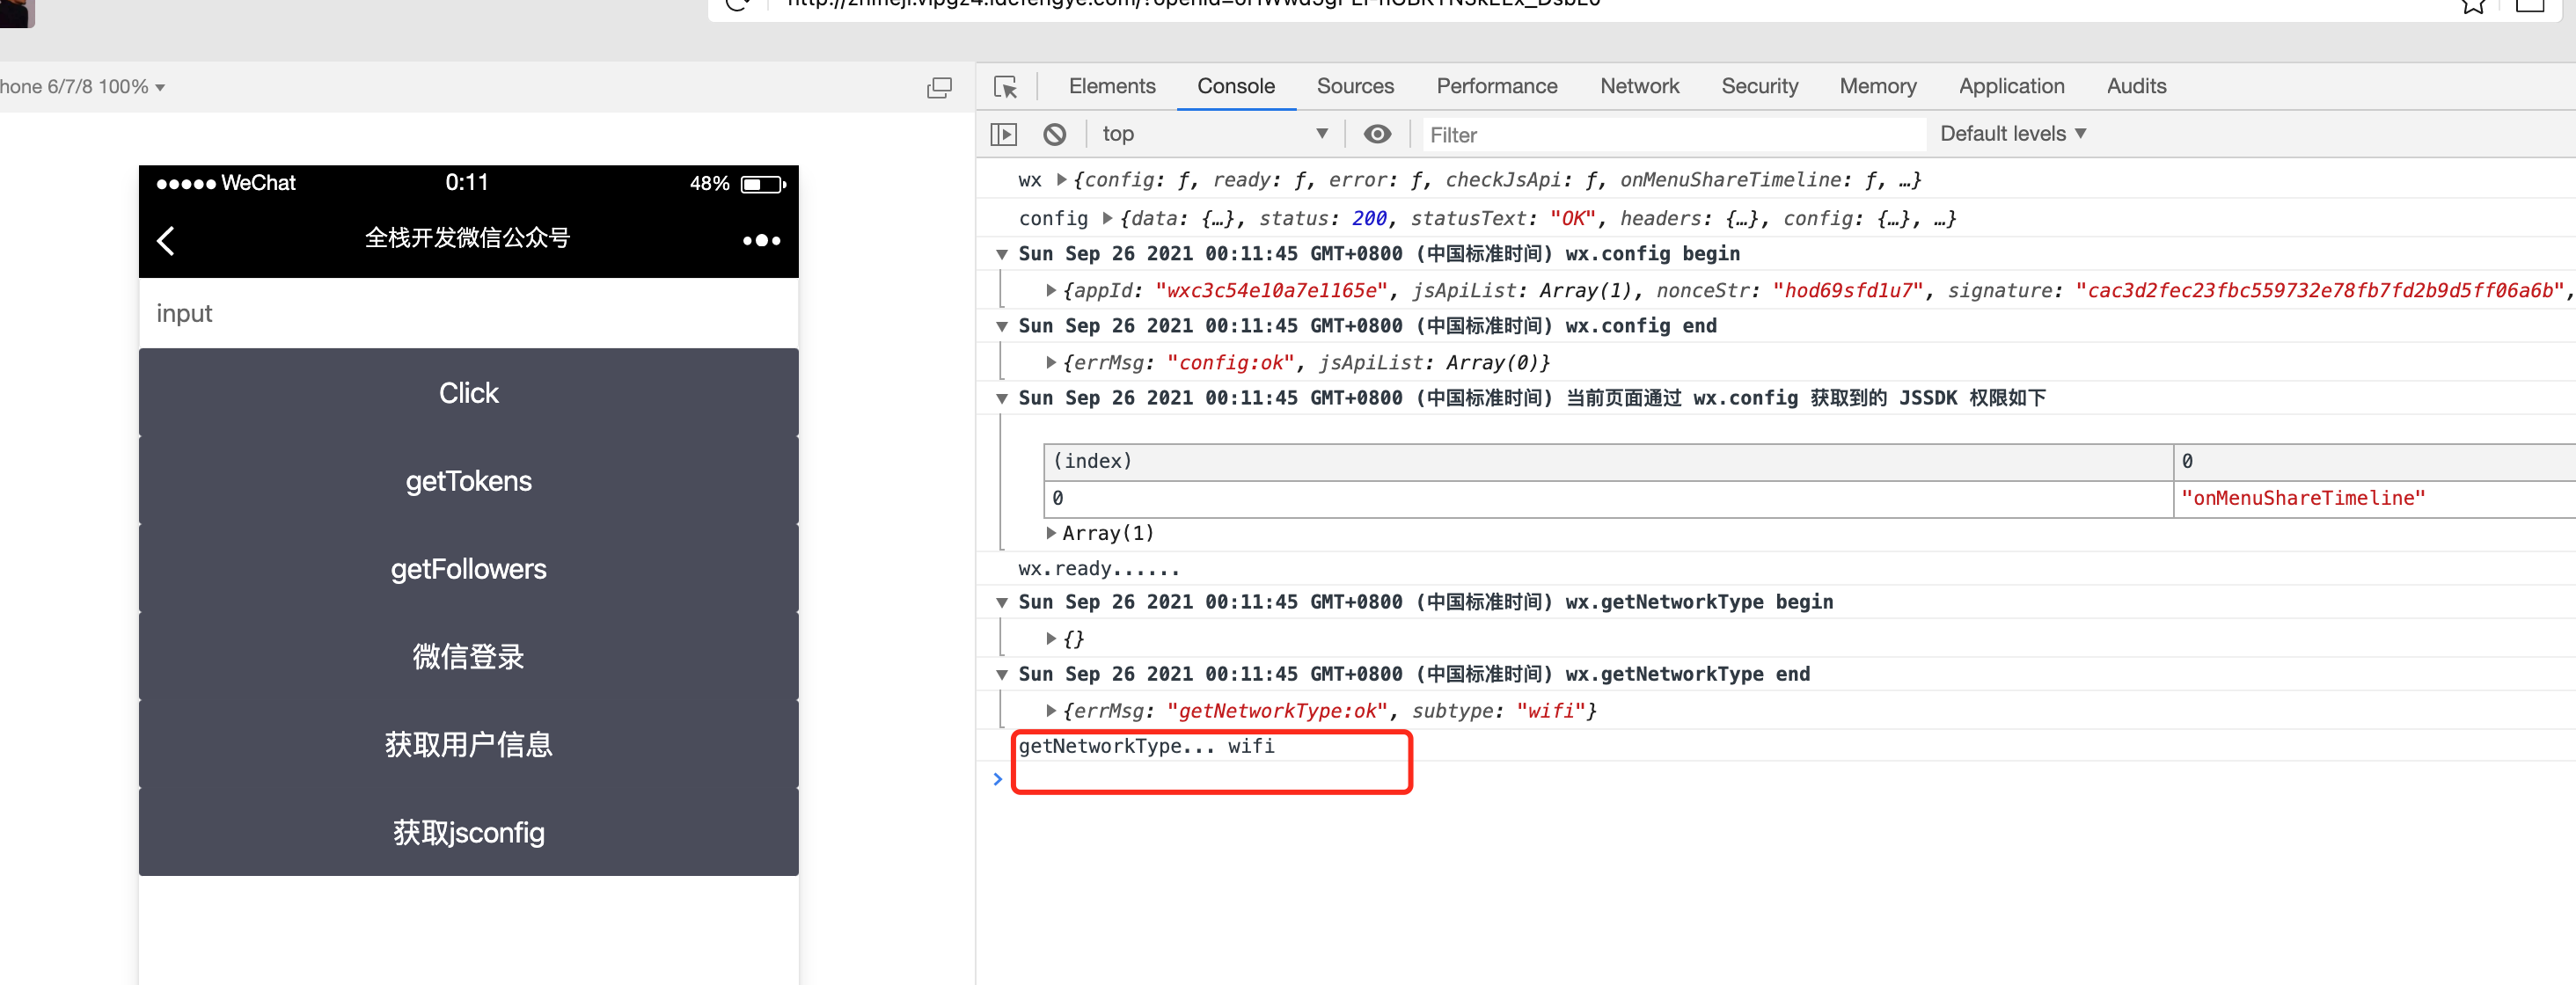 I got that I am a wifi environment, which is perfect! The same is true for other jssdk calling methods!
Another point is that we usually separate the front and back ends of our development projects, so I changed the project to separate the front and back ends.
9, Development of front and rear end separation
1. Create a new weixin_pro project 2. Copy the package.json of Weixin project to weixin_pro 3. Divide a cube UI directory into front-end code 4 and a quiz directory into back-end code 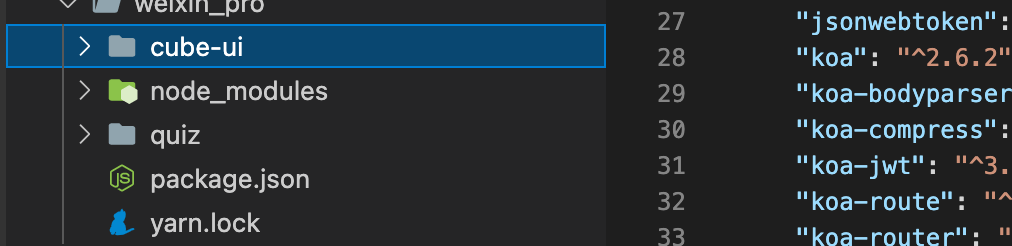 5. The installation dependency under weixin_pro is the back-end dependency. 6. The installation dependency under cube UI is the front-end dependency. 7. Start the front-end code and the back-end code respectively
The operation effect is as follows:
[video(video-v2FEoxvx-1632588608459)(type-tencent)(url-https://v.qq.com/txp/iframe/player.html?vid=l3278ig1v72)(image-http://puui.qpic.cn/vpic/0/l3278ig1v72.png/0)(title-)]
10, Code address
Code before front and rear end separation: https://gitee.com/huqinggui/weixin.git Code after separation of front and rear ends: https://gitee.com/huqinggui/weixin_pro.git