The algorithm model is applied to real life, and corresponding changes have been made to the original model for specific tasks, which is really learning for application; And it's fun. It really makes people feel the fun of scientific research! So it's a special collection
one
preface:
Looking at his increasingly fat body and recalling his heroic posture in those years, I have a lot of feelings. As a shameful procedural ape, I decided to start losing weight. After investigating dozens of weight loss projects, I chose sit ups. Because it has small space limit, short time limit, no violence and no injury to the body. The most important thing is to be able to watch variety shows and exercise at the same time. It's wonderful! After a few days of trial, I found that there was a thorny problem. When I was doing it, I forgot how many I had done. I looked confused and helpless, so I had the inspiration of this sports counting APP. There is no need for too fancy functions. The simplest thing is to count my sit ups and display them on the APP interface. At the key nodes of 10 and 20 (% 10 = = 0), there will be the encouragement of little sister Lin Zhiling! In fact, the coding of the interface is not difficult, but the development of the algorithm...
General idea:
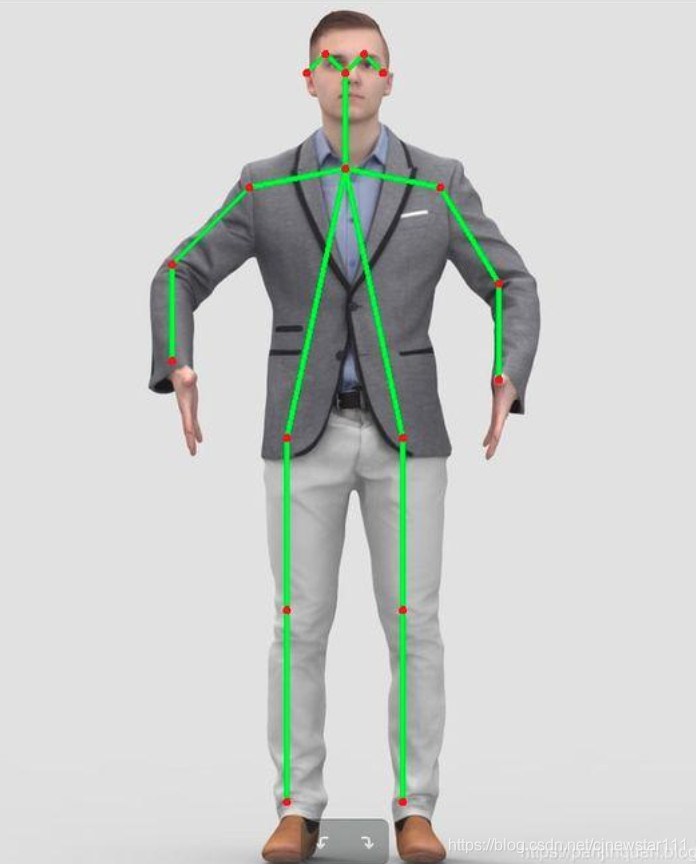
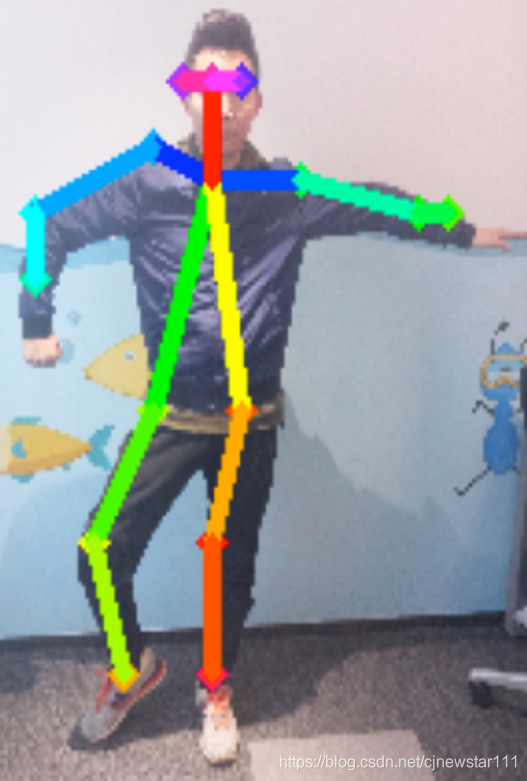
There is an application branch in computer vision called pose estimation, which can estimate the pose information of one or more people in the way of key points. As shown in the figure below:
In order to reduce the difficulty of algorithm development, this APP only needs to detect the attitude of a single person. If the effect of posture detection is good, the count of sit ups can be completed in theory. The counting rule is very simple: by observing the posture of sit ups, as long as the Euclidean distance between the key points representing the head and the key points representing the knee changes periodically, it can be considered to be doing sit ups, and the frequency and cycle can be easily counted for counting. So the remaining problem is how to choose and design a model to detect the attitude quickly and well. After all, it should be realized on the mobile phone. Without speed, everything is nonsense!
The first scheme of patting the forehead:
Because I have done more target detection before, I have not done pose estimation, and I don't know much about this field, but my intuition tells me that it's very simple. Because it is a single person's attitude detection, and suppose I need to predict 13 key points. As shown in the figure below:
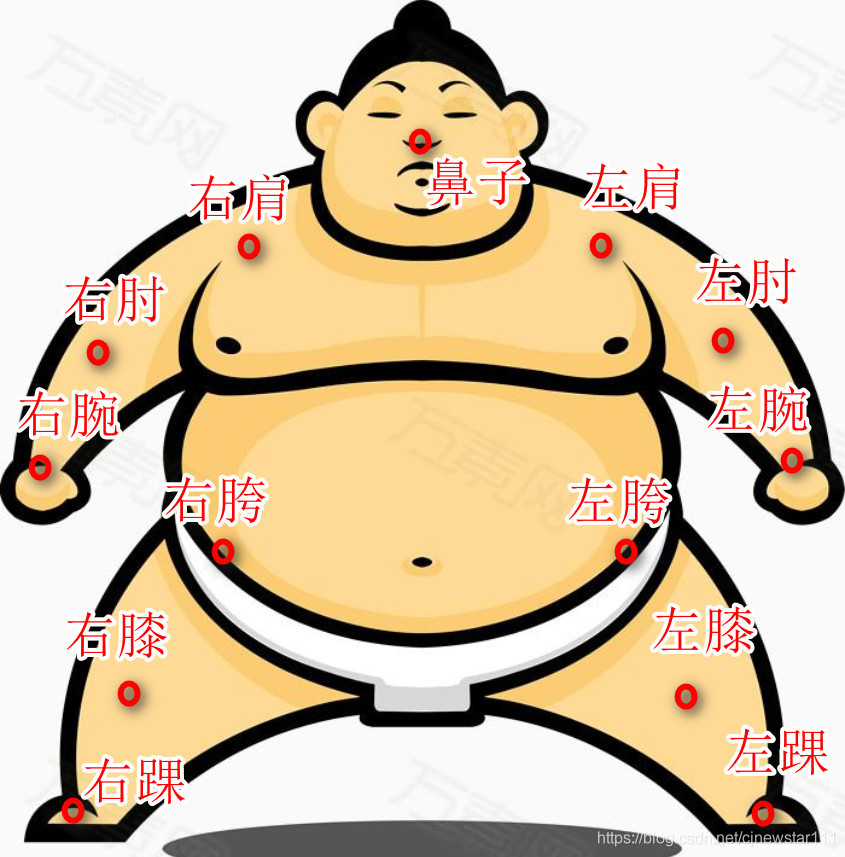
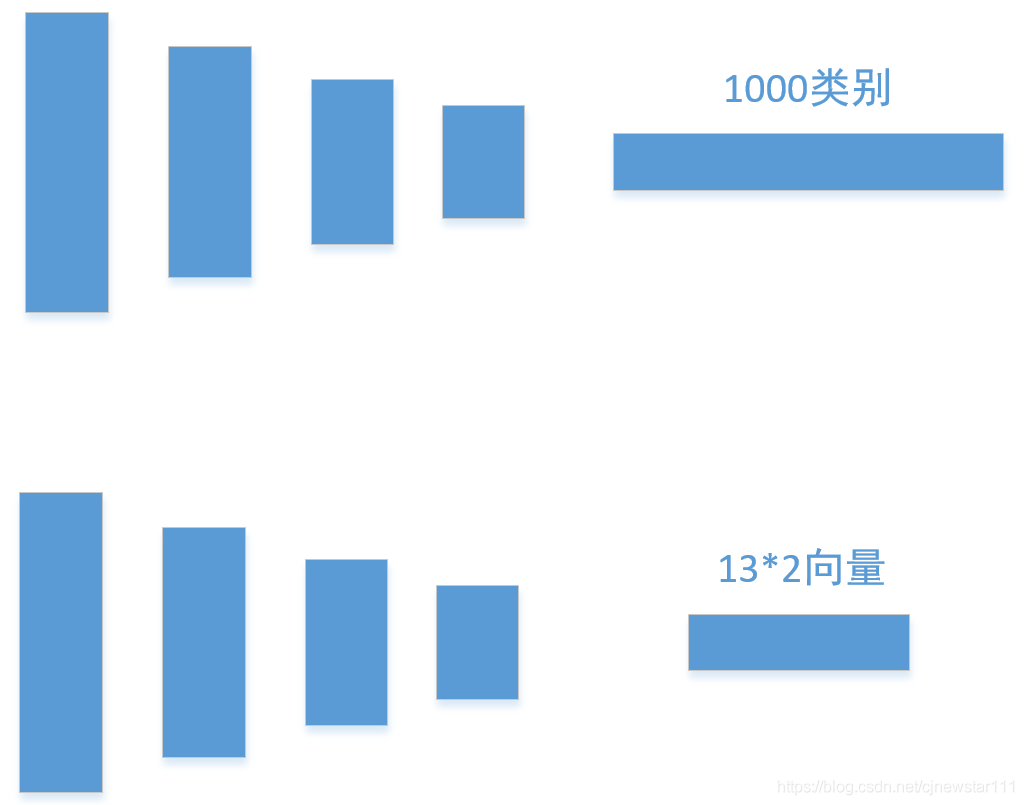
So in theory, I just need to return to the coordinates of 13 * 2. A very natural idea is to use a lightweight classification network to modify the final classification vector into coordinate regression vector. With the idea of tapping the forehead, the network of shufflenetV2 was changed in minutes, as shown in the following figure:
At this time, there is still one step away from real training, that is, training data. Since pose estimation is a popular field, there are many open source data sets. It happens that there is a COCO data set on my notebook, which contains the label of human pose estimation, so I chose COCO as the training set. Since the attitude detection of COCO includes multiple people, the network I modified is only for one person. So I filtered the images with pose estimation in COCO and only retained the single person's pose estimation images. There are probably more than 20000. Fortunately, the number is not small.
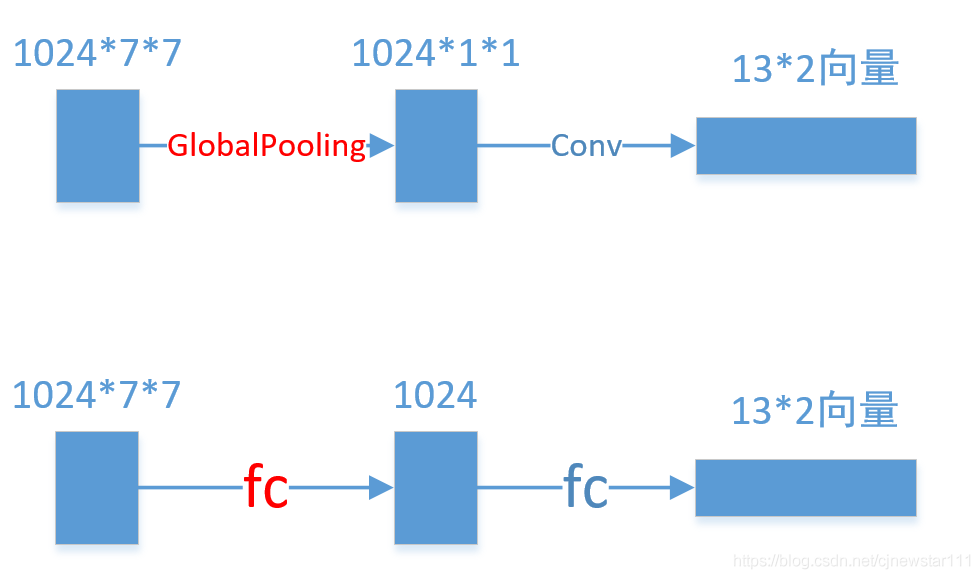
After preparing the network and data set, I started my poor notebook. The roar of the fan made me feel very secure. After 3 days and 2 nights of fierce fighting, I found that loss could not fall! At this time, my intuition tells me that the data loss in the way of Global Pooling is too large. It can be used for classification, but it may not be used for regression. So I removed the last GlobalingPooling and directly used two FC layers for prediction. As shown in the figure below:
After three days and two nights of roaring, loss is relatively normal. When I prepared for the test with joy, I found that the effect was unbearable. Basically can't use.... It seems that the posture estimation is not as simple as I thought, and it needs to be considered in the long run.
The second option:
After making up all kinds of attitude estimation knowledge, it is found that direct regression coordinates have been rarely used. Instead, use heatmap to output the location of keys. This is similar to the centress in anchor free's target detection, that is, the coordinates of key points are determined by finding the point with the largest response value in the heatmap. As shown in the following figure (only part of the heatmap is displayed):
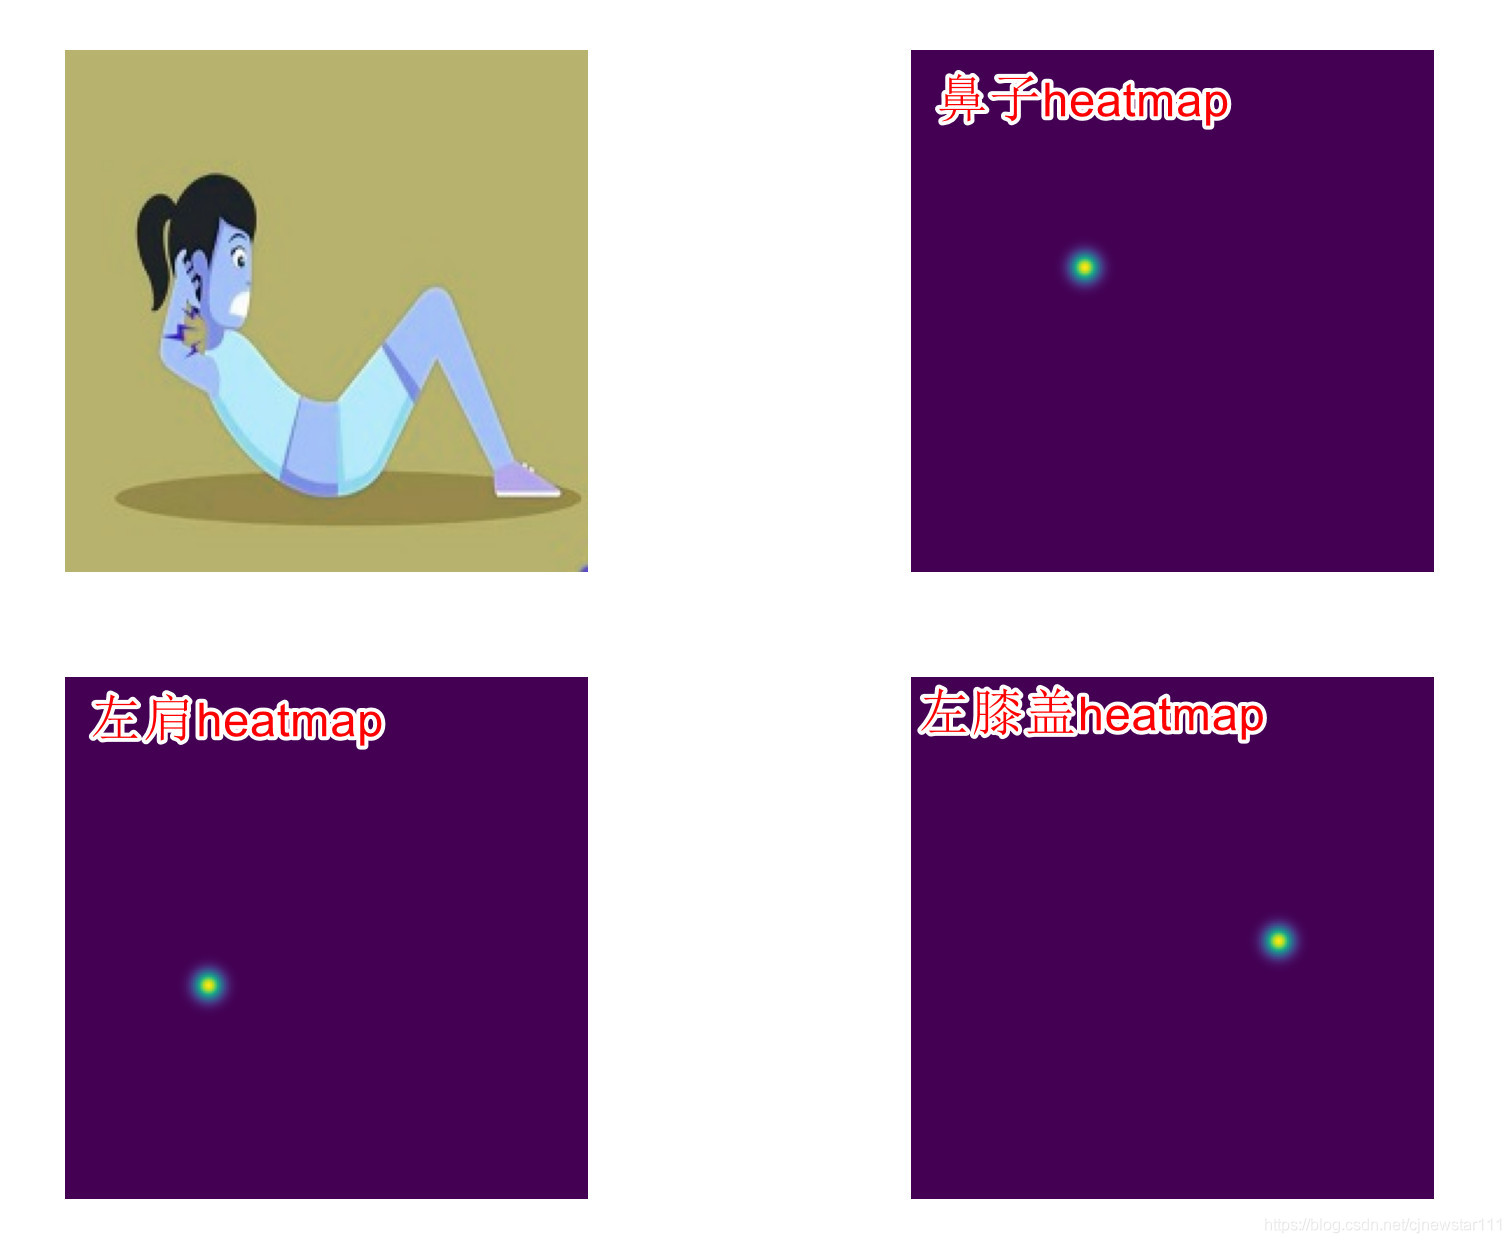
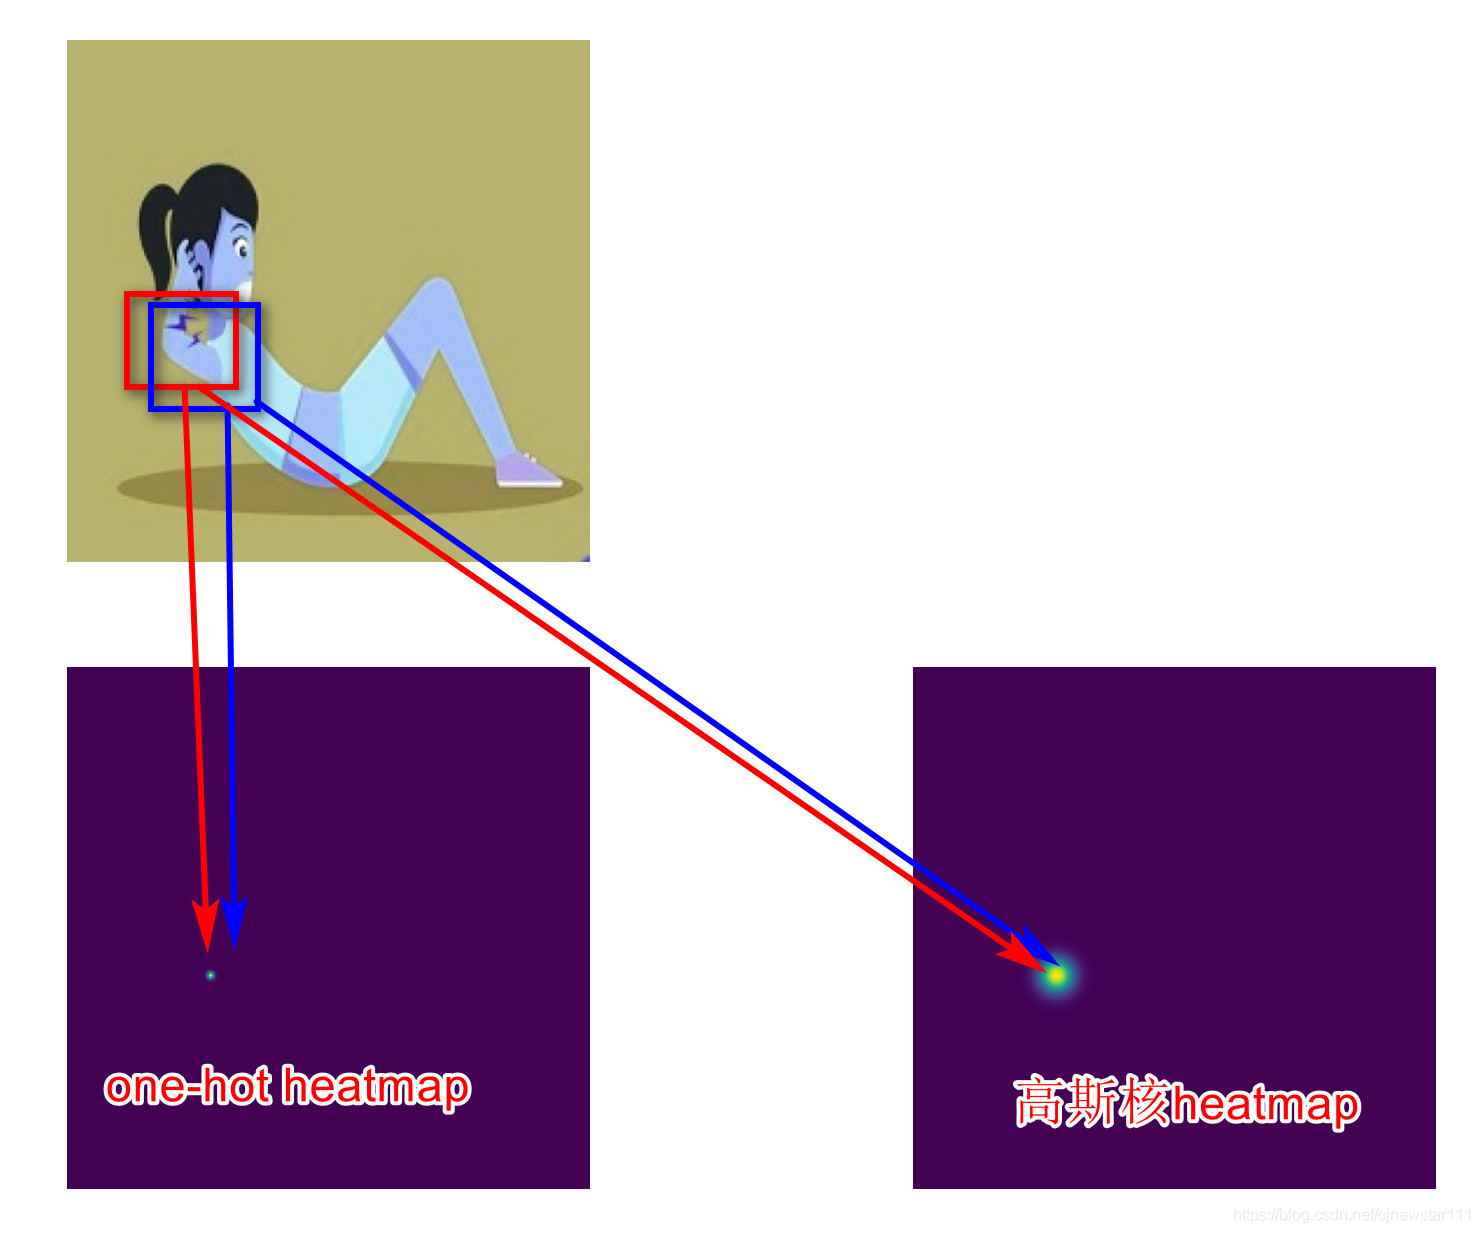
After thinking about the reasons, direct regression coordinates usually sample the last feature map to a small size, so as to achieve global regression. However, the task of key point prediction is very sensitive to location information, and too small features will greatly lose spatial information, resulting in very inaccurate prediction location. The heatmap method generally requires that the final feature map is relatively large, usually 1 / 2 or 1 / 4 of the input image, so it is very suitable for some space related tasks. In fact, if the feature map is artificially compressed very small, the way of heatmap is also inaccurate. With the above thinking, the second scheme is to up sample the 7 * 7 feature map finally output by shufflenet to the size of 13 * 56 * 56 (considering the final application and scene, 56 * 56 is enough to realize the recognition of sit ups). 13 represents 13 key points. Then, after the output features are activated by sigmoid, 13 * 56 * 56 heatmaps are obtained. Two more points are mentioned here, that is, the balance between the design of heatmap tag and loss. Let's talk about the label design first. If it's just a simple way to convert the label into a one_hot's heatmap won't work well. Because the points attached to the label points are actually similar to the extracted features for the network, if the points not near the label are forcibly set to 0, the performance will not be very good. Generally, the label heatmap will be made with Gaussian distribution, as shown in the following figure:
In addition, we need to talk about the balance of loss. You can also see the label heatmap above. Whether it is a one hot heatmap or a Gaussian heatmap, most of the points are negative sample points. MSE is directly used without distinguishing. The network will basically train a heatmap with all outputs of 0. The main reason is that the gradient of training is suppressed by negative samples, and the gradient of positive samples is too small. Therefore, you need to make a partition. I set the specific gravity of positive and negative samples to 10:1
After three days and two nights of roaring, the network can finally work. For the data trained on coco, the effect is good. As shown in the figure below:
However, for the sit up pictures pulled down from Baidu, the effect is a little lacking. After analyzing the reasons, the single posture pictures of COCO are some very life-oriented scenes, and few people lie on the ground. Therefore, we need to enhance the data or add some special sit ups.
Summary:
The current network can only work, which is still a distance from the real landing. It is mainly manifested in the poor generalization of sit ups. The later plan mainly includes two aspects: one is based on data. For example, add some attitude estimation data sets, MPII, etc., or collect some sit up videos by yourself and mark them manually. In addition, data enhancement can be improved. On the other hand, the design of network and the solution of loss are considered. Whether some shortcut s can be added to the network, whether some mature attitude detection networks can be used for reference, and whether softargmax can be used to convert the final heatmap into coordinate regression. These are left in the next issue.
II
1. First show the current effect
Pick up a video tutorial of sit ups from keep for counting test:
(CSDN can't play the video. If you are interested, leave a message in the comment area below)
2. Review:
In the content of the previous issue ([open source] development of motion counting APP based on pose estimation (I)), by using shufflenet lightweight network + heatmap of up sampling output key points, it can be trained in coco data set and can identify key points. However, there is also a problem that the recognition accuracy of sit ups is very low. By analyzing the reasons, there are two main aspects. First, people's postures in the open source data set are more life-oriented postures, and there are few postures such as sit ups. On the other hand, the network itself is relatively small and the ability to extract features is limited. In order to realize real-time detection at the mobile end, the output resolution is limited to 224 * 224, which will limit the accuracy. This issue mainly focuses on some optimization based on these problems, and preliminarily realizes a demo that can count in real time.
3. Rethinking data:
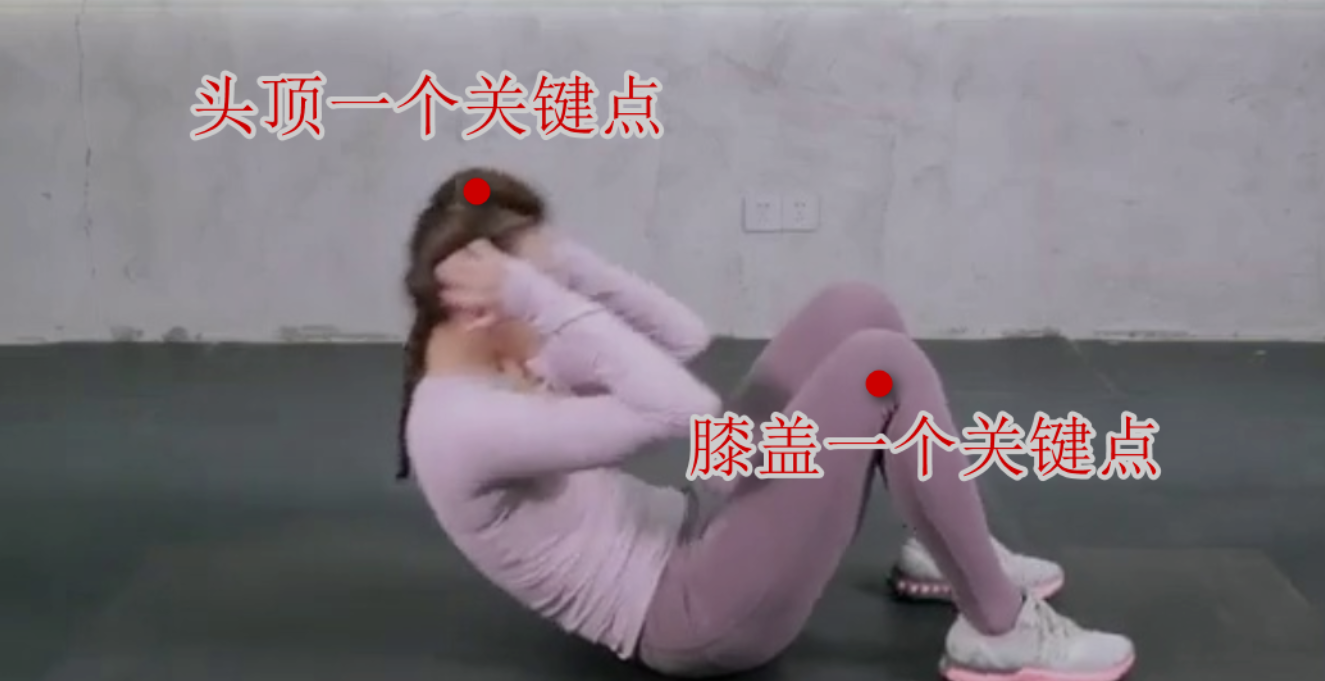
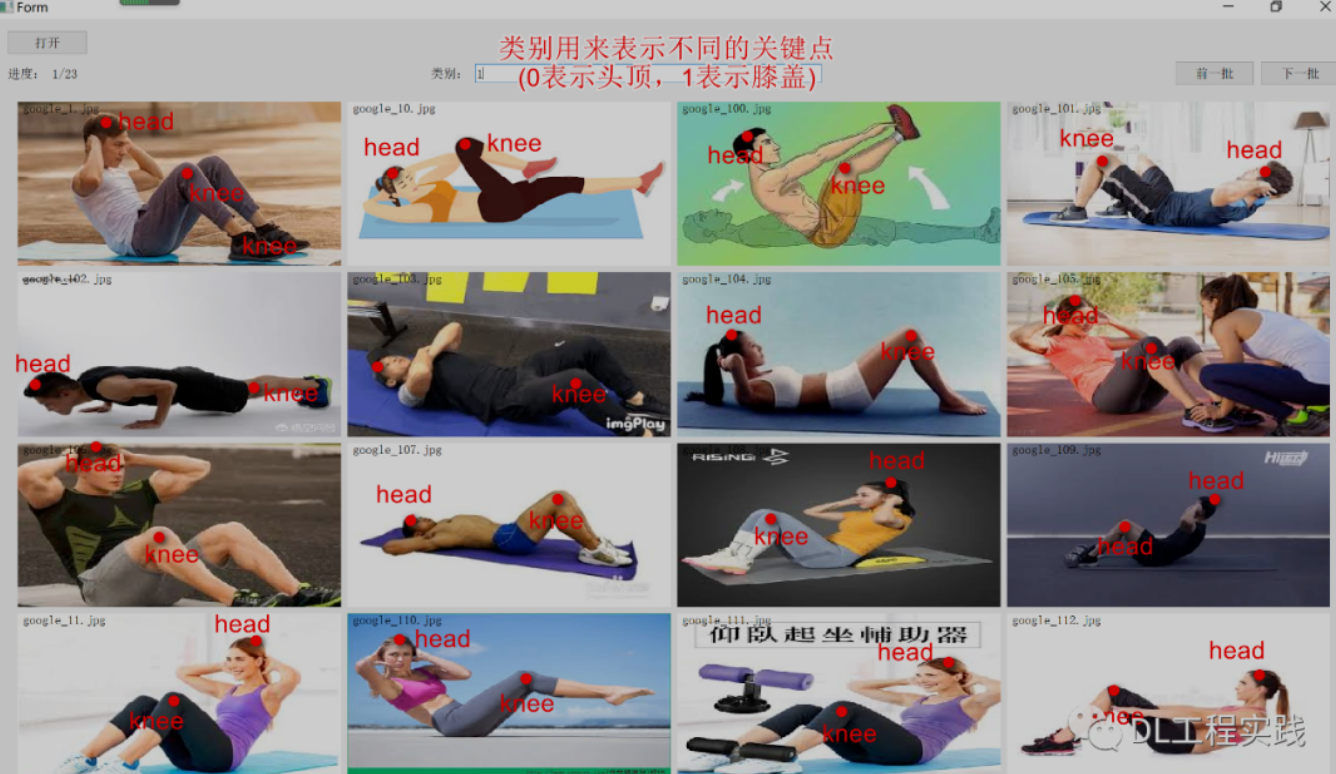
We have analyzed coco and mpii. These data sets are not very suitable for an APP such as training sit up counters. And for this task, it is not necessary to identify so many key points. Just identify two keys, one is the head key and the other is the knee key. In this way, it will not affect the function of our final counting APP, but also reduce the task of the network. We can focus on and identify these two key points, so as to improve the accuracy. As shown in the figure below.
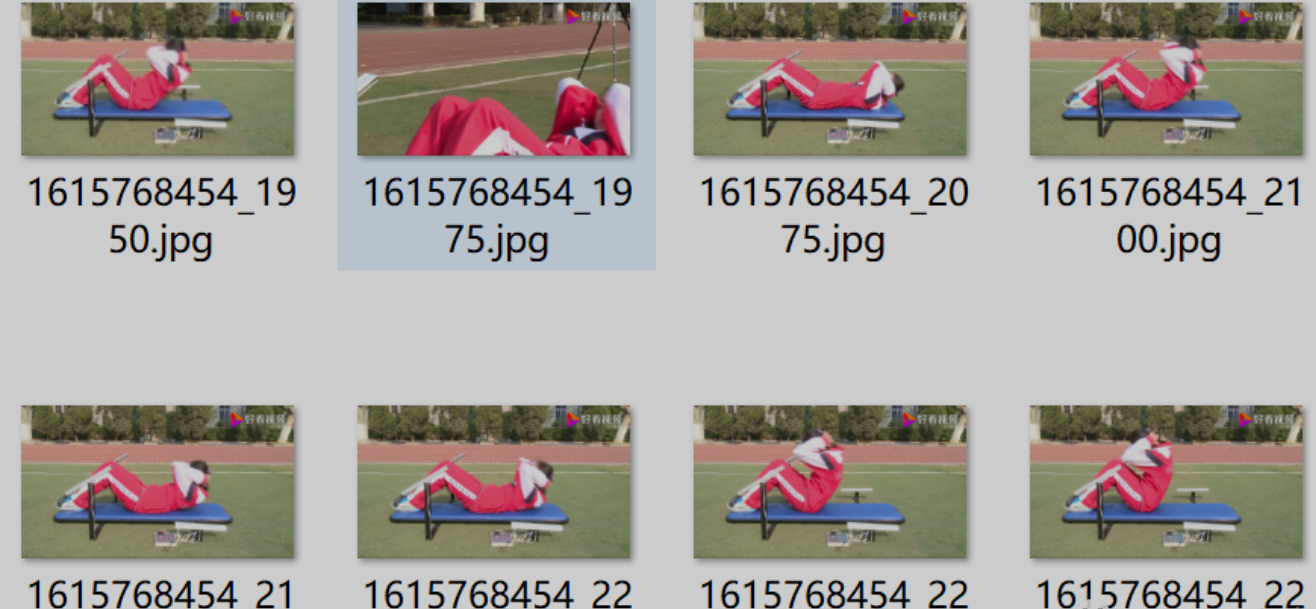
Because there is no ready-made sit up data set, you can only do it yourself. Fortunately, there are still many related resources on the Internet for routine sports such as sit ups. Here I download videos and pictures. First, search the video of "sit ups" on the Internet, download about 10 video clips, and then extract some frames from each video as training data by extracting frames. The following figure shows the key frames extracted from the video.
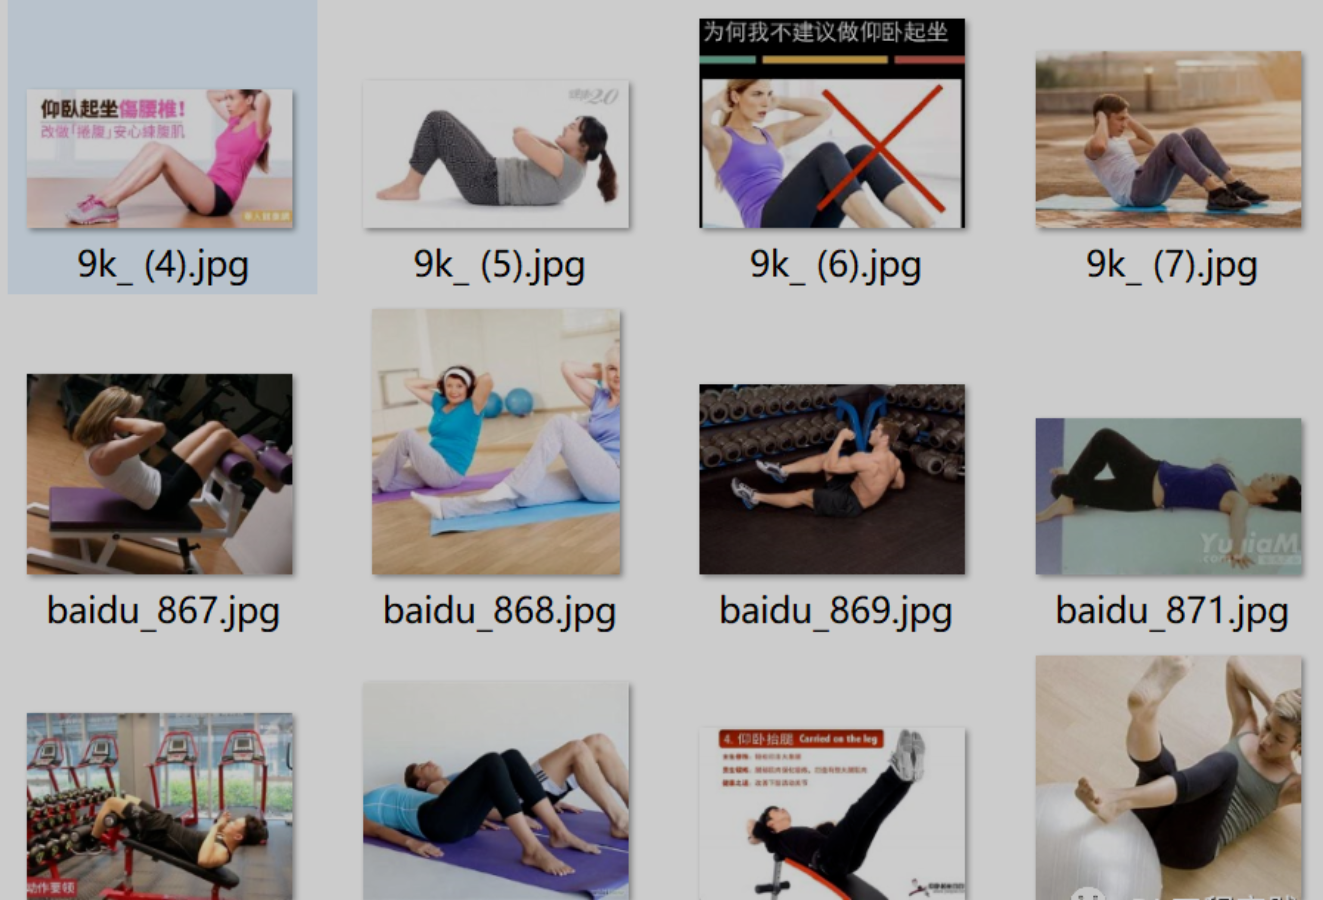
Only using the frames extracted from the video will have a serious problem, that is, the background is too single, which is easy to cause over fitting. So I searched for pictures on the Internet and got a picture with rich background, as shown in the figure below:
After collecting the data, I mark it. Here, I developed a key point marking tool for convenience. After all, I developed it myself and used it easily. Left click to annotate, and right click to cancel the previous annotation. It has to be said that it is very convenient to develop some UI based tools with python+qt! Compared with C + +, it liberates too much productivity!
4. Solved over fitting:
Through the 1K pictures collected above, it will be found that the generalization performance is not good after training, and it is easy to misidentify. In fact, it is not difficult to find that due to the small amount of data, the network has been fitted, and the loss from training to the end is very small. The best way to solve the problem of fitting is to increase the amount of data, but time is limited. I really don't want to collect and label data. It's a waste of youth. So we have to consider some data enhancement methods. I have used some illumination enhancement methods before, such as randomly changing brightness and randomly adjusting HSV. Here, I mainly add some geometric transformations. It will be troublesome because the label value needs to be modified. Here I mainly consider crop, padding, and flip.
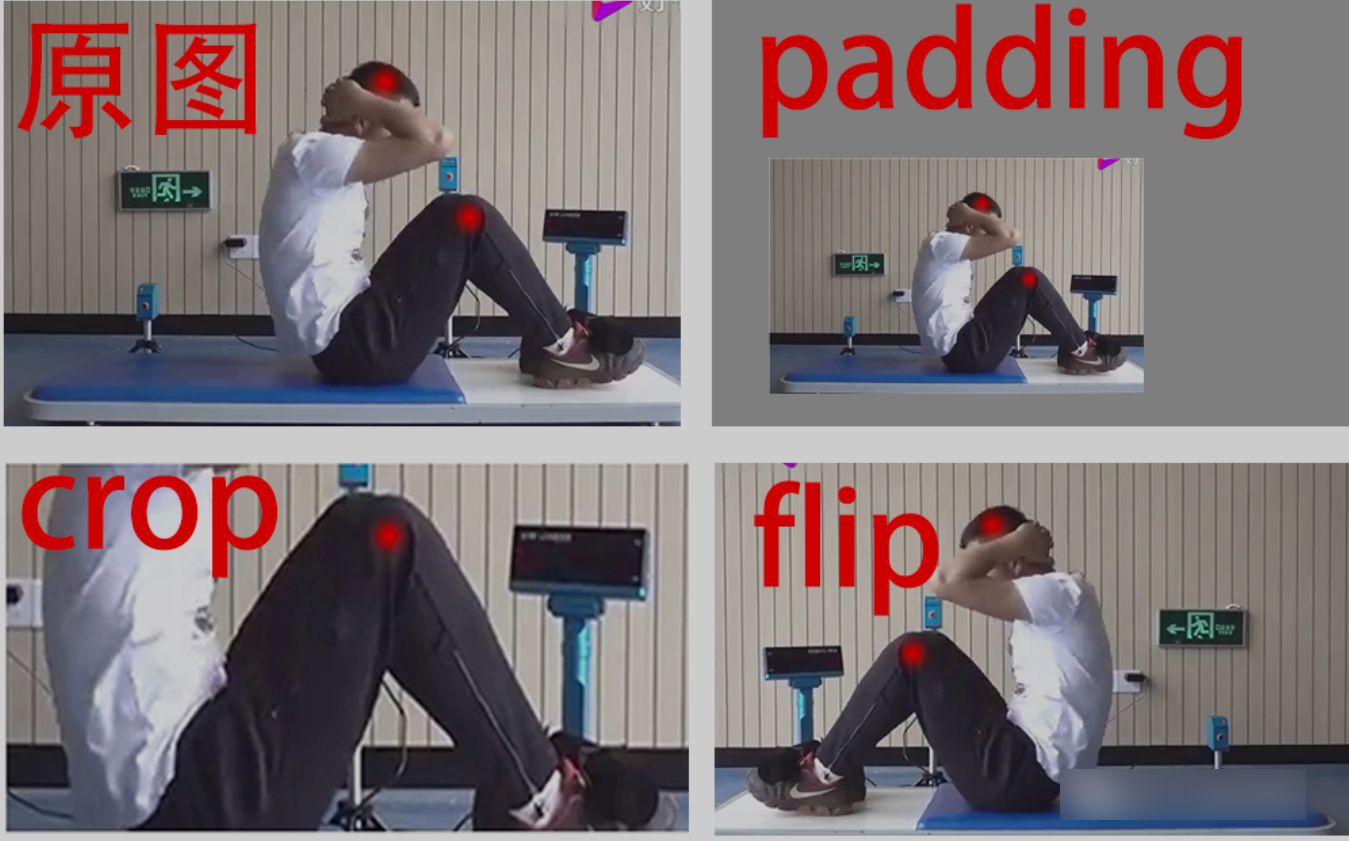
After using the above data enhancement methods, the effect has been significantly improved. The over fitting is not so serious, but there will be some wrong recalls, and some schoolbags or clothes will be regarded as key points. The main problem is that the background of the original training data is not rich enough. Here, the mixup method is used to select some pictures without people from the coco data set as the background and randomly overlap with the training pictures, which is helpful to solve this problem.
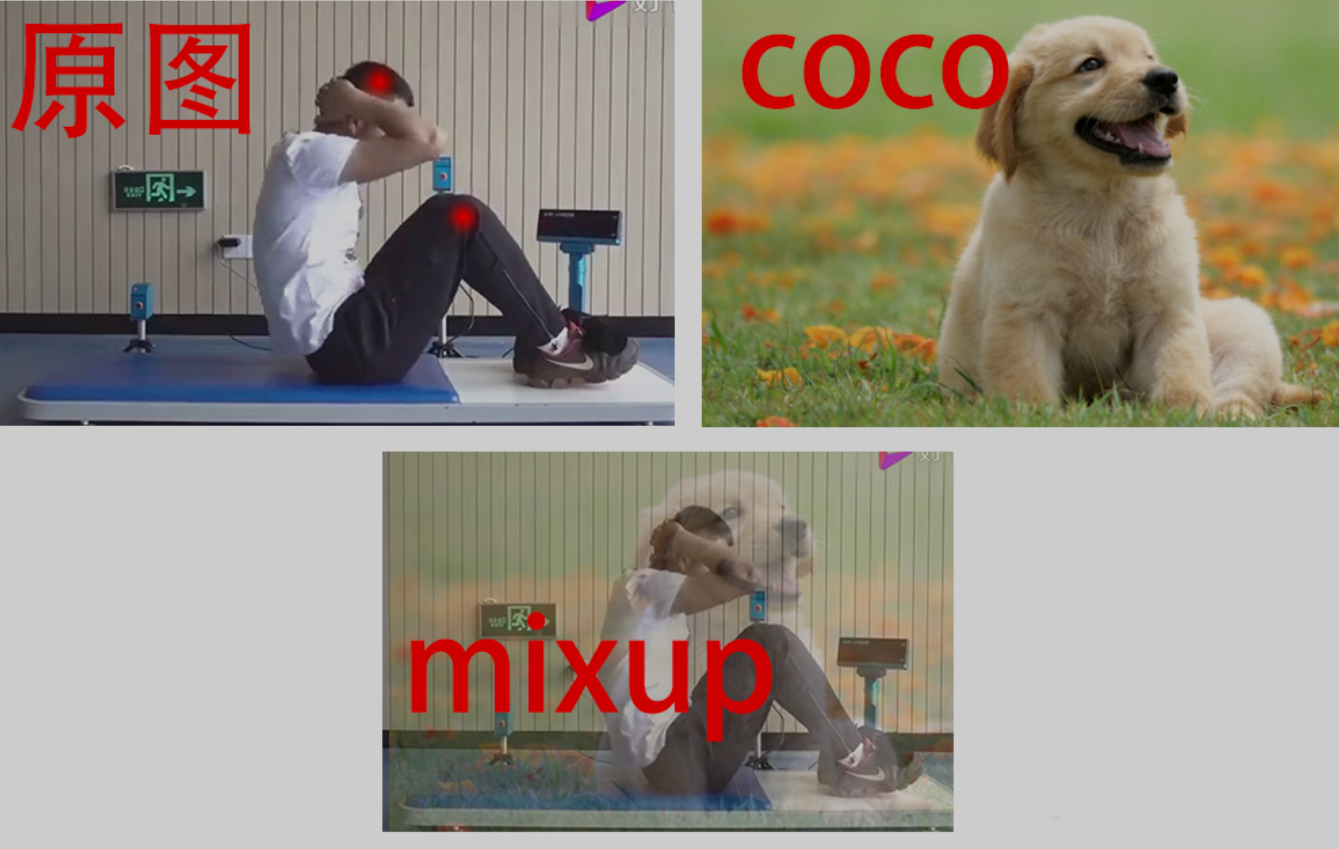
Finally, after these data enhancement, the effect is good. The following is the relevant code, which is implemented by combining crop and padding.
class KPRandomPadCrop(object):
    def __init__(self, ratio=0.25, pad_value=[128, 128, 128]):
        assert (ratio > 0 and ratio <= 1)
        self.ratio = ratio
        self.pad_value = pad_value

    def __call__(self, image, labels=None):
        if random.randint(0,1):
            h, w = image.shape[:2]
            top_offset = int(h * random.uniform(0, self.ratio))
            bottom_offset = int(h * random.uniform(0, self.ratio))
            left_offset = int(w * random.uniform(0, self.ratio))
            right_offset = int(w * random.uniform(0, self.ratio))
            # pad
            if random.randint(0,1):
                image = cv2.copyMakeBorder(image, top_offset, bottom_offset, left_offset, right_offset, cv2.BORDER_CONSTANT, value=self.pad_value)
                if labels is not None and len(labels) > 0:
                    labels[:, 0] = (labels[:, 0] * w + left_offset) / (w + left_offset + right_offset)
                    labels[:, 1] = (labels[:, 1] * h + top_offset) / (h + top_offset + bottom_offset)
            # crop
            else:
                image = image[top_offset:h - bottom_offset, left_offset:w-right_offset]
                if labels is not None and len(labels) > 0:
                    labels[:, 0] = (labels[:, 0] * w - left_offset) / (w - left_offset - right_offset)
                    labels[:, 1] = (labels[:, 1] * h - top_offset) / (h - top_offset - bottom_offset)
        return image, labels

class KPRandomHorizontalFlip(object):
    def __init__(self):
        pass

    def __call__(self, image, labels=None):
        if random.randint(0, 1):
            image = cv2.flip(image, 1)
            h, w = image.shape[:2]
            if labels is not None and len(labels) > 0:
                labels[:, 0] = 1.0 - labels[:, 0]
        return image, labels


class KPRandomNegMixUp(object):
    def __init__(self, ratio=0.5, neg_dir='./coco_neg'):
        self.ratio = ratio
        self.neg_dir = neg_dir
        self.neg_images = []
        files = os.listdir(self.neg_dir)
        for file in files:
            if str(file).endswith('.jpg') or str(file).endswith('.png'):
                self.neg_images.append(str(file))

    def __call__(self, image, labels):
        if random.randint(0, 1):
            h, w = image.shape[:2]
            neg_name = random.choice(self.neg_images)
            neg_path = self.neg_dir + '/' + neg_name
            neg_img = cv2.imread(neg_path)
            neg_img = cv2.resize(neg_img, (w, h)).astype(np.float32)
            neg_alpha = random.uniform(0, self.ratio)
            ori_alpha = 1 - neg_alpha
            gamma = 0
            img_add = cv2.addWeighted(image, ori_alpha, neg_img, neg_alpha, gamma)
            return image, labels
        else:
            return image, labels
5. Online difficult case mining
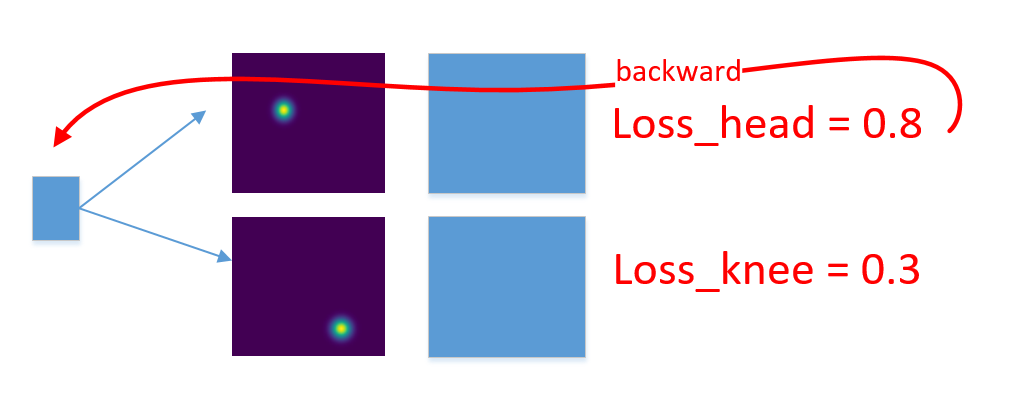
Through the above data enhancement, the trained model has a certain ability, but through a large number of test images, it is found that the detection ability of the network for knee and head is different. The detection of the knee is relatively stable, while the detection of the head often makes mistakes. The reason may be that the change of the head is much larger than that of the knee. The head may be facing the camera, back to the camera, or blocked by the arm, because it is difficult for the network to learn the real head features. There are two ways to improve this. One is to simply give the head greater weight through the loss weight, so that the gradient information of the head is larger than that of the knee, forcing the network to pay more attention to the head information. The other is to use online hard keypoint mining. This is what I saw when viewing the cpn human posture estimation network. The author has a video to introduce it. In fact, the implementation is very simple. It is to calculate the loss of different key points respectively, and then sort the loss, and only return a certain proportion of loss for gradient. The proportion given by the author is 0.5, that is, return half of the key points loss for gradient.
6. Summary
This stage is mainly to improve the network accuracy, gradually improve the network generalization performance by simplifying the key points, re collecting and labeling data, increasing padding, crop and flip data enhancement, and introducing mixup and online difficult case mining. And implemented a python demo (see the beginning of the article). The next issue is mainly to implement the function of the demo as APP.
--------
III
1. Preface:
In the development of [open source] motion counting APP based on pose estimation (II) in the last issue, we have completed the development of sit up algorithm and the demo development of windows. This issue is mainly to extend the algorithm to the android platform and realize an APP that can be used on android mobile phones. The following video is my test by the West Lake. The effect is good when the background is clean. [for the APP source code, please leave a message, or add my wechat, 15158106211, and note "sit up APP". Let's learn and make progress together.]
(CSDN can't play the video, please forgive me)
2. Model improvement
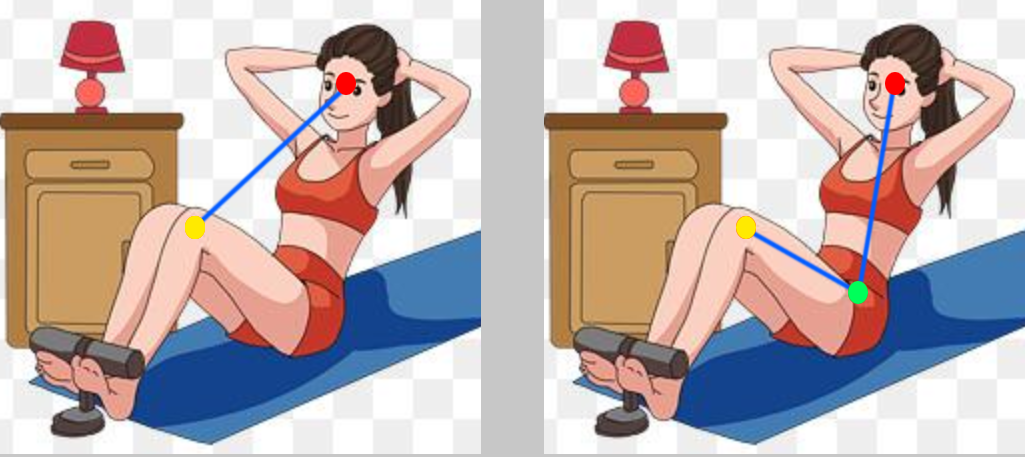
Some friends have found that in the last demo, there were only two key points, head and knee, while this APP has three key points, namely head, waist and knee. When there are only two key points, the model is prone to misidentification. It will locate the key points on some other things, and rarely consider whether it belongs to a person. After using the three key points, on the one hand, it is more conducive to judge posture, on the other hand, it also adds a supervision signal, and the three key points are located on people, which makes the model easier to understand and learn. Therefore, there is a certain improvement in performance, mainly reducing the false recognition rate.
3. APP framework
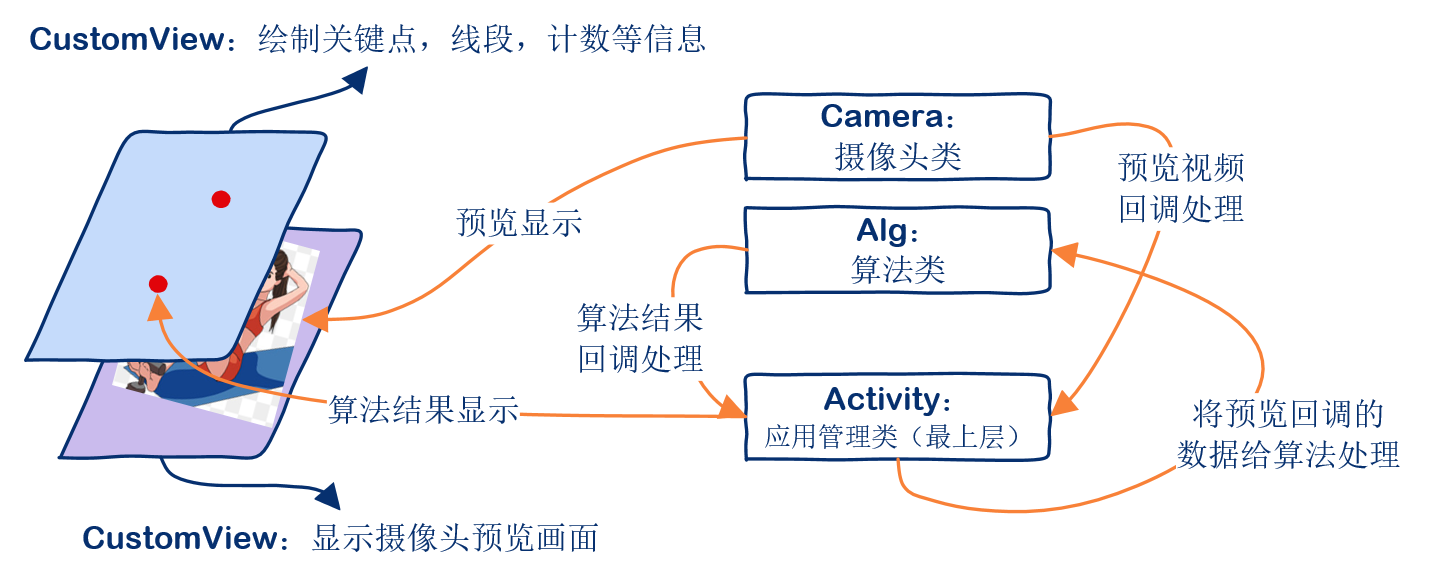
APP is mainly composed of Activiry class, two SurfaceView classes, one Alg class and one camera class. Alg class is mainly responsible for calling algorithm for reasoning and returning results. Here, I have converted the model trained by pytorch into the NCNN model, so it is actually the reasoning function of the NCNN library. Camera class is mainly responsible for opening and closing the camera, as well as preview callback. The first SurfaceView (DisplayView) is mainly used for the display of camera preview. The second surface view (CustomView) is mainly used to draw some key point information, count statistics, etc. Activity is the top management class, which is responsible for managing the whole APP, including creating buttons, creating SurfaceView, creating Alg class, creating camera class, etc.
3. Main class source code
3.1 core source code of Activity class
public class MainActivity extends Activity implements Camera.PreviewCallback, AlgCallBack{
    private DisplayView  mViewDisplay;
    private CustomView   mViewCustom;
    private Button       mBtnCameraOp;
    private Button       mBtnCameraChange;
    private CameraUtil   mCameraUtil;
    private AlgUtil      mAlgUtil;
    private int          mFrameCount = 0;

    @Override
    protected void onCreate(Bundle savedInstanceState) {
        Log.i("zhengxing", "MainActivity::onCreate");
        super.onCreate(savedInstanceState);
        this.getWindow().setFlags(WindowManager.LayoutParams.FLAG_FULLSCREEN, WindowManager.LayoutParams.FLAG_FULLSCREEN);
        this.requestWindowFeature(Window.FEATURE_NO_TITLE);
        this.getWindow().setFlags(WindowManager.LayoutParams.FLAG_KEEP_SCREEN_ON, WindowManager.LayoutParams.FLAG_KEEP_SCREEN_ON);
        setRequestedOrientation(ActivityInfo.SCREEN_ORIENTATION_LANDSCAPE);
        setContentView(R.layout.main);
        Log.i("zhengxing", "MainActivity::onCreate set basic info finished");

        // Create two surfaceviews
        mViewDisplay = (DisplayView)this.findViewById(R.id.display_view);
        mViewCustom = (CustomView)this.findViewById(R.id.custom_view);
        Log.i("zhengxing", "MainActivity::onCreate create visual toolkits finished");

        //Initialize the camera class and alg class
        mCameraUtil = new CameraUtil(mViewDisplay, this);
        mAlgUtil = new AlgUtil(getAssets(), this);
        Log.i("zhengxing", "MainActivity::onCreate create camera util and alg util finished");
    }

    // Start button
    public void onBtnStartClick(View view){
        Log.i("zhengxing", "MainActivity::onBtnStartClick");
        if (mCameraUtil.getCameraState() < 0){
            mCameraUtil.openCamera();
            Log.i("zhengxing", "MainActivity::onBtnStartClick the camera is closed, open it");
        }
    }

    //Stop button
    public void onBtnStopClick(View view){
        Log.i("zhengxing", "MainActivity::onBtnStopClick");
        if (mCameraUtil.getCameraState() >= 0){
            mCameraUtil.closeCamera();
            Log.i("zhengxing", "MainActivity::onBtnStopClick the camera is open, close it");
        }
    }

    //Algorithm callback function to process the results returned by the algorithm
    @Override
    public void onAlgRet(float[] ret) {
        float nAlgType = ret[0];
        float nClasss = ret[1];
        Log.i("zhengxing", "MainActivity::onAlgRet ret value:" +  ret[0] + ';' + ret[1]);
        mViewCustom.drawAlgRet(ret);
    }

    //Preview callback function to process each frame of picture
    @Override
    public void onPreviewFrame(byte[] data, Camera camera) {
        mFrameCount ++;
        Log.i("zhengxing", "MainActivity::onPreviewFrame");
        Camera.Size size = camera.getParameters().getPreviewSize();
        mAlgUtil.addDataToQueue(data, size.width, size.height);
    }

}
3.2. Camera core source code
public class CameraUtil
{
    private Camera mCamera;
    private final int mCameraID;
    private final SurfaceView mViewDisplay;
    private final int mOrientation;
    private final Camera.PreviewCallback mPreviewCBack;

    public CameraUtil(SurfaceView displayView, Camera.PreviewCallback cameraCBack) {
        Log.i("zhengxing", "CameraUtil::CameraUtil");
        mCamera = null;
        mViewDisplay = displayView;
        mCameraID = Camera.CameraInfo.CAMERA_FACING_FRONT;
        mOrientation = 0;
        mPreviewCBack = cameraCBack;
    }

    //Turn on the camera
    public void openCamera() {
        Log.i("zhengxing", "CameraUtil::openCamera");
        if(mCamera == null) {
            mCamera = Camera.open(mCameraID);
            Camera.Parameters parameters = mCamera.getParameters();
            //parameters.setFocusMode(Camera.Parameters.FOCUS_MODE_CONTINUOUS_VIDEO);
            //mCamera.setParameters(parameters);
            mCamera.setDisplayOrientation(mOrientation);
            mCamera.setPreviewCallback(mPreviewCBack);
            try {
                mCamera.setPreviewDisplay(mViewDisplay.getHolder());
            } catch (IOException e) {
                e.printStackTrace();
            }
            mCamera.startPreview();
        }
    }

    //Turn off the camera
    public void closeCamera() {
        Log.i("zhengxing", "CameraUtil::closeCamera");
        if (mCamera != null) {
            mCamera.setPreviewCallback(null);
            mCamera.stopPreview();
            mCamera.release();
            mCamera = null;
        }
    }
}
3.3 Alg core source code
class AlgUtil implements Runnable {
    private boolean mThreadFlag;
    private final ArrayBlockingQueue mQueue;
    private final Alg mAlg;
    private final int mAlgThreads;
    private AlgCallBack mAlgCB;
    private final Thread mThread;

    public AlgUtil(AssetManager assertManager, AlgCallBack algCallBack) {
        Log.i("zhengxing", "AlgUtil::AlgUtil");
        mAlgCB = algCallBack;
        mAlgThreads = 1;
        mQueue = new ArrayBlockingQueue(3);
        mAlg = new Alg();
        mAlg.Init(assertManager);
        mThreadFlag = true;
        mThread = new Thread(this);
        mThread.start();
    }

    //Deliver the preview picture to the queue (because the algorithm processing may be slow, not every frame of picture is processed by the algorithm)
    public boolean addDataToQueue(byte [] bytes, int width, int height) {
        Log.i("zhengxing", "AlgUtil::addDataToQueue");
        Bitmap bmp = null;
        try {
            YuvImage image = new YuvImage(bytes, ImageFormat.NV21, width, height, null);
            if (image != null) {
                ByteArrayOutputStream stream = new ByteArrayOutputStream();
                image.compressToJpeg(new Rect(0, 0, width, height), 100, stream);
                bmp = BitmapFactory.decodeByteArray(stream.toByteArray(), 0, stream.size());
                stream.close();
            }
        } catch (Exception ex) {
        }
        Bitmap rgba = bmp.copy(Bitmap.Config.ARGB_8888, true);
        Bitmap imgSelect = Bitmap.createScaledBitmap(rgba, 312, 312, false);
        rgba.recycle();
        return mQueue.offer(imgSelect);
    }

    //Return algorithm reasoning results to the upper level (Activity)
    public void setCallBack(AlgCallBack callBack) {
        Log.i("zhengxing", "AlgUtil::setCallBack");
        this.mAlgCB = callBack;
    }

    //Thread body (all algorithm reasoning is executed in the thread)
    @Override
    public void run() {
        Log.i("zhengxing", "AlgUtil::run");
        while (mThreadFlag) {
            try {
                Bitmap bmp = (Bitmap) mQueue.poll(1000, TimeUnit.MILLISECONDS);
                if (bmp != null) {
                    float[] x = mAlg.Run(bmp);
                    this.mAlgCB.onAlgRet(x);
                }
            } catch (InterruptedException e) {
                e.printStackTrace();
            }
        }
    }
}
4. Summary
It took about a month before and after the development of the sit up APP, both in the evening or on the weekend. Although very tired, I also learned a lot. I didn't understand the field of pose estimation at all and seriously underestimated the difficulty of key point detection. Later, I slowly studied, sorted out relevant papers and solved one difficulty after another. It was not only a great improvement for me, but also my persistence in my own interests and hobbies. If the whole process also makes you gain a little, it will be a great encouragement to me. [for the APP source code, please leave a message or add my wechat, 15158106211, and note "sit up APP". Let's learn and make progress together.]
--------
Copyright notice: This is the original article of CSDN blogger "DL practice", which follows the CC 4.0 BY-SA copyright agreement. Please attach the original source link and this notice for reprint.
Original link: https://blog.csdn.net/cjnewstar111/article/details/115446099