This article will comprehensively demonstrate Spring Boot's integration of JPA, Redis cache and RabbitMQ message queue around the current limiting and second kill requirements in high concurrency scenarios.
This project will realize the effect of current limiting and second kill by integrating Springboot, Redis and Lua scripts, and will realize the effect of asynchronously saving second kill results through RabbitMQ message queue.
1, Project overview
The second kill to be realized in this project refers to a marketing activity in which businesses sell goods at a very low price in a certain period of time.
Because the price of goods is very low, there will be many requests to buy goods per unit time, which will put great pressure on the system. In this regard, in some seckill systems, the function of current limiting is often integrated, and the seckill results are saved asynchronously through the message queue.
The current limiting and second killing functions to be realized in this chapter are summarized as follows:
(1) Receive the second kill request through the controller class of Spring Boot.
(2) For example, the number of goods in the second kill is 10, which is limited to 20 seconds after the second kill. Only 100 requests can participate in the second kill. This operation is realized through Redis.
(3) These requests that pass the current limit test will compete for several second kill products at the same time. This operation will be implemented through the Lua script based on Redis.
(4) In order to reduce the pressure on the database, the records of successful second kill will be recorded to the database asynchronously through the RabbitMQ queue.
(5) At the same time, the second kill request will be simulated in a multi-threaded way through the RestTemple object, so as to observe the operation effect of the second kill system.
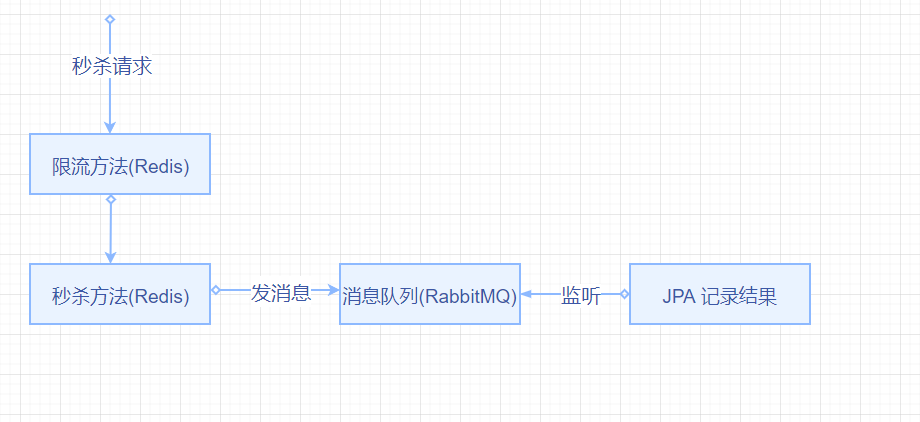
In other words, Spring Boot, JPA, Redis and RabbitMQ will be used in this system. The relationship between relevant components is shown in the figure.
2, Analysis of Lua script based on Redis
Lua is developed using standard C language. It is a lightweight scripting language that can be embedded in Redis based applications. Lua script can reside in memory, so it has high performance and is suitable for dealing with high concurrency scenarios.
Lua script features
Lua scripting language is designed by Roberto lerusalimsch, Waldemar Celes and LnHenrique de Figuciredo of a university in Brazil. It has the following two characteristics
(1) Lightweight: Lua has only some core and most basic libraries, so it is very lightweight and suitable for embedding in code written in other languages.
(2) Extensibility: Lua language reserves expansion interfaces and related extension mechanisms, so that the functions of other development languages can be easily introduced into Lua language,
In the second kill scenario given in this chapter, multiple instructions will be sent to the Redis server. In order to reduce the overhead of network call, the relevant Redis commands will be put in the Lua script. By calling Lua script, multiple Redis commands can be executed at a small cost of network call.
In addition, Redis statements related to second kill also need to be atomic, that is, these statements are either executed or not executed. The Lua script is executed as a whole, so it can fully ensure the atomicity of relevant second kill statements.
Introducing Lua script into Redis
After starting the Redis server, you can run the lua script through the Redis cli command. The specific steps are as follows:
-
Rediscalllua can be created in the C:work\redisConf\lua directory Lua file, in which Lua script is written. Note that the extension of lua script file is generally lua.
-
Rediscalllua created in the first step Add a line of code to the Lua file through redis The call command executes the command of set name Peter,
redis.call("set", "name', " Peter")Via RDIS When the call method calls the Lua script in Redis, the first parameter is the Redis command, for example, here is set, the second parameter and the following parameter are the parameters to execute the Redis command of the clause.
-
Execute the Lua script defined in step 2 through the following -- eval command, where C:work\redisConf\lua is the path where the Lua script is located, and rediscalllua Lua is the script name.
redis-cli --eval C:\work\redisConf\lua\redisCallLua.lua
After the above command is run, the returned result is null (nil), because the Lua script only sets the value through the set command and does not return the result. However, you can see the name value cached through this Lua script through the get name command, specifically Peter.
If the Lua script contains few statements, you can also directly use the eval command to execute the script,
First connect to the Redis server through the Redis cli statement, and then execute the following eval command:
eval "redis.call('set','BookName','Spring Boot')" 0
As can be seen from the above statement, the Lua script to be executed is introduced in double quotation marks after the eval command
The script is still through Redis Call statement executes the set command of Redis to set the cache.
After the eval command, the number of KEYS type parameters in the Lua script is also specified. Here is 0, which means that the Lua script has no KEYS type parameters. Note that the parameters of KEYS type are set here, not ARGV type. The differences between the two parameters will be described in detail below.
Return values and parameters of Lua script
In Lua script, you can return the execution result through retum statement. The corresponding syntax of this part is relatively simple.
At the same time, when Redis executes Lua script through eval command, two different types of parameters, KEYS and ARGV, can be passed in. The difference between them is that the parameters required by Redis command can be passed in with KEYS parameter and custom parameters can be passed in with ARGV parameter. The difference between the two parameters can be seen through the following two commands of eval executing Lua script.
127.0.0.1:6379> eval "return {KEYS[1],ARGV[1],ARGV[2]" 1 keyono argvone argvtwo
1) "keyone"
2) "argvone"
3) "argvtwo"
127.0.0.1:6379> eval "return {KEYS[1].ARGV[1],ARGV[2]}" 2 keyone argvone argvtwo
1) "key1"
2) "argvtwo"
In the eval statement on line 1, KEYS[1] represents the first parameter of KEYS type, while ARGV[1] and ARGV[2] correspondingly represent the parameters of the first and second ARGV types.
In the eval statement on the first line, the 1 after the double quotation mark indicates that the number of parameters of the KEYS type is 1, so the ARGV custom type parameters are not counted when counting the number of parameters, and the subsequent keyone, argvone and argvtwo correspond to KEYS[1], ARGV[1] and ARGV[2] respectively
When executing the Lua script corresponding to the first line, you will see the output results shown in lines 2 to 4, where KEYS[1] is output
ARGV[1] and ARGV[2] are the values corresponding to these three parameters.
The difference between the script in line 5 and line 1 is that the value indicating the number of KEYS parameters has changed from 1 to 2. However, the second parameter here is ARGV, not KEYS, so this Lua script statement will discard the second parameter, ARGV[1], which can be verified by the output results on lines 6 and 7.
Therefore, when executing Lua script through Eval command, you must ensure the correctness of the number and type of parameters. At the same time, it is reminded again that the number of parameters passed in after the eval command is the number of KEYS type parameters, not ARGV type parameters.
Branch statement
In Lua script, you can control the execution process of code through if... else statements. The specific syntax is as follows:
if(Boolean expression) then
	Boolean expressions are true Statement executed when
else
	Boolean expressions are false Statement executed when
end
Through ifdemo Lua example, readers can see the practice of using branch statements in Lua scripts.
if redis.call('exists','studentID')==1 then
return 'Existed'
else
redis.call('set','StudentID','001');
return 'Not Existed'
end
In the first line, judge redis.com by the if statement Whether the exists statement executed by the call command returns 1. If yes, it indicates that the StudentID key exists, and the return 'existing' statement on line 2 will be executed to return existing. Otherwise, follow the else process on line 3, execute the statements on lines 4 and 5, set the value of StudentID, and return not existing through the return statement.
From this, we can see the practice of using if branch statement in Lua script. The running result of the script is: in the first run, because the StudentID key does not exist, the else process will be followed to see the output of not existing. In the second run, because the key already exists, the result of 'existing' will be directly output.
3, Realize current limiting and second kill functions
In the QuickBuyDemo project to be created in this section, on the one hand, the Lua script mentioned above will be used to realize the functions of current limiting and second killing. On the other hand, the function of asynchronously saving second killing results will be realized through RabbitMQ message queue.
Create a project and write a configuration file
You can create a Maven project named QuickBuyDemo in the IDEA integrated development environment, and in the POM The required dependency packages are introduced into the XML file through the following key codes:
<dependencies>
    <dependency>
        <groupId>org.springframework.boot</groupId>
        <artifactId>spring-boot-starter-web</artifactId>
    </dependency>
    <dependency>
        <groupId>org.springframework.boot</groupId>
        <artifactId>spring-boot-starter-amqp</artifactId>
    </dependency>
    <dependency>
        <groupId>org.springframework.boot</groupId>
        <artifactId>spring-boot-starter-data-redis</artifactId>
    </dependency>
    <dependency>
        <groupId>org.apache.httpcomponents</groupId>
        <artifactId>httpclient</artifactId>
        <version>4.5.5</version>
    </dependency>
    <dependency>
        <groupId>org.apache.httpcomponents</groupId>
        <artifactId>httpcore</artifactId>
        <version>4.4.10</version>
    </dependency>
</dependencies>
Here, the dependency package of SpringBoot is introduced through lines 2-5, the dependency package related to RabbitMQ message queue is introduced through lines 6-9, the dependency package related to Redis is introduced through lines 10-13, and the dependency package related to HTTP client is introduced through lines 14-23. In this project, the customer request will be simulated through HTTP client to verify the second kill effect.
In the resources directory of this project, application In the properties configuration file, the message queue and Redis cache will be configured through the following code:
rabbitmq.host=127.0.0.1
rabbitmq.port=5672
rabbitmq.username=guest
rabbitmq.password=guest

redis.host=localhost
redis.port=6379
In this configuration file, RabbitMQ connection parameters are configured through lines 1 to 4, and Redis connection parameters are configured through lines 5 and 6.
Write startup class and controller class
The startup classes of this project are as follows. Since they are completely consistent with most startup classes of Spring Boot projects, they will not be repeated.
package prj;

import org.springframework.boot.SpringApplication;
import org.springframework.boot.autoconfigure.SpringBootApplication;

@SpringBootApplication
public class SpringBootApp {
    public static void main(String[] args) {
        SpringApplication.run(SpringBootApp.class, args);
    }
}
The Controller class code of this project is as follows. Lines 11-25 of the Controller class encapsulates the quickBuy method to realize the second kill service. This method requests external services with a URL in the format of quickBuy/{item}/{person}, in which the item parameter represents the commodity and the person parameter represents the buyer of the commodity.
package prj.controller;

import org.springframework.beans.factory.annotation.Autowired;
import org.springframework.web.bind.annotation.PathVariable;
import org.springframework.web.bind.annotation.RequestMapping;
import org.springframework.web.bind.annotation.RestController;
import prj.receiver.BuyService;

@RestController
public class Controller {

    @Autowired
    private BuyService buyService;

    @RequestMapping("/quickBuy/{item}/{person}")
    public String quickBuy(@PathVariable String item, @PathVariable String person){
        //Limit 100 requests in 20 seconds
        if(buyService.canVisit(item, 20,100)) {
            String result = buyService.buy(item, person);
            if (!result.equals("0")) {
                return person + " success";
            } else {
                return person + " fail";
            }
        }
        else{
            return person + " fail";
        }
     }
}
In the quickBuy method, first pass the BuyService. Com in line 14 The canvisit method limits the flow of requests. Here, only 100 requests are allowed to access in 20 seconds. If it passes the flow limit verification, it will continue to pass the BuyService in line 15 The buy method performs a second kill operation. Note that the code that implements the current limiting and second killing functions here is encapsulated in the BuyService class defined on line 10.
Related configuration of message queue
RabbitMQ message queue and message switch will be configured in RabbitMQConfig class of this project. The specific code is as follows:
package prj;

import org.springframework.amqp.core.*;
import org.springframework.context.annotation.Bean;
import org.springframework.context.annotation.Configuration;


@Configuration
public class RabbitMQConfig{
    //Define message queues with topics
    @Bean
    public Queue objectQueue() {
        return new Queue("buyRecordQueue");
    }
    //Define switch
    @Bean
    TopicExchange myExchange() {
        return new TopicExchange("myExchange");
    }
    @Bean
    Binding bindingObjectQueue(Queue objectQueue,TopicExchange exchange) {
        return BindingBuilder.bind(objectQueue).to(exchange).with("buyRecordQueue");
    }
}
The message queue named buyRecordQucue is created through the objectQueue method in line 9. The message queue will transmit the second kill results to the user. The clearing switch named myExhnge is created through the myExchange method in line 14, and the above message column and message switch are bound according to the buyRecordQucue subject through the bindingObjectQueue method in line 18.
Lua script to realize the second kill function
In this project, the Lua script code to achieve the second kill effect is as follows:
local item = KEYS[1]
local person = ARGV[1]
local left = tonumber(redis.call('get',item))
if (left>=1) then
	redis.call ('decrby',item,1)
	redis.call ('rpush", 'personList',person)
	return 1
else
In this script, first pass in the commodity to be spike killed through the KEYS[1] parameter and give it to the item object, then pass in the user who initiated the spike request through the ARGV[1] parameter and give it to the sub person object.
Then, in line 3, obtain the inventory of the commodity from the Redis cache through the get item command, and then judge it through the if statement in line 4.
If it is found that the remaining inventory quantity of the commodity is greater than or equal to 1, the Lua script on lines 5 to 7 will be executed. First reduce the inventory quantity by 1 through the decrby command, and then call the rpush command to record the current successful user, and return 1 through the return statement on line 7, indicating that the second kill is successful. If the inventory number is found to be less than 1, it will be returned to 0 directly through the statement on line 9, indicating that the second kill has failed.
Implement current limit and second kill in the business implementation class
In buyservice In Java, Redis and Lua scripts will be called to realize the functions of current limiting and second killing. The specific code is as follows:
package prj.receiver;

import org.springframework.amqp.core.AmqpTemplate;
import org.springframework.beans.factory.annotation.Autowired;
import org.springframework.data.redis.connection.RedisConnection;
import org.springframework.data.redis.connection.ReturnType;
import org.springframework.data.redis.core.RedisTemplate;
import org.springframework.data.redis.core.script.DefaultRedisScript;
import org.springframework.stereotype.Service;
import prj.model.buyrecord;


import javax.annotation.Resource;
import java.util.concurrent.TimeUnit;

@Service
public class BuyService {

    @Resource
    private RedisTemplate redisTemplate;

    @Autowired
    private AmqpTemplate amqpTemplate;

    public boolean canVisit(String item, int limitTime, int limitNum)  {
        long curTime = System.currentTimeMillis();
        // Save request in zset
        redisTemplate.opsForZSet().add(item, curTime, curTime);
        // Remove requests outside the time range
        redisTemplate.opsForZSet().removeRangeByScore(item,0,curTime - limitTime * 1000);
        // Count the number of requests within the time range
        Long count = redisTemplate.opsForZSet().zCard(item);
        // Set the timeout of all requests uniformly
        redisTemplate.expire(item, limitTime, TimeUnit.SECONDS);
        return limitNum >= count;
     }


    public String buy(String item, String person){
        String luaScript = "local person = ARGV[1]\n" +
                           "local item = KEYS[1] \n" +
                           "local left = tonumber(redis.call('get',item)) \n" +
                           "if (left >= 1) \n" +
                           "then redis.call('decrby',item,1) \n" +
                           " redis.call('rpush','personList',person) \n" +
                           "return 1 \n" +
                           "else \n" +
                           "return 0\n" +
                           "end\n" +
                           "\n" ;
        String key=item;
        String args=person;

        DefaultRedisScript<String> redisScript = new DefaultRedisScript<String>();
        redisScript.setScriptText(luaScript);
        //When calling lua script, please pay attention to the parameters passed in
        Object luaResult = redisTemplate.execute((RedisConnection connection) -> connection.eval(
                    redisScript.getScriptAsString().getBytes(),
                    ReturnType.INTEGER,
                    1,
                    key.getBytes(),
                    args.getBytes()));

        //If the second kill is successful, send a message to the message queue and insert it into the database asynchronously
        if(!luaResult.equals("0") ){
            buyrecord record = new buyrecord();
            record.setItem(item);
            record.setPerson(person);
            amqpTemplate.convertAndSend("myExchange","buyRecordQueue",record);
        }

        //The result is returned according to the execution of lua script
        return luaResult.toString();
    }
}
In the above code, firstly, the dependent packages to be used in this class are introduced through the import statement in lines 2-11. Then, the redisTemplate object used to call Redis is defined in line 15, and the amqpTemplate object used to send messages to the RabbitMQ message queue is defined in line 17.
The canVisit method in line 18 realizes the current limiting effect. The item parameter of this method represents the goods to be limited, and the limitTime and LimitNum parameters respectively represent the number of requests to be limited within the specified time.
In this method, the ordered set of Redis is used to realize the current limiting effect. Specifically, in the code in line 21, the item representing the operation type is inserted into the ordered set as the key through the zadd method, and the curTime representing the current time is used as the value to ensure the uniqueness of the value. Similarly, the curTime value is used as the score value of the elements in the ordered set.
Then, in line 23, remove the data from 0 to the current time limitTime range through the remoderangeby score command. For example, if the current limit time range is 20 seconds, then the data from 0 to 20 seconds from the current time can be removed from the ordered set through this command, so as to ensure that the ordered set only saves the requests in the last 20 seconds.
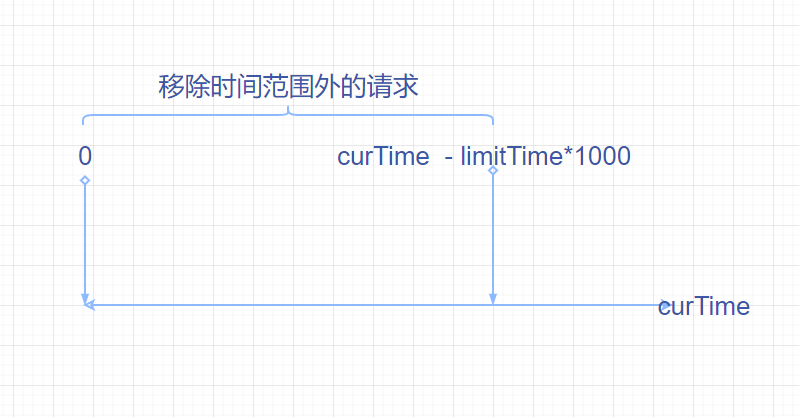
On this basis, use the zcard command to count the number of item s in the ordered set through the code in line 25. If it is found that the current number has not reached the upper limit of current limit through the Boolean statement in line 28, the method will return true, indicating that the request can continue, otherwise return false, indicating that the request will be limited.
At the same time, you need to set the timeout time of the data in the ordered collection through the expire statement on line 27, so as to ensure that these keys can be deleted automatically after the current limiting and second killing actions are completed.
The buy method defined in line 30 will realize the function of second kill. First, define the Lua script that realizes the function of second kill through lines 31 ~ 41. The script has been analyzed before, and then use redistemplate through lines 47-52 The execute method executes the Lua script.
During execution, the number of KEYS type parameters will be specified through line 50, and the KEYS and ARGVS parameters required for the execution of the script will be passed in through lines 51 and 52.
Then, the execution result of the second kill script will be judged through the f statement on line 54. If the second kill is successful, the record object containing the second kill result will be sent to the buyRecordQueue queue through the amqpTemplate object in line 55 ~ 58. Finally, the second kill result is returned through the statement on line 61.
Observe the second kill effect
At this point, you can start Redis, RabbitMQ and QuickBuyDemo projects through the following steps and observe the second kill effect.
- From the command line, click RabbitMQ server The bat start command starts RabbitMQ.
- Run Redis server Exe to start the Redis server and run Redis cli Exe starts the Redis client, and then caches an inventory data in Redis through the set Computer 10 command in the Redis client, indicating that there are 10 computers available for second kill.
- In the QuickBuyDemo project, by running springbootapp The Java startup class starts the project. After successful startup, enter http:localhost:8080/quickBuy/Computer/Tom in the browser to initiate the second kill request, where the Computer parameter represents the goods of the second kill and Tom represents the person who initiated the second kill request.
After entering, you can see the result of Tom success in the browser, and then run the get Computer command in the Redis client window. You can see that the inventory of the Computer will be reduced to 9, so you can confirm the success of the second kill. At the same time, it can be observed through the lindex personList 0 command that the person who successfully initiated the second kill request is Tom.
4, Save second kill results asynchronously
If the seckill result is directly inserted into the MySQL database in the above QuickBuyDemo project, it will cause great pressure on the database when the concurrency of seckill requests is very high. Therefore, in this project, the seckill result will be transmitted to the DBHandlerPrj project through message queue, and the data will be saved in different steps, so as to reduce the load pressure of the database.
Create projects and design databases
First, you need to create a Maven project named DBHandlerPrj to realize the function of asynchronously saving second kill data. The POM of this project The XML file is as follows. The Spring Boot dependency package is introduced through lines 2-5, the RabbitMO message queue dependency package is introduced through lines 6-9, and the JPA and MySQL dependency package is introduced through lines 10-18.
<dependencies>
    <dependency>
        <groupId>org.springframework.boot</groupId>
        <artifactId>spring-boot-starter-web</artifactId>
    </dependency>
    <dependency>
        <groupId>org.springframework.boot</groupId>
        <artifactId>spring-boot-starter-amqp</artifactId>
    </dependency>
    <dependency>
        <groupId>mysql</groupId>
        <artifactId>mysql-connector-java</artifactId>
        <scope>runtime</scope>
    </dependency>
    <dependency>
        <groupId>org.springframework.boot</groupId>
        <artifactId>spring-boot-starter-data-jpa</artifactId>
    </dependency>
</dependencies>
This project will use the buyrecord table shown in the table, which is created in the QuickBuy data table (schema) of local MySQL, in which the second kill results will be saved.
| Field name | type | explain |
|---|---|---|
| item | character string | Second kill successful trade name |
| person | character string | Second kill successful users |
The startup class SpringBootAppjava of this project is exactly the same as that in QuickBuyDemo project, so the description will not be repeated.
Configure message queuing and database parameters
In the resources directory of this project, application In the YML file, the message queue and database connection parameters will be configured through the following code.
server:
  port: 8090
rabbitmq:
  host: 127.0.0.1
  port: 5672
  username: guest
  password: guest
spring:
  jpa:
    show-sql: true
    hibernate:
      dll-auto: validate
  datasource:
    url: jdbc:mysql://localhost:3306/QuickBuy?serverTimezone=GMT
    username: root
    password: 123456
    driver-class-name: com.mysql.jdbc.Driver
Since the previous QuickBuyDemo project has occupied port 8080, this configuration file will set the working port to 8090 through lines 1 and 2. Then, the configuration file will set the connection parameters of RabbiMQ message queue through lines 3 to 7, specifically connecting to the local 5672 port, and the user name and password used for the connection are guest.
Since this project is connected to MySQL database through JPA, the configuration file configures JPA parameters through lines 8-12 and MySQL connection parameters through lines 13-17.
In addition, like the QuickBuyDemo project, this project is still in rabbitmqconf The RabbitMQ message queue and switch are set in the Java configuration file. The specific code is as follows. The configured message queue name buyRecordQueue and the switch name myExchange need to be consistent with the definition in the QuickBuyDemo project.
package prj;

import org.springframework.amqp.core.*;
import org.springframework.context.annotation.Bean;
import org.springframework.context.annotation.Configuration;


@Configuration
public class RabbitMQConfig{
    //Define message queues with topics
    @Bean
    public Queue objectQueue() {
        return new Queue("buyRecordQueue");
    }
    //Define switch
    @Bean
    TopicExchange myExchange() {
        return new TopicExchange("myExchange");
    }
    @Bean
    Binding bindingObjectQueue(Queue objectQueue,TopicExchange exchange) {
        return BindingBuilder.bind(objectQueue).to(exchange).with("buyRecordQueue");
    }
}
Listen to the message queue and save the second kill results
In quickbuysevice.com of this project The buyRecordQueue message queue will be monitored in the java file, and the second kill results will be stored in the MySOL data table. The specific code is as follows:
package prj.service;
import org.springframework.amqp.core.AmqpTemplate;
import org.springframework.amqp.rabbit.annotation.RabbitHandler;
import org.springframework.amqp.rabbit.annotation.RabbitListener;
import org.springframework.beans.factory.annotation.Autowired;
import org.springframework.stereotype.Component;
import prj.model.buyrecord;
import prj.repo.BuyRecordRepo;

@Component
@RabbitListener(queues = "buyRecordQueue")
public class QuickBuyService {

    @Autowired
    private AmqpTemplate amqpTemplate;
    @Autowired
    private BuyRecordRepo buyRecordRepo;

    @RabbitHandler
    public void saveBuyRecord(buyrecord record){
        buyRecordRepo.save(record);
    }
}
In line 10 of this class, the @ RabbitListener annotation indicates that the buyRecordQueue message queue will be monitored. When there are messages in the message queue, the saveBuyRecord method in line 17 of this class will be triggered, which is modified by the @ RabbitHandler annotation in line 16. In this method, the save method of JPA class buyRecordRepo will be called to save the second kill result to the data table.
The model class buyrecord used in the QuickBuyServce class is very similar to that in the QuickBuyDemo project. Because this class needs to be transmitted in the network through message queue, it needs to implement the Serializable interface as in line 9.
package prj.model;

import java.io.Serializable;
import javax.persistence.Column;
import javax.persistence.Entity;
import javax.persistence.Id;
import javax.persistence.Table;

@Entity
@Table(name="buyrecord")
public class buyrecord implements Serializable {

    @Id
    @Column(name = "person")
    private String person;
    @Column(name = "item")
    private String item;


    public void setItem(String item) {
        this.item = item;
    }

    public void setPerson(String person) {
        this.person = person;
    }

    public String getItem() {
        return item;
    }

    public String getPerson() {
        return person;
    }


}
Full link effect demonstration
After the above two projects are developed, the following steps can be used to observe the second kill effect of the whole link:
-
Start RabbitMQ, Redis server and client, cache the number of second kill products through the set Computer 10 command, and start the QuickBuyDemo project by running the startup class.
-
Start DBHandlerPrj project
Develop the following quickbuythread in the QuickBuyDemo project Java file, in which multiple second kill requests are simulated by multithreading. The code is as follows:
package prj.client;

import org.springframework.http.ResponseEntity;
import org.springframework.web.client.RestTemplate;

class QuickBuyThread extends Thread{

    public void run() {
        RestTemplate restTemplate = new RestTemplate();
        String user = Thread.currentThread().getName();
        ResponseEntity<String> entity = restTemplate.
                getForEntity("http://localhost:8080/quickBuy/Computer/"+user , String.class);
        System.out.println(entity.getBody());
    }
}


public class MockQuickBuy {
    public static void main(String[] args){
        for (int i = 0; i < 15; i++) {
            new QuickBuyThread().start();
        }
    }

}
The QuickBuyThread class defined in line 4 realizes the effect of Thread by inheriting the Thread class. Resttemplate is used in the run method of the Thread in line 5 The getforentity method simulates sending a second kill request, in which the name of the current Thread is used as the user initiating the second kill.
public class MockQuickBuy {
    public static void main(String[] args){
        for (int i = 0; i < 15; i++) {
            new QuickBuyThread().start();
        }
    }

}
In the main method of the MockQuickBuy class in line 12, 15 threads are started through the for loop in line 14 to initiate a second kill request. Since the number of Computer products previously set in Redis cache is 10, 10 requests will be killed successfully. Five requests failed. The following output statement can confirm this result.
In addition, if you go to MySQL database, use select from quickbuy Buyrecord statement: observe the second kill results and see the users who have successfully killed the second. These user names are exactly the same as those in the above output results.
This article comes from Chapter 17 of Spring Boot+Vue.js + distributed component full stack development training camp (video teaching edition)