Transferred from: https://www.cnblogs.com/gzggyy/p/3167208.html
This paper uses the free control Lodop+JavaScript to realize accurate template printing. The client needs to install Lodop printing application.
In fact, this scheme is relatively simple. The template design process can be realized by using an htm file, but it still takes some time to understand these steps. The following step-by-step detailed description is given:
Step 1: create a blank template design file
Copy the following hypertext code into a local html file:
<!DOCTYPE html PUBLIC "-//W3C//DTD XHTML 1.0 Strict//EN" "http://www.w3.org/TR/xhtml1/DTD/xhtml1-strict.dtd">
<html>
<head>
<meta http-equiv="Content-Type" content="text/html; charset=utf-8" />
<title>WEB Print control:Print design and position template printing bills</title>

<script language="javascript" src="js/LodopFuncs.js"></script>
</head>
<body>

get into<a href="javascript:;" onclick="javascript:Design1();">Template design</a><br><br>
get into<a href="javascript:;" onclick="javascript:CreatePrintPage();LODOP.PREVIEW();">Print preview of template</a>


<script language="javascript" type="text/javascript">
	var LODOP;
	function Design1() {
			LODOP.PRINT_INIT("Set beating**Template for");
	//		LODOP.SET_SHOW_MODE("HIDE_ITEM_LIST",true);// Set the object list to off by default
	//		LODOP.SET_SHOW_MODE("TEXT_SHOW_BORDER",1); // Set the character edit box to single by default
			LODOP.PRINT_DESIGN();

	};
</script>
</body>
</html>
This paper simulates the program development of EMS express mail order, and the file is named printems Htm, which can be called template design file.
Step 2: open the file with a browser
You can double-click the design file in the local folder, but if you need to open it before installing it, you can enter it in the local folder,
Download link on the official website: http://www.lodop.net/download.html
Step 3: prepare the design
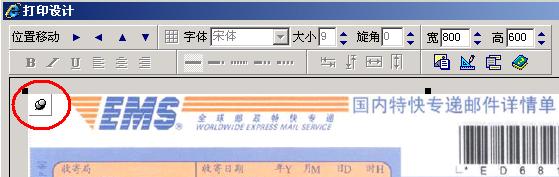
After successfully installing Lodop, open the template design file printems again Htm, click the "template design" link to pop up the following blank print design window:
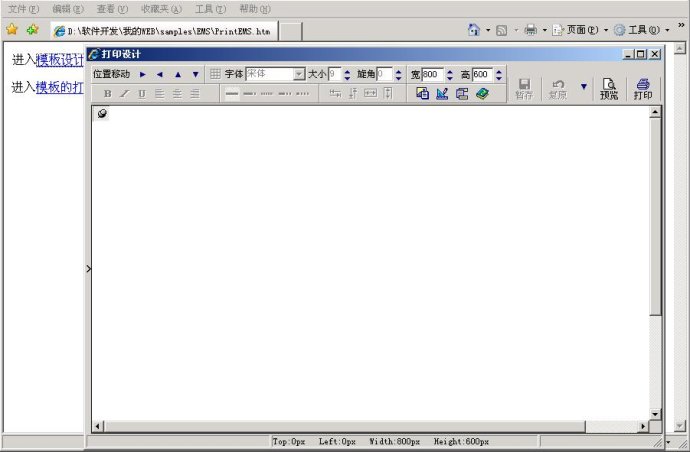
In order to locate the data position in the template as soon as possible, you need to make a bill scan as the background. Of course, it can be completed without the scan. It just needs to explore several times and take some time.
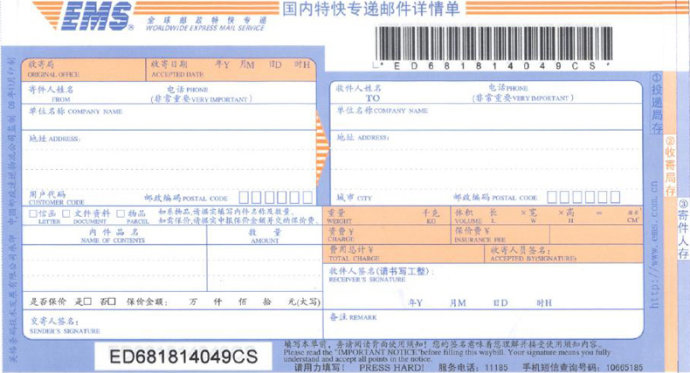
The following is the EMS scanning diagram I made. You can save the diagram as a jpg file so that we can complete the following demonstration steps together.
Step 4: load the background image and resize the image
In the print design window, click the "load background image..." menu as shown in the figure below to call in the EMS image file saved above.
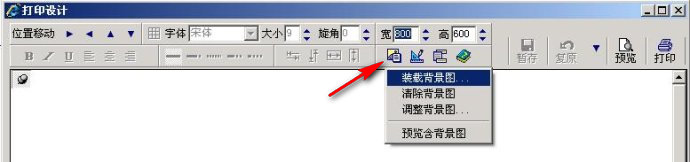
After loading the background image, click the "adjust background image..." menu shown in the above figure to pop up the "background image adjustment" window shown in the following figure. Set the width of the image to 209mm and the height to 113mm, which will change automatically.
This width value is obtained by measuring the actual bill. If the scanned image is obtained in the ratio of 1:1, the step of adjusting the background image is avoided.

Step 5: add data content and start printing test
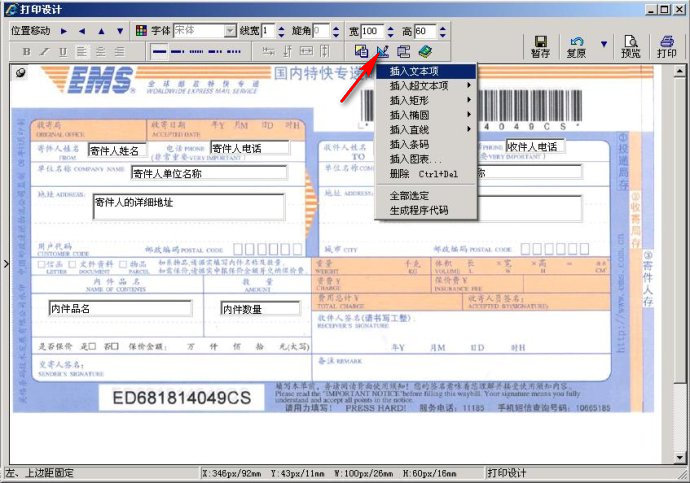
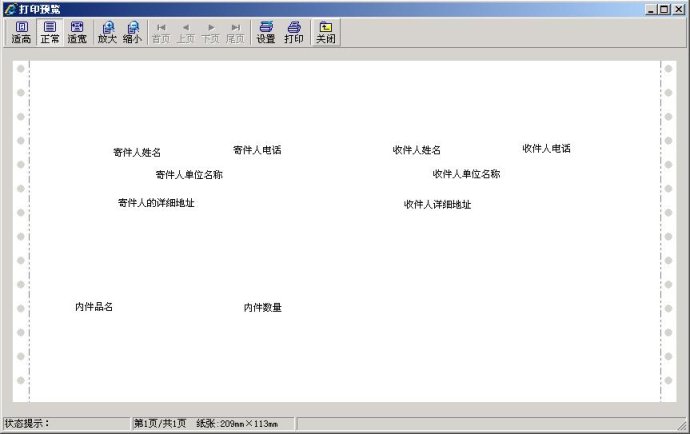
Click the "insert text item" menu shown in the figure below to add print content. The content items can be dragged or fine adjusted. After basic alignment, click the "Preview" button (note that the "print" button next to it is a charging function, and there will be watermark on the paper, while the "print during preview" button is completely free, we use the latter).
Print the content on a thinner white paper, and then compare it with the real bill in the sun. Take one of the leftmost and uppermost contents as the benchmark, and adjust the distance of other contents. Repeat the test until all contents are aligned with each other.
This step is to align the contents with each other, and then deal with the overall position in the next step.
Step 6: overall alignment
Since the left margin or upper margin of the printer is not necessarily zero or there is error at the edge of the bill, although the contents printed in step 5 are accurate, they will still deviate from the real bill as a whole, and the overall position needs to be adjusted.
Click the "paper nail" button shown in the red circle below. After the "paper nail" pops up, the whole design layout can be adjusted up, down, left and right, and then print the test according to the method in the previous step until the overall alignment is successful. In order to avoid wasting bills, thin white paper can still be used for testing during printing. Note that during light transmission control at this time, the left edge and upper edge of the paper should be aligned with the bills, and whether the overall alignment is determined by observing the position of the contents.
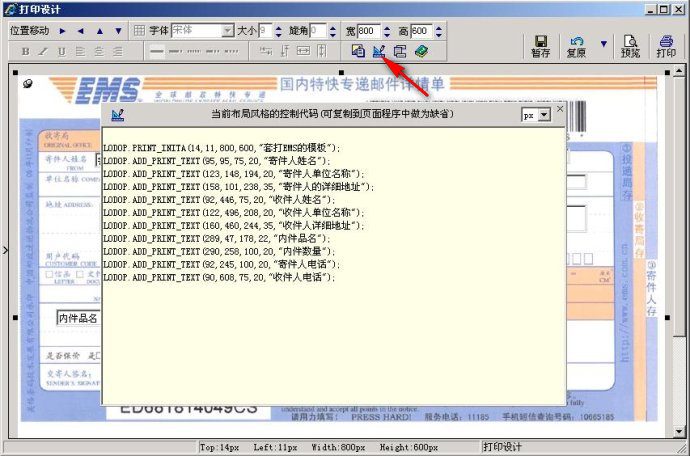
Step 7: generate the program code of the print template
After the template printing test is successful, click the "generate program code" menu shown in the figure in step 5, and the following results will appear. These codes are the template program codes we need. Copy them and prepare them for integration into your page program.
Step 8: finish printing template design documents
Do you want to know what it feels like to play WEB games? OK, let's make a static WEB page first: put the program code generated in step 7,
Insert into the CreatePrintPage function of the blank design file in the first step of replacement, and it becomes as follows:
<!DOCTYPE html PUBLIC "-//W3C//DTD XHTML 1.0 Strict//EN" "http://www.w3.org/TR/xhtml1/DTD/xhtml1-strict.dtd">
<html>
<head>
<meta http-equiv="Content-Type" content="text/html; charset=utf-8" />
<title>WEB Print control:Print design and position template printing bills</title>

<script language="javascript" src="js/LodopFuncs.js"></script>
</head>
<body>

get into<a href="javascript:;" onclick="javascript:Design1();">Template design</a><br><br>
get into<a href="javascript:;" onclick="javascript:CreatePrintPage();">Print preview of template</a>


<script language="javascript" type="text/javascript">
	var LODOP;
	function Design1() {
			LODOP.PRINT_INIT("Set beating EMS Template for");
	//		LODOP.SET_SHOW_MODE("HIDE_ITEM_LIST",true);// Set the object list to off by default
	//		LODOP.SET_SHOW_MODE("TEXT_SHOW_BORDER",1); // Set the character edit box to single by default
			LODOP.PRINT_DESIGN();

	};

	function CreatePrintPage() {
		LODOP.PRINT_INITA(14,11,800,600,"Set beating EMS Template for");
		LODOP.ADD_PRINT_TEXT(95,95,75,20,"name of sender ");
		LODOP.ADD_PRINT_TEXT(123,148,194,20,"Name of sender");
		LODOP.ADD_PRINT_TEXT(158,101,238,35,"Sender's full address");
		LODOP.ADD_PRINT_TEXT(92,446,75,20,"Recipient name");
		LODOP.ADD_PRINT_TEXT(122,496,208,20,"Name of recipient unit");
		LODOP.ADD_PRINT_TEXT(160,460,244,35,"Recipient's detailed address");
		LODOP.ADD_PRINT_TEXT(289,47,178,22,"Inner part name");
		LODOP.ADD_PRINT_TEXT(290,258,100,20,"Number of Internals");
		LODOP.ADD_PRINT_TEXT(92,245,100,20,"Sender telephone");
		LODOP.ADD_PRINT_TEXT(90,608,75,20,"Recipient phone");

		LODOP.PREVIEW();
	};
</script>
</body>
</html>
Copy the above contents to another htm file printEMS_OK.htm, double-click to open it and click the print preview to realize simple WEB template printing.
The above eight steps basically complete the template design and realize the template printing of static pages, but some work needs to be done to integrate the template code into the actual WEB program.
Step 9: use of template program code
Simply transform the above CreatePrintPage function. The original function is as follows:
function CreatePrintPage() {
		LODOP.PRINT_INITA(14,11,800,600,"Set beating EMS Template for");
		LODOP.ADD_PRINT_TEXT(95,95,75,20,"name of sender ");
		LODOP.ADD_PRINT_TEXT(123,148,194,20,"Name of sender");
		LODOP.ADD_PRINT_TEXT(158,101,238,35,"Sender's full address");
		LODOP.ADD_PRINT_TEXT(92,446,75,20,"Recipient name");
		LODOP.ADD_PRINT_TEXT(122,496,208,20,"Name of recipient unit");
		LODOP.ADD_PRINT_TEXT(160,460,244,35,"Recipient's detailed address");
		LODOP.ADD_PRINT_TEXT(289,47,178,22,"Inner part name");
		LODOP.ADD_PRINT_TEXT(290,258,100,20,"Number of Internals");
		LODOP.ADD_PRINT_TEXT(92,245,100,20,"Sender telephone");
		LODOP.ADD_PRINT_TEXT(90,608,75,20,"Recipient phone");

		LODOP.PREVIEW();
	};
Take the printed content as the variable parameter, and change the function to the following style:
function CreatePrintPage(data) {
    LODOP.PRINT_INITA(14,11,800,600,data.strPName);        //Print task name
    LODOP.ADD_PRINT_TEXT(95,95,75,20,data.strJJRXM);       //name of sender
    LODOP.ADD_PRINT_TEXT(123,148,194,20,data.strJJRDW);    //Name of sender
    LODOP.ADD_PRINT_TEXT(158,101,238,35,data.strJJRDZ);    //Sender's full address
    LODOP.ADD_PRINT_TEXT(92,446,75,20,data.strSJRXM);      //Recipient name
    LODOP.ADD_PRINT_TEXT(122,496,208,20,data.strSJRDW);    //Name of recipient unit
    LODOP.ADD_PRINT_TEXT(160,460,244,35,data.strSJRDZ);    //Recipient's detailed address
    LODOP.ADD_PRINT_TEXT(289,47,178,22,data.strNJPM);      //Inner part name
    LODOP.ADD_PRINT_TEXT(290,258,100,20,data.strNJSL);     //Number of Internals
    LODOP.ADD_PRINT_TEXT(92,245,100,20,data.strJJRDH);     //Sender telephone
    LODOP.ADD_PRINT_TEXT(90,608,75,20,data.strSJRDH);      //Recipient phone

	LODOP.PREVIEW();
};
The modified JS function is easy to understand. It is easy to use whether it is written into a JS file or directly embedded in the page.
If you change the font, size, bold italics and other formats of the content, the code will be more, but it is relatively concise in general.
Step 10: set the paper height to realize continuous printing
Most of the bills of template printing business are continuous paper, which needs to be paged accurately, so as to ensure that continuous multiple pages are printed without offset,
For this reason, the above code should also be printed in print_ Add a line set after inita_ PRINT_ PageSize statement:
function CreatePrintPage(data) {
    LODOP.PRINT_INITA(14,11,800,600,data.strPName);        //Print task name
    LODOP.SET_PRINT_PAGESIZE(1,"209mm","113mm","");//Set paper height
    LODOP.ADD_PRINT_TEXT(95,95,75,20,data.strJJRXM);       //name of sender
    LODOP.ADD_PRINT_TEXT(123,148,194,20,data.strJJRDW);    //Name of sender
    LODOP.ADD_PRINT_TEXT(158,101,238,35,data.strJJRDZ);    //Sender's full address
    LODOP.ADD_PRINT_TEXT(92,446,75,20,data.strSJRXM);      //Recipient name
    LODOP.ADD_PRINT_TEXT(122,496,208,20,data.strSJRDW);    //Name of recipient unit
    LODOP.ADD_PRINT_TEXT(160,460,244,35,data.strSJRDZ);    //Recipient's detailed address
    LODOP.ADD_PRINT_TEXT(289,47,178,22,data.strNJPM);      //Inner part name
    LODOP.ADD_PRINT_TEXT(290,258,100,20,data.strNJSL);     //Number of Internals
    LODOP.ADD_PRINT_TEXT(92,245,100,20,data.strJJRDH);     //Sender telephone
    LODOP.ADD_PRINT_TEXT(90,608,75,20,data.strSJRDH);      //Recipient phone

	LODOP.PREVIEW();
};
Among them, the paper width parameter of 209mm has little significance, mainly the height parameter of 113mm, which determines the paper walking distance of each page and has a great impact on continuous printing. This value is obtained by measuring the actual bill height, including the tear hole gap between papers. The ideal measurement method is to connect several pages and measure them together to take their average height.
The print preview after adding the paper height control is as follows. You can print two pages continuously on the same piece of white paper with a longer length. Test and compare it. Add the above to set_ PRINT_ The code of the PageSize statement is copied into the third htm file printems_ OKM. Please try. If the content is shifted downward from the second page, it indicates that the paper height setting is larger than the actual bill, reduce the parameter value of 113mm, otherwise increase it, and the parameter can be accurate to 0.1mm.
Step 11: let the operator adjust the position by himself
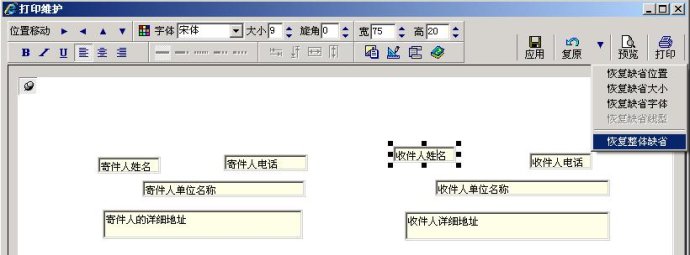
The above ten steps can be very accurate, but they are all based on the current printer. If your printing program faces many types of printers, even some unknown printer types, the "print maintenance" function will be very useful. You can authorize this function to the final operator or on-site technical maintenance personnel in the program according to the situation, so that the user can adjust the printing position to adapt to various types of printers.
The instruction statement for print maintenance is PRINT_SETUP, enter the online file printems containing this function_ OKMSetup. Htm, first adjust the print content or overall position in print maintenance, and click the "application" button. Close the browser and reopen it to enter the "print preview" to see if there are associated changes. The following figure shows the print maintenance interface, where you can see the positions of the "apply" button and "restore overall default" button.
Postscript:
After the lodop printing application is installed, 51 printing scenarios are officially provided. The referenced js files can be found in the directory where the template is located. Other application methods can be obtained by modifying 51 scenarios.