I. differences between MySQL 5.6 and MySQL 5.7 installation
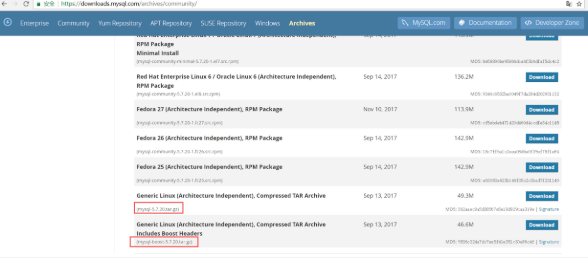
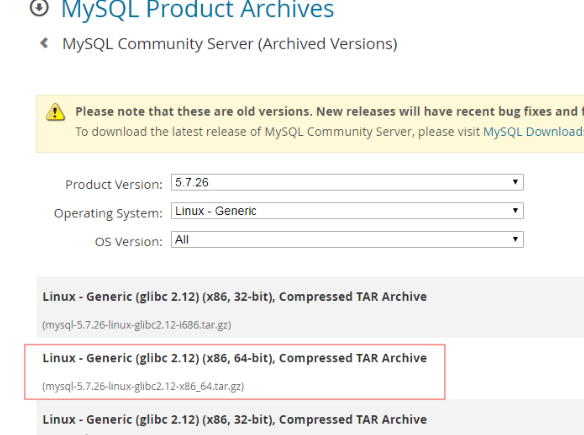
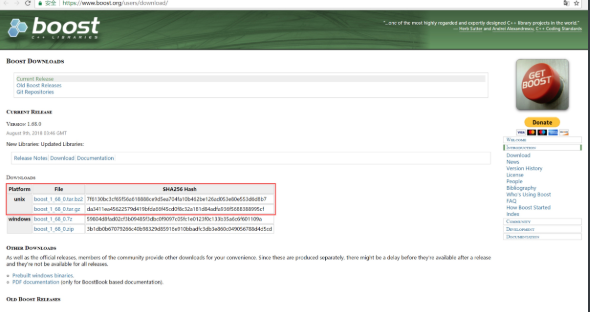
- 1. cmake added boost to download boost.org
- 2. When initializing cd /application/mysql/bin/mysql, use mysqld --initialize to replace MySQL? Install? DB. Other parameters remain unchanged: - user= --basedir= --datadir=
- 3. -- initialize will generate a temporary password
- 4. You can also use another parameter - initialize execute (plus generate password)
mysql 5.7 using weak password
validate_password_length 8 # The minimum length of the password, 8 here.
validate_password_mixed_case_count 1 # At least number of lowercase or uppercase letters, here is 1.
validate_password_number_count 1 # At least the number of numbers to include, here is 1.
validate_password_policy MEDIUM # Strength level, where values can be set to 0, 1, 2. Corresponding to:
[0/LOW]: Only check the length.
[1/MEDIUM]: Check the number, case and special characters on the basis of level 0.
[2/STRONG]: Check the special character dictionary file on the basis of level 1, here it is 1.
validate_password_special_char_count 1 # The minimum number of characters to include, here is 1.
[root@db02 mysql-5.7.20]# yum install -y gcc gcc-c++ automake autoconf
[root@db02 mysql-5.7.20]# yum install make cmake bison-devel ncurses-devel libaio-devel
[root@db02 mysql-5.7.20]#
wget httpss://dl.bintray.com/boostorg/release/1.65.1/source/boost_1_59_0.tar.gz
#You can also log in to boost.org to download
[root@db02 mysql-5.7.20]# tar xf boost_1_59_0.tar.gz -C /usr/local/
[root@db02 mysql-5.7.20]#
cmake . -DCMAKE_INSTALL_PREFIX=/application/mysql-5.7.20 \
-DMYSQL_DATADIR=/application/mysql-5.7.20/data \
-DMYSQL_UNIX_ADDR=/application/mysql-5.7.20/tmp/mysql.sock \
-DDOWNLOAD_BOOST=1 \
-DWITH_BOOST=/usr/local/boost_1_59_0 \
-DDEFAULT_CHARSET=utf8 \
-DDEFAULT_COLLATION=utf8_general_ci \
-DWITH_EXTRA_CHARSETS=all \
-DWITH_INNOBASE_STORAGE_ENGINE=1 \
-DWITH_FEDERATED_STORAGE_ENGINE=1 \
-DWITH_BLACKHOLE_STORAGE_ENGINE=1 \
-DWITHOUT_EXAMPLE_STORAGE_ENGINE=1 \
-DWITH_ZLIB=bundled \
-DWITH_SSL=bundled \
-DENABLED_LOCAL_INFILE=1 \
-DWITH_EMBEDDED_SERVER=1 \
-DENABLE_DOWNLOADS=1 \
-DWITH_DEBUG=0
Generate password in different location
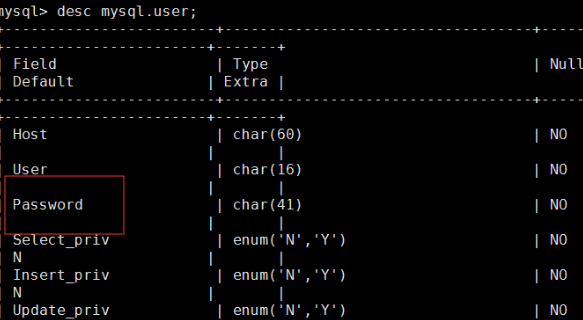
select user,host passwd from mysql.user
Check if there is a password
5.6
mysql 5.7
2. MySQL user rights management
- 1. Basic operation of MySQL user
The role of Linux users:
- 1) landing system
- 2) management system documents
Linux user management:
- 1) create user: useradd adduser
- 2) delete user: userdel
- 3) modify user: usermod
The role of MySQL users:
- 1) log in MySQL database
- 2) manage database objects
MySQL user management:
- 1) create user: create user
#Create user
create user zls@'%';
#Create the user and give the password (5.7). If the user does not exist, grant cannot be used
create user qls@'%' identified by '123';
grant all on *.* to qls@'%';
- 2) delete user: delete user drop user (user here is a command, not a user)
mysql> drop user root@'db02';
Query OK, 0 rows affected (0.00 sec)
mysql> drop user ''@'db02';
Query OK, 0 rows affected (0.00 sec)
- )Modify user: update alter grant
mysql> update mysql.user set password=PASSWORD('123') where user='root' and
host='localhost';
#In storage, in operation
User definition:
-
1) username @ 'host domain'
root@'%' select
root @ '%' superuser
root@'172.0.0.0' super user
2) host domain: it can be understood as the white list of MySQL login.
-
3) host domain format:
- '10.0.0.51'
- '10.0.0.5%'
- '10.0.0.%'
- '10.0.%.%'
- '10.%.%.%'
- '%'
- 'db01'
- '10.0.0.51/255.255.255.0'
- ’10.0.0.0/24 not available, not recognized
User management practice
Just finished installing MySQL database
- 1. Set the initial password (root@localhost)
[root@db02 mysql-5.7.20]# mysqladmin -uroot -p password 'oldboy123'
- 2. Change password
- 3. Log in with password
[root@db02 mysql-5.7.20]# mysql -uroot -p123
- 4. Clean up useless users
All users deleted by mistake
#close database
[root@db02 mysql-5.7.20]# /etc/init.d/mysqld stop #currency
#Start database
[root@db02 mysql-5.7.20]# mysqld_safe --skip-grant-tables --skip-networking &
#Skip authorization table, skip network, only sockect connection, not tcp\ip connection
#Using mysql Library
mysql> use mysql
#Error method 1: create root user
mysql> create user root@'localhost';
#Error method 2. Create root user
mysql> insert into user(user,host,password) values('root','10.0.0.55',PASSWORD('123'));
#Wrong method
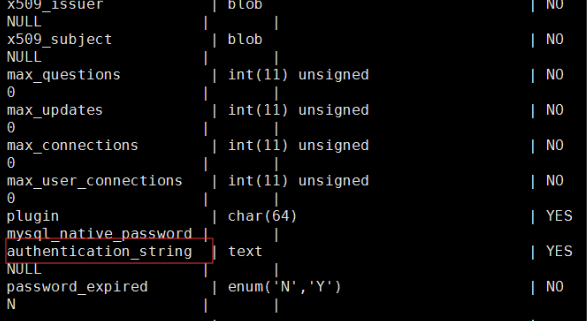
mysql> insert into user(user,host,password,ssl_cipher,x509_issuer,x509_subject)
values('root','localhost',PASSWORD('123'),'null','null','null');
#No permission, no permission in the table
#The right way to create root
mysql> insert into mysql.user values ('localhohost','root',PASSWORD('123'),
-> 'Y',
-> 'Y',
-> 'Y',
-> 'Y',
-> 'Y',
-> 'Y',
-> 'Y',
-> 'Y',
-> 'Y',
-> 'Y',
-> 'Y',
-> 'Y',
-> 'Y',
-> 'Y',
-> 'Y',
-> 'Y',
-> 'Y',
-> 'Y',
-> 'Y',
-> 'Y',
-> 'Y',
-> 'Y',
-> 'Y',
-> 'Y',
-> 'Y',
-> 'Y',
-> 'Y',
-> 'Y',
-> 'Y',
-> '',
-> '',
-> '',
-> '',0,0,0,0,'mysql_native_password','','N');
#Restart mysqld
/etc/init.d/mysqld start
Method two:
#close database
[root@db02 mysql-5.7.20]# /etc/init.d/mysqld stop #currency
#Start database
[root@db02 mysql-5.7.20]# mysqld_safe --skip-grant-tables --skip-networking &

mysql>flush privileges;#Refresh the authorization table, and the update will take effect only when the password is changed, which is dangerous
mysql> all on *.* to root@'127.0.0.1' identified by '1'
with grant option;#Super user
#Version 5.7, if the user does not exist, grant cannot be used
Method three:
#Export library, export system library on another server
mysqldump -uroot -p1 -B mysql >/tmp/mysql.sql
Method 4: (not suitable for production environment)
#Initialization
cd /application/mysql/
rm-fr data/ #Do not delete the data directory incorrectly
Forget root password
#close database
[root@db02 mysql-5.7.20]# /etc/init.d/mysqld stop
#Start database
[root@db02 mysql-5.7.20]# mysqld_safe --skip-grant-tables --skip-networking &

#1.update password
update mysql.user set password=PASSWORD('123') where user='root' and host='localhost';
mysql> flush privileges;
#2.set
mysql> set password=PASSWORD('1');
#3.grant
mysql> grant all on *.* to root@'localhost' identified by '2';
#4.mysqladmin
[root@db01 ~]# mysqladmin -uroot -p2 password '123'
#5.alter- 2. User management and authority management_
1) create user
mysql> create user oldboy@'10.0.0.%' identified by '123';
2) view users
mysql> select user,host from mysql.user;
3) delete user
mysql> drop user oldboy@'10.0.0.%';#drop user sql statement
4) change password
select database();#pwd
desc mysql.user;View table permissions
#insert into user(user,host.password) values()

#Enter the storage to change the password, or use the absolute path

mysql> set password
mysql> update user set password=PASSWORD('oldboy123') where user='root' and host='localhost';#mysql.user
mysql> grant all privileges on *.* to oldboy@'10.0.0.%' identified by '123';
5) user authority introduction
MySQL permission definition:
Objects: library, table
Jurisdiction
INSERT,SELECT, UPDATE, DELETE, CREATE, DROP, RELOAD, SHUTDOWN, PROCESS, FILE, REFERENCES, INDEX, ALTER, SHOW DATABASES, SUPER, CREATE TEMPORARY TABLES, LOCK TABLES, EXECUTE, REPLICATION SLAVE, REPLICATION CLIENT, CREATE VIEW, SHOW VIEW, CREATE ROUTINE, ALTER ROUTINE, CREATE USER, EVENT, TRIGGER, CREATE TABLESPACE
Give development permission
grant INSERT,SELECT, UPDATE, DELETE on *.* to dev@'xxx';
Permission is minimized. The minimum level is not the table level, but the column level
grant select on mysql.user.user to dev@'10.0.0.5%' identified by '123';
use vip;
use tables;
Host domain: 10.0.0.5% can connect: 10.0.0.50-59 10.0.0.5
Desensitization: desensitization of sensitive information
grant select(user,host) on wzry.user to no_vip@'%' identified by '123';
Database cluster: 10.0.0.51 52 53 54
ascription
Only one owner can be set at a time. There is no concept of group or other users
grant all privileges on *.* to oldboy@'10.0.0.%' identified by '123';
        Authority object ownership password
Action object decomposition
. [all tables under all databases in the current MySQL instance]
wordpress. * [all tables in the wordpress Library in the current MySQL instance (single library level))
wordpress.user [user table (single table level) in wordpress Library in the current MySQL instance]
Consider the following scenario:
Development: you give root to me?
You: emmmmm....... So? 

Experimental thinking:
#Create wordpress database
create database wordpress;
#Using wordpress Library
use wordpress;
#Create t1, t2 tables
create table t1 (id int);
create table t2 (id int);
#Create blog Library
create database blog;
#Use blog Library
use blog;
#Create t1 table
create table tb1 (id int);
To grant authorization:
1,grant select on *.* to wordpress@'10.0.0.5%' identified by '123';
2,grant insert,delete,update on wordpress.* to wordpress@'10.0.0.5%' identified by '123';
3,grant all on wordpress.t1 to wordpress@'10.0.0.5%' identified by '123';
Q:
A client program uses wordpress to log in to MySQL 10.0.0.51,
- 1. Management ability of t1 table?
- 2. Management ability of t2 table?
- 3. Management ability of tb1 table?
Solution:
- 1. Meet 1, 2, 3 at the same time. The final authority is 1 + 2 + 3
- 2. Both 1 and 2 authorizations are met, and the final authority is 1 + 2
- 3. Only 1 authorization is satisfied, so only select
But the column level is the minimum level
create database wordpress;
use wordpress;
create table t1 (id int);
create table t2 (id int);
create database blog;
use blog;
create table tb1 (id int);
mysql> show databases;
+--------------------+
| Database |
+--------------------+
| blog |
| wordpress |
+--------------------+
mysql> show tables from wordpress;
+---------------------+
| Tables_in_wordpress |
+---------------------+
| t1 |
| t2 |
+---------------------+
mysql> show tables from blog;
+----------------+
| Tables_in_blog |
+----------------+
| tb1 |
+----------------+
1,grant select on *.* to wordpress@'10.0.0.5%' identified by '123';
For wordpress@'10.0.0.5% ', the authorization password for all tables in all libraries is 123
2,grant insert,delete,update on wordpress.* to wordpress@'10.0.0.5%' identified by '123';
For wordpress@'10.0.0.5%', the password of all tables in the wordpress library is 123
3,grant all on wordpress.t1 to wordpress@'10.0.0.5%' identified by '123';
For wordpress@'10.0.0.5%', the password of t1 table in the wordpress library is 123
A client program uses wordpress user to log in to mysql of 10.0.0.51
[root@db02 ~]# mysql -uwordpress -p123 -h10.0.0.51

1. Management ability of t1(wordpress) table t1: select ,insert,delete,update all
 All permissions
 2. How to manage t2(wordpress) tables? t2: select,insert,delete,update
insert update delete select
 3. Management ability of tb1 table?
Only select
Conclusion:
1. If the management ability of a table is included in different levels, the permissions are additive
2. However, we do not recommend defining duplicate permissions at multiple levels
3. The most commonly used permission setting method is single database level authorization, that is, WordPress. * [single database level]
In the enterprise, development allows you to open a MySQL user:
grant insert,delete,update on wordpress.* to wordpress@' identified by '123';
1. What is the authority? insert,delete,update
2. Which library and which tables? Which columns wordpress.*
3. Where do you connect? ‘10.0.0.5%’
4. What is the user name and password?
5. Email and go through the process
3. MySQL connection management
1. Connection tool
- 1)MySQL's own connection tool
mysql
Common client specific connection options:
-u: specify user
-p: specify password
-h: designated host
-P: specify port
-S: specify the sock
-e: specify SQL
--protocol=name: specify the connection method
- 2) third party connection tools
sqlyog,navicat
Application connection to MySQL
Note: the API of the corresponding language program needs to be loaded
2. Connection mode
- 1) socket connection
mysql -uroot -poldboy123 -S/application/mysql/tmp/mysql.sock
mysql -uroot -poldboy123
- 2) TCP/IP
mysql -uroot -poldboy123 -h10.0.0.51 -P3306
- Question: how do you judge that your MySQL database can provide external services?
IV. MySQL startup and shutdown process
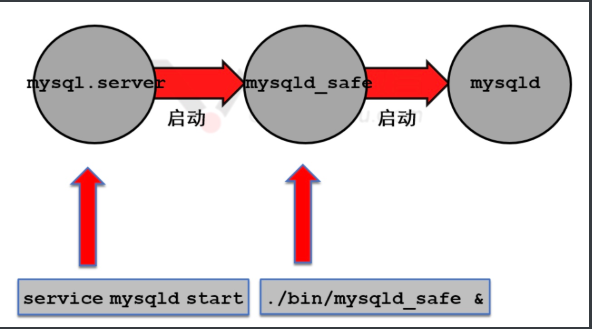
start-up
/etc/init.d/mysqld start
service mysqld start
systemctl start mysqld
mysqld_safe --defaults-file=/etc/my.cnf &
Close
/etc/init.d/mysqld stop
mysqladmin -uroot -poldboy123 shutdown
service mysqld stop
systemctl stop mysqld
kill -9 pid ?
killall mysqld ?
pkill mysqld ?
Problems:
-1. If the business is busy, the database will not release pid and sock files
-2. Claims can achieve the same security as Oracle, but not 100%
-3. In case of busy business, lose data (remedial measures, highly available)
V. MySQL instance initialization configuration
1. Function of initialization configuration file
Scenario: I want to start the instance
Question:
1) I don't know where my program is?
2) I don't know where to find the database after I start in the future?
3) where do I put the startup information and error information when I start in the future?
4) where is the pid file of the sock file when I start?
5) how much memory did you give me when I started?
...
N) I have a lot of questions to tell me before I start, emmmmm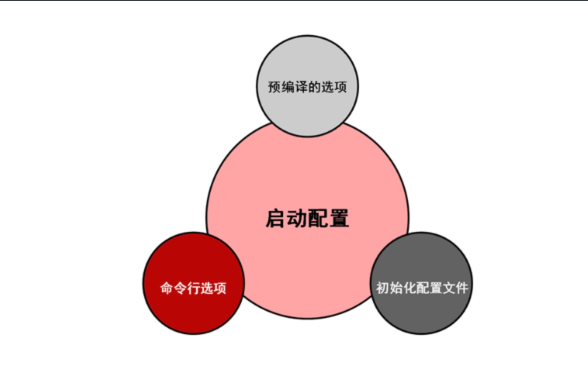

- 1) precompile: cmake to specify, hard code to program
- 2) set the startup initialization configuration on the command line
--skip-grant-tables
--skip-networking
--datadir=/application/mysql/data
--basedir=/application/mysql
--defaults-file=/etc/my.cnf
--pid-file=/application/mysql/data/db01.pid
--socket=/application/mysql/data/mysql.sock
--user=mysql
--port=3306
--log-error=/application/mysql/data/db01.err
- 3) initialize the configuration file (/ etc/my.cnf)
Profile read order:
 

Explain:
$MYSQL_HOME/my.cnf >>>>>>/application/mysql/my.cnf
defaults-extra-file>>>>>/tmp/my.cnf
#Query server ID
mysql -uroot -p1 -e "show variables like 'server_id'"
--Defaults file: default profile
If the -- defaults file = parameter is used when starting mysql database with. / bin/mysqld_safe daemons, only the configuration file specified by this parameter will be used.
Reflection:
#cmake:
socket=/application/mysql/tmp/mysql.sock
#Command line:
--socket=/tmp/mysql.sock
#Configuration file:
/etc/my.cnf in[mysqld]Under the label: socket=/opt/mysql.sock
#default parameter:
--defaults-file=/tmp/a.txt In profile[mysqld]Under the label: socket=/tmp/test.sock
Where will socket files be generated??? What's the name of the document???
/tmp/mysql.sock
 

Priority conclusion:
- 1. Command line
- 2,defaults-file
- 3. Configuration file (overwrite)
- 4. Precompile (cmake)
2. Use of initialization configuration file
Initialize profile function
1) affect the startup of the server (mysqld)
2) affect the connection to the client
- mysql
- mysqldump
- mysqladmin
How to configure initialization profile
1) configure label classification
[Client] all client programs
mysql
mysqldump
...
[server] all server programs
mysqld
mysqld_safe
...
Vi. MySQL multi instance configuration
- 1. What is multi instance
1) multiple background processes + threads + memory structures
2) multiple profiles
a. multiple ports
b. multiple socket files
c. multiple log files
d. multiple server IDS
3) multiple sets of data
Startup script
2. Multi instance combat
1. Prepare multiple profiles
#Create multiple directories to hold configuration files
[root@db02 ~]# mkdir /data/{3307,3308,3309} -p
[root@db02 ~]# tree /data/
/data/
├── 3307
├── 3308
└── 3309
#Create multiple profiles
[root@db02 ~]# vim /data/3307/my.cnf
[mysqld]
basedir=/application/mysql
datadir=/data/3307/data
socket=/data/3307/data/mysql.sock
port=3307
log_error=/data/3307/data/3307.err
log-bin=/data/3307/mysql-bin
server_id=7
pid_file=/data/3307/data/3307.pid
[client]
socket=/data/3307/mysql.sock
------------------------------------------------------------[root@db02 ~]# vim /data/3308/my.cnf
[mysqld]
basedir=/application/mysql
datadir=/data/3308/data
socket=/data/3308/data/mysql.sock
port=3308
log_error=/data/3308/data/3308.err
server_id=8
pid_file=/data/3308/data/3308.pid
------------------------------------------------------------[root@db02 ~]# vim /data/3309/my.cnf
[mysqld]
basedir=/application/mysql
datadir=/data/3309/data
socket=/data/3309/data/mysql.sock
port=3309
log_error=/data/3309/data/3309.err
server_id=9
pid_file=/data/3309/data/3309.pid
------------------------------------------------------------[root@db02 ~]# tree /data
/data
├── 3307
│ └── my.cnf
├── 3308
│ └── my.cnf└── 3309
└── my.cnf
2. Initialize multiple datadir s
[root@db02 ~]# cd /application/mysql/scripts/
#Initializing the data catalog for 3307
[root@db02 scripts]#./mysql_install_db --defaults-file=/data/3307/my.cnf --user=mysql --basedir=/application/mysql --datadir=/data/3307/data
#3308
[root@db02 scripts]# ./mysql_install_db --defaults-file=/data/3308/my.cnf --user=mysql --
basedir=/application/mysql --datadir=/data/3308/data
#3309
[root@db02 scripts]# ./mysql_install_db --defaults-file=/data/3309/my.cnf --user=mysql --
basedir=/application/mysql --datadir=/data/3309/data
[root@db02 scripts]# tree -L 2 /data
/data
├── 3307
│ ├── data
│ └── my.cnf
├── 3308
│ ├── data
│ └── my.cnf
└── 3309
├── data
└── my.cnf
3. Start multiple instances
mysqld_safe --defaults-file=/data/3307/my.cnf &
mysqld_safe --defaults-file=/data/3308/my.cnf &
mysqld_safe --defaults-file=/data/3309/my.cnf &
#Check port
[root@db02 scripts]# netstat -lntup
Active Internet connections (only servers)
Proto Recv-Q Send-Q Local Address Foreign Address State PID/Program
name
tcp6 0 0 :::3306 :::* LISTEN
13052/mysqld
tcp6 0 0 :::3307 :::* LISTEN
13598/mysqld
tcp6 0 0 :::3308 :::* LISTEN
13428/mysqld
tcp6 0 0 :::3309 :::* LISTEN
13768/mysqld
4. Set password
[root@db02 scripts]# mysqladmin -uroot -p -S/data/3307/data/mysql.sock password '3307'
[root@db02 scripts]# mysqladmin -uroot -p -S/data/3308/data/mysql.sock password '3308'
[root@db02 scripts]# mysqladmin -uroot -p -S/data/3309/data/mysql.sock password '3309'
5. Connect mysqsl
[root@db02 scripts]# mysql -uroot -p3307 -S /data/3307/data/mysql.sock
[root@db02 scripts]# mysql -uroot -p3308 -S /data/3308/data/mysql.sock
[root@db02 scripts]# mysql -uroot -p3309 -S /data/3309/data/mysql.sock

#antic
#system management
[root@db01 ~]# vim /usr/lib/systemd/system/mysqld.service

[Unit]
Description=MySQL Server
Documentation=man:mysqld(8)
Documentation=https://dev.mysql.com/doc/refman/en/using-systemd.html
After=network.target
After=syslog.target
[Install]
WantedBy=multi-user.target
[Service]
User=mysql
Group=mysql
ExecStart=/application/mysql/bin/mysqld --defaults-file=/etc/my.cnf #Route down
LimitNOFILE = 5000

#mysql connection
[root@db02 bin]# vim mysql3309
mysql -uroot -p3309 -S /data/3309/data/mysql.sock
[root@db02 bin]# chmod +x mysql3309
High availability:
Master slave replication
Main library operation
Modify profile
#Edit mysql configuration file
[root@mysql-db01 ~]# vim /etc/my.cnf
#Configure under mysqld label
[mysqld]
#Master database server ID is 1, slave database is not equal to 1
server_id =1
#Open binlog log
log_bin=mysql-bin
Create primary and secondary replication users
#Log in to the database
[root@mysql-db01 ~]# mysql -uroot -poldboy123
#Create rep user
mysql> grant replication slave on *.* to rep@'10.0.0.%' identified by '123';
Slave operation
Modify profile
#Modify mysql-db02 configuration file
[root@mysql-db02 ~]# vim /etc/my.cnf
#Configure under mysqld label
[mysqld]
#Master database server ID is 1, slave database must be greater than 1
server_id =5
#Open binlog log
log_bin=mysql-bin
#Restart mysql
[root@mysql-db02 ~]# /etc/init.d/mysqld restart
#Modify mysql-db03 configuration file
[root@mysql-db03 ~]# vim /etc/my.cnf
#Configure under mysqld label
[mysqld]
#Master database server ID is 1, slave database must be greater than 1
server_id =10
#Open binlog log
log_bin=mysql-bin
#Restart mysql
[root@mysql-db03 ~]# /etc/init.d/mysqld restart
==For master-slave replication based on binlog logs, you must remember the master status information of the master database==
mysql> show master status;
+------------------+----------+
| File             | Position |
+------------------+----------+
| mysql-bin.000002 |      120 |
+------------------+----------+
Slave Library
mysql>change master to
    master_host='127.0.0.1',
    master_user='rep',
    master_password='123',
    master_log_file='mysql-bin.000001',
    master_log_pos=120,
    master_port=3306;

    start slave;
    show slave status\G
If IO thread is NO
-
1. Check the network
ping 127.0.0.
-
2. Check port
telnet 127.0.0.1 3307
-
Check account and password
mysql -urep -p123 -h127.0.0.1 -P 3307