catalogue
1.2 download and install libfastcommon
1.3 download and install FastDFS
1.4 configuring Tracker service
1.5 configuring Storage services
1.1 preparation
Operating environment CentOS 6.4
Put all downloaded files into the package for unified management
1.2 download and install libfastcommon
1. Download libfastcommon
# wget https://github.com/happyfish100/libfastcommon/archive/V1.0.38.tar.gz
2. Unzip the file
# tar -zxvf V1.0.38.tar.gz
# cd libfastcommon-1.0.38
3. Compile and install
# ./make.sh
# ./make.sh install
4. After compilation, libfastcommon So is installed under / usr/lib64. It will be installed in / usr/lib / in 32-bit and / usr/lib64 in 64 bit/

5. Create soft links. Because the Lib directory set by FastDFS main program is / usr/local/lib, we need to create soft links
# ln -s /usr/lib64/libfastcommon.so /usr/local/lib/libfastcommon.so
# ln -s /usr/lib64/libfastcommon.so /usr/lib/libfastcommon.so
# ln -s /usr/lib64/libfdfsclient.so /usr/local/lib/libfdfsclient.so
# ln -s /usr/lib64/libfdfsclient.so /usr/lib/libfdfsclient.so
1.3 download and install FastDFS
1 download FastDFS
# wget https://github.com/happyfish100/fastdfs/archive/V5.11.tar.gz
2 decompression
# tar -zxvf V5.11.tar.gz
# cd fastdfs-5.11
3 compilation and installation
# ./make.sh
# ./make.sh install
4 default installation directory
Service script: CD / etc / init D directory
/etc/init.d/fdfs_storaged
/etc/init.d/fdfs_tracker
Configuration file: cd /etc/fdfs, there are four sample suffix file (automatically generated fdfs template configuration file)
/etc/fdfs/client.conf.sample
/etc/fdfs/storage.conf.sample
/etc/fdfs/storage_ids.conf.sample
/etc/fdfs/tracker.conf.sample
Command script:
fdfs_appender_test
fdfs_appender_test1
fdfs_append_file
fdfs_crc32
fdfs_delete_file
fdfs_download_file
fdfs_file_info
fdfs_monitor
fdfs_storaged
fdfs_test
fdfs_test1
fdfs_trackerd
fdfs_upload_appender
fdfs_upload_file
stop.sh
restart.sh
You can also view the executable command: ls -la /usr/bin/fdfs*
-rwxr-xr-x. 1 root root  317480 10 September 9:48 /usr/bin/fdfs_appender_test
-rwxr-xr-x. 1 root root  317256 10 September 9:48 /usr/bin/fdfs_appender_test1
-rwxr-xr-x. 1 root root  304104 10 September:48 /usr/bin/fdfs_append_file
-rwxr-xr-x. 1 root root  303808 10 September 9:48 /usr/bin/fdfs_crc32
-rwxr-xr-x. 1 root root  304144 10 September 9:48 /usr/bin/fdfs_delete_file
-rwxr-xr-x. 1 root root  304904 10 September 9:48 /usr/bin/fdfs_download_file
-rwxr-xr-x. 1 root root  304496 10 September 9:48 /usr/bin/fdfs_file_info
-rwxr-xr-x. 1 root root  322400 10 September 9:48 /usr/bin/fdfs_monitor
-rwxr-xr-x. 1 root root 1111520 10 September 9:48 /usr/bin/fdfs_storaged
-rwxr-xr-x. 1 root root  327384 10 September 9:48 /usr/bin/fdfs_test
-rwxr-xr-x. 1 root root  326592 10 September 9:48 /usr/bin/fdfs_test1
-rwxr-xr-x. 1 root root  453848 10 September 9:48 /usr/bin/fdfs_trackerd
-rwxr-xr-x. 1 root root  305096 10 September 9:48 /usr/bin/fdfs_upload_appender
-rwxr-xr-x. 1 root root  306120 10 September 9:48 /usr/bin/fdfs_upload_file
5 set script soft link
The bin directory set by the FastDFS service script is / usr/local/bin, but the actual command is installed under / usr/bin /
You can establish a soft link from / usr/bin to / usr/local/bin
# ln -s /usr/bin/fdfs_trackerd   /usr/local/bin
# ln -s /usr/bin/fdfs_storaged   /usr/local/bin
# ln -s /usr/bin/stop.sh         /usr/local/bin
# ln -s /usr/bin/restart.sh      /usr/local/bin
1.4 configuring Tracker service
1. Enter the / etc/fdfs directory and copy the tracker.com file through the cp command Conf.sample, renamed: tracker Con (delete the. Sample suffix) as an official document
# cd /etc/fdfs/
# cp tracker.conf.sample  tracker.conf
# vi tracker.conf
2. Edit tracker conf: vi tracker.conf, modify relevant parameters (just modify: base_path and http.server_port)
# Service providing port, default: 22122
port=22122

# Tracker stores the root path of data and log. The root directory must exist and the subdirectory will be created automatically
base_path=/home/lyy/fastdfs


# The http port needs to be the same as nginx
http.server_port=80
3. Create the tracker basic data directory, i.e. base_ Directory corresponding to path
mkdir -p /home/lyy/fastdfs
4. Open 22122 port
# vi /etc/sysconfig/iptables

Add the following port line:
-A INPUT -m state --state NEW -m tcp -p tcp --dport 22122 -j ACCEPT

Restart firewall:
# service iptables restart
5. Start the tracker (support start|stop|restart):
It can be started in this way
# /etc/init.d/fdfs_trackerd start

It can also be started in this way, provided that a soft link is created above
# service fdfs_trackerd start
After successful startup, data and logs directories will be created under / home / lyy / fastdfs (configured base_path).

6. View startup log
Enter the base just specified_ There is a logs directory in path (/ home / lyy / fastdfs). Check tracker Log file

7. View port status
netstat -apn|grep fdfs
If port 22122 is being monitored, the Tracker service is successfully installed, as shown in the following figure:

Tracker close command: service fdfs_trackerd stop
8. Set Tracker startup
# chkconfig fdfs_trackerd on

Or:
# vi /etc/rc.d/rc.local
 Join configuration:
/etc/init.d/fdfs_trackerd start
1.5 configuring Storage services
1. Enter the / etc/fdfs directory and copy the cp command to storage Conf.sample, renamed storage Conf (delete. Sample) suffix as official document
# cd /etc/fdfs/
# cp storage.conf.sample storage.conf
# vi storage.conf
2. Edit storage Conf, modify relevant parameters (base_path, store_path0, tracker_server, http.server_port)
# Whether the configuration file does not take effect. false means it takes effect
disabled=false

# Specify the group (volume) where this storage server is located
group_name=group1

# storage server service port, 23000 by default
port=23000

# Heartbeat interval, in seconds (this refers to actively sending heartbeat to the tracker server)
heart_beat_interval=30

# Number of storage paths, and store_ The number of paths matches
store_path_count=1

# The storage path for storing data and log must be created in advance
base_path=/home/lyy/storage/fastdfs

# If empty, base is used_ path
store_path0=/home/lyy/storage/file

#If this parameter is only N (e.g. 256), the storage server will be in store when running for the first time_ Automatically create N * N subdirectories for storing files under path
subdir_count_per_path=256

# Configure the ip and port of the tracker that this storage listens to
#When there are multiple tracker servers, write one line for each tracker server
tracker_server=192.168.50.198:22122

# The time period during which the system is allowed to synchronize (the default is all day). It is generally set to avoid some problems caused by peak synchronization.
sync_start_time=00:00
sync_end_time=23:59

#Access port
http.server_port=80
3. Create Storage basic data directory, corresponding to base_path directory
# mkdir -p /home/lyy/storage/fastdfs

# This is the configured store_path0 path
# mkdir -p /home/lyy/storage/file
4. Start Storage
It can be started in this way
# /etc/init.d/fdfs_storaged start

You can also use this way,I use this here
# service fdfs_storaged start
5. Viewing the Storage startup log
View the storage startup log: enter the base just specified_ There is a logs directory in path (/ home / lyy / storage / fastdfs). Check storage Log file

6. Check the port status: netstat -apn|grep fdfs

Close Storage command: service fdfs_storaged stop
Restart Storage command: service fdfs_storaged restart
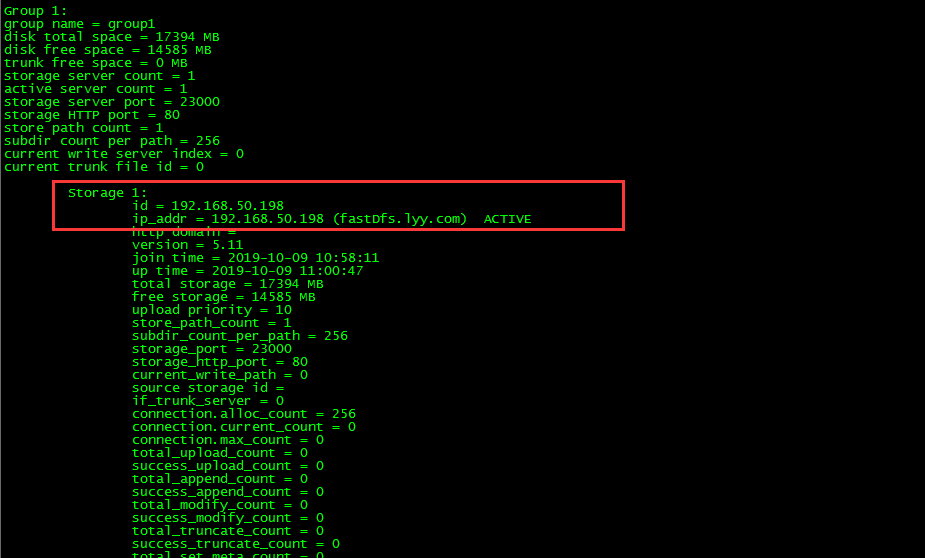
7. Use monitor to check whether storage is successfully bound and whether storage and Tracker communicate successfully
/usr/bin/fdfs_monitor /etc/fdfs/storage.conf
 8. Set Storage boot
8. Set Storage boot
# chkconfig fdfs_storaged on

Or:
# vi /etc/rc.d/rc.local
 Join configuration:
/etc/init.d/fdfs_storaged start
9. Storage directory
After the Tracker and Storage are started successfully, in the base_ Under path (/ home / lyy / Storage / file), create data and logs directories to record the information of the Storage Server.
In the store_ Under path0 directory, N*N subdirectories are created:
