- Introduction: the virtual machine system is CentOS7. FastDFS has been installed on the original virtual machine. Due to the version problem, it cannot run. Therefore, delete the original FastDFS system and reinstall it.
- Note: due to the unclean deletion of FastDFS at the beginning, the incorrect version of cmake and various small problems, there are various small problems. However, after deleting FastDFS and upgrading cmake, FastDFS is successfully reinstalled.
- Suggestion: in view of the experience in the virtual machine installation environment for many times, it is recommended to take a snapshot of the virtual machine before operating the virtual machine to facilitate the rollback in case of subsequent errors and reduce time consumption.
1. Install libfastcommon
- 1.1 obtain libfastcommon installation package:
wget https://github.com/happyfish100/libfastcommon/archive/V1.0.38.tar.gz
- 1.2 unzip the installation package:
tar -zxvf V1.0.38.tar.gz -C Directory to install
- 1.3 entry Directory:
cd libfastcommon-1.0.38
- 1.4 execute compilation:
./make.sh
- 1.5 installation:
./make.sh install

2. Install FastDFS
- 2.1 obtain fdfs installation package:
wget https://github.com/happyfish100/fastdfs/archive/V5.11.tar.gz
- 2.2 unzip the installation package:
tar -zxvf V5.11.tar.gz -C Directory to install
- 2.3 entry Directory:
cd fastdfs-5.11
- 2.4 execute compilation:
./make.sh
- 2.5 installation
./make.sh install

3. Configure Tracker service
- 3.1 enter the / etc/fdfs directory, there are three The file with the suffix of sample (the automatically generated fdfs template configuration file) can be copied to the tracker through the cp command Conf.sample, delete Sample suffix as official document:
cp tracker.conf.sample tracker.conf
- 3.2 create the root path of tracker to store data and log
mkdir -p /home/mm/fastdfs/tracker
- 3.3 edit tracker conf: vi tracker.conf, modify relevant parameters
base_path=/home/mm/fastdfs/tracker  #The tracker stores the root path of data and log
port=22122 #tracker default 22122
http.server_port=80 #The http port needs to be the same as nginx
- 3.4 start tracker (support start|stop|restart):
/usr/bin/fdfs_trackerd /etc/fdfs/tracker.conf start
- 3.5 check the tracker startup log: enter the base just specified_ There is a logs directory in path (/ home / mm / fastdfs / tracker). Check the tracker Log file
cat /home/mm/fastdfs/tracker/logs/trackerd.log

- 3.6 check the port status:
netstat -apn|grep fdfs

4. Configure Storage services
-
4.1 enter / etc/fdfs directory and copy storage with cp command Conf.sample, delete The suffix sample is used as the official document;
-
4.2 edit storage conf: vi storage.conf, modify relevant parameters:
base_path=/home/mm/fastdfs/storage   #The storage path for storing data and log must be created in advance
port=23000  #Storage is 23000 by default. The storage port numbers of the same group must be the same
group_name=group1  #Default group name, which can be modified according to the actual situation
store_path_count=1  #Number of storage paths, and store_ The number of paths matches
store_path0=/home/mm/fastdfs/storage  #If empty, base is used_ path
tracker_server=10.122.149.211:22122 #Configure the ip and port of the tracker that this storage listens to
- 4.3 start storage (support start|stop|restart):
/usr/bin/fdfs_storaged /etc/fdfs/storage.conf start
- 4.4 check the storage startup log: enter the base just specified_ There is a logs directory in path (/ home / mm / fastdfs / storage). Check storage Log file

- 4.5 check the tracker log again at this time: it is found that the election has started and, as the only tracker, is elected as the leader

- 4.6 check the port status: netstat -apn|grep fdfs

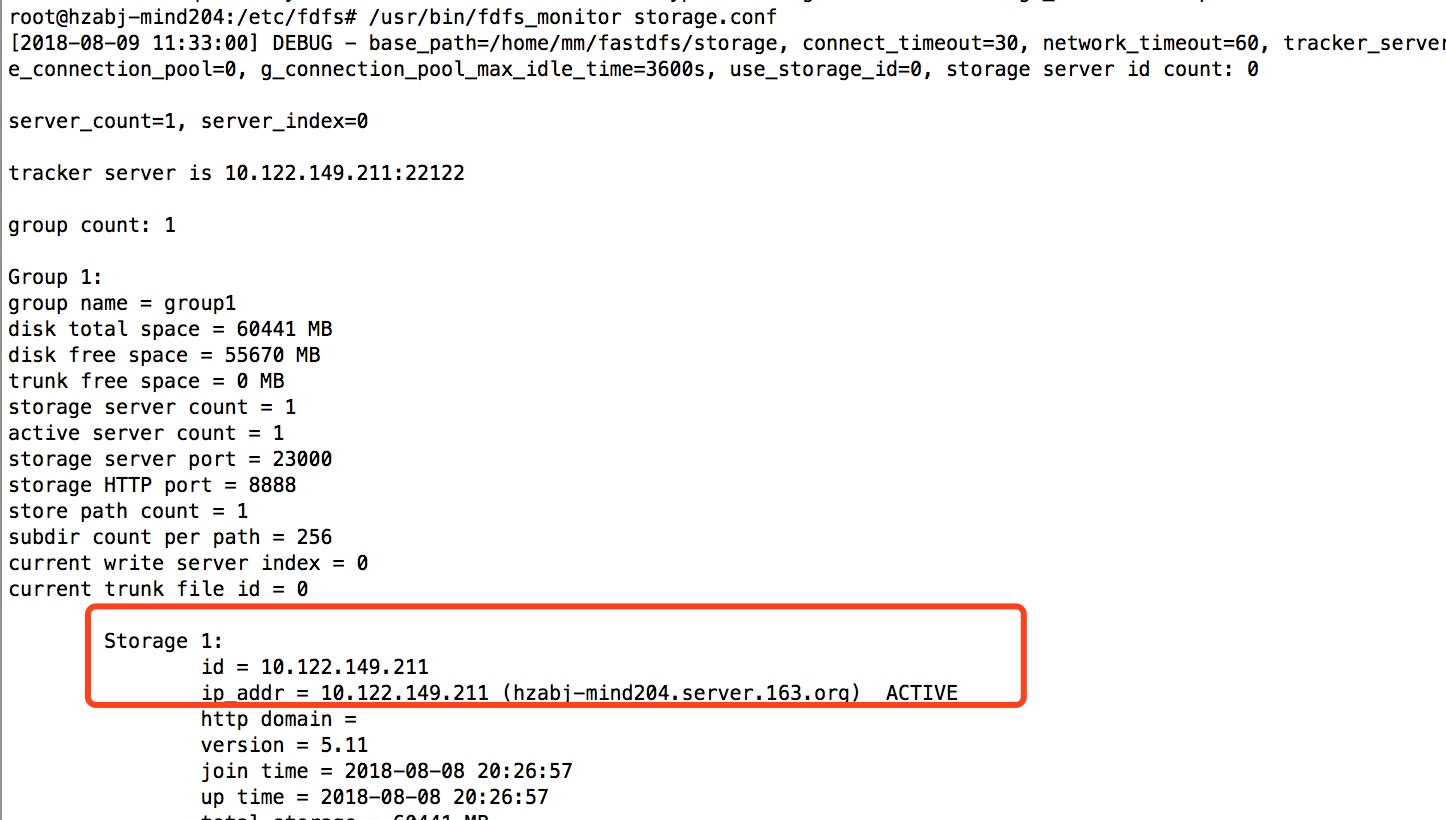
- 4.7 check whether storage is bound successfully through monitor:
/usr/bin/fdfs_monitor /etc/fdfs/storage.conf
5. Install Nginx and fastdfs Nginx module
- 5.1 download Nginx installation package
wget http://nginx.org/download/nginx-1.15.2.tar.gz
- 5.2 download the FastDFS nginx module installation package (although the github file requires FastDFS-5.12 or above, there was a problem in the first installation, I thought there might be a problem here, but later it was found that the previous FastDFS was not deleted completely, and the second installation was successful)
wget https://github.com/happyfish100/fastdfs-nginx-module/archive/V1.20.tar.gz
- 5.3 decompression nginx:
tar -zxvf nginx-1.15.2.tar.gz -C Directory to install
- 5.4 unzip fastdfs nginx module:
tar -zxvf V1.20.tar.gz -C Directory to install
-
Enter the directory: ngcd-10.inx-ng1.in5
-
5.6 installing dependent Libraries
yum -y update
yum -y install  libpcre3 libpcre3-dev openssl libssl-dev libperl-dev
- 5.7 configure and load fastdfs nginx module: (– add module refers to the path where fastdfs nginx module-1.20 is stored)
./configure --prefix=/usr/local/nginx --add-module=/usr/local/src/fastdfs-nginx-module-1.20/src/
- 5.8 compilation and installation:
make
make install
- 5.9 check the installation path: where is nginx

- 5.10 check the nginx version at this time: it is found that the fastdfs module has been installed

- Possible error reports:
/usr/include/fastdfs/fdfs_define.h:15:27: fatal error: common_define.h: No such file or directory

Solution: modify fastdfs-nginx-module-1.20/src/config File, and then restart step 7
ngx_module_incs="/usr/include/fastdfs /usr/include/fastcommon/"
CORE_INCS="$CORE_INCS /usr/include/fastdfs /usr/include/fastcommon/"
6. Configure Nginx and fastdfs Nginx module modules
- 6.1 configure mod fastdfs Conf and copy it to the / etc/fdfs file directory
cd fastdfs-nginx-module-1.20/src/
cp mod_fastdfs.conf /etc/fdfs
- 6.2 enter / etc/fdfs to modify mod fastdfs conf:
base_path=/home/mm/fastdfs
tracker_server=10.122.149.211:22122 #The address of the tracker
url_have_group_name=true #Does the url contain the group name
storage_server_port=23000 #It needs to be the same as the storage configuration
store_path_count=1  #Number of storage paths, and store_ The number of paths matches
store_path0=/home/mm/fastdfs/storage #Location of file storage
- 6.3 configure nginx and add location to 80 port server, as shown in the figure:
cd /usr/local/nginx/conf/
vi nginx.conf

location ~/M00 {
           root /home/fastdfs/storage/data;
           ngx_fastdfs_module;
}
- 6.4 finally, you need to copy the HTTP. In the fastdfs decompression directory Conf and mime types:
cd /usr/local/src/fastdfs-5.11/conf
cp mime.types http.conf /etc/fdfs/
7. FastDFS test
- 7.1 enter the / etc/fdfs directory and copy the client with the cp command Conf.sample, delete The suffix sample is used as the official document;
- 7.2 modify client Conf related configuration:
base_path=/home/mm/fastdfs/tracker //tracker server file path
tracker_server=virtual machine ip:22122 //The IP address and port number of the tracker server and the IP address of the virtual machine can be queried through the ifconfig command
http.tracker_server_port=80 # The http port number of the tracker server must correspond to the settings of the tracker
-
7.3 create a new test document 1 Txt, abc
-
7.4 /usr/bin/fdfs_upload_file <config_file> <local_filename>
-
7.5 examples
/usr/bin/fdfs_upload_file /etc/fdfs/client.conf 1.txt

- 7.6 successful access through wget and browser:
wget http://10.122.149.211/group1/M00/00/00/CnqV01trmeyAbAN0AAAABLh3frE677.txt
